Chapter 5. Writing a Program: Extra-Strength Methods

Let’s put some muscle in our methods. We dabbled with variables, played with a few objects, and wrote a little code. But we were weak. We need more tools. Like operators. We need more operators so we can do something a little more interesting than, say, bark. And loops. We need loops, but what’s with the wimpy while loops? We need for loops if we’re really serious. Might be useful to generate random numbers. And turn a String into an int, yeah, that would be cool. Better learn that too. And why don’t we learn it all by building something real, to see what it’s like to write (and test) a program from scratch. Maybe a game, like Battleships. That’s a heavy-lifting task, so it’ll take two chapters to finish. We’ll build a simple version in this chapter, and then build a more powerful deluxe version in chapter 6.
To Do: find 3 short safe, fake statup names.
Let’s build a Battleship-style game: “Sink a Startup”
It’s you against the computer, but unlike the real Battleship game, in this one you don’t place any ships of your own. Instead, your job is to sink the computer’s ships in the fewest number of guesses.
Oh, and we aren’t sinking ships. We’re killing ill-advised, Silicon Valley Startups. (Thus establishing business relevancy so you can expense the cost of this book).
Note
You’re going to build the Sink a Startup game, with a 7 x 7 grid and three Startups. Each Startup takes up three cells.
Goal: Sink all of the computer’s Startups in the fewest number of guesses. You’re given a rating or level, based on how well you perform.
Setup: When the game program is launched, the computer places three Startups on a virtual 7 x 7 grid. When that’s complete, the game asks for your first guess.
How you play: We haven’t learned to build a GUI yet, so this version works at the command-line. The computer will prompt you to enter a guess (a cell), that you’ll type at the command-line as “A3”, “C5”, etc.). In response to your guess, you’ll see a result at the command-line, either “Hit”, “Miss”, or “You sunk Pets.com” (or whatever the lucky Startup of the day is). When you’ve sent all three Startups to that big 404 in the sky, the game ends by printing out your rating.

part of a game interaction
First, a high-level design
We know we’ll need classes and methods, but what should they be? To answer that, we need more information about what the game should do.
First, we need to figure out the general flow of the game. Here’s the basic idea:

Now we have an idea of the kinds of things the program needs to do. The next step is figuring out what kind of objects we’ll need to do the work. Remember, think like Brad rather than Larry; focus first on the things in the program rather than the procedures.

Whoa. A real flow chart.
The “Simple Startup Game” a gentler introduction
It looks like we’re gonna need at least two classes, a Game class and a Startup class. But before we build the full monty Sink a Startup game, we’ll start with a stripped-down, simplified version, Simple Startup Game. We’ll build the simple version in this chapter, followed by the deluxe version that we build in the next chapter.
Everything is simpler in this game. Instead of a 2-D grid, we hide the Startup in just a single row. And instead of three Startups, we use one.
The goal is the same, though, so the game still needs to make a Startup instance, assign it a location somewhere in the row, get user input, and when all of the Startup’s cells have been hit, the game is over. This simplified version of the game gives us a big head start on building the full game. If we can get this small one working, we can scale it up to the more complex one later.

In this simple version, the game class has no instance variables, and all the game code is in the main() method. In other words, when the program is launched and main() begins to run, it will make the one and only Startup instance, pick a location for it (three consecutive cells on the single virtual seven-cell row), ask the user for a guess, check the guess, and repeat until all three cells have been hit.
Keep in mind that the virtual row is... virtual. In other words, it doesn’t exist anywhere in the program. As long as both the game and the user know that the Startup is hidden in three consecutive cells out of a possible seven (starting at zero), the row itself doesn’t have to be represented in code. You might be tempted to build an array of seven ints and then assign the Startup to three of the seven elements in the array, but you don’t need to. All we need is an array that holds just the three cells the Startup occupies.
![]() Game starts, and creates ONE Startup and gives it a location on three cells in the single row of seven cells.
Game starts, and creates ONE Startup and gives it a location on three cells in the single row of seven cells.
Instead of “A2”, “C4”, and so on, the locations are just integers (for example: 1,2,3 are the cell locations in this picture):

![]() Game play begins. Prompt user for a guess, then check to see if it hit any of the Startup’s three cells. If a hit, increment the numOfHits variable.
Game play begins. Prompt user for a guess, then check to see if it hit any of the Startup’s three cells. If a hit, increment the numOfHits variable.
![]() Game finishes when all three cells have been hit (the numOfHits variable value is 3), and tells the user how many guesses it took to sink the Startup.
Game finishes when all three cells have been hit (the numOfHits variable value is 3), and tells the user how many guesses it took to sink the Startup.

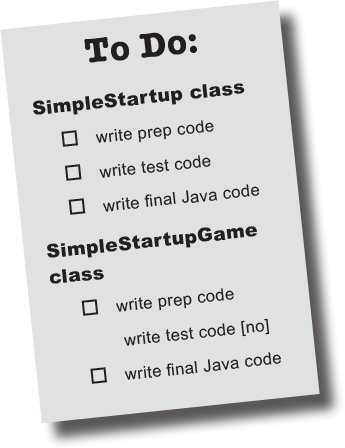
Developing a Class
As a programmer, you probably have a methodology/ process/approach to writing code. Well, so do we. Our sequence is designed to help you see (and learn) what we’re thinking as we work through coding a class. It isn’t necessarily the way we (or you) write code in the Real World. In the Real World, of course, you’ll follow the approach your personal preferences, project, or employer dictate. We, however, can do pretty much whatever we want. And when we create a Java class as a “learning experience”, we usually do it like this:
-
 Figure out what the class is supposed to do.
 -
List the instance variables and methods.
-
Write prepcode for the methods. (You’ll see this in just a moment.)
-
Write test code for the methods.
-
Implement the class.
-
Test the methods.
-
Debug and reimplement as needed.
-
Express gratitude that we don’t have to test our so-called learning experience app on actual live users.
 Brain Power
Flex those dendrites.
How would you decide which class or classes to build first, when you’re writing a program? Assuming that all but the tiniest programs need more than one class (if you’re following good OO principles and not having one class do many different jobs), where do you start?
The three things we’ll write for each class:

This bar is displayed on the next set of pages to tell you which part you’re working on. For example, if you see this picture at the top of a page, it means you’re working on prepcode for the SimpleStartup class.
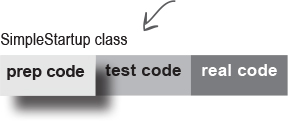
prep code
A form of pseudocode, to help you focus on the logic without stressing about syntax.
test code
A class or methods that will test the real code and validate that it’s doing the right thing.
real code
The actual implementation of the class. This is where we write real Java code.
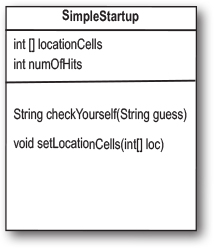
SimpleStartup class

You’ll get the idea of how prepcode (our version of pseudocode) works as you read through this example. It’s sort of half-way between real Java code and a plain English description of the class. Most prepcode includes three parts: instance variable declarations, method declarations, method logic. The most important part of prepcode is the method logic, because it defines what has to happen, which we later translate into how, when we actually write the method code.
DECLARE an int array to hold the location cells. Call it locationCells.
DECLARE an int to hold the number of hits. Call it numOfHits and SET it to 0.
DECLARE a checkYourself() method that takes a String for the user’s guess (“1”, “3”, etc.), checks it, and returns a result representing a “hit”, “miss”, or “kill”.
DECLARE a setLocationCells() setter method that takes an int array (which has the three cell locations as ints (2,3,4, etc.).

Writing the method implementations
let’s write the real method code now, and get this puppy working.
Before we start coding the methods, though, let’s back up and write some code to test the methods. That’s right, we’re writing the test code before there’s anything to test!
The concept of writing the test code first is one of the practices of Test-Driven Development (TDD) , and it can make it easier (and faster) for you to write your code. We’re not necessarily saying you should use TDD but we do like the part about writing tests first. And TDDjust sounds cool.

Writing test code for the SimpleStartup class
We need to write test code that can make a SimpleStartup object and run its methods. For the SimpleStartup class, we really care about only the checkYourself() method, although we will have to implement the setLocationCells() method in order to get the checkYourself() method to run correctly.
Take a good look at the prepcode below for the checkYourself() method (the setLocationCells() method is a no-brainer setter method, so we’re not worried about it, but in a ‘real’ application we might want a more robust ‘setter’ method, which we would want to test).
Then ask yourself, “If the checkYourself() method were implemented, what test code could I write that would prove to me the method is working correctly?”
|
Based on this prepcode: METHOD String checkYourself(String userGuess)
GET the user guess as a String parameter
CONVERT the user guess to an int
REPEAT with each of the location cells in the int array
// COMPARE the user guess to the location cell
IF the user guess matches
INCREMENT the number of hits
// FIND OUT if it was the last location cell:
IF number of hits is 3, RETURN “Kill” as the result
ELSE it was not a kill, so RETURN“Hit”
END IF
ELSE the user guess did not match, so RETURN “Miss”
END IF
END REPEAT
END METHOD
|
Here’s what we should test:
|
There are no Dumb Questions
Q: Maybe I’m missing something here, but how exactly do you run a test on something that doesn’t yet exist!?
A: You don’t. We never said you start by running the test; you start by writing the test. At the time you write the test code, you won’t have anything to run it against, so you probably won’t be able to compile it until you write ‘stub’ code that can compile, but that will always cause the test to fail (like, return null.)
Q: Then I still don’t see the point. Why not wait until the code is written, and then whip out the test code?
A: The act of thinking through (and writing) the test code helps clarify your thoughts about what the method itself needs to do.
As soon as your implementation code is done, you already have test code just waiting to validate it. Besides, you know if you don’t do it now, you’ll never do it. There’s always something more interesting to do.
Ideally, write a little test code, then write only the implementation code you need in order to pass that test. Then write a little more test code and write only the new implementation code needed to pass that new test. At each test iteration, you run all the previously-written tests, so that you always prove that your latest code additions don’t break previously-tested code.
Test code for the SimpleStartup class
![]() sharpen your Pencil
sharpen your Pencil
In the next couple of pages we implement the SimpleStartup class, and then later we return to the test class. Looking at our test code above, what else should be added? What are we not testing in this code, that we should be testing for? Write your ideas (or lines of code) below:
The checkYourself() method
There isn’t a perfect mapping from prepcode to javacode; you’ll see a few adjustments. The prepcode gave us a much better idea of what the code needs to do, and now we have to find the Java code that can do the how.
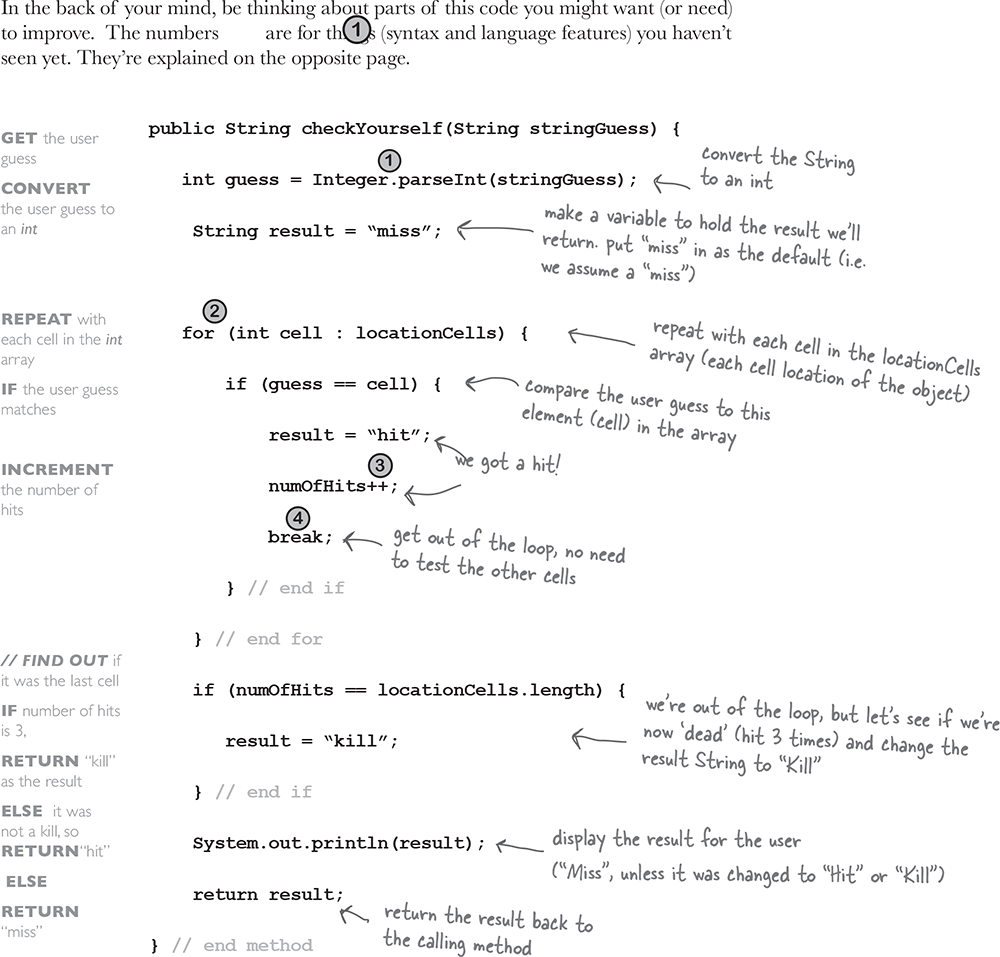
Just the new stuff
The things we haven’t seen before are on this page. Stop worrying! The rest of the details are at the end of the chapter. This is just enough to let you keep going.
There are no Dumb Questions
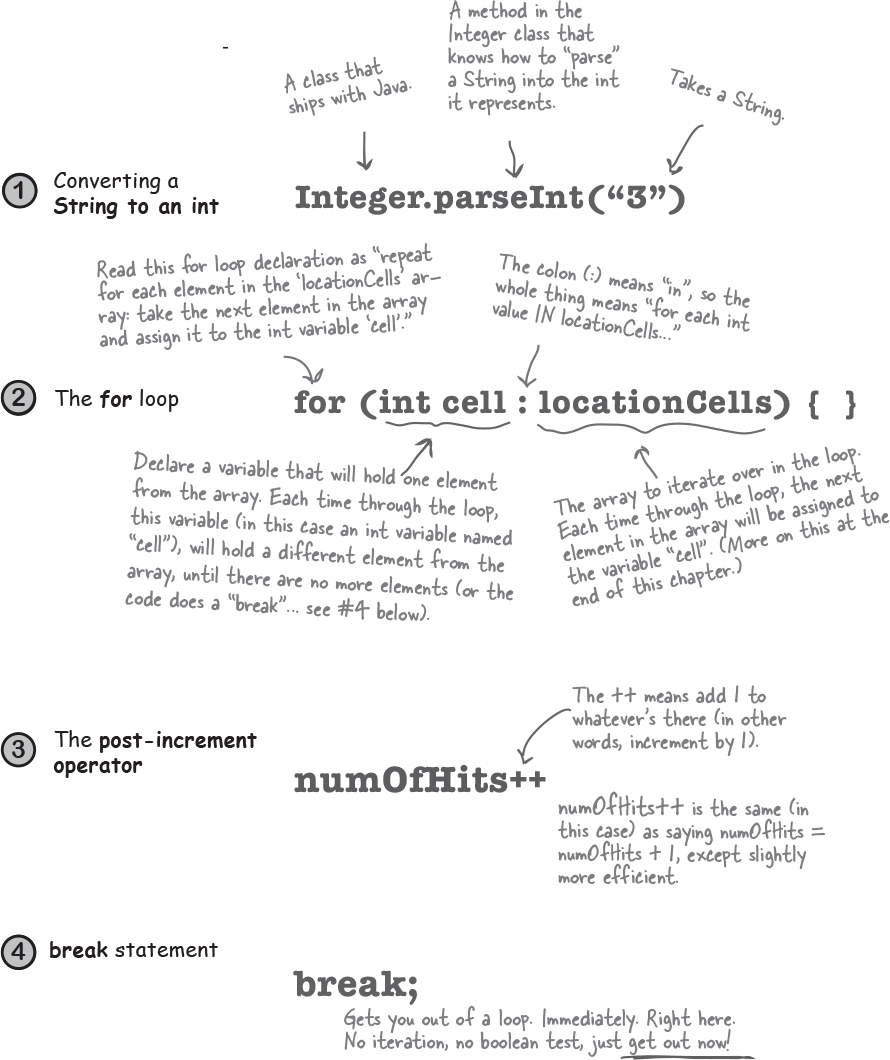
Q: What happens in Integer. parseInt() if the thing you pass isn’t a number? And does it recognize spelled-out numbers, like “three”?
A: Integer.parseInt() works only on Strings that represent the ascii values for digits (0,1,2,3,4,5,6,7,8,9). If you try to parse something like “two” or “blurp”, the code will blow up at runtime. (By blow up, we actually mean throw an exception, but we don’t talk about exceptions until the Exceptions chapter. So for now, blow up is close enough.)
Q: In the beginning of the book, there was an example of a for loop that was really different from this one—are there two different styles of for loops?
A: Yes! From the first version of Java there has been a single kind of for loop (explained later in this chapter) that looks like this:
for (int i = 0; i < 10; i++) {
   // do something 10 times
}
You can use this format for any kind of loop you need. But... beginning with Java 5.0 (Tiger), you can also use the enhanced for loop (that’s the official description) when your loop needs to iterate over the elements in an array (or another kind of collection, as you’ll see in the next chapter). You can always use the plain old for loop to iterate over an array, but the enhanced for loop makes it easier.
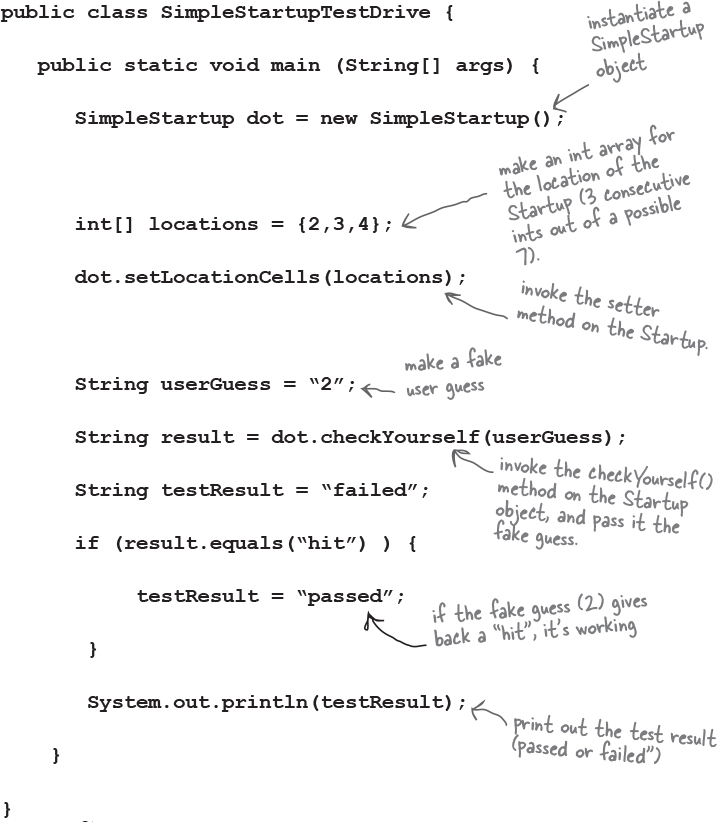
Final code for SimpleStartup and SimpleStartupTester
public class SimpleStartupTestDrive {

   public static void main (String[] args) {
      SimpleStartup dot = new SimpleStartup();
      int[] locations = {2,3,4};
      dot.setLocationCells(locations);
      String userGuess = “2”;
      String result = dot.checkYourself(userGuess);
   }
}
public class SimpleStartup {

   int[] locationCells;
   int numOfHits = 0;

   public void setLocationCells(int[] locs) {
      locationCells = locs;
   }

public String checkYourself(String stringGuess) {
   int guess = Integer.parseInt(stringGuess);
   String result = “miss”;
   for (int cell : locationCells) {
      if (guess == cell) {
         result = “hit”;
         numOfHits++;
         break;
      }
   } // out of the loop

   if (numOfHits ==
       locationCells.length) {
       result = “kill”;
   }
   System.out.println(result);
      return result;
   } // close method
} // close class
There’s a little bug lurking here. It compiles and runs, but sometimes... don’t worry about it for now, but we will have to face it a little later.
Prepcode for the SimpleStartupGame class
Everything happens in main()
There are some things you’ll have to take on faith. For example, we have one line of prepcode that says, “GET user input from command-line”. Let me tell you, that’s a little more than we want to implement from scratch right now. But happily, we’re using OO. And that means you get to ask some other class/object to do something for you, without worrying about how it does it. When you write prepcode, you should assume that somehow you’ll be able to do whatever you need to do, so you can put all your brainpower into working out the logic.
public static void main (String [] args)
       DECLARE an int variable to hold the number of user guesses, named numOfGuesses, set it to 0.
       MAKE a new SimpleStartup instance
       COMPUTE a random number between 0 and 4 that will be the starting location cell position
       MAKE an int array with 3 ints using the randomly-generated number, that number incremented by
       1, and that number incremented by 2 (example: 3,4,5)
       INVOKE the setLocationCells() method on the SimpleStartup instance
       DECLARE a boolean variable representing the state of the game, named isAlive. SET it to true

       WHILE the Startup is still alive (isAlive == true) :
          GET user input from the command line
          // CHECK the user guess
          INVOKE the checkYourself() method on the SimpleStartup instance
          INCREMENT numOfGuesses variable
          // CHECK for Startup death
          IF result is “kill”
               SET isAlive to false (which means we won’t enter the loop again)
               PRINT the number of user guesses
          END IF
    END WHILE
END METHOD

The game’s main() method
Just as you did with the SimpleStartup class, be thinking about parts of this code you might want (or need) to improve. The numbered things are for ![]() stuff we want to point out. They’re explained on the opposite page. Oh, if you’re wondering why we skipped the test code phase for this class, we don’t need a test class for the game. It has only one method, so what would you do in your test code? Make a separate class that would call main() on this class? We didn’t bother.
stuff we want to point out. They’re explained on the opposite page. Oh, if you’re wondering why we skipped the test code phase for this class, we don’t need a test class for the game. It has only one method, so what would you do in your test code? Make a separate class that would call main() on this class? We didn’t bother.

random() and getUserInput()
Two things that need a bit more explaining, are on this page. This is just a quick look to keep you going; more details on the GameHelper class are at the end of this chapter.

One last class: GameHelper
We made the Startup class.
We made the game class.
All that’s left is the helper class— the one with the getUserInput() method. The code to get command-line input is more than we want to explain right now. It opens up way too many topics best left for later. (Later, as in chapter 14.)
Just copy* the code below and compile it into a class named GameHelper. Drop all three classes (SimpleStartup, SimpleStartupGame, GameHelper) into the same directory, and make it your working directory.
Whenever you see the ![]() logo, you’re seeing code that you have to type as-is and take on faith. Trust it. You’ll learn how that code works later.
logo, you’re seeing code that you have to type as-is and take on faith. Trust it. You’ll learn how that code works later.

import java.io.*;
public class GameHelper {
   public String getUserInput(String prompt) {
      String inputLine = null;
      System.out.print(prompt + “ “);
      try {
        BufferedReader is = new BufferedReader(
        new InputStreamReader(System.in));
      inputLine = is.readLine();
      if (inputLine.length() == 0 ) return null;
    } catch (IOException e) {
      System.out.println(“IOException: “ + e);
    }
    return inputLine;
  }
}
*We know how much you enjoy typing, but for those rare moments when you’d rather do something else, we’ve made the Ready-bake Code available on wickedlysmart.com.
Let’s play
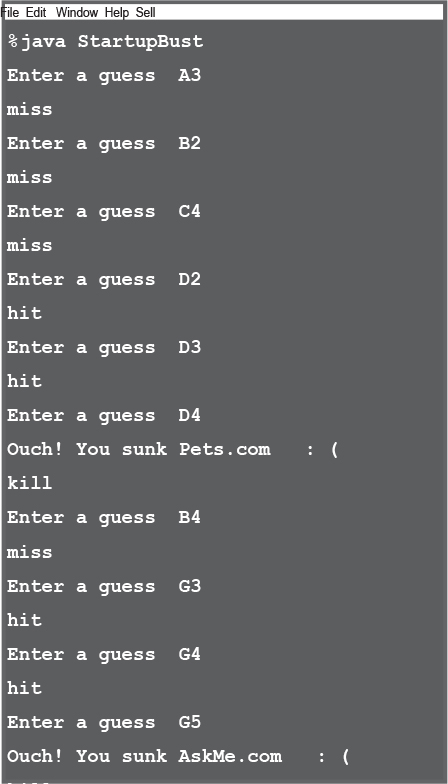
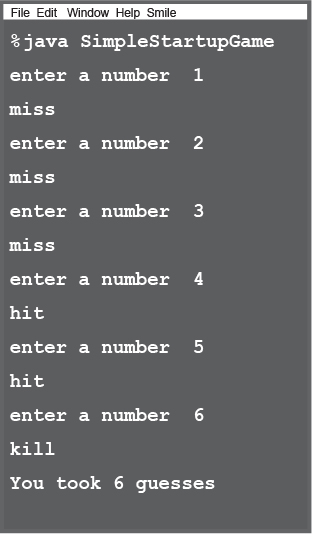
Here’s what happens when we run it and enter the numbers 1,2,3,4,5,6. Lookin’ good.
A complete game interaction (your mileage may vary)
What’s this? A bug ?
Gasp!
Here’s what happens when we enter 1,1,1.
A different game interaction (yikes)

More about for loops
We’ve covered all the game code for this chapter (but we’ll pick it up again to finish the deluxe version of the game in the next chapter). We didn’t want to interrupt your work with some of the details and background info, so we put it back here. We’ll start with the details of for loops, and if you’re a C++ programmer, you can just skim these last few pages...
Regular (non-enhanced) for loops
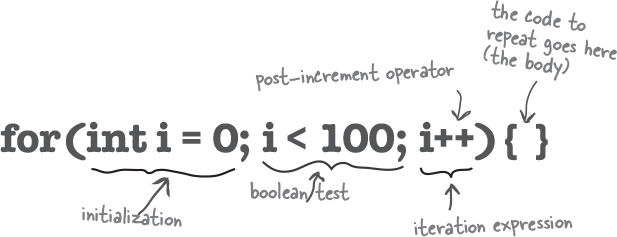
What it means in plain English: “Repeat 100 times.”
How the compiler sees it:
* create a variable i and set it to 0.
* repeat while i is less than 100.
* at the end of each loop iteration, add 1 to i
Part One: initialization
Use this part to declare and initialize a variable to use within the loop body. You’ll most often use this variable as a counter. You can actually initialize more than one variable here, but we’ll get to that later in the book.
Part Two: boolean test
This is where the conditional test goes. Whatever’s in there, it must resolve to a boolean value (you know, true or false). You can have a test, like (x >= 4), or you can even invoke a method that returns a boolean.
Part Three: iteration expression
In this part, put one or more things you want to happen with each trip through the loop. Keep in mind that this stuff happens at the end of each loop.

Trips through a loop
for (int i = 0; i < 8; i++) {
   System.out.println(i);
}

System.out.println(“done”);

Difference between for and while
A while loop has only the boolean test; it doesn’t have a built-in initialization or iteration expression. A while loop is good when you don’t know how many times to loop and just want to keep going while some condition is true. But if you know how many times to loop (e.g. the length of an array, 7 times, etc.), a for loop is cleaner. Here’s the loop above rewritten using while:

output:

The enhanced for loop
Beginning with Java 5.0 (Tiger), the Java language added a second kind of for loop called the enhanced for, that makes it easier to iterate over all the elements in an array or other kinds of collections (you’ll learn about other collections in the next chapter). That’s really all that the enhanced for gives you—a simpler way to walk through all the elements in the collection. We’ll revisit the enhanced for loop in the next chapter, when we talk about collections that aren’t arrays. (Later in the book we’ll be talking about a newer, more super-charged way of looping called “streams”, stay tuned!)
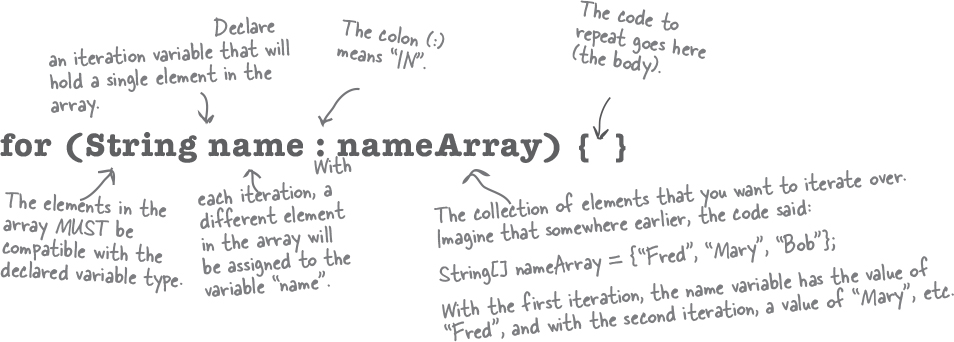
What it means in plain English: “For each element in nameArray, assign the element to the ‘name’ variable, and run the body of the loop.”
How the compiler sees it:
* Create a String variable called name and set it to null.
* Assign the first value in nameArray to name.
* Run the body of the loop (the code block bounded by curly braces).
* Assign the next value in nameArray to name.
* Repeat while there are still elements in the array.
Part One: iteration variable declaration
Use this part to declare and initialize a variable to use within the loop body. With each iteration of the loop, this variable will hold a different element from the collection. The type of this variable must be compatible with the elements in the array! For example, you can’t declare an int iteration variable to use with a String[] array.
Part Two: the actual collection
This must be a reference to an array or other collection. Again, don’t worry about the other non-array kinds of collections yet—you’ll see them in the next chapter.
Note
depending on the programming language they’ve used in the past, some people refer to the enhanced for as the “for each” or the “for in” loop, because that’s how it reads: “for EACH thing IN the collection...”

Casting primitives

In Chapter 3 we talked about the sizes of the various primitives, and how you can’t shove a big thing directly into a small thing:
long y = 42;
int x = y; // won’t compile
A long is bigger than an int and the compiler can’t be sure where that long has been. It might have been out drinking with the other longs, and taking on really big values. To force the compiler to jam the value of a bigger primitive variable into a smaller one, you can use the cast operator. It looks like this:
long y = 42; // so far so good
int x = (int) y; // x = 42 cool!
Putting in the cast tells the compiler to take the value of y, chop it down to int size, and set x equal to whatever is left. If the value of y was bigger than the maximum value of x, then what’s left will be a weird (but calculable*) number:
long y = 40002;
// 40002 exceeds the 16-bit limit of a short

short x = (short) y; // x now equals -25534!
Still, the point is that the compiler lets you do it. And let’s say you have a floating point number, and you just want to get at the whole number (int) part of it:
float f = 3.14f;
int x = (int) f; // x will equal 3
And don’t even think about casting anything to a boolean or vice versa—just walk away.
*It involves sign bits, binary, ‘two’s complement’ and other geekery, all of which are discussed at the beginning of appendix B.

BE the JVM
The Java file on this page represents a complete source file. Your job is to play JVM and determine what would be the output when the program runs?


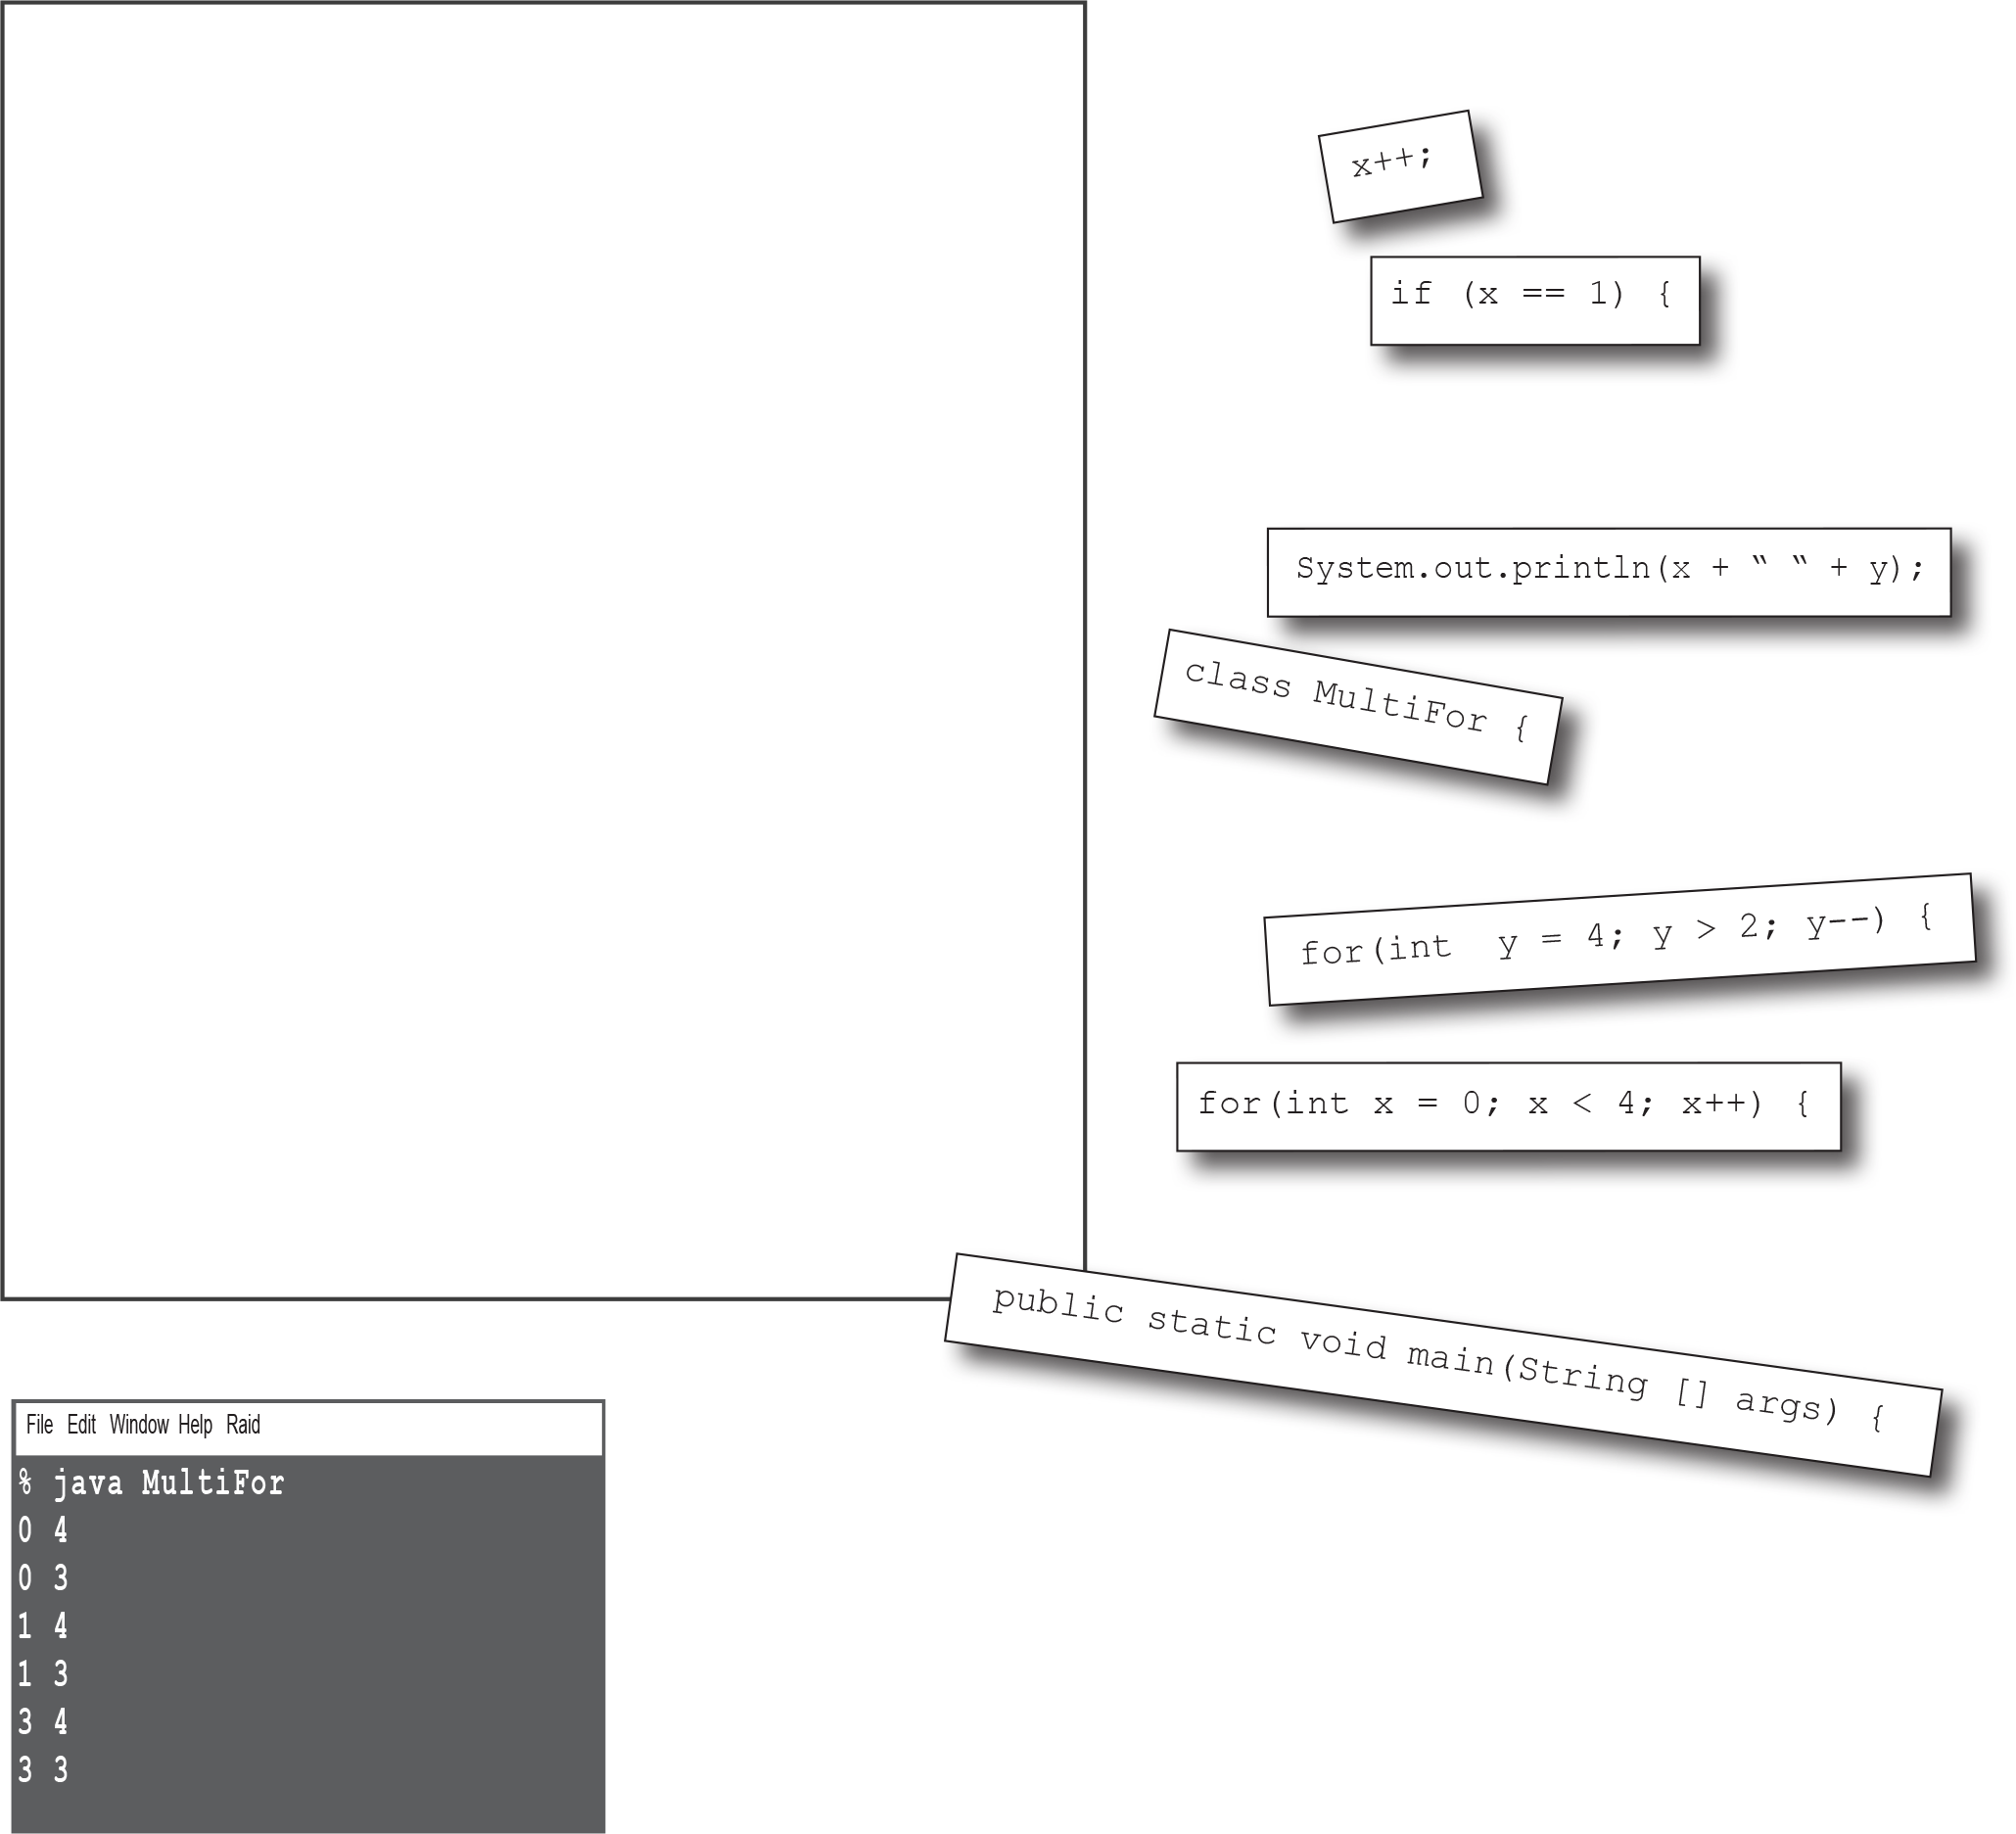
Code Magnets
A working Java program is all scrambled up on the fridge. Can you reconstruct the code snippets to make a working Java program that produces the output listed below? Some of the curly braces fell on the floor and they were too small to pick up, so feel free to add as many of those as you need!

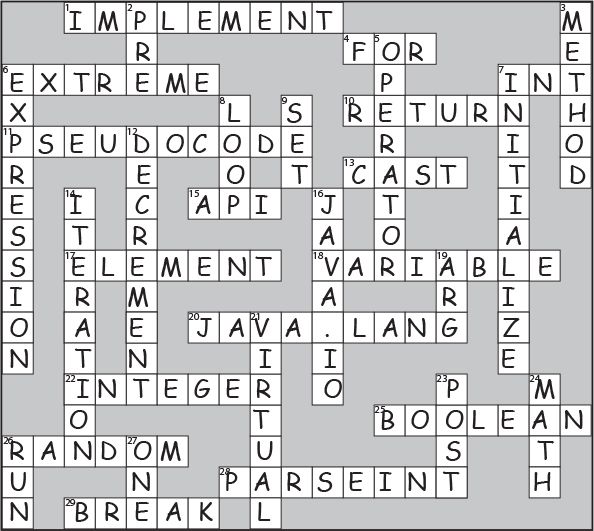
Across
1. Fancy computer word for build
4. Multi-part loop
6. Test first
7. 32 bits
10. Method’s answer
11. Prepcode-esque
13. Change
15. The big toolkit
17. An array unit
18. Instance or local
20. Automatic toolkit
22. Looks like a primitive, but..
25. Un-castable
26. Math method
28. Converter method
29. Leave early
Down
2. Increment type
3. Class’s workhorse
5. Pre is a type of _____
6. For’s iteration ______
7. Establish first value
8. While or For
9. Update an instance variable
12. Towards blastoff
14. A cycle
16. Talkative package
19. Method messenger (abbrev.)
21. As if
23. Add after
24. Pi house
26. Compile it and ____
27. ++ quantity
 JavaCross
How does a crossword puzzle help you learn Java? Well, all of the words are Java related. In addition, the clues provide metaphors, puns, and the like. These mental twists and turns burn alternate routes to Java knowledge, right into your brain!
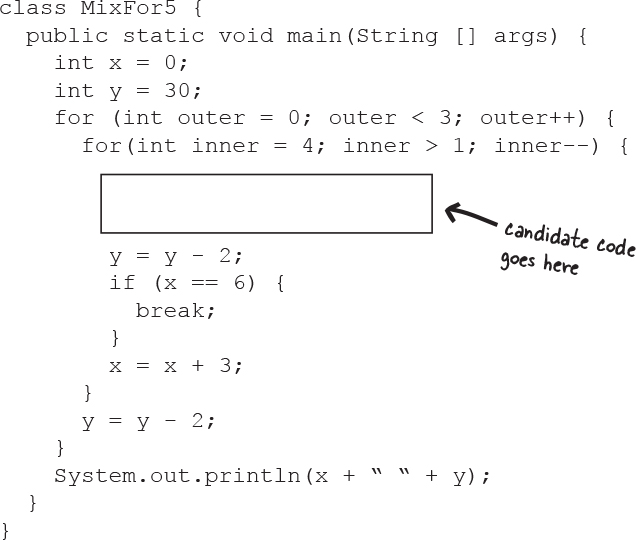
Mixed Messages
A short Java program is listed below. One block of the program is missing. Your challenge is to match the candidate block of code (on the left), with the output that you’d see if the block were inserted. Not all the lines of output will be used, and some of the lines of output might be used more than once. Draw lines connecting the candidate blocks of code with their matching command-line output.

 Exercise Solutions
Be the JVM:
class Output {

  public static void main(String [] args) {
    Output o = new Output();
    o.go();
  }

  void go() {
    int y = 7;
    for(int x = 1; x < 8; x++) {
       y++;
       if (x > 4) {
          System.out.print(++y + " ");
       }

       if (y > 14) {
         System.out.println(" x = " + x);
         break;
       }
     }
   }
}

Code Magnets:
class MultiFor {

  public static void main(String [] args) {

    for(int x = 0; x < 4; x++) {

      for(int y = 4; y > 2; y--) {
        System.out.println(x + “ “ + y);
      }

      if (x == 1) {
        x++;
      }
    }
  }
}

 Puzzle Solutions