
Chapter 3. Looking Around: Investigating your Git repository

You ready to do some digging, Sherlock? As you continue to work in Git, you’ll create branches, make commits and often merge your work back into the integration branches. Each commit represents a step forward, and the commit history represents how you got there. Every so often, you might want to look back to see how you got to where you are, or perhaps if two branches have diverged from one another. We’ll start by figuring out what your commit history looks like.
But remember, commits represent changes, and branches represent a series of changes. How do you know what changed—between commits, between branches, or even between your working directory, the index, and the object database? That is the other topic of this chapter.
Together, we will get to do some seriously interesting Git detective work. Come on, let’s level up those investigative skills!
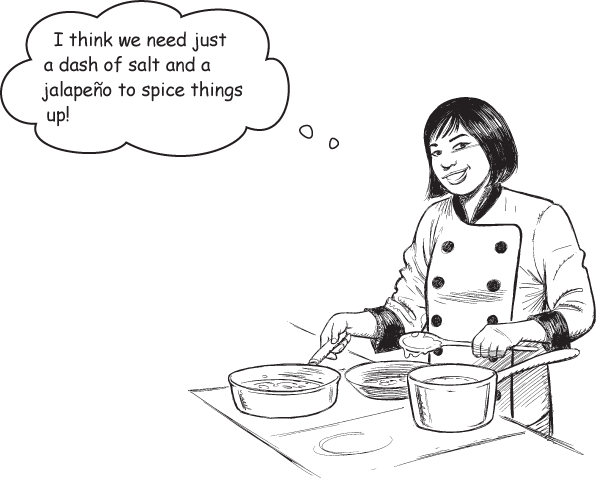
In pursuit of the ultimate cilantro sauce recipe
We are going to make things saucy in this chapter. But don’t get too excited—we’ve got real work to do along the way.
Cilantro is a local crop. Our friends at the 80’s diner are getting ready to submit their entry for this year’s Cilantro Fest. All the local restaurants compete to win and it certainly makes for great publicity. The chefs at the 80’s diner feel that their dish is pretty close to being perfect, but the real competition comes down to the sauce. As they iterated over their recipe for the sauce, they created a Git repository to keep track of the variations they had tried.
Well, we managed to get a hold of that repository, and we are going to use that in this chapter. This repository contains a a couple of branches, with commits. Your job is to interrogate this repository to see what they’ve have already tried.
Note
Remember, you already know how to look around a Git repository with commands like git status and git branch.
To do that, we are going to use a new Git command that allows us to explore the commit history. We will even aim to make our own variation on the recipe, and see how that differs from our previous attempts.
And to top it off, we will combine these commands! Let’s dig in and see how this all is going to play out. Hell, we might help the folks at the 80’s diner to come up with an award winning recipe at the end of it all ...
You will find the repository in the folder called recipes. Navigate to the location where you downloaded the source code for this book, and then use the cd command to enter the recipes folder.
You are all set!
Brigitte’s on a mission
Before you get to work on your recipe, we would like to introduce you to Brigitte. Brigitte, after a much-needed vacation, is in the market looking for a new gig. Naturally, she needs a resume, so she created a repository to work in, started working on a draft of her resume, and committed it.
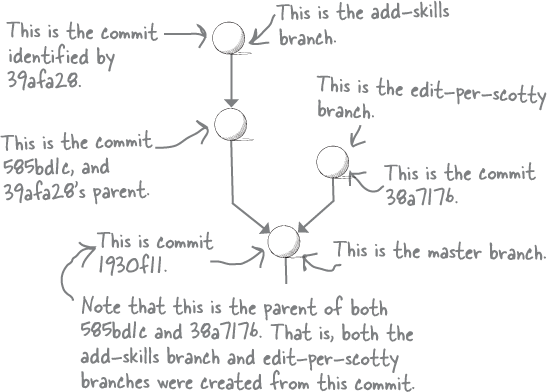
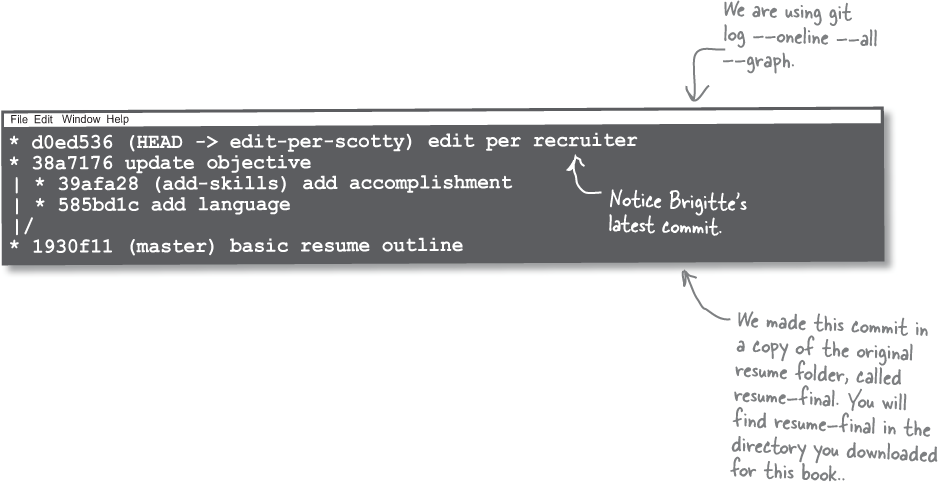
She then sent it off to a few friends from her previous job, who suggested some changes. Brigitte took her friends advice to heart, and for every edit suggested, made a new commit. Below is her commit history. We have annotated every commit with the commit ID and the commit message that Brigitte used when she made the commit. Note that she has three branches—master, add-skills and edit-per-scotty.


We are going to use Brigitte’s repository to demonstrate some of the ideas in this chapter, so feel free to bookmark this page in case you need to jog your memory.
Note
You can find this repository in a folder called “resume” in the directory you downloaded for this book..
While Brigitte explores her future employment options, we are going to go explore some more Git commands. You coming?
Commits aren’t enough
Committing your work to Git on a regular basis is a good idea. Commits, as you probably recall, are simply snapshots of the changes that you added to the index (or the staging area). Each commit represents the state of changes as they were when you made the commit.
This means that commits are snapshots taken at a particular time. Consequently, a commit in and of itself does not give us much insight into the history of the project itself. The project’s history—its evolution over time—is baked in it’s commit history.
So how can we visualize the commit history of a project? Git provides us a command, called log that does just that. By default the git log command lists all the commits in the current branch, with the latest commit at the top, followed by it’s parent, and so on and so forth:

You might recall from Chapter 1 that a commit stores a bunch of metadata alongside a pointer to the changes that you committed. Well, the role of the git log command is to detail all that out in a simple list.
We’ll grant you that the log isn’t something that will take your breath away. It seems pretty plain, and can be rather verbose. Worry not! We will see several ways to prettify the output so that not only does the log look pretty, it gives us a ton more information about the history of our repository.
One final note before we move on. The git log command uses a pager, in case you have more commits to show than there is space for. Recall you can use the up and down arrow keys to navigate it and when you are done, simply hit the q (stands for“quit”) key which returns you back to the prompt.
Note
We talked about the pager in Chapter 2 as well.
Mirror, mirror on the wall
While the output of the git log command is exhaustive, it certainly leaves much to be desired. Especially when it comes to discerning the history of our project. Thankfully the log command offers a slew of flags to pretty up it’s output, and make it more useful. Let’s take a look at some of these flags and the effect it has the output.
First up, let’s truncate the commit ID. Recall that commit IDs are unique, and usually it enough to see the first 6-7 characters of the commit ID. The abbrev-commit flag only displays enough characters to identify a commit uniquely which is usually what you want:

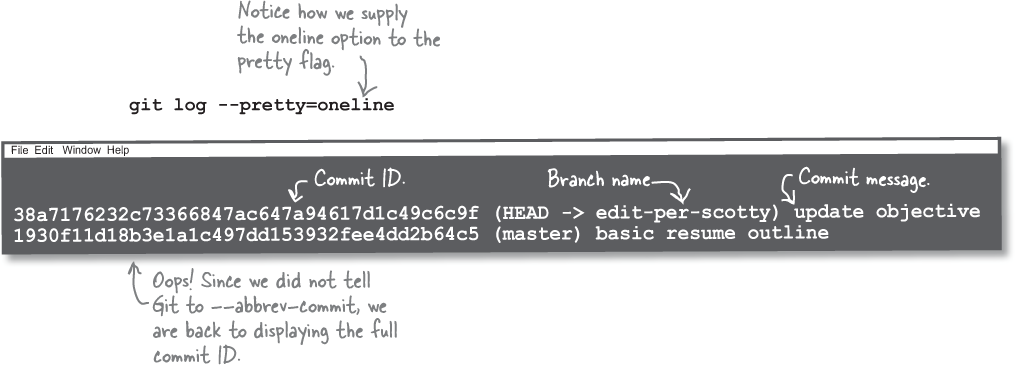
Perhaps you don’t care to see all the information about the author and the date. No problem! git log has you covered with the pretty flag. We are going to use an in-built formatting option called oneline:
Note
Git has a handful of in-built formatting options like oneline that you can use, or you can write a custom one. As you get to know Git more, you can learn how to customize this to your heart’s content. For now, oneline is a great start..
Together now! You can combine many of the flags available in the git log command, so if you like the shorter commit IDs presented by the abbrev-commit flag, but you also want the succinct view you can simply combine the two!
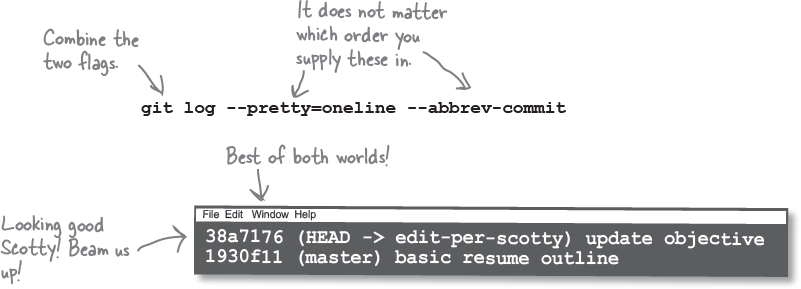
This combination is so popular, that Git gives you a shortcut, namely the --oneline flag.
Note
We know it’s confusing, but --oneline is an flag just like --abbrev-commit. This is not the same as the“oneline” formatting option we supplied to the pretty flag.


Right! Every commit (excluding the very first commit in your repository) has a pointer to its parents. So, what happens when you run git log? Well, Git looks at the last commit you made, and displays details about that commit per the flags you supplied. It then follows the pointer to the parent commit, and repeats. Wash, rinse, repeat till it reaches a commit that has no parents.
But, Git also knows how many branches you have in your repository! This implies that Git should be able to find the latest commit on every branch, and trace the lineage of that commit simply by following the parent pointer.
Let’s see how we can do that. We get the feeling you are going to be very pleased with the results.
How does git log work?
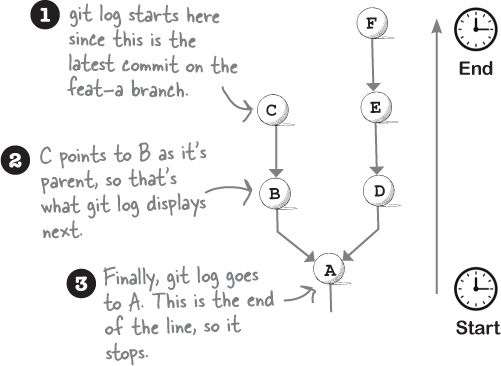
Consider a hypothetical commit history—it is made up of 3 branches—master, feat-a and feat-b. You switch to feat-a branch and execute the git log command:

Since you are on the feat-a branch, which points to commit“C” git log starts with C. It then reads and displays the details of that commit. It sees that“B” is C’s parent, so it does the same for“B”.
After displaying the details of commit“B”, Git proceeds to commit“A” since that is the parent commit of“B”. However,“A” is the first commit made in this repository, and it has no parent, so it stops.
Making git log do all the work
Enough with the suspense—let’s see what it takes for git log to display all the commits across all the branches in your repository. If you guessed more flags then ding, ding, ding—you win the prize! We know we like the --oneline flag—this time around we are going to add two more flags, namely --all and --graph. The --all flag does exactly what it says on the tin—it displays all branches in the repository. The --graph flag asks the Git log command to display the commits as a graph, like so:
Note
This graph is the graph in“Directed Acyclic Graph” that we mentioned in Chapter 1. We’ve come full circle!

The output this time around is pretty, but terse. Git shows off the abbreviated commit IDs, along with branch names where appropriate. The order is still bottom to top, with newer commits showing up higher. Let’s contrast this with the format we have been using so far so you can see how to align the two.
Note
Take a breather here, maybe grab a cup of your favorite beverage while you ruminate over this for a bit. This book isn’t going anywhere.

Ah! Great question. The commit history of your repository reflects how the repository has evolved over time. As you progress with your work, you will be continuously making commits. These commits, in sequence will represent the commit history of the branch you are working on. Maybe you will have multiple such branches in flight. Over time, you will create many such branches, and then merge them into the integration branch. For projects that stick around for a while, it’s easy to forget what happened when. This is where the git log commit is handy—think of it as automatic note-taking for your project.
Note
In future chapters we will see how we can use Git to collaborate with others. The git log command is particularly handy here so you can see how others added to the history of the project.
Also, questions like “Has my branch diverged away from the integration branch?” or“Will this be a fast-forward merge?” can easily be answered by looking at the commit history of your branch and the branch you intend on merging into.
Finally, recall that every commit you make reflects a set of changes that you added to Git’s memory in the form of a commit. That is, each commit differs from another commit in some way. And every so often you might want to know what the difference between two commits, or even two branches. This is particularly handy when you are getting ready to merge and you want to know what you are marrying into. So how would we do that? Well, in order to compare two commits, you will need:
A way to identify the things you wish to compare, namely the commit IDs. We know
git logcan help with this.A way to compare the two—which is exactly the topic of our next discussion!
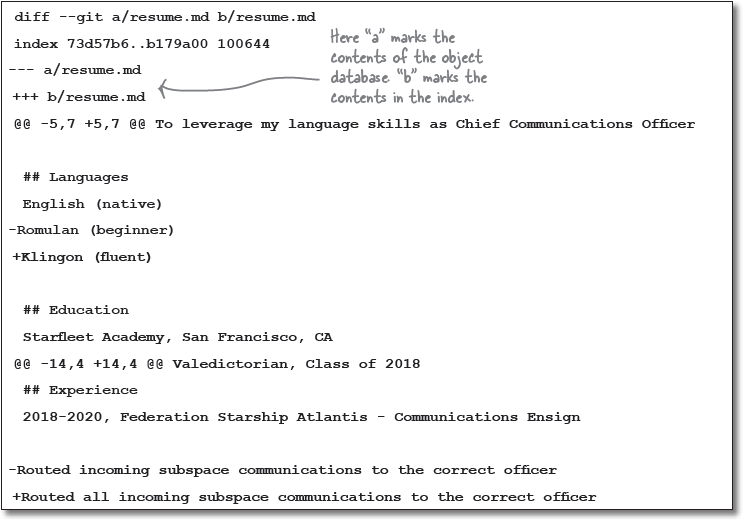
Brigitte’s job hunt isn’t going so well, so she decided to work with an independent career coach (a.k.a recruiter). After having a really personal conversation with the coach, she received some edits.

Brigitte took her recruiter’s handwritten notes and and applied them to the resume.md file in her repository. Let’s see how she can use Git to figure out the differences between her version and the edits that the recruiter sent her.
What diff-erence does it make?
Since we are on the topic of finding differences, let’s first talk about what we mean when we say“different”.
The role of a Git repository—any Git repository— is to track the content of your files. You may create new files, edit or move or delete existing files as you progress with your work, maybe commiting along the way. So what constitutes a difference?
Well, if Git knows what a file (or a set of files) look like, and you make a change to it, well, now Git can help you figure out what changed. And remember—Git only knows what a file looks like if its tracking the file, in that, at some point, you either added a particular file to Git’s index, and/or commited it.
Note
We talked about untracked and tracked files in Chapter 1.
Let’s make this a bit more concrete—say this is the status of the repository after Brigitte made the edits:

To help jog your memory, recall that there are various states Git assigns to your files as they move from the working directory, to the index and finally when you commit them.

We can infer a couple of things from the Git status report—the file is being“tracked” by Git (since it is not marked as“Untracked”). Git also reports that the file has been modified, but isn’t staged—so this file was previously committed, but Brigitte has edited it since then. However, she hasn’t added it to the index yet.
But in what way did the file change? That’s where the git diff command comes into play.
A life of pluses and minuses
The git diff command is short for“difference”. This command can be used to find the difference—in other words, compare, between all kinds of things in Git. Let’s start by executing the git diff command in Brigitte’s repository and see what it does:

Holy diffusor, Batman! There’s a lot going on in the output of the git diff command, so let’s break it down. Running git diff in a repository compares the version that Git has in it’s index with the version of the file in the working directory. let’s start by looking at the first few lines of the output:
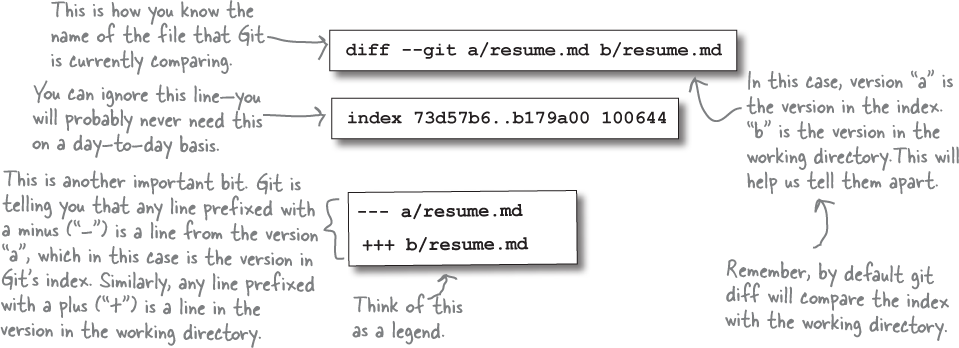
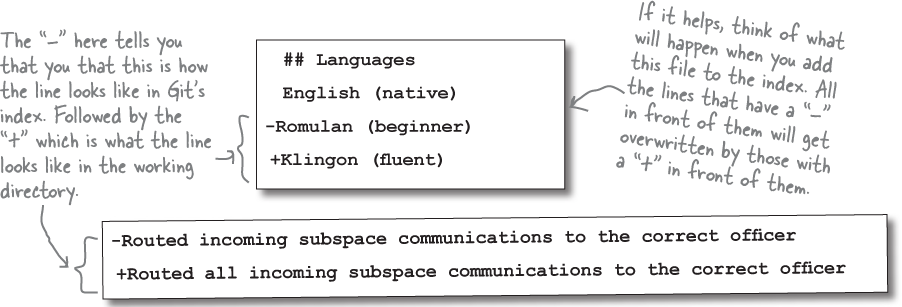
All of this sets up the backdrop. We know we are looking at the“diff” of the resume.md file, with any changes that were introduced in the file since we last committed it. The changes that Git knows about will be prefixed with a“-”, and the changes we just introduced in the file will be prefixed with a“+”.
A life of pluses and minuses (continued)
Now let’s take a look at the rest of the output, and tease it apart, bit by bit. Git does not display the entire file in the out of the git diff command—that won’t be particularly useful if the file had a few thousand lines in it, would it? Instead it chooses to display only the parts of the file that have changed (hunks). To provide you some context it tells you the starting line number (5 in this case), and tells you how many lines are being displayed in this hunk (7). It tries to show you some text from surrounding lines so you can attempt to discern how this change fits into the big picture.
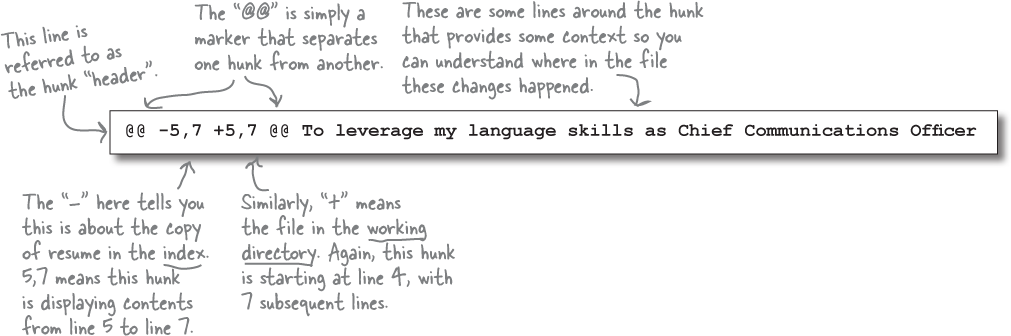
Onto the main attraction! Git starts actually displaying the differences it sees between the copy it has tucked away in the index and the changes made in the working directory. Just remember—any line prefixed with a“-” (minus) is in the index—any line with a“+” (plus) is in the working directory.
Git will only display as many hunks as it needs to show you the differences in different parts of the file. That means that on one side, if you just one change in a big file you get to see only one hunk. Alternatively, you will see a lot many more hunks if the file you are diffing is long and has a bunch of changes. Of course if you have many changes in many files you are going to be seeing a lot of hunks.
Note
If you look back at the previous page, you will notice that Git used two hunks to display all the differences.
Making your diffs easier on the eyes
Most Git commands offer a slew of flags. We saw a few that are available for the git log command. There is one flag that you might want to consider that makes looking at diffs just a tad easier:
Feel free to pick whichever flag works best for you. Personally, we like both—we aren’t picking sides here.

Just a quick update on Brigitte’s job hunt—she really liked the updates the recruiter (Ahem! Indepedent career coach) sent her. So she use the git add command to add the resume.md file to the index. She’s ready to commit, but she really wants to be sure that she is only committing the changes her recruiter suggested. When she tried git diff, she got no output!
Uh oh!
Well, let’s find out what’s going on with her repository, and see if we can help Brigitte out. She has an interview to prep for!
Diff-ing staged changes
The default behavior of the git diff command is to compare the contents of the files in the index with the content in the working directory and show you the differences. Now in Brigitte’s case, she has added all the files in the working directory to the index. This is the state of the files in her repository:
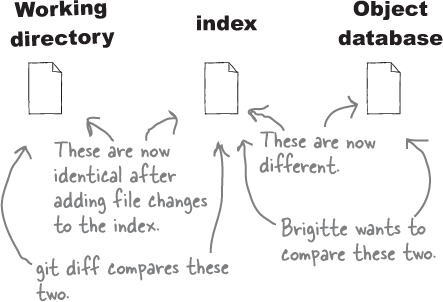
Since the contents of the working directory and the index are identical since Brigitte added all the files to the index, Git reports no difference. So how does she know what she is going to commit?
Brigitte can still use the git diff command to compare the contents she had in her last commit with the index, except this time she will need to supply the“--cached” flag, like so:

When she runs this, the output she gets is shown below. Notice that it’s very similar to the first time she ran git diff, because she just moved the changes she had in the working directory to the index. The most significant difference between git diff and git diff --cached is that in the case of the former, you are comparing the index with the working directory; in the second, you are comparing the previously committed version with the index.
After seeing this diff, Brigitte is happy with the changes she is about to commit. So she does just that, using the git commit command, and the message“edit per recruiter”. Alright! Now where’s that book on interview prep?
How’s the view from over there?
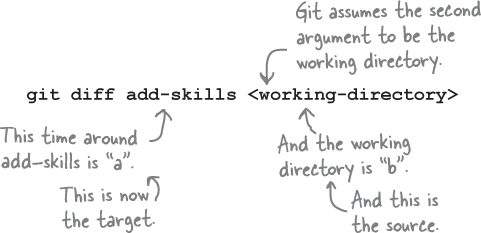
Back to Brigitte. Brigitte’s been studying pretty hard so she can nail the interview when the time comes. Brigitte was super excited about the edits her recruiter suggested. She happily made the changes to her resume, which she then committed on the edit-per-scotty branch. In Brigitte’s repository, she has three branches—add-skills, edit-per-scotty, and master. What if she wants to find out what changed between, say, the add-skills and the edit-per-scotty branches?
The question is—why would she want to do this? Well, perhaps she is curious to see how the two the two branches differ from one another. Once again, git diff to the rescue! You can use the git diff command to compare two branches.
Brigitte is on the edit-per-scotty branch (she used git branch to make sure). She is ready to merge the add-skills branch into the edit-per-scotty branch but she wants to be sure she knows what the final result will be. She can compare edit-per-scotty with the add-skills branch like this:

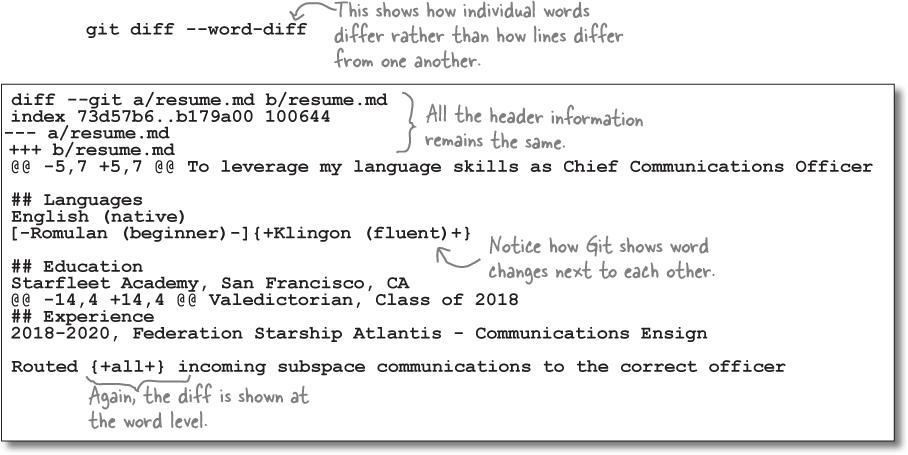
As you might have guessed, you can use the --worddiff flag here as well.
If Brigitte wants to merge the add-skills branch into the edit-per-scotty branch, then it makes sense to have the add-skills branch as a“source” and the edit-per-scotty branch as the“target”. To compare the two two, specifying edit-per-scotty first makes it the target, and add-skills second makes it the source.
But before we perform the diff, let’s make sure we know exactly what we are diff-ing ...
A branch is used to capture a single unit of work. Often, you’ll make several commits on the same branch before you are ready to merge your work into another branch. So what does it mean when Brigitte compares the add-skills branch to the edit-per-scotty branch?
When you compare two branches, Git simply compares the latest commits on each branch—often referred to as the“tips” of the branches. This is what comparing the two branches looks like:
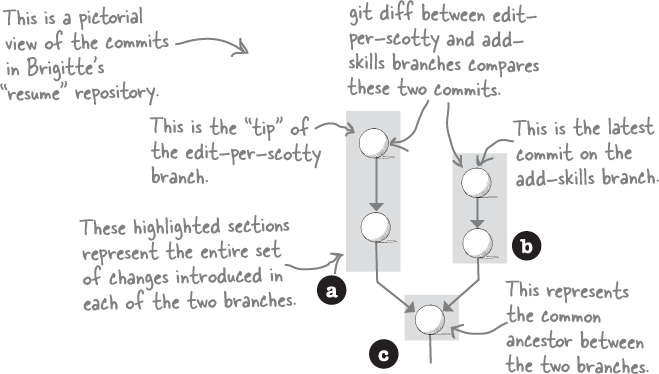
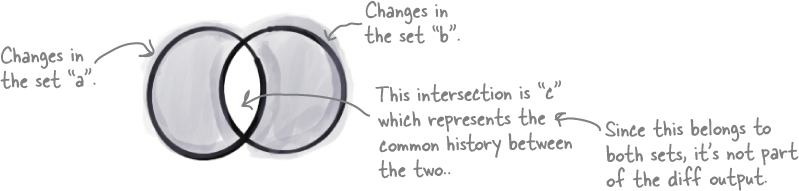
Every commit in a branch builds on top of the commits that came before it. Which means that when you compare the tips of two branches, you are actually comparing the entire set of changes introduced in each of the branches. In the picture above, the changes introduced by the edit-per-scotty branch are indicated by the letter“a”, and all the changes in the add-skills branch are marked by“b”. Notice that both branches originate from master. These set of changes are therefore common between the two, marked by“c”. Here is the result of the git diff command represented as a Venn diagram:
Now you know what the output of the git diff command represents. Next, let’s take a look at what we get when we actually run the git diff command in Brigitte’s repository.
As a gentle reminder, this is the command we executed in Brigitte’s repository:

This is what you would see:

It follows that if we were to swap the order of the branch names we supply to diff, comparing add-skills with edit-per-scotty (as opposed to the other way around), then“a” would represent the changes in the add-skills branch, and“b” would represent the edit-per-scotty branch. In other words, all the“+”s would become“-”s, and vice-versa.
There you have it. Finding the differences between two branches isn’t that different from comparing the index to the working directory, or the object database with the index.
Be careful when you compare branches!
The git diff command does not need to be supplied two separate branch names. You can simply supply it the name of a single branch, and it seems to work. But Git pulls a fast one, and it can be a tad confusing. Suppose you ran this:
git diff add-skills as compared to git diff edit-per-scotty add-skills
Since Git was only supplied one branch, it assumes you want to compare that branch with the working directory! That is, you are no longer comparing two branches. Instead, you are comparing the branch with the current state of your working directory. Furthermore, the order is now flipped!
Note
This is even more confusing if you have modified files in your working directory or the index, since those differences wil show up in the diff output.
As you can tell, the“+”s and“-”s will be reversed since the order of the arguments is reversed. It’s best to be explicit with the arguments you supply to the git diff command, so you know exactly what you are comparing.
Ding ding ding! The git diff command is truly as versatile as a swiss army knife. We have seen how to compare the working directory with the index, and the index with the object database. We then saw how to compare two branches.
The thing is, you can use the diff command to compare almost anything, including two different commits.
So, the question is—why would you ever do that? Well, suppose you are furiously working on a branch, and have made a series of commits. Perhaps you want to see what you changed between two commits on a branch. Or perhaps you just want to compare two arbitrary commits and see how they differ.
All together now!
Let’s talk about what it takes to compare two commits. You are going to need the commit IDs to begin with, so let’s start there. We have already used the git log command to see the history of our repository, and as an added bonus, we get the commit IDs. Here is Brigitte’s commit log again:

Brigitte is curious about what changed between her latest commit on the edit-per-scotty branch (d0ed536) and the commit that came just before it (38a7176). It’s important to get the order of the commits right—if the intent is to find what was changed since the last commit, then the latest commit should be the“source”, like so:

Think about it—changes in the target (the left-hand side of the Venn diagram) always show up as minuses (-) and changes in the target (right-hand side) show up as pluses (+). In order to see what was“added” in the latest commit, you would want to put that commit second, since that shows up with the plus prefix. The output is very similar to the output of every other diff command we have seen so far, so we are going to skip showing it again.
Using the diff command, Brigitte cam compare any two commits in her repository. They don’t have to be parent and child, or even on the same branch!
That’s it for this chapter! Let’s wish Brigitte the very best in her job hunt, and we certainly hope you get a chance to try out the cilantro sauce recipe at home. Do let us know if you come up with any modifications.