
Chapter 4. Google Cloud Compute Engine
Google Compute Engine provides you the ability to run virtual machines on Google’s infrastructure. You can run Windows and Linux virtual machines. You have the ability to customize the virtual machine to meet your needs, you can change the memory allocation, how many virtual CPUs are assigned and even automating patching of the operating system.
This chapter contains recipes for creating, and managing your virtual machines including unique methods to automate deployments, deploying containers to virtual machines and using Identity Aware Proxy to tunnel RDP traffic to securely connect to your Windows Virtual Machines.
4.1 Create a Windows Virtual Machine
Problem
You have an application that needs to be installed on a Windows server. You also need access to the operating system to change configuration options required by the application.
Solution
Using the Google Cloud Console, you will create a Windows Server on Google Cloud Compute Engine. This will provide you with full access to the operating system to allow you to make any configuration changes required by the application.
Sign in to Google Cloud Console.
-
In the main menu, navigate to Compute and click on Compute Engine

-
Select VM instances from the menu and click Create
-
Choose a name for your instance
-
Choose a Region and Zone for where this VM will be hosted in
-
Select a Machine configuration or customize based on your requirements
-
Click the Change button in the Boot disk section
-
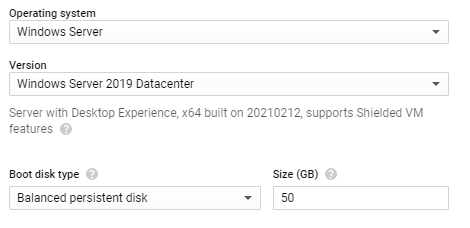
Choose Windows Server for the operating system
-
Chose the Windows Version required and select a disk size
-
Click Select
-
Leave other settings to default and click Create
-
It will take a few seconds for your Windows Virtual Machine to start up.

Discussion
In this recipe you used the Google Cloud Console to create a Windows Server. Creating a Windows Server on Compute Engine is a quick and painless way to run your Windows workloads on a managed infrastructure. When creating your virtual machine explore the options available as the ability to customize the memory and virtual CPU allocation for your virtual machine. You are never locked into a pre-configured template.
4.2 Create a Linux Virtual Machine and install NGNIX
Problem
You want to install a NGINX web server in the Cloud and need full access to the operating system hosting NGINX.
Solution
Using the Google Cloud Console, you will create a Linux Virtual Machine on Google Cloud Compute engine. This will provide you with full access to the operating system to allow you to make any configuration changes required by the application. You will also connect to the instance and install a NGINX web server.
-
Sign in to Google Cloud Console.
-
In the main menu, navigate to Compute and click on Compute Engine

-
Select VM instances from the menu and click Create
-
Choose a name for your instance
-
Choose a Region and Zone for where this VM will be hosted in
-
Select a Machine configuration or customize based on your requirements
-
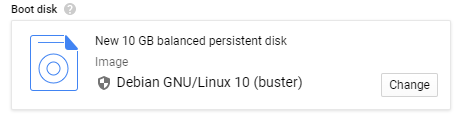
Leave the Boot disk set to Debian GNU/Linux 10 (buster)

-
Allow HTTP traffic to the instance

-
Click Create
-
Once the instance has been created and public IP address has been set, click on the SSH and select Open in browser window

-
In the instance terminal enter the following commands to install NGINX:
-
sudo su -
apt-get update
apt-get install -y nginx
service nginx start -
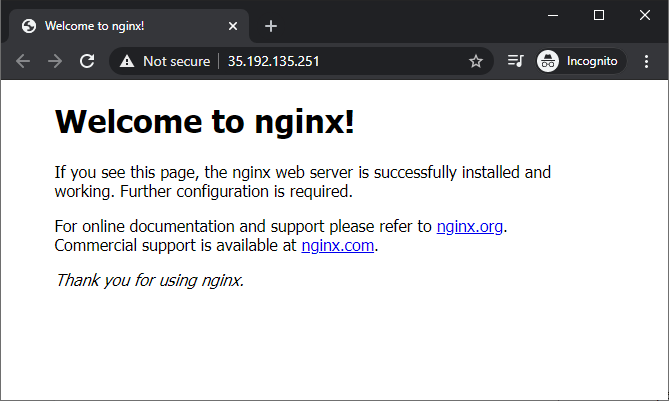
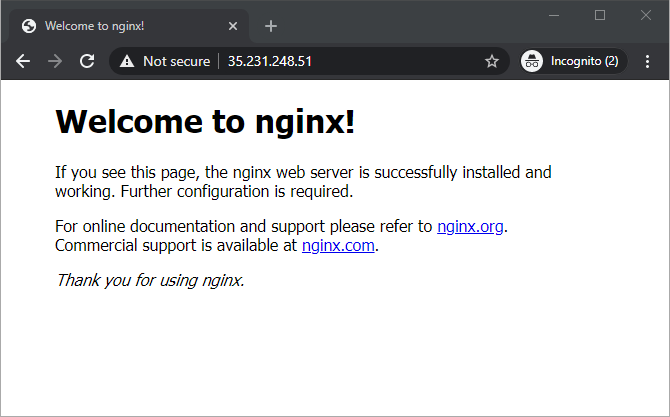
In the Cloud Console click on the Public IP Address of your server to open the URL in a new browser tab

Figure 4-1. Cap tk
-
You should see the following in your browser
Discussion
In this recipe you used the Google Cloud Console to create a Linux Virtual Machine. You also installed NGINX via the Google Cloud SSH browser. The SSH browser is a quick and easy way to get access to your Linux terminal without having to manage local SSH keys which you can if you choose to. You also allowed HTTP traffic to the instance by selecting Allow HTTP Traffic in the firewall section of the creation screen. For this to work, you need to make sure you do not delete the default firewall rule that allows HTTP traffic. If you happen to delete the firewall rule, you can recreate it or create a new one and associate the firewall tags with the instances you need HTTP traffic to be allowed.
4.3 Connecting to your Windows Virtual Machines with Identity-Aware Proxy TCP Forwarding
Problem
You want to install a NGINX web server in the Cloud and need full access to the operating system hosting NGINX. You also need the ability to replicate this process multiple times and require a quick method to deploy additional instances.
Solution
Using the Google Cloud Console, you will create a Linux Virtual Machine on Google Cloud Compute engine. This will provide you with full access to the operating system to allow you to make any configuration changes required by the application. You will also create a startup script to automate the installation of NGINX allowing you to quickly deploy additional instances.
-
You will need an existing Windows Virtual Machine ready and running on Compute Engine.
-
In the main menu of the Cloud Console, navigate to Networking and click on VPC network

-
Click on Firewall in the menu

-
Click Create a firewall rule
-
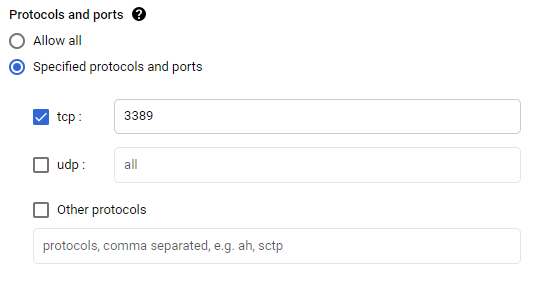
Enter a name for the firewall rule as:
-
allow-remote-iap
-
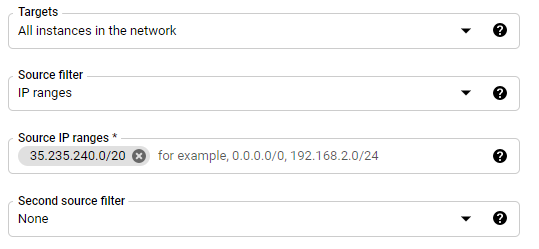
For the Targets select All instances in the network

-
For the Source IP ranges enter the following CIDR range: 35.235.240.0/20
-
Note: The 35.235.240.0/20 CIDR range contains all IP addresses that Google Cloud IAP uses for TCP forwarding.
-
Select TCP and enter 3389 to allow RDP in the Protocols and ports section
-
Click Create
-
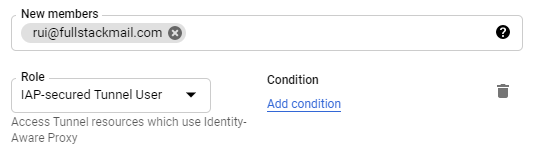
Navigate to IAM & Admin in the Cloud Console menu

-
Click Add to a new permission to allow the groups or and users to access to the IAP TCP forwarding which will grant them access to connect to the instances in this project.
-
For the members, select the groups and or users for which you want to grant access
-
Select a role and choose IAP-Secured Tunnel User.
-
Click Save
-
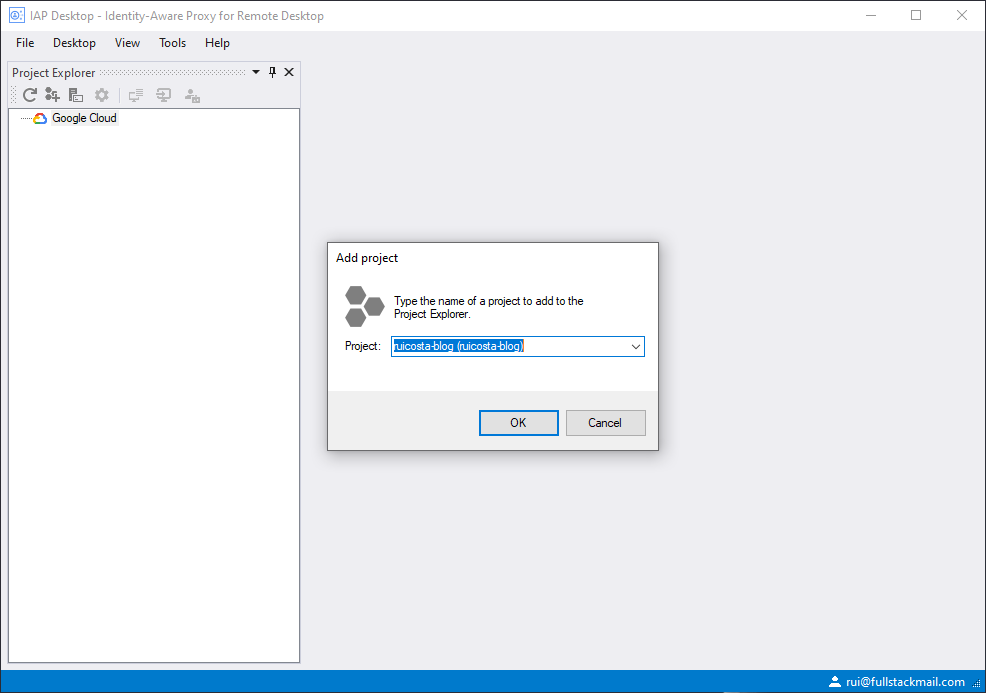
Install IAP Desktop, you can find the download at the following location https://github.com/GoogleCloudPlatform/iap-desktop
-
Launch the IAP Desktop application and Sign-in with the account you granted access in step 13
-
Select your Google Cloud Project
-
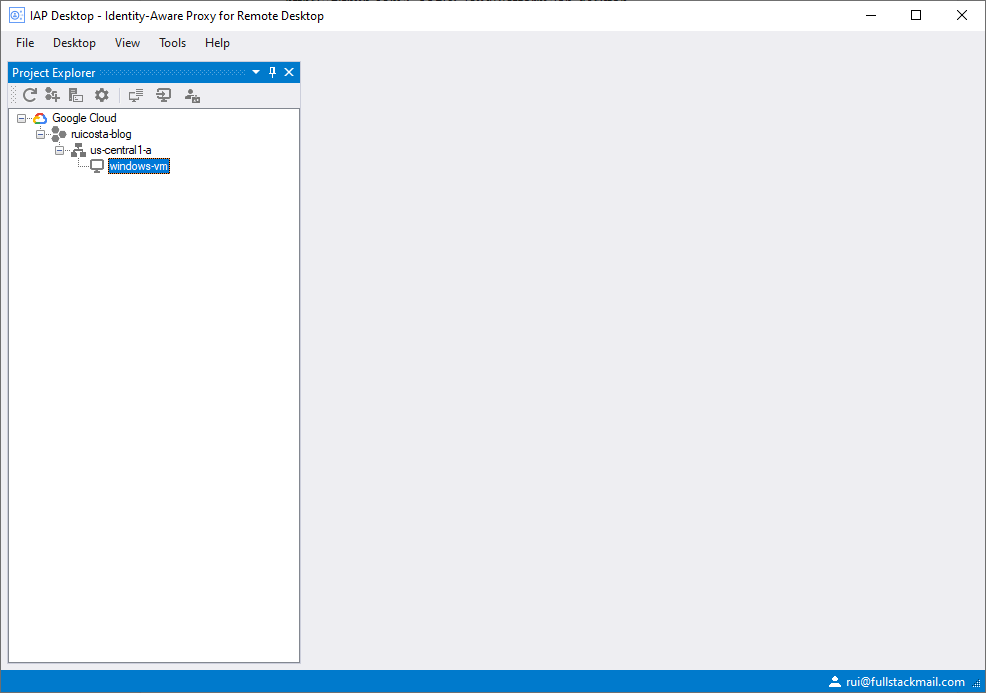
Once successfully authenticated you should see your Windows Virtual Machines listed
-
Right click on the instance and select connect, after successfully authenticated you should see the Windows Server desktop

Discussion
Identity-Aware Proxy (IAP) allows you to create a centralized authorization layer for applications. In this recipe you used IAP to tunnel RDP traffic to your Windows Virtual Machines. Using the IAP Desktop client you established a secure connection to Google Cloud, then your account was authenticated and authorized. Once successfully authenticated and authorized you then had access to the instances you had been granted to in your Google Cloud Project. You can further secure this process by implementing 2 step verification, see recipe four for more information.
4.4 Virtual Machine OS Login with 2 Step Verification
Problem
You want to secure your virtual machine OS logins with a 2 step verification process.
Solution
Compute Engine provides you the ability to secure your Virtual Machine logins with a 2 verification process. In this recipe you will enable 2 step verification on your Google Account as well as a Virtual Machine.
You will need at least a Linux virtual machine running on Compute Engine to continue with this recipe.
You will also need to enable 2 step verification on your Google Account. To enable this please visit the following link for instructions: https://support.google.com/a/answer/184711?hl=en
Sign in to Google Cloud Console.
In the main menu, navigate to Compute and click on Compute Engine

-
Select VM instances from the menu and select the instance you want to enable the 2 step verification for.
-
Click Edit
-
In the Custom metadata section add the following key/value pairs:
-
enable-oslogin: TRUE
-
enable-oslogin-2fa: TRUE
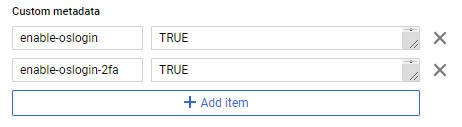
-
Click Save
-
Add the Compute OS Admin Login or Compute OS Login role to the user account who you wish to grant access to the Virtual Machine
-
Using the Cloud SSH Browser connect to the instance.
-
You will now be prompted for a 2 step verification.

-
After making your selection you should receive a code that you will enter into the 2 step verification.
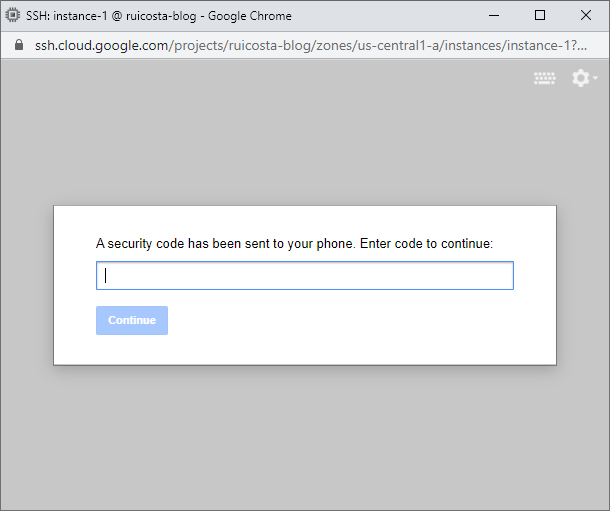
-
Once verification is complete you will have access to Linux Virtual Machines
Discussion
By implementing a 2 step verification you further secured access to your virtual machines running in Google Cloud. Users that need access to instances running in Google Cloud with 2 step verification enabled will be required to enter a code or other methods as physical keys to access the instances. The 2 step verification process is set on your Google Account, if you choose to use a physical you will need to first configure this on your Google Account before you can use it for accessing your virtual machines.
4.5 Running Startup Scripts
Problem
You want to install a NGINX web server in the Cloud and you need the ability to replicate this process multiple times to deploy additional instances.
Solution
Using the Google Cloud Console, you will create a Linux Virtual Machine on Google Cloud Compute engine.You will also create a startup script to automate the installation of NGINX allowing you to quickly deploy additional instances.
-
Sign in to Google Cloud Console.
-
In the main menu, navigate to Compute and click on Compute Engine

-
Select VM instances from the menu and click Create
-
Choose a name for your instance
-
Choose a Region and Zone for where this VM will be hosted in
-
Select a Machine configuration or customize based on your requirements
-
Leave the Boot disk set to Debian GNU/Linux 10 (buster)

-
Allow HTTP traffic to the instance

-
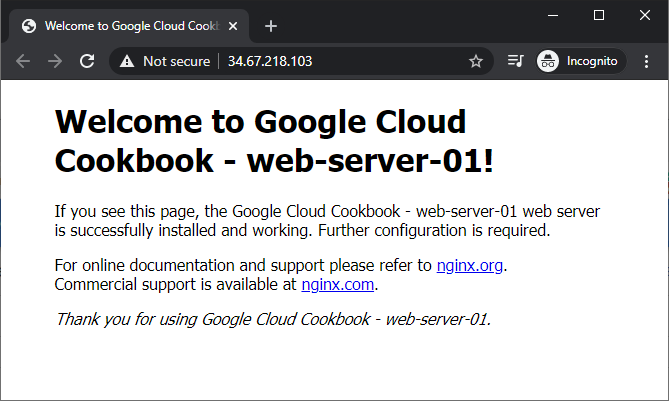
In the Startup script text input enter the following commands:
#! /bin/bash
apt-get update
apt-get install -y nginx
service nginx start
sed -i -- ’s/nginx/Google Cloud Cookbook - '"$HOSTNAME"'/' /var/www/html/index.nginx-debian.html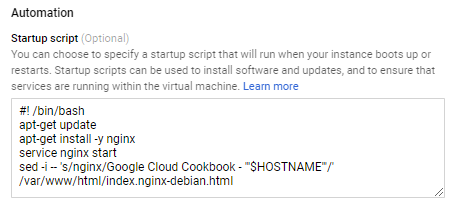
-
Click Create
-
Once the instance has been created and public IP address has been set, open your Internet Browser to the instances public IP Address

-
You should see the following in your browser

Discussion
Compute Engine allows you to create startup and shutdown scripts for your virtual machines. With this recipe you had the opportunity to use startup scripts to automate the installation of software. By using startup scripts it automated the deployment of say large fleet of web servers. In recipe six you will learn how to use the startup scripts to deploy a cluster of web servers which makes the process of installing software more efficient then connecting to each instance to install the software.
4.6 Create a Cluster of NGINX web server with an Instance Group
Problem
You need to host a highly available web server using NGINX. In the event one server fails you need for your web application to tolerate a host failure.
Solution
Using Instance Templates, you will create a cluster of Linux Virtual Machines on Google Cloud Compute engine.You will also create a Network Load Balancers to distribute traffic across the cluster of virtual machines.
-
Sign in to Google Cloud Console and launch Cloud Shell.
-
In your Cloud Shell create a startup script named nginx-startup.txt with the following commands:
#! /bin/bash
apt-get update
apt-get install -y nginx
service nginx start
sed -i -- 's/nginx/Google Cloud Cookbook - '"$HOSTNAME"'/' /var/www/html/index.nginx-debian.html

-
Create a new Instance Template and define the startup script to file created in step 2
gcloud compute instance-templates create nginx-template --metadata-from-file startup-script=nginx-startup.txt
-
Create a target pool. A target pool will allow you have a single access point for load balancing. Run the following command:
gcloud compute target-pools create nginx-pool
-
Run the following command to create an Instance Group
gcloud compute instance-groups managed create nginx-group --base-instance-name nginx --size 2 --template nginx-template --target-pool nginx-pool -
You should see the following output:

-
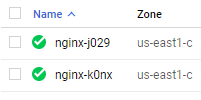
Open the Cloud Console and navigate to VM instances, you should see two new instances created from the command in step 5.
-
Create a regional network load balancer for the new instance group created, run the following command:
gcloud compute forwarding-rules create nginx-lb --ports 80 --target-pool nginx-pool -
When prompted for a region choose the region your instance group is located in, for this example you would choose us-east1
-
Run the following command to allow HTTP access to your instance group:
gcloud compute firewall-rules create allow-80 --allow tcp:80
-
To get the IP address of the regional load balancer run the following command:
gcloud compute forwarding-rules list
-
Visit the associated IP address in your browser. You should see a similar screen
Discussion
In this recipe you were introduced to Instance Templates plus Instance Groups. Instance templates are a great method to deploy instances that require identical settings. An example is creating web servers for a cluster, you want all the instances to have the same configuration as memory, virtual CPUs and the associated required software. You then used the instance template to create an instance group. An instance group is a grouping of virtual instances managed by a single entity. As a plus you deployed a load balancer to distribute traffic to the virtual instances in the instance group. In the event one instance failed your application would still be running as you had additional instances in the instance group.
4.7 Deploy Containers to Managed Instance Groups
Problem
You have a requirement to start running your applications as containers. You want to get started with Compute Engine and you want to run your NGINX as a container. You also want similar benefits that Kubernetes provides as autoscaling, autohealing, and rolling updates.
Solution
You will create a new Docker container. You will then deploy the Docker container to an Instance Group that will provide with the autoscaling, autohealing, and rolling updates requirements for your application.
-
Sign in to Google Cloud Console and launch Cloud Shell.
-
In this step you will create an new instance template and associate it with a publicly accessible container image. Run the following command in your Cloud Shell
gcloud compute instance-templates create-with-container nginx-template
   		 --container-image gcr.io/cloud-marketplace/google/nginx1:1.15
		 --tags http-server
-
Create a target pool. A target pool will allow you have a single access point for load balancing. Run the following command:
gcloud compute target-pools create nginx-pool
-
Run the following command to create an Instance Group based on the newly created template:
gcloud compute instance-groups managed create nginx-group --base-instance-name nginx-vm --size 2 --template nginx-template --target-pool nginx-pool -
In the Cloud Console, navigate to your instance groups. You should see your instance group listed.

-
Run the following command to create a regional load balancer for the newly created instance group:
gcloud compute forwarding-rules create nginx-lb --ports 80 --target-pool nginx-pool -
When prompted for a region choose the region your instance group is located in, for this example you would choose us-east1
-
To get the IP address of the regional load balancer run the following command:
gcloud compute forwarding-rules list
-
The output should look like this

-
Visit the associated IP address in your browser
-
You should see a similar screen
Discussion
In this recipe you learned how to deploy a container to Compute Engine. This is a great way to get started with containers. It is recommended to run containers on Kubernetes Engine as the orchestration engine for your microservices. After deploying the containers you exposed them with the --tags http-server flag plus you created a load balancer to distribute the traffic across the containers running on multiple virtual machines.
4.8 Transferring Files to your Virtual Machine
Problem
You have a Linux virtual machine running on Compute Engine and you need to transfer files to the instance.
Solution
In this recipe you will use two methods of transferring files to your Linux virtual machine using the gcloud command line tool and SSH in your browser.
-
You will need a Linux virtual machine running on Compute Engine to continue with this recipe.
-
Sign in to Google Cloud Console and launch Cloud Shell.
-
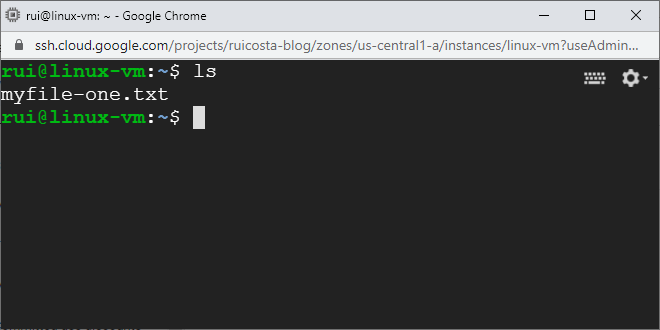
In your cloud shell run the following command:
touch myfile-one.txt
-
To copy the newly created file, run the following command and replace your-instance with your instance name:
gcloud compute scp myfile-one.txt instance-name:~
-
Connect to the Linux virtual machine with the Cloud Console SSH Browser
-
In the Linux terminal, validate the file copied
-
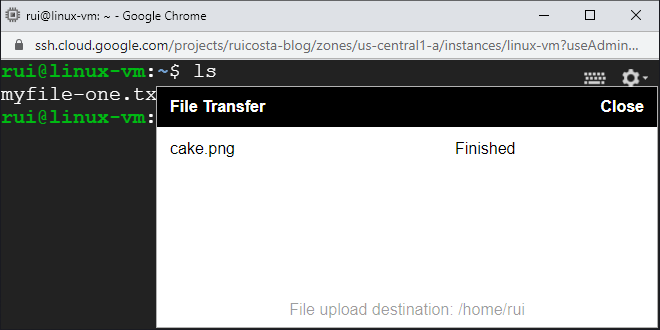
To upload a file with the SSH Browser, click on the settings icon and select Upload File

-
Upload a sample file from your local workstation
Discussion
Google Cloud provides you multiple ways to transfer files to your virtual machines. In this recipe you learned two methods to transfer files, one via the gcloud command that can be run on your local machine and the other via a web browser.
4.9 Using VM Manager for Patch Management
Problem
You host your virtual machines on Compute Engine and you need a method patching all the operating systems at once.
Solution
Using OS patch management with VM Manager you will create a patch job to patch your fleet of Linux Virtual Machines.
-
You will need at least one Linux virtual machine running on Compute Engine to continue with this recipe.
-
Sign in to Google Cloud Console and launch Cloud Shell.
-
To have Compute Engine manage your operating systems you will need to install configure and install VM manager, run the following commands to enable Operating system management for all your Virtual Machines:
gcloud compute project-info add-metadata
  --project PROJECT_ID
  --metadata=enable-osconfig=TRUE

gcloud compute project-info add-metadata
  --project PROJECT_ID
--metadata=enable-guest-attributes=TRUE,enable-osconfig=TRUE
-
Replace the PROJECT_ID with your Google Cloud Project ID
-
Using the Cloud Shell SSH browser connect to one of your instances to validate the OS Config Agent is installed, run the following command:
sudo systemctl status google-osconfig-agent
-
If the agent is running you should see a similar output from the command:

-
In the Cloud Console navigate to Compute Engine > VM Manager > OS patch management

-
Click Enable VM Manager
-
Click New Patch Deployment

-
Select the Target Zones for your Virtual Machines

-
Click Next
-
Enter a Deployment Name

-
Click Next
-
Choose default options for Scheduling, Rollout Options and Advanced Options
-
Click Deploy
-
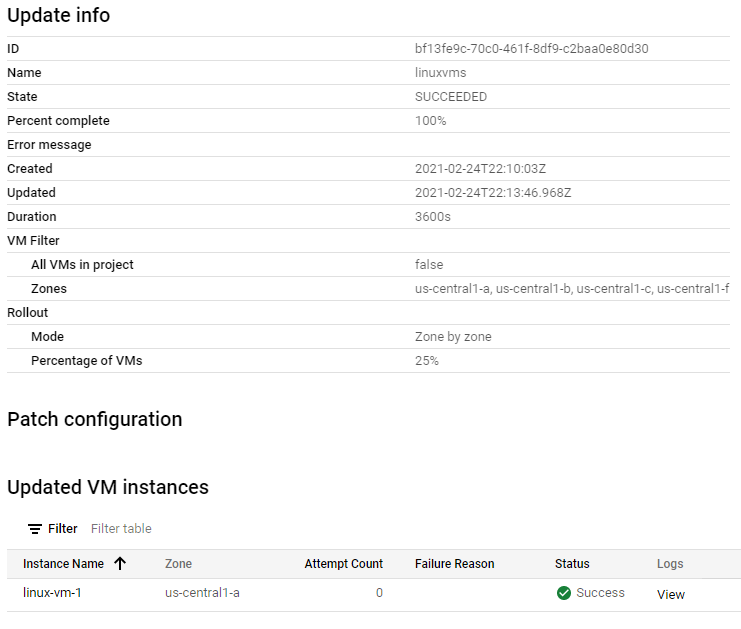
Your patch job will start automatically and provide you a status similar to the below

-
Once the patch job is completed you should should see a status window similar to the below
Discussion
When managing one virtual machine it’s fairly easy to perform patch updates. However, when running large fleets of virtual machines it becomes difficult to patch all your instances without some complicated scripting or 3rd party tool. With VM Manager and OS Patch management Google Cloud provides you the tools to distribute patch updates with multiple options as rolling updates, and restrict updates to certain zones.
4.10 Backuping your Virtual Machine
Problem
You have a Linux Virtual Machine running on Compute Engine. This is a critical application to your business and you want to perform backups of the persistent disks assigned to the Virtual Machine as a method to recover the instance if something goes wrong.
Solution
Using Compute Engine persistent disk snapshots you will create a snapshot of the virtual machine’s persistent disk to have a recovery point of the disk in the event of mishap.
-
You will need a Linux virtual machine running on Compute Engine to continue with this recipe.
-
Sign in to Google Cloud Console.
-
Navigate to Compute > Compute Engine > Snapshots

-
Click Create Snapshot

-
Enter a name for the snapshot and select the source disk of you virtual machine

-
Click Create
-
Once completed you should see your snapshot listed similar to the screenshot below

-
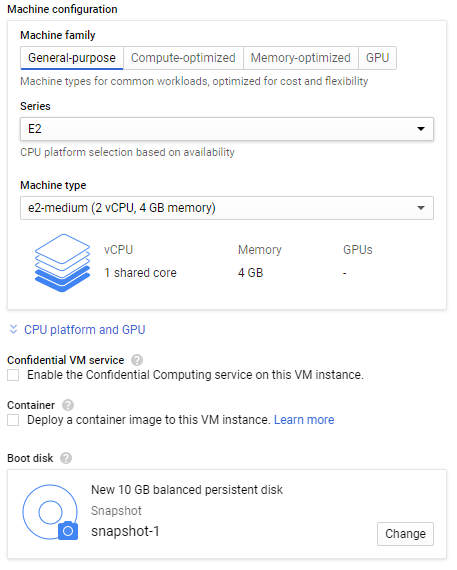
You can now create a new virtual machine based on this snapshot. Below is virtual machine creation window with the boot disk selected as the snapshot created.
Discussion
Using snapshots is a great method to protect your data in the event something goes wrong. It creates a point in time copy of your persistent disk. Besides being a recovery point, it also allows you to create a virtual machine based off the snapshot allowing you to perform file level recovery and testing changes in your application or operating system. You can create a virtual machine with the disk that was snapshotted to maybe test how an operating system change would affect the state of the virtual machine.