CHAPTER 11. Configuring Channels
Having read the previous chapters and having a working chatbot, the next step is to deploy this chatbot to one or more channels. A channel is where a user interacts with a chatbot. Often, chatbots reside on messaging channels and users invite the chatbot into their list on the platform the channel is designed for. Here are some of the major channels that are available now:
![]() Bing
Bing
![]() Email
Email
![]() Facebook Messenger
Facebook Messenger
![]() Skype
Skype
![]() Teams
Teams
![]() Twilio (SMS)
Twilio (SMS)
![]() Web Chat
Web Chat
In Chapter 12, Creating Email, SMS, and Web Chatbots, we’ll cover email, Twilio, and the Web Chat control. In this chapter, you’ll learn how to configure channels. Because there are a growing list of channels, it isn’t practical to list them all here, so you’ll see a couple that are available to get an idea of how the channel configuration process works. You’ll get a general overview of channels and then look at Teams and Bing. The chapter wraps up with a discussion of the Channel Inspector and how it helps visualize specific features.
Channel Overview
Each chatbot has its own page where you can configure channels, view channel analytics, and modify chatbot settings. To get started, visit https://dev.botframework.com/, visit My Bots, and select the chatbot you want to deploy. This shows a list of channels, as shown in Figure 11-1.
 Note
Note
You can learn how to register a chatbot in Chapter 2; the My Bots list shows any registered chatbots.
The first page you’ll see is the Channel page, discussed next.

The Channel Configuration Page
Figure 11-1 shows that the Skype and Web Chat channels are running. The Edit link on the right lets you change the configuration settings. Clicking Get Bot Embed Codes pops up a window with an HTML snippet for each configured channel. Below Add A Channel, there’s a list of available channels that aren’t yet configured where you click the button for a channel to begin the configuration process.
Chatbot Analytics
The Analytics tab, as its name suggests, displays usage metrics for the chatbot. It doesn’t work automatically and you need to set up Azure Application Insights. Application Insights is an Azure service that collects telemetry information and you can query that information to view the health of a chatbot or collect metrics as this section explains. To set up analytics, you need to configure Visual Studio, obtain keys and IDs, and update settings.
Configuring Visual Studio
Application Insights needs to be a part of a Visual Studio project so it can add the appropriate instrumentation to the project. To add Application Insights, right-click the chatbot project, select Add | Application Insights Telemetry, as shown in Figure 11-2.

FIGURE 11-2 How to configure Application Insights in Visual Studio.
After selecting Application Insights Telemetry, you’ll see windows that ask to log in to Azure and select various Azure service parameters, similar to the type of questions encountered during deployment in Chapter 2. Keep track of the name you used for Application Insights for this app because that will help you find it in the next section. After that you’ll have new DLLs and other configuration items in the project to support Application Insights.
After adding Application Insights, deploy the chatbot to Azure, as explained in Chapter 2. If you’ve previously deployed the chatbot, you should re-deploy. Analytics only works if the chatbot is deployed where the telemetry collection will work.
Finding Application Insights Claims
Analytics requires three claims for registering Application Insights: Instrumentation Key, API Key, and Application ID. To get the Instrumentation Key, log in to your Azure portal, click the Applications Insights service (that you created in the previous section) for this chatbot, select CONFIGURE | Properties, and copy Instrumentation Key in the Properties blade, as shown in Figure 11-3.

FIGURE 11-3 How to obtain the Application Insights Instrumentation Key.
Save that Instrumentation Key and we’ll get the next two claims. While on CONFIGURE, select API Access, and click Create API Key on the new blade. This opens the Create API Key blade to let you generate a new API Key. Generate the New API Key, save the API Key, and you’ll see that Azure has created a new API Key entry on the API Access blade, shown in Listing 11-4.
![]() Tip
Tip
Save your API Key because once you close the API Key Generation blade, you won’t be able to access the API Key any more. If you lose an API Key, regenerate a new API Key and update Settings (discussed in the next section).
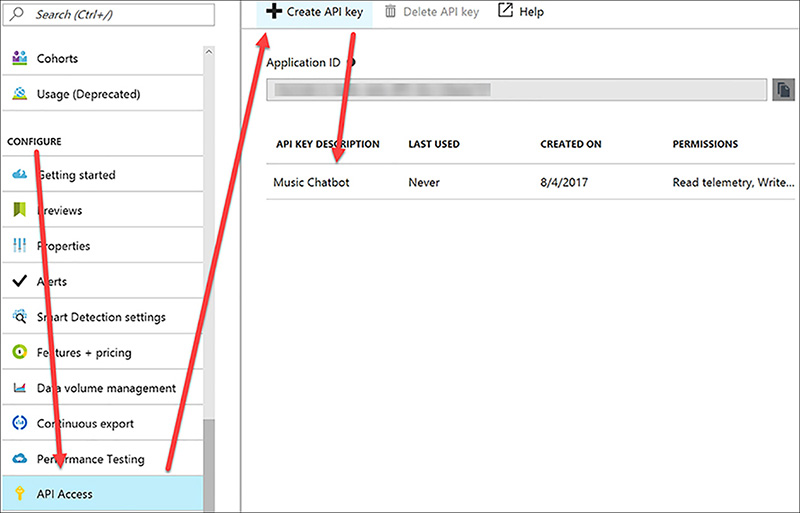
FIGURE 11-4 Obtaining the Application Insights API Key and Application ID.
Notice from Figure 11-4 that the API Acess blade also has an entry for Application ID. Copy the Application ID. You now have Instrumentation Key, API Key, and Application ID. Now you can update the chatbot settings.
Updating Settings
Once you have all the Application Insights claims, go back to the chatbot, click Settings and add those claims in the Analytics section, as shown in Figure 11-5.
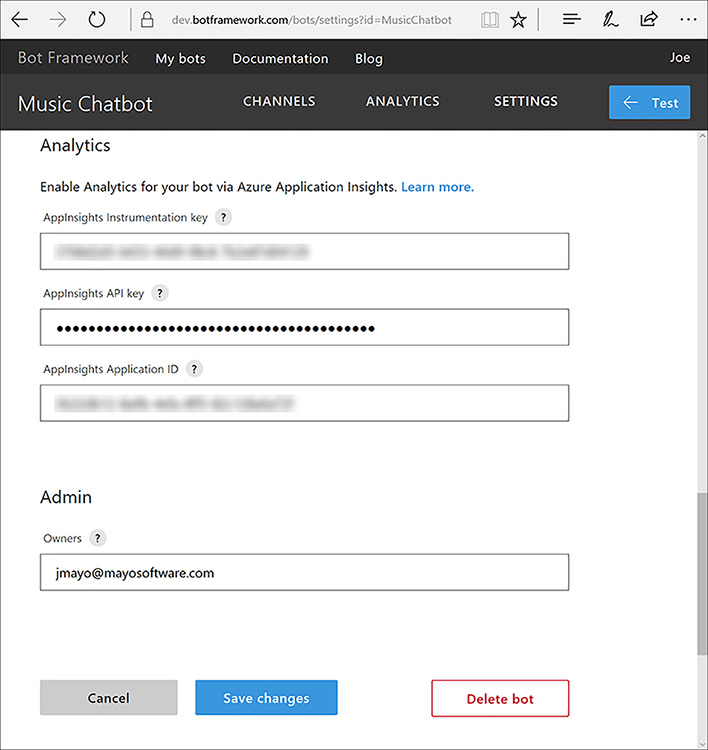
FIGURE 11-5 Adding claims to Analytics Settings.
Make sure you click Save Changes before leaving Settings. Now, any communication with a chatbot via a channel records metrics and stats you can view via the Analytics page.
In the following sections, you’ll learn about setting up specific channels that will result in analytics data whenever people communicate with the chatbot.
Configuring Teams
Teams is a platform that allows people to chat and collaborate. It’s currently part of the Office 365 suite of tools and integrates with office apps. It also supports developers through chatbots, tabs, and extensions. The chatbot part is what this book discusses because you can build a Bot Framework chatbot and let it participate in conversations through Teams. Let’s look at getting set up first.
Channel Setup
At first glance, it might sound easy to set up a channel because the process of configuring a Teams channel consists of clicking the Teams button on the Channels page. Figure 11-6 shows a configured Teams channel for Music Chatbot.

FIGURE 11-6 Configuring a Teams channel.
While Music Chatbot is configured for the Teams channel via the Bot Framework, you still need to perform Office 365 configuration. To do so, visit Office 365, log in as Administrator, select the Settings | Services & Add-Ins, and click Microsoft Teams, as shown in Figure 11-7.
You need an Office 365 account and the ability to log into that account as Administrator to configure Teams.
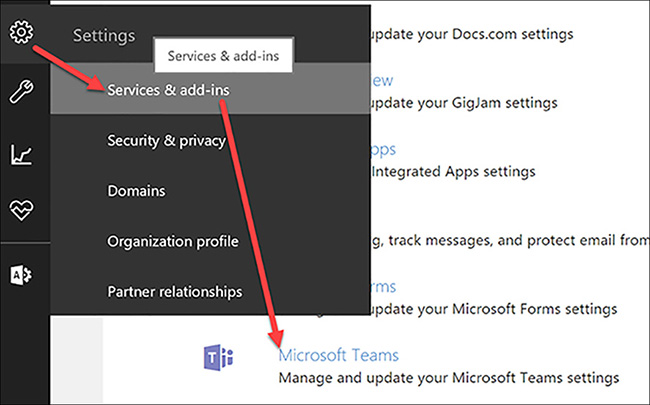
FIGURE 11-7 Finding the Teams configuration page in Office 365.
This opens the Microsoft Teams settings page. Set the Turn Microsoft Teams On Or Off For Your Entire Organization to On. Expand the Apps panel, as shown in Figure 11-8, and ensure those options are toggled On: Allow External Apps In Microsoft Teams, Enable New External Apps By Default, and Allow Sideloading Of External Apps.

FIGURE 11-8 Configuring Teams in Office 365.
With the Office 365 configuration completed, you can start using the chatbot in Teams.
Using the Chatbot
You can get started with Teams via their website: https://teams.microsoft.com/. The easiest way to start testing with Microsoft Teams is to visit the Bot Framework Channels page and click on the Microsoft Teams link (after configured as described above). This opens Microsoft Teams with the Chat opened to the chatbot. Figure 11-9 shows a conversation with Music Chatbot.

FIGURE 11-9 Testing in Microsoft Teams.
Figure 11-9 shows the Done thumbnail card in the Browse carousel for the Pop genre. As you can see, the channels render differently than the Bot Emulator.
Configuring Bing
Deploying to Bing makes a chatbot discoverable. When people do Bing searches, your chatbot can appear in relevant listings. This allows users to interact with the chatbot directly in Bing.
![]() Tip
Tip
For some businesses, a Bing chatbot might introduce a competitive advantage, especially if competitors don’t have a chatbot.
Channel Setup
The Bing Channel Setup page has several sections for chatbot information, categories, publisher information, and privacy/terms of use pages. Figure 11-10 shows a few of those fields, and most are self explanatory.
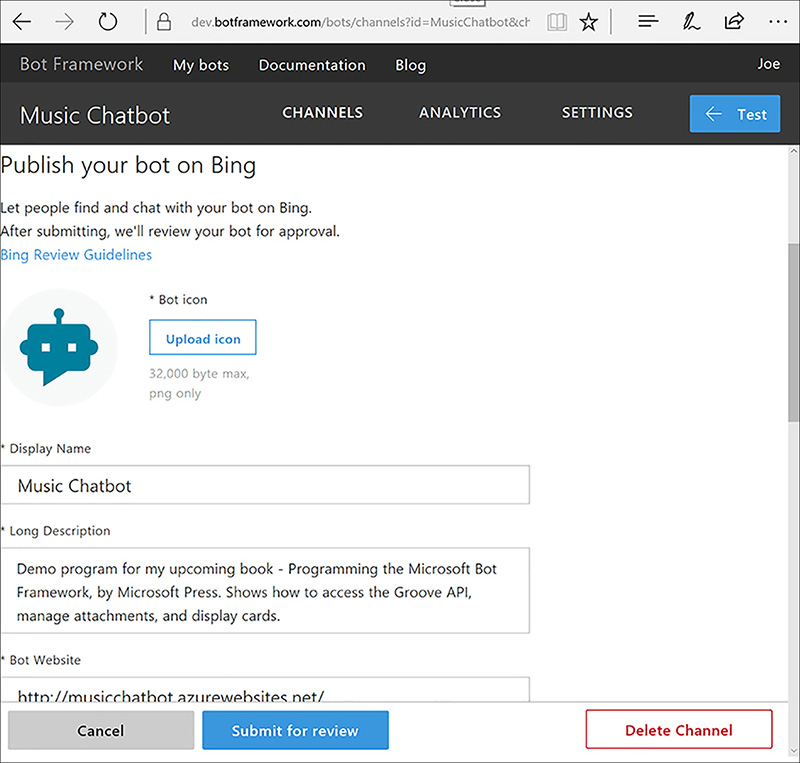
FIGURE 11-10 Configuring the Bing Channel.
You should click the Bing Review Guidelines for more information to ensure a successful submission.
On the Terms Of Use And Privacy Statement, you can have your own attorney do yours, or do a Bing search for Free Terms of Use and Free Privacy Statement, which returns many entries. The Bing Review Guidelines might have additional resources. We’ve included modified versions of these documents in the accompanying source code for Music Chatbot that we’ve used to successfully submit a chatbot and will give you an idea of what these documents can contain.
Microsoft has streamlined the submission guidelines for each channel they support to minimize the amount of work you need to do. However, the requirements for each channel vary and you should visit the channel sites and read their requirements thoroughly to make the submission process easier.
Using in Search
After submitting a chatbot for review you’ll see a link to click to test the chatbot on Bing, as shown in Figure 11-11.
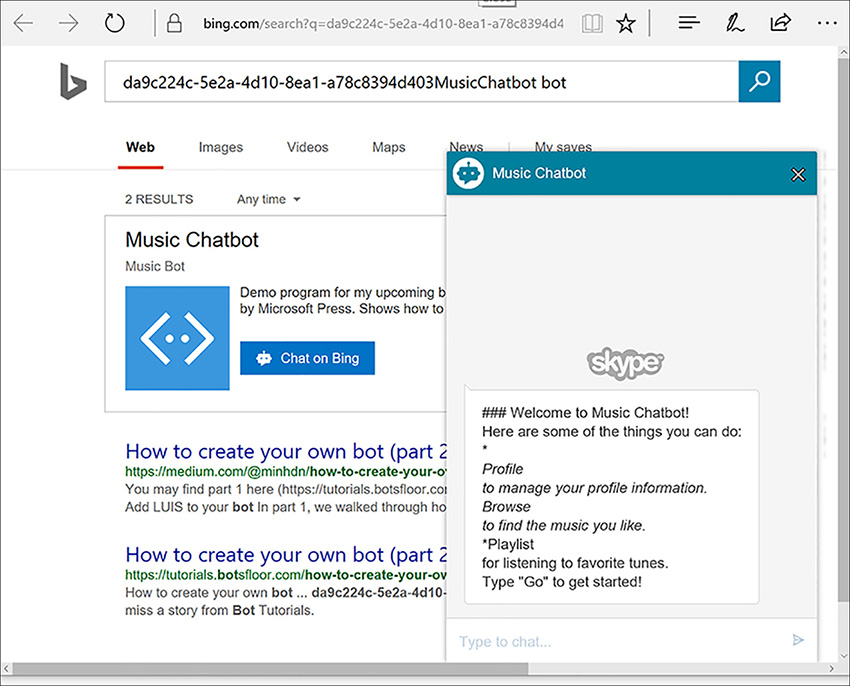
FIGURE 11-11 Using Music Chatbot on Bing.
As shown in Figure 11-11, when Bing shows a chatbot in search results, there’s a Chat On Bing button. Clicking Chat On Bing opens a chat window where users can chat directly on the browser search page. There is no need to navigate, move out of context, or wonder – a user can ask a quick question and be closer to determining whether your chatbot or business meets their needs.
The Channel Inspector
The Bot Framework has a tool called a Channel inspector. What this does is show how each feature of a chatbot looks for a given channel. This can help when performing user experience design. Figure 11-12 shows what Channel Inspector looks like.
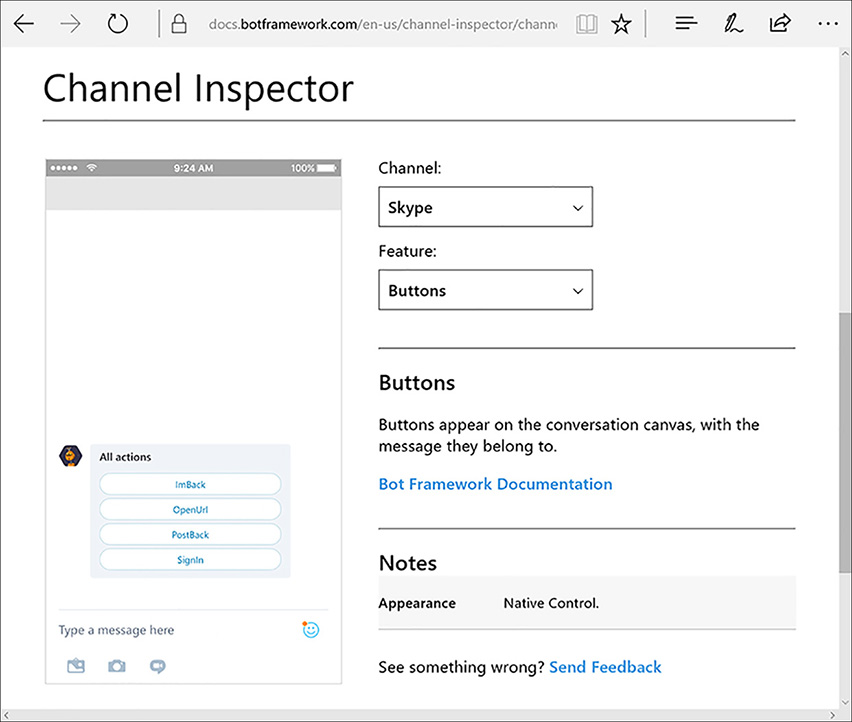
FIGURE 11-12 The Channel Inspector shows how various features of a chatbot look like on a channel.
The Channel drop-down in Figure 11-12 contains options for each channel that the Bot Framework supports. The Feature drop-down has options for various ways a chatbot can display content, such as Carousel, Hero Card, markdown, and more.
Summary
Building on the registration process from Chapter 2, this chapter discusses how to configure channels for a chatbot. The specific examples were for Microsoft Teams and Bing, but this was to give you an idea about how channels work and a few tips as you approach configuring other channels.
You learned how to configure analytics, instrumenting a project, and gathering keys from Application Insights. The Bot Framework page for a chatbot has an Analytics tab you can visit to learn a few things about the amount of traffic a chatbot receives. You also learned about Channel Inspector, which is a tool to help visualize various chatbot features on specific channels. The next chapter continues the journey into Email, SMS, and Web Chat channels.