CHAPTER 12. Creating Email, SMS, and Web Chatbots
Chapter 11 showed how channel configuration works, concentrating mostly on technologies that reach out to a single application. This chapter builds on that, but the theme is on the channels that go beyond a messaging app. There are some people and parts of the world that don’t have smart phones, but they do have email, SMS, or some way to read a web page. This chapter shows how to set up those channels too.
Emailing Chatbot Conversations
The Bot Framework offers an email channel, which allows users to communicate with a chatbot via email. To use the Email channel, create an Office 365 email account and configure the email on the Bot Framework web page for the chatbot.
![]() Tip
Tip
While you can communicate with a chatbot via any type of email account, the Email channel requires an Office 356 account.
Creating the Email Account
To create an email account, visit the Office 365 website as Administrator. Go to Admin tools, click Users | Active Users, and click the Add User button. Fill in the required information on the Add User blade, shown in Figure 12-1, and click Add.

After clicking Add, keep track of the password for the new email account because you need it for configuring the Email channel, discussed next.
![]() Tip
Tip
The initial Office 365 email password is temporary and valid for only 90 days. This is fine for a test where you intend to delete the email address, but you’ll want to log onto that account and change the password to avoid hard to figure out problems when the chatbot stops working over email in 90 days.
Configuring the Email Channel
To configure the email channel, visit the chatbot on the Bot Framework site and click the email channel. As shown in Figure 12-2, add an Email Address and Email Password, and click Save.

Now, a user can communicate with the RockPaperScissors chatbot by sending an email to the configured address, [email protected], in this example.
Texting a Chatbot
You can let users communicate via SMS text messages with the Twilio channel. To start, visit the chatbot on the Bot Framework site and click the Twilio channel, shown in Figure 12-3.
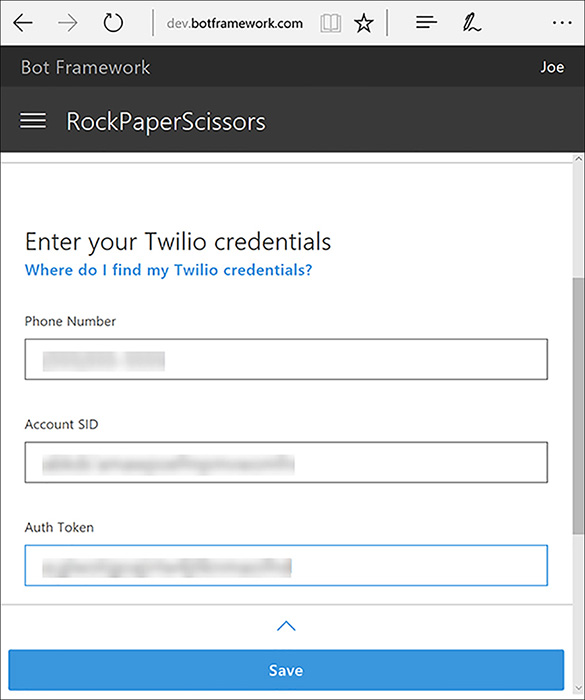
Click the Where Do I Find My Twilio Credentials link. It has detailed instructions on how to register a new TwilioML app, select a phone number, and obtain credentials. Twilio offers a free level, which is ideal for testing.
 Note
Note
Some channels have extensive setup requirements for the third-party platform supported. The Bot Framework team keeps these documents up-to-date and they’re typically very good at minimizing the amount of work you need to do. e.g. the Twilio setup procedures have links you can click that will take you to the exact page you need to be at, saving you from needing to search yourself.
Click the Save button when you’ve added the Twilio information. After channel configuration, users can communicate with the chatbot by sending a text message to the phone number, Figure 12-3, that the chatbot is configured to communicate with.
Embedding the Webchat Control
The Webchat control lets you add a chatbot to any web page. Since it fits in an HTML iframe, you can put the Webchat control on any surface that supports HTML, maybe even in another application’s web control. This example adds a Webchat control to the default.htm file that comes with the default Bot Application template. This section shows one way to write the HTML for a web page to hold the Webchat control. The technique used here is to use JavaScript on the client to communicate with a server Web API. I’ll explain why I recommend this approach, or something similar, in the next section.
Adding the Webchat IFrame Placeholder
To use the Webchat control, visit the Channels page for the chatbot, and add the Webchat channel, like other channels. If the Webchat channel is already added, click the edit button and you’ll see a list of sites. If there aren’t any sites, click the Add New Site button, give the site a name, and click Done. Selecting that site in the list, you’ll see a screen similar to Figure 12-4.
![]() Tip
Tip
Adding multiple sites allows you to have different credentials for each location where the Webchat control deploys.
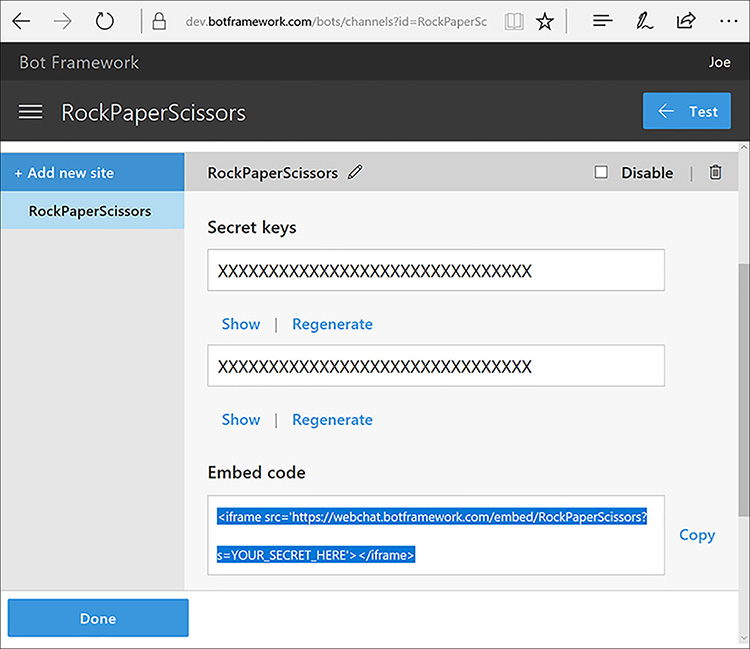
FIGURE 12-4 Configuring the Webchat channel.
As shown in Figure 12-4, you get two secret keys, which is useful for scenarios where you might want one for production and the other for testing, prototyping, or anywhere someone needs to use the chatbot without needing to share the production key. You can always click the Regenerate button to create a new key if one is compromised or doesn’t need to be shared anymore.
The Embed code is the iframe with the src for the Webchat control. Notice that the parameter to the URL, s, is for the secret key, repeated below:
<iframe src=’https://webchat.botframework.com/embed/RockPaperScissors?s=YOUR_SECRET_HERE’>
</iframe>
If you add this iframe to a web page and use one of the secret keys for the s parameter, this will work and users can interact with the Webchat control on a web page just fine. However, this could be bad because it compromises your secret key. Anyone can look at the source code in the browser and read the secret key. You should do your own threat assessment to determine the impact of this, but I’m not going to show how to do that because of the potential problems it can cause you, starting in the next section.
Client-Side Coding
There are various ways to securely deploy the Webchat control without exposing secrets and I’ll show you one of those. The approach in this section is to place a div placeholder in the HTML page and use jQuery to call the server and load the iframe. That keeps the secret on the server, where users can’t see it. Listing 12-1 is the HTML page that does this.
LISTING 12-1 The HTML page for the Webchat control: default.htm.
<!DOCTYPE html>
<html>
<head>
    <title></title>
    <meta charset=”utf-8” />
</head>
<body style=”font-family:’Segoe UI’”>
    <h1>Rock Paper Scissors</h1>

    <div id=”webChatControl”/>

    <script src=”https://code.jquery.com/jquery-3.2.1.min.js”></script>
    <script type=”text/javascript”>
        $(“#webChatControl”).load(“api/WebChat”);
    </script>
</body>
</html>
Listing 12-1 shows the modified default.htm page. Notice that the body contains a div whose id is webChatControl, which is a placeholder. Below that are a couple of script tags – the first loading jQuery. The second script tag contains a single jQuery statement that selects the #webChatControl div and loads the contents that comes back from an HTTP GET request to api/WebChat. The jQuery load function specifies a relative address, using the Web API convention of adding a first segment of api. The second segment specifies the controller and under Web API conventions, this would map to the controller class named WebChatController.
That’s how the client obtains and loads the Webchat control onto the page. Next, let’s examine WebChatController and how it responds to the request from the page.
Note
The Web Chat control is open-source and you can visit it at https://github.com/Microsoft/BotFramework-WebChat. In addition to the techniques I cover here, the GitHub site has additional ways to integrate the Web Chat control into yor site, such as with a React.js wrapper.
Handling the Server Request
As stated earlier, the benefit of avoiding putting the iframe directly in the HTML is to avoid putting secret keys on the page where any user can access it. Instead, we want to return an iframe that doesn’t contain the secret key. The Bot Framework supports this by having a REST endpoint that exchanges the secret key for a token. This means we can pass the iframe back to the caller with the token, rather than the secret key. Each instance of the Webchat control gets a separate token and the token expires after a period of non-use, meaning that a user can’t reuse that token like they could with the secret key. In this section, you’ll see how to create the WebChatController, addressed in the client in the previous section, to handle swapping the secret key for a token and returning a more secure version of the iframe.
To start, copy one of the secret keys from the Webchat channel configuration to web.config. Here’s what the appSettings element in web.config might look like:
  <appSettings>
    <!-- update these with your BotId, Microsoft App Id and your Microsoft App Password-->
    <add key=”BotId” value=”RockPaperScissors” />
    <add key=”MicrosoftAppId” value=”Your App ID” />
    <add key=”MicrosoftAppPassword” value=”Your App Password” />
    <add key=”WebChatSecret” value=”Your Secret Key” />
  </appSettings>
WebChatSecret holds the key and is read by the WebChatController.
To add a new controller, right-click the Controllers folder, select Add | Controller, click Web API 2 Controller – Empty, click the Add button, and the controller WebChatController, and click the Add button. This produces a new WebChatController.cs file. Listing 12-2 shows the WebChatController class with code that sends a new iframe back to the calling client (web page) and Listing 12-3 shows the WebChatTokenResponse that WebChatController uses to parse the token response from the Bot Framework.
Listing 12-2 The controller that swaps secret keys for tokens: WebChatController.cs.
using Newtonsoft.Json;
using RockPaperScissors3.Models;
using System.Configuration;
using System.Net;
using System.Net.Http;
using System.Text;
using System.Threading.Tasks;
using System.Web.Http;

namespace RockPaperScissors3.Controllers
{
    public class WebChatController : ApiController
    {
        public async Task<HttpResponseMessage> Get()
        {
            string webChatSecret = ConfigurationManager.AppSettings[“WebChatSecret”];

            string result = await GetIFrameViaPostWithToken(webChatSecret);

            HttpResponseMessage response = Request.CreateResponse(HttpStatusCode.OK);
            response.Content = new StringContent(result, Encoding.UTF8, “text/html”);
            return response;
        }

        async Task<string> GetIFrameViaPostWithToken(string webChatSecret)
        {
            var request = new HttpRequestMessage(
                HttpMethod.Post, “https://webchat.botframework.com/api/conversations”);
            request.Headers.Add(“Authorization”, “BOTCONNECTOR “ + webChatSecret);

            HttpResponseMessage response = await new HttpClient().SendAsync(request);
            string responseJson = await response.Content.ReadAsStringAsync();
            WebChatTokenResponse webChatResponse =
                JsonConvert.DeserializeObject<WebChatTokenResponse>(responseJson);

            return
                $”<iframe width=’600px’ height=’500px’ “ +
                $”src=’https://webchat.botframework.com/embed/RockPaperScissors” +
                $”?t={webChatResponse.Token}’>” +
                $”</iframe>”;
        }
    }
}
Listing 12-3 The class for helping parse the token: WebChatTokenResponse.cs
namespace RockPaperScissors3.Models
{
    public class WebChatTokenResponse
    {
        public string ConversationID { get; set; }
        public string Token { get; set; }
    }
}
The Get method in Listing 12-2 reads the secret key from configuration, calls the GetIFrameViaPostWithToken method, and sends the response back to the caller, which is the default.htm page in this example.
There are three main sections of GetIFrameViaPostWithTokenMethod: setting request parameters, requesting the response, and formatting the return string. The first section configures the request parameters:
            var request = new HttpRequestMessage(
                HttpMethod.Post, “https://webchat.botframework.com/api/conversations”);
            request.Headers.Add(“Authorization”, “BOTCONNECTOR “ + webChatSecret);
This request will send an HTTP POST to the https://webchat.botframework.com/api/conversations endpoint. The request must be authorized by appending the secret key to BOTCONNECTOR and assigning that to the Authorization header. Next, we need to make the HTTP request and parse the results:
            HttpResponseMessage response = await new HttpClient().SendAsync(request);
            string responseJson = await response.Content.ReadAsStringAsync();
            WebChatTokenResponse webChatResponse =
                JsonConvert.DeserializeObject<WebChatTokenResponse>(responseJson);
This code calls SendAsync to post the request and reads the results into the responseJson string. Since this is a JSON document, we call JsonConvert.DeserializeObject to convert the JSON string into the WebChatTokenResponse object, whose type is defined in Listing 12-3. Next, we format the response:
            return
                $”<iframe width=’600px’ height=’500px’ “ +
                $”src=’https://webchat.botframework.com/embed/RockPaperScissors” +
                $”?t={webChatResponse.Token}’>” +
                $”</iframe>”;
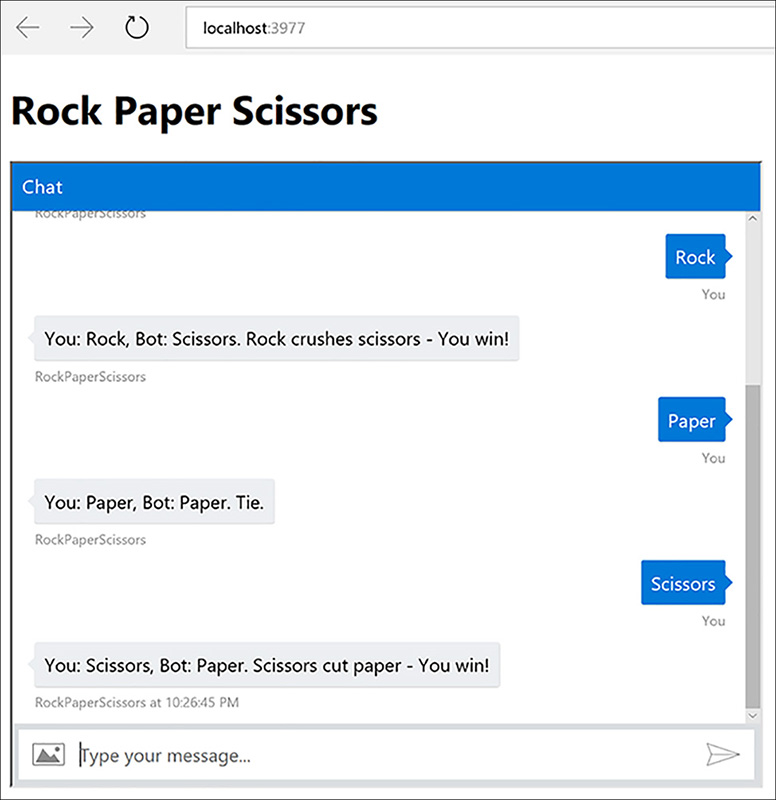
This is an iframe similar to the one given by the Webchat control channel. The first difference is that its height/width is 600x500. You can change the dimensions how you like for your page. The second difference is that the s parameter is now t. Also, the t parameter value is the token returned from the REST call just made, webChatResponse.Token. Figure 12-5 shows what this looks like on the web page.
Summary
Now you know how to set up a few more channels. You learned how to configure the email channel. When working with email, remember that you need admin access to Office 365 to create an email account that the Bot Framework uses.
The Twilio channel supports configuring a chatbot to communicate over SMS text. The example we used, RockPaperScissors chatbot, was ideal for this type of communication because it’s text only. This also provides access to users in the world who might not have a smart phone.
Finally, you learned how to add the Webchat control to a page. This is useful to put a chatbot anywhere an HTML page can go. The example focused on a secure way to save secret keys on the server, making the chatbot more secure.
You’ve seen examples of how to use pre-configured channels, but sometimes you might want to surface a chatbot in your own applications. The next chapter shows how to use Direct Line to create custom channels.