
Chapter 9
Travel and Landscape Photography
Your friends have asked me to raise a difficult subject with you—one they have been too embarrassed to bring up.
They hate it when you go on vacation. It was bad enough in the past when you came to work with 10 envelopes of snapshots fresh from the one-hour photo lab and made them look through hundreds of photos of white, sandy beaches. Now that you are just bringing in the camera and scrolling through the memory card, it has become unbearable. Please stop—they’re begging you.
Think about it from the other side. Have you ever been really interested in someone else’s vacation photos? Probably not. There might have been one or two great shots, but chances are you were bored to tears. It’s even worse when there’s a story that goes along with every photograph.
French photographer Henri Cartier-Bresson once said, “The anecdote is the enemy of photography.” What Bresson meant by this was two-fold:
1. When a photograph requires explanation, it’s probably not as good a photograph as it should be.
2. When a photograph is amazing, telling the story behind it detracts from the inherent mystery and beauty of the photograph.
When I’m asked to both write and shoot a story, I’m always trying to imagine what the words can do well and what the photographs can do well. Photographs can’t tell you how funky a hotel room smelled, how great a steak tasted, or how warm the sun felt on your skin. Good photographs do something very important that words don’t do as well, though: they describe people, places, and things. They describe the light and the weather. They describe the unique point of view of the photographer.
Travel Photography Is Hard
Travel photography seems easy, but I think it is actually the hardest thing for most amateurs to master.
We look at travel magazines it looks so easy—but don’t believe it. When a magazine hires a photographer to shoot a travel story, the apparent ease and simplicity in the photographer’s portfolio is one of the qualities the editors look for. Photographs for travel stories are supposed to look effortless and simple, and good travel photographers work very hard to make it look that way.
The hardest thing any photographer can do is to engage another person in his or her unique experience. This is one of the main reasons why your friends are (maybe) bored with your vacation photos.
When I do a travel story for a magazine, I realize that I will be lucky to get 10 photos published. Five is more likely. I shoot a few hundred. Why? Because each of the five photographs has to say a lot. Packing a lot of information into a single photograph is hard to do. Travel photographs are where you need to really hone your storytelling skills. Don’t aim for a stack of mediocre photos; try to make 10 or 20 really great ones that completely sum up the experience. Shoot hundreds; show few. Leave the audience wanting more. Last, don’t delete photos in the field. Look at them carefully on a screen at home.
It’s All About Being There
In the real estate business, there’s a saying: “Location, location, location.” In photography, it is “Vantage point, vantage point, vantage point.” You already know this, but you might not have been thinking about it.
The Vantage Point of Space
This concept is obvious but very subtle as well. Find something in your field of vision right now, and line it up with something in the background. Close one eye and move your head. This is the vantage point of space. This simple concept is the very backbone of photography.
I don’t know if this story is true, but I like it and it’s instructive.
The great photographer Garry Winogrand was a man of few words. According to the story, he spent hours looking through a large portfolio of work by the great French photographer Eugene Atget without saying a word. After looking through the entire portfolio, he simply closed it and said, “Boy, that guy really knew where to stand.”
How simple—but as true a statement as anyone has ever made. Knowing exactly where to stand is really important.
If I plan a trip to Paris on a vacation, I have made a very active, conscious choice about what kinds of things I wish to see. At this level, the choice of vantage point is truly global in scale. I am deciding to place myself at a particular place in the world.
When I walk down a Parisian street and see the Eiffel Tower framed between two buildings, I make a series of smaller and smaller decisions about my vantage point until finally I am standing in the middle of the street and crouching two inches to find the exact composition. The choices of vantage point represents an ever-shrinking series of choices that zero in to one particular point in space (and time).
The Vantage Point of Time
There are at least two important vantage points in time. The first deals with time in a fairly simple way and refers to the time when you made the photograph.
Photographs made in color are very distinctive in the way they deal with time. Color, and the color of light, is intrinsic to the time of day and season when the photograph is made. If you have been making photographs of “the same thing every time you see it” (as I outlined in Chapter 6), this will be obvious to you in your own photographs.
The other vantage point of time is longer. I call it the “palette of history.” Certain colors and styles of clothing, cars, and even photographs place a photograph in a certain time. They tell you when a photograph was made and provide historical context. A photograph of a soldier in a helicopter wearing green fatigues, shot on Kodachrome film, tells you he is in Vietnam. The same photo of a soldier in tan camouflage shot with a digital camera tells you he’s in Iraq. The palette of history isn’t obvious to us now, but it becomes important in the future. Look at a few old snapshots that your parents took of you, and you will see exactly what I mean (avocado-colored kitchen appliances are chic again!).
Photographs are, by nature also series of smaller and smaller temporal or time-based decisions. Am I in Paris in the summer or the winter? Do I shoot the Eiffel tower at noon, or do I come back at sunset? Do I press the button now, or do I wait for the pedestrian to cross the street so the street looks deserted? Again, out of an infinity of possibilities, a single exact moment is chosen.
The Vantage Point of Identity
It’s your vacation. Why are you making photographs that look like barcode postcards? Chances are, the photographs your friends and family are going to be the most interesting and will be the ones that reflect your unique point of view and personality.
All that stuff our parents told us is true: we’re all special. You are a unique entity in a unique place at a unique point in time. What you are looking at this very instant might not be interesting, but it has never been seen before and will never be seen again in exactly the way you are seeing it right now. Everything you will see in your entire life is a personal treasure. Showing it to others, as you see it, is the strength of photography.
I am often amazed when really promising students, with a strong style come back from a semester abroad and show me the work they did on the trip. More often than not, they make very generic photographs that don’t reflect their unique personality or point of view, and I’ll think, or even say, “Wow, you went to Paris but you left yourself at home.”
Where you have been, and when you were there, is—to a large extent—your legacy. You are an interesting person (I guarantee it), letting your photos reflect that will make them better.
Case Study: On Top of the World
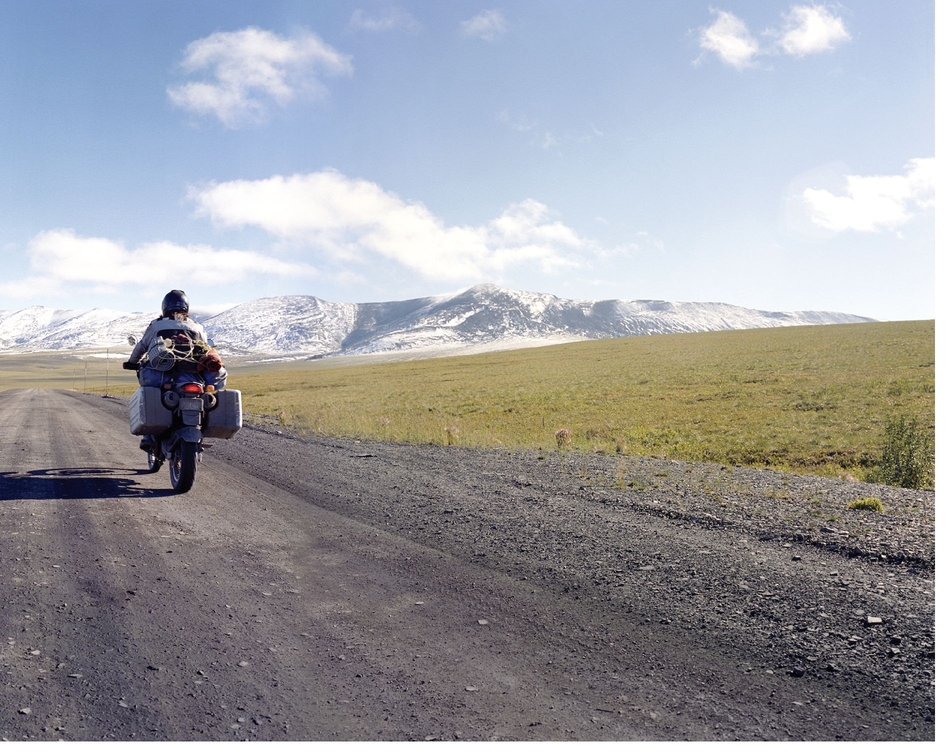
One of the hardest travel stories I’ve ever done was a motorcycle trip for Unlimited magazine. The basic premise was simple: a buddy and I were to search for the northernmost bar on the continent.
Starting in Seattle, we got on two motorcycles and headed north for 2,500 miles until we reached the town of Inuvik in Canada’s Northwest Territories on the Arctic Ocean, 300 miles above the Arctic Circle. Once we got there, we had a beer at great little bar.
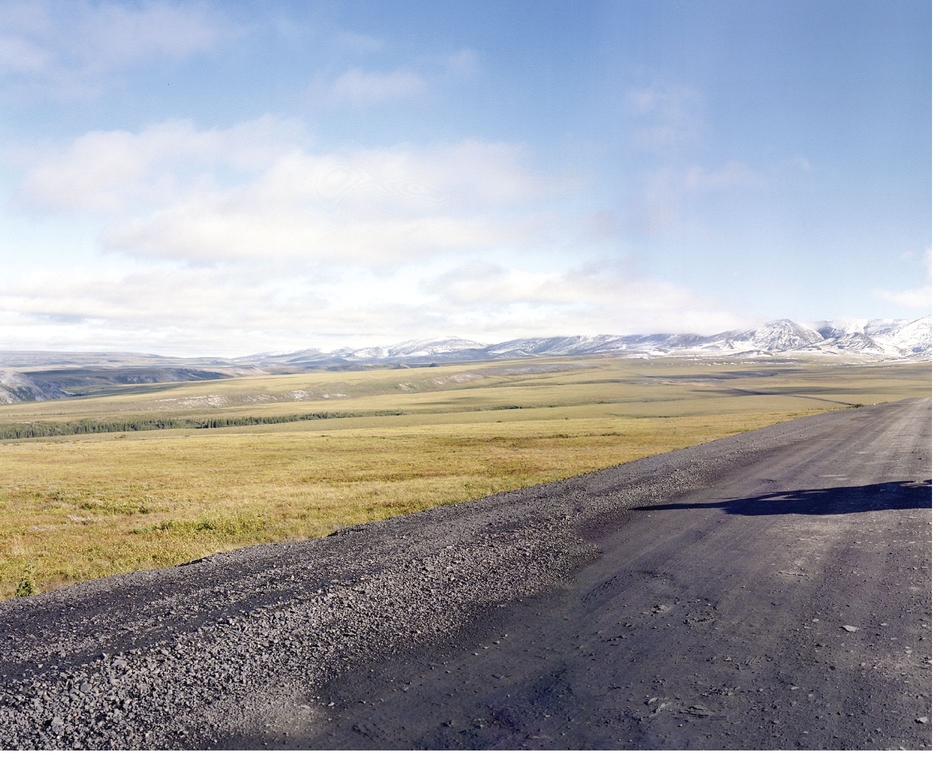
This photograph ended up as the opening double-page spread for the story titled, “Arctic Blast.” It was originally shot as three separate photos because I thought a pieced-together collage, or triptych, would better communicate the idea that the landscape was so vast it couldn’t be contained in one shot.
Then, we got back on the motorcycles and drove home. It was 5,000 miles round trip through some of the most desolate terrain on Earth.
The story was hard because there was so little to see. No beautiful women, no nightlife—just two average guys, the open road, and a whole lot of bears.
The art director disagreed, (he was right) and the magazine digitally stitched the three photographs together into this panorama.
Think Ahead: What Do You Need?
Try the same exercise that I outlined in Chapter 8 about thinking through what equipment you’ll need and the different levels of equipment. You obviously planned your vacation around getting to see things you wouldn’t normally see. What are you hoping to photograph?
Your equipment really needs to be well thought out when you travel. Take too much and you won’t want to carry it all; take too little and you’ll spend the entire time wishing you had the one item you left behind.
For this exercise, let’s imagine we are going to Europe for a typical tourist week in Paris.
Level 1 (for travel photography):
• Camera with a kit zoom lens (lens hood, filter, and so on)
• Tripod
• Small tabletop tripod
• Point-and-shoot pocket camera
• Infrared remote control for self-portraits
• 16 GB of memory or 30 rolls of 35 mm film
• Portable data storage drive or viewer (optional but highly recommended) or a laptop computer
• Gaffer tape (you’ll find a new use for it every day)
• Pocket diffuser for pop-up flash
Level 2:
• Ultra wide-angle zoom lens, 10-22 mm (digital) or 20-35 mm (film), for interiors of churches, attractions, and panoramas
• Lightweight, variable-aperture zoom lens with a normal to long range (like a 50-200 mm)
• Fast, fixed-focal length prime lens, 20-28 mm, at least f/2.8 maximum aperture.
• Shoe-mounted flash unit
I probably wouldn’t carry all of this equipment every day, and if I took these lenses I’d leave the kit lens at home. Anything beyond this is really tailored to a specific kind of vacation.
If it were a bicycle or backpacking trip, I’d want a carbon fiber tripod. I might also trade up the kit zoom for a pro zoom lens in the 17-40 mm f/4 range (better quality but still lightweight) and only take that lens.
For a photo safari trip to Africa, you’d obviously want a very long zoom lens in the 100-400 mm range. If I were going to the Bahamas, I might want to bring an underwater camera or an inexpensive housing for my point-and-shoot. These special trips actually make planning easier because you have a better idea of what to expect.
More and more point-and-shoot cameras are capable of underwater photography without an auxiliary housing.
A Travel Approach
When you travel with your family, it can become easy for photography to take over the trip. The kids really don’t want to stand around while you try to find the one undiscovered angle of the Eiffel Tower.
One tactic is to simply set aside one hour a day to just wander and shoot—and the best time to do that is early in the morning before breakfast or late in the afternoon when everyone wants to rest and relax before dinner. One hour to yourself … sounds kind of good, doesn’t it?
Pro Tip
As a rule, most pros avoid the noonday sun because the light is boring and ordinary. Dawn and dusk are the “magic hours” when the light from the sun is almost equal to the light from artificial sources.
Wandering a new city before dawn is amazing. The streets are quiet, and there are no other tourists out. Another big plus is that when you are alone with a camera, the locals will often engage you in a way they never would if you were part of a group. It’s a chance to see the culture without the insulating bubble of tourism—as well as to make memorable photographs. Also I often see a location I’m interested in and think, “This will be great at sunset, at dawn, with a person, or completely deserted.”
Don’t be satisfied with your one and only photo of the Eiffel Tower. Keep working at it and thinking—adding new levels of complexity and meaning.
An Assignment
Try to make a photograph every 15 minutes (or every 30 minutes) during that hour to yourself. It doesn’t matter where you are. Find something worthwhile to make a photograph of. A little process like this keeps you from zoning out and keeps you alert and observant. It also means that you will relax and enjoy yourself when you aren’t “on.”
Case Study: The Carrera Pan Americana
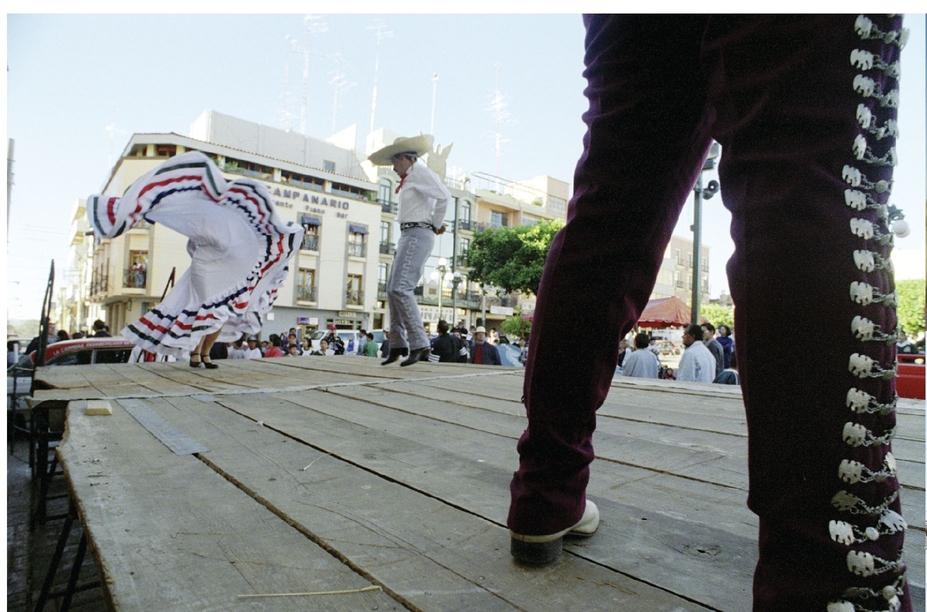
One of my favorite travel stories is this one from the Carrera Pan Americana, a 2,500-mile road race with vintage cars that takes place in Mexico.
While it’s a serious car race, it takes place on open roads that travel through many of the original Spanish colonial towns and is shot as a travel story. The race is a source of national pride for the Mexicans, and every village holds a fiesta to honor the racers as they pass through.
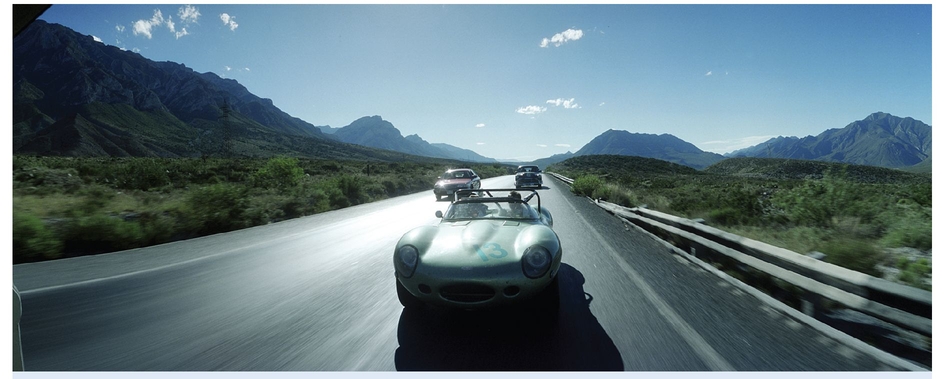
This photograph is made with a special panoramic camera. This story was really about traveling more than car racing. The panoramic format allowed me to show the cars while retaining the context of the Mexican countryside and architecture.
Find a view that no else is seeing.
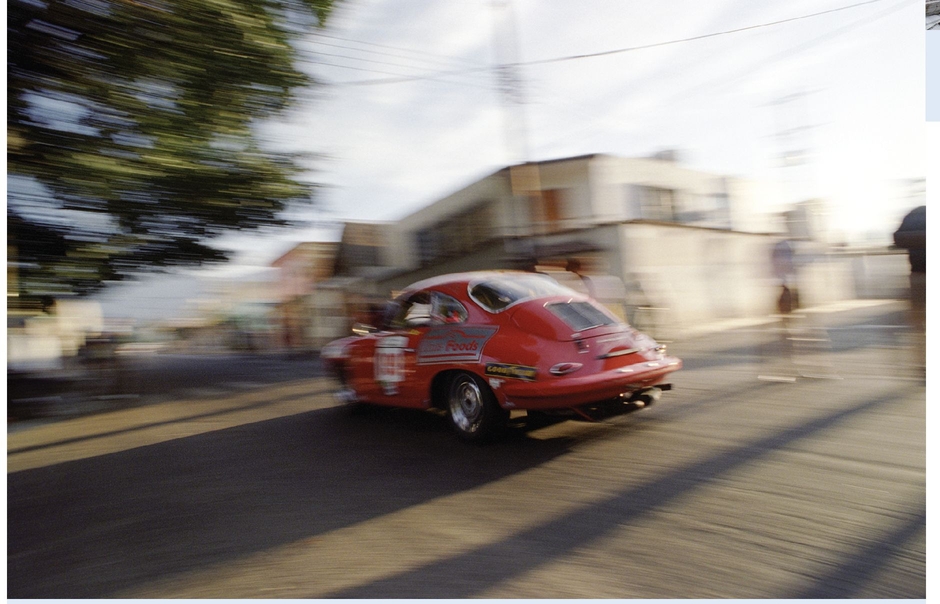
The race takes place at speeds of up to 200 mph (the police close off the roads). Keeping up while competing and shooting takes lots of planning ahead.
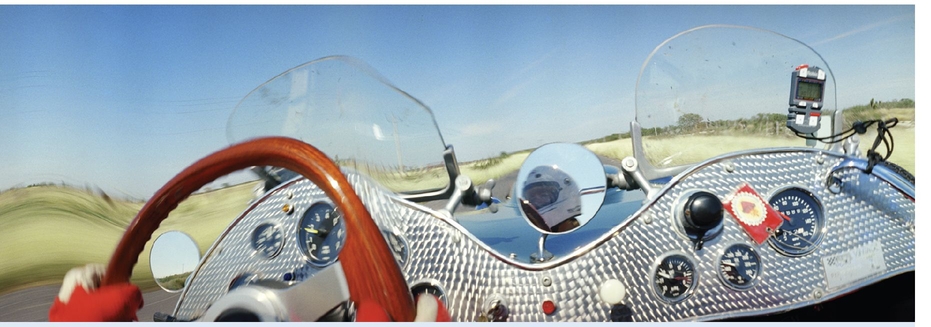
This is the view from our racecar and a portrait of my co-driver, Sue Callaway, in the mirror.
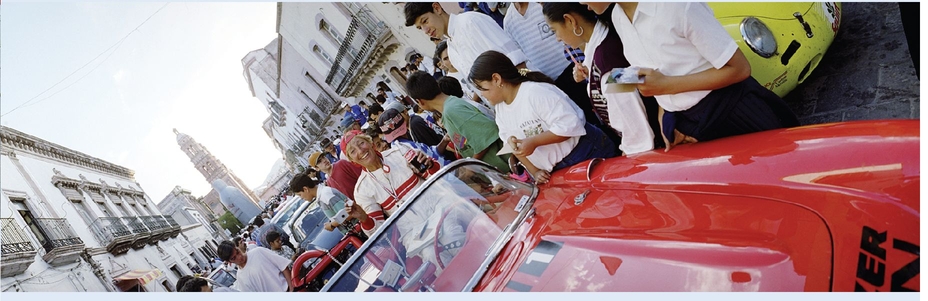
When you are traveling, shoot the people you meet. This is the famous German rally champion Heidi Hetzer signing autographs in the beautiful colonial town of Zacatecas.
Travel FAQs
Whenever I shoot with flash at night, the foreground is all blown out and the background is dark.
Remember that when you are shooting with flash, the camera is still using a light meter to read and evaluate the light from the flash. If not enough light is reflecting back from the subject, then the flash just adds more and more although your spouse is getting overexposed.
When your subject is small in the frame, most of the light from the flash is just flying off into the darkness and not reflecting back to the camera.
By now, you should know that the only real solution is to set the camera on Manual and try to find a reasonable exposure for the background lights (a tripod really helps), then set the flash to underexpose by at least one stop.
The stained glass is too bright; I can’t see its colors. (Or, the church is too dark.)
Most old churches were designed with the windows as the primary illumination. That’s what makes them so special. If the window is supplying all of the light, then the meter in the camera is fooled into trying to make them “gray”—which results in underexposure of the window. This might be good for the window but bad for the rest of the church.
If the glass is blowing out and overexposing, then chances are that the window is small in the frame and the camera is reading a lot of the dark shadow areas of the church. Set the exposure compensation to underexpose (the church will go darker as well).
You have to remember that there’s a limit to the total contrast range the camera can handle. If your camera has an auto-bracketing feature (most do), this can often help you find a compromise setting that works well.
If you are trying to get the entire interior to be as well lit as the windows, you are probably going to need extra flash. Your pop-up flash can’t light the entire interior of Notre Dame de Paris. But in a smaller space, it might do a pretty decent job of just “filling in” and opening up some of the shadows. Leave your pocket diffuser off; it has no appreciable effect in large spaces and will just make the flash less effective.
Painting with Light
If you really want to get tricky with that interior church shot, then you can “paint” the interior with your separate shoe-mounted flash (like I painted the two cars in Chapter 6).
Set the camera on a tripod. (If you aren’t allowed to use the big tripod, then use the tabletop tripod in your bag.)
Keep the flash unit in your hand. Set your camera on Manual exposure and select a small f-stop and the lowest ISO. Now, find a shutter speed that will underexpose the scene by about one to two stops. You want an extremely long shutter speed (in the 15-second to 45-second range). The ideal exposure might be something like f/16 at 30 seconds. This gives you enough time to move around with the flash.
Set your flash to quarter power. You want it to recycle quickly.
Use your remote control to open the shutter. Now, walk quickly down the aisle (as long as you keep moving, you won’t be visible in the shot) and pop the flash around the room—at the ceiling, and the end of the aisle. Keeping walking away from the camera and keep setting off the flash as fast as it can recycle. Make sure you don’t point the flash back toward the camera, though.
This takes a little experimentation, but the shot can look amazing.
Shooting at Night
Your camera—and the view on the playback screen—can be deceptive. Cranking the camera up to ISO 3,200 and just shooting might lead you to believe that you don’t need a tripod for night photos. The view on the camera’s playback screen might look fine, but it will probably be a noisy mess when you look at it on the computer and try to make prints.
Remember, large dark areas in the frame can fool your camera’s meter. This will often result in highlights being blown out. Your clipping indicator (the playback option I described in Chapter 3 that has a blinking indicator for overexposed areas) will help you find an exposure that retains good highlight detail.
In this photo, the meter is fooled by the dark sky. It tries to turn night into day.
Changing to Manual exposure and underexposing almost three stops resulted in a photo that looked pretty decent on the camera’s screen.
But excessive noise from the high ISO makes it useless.
Long night exposures are not the strong suit of digital cameras. Try to shoot with the lowest ISO possible and use a tripod. Many cameras also have a noise reduction setting for long exposures. If you are shooting JPEGs, I’d recommend using this feature. When you shoot RAW files, you will have more control over the noise during postprocessing. But you still can’t shoot at ridiculously high ISO settings without consequences.
Shooting RAW
While RAW files might be too slow for sports, a vacation is a perfect time to try your camera’s RAW format. You still have to get the exposure right, but RAW files will offer a lot more flexibility in controlling the contrast and color of your final photographs.
Try shooting both JPEG and RAW simultaneously. Shooting really good travel photographs means that you are trying to get 10 to 20 great photos instead of 300. Shooting in RAW will allow you to tweak the best photos when you get home.
Case Study: Lightning
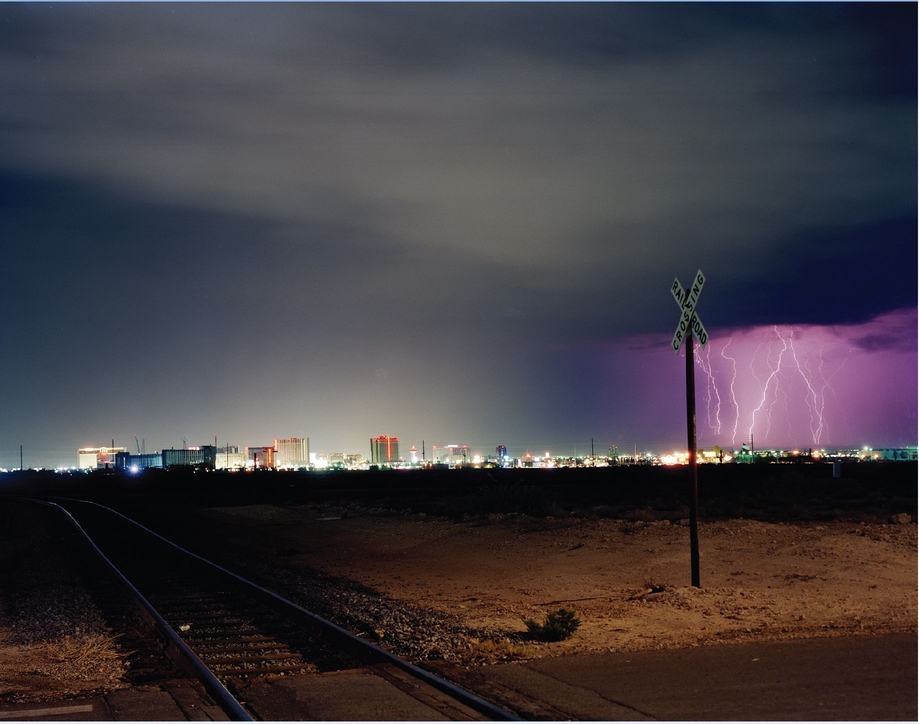
I spotted this view of Las Vegas a few days earlier during the daytime, but the light was awful. When I saw this lightning storm start two days later, I jumped in the car and drove back—hoping to get the exact photo you see here.
The trick to capturing lightning is to set the camera to a very small aperture and long exposure (or bulb) so that the shutter is open when the lightning strikes. Lightning is very bright, so it will easily record at f/11-22. After the lightning flash, leave the camera open until the overall exposure is correct. Setting a low ISO will help avoid overexposure.
The light in the foreground (on the sign) was “painted” by popping a handheld flash about 10 times while I walked around during the two- to three-minute exposure. There were multiple lightning strikes during this time.
See what Cartier-Bresson meant about anecdotes? It’s like a magician explaining a trick. The photo isn’t nearly as mysterious and cool once you know how easy it was.
Mindful Travel with Cameras and Gear
You are a target when you walk through a strange city with camera gear—especially when you have your kids with you, because they are a great distraction for a pickpocket to take advantage of. It’s important to note some safeguards for your camera and gear when you are traveling.
Look purposeful. Carry your camera in your hand with the strap looped around your wrist. Keep your bag(s) zipped or buckled. I like additional Velcro closures because they make noise when they are opened. Backpacks might be a comfortable way to carry your equipment, but they are easier for someone to unzip and reach into on a subway.
Photosensitive
Never hang a camera bag over the back of a chair in a restaurant! I have personally witnessed at least five occasions when camera bags or purses have been stolen this way. Put it between your feet, and loop the strap over your knee.
Leave expensive equipment you aren’t using in a plain suitcase with the hotel concièrge. Domestic hotel staff are generally very trustworthy, but beware that there are professional thieves who work hotels and know how to access rooms.
The Least You Need to Know
• Use the lowest ISO you can at night, and use a tripod.
• Set aside time (especially time alone) for photography during vacations.
• Revisit key locations whenever possible.
• Strive to make 10 great photographs that tell the whole story instead of 200 that are each little pieces of it. Shoot freely, edit tightly.
..................Content has been hidden....................
You can't read the all page of ebook, please click here login for view all page.