
Fourth Defensive Layer: You'll Need That Secret Decoder Ring
Imagine for a second that an attacker has targeted you and has managed to penetrate all three of the layers in this chapter that you have prepared. All that is left is the asset your organization holds most dear: its data – information on its payroll and financial health, intellectual property, proprietary product data, and documented analysis of your competitors. The last thing you will want is this most valuable asset being left bare for all to see (and take). There is one last line of defense that you can implement to safeguard your files: data encryption. The use of encryption technology would have prevented the disgruntled patron of Casa de Marginal in Scenario 2 (Attacking Customer Confidence) from reading and altering files.
There are a host of third-party vendors offering encryption software for Windows. There are too many options on the market to give any of them the justice they are due. This chapter focuses on the native Microsoft tools that ship with various versions of Windows. In recent versions – Windows XP and newer – there are two options to encrypt the contents of a volume on a hard disk: Encrypting File System (EFS) and BitLocker. Each tool is used for different purposes. EFS is designed to encrypt and decrypt individual files; BitLocker is used to encrypt an entire hard disk.
alt1 Tip
BitLocker Drive Encryption and EFS are not mutually exclusive. In fact, they can be used together in a rather effective combination. When using EFS, encryption keys are stored with the computer's operating system. Although the keys used with EFS are encrypted, their security could still be compromised if a hacker is able to access the operating system drive. Using BitLocker to encrypt, the operating system drive can help protect these keys by preventing itself from booting or being accessed if it is installed in another computer.
Using EFS
EFS encrypts files and folders individually based on the user account associated with them. If a computer has multiple users or groups, each user or group can encrypt their own files independently. EFS has been around since Windows 2000 and has been steadily improved with every new version of the Windows code base, either client or server. Unlike BitLocker, it neither requires nor uses any special hardware.
Although EFS has been available in all versions of Windows client and server operating systems since Windows 2000, it is fully implemented only in certain editions, specifically any of the Windows Server editions, Vista Enterprise and Ultimate, and Windows 7 Ultimate. It is not fully supported on Windows Vista Starter, Home Basic and Premium, and Business, or on Windows 7 Home Premium or Professional. On those versions, you can decrypt and modify encrypted files, but cannot encrypt them.
Working with encrypted folders and files is much the same as other file operations. Open Windows Explorer and right-click the folder or file you want to encrypt, and then click Properties in the context menu. Select the General tab and then click Advanced. The dialog box shown in Figure 2.9 will appear. Select the Encrypt contents to secure data (circled in the screenshot in Figure 2.9) check box and click OK. Finally click OK to confirm the operation. The encrypted folder or file in the file list in Windows Explorer will turn green once the encryption attribute is set. Decrypting a folder or file is nearly identical except that you will clear the Encrypt contents to secure data check box in the Advanced Attributes window and click OK to accept the change.
FIGURE 2.9. Encrypting a File Using EFS

alt1 Note
The first time you encrypt a folder or file, an encryption certificate is automatically created. You should back up your encryption certificate. If your certificate and key are lost or damaged and you don't have a backup, you won't be able to use the files that you have encrypted.
Using BitLocker
If your requirements suggest that encrypting the entire hard disk is preferred to working with individual files, BitLocker Drive Encryption is a better choice than EFS. Road warrior employees who truck laptops everywhere they go are very suitable candidates. A laptop left in an airport is an attractive target, especially because employees on the road tend to be self-contained, carrying all of the files they need to work on and anything they pick up on the road. An encrypted disk makes it extremely difficult to extract the data from the purloined computer.
A further benefit of BitLocker is that it can be used to encrypt the contents of removable media. BitLocker To Go works with many media, notably the ubiquitous Universal Serial Bus (USB) drives that are the bane of IT security professionals' existences and seem to proliferate at an alarming rate. Because it encrypts the entire disk, another unique characteristic of BitLocker and BitLocker To Go is that they disregard individual user accounts associated with files; it is either enabled or disabled for all users or groups on the system.
alt1 Tip
Like EFS, your options for encrypting the contents of your hard drive depend on the version of Windows that you are running. BitLocker is available only in Windows Vista Enterprise and Ultimate, Windows Server 2008 and Windows 7 Ultimate, which means it is not available in Vista Home Basic, Home Premium or Business, or in Windows 7 Home Premium or Professional.
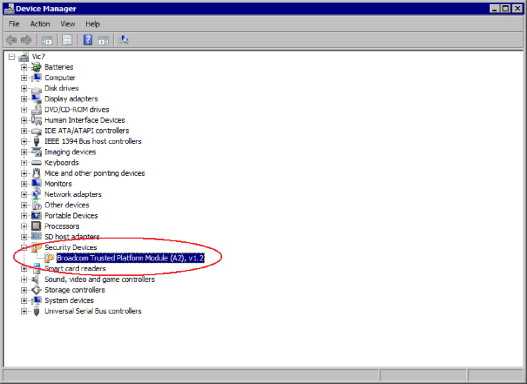
Unlike EFS, BitLocker requires the use of special hardware before it can be enabled. A trusted platform module (TPM) is a secure cryptoprocessor that can store cryptographic keys, which is embedded in the workstations microprocessor. It must be enabled in the Basic Input/Output System (BIOS), which may or may not be by default. Once enabled, it will be displayed in Device Manager under Security Devices, as shown in Figure 2.10. The TPM must be of version 1.2 or later in order to be used with BitLocker. If a TPM is not installed or is an earlier version, you can also use a removable USB memory device, such as a USB flash drive to store its key. For this chapter, we will focus on enabling BitLocker on systems that have an embedded TPM.
FIGURE 2.10. Verifying that the TPM is Enabled
Once the TPM has been enabled in the BIOS and you have verified in Device Manager that Windows acknowledges its existence, you can manage it. Unlike other hardware on your system, there is a specific and rather robust applet for managing the TPM. The applet, shown in the screenshot in Figure 2.11, allows you to initialize the TPM, enable or disable it, and change the password, among other functions. The initial setup of the TPM is performed during the setup process for BitLocker; after verifying that the TPM has been initialized, you do not need to change the settings in order for BitLocker to be set up correctly.
FIGURE 2.11. Managing the TPM

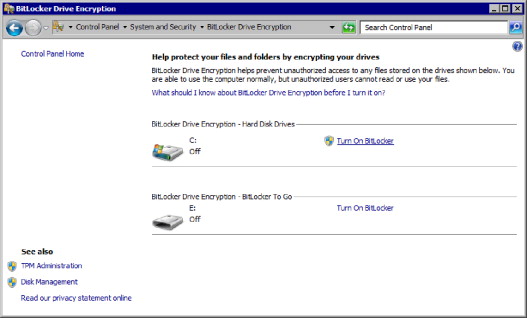
Once you have the TPM enabled in the BIOS and have verified that it is recognized by Windows, you can proceed to configure BitLocker. The applet, shown in Figure 2.12, can be found through Control Panel | System and Security | BitLocker Drive Encryption. As shown in the screenshot in Figure 2.12, you use this single applet to configure it on both fixed disks and removable media. Please bear in mind that you need to be an administrator to work with BitLocker on fixed disks and once you click on Turn On BitLocker, you will need to confirm your permission to proceed through UAC. “Normal” users can enable and disable BitLocker To Go on their removable media.
FIGURE 2.12. Selecting the Drive to Encrypt with BitLocker
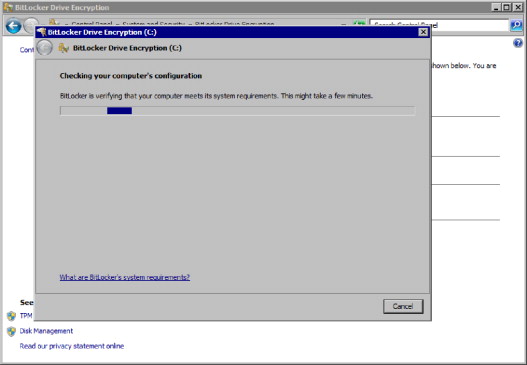
The setup process takes care of everything. Once you click on Turn On BitLocker or BitLocker To Go, it runs a check of your hardware and software to verify that your system satisfies the requirements to enable BitLocker. If you are enabling BitLocker in a hard disk drive, you will need to respond to the prompts that pop up in any UAC windows. The system check is depicted in Figure 2.13.
FIGURE 2.13. Verifying that BitLocker Can Be Enabled
If your hardware and software satisfies the system requirements for BitLocker, you will be presented with the screen shown in Figure 2.14. To get to this screen, the TPM has been discovered; if the TPM is not enabled, you will be instructed to enable it and start the process again. Since the TPM needs to be enabled in the BIOS, you will need to reboot before you restart the process.
FIGURE 2.14. Setting Up BitLocker

Once BitLocker or BitLocker To Go is configured on your desired disk, you are free to use your system the way you did before it was enabled. You will not notice a difference. The TPM provides the required credentials for the boot process to continue on a hardware restart. If you are not using a TPM (e.g., your hardware is not suitably equipped or you do not want to enable it for some reason), you will need the key that is installed on a USB drive in order for the computer to start.
As mentioned earlier, data encryption is the defense of last resort. By the time that an attacker encounters an encrypted file or disk, he has compromised an application that was vulnerable (perhaps it was left un-patched) or a user account with elevated privileges. Fortunately, Windows ships with a number of these defenses that simply await configuration. Your job is to ensure that the proper safeguards are in place.
Summary
In looking back on the attack scenarios, none of these attacks look terribly sophisticated. The attackers just used their creativity to think outside the box with respect to how an application can be used or manipulated. The trouble in defending against these types of attacks is that the defenses need to be in play before the attack is launched, and while the attackers are dynamic and can maneuver at will, the defenses are static and need to be strong enough to counter any creative force that the attackers can exert.
Another aid for attackers (and corresponding difficulty for defenders) is the speed of information dissemination. A vulnerability is discovered and news of it travels at wire speed through well-established avenues of communication. The exploit can be developed and tested collaboratively and released before any vendor has the chance to respond. The only defense is the careful planning to ensure that the defenses are available and a speedy response to stand up the defenses when called upon.
Finally, privilege escalation is not easily detected because it can be difficult to distinguish between routine and malicious behavior. If you had only one user to supervise, you could easily determine whether he is permitted to view a particular file.
It is virtually impossible to do this for more than a handful of users, let alone hundreds or thousands of them. The attack and defense technologies mentioned in this chapter are readily available. Much care has been taken to stay true to the book in order to describe native Windows applications that can be used to defend your organization. Prevention and planning are truly your best defenses.
Endnotes
1. www.blackviper.com/WinXP/servicecfg.htm, www.blackviper.com/WinVista/servicecfg .htm, www.blackviper.com/Windows_7/servicecfg.htm, Accessed on November 30, 2009.
2. Saltzer J., Schroeder M., The Protection of Information in Computer Systems, 1975
3. http://archives.cnn.com/2001/TECH/internet/09/27/msoft.supports.IIS.idg/index.html, Accessed on December 6, 2009.4. http://support.microsoft.com/kb/875352, Accessed on November 23, 2009.