
Chapter 1. What Is Penetration Testing?
Information in This Chapter:
■ Introduction to Backtrack Linux: Tools. Lots of Tools
■ Working with Backtrack: Starting the Engine
■ The Use and Creation of a Hacking Lab
■ Phases of a Penetration Test
This chapter introduces the reader to the concept of penetration testing and ethical hacking. A formal methodology is introduced and explained. Information about Backtrack Linux is presented, which includes setting up a network connection and working with a terminal window. The use and creation of a penetration testing lab for completing and following along with the examples in this book is outlined. The chapter concludes with a summary and a look at the remaining chapters.
Keywords
Backtrack Linux, creating a hacking lab, penetration testing, penetration testing methodologies
Introduction
Penetration testing can be defined as a legal and authorized attempt to locate and successfully exploit computer systems for the purpose of making those systems more secure. The process includes probing for vulnerabilities as well as providing proof of concept (POC) attacks to demonstrate the vulnerabilities are real. Proper penetration testing always ends with specific recommendations for addressing and fixing the issues that were discovered during the test. On the whole, this process is used to help secure computers and networks against future attacks.
Penetration testing is also known as
■ Pen Testing
■ PT
■ Hacking
■ Ethical Hacking
■ White Hat Hacking
It is important to spend a few moments discussing the difference between penetration testing and vulnerability assessment. Many people (and vendors) in the security community incorrectly use these terms interchangeably. A vulnerability assessment is the process of reviewing services and systems for potential security issues, whereas a penetration test actually performs exploitation and POC attacks to prove that a security issue exists. Penetration tests go a step beyond vulnerability assessments by simulating hacker activity and delivering live payloads. In this book, we will cover the process of vulnerability assessment as one of the steps utilized to complete a penetration test.
Setting the Stage
Understanding all the various players and positions in the world of hacking and penetration testing is central to comprehending the big picture. Let us start by painting the picture with broad brush strokes. Please understand that the following is a gross oversimplification; however, it should help you see the differences between the various groups of people involved.
It may help to consider the Star Wars universe where there are two sides of the “force”: Jedis and Siths. Good vs. Evil. Both sides have access to an incredible power. One side uses its power to protect and serve, whereas the other side uses it for personal gain and exploitation.
Learning to hack is much like learning to use the force (or so I imagine!). The more you learn, the more power you have. Eventually, you will have to decide whether you will use your power for good or bad. There is a classic poster from the Star Wars Episode I movie that depicts Anakin as a young boy. If you look closely at Anakin’s shadow in the poster, you will see it is the outline of Darth Vader. Try searching the Internet for “Anakin Darth Vader shadow” to see it. Understanding why this poster has appeal is critical. As a boy, Anakin had no aspirations of becoming Darth Vader, but it happened nonetheless.
It is probably safe to assume that very few people get into hacking to become a super villain. The problem is that journey to the darkside is a slippery slope. However, if you want to be great, have the respect of your peers, and be gainfully employed in the security workforce, you need to commit yourself to using your powers to protect and serve. Having a felony on your record is a one-way ticket to another profession. It is true that there is currently a shortage of qualified security experts, but even so, not many employers today are willing to take a chance, especially if those crimes involve computers.
In the pen testing world, it is not uncommon to hear the terms “white hat” and “black hat” to describe the Jedis and Siths. Throughout this book, the terms “white hat,” “ethical hacker,” or “penetration tester” will be used interchangeably to describe the Jedis. The Siths will be referred to as “black hats,” “crackers,” or “malicious attackers.”
It is important to note that ethical hackers complete many of the same activities with many of the same tools as malicious attackers. In nearly every situation, an ethical hacker should strive to act and think like a real black hat hacker. The closer the penetration test simulates a real-world attack, the more value it provides to the customer paying for the PT.
Please note how the previous paragraph says “in nearly every situation.” Even though white hats complete many of the same tasks with many of the same tools, there is a world of difference between the two sides. At its core, these differences can be boiled down to three key points: authorization, motivation, and intent. It should be stressed that these points are not all inclusive, but they can be useful in determining if an activity is ethical or not.
The first and simplest way to differentiate between white hats and black hats is authorization. Authorization is the process of obtaining approval before conducting any tests or attacks. Once authorization is obtained, both the penetration tester and the company being audited need to agree upon the scope of the test. The scope includes specific information about the resources and systems to be included in the test. The scope explicitly defines the authorized targets for the penetration tester. It is important that both sides fully understand the authorization and scope of the PT. White hats must always respect the authorization and remain within the scope of the test. Black hats will have no such constraints on the target list.
The second way to differentiate between an ethical hacker and a malicious hacker is through examination of the attacker’s motivation. If the attacker is motivated or driven by personal gain, including profit through extortion or other devious methods of collecting money from the victim, revenge, fame, or the like, he or she should be considered a black hat. However, if the attacker is preauthorized and his or her motivation is to help the organization and improve their security, he or she can be considered a white hat.
Finally, if the intent is to provide the organization a realistic attack simulation so that the company can improve its security through early discovery and mitigation of vulnerabilities, the attacker should be considered a white hat. It is also important to comprehend the critical nature of keeping PT findings confidential. Ethical hackers will never share sensitive information discovered during the process of a penetration testing with anyone other than the client. However, if the intent is to leverage information for personal profit or gain, the attacker should be considered a black hat.
Introduction to Backtrack Linux: Tools. Lots of Tools
A few years back, the open discussion or teaching of hacking techniques was considered a bit taboo. Fortunately, times have changed and people are beginning to understand the value of offensive security. Offensive security is now being embraced by organizations regardless of size or industries. Governments are also getting serious about offensive security. Many governments have gone on record stating they are actively building and developing offensive security capabilities.
Ultimately, penetration testing should play an important role in the overall security of your organization. Just as policies, risk assessments, business continuity planning, and disaster recovery have become integral components in keeping your organization safe and secure, penetration testing needs to be included in your overall security plan as well. Penetration testing allows you to view your organization through the eyes of the enemy. This process can lead to many surprising discoveries and give you the time needed to patch your systems before a real attacker can strike.
One of the great things about learning how to hack today is the plethora and availability of good tools to perform your craft. Not only are the tools readily available, but many of them are stable with several years of development behind them. Maybe even more important to many of you is the fact that most of these tools are available free of charge. For the purpose of this book, every tool covered will be free.
It is one thing to know a tool is free, it is another to find, compile, and install each of the tools required to complete even a basic penetration test. Although this process is quite simple on today’s modern Linux OS’s, it can still be a bit daunting for newcomers. Most people who start are usually more interested in learning how to use the tools than they are in searching the vast corners of the Internet locating and installing tools.
To be fair, you really should learn how to manually compile and install software on a Linux machine; or at the very least, you should become familiar with apt-get (or the like).
More Advanced
APT, short for Advanced Package Tool, is a package management system. APT allows you to quickly and easily install, update, and remove software from the command line. Aside from its simplicity, one of the best things about APT is the fact that it automatically resolves dependency issues for you. This means that if the package you are installing requires additional software, APT will automatically locate and install the additional software. This is a massive improvement over the old days of “dependency hell.”
Installing software with APT is very straightforward. For example, let us assume you want to install the classic network-mapping tool Cheops. Once you know the name of the package you want to install, from the command line you can run apt-get install followed by the name of the software you want to install. It is always a good idea to run apt-get update before installing software. This will ensure that you are getting the latest version available. To install Cheops, we would issue the following commands:
apt-get update
apt-get install cheops
Before the package is installed, you will be shown how much disk space will be used and you will be asked if you want to continue. To install your new software, you can type “Y” and hit the enter key.
A basic understanding of Linux will be beneficial and will pay you mountains of dividends in the long run. For the purpose of this book, there will be no assumption that you have prior Linux experience, but do yourself a favor and commit yourself to becoming a Linux guru someday. Take a class, read a book, or just explore on your own. Trust me, you will thank me later. If you are interested in penetration testing or hacking, there is no way of getting around the need to know Linux.
Fortunately, the security community is a very active and very giving group. There are several organizations that have worked tirelessly to create various security-specific Linux distributions. A distribution, or “distro” for short, is basically a flavor, type, or brand of Linux.
Among the most well known of these penetration testing distributions is one called “Backtrack.” Backtrack Linux is your one-stop shop for learning hacking and performing penetration testing. Backtrack Linux reminds me of that scene in the first Matrix movie where Tank asks Neo “What do you need besides a miracle?” Neo responds with “Guns. Lots of Guns.” At this point in the movie, rows and rows of guns slide into view. Every gun imaginable is available for Neo and Trinity: handguns, rifles, shotguns, semiautomatic, automatic, big and small from pistols to explosives, an endless supply of different weapons from which to choose. That is a similar experience most newcomers have when they first boot up Backtrack. “Tools. Lots of Tools.”
Backtrack Linux is a hacker’s dream come true. The entire distribution is built from the ground up for penetration testers. The distribution comes preloaded with hundreds of security tools that are installed, configured, and ready to be used. Best of all, Backtrack is free! You can get your copy at http://www.Backtrack-linux.org/downloads/.
Navigating to the Backtrack link will allow you to choose from either an .iso or a VMware image. If you choose to download the .iso, you will need to burn the .iso to a DVD. If you are unsure of how to complete this process, please Google “burning an iso.” Once you have completed the burning process, you will have a bootable DVD. In most cases, starting Backtrack from a bootable DVD is as simple as putting the DVD into the drive and restarting the machine. In some instances, you may have to change the boot order in the BIOS so that the optical drive has the highest boot priority.
If you choose to download the VMware image, you will also need software capable of opening and deploying or running the image. Luckily enough, there are several good tools for accomplishing this task. Depending on your preference, you can use VMware’s VMware Player, Sun Microsystem’s VirtualBox, or Microsoft’s Virtual PC. In reality, if you do not like any of those options, there are many other software options capable of running a VM image. You simply need to choose one that you are comfortable with.
Each of the three virtualization options listed above are available free of charge and will provide you with the ability to run VM images. You will need to decide which version is best for you. This book will rely heavily on the use of a Backtrack VMware image and VMware Player. At the time of writing, VMware Player was available at: http://www.vmware.com/products/player/. You will need to register for an account to download the software, but the registration process is simple and free.
If you are unsure of which option to choose, it is suggested that you go the VMware route. Not only is this another good technology to learn, but using VMs will allow you to set up an entire penetration testing lab on a single machine. If that machine is a laptop, you essentially have a “travelling” PT lab so you can practice your skills anytime, anywhere.
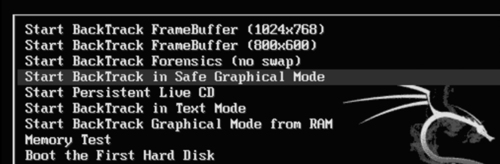
If you choose to run Backtrack using the bootable DVD, shortly after the system starts, you will be presented with a menu list. You will need to review the list carefully, as it contains several different options. The first couple of options are used to set some basic information about your system’s screen resolution. If you are having trouble getting Backtrack to boot, be sure to choose the “Start Backtrack in Safe Graphical Mode.” The menu contains several other options, but these are outside the scope of this book. To select the desired boot option, simply use the arrow keys to highlight the appropriate row and hit the enter key to confirm your selection. Figure 1.1 shows an example of the Backtrack boot screen.
The use of Backtrack is not required to work through this book or to learn the basics of hacking. Any version of Linux will do fine. The major advantage of using Backtrack is that all the tools are preloaded for you. If you choose to use a different version of Linux, you will need to install the tools before reading the chapter. It is also important to remember that because this book focuses on the basics, it does not matter which version of Backtrack you are using. All the tools we will explore and use in this book are available in every version.
Working with Backtrack: Starting the Engine
Regardless of whether you choose to run Backtrack as a VM or boot to a Live DVD, once the initial system is loaded you will be presented with a log-in prompt. The default username is root and the default password is toor.
Notice the default password is simply “root” spelled backward. This default username and password combination has been in use since Backtrack 1, and most likely it will remain in use for future versions. At this point, you should be logged into the system and should be presented with “root@bt:~#” prompt. Although it is possible to run many of the tools we will discuss in this book directly from the terminal, it is often easier for newcomers to make use of the X Window System. You can start the GUI by typing the following command after the “root@bt~#” prompt:
startx
After typing this command and hitting the Enter key, X will begin to load. This environment should seem vaguely familiar to most computer users. Once it has completely loaded, you will see a desktop, icons, a task bar, and a system tray. Just like Microsoft Windows, you can interact with these items by moving your mouse cursor and clicking on the desired object.
Most of the programs we will use in this book will be run out of the terminal. You can start a terminal session by either clicking on the black box located in the lower left in the taskbar, or by typing the following command into the launcher as shown in Figure 1.2.

konsole
Unlike Microsoft Windows or many of the modern-day Linux OS’s, by default, Backtrack does not come with networking enabled. This setup is by design. As a penetration tester, we often try to maintain a stealthy or undetected presence. Nothing screams “LOOK AT ME!! LOOK AT ME!! I’M HERE!!!” like a computer that starts up and instantly begins spewing network traffic by broadcasting requests for a DHCP server and IP address. To avoid this issue, the networking interfaces of your Backtrack machine are turned down (off) by default.
The easiest way to enable networking is through the terminal. Open a terminal window by clicking on the terminal icon as shown by the leftmost arrow in Figure 1.2. Once the terminal opens, enter the following command:
ifconfig –a
This command will list all the available interfaces for your machine. At a minimum, most machines will include an eth0 and a lo interface. The “lo”interface is your loopback interface. The “eth0” is your first ethernet card. Depending on your hardware, you may have additional interfaces or different interface numbers listed. If you are running Backtrack through a VM, your main interface will usually be eth0.
To turn the network card on, you enter the following command into a terminal window:
ifconfig eth0 up
Let us examine this command in more detail; “ifconfig” is a Linux command that means “I want to configure a network interface.” As we already know, “eth0” is the first network device on our system (remember computers often start counting at 0 not 1), and the keyword “up” is used to activate the interface. So we can roughly translate the command you entered as “I want to configure the first interface to be turned on.”
Now that the interface is turned on, we need to get an IP address. There are two basic ways to complete this task. Our first option is to assign the address manually by appending the desired IP address to the end of the previous command. For example, if we wanted to assign our network card an IP address of 192.168.1.23, we would type:
ifconfig eth0 up 192.168.1.23
At this point, the machine will have an IP address but will still need a gateway and Domain Name System (DNS) server. A simple Google search for “setting up nic linux” will show you how to enter that information. You can always check to see if your commands worked by issuing the following command into a terminal window:
ifconfig
Running this will allow you to see the current settings for your network interfaces. Because this is a beginner’s guide and for the sake of simplicity, we will assume that stealth is not a concern at the moment. In that case, the easiest way to get an address is to use DHCP. To assign an address through DHCP, you simply issue the command:
dhclient eth0
Please note, this assumes you have already successfully run the command to turn up your network interface (eth0 in this case).
Now that we have successfully assigned an IP address, the last thing to address is how to turn off Backtrack. As with most things in Linux, there are multiple ways to accomplish this task. One of the easiest ways is to enter the following command into a terminal window:
poweroff
You can also substitute the poweroff command with the reboot command if you would prefer to restart the system rather than shut it down.
Before proceeding, you should take several minutes to review and practice all the steps highlighted thus far including
■ Power on/Start up Backtrack
■ Log in with the default user name and password
■ Start X (the windows GUI)
■ View all the network interfaces on your machine
■ Turn up (on) the desired network interface
■ Assign an IP address manually
■ View the manually assigned IP address
■ Assign an IP address through DHCP
■ View the dynamically assigned address
■ Reboot the machine using the command line interface
■ Poweroff the machine using the command line interface
The Use and Creation of a Hacking Lab
Every ethical hacker must have a place to practice and explore. Most newcomers are confused about how they can learn to use hacking tools without breaking the law or attacking unauthorized targets. This is most often accomplished through the creation of a personal “hacking lab.” A hacking lab is a sandboxed environment where your traffic and attacks have no chance of escaping or reaching unauthorized and unintended targets. In this environment, you are free to explore all the various tools and techniques without fear that some traffic or attack will escape your network. At a minimum, the lab is set up to contain at least two machines: one attacker and one victim. In other configurations, several victim machines can be deployed simultaneously to simulate a more realistic network.
The proper use and setup of a hacking lab is vital because one of the most effective means to learn something is by doing that thing. Learning and mastering the basics of penetration testing is no different.
The single most crucial point of any hacker lab is the isolation of the network. You must configure your lab network in such a way that it is impossible for traffic to escape or travel outside of the network. Mistakes happen and even the most careful people can fat-finger or mistype an IP address. It is a simple mistake to mistype a single digit in an IP address, but that mistake can have drastic consequences for you and your future. It would be a shame (and more importantly illegal) for you to run a series of scans and attacks against what you thought was your hacker lab target with an IP address of 172.16.1.1 only to find out later that you actually entered the IP address as 122.16.1.1.
The simplest and most effective way to create a sandboxed or isolated environment is to physically unplug or disconnect your network from the Internet. If you are using physical machines, it is best to rely on hardwired Ethernet cables and switches to route traffic. Also be sure to double- and triple-check that all of your wireless NICs are turned off. Always carefully inspect and review your network for potential leaks before continuing.
Although the use of physical machines to create a hacking lab is an acceptable solution, the use of virtual machines provides several key benefits. First, given today’s processing power, it is easy to set up and create a mini hacking lab on a single machine or laptop. In most cases, an average machine can run two or three virtual machines simultaneously because our targets can be set up using minimal resources. Even running on a laptop, it is possible to run two virtual machines at the same time. The added benefit of using a laptop is the fact that your lab is portable. With the cheap cost of external storage today, it is easily possible to pack hundreds of virtual machines on a single external hard drive; these can be easily transported and set up in a matter of minutes. Anytime you are interested in practicing your skills or exploring a new tool, simply open up Backtrack and deploy a VM as a target. Setting up a lab like this gives you the ability to quickly plug-and-play with various operating systems and configurations.
Another benefit of using virtual machines in your pen testing lab is the fact that it is very simple to sandbox your entire system. Simply turn off the wireless card and unplug the cable from the Internet. Your physical machine and virtual machines will still be able to communicate with each other and you can be certain that no attack traffic will leave your physical machine.
In general, penetration testing is a destructive process. Many of the tools and exploits we run can cause damage or take systems offline. In some cases, it is easier to reinstall the OS or program rather than attempt to repair it. This is another area where VMs shine. Rather than having to physically reinstall a program like SQL server or even an entire operating system, the VM can be quickly reset or restored to its original configuration.
Phases of a Penetration Test
Like most things, the overall process of penetration testing can be broken down into a series of steps or phases. When put together, these steps form a comprehensive methodology for completing a penetration test. Careful review of unclassified incident response reports or breech disclosures supports the idea that most black hat hackers also follow a process when attacking a target. The use of an organized approach is important because it not only keeps the penetration tester focused and moving forward but also allows the results or output from each step to be used in the ensuing steps.
The use of a methodology allows you to break down a complex process into a series of smaller more manageable tasks. Understanding and following a methodology is an important step in mastering the basics of hacking. Depending on the literature or class you are taking, this methodology usually contains between four and seven steps or phases. Although the overall names or number of steps can vary between methodologies, the important thing is that the process provides a complete overview of the penetration testing process. For example, some methodologies use the term “Information Gathering,” whereas others call the same process “Reconnaissance.” For the purpose of this book, we will focus on the activities of the phase rather than the name. After you have mastered the basics, you can review the various penetration testing methodologies and choose one that you like best.
To keep things simple, we will use a four-step process to explore and learn penetration testing. If you search around and examine other methodologies (which is important to do), you may find processes that include more or less steps than we are using as well as different names for each of the phases. It is important to understand that although the specific terminology may differ, most solid penetration testing methodologies cover the same topics.
There is one exception to this rule: the final step in many hacking methodologies is a phase called “hiding,” “covering your tracks,” or “removing evidence.” Because this book focuses on understanding the basics, it will not be included in this methodology. Once you have a solid understanding of the basics, you can go on to explore and learn more about this phase.
The remainder of this book will be dedicated to reviewing and teaching the following steps: Reconnaissance, Scanning, Exploitation, and Maintaining Access. Sometimes, it helps to visualize these steps as an inverted triangle. Figure 1.3 demonstrates this approach. The reason we use an inverted triangle is because the outcome of initial phases is very broad. As we move down into each phase, we continue to drill down to very specific details.
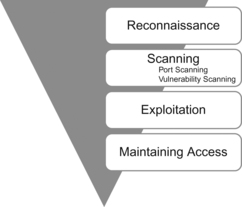
The inverted triangle works well because it represents our journey from the broad to the specific. For example, as we work through the reconnaissance phase, it is important to cast our nets as wide as possible. Every detail and every piece of information about our target is collected and stored. The penetration testing world is full of many great examples when a seemingly trivial piece of information was collected in the initial phase and later turned out to be a crucial component for successfully completing an exploit and gaining access to the system. In later phases, we begin to drill down and focus on more specific details of the target. Where is the target located? What is the IP address? What operating system is the target running? What services and versions of software are running on the system? As you can see, each of these questions becomes increasingly more detailed and granular.
It is also important to understand the order of each step. The order in which we conduct the steps is very important because the result or output of one step needs to be used in the step below it. You need to understand more than just how to simply run the security tools in this book. Understanding the proper sequence in which they are run is vital to performing a comprehensive and realistic penetration test.
For example, many newcomers skip the Reconnaissance phase and go straight to exploiting their target. Not completing steps 1 and 2 will leave you with a significantly smaller target list and attack vector on each target. In other words, you become a one-trick-pony. Although knowing how to use a single tool might be impressive to your friends and family, it is not to the security community and professionals who take their job seriously.
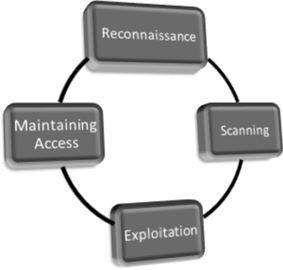
It may also be helpful for newcomers to think of the steps we will cover as a circle. It is very rare to find critical systems exposed directly to the Internet in today’s world. In many cases, penetration testers must access and penetrate a series of related targets before they have a path to reach the original target. In these cases, each of the steps is often repeated. Figure 1.4 introduces the methodology as a cyclical process.
Zero Entry Hacking: A Four-Step Model
Let us briefly review each of the four steps that will be covered so you have a solid understanding of them. The first step in any penetration test is “reconnaissance.” This phase deals with information gathering about the target. As was mentioned previously, the more information you collect on your target, the more likely you are to succeed in later steps. Reconnaissance will be discussed in detail in Chapter 2.
Regardless of the information you had to begin with, after completing in-depth reconnaissance you should have a list of target IP addresses that can be scanned. The second step in our methodology can be broken out into two distinct activities. The first activity we conduct is port scanning. Once we have finished with port scanning, we will have a list of open ports and potential service running on each of the targets. The second activity in the scanning phase is vulnerability scanning. Vulnerability scanning is the process of locating and identifying specific weaknesses in the software and services of our targets.
With the results from step 2 in hand, we continue to the “exploitation” phase. Once we know exactly what ports are open, what services are running on those ports, and what vulnerabilities are associated with those services, we can begin to attack our target. This is the phase that most newcomers associate with “real” hacking. Exploitation can involve lots of different techniques, tools, and code. We will review a few of the most common tools in Chapter 4. The ultimate goal of exploitation is to have administrative access (complete control) over the target machine.
The final phase we will examine is “maintaining access.” Oftentimes, the payloads delivered in the exploitation phase provide us with only temporary access to the system. Because most payloads are not persistent, we need to create a more permanent backdoor to the system. This process allows our administrative access to survive program closures and even reboots. As an ethical hacker, we must be very careful about the use and implementation of this phase. We will discuss how to complete this step as well as the ethical implications of using backdoor or remote control software.
Although not included as a formal step in the penetration testing methodology, the final (and arguably the most important) activity of every PT is the report. Regardless of the amount of time and planning you put into conducting the penetration test, the client will often judge your work and effectiveness on the basis of the quality of your report. The final PT report should include all the relevant information uncovered in your test and explain in detail how the test was conducted and what was done during the test. Whenever possible, mitigations and solutions should be presented for the security issues you uncovered. Finally, an executive summary should be included in every PT report. The purpose of this summary is to provide a simple one- to two-page, nontechnical overview of your findings. This report should highlight and briefly summarize the most critical issues your test uncovered. It is vital that this report be readable (and comprehendible) by both technical and nontechnical personnel. It is important not to fill the executive summary with too many technical details; that is the purpose of the detailed report.
Chapter Review
This chapter introduced the concept of penetration testing and hacking as a means of securing systems. It also discussed the various roles and characters that take part in the hacking scene. The chapter examined the basics of Backtrack Linux including how to boot up, login, start X, get an IP address, and shutdown. We talked about how to set up your own isolated PT lab so you have a place to practice without fear of breaking the law and we wrapped up by reviewing the steps of a penetration test.
It should be noted that there are several alternatives to Backtrack. At some point, you may want to review and explore these other distributions. Matriux is similar to Backtrack but also includes a Windows binary directory that can be used and accessed directly from a Windows machine. Fedora Security Spin is a collection of security-related tools built off of the Fedora distribution. KATANA is a multi-boot DVD that gathers a number of different tools and distributions into a single location. Finally, you may want to explore the classic STD distribution as well as Pentoo and Blackbuntu. There are many other Linux penetration testing distributions—a simple Google search for “Linux Penetration Testing Distributions” will provide you with a plethora of options. You could also spend some time building and customizing your own Linux distribution by collecting and installing tools as your hacking career progresses.
Summary
This chapter introduced the concept of penetration testing and ethical hacking. A special “basics only,” four-step methodology including Reconnaissance, Scanning, Exploitation, and Maintaining Access was presented and explained. Information for setting up and using Backtrack Linux including configuring a network connection and issuing commands in a terminal window was presented. The use and creation of a penetration testing lab was outlined. This will allow you to practice your skills in a safe and sandboxed environment. It will also allow for completing and following along with the examples detailed in this book.
..................Content has been hidden....................
You can't read the all page of ebook, please click here login for view all page.