
Chapter 4
Collecting Evidence
Information in This Chapter:
![]() Documenting the Scene and the Evidence
Documenting the Scene and the Evidence
![]() Establishing and Maintaining the Chain of Custody
Establishing and Maintaining the Chain of Custody
![]() Dealing with Live Systems and Dead Systems
Dealing with Live Systems and Dead Systems
Cases can be won or lost based on how the digital evidence was collected. Digital evidence is fragile and must be handled with care. We will explore how to properly collect evidence from various devices so that the examiner will get the opportunity to present their hard-found evidence outside of the lab.
Chain of Custody, Live System, Dead System, Volatile Memory, Order of Volatility, Hash Function, Algorithm, Faraday
Introduction
That “smoking gun” you discovered will never get to a jury unless it's been properly collected and accounted for starting at the scene. As important as it is, you'll never see it done right on TV cop shows. Nothing kills the excitement faster than three solid hours of paperwork. In the real world, it's those three solid hours of paperwork that get your evidence into court. It all starts at the crime scene. Just locating the evidence can be tough. Especially with stamp-sized (or smaller) memory cards and the like. They could be hidden in an almost limitless number of places.
At the scene, examiners could be confronted with a variety of devices and storage media. They could find one or more running computers and wireless devices like cell phones. Together, they present some unique challenges for the investigator.
Actions during the collection process must be well documented. Notes, photos, video, and sketches record our actions and refresh our recollections. As digital evidence is extremely volatile, preservation is paramount. If at all possible, a forensic image or clone is made of the suspect media. The exam is conducted on the clone (which is an exact bit for bit copy) rather than the original.
Crime Scenes and Collecting Evidence
From a practical standpoint, not all scenes involving digital evidence are created or treated equally. Digital evidence has been the focus of criminal, civil, and administrative proceedings. There are distinct differences in how the scene and the evidence may be handled and documented for these proceedings. Some cases, like a homicide, will require painstaking documentation. Others, like a civil dispute, will necessitate a somewhat less intense response. While acknowledging these subtle differences, there are certain core principles and protocols that will remain consistent.
After it's deemed safe, job one at a digital crime scene, or any other, is securing the evidence. The scene and its evidence must be protected from accidental or intentional compromise. Securing a traditional crime scene entails limiting physical access by those folks that don't have a legitimate reason to be there. Nosy neighbors, the news media, and police supervisors are typical crime scene trespassers. Securing a traditional scene is accomplished by stringing crime scene tape, posting guards, or simply asking people to leave.
In contrast, a scene with digital evidence presents an entirely new dimension of access. Most computers and digital devices are connected to the Internet, cellular, or other kinds of networks. It's this connection that permits remote access and puts the evidence at risk. Computers and wireless devices must be made inaccessible as soon as you're sure that no volatile data would be lost (Association of Chief Police Officers, 2011). For computers, it may be a matter of removing the Ethernet cable or unplugging a wireless modem or router. With wireless devices such as cell phones, we must take steps to isolate the phone from network signals.
Removable Media
If legally permissible (such as with a warrant), we want to search anywhere that could contain a piece of storage media. Considering today's “stamp-sized” memory cards, this piece of evidence could be hidden almost anywhere such as in books, wallets, hat bands, etc.
Despite their small size, memory cards can hold a ton of potential evidence such as child pornography or stolen credit card numbers. Let's break it down. A quick check of Amazon.com shows that you can buy a 64 gigabyte memory card for around $120. Gigabytes (GB) are pretty abstract for most of us. Instead of using a standard unit of data storage, we'll use an example that is less conventional yet more relatable.
We're going to convert the 64 GB memory card into our own unit of measure, which we will call “Potters”—Harry “Potters,” to be exact. Picture a set of all seven books in the Harry Potter series. In rough numbers, each GB contains about 109 complete sets. With some simple math, we find that our 64 GB memory card can hold approximately seven thousand complete sets of books on something about the size of a postage stamp! Think about the amount of evidence that could be pulled from just one memory card.
Removable Storage Media
Removable storage media include things like DVDs, external hard drives, thumb drives, and memory cards.
We're not just interested in the devices and storage media at the scene; the surrounding area and items are also worth a look. For example, books and manuals can give investigators clues as to the skill level of the target and what kind of technology they may be up against. Perhaps the biggest payoff is an alert to the possible use of encryption. Discarded packaging in the trash could also be helpful. Any forensic examiner would tell you that avoiding encryption is definitely worth the trouble.
Cell Phones
Almost everyone has a cell phone these days. As such, they often contain some very valuable evidence. Text messages, e-mail, call logs, and contacts are examples of what you can recover. These items can be used to show intent, determine the last person to come in contact with a murder victim, establish alibis, determine approximate locations, and more.
As with other electronic devices, our first mandate is to make no changes to the device or its storage media. Therefore, interacting with the phone should be avoided unless absolutely necessary. Cell phones are particularly vulnerable because they can be wiped by the cell provider or even by the owner themselves. This functionality is intended to protect your data should you lose your phone or have it stolen. Apple's “Find My Phone” app is one notable example. We must address this concern by isolating or shielding the phone as soon as possible.
You have a few options to get this done:
![]() Turn the phone off. The concern with this approach is the same as a PC. The phone may be password-protected. Once powered down, the code may be necessary to access the phone. If possible, it may be best to isolate the phone in a Faraday bag or arson can and leave it powered on. It can then be transported to the lab to be examined in a shielded room, and so on.
Turn the phone off. The concern with this approach is the same as a PC. The phone may be password-protected. Once powered down, the code may be necessary to access the phone. If possible, it may be best to isolate the phone in a Faraday bag or arson can and leave it powered on. It can then be transported to the lab to be examined in a shielded room, and so on.
![]() Place the phone in special containers that shield the phone from wireless signals. Empty paint cans and Faraday bags are two of the more typical choices. Both of these items are effective at safeguarding the phone from cell signals. (See Figure 4.1.)
Place the phone in special containers that shield the phone from wireless signals. Empty paint cans and Faraday bags are two of the more typical choices. Both of these items are effective at safeguarding the phone from cell signals. (See Figure 4.1.)
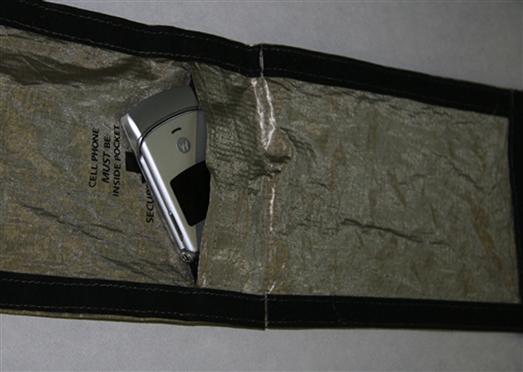
Figure 4.1 A Faraday bag and cell phone.
Alert!
Protecting Cell Phones from Network Signals
It's essential to isolate a live cell phone from the network. If not, it can receive calls, text messages, or even commands to delete all the data. A Faraday bag is one way to prevent a network signal from reaching the phone. A Faraday bag is made of “some type of conducting material or mesh” that repels these signals. The function of the bag is based on the work of Michael Faraday, an English scientist who specialized in electromagnetism (Microsoft Corporation).
Alert!
Power
Power is a concern whenever you seize a cell phone. If the phone is on, it will continuously try to connect to a tower, draining the battery. If the phone is off, you should also seize the power cables. Lab personnel may very well need to recharge the device in order to complete their exam.
Failing to remove connectivity to these devices not only risks destruction of the evidence; it can raise serious concerns about its integrity as well. A competent attorney could successfully argue that this evidence is untrustworthy and should be excluded.
After securing the evidence, a survey of the scene will give investigators an accurate sense of what's ahead. Several questions need to be answered:
![]() What kinds of devices are present?
What kinds of devices are present?
![]() How many devices are we dealing with?
How many devices are we dealing with?
Once these questions are answered, the real work begins.
Order of Volatility
It's a good idea to prioritize the evidence to be collected. Generally, we want to start with the most volatile evidence first. In computer parlance, this is known as the order of volatility. This descending list works from the most volatile (RAM) to the least volatile (archived data). The order of volatility is:
1. CPU, cache, and register content
2. Routing table, ARP cache, process table, kernel statistics
4. Temporary file system/swap space
7. Data contained on archival media (Henry, 2009)
Documenting the Scene
There is an old tried and true saying in law enforcement: “If you don't write it down, it didn't happen.” These are words of wisdom indeed. Regardless of the situation, any time evidence is collected, documentation is a vitally important part of the process. There are several different types of documentation. The most common in terms of digital forensics are photographs and written notes; video is also an option for documenting evidence.
This documentation process begins the moment investigators arrive at the scene. Typically, we start by noting the date and time of our arrival along with all the people at the scene. The remainder of our notes consists of detailed descriptions of the evidence we collect, its location, the names of who discovered and collected it, and how it was collected. It's also a good idea to note the item's condition, especially if there is visible damage.
Accurately and precisely describing the evidence is of critical importance. A piece of digital evidence is described by type, make, model, serial number, or other similar descriptors. It's also important to note whether a device is on or off or if it's connected to other devices (such as printers) or a network (like the Internet). Virtually everything we see, find, and do should be documented.
While we're talking about peripheral connections, it is good practice to label each so that the entire system can be reconstructed in the lab should that become necessary.
After the scene and evidence are secure, our attention can turn to the documentation as well as identifying and collecting potential sources of evidence. Before anything is done, it's prudent to do a walk-through to survey the scene, pinpointing the type and number of devices as well as resources that will be needed.
Photography
Next, the entire scene should be photographed. Photos should be taken of the scene before anything is disturbed, including the evidence. It's helpful to think of the photos as telling a story. Remember, at some point, you may have to walk a judge or jury through this scene weeks, months, or even years later.
Start with a broad perspective, perhaps the outside of the house or office being investigated. After the overall scene has been photographed, we can then focus on each individual piece of evidence. Long-, medium-, and close-range photos show the item in the context of its surroundings. The photos of each item should clearly show the condition of the item as it was found. We need to pay particular attention to and capture things like identifying information such as serial numbers, damage, and connections. Connection examples could include networks and peripherals such as printers and scanners. It's very important to keep in mind that this is likely the only chance we'll get to capture the scene. So, when in doubt shoot more, not less.
You've probably seen photos with both the evidence item and a ruler of some sort. This is done to give some perspective to the item. It gives us an idea as to the size of that particular piece of evidence. Remember, we want to record the scene before it's disturbed or altered in any way so inserting anything into the scene with that item (like a ruler) can qualify as alteration. If it is necessary to show the size of the piece of evidence, it's a good idea to take a picture without the ruler first, then one with the ruler.
Photographs are used to depict the scene and the evidence exactly as we find them to help supplement our notes. They don't replace them. Notes capture our personal observations that won't be recorded in a photo. They are used to refresh our recollections when we go to court. Photos are a great aid to help us tell our story to the judge and jury. They really are worth a thousand words.
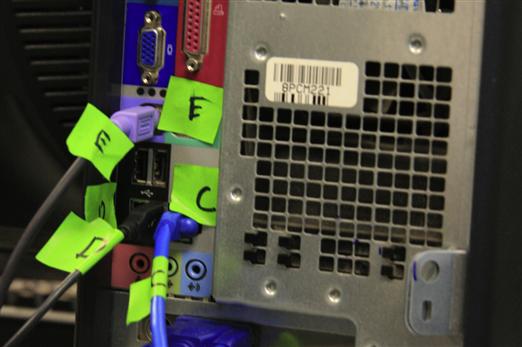
Figure 4.2 Marked cables from the back of a PC. Labels are placed on both ends of a cable to help document how what was connected to the PC at the time it was collected.
Notes
As we photograph the evidence, we'll also be taking detailed notes of our actions along with any potential evidence we find. There is no set standard for note-taking. It's really up to the individual on how they want to document things. Chronological order is a common method. You would want to note things such as the time you arrived, who was present at the scene, who took what action, who found and collected which piece of evidence, and so on.
Never lose sight of the fact that you will be relying on these photos, notes, and reports months or years later when you prepare for court. With that in mind, you will want more detail rather than less. Memories fade, cases run together, and details get blurry. They should also be legible for the same reason. If cost is a concern, keep in mind that digital photos are cheap. You can fit a lot photos on today's memory cards.
What you write in those notes matters to other people involved in the case, especially if they end up being turned over to the opposition. Under certain legal requirements, your notes could become discoverable and made available to the opposing side. This can happen if you take your notes with you to the witness stand. With that in mind, it's important not to draw conclusions or speculate based on your initial observations. You could very well end up eating those words and losing the case. It's best to keep those notes focused on what you do and observe at the scene. Saving the interpretations and conclusions until after the analysis is a much better approach.
Chain of Custody
Before a piece of evidence gets in front of a jury, it must first meet a series of strict legal requirements. One of those is a well-documented chain of custody. A computer taken in as evidence makes many stops on its road to trial. It's collected, logged in at the lab, stored, checked out for analysis, checked back in for storage, and so on. Each of these stops must be noted, tracking each and every time the evidence item changes hands or locations. Without this detailed accounting, the evidence will be deemed untrustworthy and inadmissible. It's this detailed trail that makes up the chain of custody.
Marking Evidence
The first “link” in the chain of custody in any case is the person collecting the evidence. Civil cases may differ a bit in that IT staff or others may hold the distinction of being the first link. The evidence is marked as it is collected. Typically, evidence items are marked with initials, dates, and possibly case numbers. Permanent markers are best to ensure the markings aren't smudged or removed altogether. Apart from documenting the chain of custody, these marks help authenticate the item should it be introduced in court. The person who collected the item may be asked to identify it from the witness stand. What needs to be proved is that the item presented is the same one that was collected. These marks make this identification a near sure thing. (See Figure 4.3.)
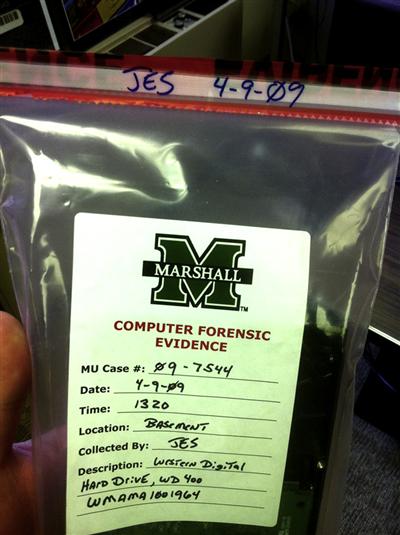
Figure 4.3 A marked piece of evidence, sealed in an evidence bag. (Photo courtesy of Marshall University.)
Items small enough are normally sealed in a bag with tamper-proof evidence tape. The seal is then initialed and dated. The bags are usually made of paper, plastic, or special anti-static material. The anti-static material bags are used for electronics because this material helps protect the sensitive electronics found on hard drives from being damaged by static electricity.
Cloning
A forensic clone is an exact, bit for bit copy of a hard drive. It's also known as a bit stream image. In other words, every bit (1 or 0) is duplicated on a separate, forensically clean piece of media, such as a hard drive. Why go to all that trouble? Why not just copy and paste the files? The reasons are significant. First, copying and pasting only gets the active data. That is, data that are accessible to the user. These are the files and folders that users interact with, such as a Microsoft Word document. Second, it does NOT get the data in the unallocated space, including deleted and partially overwritten files. Third, it doesn't capture the file system data. All of this would result in an ineffective and incomplete forensic exam.
We will want to make a forensic clone of the suspect's hard drive(s) as soon as we reasonably can. Cloning a drive can be a pretty time-consuming process, and for that reason it usually makes more sense to do the cloning in the lab as opposed to at the scene. Cloning in the lab eliminates the need to be on scene for what could be hours. It also provides a much more stable environment, affording us better control of the process.
Before we take a computer off premises, we must have the legal authority to do so. In a criminal case, this request and the rationale behind it should be part of the search warrant application. In civil cases, this provision can be negotiated by the parties or ordered by a judge.
Although taking the hardware back to the lab is routine in criminal cases, the cloning may have to be done at the scene in a civil case. Most civil cases with digital evidence focus on business computers. A business computer sitting in a lab isn't generating any revenue, which tends to get business folks understandably cranky. If the hard drive in a business computer can't be replaced, then the machine is often cloned and put right back into service.
Purpose of Cloning
We know from earlier chapters that digital evidence is extremely volatile. As such, you never want to conduct your examination on the original evidence unless there are exigent circumstances or there is no other option available. Exigent circumstances could include situations in which a child is missing. Sometimes there are no tools or techniques available to solve the problem at hand.
Examining the clone affords us the chance at a “mulligan” should something go wrong. If possible, the original drive should be preserved in a safe place and only brought out to reimage if needed.
Hard drives are susceptible to failure. Having two clones gives you one to examine and one to fall back on. Ideally, all examinations are done on a clone as opposed to the original.
Sometimes that isn't an option, especially in a business setting when the machine and drive must be returned to service. In the eyes of the court, a properly authenticated forensic clone is as good as the original.
The Cloning Process
Cloning a hard drive should be a pretty straightforward process, at least in theory. Typically, you will clone one hard drive to another. The suspect's drive is known as the source drive and the drive you are cloning to is called the destination drive. The destination drive must be at least as large (if not slightly larger) than our source drive. Although it is not always possible, knowing the size of the source in advance is pretty handy. Bringing the right size drive will save a lot of time and aggravation.
The drive we want to clone (the source) is normally removed from the computer. It's then connected via cable to a cloning device of some kind or to another computer. It's critical to have some type of write blocking in place before starting the process. A write block is a crucial piece of hardware or software that is used to safeguard the original evidence during the cloning process. The hardware write block is placed between the cloning device (PC, laptop, or standalone hardware) and the source. The write block prevents any data from being written to the original evidence drive. Using this kind of device eliminates the possibility of inadvertently compromising the evidence. Remember, the hardware write blocking device goes in between the source drive and the cloning platform.
There is a little prep work involved in making a clone. The destination drive must be forensically cleaned prior to cloning a suspect's drive to it. Most if not all forensic imaging tools will generate some type of paper trail, proving that this cleaning has taken place. This paperwork becomes part of the case file.
Once the connections are made, the process is started with the press of a couple of buttons or clicks of a mouse. When complete, a short report should be generated by the tool indicating whether or not the cloning was successful. Cloning is successful when the hash values (think “digital fingerprint”) for the source and clone match. We'll dig deeper into hash values in just a bit.
Forensically Clean Media
A forensically clean drive is one that can be proven to be devoid of any data at the time the clone is made. Being sterile is another way of looking at it. It is important to prove the drive is clean because comingled data is inadmissible data. Drives can be cleaned with the same devices used to make the clones. The cleaning process overwrites the entire hard drive with a particular pattern of data such as 1111111111111 (Casey, 2011).
Forensic Image Formats
The end result of the cloning process is a forensic image of the source hard drive. Our finished clone can come in a few different formats. The file extension is the most visible indicator of the file format. Some of the most common forensic image formats include:
There are differences in the formats, but they are all forensically sound. Some, like DD, are open source, while others, like AD1, are proprietary. Choosing one format over the other can simply be a matter of preference. Most forensic examination tools will read and write multiple image formats.
In addition to being forensically sound, the other major consideration is that the tools to be used can read the image. The documentation with the tool should provide this information. Compatibility is a concern. This is especially true when exchanging image files between examiners.
Risks and Challenges
The biggest risk during the cloning process is in writing to the source or evidence drive. Any writes to the evidence will compromise its integrity and jeopardize its admissibility. Getting a functioning write-blocking device or software in place will keep this from happening. Proper cloning should be pretty boring. Any time it gets exciting, you've got problems. What can ratchet up the adrenaline? Bad sectors and damaged or malfunctioning drives come to mind. A corrupt boot sector or a failing motor can also create complications.
Value in eDiscovery
The Sedona Conference, the leading think tank on electronic discovery, defines eDiscovery as: “The process of identifying, preserving, collecting, preparing, reviewing, and producing electronically stored information (“ESI”) in the context of the legal process” (Sedona Conference, 2010).
Forensic cloning provides some additional value in the eDiscovery process. Preservation of potentially relevant data is paramount in electronic discovery. Parties that fail to preserve evidence can face some very stiff punishment. Forensic cloning is one option available to preserve some kinds of media such as hard drives and removable media such as flash drives. It serves as the “gold standard” of data preservation in that it preserves all of the data on a piece of media, not just the active data. The down side of cloning is that it can be expensive and just not practical in all situations.
Alert!
Sanctions in Electronic Discovery
Take the case of E.I. du Pont de Nemours v. Kolon Industries (2011). In this case, the jury awarded $919 million to DuPont in an eye-popping verdict. Earlier in the case, the court determined that Kolon had destroyed e-mails and other potentially relevant data connecting it to the theft of trade secrets. As a result of that determination, the judge instructed the jury that Kolon (both executives and employees) deleted important evidence even though they had a duty to preserve it. Kolon's suffering may not end there. DuPont plans on requesting $50 million in punitive damages plus $30 million more for attorney fees (Favro, 2011).
Live System versus Dead System
Up to now, we've been talking about “dead” or powered off machines. What happens when we come across a running computer? At the moment there is no consensus on the answer. A growing debate exists in the digital forensics community about how to handle a “live” or running machine. The “old school” solution is simply to pull the plug, instantly removing power to the computer. Today, that approach is garnering second thoughts. There are compelling reasons not to pull the power on a running computer. Next, we'll look at the reasons both for and against this somewhat controversial method.
Live Acquisition Concerns
On the plus side, pulling the plug eliminates the need to interact with the running machine. Interacting with a running computer, in any way, causes changes to the system. Any change to a piece of evidence is bad and can cause major problems from a legal standpoint. These alterations can call the integrity of the evidence into question. Even when a machine is just sitting powered on, things are changing. When a person interacts with a running machine, even more things are changing. Knowing that change is a forensic faux pas; it's easy to see why pulling the plug is an attractive option. On a side note, these changes may have no impact on the artifacts relevant to the case. But the system is changing nonetheless.
We are now starting to second-guess this approach, recognizing that pulling the plug has some significant downsides.
For starters, yanking the plug means that any evidence in RAM will be under real threat of destruction. Data in RAM start to dissipate or fade when power is removed. There is a technique that can be used to preserve data in memory after the power is off, but it's not yet been widely adopted. (See the sidebar.)
More Advanced
Preserving Evidence in RAM
It's widely thought that data in RAM vanish when the power is turned off. That's really not true. Research by Princeton University has shown that data in RAM fade rather than disappear. This dissipation can be further slowed if the RAM is cooled to –58 deg Fahrenheit (–50 Celsius). This cooling will give examiners more time to collect this volatile data. To see this technique in action, see the video here: http://www.youtube.com/watch?v=JDaicPIgn9U.
Second, is encryption. The system or files may be unencrypted while the machine is powered on. Abruptly pulling the plug could return it to an encrypted state, potentially putting that evidence out of reach for good. Avoiding encryption is a good idea any time.
Third, a sudden loss of power could damage the data, rendering them unreadable. Fourth, some evidence may not get recorded on the drive unless and until the computer is properly shut down.
The old school solution of pulling the plug is not the only option on the table these days. There are now tools and techniques that will capture volatile memory from a live machine in a forensically sound manner. With these advances, it's time to start recognizing the advantages of live collection.
Advantage of Live Collection
Until fairly recently, pulling the plug was the only real option. Capturing data in a running computer's main memory (RAM) wasn't a realistic option. The potential solutions that existed just weren't practical to be used in the field. In contrast, present-day examiners do have some forensically sound alternatives. There are several commercial and open source tools that can be used to collect these volatile data. Unlike the older lab-bound approaches, these tools are very simple to use—so simple, in fact, that they are being marketed to nontechnical folks like most first responders. First responders could include patrol officers and IT staff among others. While these tools do simplify the process, they still require training for proper use.
Principles of Live Collection
Doing a live collection is not a rudimentary task. The following is an example of one approach.
After coming across a running computer at the scene, a couple of questions will need to be answered right from the start. Is the potential evidence to be recovered truly worth the time and effort? In some instances, the answer may be “no.” In cases involving malware, RAM is vitally important. In others, such as a clear-cut possession of child pornography, RAM will likely have little value. Second, are the necessary resources available? To successfully capture the evidence in memory will require some specialized tools and training. Without these key ingredients, it could be best to punt and simply pull the plug. The risk of compromising the evidence may simply be too great. It's important to be able to recognize when you are in over your head and when you should call for help.
When interacting with a live machine, it's best to always choose the least invasive approach possible. This will require thinking before you click. Haste is not your friend in this situation. As mentioned earlier, we want to collect the most volatile information first.
Alert!
Evidence in RAM
A computer's volatile memory (RAM) can contain some very valuable evidence, including running processes, executed console commands, passwords in clear text, unencrypted data, instant messages, Internet Protocol addresses, and Trojan horse(s) (Shipley & Reeve, 2006).
Conducting and Documenting a Live Collection
Now comes the tricky part. It's time to get focused. Once you start, you should work uninterrupted until the process is complete. To do otherwise only invites mistakes. Before getting underway, gather everything you will need: report forms, pens, memory capture tools, and so on. Every interaction with the computer will need to be noted. You could use an action/response approach (“I did this … The computer did that.”).
If the desktop isn't visible, you can move the mouse slightly to wake it up. If that fails to bring up the desktop, pressing a single key should solve the problem. You should of course document which key was depressed in your notes. Now that you can see the desktop, the first thing to note is the date and time as it appears on the computer. Next, record the icons and running applications. You don't want to stop there. Documenting the running processes could help identify any malware that is in residence on the computer. The running processes can be documented by accessing the task manager. Why would that matter? One of the more popular defenses, especially in child pornography cases, is to claim that the contraband images were deposited by an unknown third party by way of a Trojan.
Now it's time to use a validated memory capture tool to collect that volatile evidence in the RAM. After this step is complete, the process ends with proper shutdown. The proper shutdown allows any running application a chance to write any artifacts to the disk, allowing us to recover them later.
Hashing
How do we know our clone is an exact duplicate of the evidence drive? The answer comes in the form of a hash value. A hash is a unique value generated by a cryptographic hashing algorithm. Hash values (functions) are used in a variety of ways including cryptography and evidence integrity. Hash values are commonly referred to as a “digital fingerprint” or “digital DNA.” Any change to the hard drive, even by a single bit, will result in a radically different hash value. Therefore, any tampering or manipulation of the evidence is readily detectable.
Types of Hashing Algorithms
There are multiple types of hashing algorithms. The term algorithm may strike fear in the hearts of the mathematically challenged. Never fear. We won't be getting into any higher-level math here, but we will get comfortable with some of the basic concepts and terms. The most common hash functions used in digital forensics are Message Digest 5 (MD5), and Secure Hashing Algorithm (SHA) 1 and 2.
Hashing Example
Let's hash a short phrase to demonstrate what happens with only a minor change. Apologies up front to any Baltimore or Cleveland fans. For this exercise, we'll use SHA1.
Now let's make one small alteration, changing the “S” from upper case to lower case. When we rehash, we get this:
Note the drastic change in the resulting hash values. Here they are stacked for an easier comparison:
As you can see, small changes make a big difference. If you'd like to try this yourself, it's easy to do. Go to http://www.wolframalpha.com and enter the hash function you would like to use (MD5, SHA1, etc.), followed by a space and then the phrase Go Steelers! (See Figure 4.4.)

Figure 4.4 WolframAlpha results.
Uses of Hashing
Hash values can be used throughout the digital forensic process. They can be used after the cloning process to verify that the clone is indeed an exact duplicate. They can also be used as an integrity check at any point it is needed. Examiners often have to exchange forensic images with the examiner on the opposing side. A hash value is sent along with the image so that it can be compared with the original. This comparison verifies that the image is a bit for bit copy of the original.
The relevant hash values that were generated and recorded throughout the case should be kept and included with the final report. These digital fingerprints are crucial to demonstrating the integrity of the evidence and ultimately getting them before the jury.
Final Report
At the conclusion of the analysis, the examiner will generate a final report detailing what was done, what was found, and their findings. Ideally, final reports need to be crafted with the intended audience in mind. In reality, far too many final reports read like the owner's manual for the space shuttle. Not only can these reports be difficult to read, they can be downright intimidating.
Because they are often filled with jargon and code, these reports aren't very useful to non-technical reader's such as judges, attorneys and juries. It is important to remember that these people must be able to comprehend information contained in your report. Even the best, most compelling evidence can be ignored if the jury can't understand it.
The major forensic tools, such as EnCase and FTK, have very robust reporting features, generating quite a bit of customizable information. However, as helpful as these reports are, they are just not adequate to stand on their own. They are difficult for most non-technical readers to understand. This information should be included in the final report, but they should not serve as the lone piece of documentation for the entire examination.
The best reports will consist of much more than the standard report generated with the tool alone. The final report should include a detailed narrative of all the actions taken by the examiner, starting at the scene if they were present. The examination should be documented with sufficient detail so that the procedure can be duplicated by another examiner.
A digital forensic report written in plain English is both much appreciated and much more effective (can I get an “Amen” from the lawyers out there?).
Summary
As we discussed in this chapter, the first step in the collection process is to secure both the scene and the evidence. If the device containing the evidence is a cell phone, you will need to isolate the phone from the network signal to prevent evidence from being destroyed.
Photographs are an excellent way to document the evidence and the scene. You will photograph the entire scene (e.g., the entire room, not just the computer on the desk). You must ensure that the chain of custody is fully documented and that the evidence is properly marked.
Preservation of the evidence is critical. Capturing a forensic image or clone eliminates the need to examine the original evidence. Examining the original could lead to the evidence being excluded.
Cloning the device will produce an exact, bit-for-bit copy of the original evidence. Hash values are used to verify that the cloned evidence is identical to the original. These hash values, such as MD5 or SHA1, are often likened to “Digital DNA” or a “Digital Fingerprint.” We discussed the differences between live and dead acquisitions and the benefits and challenges of each. The final report should include detail about the scene, the collection process, the analysis, and the what conclusions, if any, were reached. It's critical that the final report be understandable to a nontechnical audience.
REFERENCES
1. About: American Society of Crime Laboratory Directors/Laboratory Accreditation Board. (n.d.). Retrieved June 4, 2011, from: http://www.ascld-lab.org/about_us/aboutoverview.html.
2. AccessData Group, LLC. (2011, February). Downloads: AccessData. Retrieved August 24, 2011, from: http://accessdata.com/downloads/media/FTK_3x_System_Specifications_Guide.pdf.
3. American Society of Crime Laboratory Directors Laboratory Acceditation Board. (n.d.). ASCLD/LAB Guiding Principles of Professional Responsibility for Crome Laboratories and Forensic Scientists. Retrieved September 3, 2011, from: http://www.ascld-lab.org/about_us/guidingprinciples.html.
4. American Society of Crime Laboratory Directors/Laboratory Accreditation Board. (n.d.). Did You Know: American Society of Crime Laboratory Directors/Laboratory Accreditation Board. Retrieved June 4, 2011, from: http://www.ascld-lab.org/largest_accreditation.html.
5. American Society of Crime Laboratory Directors/Laboratory Accreditation Board. (n.d.). Objectives: American Society of Crime Laboratory Directors/Laboratory Accreditation Board. Retrieved June 4, 2011, from: http://www.ascld-lab.org/about_us/objectives.html.
6. Association of Chief Police Officers. Good Practice Guide for Computer-Based Electronic Evidence Cambridge, MA: 7Safe; 2011.
7. ASTM International. (n.d.). ASTM Overview. Retrieved October 1, 2011, from: http://www.astm.org/ABOUT/overview.html.
8. Barbara, J. J. (n.d.). Digital Evidence Accreditation. Retrieved August 25, 2011, from: http://www.forensicmag.com/article/digital-evidence-accreditation?page=0,3.
9. Barbara, J. J. (n.d.). Digital Evidence Accreditation: Forensic Magazine. Retrieved June 4, 2011, from: http://www.forensicmag.com/article/digital-evidence-accreditation.
10. Barbara, J. J. (n.d.). Triage a Computer. Retrieved June 14, 2011, from: http://www.forensicmag.com/article/triage-computer.
11. Brunty, J. (2011, March 2). Validation of Forensic Tools and Software: A Quick Guide for the Digital Forensic Examiner. Retrieved August 24, 2011, from: http://www.dfinews.com/article/validation-forensic-tools-and-software-quick-guide-digital-forensic-examiner?page=0,2.
12. Carrier, B. B. (2002, October). Papers: Digital-evidence.org. Retrieved August 24, 2011, from: http://www.digital-evidence.org/papers/opensrc_legal.pdf.
13. Carvey H. Windows Forensic Analysis DVD Toolkit 2nd ed. Burlington, MA: Syngress; 2009.
14. Casey E. Handbook of Digital Forensics and Investigation Burlington, MA: Academic Press; 2009.
15. Casey E. Digital Evidence and Computer Crime, 3rd ed.: Forensic Science, Computers, and the Internet Waltham, MA: Academic Press; 2011.
16. Cellebrite Mobile Synchronization LTD. (n.d.). UFED Physical Pro. Retrieved October 2, 2011, from: http://www.cellebrite.com/forensic-products/forensic-products/ufed-physical-pro.html.
17. Chan, S. (1994, August 21). Scores of Convictions Reviewed as Chemist Faces Perjury Accusations: Forensics. Retrieved September 27, 2011, from: http://articles.latimes.com/1994-08-21/news/mn-29449_1_lab-tests-fred-zain-double-murder.
18. Craiger, P. J. (n.d.). Virtual Digital Evidence Laboratory. Retrieved September 16, 2011, from: http://www.ncfs.org/VDEL.Craiger.Report.NIJ.final.pdf.
19. DNA Initiative, The. (n.d.). Glen Woodall (Huntington, West Virginia). Retrieved September 27, 2011, from: http://www.dna.gov/postconviction/convicted_exonerated/woodall.
20. EC-Council. Computer Forensics: Investigation Procedures and Response Clifton Park, NY: Cengage Learning; 2009.
21. Favro, P. (2011, September 15) Breaking News: $919 Million Verdict for DuPont in Trade Secret Theft and eDiscovery Sanctions Case. E-Discovery blog: http://www.clearwellsystems.com/e-discovery-blog/.
22. Federal Bureau of Investigation. Regional Computer Forensics Laboratory Annual Report Fiscal Year 2010 Washington, DC: U.S. Department of Justice; 2010.
23. Henry, P. (2009, September 12). Best Practices in Digital Evidence Collection. Retrieved October 15, 2011, from: http://computer-forensics.sans.org/blog/2009/09/12/best-practices-in-digital-evidence-collection/.
24. James S, Nordby JJ. Forensic Science: An Introduction to Scientific and Investigative Techniques 3rd ed. Boca Raton, FL: CRC Press; 2009.
25. Microsoft Corporation. (n.d.). Encarta: Michael Faraday. Retrieved June 13, 2011, from: http://www.webcitation.org/5kwc3quLs.
26. National Institute of Justice. (n.d.). Collecting Digital Evidence Flowchart: National Institute of Justice. Retrieved June 14, 2011, from: http://www.nij.gov/publications/ecrime-guide-219941/ch5-evidence-collection/collecting-digital-evidence-flowchart.htm.
27. National Institute of Justice. (n.d.). Digital Evidence and Forensics: National Institute of Justice. Retrieved June 14, 2011, from: http://www.nij.gov/nij/topics/forensics/evidence/digital/welcome.htm.
28. National Institute of Justice. Forensic Examination of Digital Evidence: A Guide for Law Enforcement Washington, DC: U.S. Department of Justice Office of Justice Programs; 2004.
29. National Institute of Justice. Electronic Crime Scene Investigation: A Guide for First Responders 2nd ed. Washington, DC: U.S. Department of Justice; 2008.
30. National Institute of Justice. Electronic Crime Scene Investigation: An On-the-Scene Reference for First Responders Washington, DC: U.S. Department of Justice; 2009a;.
31. National Institute of Justice. Test Results for Hardware Write Block Device: T4 Forensic SCSI Bridge (FireWire Interface) Washington, DC: National Institute of Justice; 2009b; U.S. Department of Justice, Office of Justice Programs.
32. National Institute of Standards & Technology. (n.d.). CFTT Project Overview. Retrieved September 30, 2011, from.gov: http://www.cftt.nist.gov/project_overview.htm.
33. National Institute of Standards and Technology. (n.d.). Computer Forensics Tool Testing Project Web Site: National Institute of Standards and Technology. Retrieved June 6, 2011, from: http://www.cftt.nist.gov/index.html.
34. Paraben Corporation. (n.d.). Device Seizure v4.5. Retrieved October 2, 2011, from: http://www.paraben.com/device-seizure.html.
35. Phillip A, Cowen D, Davis C. Hacking Exposed Computer Forensics: Computer Forensics Secrets & Solutions New York: McGraw-Hill; 2009.
36. Princeton University Center for Information Technology Policy. (2008, February 21). Lest We Remember: Cold Boot Attacks on Encryption Keys. Retrieved October 19, 2011, from: http://www.youtube.com/watch?v=JDaicPIgn9U.
37. Saferstein R. Criminalistics: An Introduction to Forensic Science (College Edition) 9th ed. Upper Saddle River, NJ: Prentice Hall; 2006.
38. Scientific Working Group on Digital Evidence. (2009, January 15). SWGDE Recommended Guidelines for Validation Testing v1.1. Retrieved September 19, 2011, from: http://www.swgde.org/documents/current-documents/.
39. Scientific Working Group on Digital Evidence. (2010a, May 15). Minimum Requirements for Quality Assurance in the Processing of Digital and Multimedia Evidence. Retrieved August 24, 2011, from: http://www.swgde.org/documents/current-documents/.
40. Sedona Conference. (2010, September). The Sedona Conference Glossary: E-Discovery & Digital Information Management (3rd ed.). Retrieved October 21, 2011, from: http://www.thesedonaconference.org/publications_html.
41. Shipley, T. G. (n.d.). Collection of Evidence from the Internet: Part 1. Retrieved June 14, 2011, from: http://www.dfinews.com/article/collection-evidence-internet-part-1?page=0,1.
42. Shipley, T. G. (n.d.). Collection of Evidence from the Internet: Part 2. Retrieved June 14, 2011, from: http://www.dfinews.com/article/collection-evidence-internet-part-2.
43. Shipley TG, Reeve HR. Collecting Evidence from a Running Computer: A Technical and Legal Primer for the Justice Community Sacramento, CA: Search Group, Incorporated; 2006.
44. Warrington, D. (n.d.). Crime Scene 101: Locating and Documenting Evidence. Retrieved June 14, 2011, from: http://www.forensicmag.com/article/crime-scene-101-locating-and-documenting-evidence.
45. Whitcomb, C. (n.d.). A Virtual Digital Forensics Lab. Retrieved September 28, 2011, from: http://www.ascld.org/files/digital%20VDEL%20Craiger%20ASCLD%20cmw.pdf.
46. WSAZ. (2011, April 1). UPDATE: Donald Good Receives Two Life Sentences in Mall Rape Case. Retrieved September 27, 2011, from: http://www.wsaz.com/news/headlines/105522183.html.