
Chapter 3. Persistence pays off
This chapter covers
- The benefits of JDBC and JPA, and why they won’t work in an OSGi environment without help
- How enterprise OSGi and the Apache Aries extensions restore a lovely programming model
- How to read and write from a database in your sample application
- How to use transactions for cleanup when things go wrong
Just as it needs a frontend, every enterprise application needs a backend. For many business applications the heart of the backend is persistence—either read-only access to a directory service, or a full read–write relational data mine, or something in between. This chapter explains how to use persistence and transactions in an enterprise OSGi environment.
Let’s start with a reminder of the persistence options available in Java.
3.1. Java and persistence
Persistence has been a core part of the Java platform since its introduction. Although the designers of Java didn’t envisage it being used in the kinds of enterprise environments where it’s now common, databases have always been important.
3.1.1. Making persistence easy
One of the aims of the early Java persistence support was to provide solid abstractions for database access. Databases are notoriously idiosyncratic, and accessing them can be hard work, so it’s an area that benefits from a little help from the platform.
JDBC
Java support for databases began with the Java Database Connectivity (JDBC) API, a part of the core Java platform. All of the classes in the javax.sql and java.sql packages are part of the JDBC API. JDBC abstracts away the vendor-specific details of connecting to databases. It also provides interfaces that represent SQL statements and the results of a query.
Although they’re database-independent, these interfaces are thin wrappers for the raw database access. Developers assume complete responsibility for converting the result set into Java objects. Developers must also code all of the SQL statements for inserting and retrieving data. Developers need a fairly solid grasp of SQL and database administration to achieve much with JDBC. Because SQL support tends to vary between database vendors, developers also need to know a good deal about the intended deployment environment for their applications.
This programming model is clearly not ideal, and there have been a number of attempts over the years to provide more substantial abstractions between the developer and the database.
Entity Beans
The first attempt to protect developers from databases was the entity bean. Entity beans were introduced in the Java Enterprise Edition as part of the Enterprise JavaBeans (EJB) specification. Entity beans moved to an object-oriented view of database access; each entity bean represented a collection of data that was persisted. The job of managing the persistence was handled by the container, leaving the programmer free to focus on the data structure and the business logic.
It all sounds nice, but after some initial uptake, EJBs were criticized and largely dropped from any serious business use. There was widespread agreement that the problem they were trying to solve was a real one, but the entity bean cure might be worse than JDBC disease. EJBs were heavyweight, difficult to use, and verbose. Developers were required to implement a dizzying assortment of interfaces and lifecycle methods.
The EJB 3.0 specification has gone some way to rehabilitate EJBs by replacing the creaking interface-driven beans with annotated Plain Old Java Objects (POJOs). But the original entity beans didn’t even survive to EJB 3.0, having been replaced with their more popular competitor, JPA.
Hibernate
Despite their eventual unpopularity, entity beans did much to popularize Object-Relational Mapping (ORM). The ORM ideas were picked up by a range of lightweight alternatives to EJBs. The dominant competitor was an open source product called Hibernate. Hibernate uses an XML file (or, in later versions, annotations) to define the mapping between data objects and database content. The Hibernate framework does all the JDBC work so that the application doesn’t have to.
JPA
The Java Persistence API (JPA) is a Java EE 5 specification that’s a natural evolution of Hibernate and another ORM technology known as JDO. Many Hibernate ideas were incorporated into JPA, and more recent versions of Hibernate implement the JPA specification (as do many other persistence providers such as EclipseLink and OpenJPA). The standardization of JPA allows different persistence providers to be used without rewriting applications.
Although JPA (and its precursors, like Hibernate) is now the persistence programming model of choice, JDBC hasn’t gone away. JPA implementations are all built internally on JDBC (figure 3.1).
Figure 3.1. JDBC provides a useful Java-language access layer on top of a raw database. JPA and other ORM frameworks add support for transparently moving between database entries and Java objects.
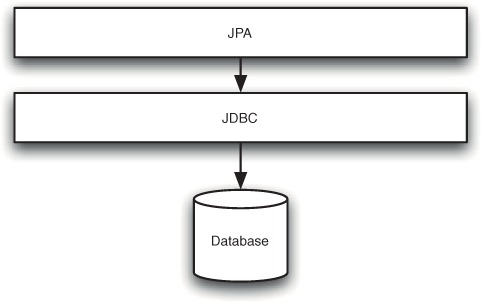
Although it’s a Java EE specification, JPA also works well in a conventional Java environment. Unfortunately, until recently, neither JDBC nor JPA worked well in an OSGi environment. This was a shame, because these technologies had some limitations that could be fixed by OSGi. Although JPA gives good vendor-independence, because there’s no support for dynamic replacement, JPA providers can’t be swapped without restarts. Similarly, JDBC drivers can’t be removed from a running system.
3.1.2. The problems with traditional persistence in OSGi
Why don’t JDBC and JPA work well as designed in an OSGi environment? After all, OSGi is Java with a fancy classpath.
It turns out that it’s exactly the classpath that causes problems. JDBC driver implementations rely heavily on Class.forName() and META-INF services. This sort of reflection doesn’t work in OSGi without an explicit package dependency on the driver implementation. The DriverManager only scans the META-INF/services folder once, on initialization, so it might not even find all of the available drivers. (Remember that in OSGi things appear on and disappear off the classpath.)
The general experience of using JDBC in an OSGi environment, therefore, is that often the DriverManager won’t recognize your datasource drivers. Even when the DriverManager does find the drivers and tries to initialize them, the result is almost always a ClassNotFoundException.
JPA faces similar problems because it uses similar patterns. EntityManagerFactories are constructed reflectively from META-INF services by a static Persistence class. The consequence is that the EntityManagerFactories can’t be found and can’t be constructed if they are found.
Workarounds for both JPA and JDBC are possible, but they’re not pretty. They generally involve strange little wrappers to bundle-ize JDBC and JPA providers and register them by hand with the static DriverManager or Persistence factory classes. Explicit dependencies on the exact JDBC and JPA provider in the manifest of the consuming code are unavoidable.
What the META-INF services pattern is trying to achieve is a loose, service-oriented coupling between the consuming code and the implementation. The ironic and unintended side effect of this pattern in core OSGi is tight coupling and explicit management of implementations.
Happily, enterprise OSGi offers a first-class services solution. It’s natural to register both JDBC and JPA providers as OSGi services. These can then be looked up from the Service Registry or injected using Blueprint.
Application-Managed and Container-Managed Persistence
With a JDBC provider that adheres to the enterprise OSGi JDBC service specification, an application is well positioned to access a database using JDBC in a clean, service-oriented way. But few developers use JDBC to access databases anymore, unless they’re writing a JPA implementation!
The JPA service specification also allows clean, service-oriented database access, but it’s not as complete a solution as the JDBC one. Conventional JPA can be used in both Java SE and Java EE environments. In Java SE environments, the application needs to do a reasonable amount of work to get hold of the right bits of the JPA implementation, define scopes, handle exceptions, and generally manage the lifecycle of the JPA resources. This is described as unmanaged or application-managed JPA. In a Java EE environment, the container can take over much of this work, significantly reducing the amount of boilerplate code.
What’s offered by the JPA service specification is the equivalent of the Java SE level of support. Apache Aries provides extensions to this that bring the support up to the level of container-managed Java EE.
Managed JPA in Enterprise OSGI
The Aries JPA container makes use of the metadata required by the JPA service specification, but provides managed resources rather than unmanaged ones. By using dependency injection, an enterprise application can integrate with managed JPA using a single line of XML. The resulting code will automatically participate in JTA transactions and will have its lifecycle managed by the container.
How does this all look in action? Let’s start by extending your Fancy Foods application with some persistent data.
3.2. Building a persistent application
The Fancy Foods application you’ve written is a nice application. It’s got clean and elegant modularization and a fully dynamic architecture. New translations can be dropped in, and it has a nice push-based model for publishing special offers. Nonetheless, you may have a bothersome feeling that something is missing. The only Food instance in the entire system is one hardcoded box of chocolates. Not quite a superstore yet! We probably won’t have to work hard to persuade you that a food shop needs more food, and that the most sensible way to manage ever-growing stock lists, variable prices, fluctuating inventory levels, and complex systems of categorization is with a database.
3.2.1. Setting up a datasource
Before you can do anything exciting with databases, you need to set up a datasource. The datasource is a mechanism for talking to the backend database from Java code. All that’s required is a garden-variety datasource, but the pattern for setting it up may be new to you. Application servers usually support using an administrative console or series of configuration files for defining datasources. The platform you’re using is a bare-bones runtime, so it doesn’t have a user interface for datasources—or any graphical user interface at all, in fact.
Luckily, some of the generic wiring utilities provided by enterprise OSGi work well for configuring datasources. You’ll use Blueprint to help out (figure 3.2). As you continue through the book, you’ll see this is a common pattern.
Figure 3.2. The datasource bundle is about as simple as a useful bundle could be. It has a manifest and a Blueprint file, but nothing else.

You’ve already seen how to add Blueprint metadata to an OSGi bundle in section 2.3.8. Set up a new bundle, fancyfoods.datasource, with a blueprint.xml file in OSGI-INF/blueprint.
Isn’t a bundle with nothing inside it but a manifest and a Blueprint file a bit of a heavyweight way of setting up a datasource? Well, if we’re honest, perhaps! But the datasource configuration is closely tied to the database implementation. The Apache Aries sandbox that we’re using comes with the Apache Derby database, but as you explore other stacks (chapter 13) you may wish to switch databases, or move to an application server with built-in admin support for configuring datasources. Isolating the datasource ensures you won’t have to rewrite or rip out datasource configuration from another bundle as you update your stack.
Listing 3.1 shows the Blueprint for setting up the datasources. It defines two datasources, one for transactional writes, and one for optimized nontransactional reads. A lot is going on in this Blueprint file, so we’ll walk through the parts in detail.
Listing 3.1. An OSGI-INF/blueprint/blueprint.xml file that defines a Derby datasource

The first thing that’s interesting about this Blueprint is that the classes that are being instantiated for the bean (![]() and
and ![]() ) aren’t ones from the datasource bundle itself. This is different from what you were doing in chapter 2, where you were wiring together your own classes. It turns out the origin of the class doesn’t matter at all. As long as
the class can be loaded and has a public constructor, then Blueprint can create it and set properties on it. Even constructors
that take arguments can be accommodated with Blueprint’s <argument> element.
) aren’t ones from the datasource bundle itself. This is different from what you were doing in chapter 2, where you were wiring together your own classes. It turns out the origin of the class doesn’t matter at all. As long as
the class can be loaded and has a public constructor, then Blueprint can create it and set properties on it. Even constructors
that take arguments can be accommodated with Blueprint’s <argument> element.
In this case, the essential property is the name of the physical database. You want to get up and going quickly, so you’ll
opt for an in-memory database by prefixing memory: to the database name. (It should be obvious that this is great for testing but not recommended for long-term business use!)
For convenience, the datasource should automatically create the database, which can be achieved by setting the createDatabase property ![]() .
.
With those properties set, you’ll have good transactional and nontransactional datasources that come with free autocreated databases. The next step is to make these datasources available to be connected to.
Services, Service Properties, and Filters
For this, you’ll use another feature of Blueprint: the ability to set service properties. Service properties are a general OSGi concept. When it’s registered in the Service Registry, any service can have arbitrary properties set on it. Unlike bean properties, the service properties aren’t for the benefit of the service. In fact, the service doesn’t even get to see them. Instead, the service properties tell the rest of the world a bit more about the service, so that they can decide between multiple possible matches. See figure 3.3.
Figure 3.3. Properties can be set for both beans and services using Blueprint. Bean properties are used by the bean’s business logic. Service properties are invisible to the object implementing the service, but they’re visible to consumers of the service.

Services can be looked up using the interface name, or extra criteria can be specified. These extra criteria are set using OSGi service filters. The filter syntax is based on LDAP syntax. It can take a bit of getting used to all the ampersands and parentheses, but filters are actually straightforward. If you’d like to brush up on the finer points of filters, we’ve got more examples in appendix A.
The most important thing to remember about filters is that they’re directly related to service properties; if it can be set using a service property, it can be queried using a filter. This means service lookups can be general—“give me anything that implements this interface”—or very, very specific—“give me a service with this interface that also has this property set to that value but also doesn’t have this other property set to some other value.”
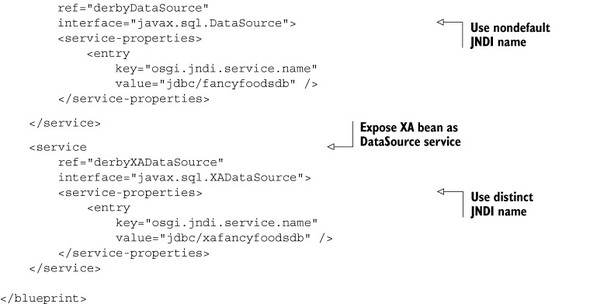
How does that relate to datasources? In section 2.4, we explained how our Aries stack helpfully publishes services to JNDI. Like a web container, most JPA implementations weren’t originally written with enterprise OSGi in mind, and they rely on JNDI to find their datasources. Luckily, any Blueprint service can be looked up in JNDI. The lookup name is the interface implemented by the service, javax.sql.DataSource in this case. Anything can look up the datasource for your fancyfoodsdb database using the JNDI name osgi:service/javax.sql.DataSource.
This works nearly perfectly. JPA can be pointed to the JNDI name for the datasource, and it can look it up and use it as intended. The problems happen when the server has more than one datasource. Which one is returned from a service lookup of the javax.sql.DataSource interface? Well, it depends, but it’s probably not the one you were hoping for. Because each datasource is closely associated with a particular database, a datasource isn’t the sort of service where any arbitrary implementation will do!
This is where service properties and filters come to the rescue. Service properties can be added to the service, and then any JNDI lookup can filter on those properties. In listing 3.1 you specified a service property for the datasource:
<service-properties>
            <entry
                key="osgi.jndi.service.name"
                value="jdbc/fancyfoodsdb" />
        </service-properties>
This service can be looked up from JNDI using the following name:
osgi:service/javax.sql.DataSource/
 (osgi.jndi.service.name=jdbc/fancyfoodsdb)
Specify the osgi:service namespace, and then the interface name, and then you can add on any filters you like.
That’s a slightly long-winded way of getting hold of a datasource from JNDI. It’s too long to fit on a single line in this book, in fact! Enterprise OSGi gives you the tools to do better than that. The osgi.jndi.service.name property is a special property that tells the container to register the service in JNDI under that name. You can shorten the JNDI name to just the namespace and the name you provided:
osgi:service/jdbc/fancyfoodsdb
Note: Apache Aries Limitations
For Apache Aries transactions wrappers bundle versions 0.3 and below, the short-form JNDI lookup won’t work, and the long-form lookup should be used instead.
The osgi.jndi.service.name property works in both directions. Objects registered in JNDI can be looked up as OSGi services using their interface name. As part of the conversion, the container will set the osgi.jndi.service.name to the object’s original JNDI name.
The Datasource Manifest
Before the datasource can be deployed as an OSGi bundle, it will also need a manifest. The manifest defines the bundle symbolic name, and it will also need to import some packages. But wait—why does a bundle with no source code need to import packages?
Just because the bundle doesn’t have any class files doesn’t mean it’s not doing anything. The datasource bundle does a great deal, but does it declaratively with Blueprint metadata. In this example, the Blueprint file refers to classes and interfaces in the javax.sql and org.apache.derby.jdbc packages. These classes will be instantiated by the Blueprint container on behalf of the bundle.
Think for a moment about what would happen if you tried to start the datasource bundle in an environment where nothing provided the javax.sql or org.apache.derby.jdbc packages. When the Blueprint container tried to instantiate the EmbeddedDataSource class it would fail horribly with a ClassNotFoundException. Not good. OSGi is all about avoiding these unpleasant runtime surprises by declaring dependencies up front.
With those dependencies, the manifest is as follows:
Manifest-Version: 1.0
Bundle-ManifestVersion: 2
Bundle-Name: Fancy Foods Datasource
Bundle-SymbolicName: fancyfoods.datasource
Bundle-Version: 1.0.0
Import-Package: javax.sql,
 org.apache.derby.jdbc
Confirming You Have a DataSource—Or Three
Build your JAR and drop it into the load directory. When you list the bundles with ss, you should see your datasource bundle. If you get the bundle details with the bundle command, you’ll see that your bundle is providing several datasource services (figure 3.4).
Figure 3.4. The datasource bundle provides three datasource services. The first and third were explicitly configured in the blueprint.xml, but the second was automatically created by the container to provide support for implicit transactions.
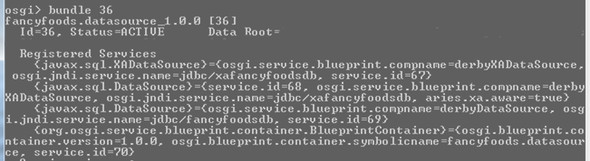
Not only do you have the two datasource services you registered, the container has helpfully provided you with a third. The third service implements the DataSource interface, as expected by JPA, but it provides an extra function built around the XADataSource you registered, to provide full container-managed transaction support (figure 3.5).
Figure 3.5. The fancyfoods.datasource bundle explicitly declares two datasource services. A third service that consumes the XADataSource is automatically registered by the container.

This has perhaps been more work than you expected to have to do to set up a datasource. It’s important to remember that the assembly shipped with the Apache Aries samples isn’t a proper application server, or even half an application server. If you opt to use Apache Aries with one of the open or commercial application server integrations—which we heartily recommend—setting up the datasources will be much less verbose. In the interim, think of the process of setting up the datasources as a useful exercise in advanced Blueprint.
Now that you have a datasource service, what can you do with it?
3.2.2. Creating a persistence bundle
The datasource groundwork allows you to move on to the real meat of the Fancy Foods persistence. You set your datasources up to use in-memory databases, so you don’t need to worry about creating physical databases or writing lots of SQL to set them up. It’s still worth thinking, though, about what you’re trying to model with the database and what kind of data you want to store.
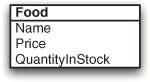
The Fancy Foods Schema
The schema for modeling the Fancy Foods shop is fairly straightforward—so straightforward, in fact, that it contains only one small table. Figure 3.6 shows the schema. You shouldn’t infer anything from our tiny schema about the general scalability of JPA in enterprise OSGi. We’ll play with quite a small database, but complicated databases can also be handled with ease.
Figure 3.6. The schema for the Fancy Foods database. It’s probably not the most complex schema you’re likely to see in your career! The database only has one table, representing a food. Foods have a name, a price, and a stock level.
Defining a Persistence Unit
You tell JPA about your schema in two ways. The first is in the persistence.xml file. This file is the heart of a JPA application, whether it’s running in Java SE, Java EE, or enterprise OSGi. It sets up one or more persistence units. Each persistence unit defines a relationship between a datasource and Java classes that represent database tables (see figure 3.7).
Figure 3.7. The connection between a database and Java objects is managed by a JPA entity manager. The persistence unit defines the relationship between the datasource and the classes.

We won’t cover persistence units in too much detail, because an enterprise OSGi persistence.xml file is pretty much the same as a Java EE persistence unit or even a Java SE persistence unit. Listing 3.2 shows the persistence.xml for the Fancy Foods shop.
Each table is represented by one Java POJO, known as an entity. In your case you only have one table, so you only declare one entity.
Listing 3.2. The META-INF/persistence.xml file

The persistence unit must declare both a JTA and a non-JTA datasource (see figure 3.8). JPA-managed database access usually requires a transactional datasource, but transactions can be expensive, so in some cases the JPA container optimizes operations by using a nontransactional datasource. We’ll come back to transactions in section 3.3. Use the JNDI names you configured in listing 3.1.
Figure 3.8. The persistence bundle uses the services exposed by the datasource bundle. It accesses them by JNDI lookup.

The persistence unit also declares one or more class files, each of which contains an entity that’s mapped to a database table. Finally, you don’t want to have to worry about SQL and table creation, so add an extra property that requests that the database tables are generated on the fly, based on the Java entities. The combination of this and the setting to create the database in section 3.3 means that you can now do database programming without ever having to create or configure a database.
Entities
For the moment, the persistence unit declares one entity, fancyfoods.persistence .FoodImpl. FoodImpl is an implementation of the Food interface we defined in section 2.3.9. It allows Food objects to be persisted to, and read from, a database. The nice thing about it, and the reason why so many people use JPA, is that it does all this with one or two tiny little annotations; JPA does all the work for you, as shown in the following listing.
Listing 3.3. The implementation of the FoodImpl entity class

Although it’s too long to include in full here, the FoodImpl class is a thin data carrier. It only contains getters and setters, without any business logic. It doesn’t have responsibility for persisting itself.
Enhancing the entities
Before they can be used by most JPA providers, entity POJOs must be enhanced. Enhancement adds extra bytecode to the classes. If you’re running in a Java EE 5 (or later) application server, JPA entities will be automatically enhanced. Usefully, recent versions of Apache Aries are also able to perform this enhancement. If you aren’t running in a system that provides automatic enhancement, then an Ant task (or similar) can be used to enhance the entities when building, but it can also be done using an Eclipse builder.
Note: Apache Aries Limitations
For versions of Apache Aries JPA below 1.0, or OSGi framework versions earlier than 4.3, entities aren’t automatically enhanced. The OpenJPA documentation has instructions on build-time enhancement. If you’re using one of the application servers discussed in chapter 13, rather than our little Aries assembly, the server may take care of enhancing the entities at runtime.
The Persistence Manifest
To achieve full container management of your persistence, you need to let the container know that this is an OSGi persistence bundle by telling it about the persistence.xml file in the bundle manifest:
Manifest-Version: 1.0
Bundle-ManifestVersion: 2
Bundle-Name: Fancy Foods Persistence Bundle
Bundle-SymbolicName: fancyfoods.persistence
Bundle-Version: 1.0.0
Meta-Persistence:
Import-Package: fancyfoods.food;version="[1.0.0,2.0.0)",
 javax.persistence;version="[1.1,2.0)",
 org.apache.openjpa.util
The Meta-Persistence: header tells the JPA service where to look for the persistence.xml file (which therefore doesn’t need to be called persistence.xml). The header must be specified for the bundle to be eligible for managed JPA, but the location is optional. If no location is specified, it defaults to META-INF/persistence.xml, the same as in the Java SE and Java EE cases.
As usual, the bundle also needs package imports, but not many. The persistence bundle will provide implementations of the Fancy Foods API, so it will need to import that package. It also needs the JPA API, but nothing else. Because of the OSGi services approach, it doesn’t need any implementation-specific packages.
Notice that the fancyfoods.persistence package isn’t exported. In fact, no packages are exported. Data is persisted using JPA, but consuming code shouldn’t have to know these implementation details. In fact, consuming code shouldn’t even have to know that there’s a fancyfoods.persistence bundle. How does anything get hold of the persistence classes? Blueprint!
Setting up a Persistence Service
Define a new interface, fancyfoods.food.Inventory, shown in the following listing. To keep the interface separate from implementation, it should be packaged in the fancyfoods.api bundle you wrote in chapter 2.
Listing 3.4. The interface for the food persistence service
package fancyfoods.food;

import java.util.List;

public interface Inventory {

    Food getFood(String name);

    List<Food> getFoodsWhoseNameContains(String name, int maxResults);

    void createFood(String name, double price, int quantity);

    int removeStock(String name, int quantity);

    int getFoodCount();

}
The Inventory interface provides methods for adding and removing food from the database, searching for food in the database, and finding out how much food there is in the database. In a more complex application, you might want to expose more complex queries as well. You haven’t exposed the fact that you’re using JPA in your interface. This keeps things more flexible and decoupled, and it can be particularly handy when it comes to unit testing.
You may be wondering why you’re rebuilding bundles you wrote earlier. After all, OSGi is all about modularity, and modularity definitely doesn’t mean rebuilding existing bundles every time you add new function to your application. Our excuse is that you’d normally do a bit more up-front design work rather than build an application up one chapter at a time!
But, if you don’t like the idea of rebuilding the API bundle, feel free to add a new bundle instead. Our one caution is that you must choose a different package name for Inventory. Packages are closely associated with bundles in OSGi, and splitting a package across multiple bundles is best avoided. For one thing, it’s not very modular! More seriously, by default OSGi will only wire importing bundles to one of the exporting bundles, leaving some of your interfaces inaccessible.
The Blueprint for the persistence service
In the cases where you’re not unit testing, it’s most convenient to allow the Blueprint and JPA containers to do most of the work to set up and manage the instances of Inventory.
You’ll be relieved to see that the Blueprint for setting up the managed persistence is much shorter than the Blueprint for setting up the datasource, even though it’s arguably achieving a great deal more, as shown in the following listing.
Listing 3.5. The blueprint.xml for the persistence bundle

This creates an instance of InventoryImpl, performs some magic with transactions ![]() , and injects the InventoryImpl with a JPA EntityManager
, and injects the InventoryImpl with a JPA EntityManager ![]() . For application-managed persistence, an EntityManagerFactory could be injected instead with the following line:
. For application-managed persistence, an EntityManagerFactory could be injected instead with the following line:
<jpa:unit property="entityManagerFactory" unitname="fancyfoods" />
Programming with JPA
The InventoryImpl class is where you get to see the JPA programming model in action. The reference to the EntityManager is injected, and so the InventoryImpl never needs to worry about creating it, closing it, or checking that it’s associated with the right persistence context:
public class InventoryImpl implements Inventory {

    private EntityManager em;

    public void setEntityManager(EntityManager em) {
        this.em = em;
    }
Writing and retrieving data
Food can be retrieved from the database and persisted to the database easily using the JPA API:
@Override
public FoodImpl getFood(String name) {
    return em.find(FoodImpl.class, name);
}

@Override
public void createFood(String name, double price, int quantity) {
    FoodImpl food = new FoodImpl(name, price, quantity);
    em.persist(food);
}
The find() method retrieves a persisted FoodImpl by its primary key, and the persist method writes a new or modified FoodImpl to the database.
Using the Java Persistence Query Language
If you want to do anything more than find objects by their primary key, you’ll need to use Java Persistence Query Language (JPQL):
@Override
public List<Food> getFoodsWhoseNameContains(String foodName,
                                            int maxResults) {
    String query = "SELECT f FROM FOOD f WHERE f.name LIKE '%" +
              foodName + "%' ORDER BY f.quantity DESC";
    Query q = em.createQuery(query);

    q.setMaxResults(maxResults);
    List<Food> list = q.getResultList();

    return list;
}

@Override
public int getFoodCount() {
    Query query = em.createQuery("SELECT COUNT(f) FROM FOOD f");
    Number count = (Number) query.getSingleResult();
    return count.intValue();
}
JPQL may bring back unpleasant (or pleasant) memories of SQL for some of you. In terms of syntax, it’s much like SQL, but avoids most vendor-compliance compatibility issues. It breaks the object-oriented abstraction provided by JPA and makes it clear that there is a database involved in all this.
Initializing the Database
One slight disadvantage of allowing JPA to create all your database tables for you in memory is that the database will always be completely empty when you start the system. This is fine for some applications, but it’s not ideal for a food shop that’s supposed to have food. Use another Blueprint bean to initialize the database when the system starts:
<bean
    id="populator"
    class="fancyfoods.persistence.InventoryPopulater"
    init-method="populate"
    activation="eager"    >
        <property
            name="inventory"
            ref="inventory" />
</bean>
If you’re familiar with OSGi bundle activators, you’ll recognize that this bean plays a similar role. It’s activated as soon as the bundle starts, rather than waiting to be looked up or injected into another bean. The advantage over a normal bundle activator is it can be injected with any other Blueprint reference.
Another advantage of the InventoryPopulater over a bundle activator is that an eager Blueprint bean isn’t required to implement any special interface (see the following listing). It only needs to provide the declared initialization method and setters for any injected properties.
Listing 3.6. InventoryPopulator fills the database when the bundle starts

The populate method adds two cheeses and a chocolate to the database. To avoid trying to persist the same blue cheese row six times, the
populater is defensive and only creates new foods if the database is empty ![]() .
.
Warning: How Many Times is an Eager Blueprint Bean Initialized?
The eager Blueprint runs once when its bundle is started. Be careful here—this feels a lot like constructing and initializing a Java singleton, but it’s not the same. A singleton will be initialized once in the lifetime of a JVM. Bundles, on the other hand, can be stopped and started repeatedly without restarting the JVM. This means each eager Blueprint bean will be created the same number of times that the bundle is started during the lifetime of the virtual machine. Be careful using init methods to change the external state. We’re patently using the init method as a simple way to change the external state here, so this is a case of “do as we say, not do as we do!”
3.2.3. Making use of the data
Now that Fancy Foods has a datasource and a JPA persistence bundle, all that’s needed is something to take advantage of the persistence. The special offer in section 2.3.3 used the time of year to determine which chocolates should be on offer. Many other foods, on the other hand, aren’t seasonal purchases. Instead, shops aim to promote foods that are selling poorly, so that they don’t get left with piles of food that are past their sell-by dates. The container-managed persistence makes that kind of promotion simple.
Let’s add a second department, in charge of cheese. The appeal of cheese doesn’t vary seasonally, but cheese does have a limited lifespan, so it’s important to keep the stock moving. Whichever cheese has the highest stock levels should be displayed prominently on the front page to try to spark interest. To work out the list of available cheeses and their stock levels, we use Blueprint to wire together a SpecialOffer service and the Inventory service, as shown in the following listing.
Listing 3.7. The Blueprint for registering a special offer with an Inventory dependency
<?xml version="1.0" encoding="UTF-8"?>
<blueprint xmlns="http://www.osgi.org/xmlns/blueprint/v1.0.0">
  <service interface="fancyfoods.offers.SpecialOffer">
    <bean
      class="fancyfoods.department.cheese.offers.DesperateCheeseOffer">
      <property    name="inventory" ref="inventory" />
    </bean>
  </service>

  <reference id="inventory" interface="fancyfoods.food.Inventory" />
</blueprint>
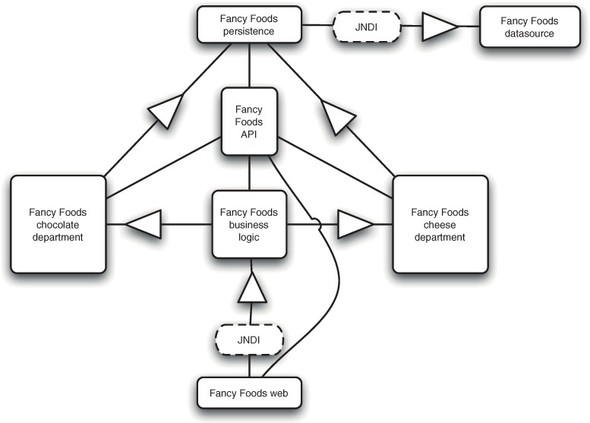
With this new bundle, our system has the architecture shown in figure 3.9.
Figure 3.9. The architecture of the Fancy Foods application
The special offer implementation takes advantage of the injected Inventory service to work out which cheese has the highest stock levels, as shown here.
Listing 3.8. The DesperateCheeseOffer class

Build a bundle containing the blueprint.xml and the DesperateCheeseOffer class (and a manifest). When you drop this bundle into the load directory, you should find that the front page of the Fancy Foods shop has gotten a lot more exciting (figure 3.10).
Figure 3.10. After the addition of the cheese department, datasource, and persistence bundles, the Fancy Foods shop has a new special offer, driven from the cheese stock levels in the database.
If you get the persistence wrong, you’ll find that the cheese offer isn’t listed. If the dependencies of the DesperateCheeseOffer aren’t available, Blueprint won’t instantiate the cheese offer and it won’t publish a SpecialOffer service. Using the OSGi console’s ss and bundle commands can usually help track down the weak link in the dependency chain.
After you’ve fixed and rebuilt the misconfigured bundle, you’ll find that things kick into life without any restarts or manual interventions on your part. All that’s required is a refresh of the web page for the cheese offer to appear. (And if you stop the cheese bundle or any of its dependencies in the OSGi console using the stop command, the cheese offer will vanish again. The authors can stop and start bundles and watch application behavior change a lot before they get bored of the trick.)
3.3. Transactions—the secret ingredient
Working through the inventory example, you’ll have noticed a few references to transactions, XA, and JTA. You’ve written the Inventory class so it has full container-managed transaction support. Does it need this elaborate transaction infrastructure for its simple database reads and writes? Well, possibly not. But container-managed JPA (with or without OSGi) always requires a transaction to be present to update a database, so doing work without transactions means moving to unmanaged or application-managed JPA.
Even in the unmanaged case, it’s difficult to do anything with databases without getting transactions involved. We don’t recommend you try it, but rewriting the example so that it doesn’t use XA and JTA requires more transaction-related metadata and an alarming quantity of transaction-related code. Getting it to work at all requires a pretty solid knowledge of transactions. Luckily, you can usually rely on container management of transactions and for the most part ignore them.
3.3.1. What is a transaction?
You may want to understand a bit more about what’s going on with JTA transactions and enterprise OSGi. Particularly if you’re writing an application where failures and data integrity matter, it’s worth digging deeper into the world of enterprise transactions.
A transaction is a set of distinct operations that must behave like one atomic operation. If disaster strikes and one part of the group fails, the whole lot must be reversed.
Local Transactions
The simplest transactions are those that take place entirely on one resource. For example, a database may update several rows under a single transaction to ensure the state of the data remains consistent. In these cases there’s no doubt about whether parts of the transaction have succeeded or failed. Local transactions are sufficiently straightforward that they don’t really count as part of the enterprise programming model.
Distributed Transactions
In the distributed case, asynchronous and unreliable communication means that establishing whether any part of a transaction has been successful is rather more tricky. Has a remote database not reported success because it’s crashed, or because of unusually heavy network traffic? When the transaction manager makes the decision to commit or roll back, it’s also difficult to be sure all the participants in the transaction have followed along. Did that server fail before or after it applied the commit request?
Despite their difficulty, transactions are arguably even more essential in the distributed case. Transactions will almost certainly take longer, so the chances of multiple users trying to access the same data at the same time are higher. What happens if an online shopper buys a DVD and then cleans out their account by buying a car before the DVD payment has been processed?
These worries are addressed by using a transaction manager to coordinate the transaction across multiple resources using a robust transaction protocol known as a two-phase commit. Writing a transaction manager to coordinate a two-phase commit is complicated and error prone. Luckily, robust open source transaction manager implementations are available.
JTA
The Java Transaction API (JTA) is the Java EE implementation of the XA two-phase commit API. It defines an API for resources to communicate with the transaction manager, and also an API for applications to control transaction boundaries programmatically. JTA is the accepted standard for Java transaction managers.
Declarative Transactions
Even with the support provided by the basic JTA, coordinating transactions can be time consuming and fragile. Rollbacks and commits need to be made in code, leaving the chance that some code paths, particularly unexpected exits, could fail to complete the transactions properly.
The process of handling transactions is made much simpler for container-managed declarative transactions. Transaction boundaries are declared simply in metadata and the container handles creating the transactions and managing failure cases. Container-managed transactions are so useful that they’re arguably among the key attractions of application servers.
Updating an inventory with application-managed transactions
To see the difference, let’s have a look at how the InventoryImpl implementation to persist a Food object would look if it were using application-managed persistence (and by extension application-managed transactions):
EntityManager em = entityManagerFactory.createEntityManager();
EntityTransaction tx = em.getTransaction();
em.getTransaction().begin();
try {
    em.persist(food);
    em.getTransaction().commit();
} catch (PersistenceException e) {
    if (em.getTransaction().isActive()) {
        em.getTransaction().rollback();
    }
} finally {
    em.close();
}
Not much fun, is it? Everything that’s being done by hand here was automatically handled for you by the container (with much less hand-wringing and debugging) in section 3.2.4.
3.3.2. Handling multipart transactions
You may be feeling slightly suspicious about transactions you can’t see and didn’t do much work to create. Is the single line <tx:transaction method="*" value= "Required" /> in your Blueprint enough to ensure complete transactional integrity? Aren’t you better off keeping the transactions where you can see them?
The answers to these questions are, respectively, “not totally” and “almost never.” There will be applications where you’ll have to think a bit harder about what’s going on with your transactions, but there will be few occasions indeed where this extends to having to code the transactions by hand.
Let’s explore an example where the minimal transaction support isn’t enough. So far, Fancy Foods has been a bit more like a printed flier than a modern shopping website. (And if it was a flier for your business, you’d probably fire the graphic designer responsible.) Users can see some of the available food, but they can’t buy the food. Profits will be higher if people can buy things!
Enabling Food Shopping
A fancyfoods.foods.Customer interface should be added to the API bundle, and a fancyfoods.persistence.CustomerImpl implementation class written. As with FoodImpl, the @Entity annotation should be added and a primary key declared:
@Entity
public class CustomerImpl implements Customer {

    @Id
    private String name;
    private double creditLimit;
    private double balance;
[. . .]
Figure 3.11. The schema for the purchase-enabled Fancy Foods website. The schema is still simple, but there are now two entities, and two corresponding tables in the database.

If you’re using a version of Aries persistence below 0.4, the new entity class needs to be listed in the persistence.xml so that it can be managed by JPA:
<class>fancyfoods.persistence.CustomerImpl</class>
We’ll also add an Accounting interface and implementation to handle retrieving and updating customer details. Like the InventoryImpl, the AccountingImpl should be managed by Blueprint and exposed as a service:
<bean
    id="accounting"
    class="fancyfoods.persistence.AccountingImpl">
    <tx:transaction    method="*" value="Required" />
    <jpa:context property="entityManager" unitname="fancyfoods" />
</bean>

<service
    interface="fancyfoods.food.Accounting"
    ref="accounting" />
The EntityManager gets injected into the AccountingImpl, which makes handling the persistence easy. The AccountingImpl will do something we haven’t done yet, which is to make changes to entity classes and persist them back.
Listing 3.9. The chargeToAccount() method of the AccountingImpl class

If a request is made to charge a customer’s account, the customer manager will first try to retrieve the customer record from the database. If the customer can’t be found, the manager will—trustingly—set up a new credit account for that customer. The customer manager will then try to charge the customer’s account. If the customer’s credit limit is exceeded, no charge will be made and an exception will be thrown.
Not only will nothing be charged to the account, no changes at all will be made. In particular, no account will be created for the new customer. Although the new customer instance was created and persisted, the entire chargeToAccount method is wrapped in a single transaction. If any exception is thrown from the method, all changes made in the method will be rolled back.
You can update the food stock levels in a similar way in the inventory manager class:
public int removeStock(String name, int quantity) {
    FoodImpl food = getFood(name);
    int currentLevel = food.getQuantityInStock();
    int newLevel = currentLevel -  quantity;
    if (newLevel >= 0)  {
        food.setQuantityInStock(newLevel);
        em.persist(food);
        return newLevel;
    } else {
        throw  new IllegalArgumentException(
            "Cannot have levelbelow 0: "+ newLevel);
    }
}
There should never be an attempt to purchase nonexistent food, so you don’t add special code to handle that case. You automatically created customer accounts for new customers, but you definitely don’t want to create entries for foods if they don’t already exist in the database.
The final piece is a Shop service that coordinates purchases across the inventory and customer accounting classes. It can be created by Blueprint and automatically wired to the inventory and accounting beans:
<service
    interface="fancyfoods.food.Shop">
    <bean
        class="fancyfoods.persistence.ShopImpl">
        <tx:transaction
            method="*"
            value="Required" />
        <property
            name="inventory"
            ref="inventory" />
        <property
            name="accounting"
            ref="accounting" />
    </bean>
</service>
The shop implementation will have its inventory and account dependencies injected. To handle a purchase, it decrements the stock levels of the food, and debits the total cost to the customer’s account:
public int removeStock(String name, int quantity) {
    FoodImpl food = getFood(name);
    int currentLevel = food.getQuantityInStock();
    int newLevel = currentLevel - quantity;
    if (newLevel >= 0) {
        food.setQuantityInStock(newLevel);
        em.persist(food);
        return newLevel;
    } else {
        throw new IllegalArgumentException(
            "Cannot have level below 0: " + newLevel);
    }
}
You don’t want customers to be able to rack up credit indefinitely. If they’ve exceeded their credit limit, no changes are made to the database and an exception is thrown.
Adding a Web Frontend
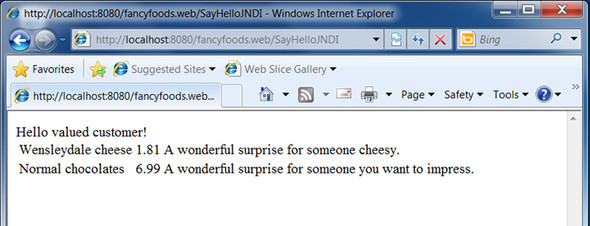
All that remains now is to hook the Shop service up to the web frontend. Start by livening up the display of the special offers. Instead of a static list of special offers, users should be able to click on a food and bring up a purchase page (figure 3.12).
Figure 3.12. The SayHello servlet with links to allow users to purchase food

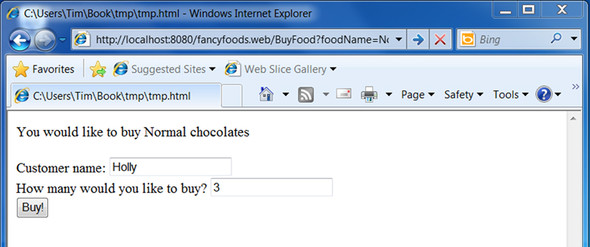
The link should lead to a new servlet that allows users to buy the food by filling in a customer name and a purchase quantity (figure 3.13).
Figure 3.13. The BuyFood servlet prompts customers to fill in their name and how much food they’d like to buy.

The HTML for the GET method of the BuyFood servlet is a standard HTML form:
protected void doGet(HttpServletRequest request,
                     HttpServletResponse response)
                     throws ServletException, IOException {
    String foodName = request.getParameter("foodName");

    PrintWriter html = response.getWriter();
    html.append("<html>");
    html.append("<body>");

    html.append("You would like to buy " + foodName);
    html.append("<form method=post action="BuyFood">");
    html.append("Customer name:");
    html.append("<input type=text name=customerName> <br/>");
    html.append("How many would you like to buy?");
    html.append("<input type=text name=quantity><br/>");
    html.append("<input type=hidden name=foodName value=""

               + foodName + "">");
    html.append("<input type=submit value=Buy!>");
    html.append("</form>");

    html.append("</body>");
    html.append("</html>");
}
The POST method takes the parameters passed across from the GET method, looks up a Shop service, and puts the purchase through.
Listing 3.10. The doPost() method of the BuyFood servlet
protected void doPost(HttpServletRequest request,
                      HttpServletResponse response)
                      throws ServletException, IOException {
    PrintWriter html = response.getWriter();

    html.append("<html>");

    String customerName = request.getParameter("customerName");
    String foodName = request.getParameter("foodName");
    String quantity = request.getParameter("quantity");

    try {
        InitialContext ctx = new InitialContext();
        Shop shop = (Shop) ctx.lookup("osgi:service/"
                + Shop.class.getName());
        Inventory inventory = (Inventory) ctx.lookup(
            "osgi:service/" + Inventory.class.getName());
        Accounting accounting = (Accounting) ctx.lookup(
            "osgi:service/" + Accounting.class.getName());

        Customer customer = accounting.getCustomer(customerName);
        if (customer != null) {
            html.append(customer + "<br/>");
        } else {
            html.append(customerName + " is a new customer.<br/>");
        }

        Food food = inventory.getFood(foodName);
        html.append(food + "<br/>");

        html.append(customerName + " tried to buy " + quantity
               + " packs of " + foodName + "<br/>");

        try {
            shop.purchase(foodName, customerName,
                          Integer.valueOf(quantity));
            Customer refreshedCustomer = accounting
                    .getCustomer(customerName);
            html.append("Afterwards, " + refreshedCustomer +
                        "<br/>");
        } catch (Exception e) {
            html.append("A problem happened: " + e.getMessage() +
                        "<br/>");
        }

        Food refreshedFood = inventory.getFood(foodName);
        html.append("And after? " + refreshedFood);
    } catch (NamingException e) {
        html.append("We have no shop today. Try again tomorrow.");
    }

    html.append("</body>");
    html.append("</html>");
}
You may be dismayed by how long this method is. In fact, almost all of it’s concerned with writing output to the page. The purchase itself could be managed in two or three lines of code. Part of the reason that writing out the object states is so verbose is that you have to retrieve the objects twice: once before the purchase and once after. If this wasn’t a database application, you’d expect that each food or customer instance was unique. Changes to a food made in one part of the application (like the Shop) would automatically be reflected in food instances elsewhere.
Because this is a database, things aren’t so easy. When they were passed to the BuyFood servlet, the food and customer instances moved outside the boundaries of the persistence context and were detached. To see the latest state of the database after changes, it’s necessary to request new instances of the entity classes.
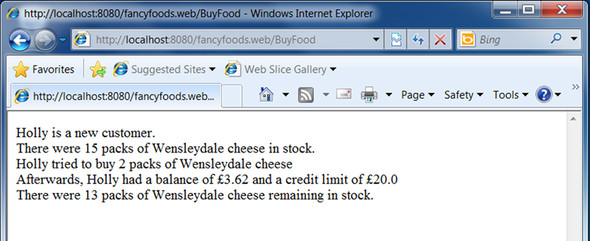
Let’s play with the shop. If a new user named Holly buys two packs of Wensleydale cheese, everything works exactly as you’d hope. The stock level of the cheese is decremented, and the purchase price is added to your account (figure 3.14). The only disappointing part is that you don’t get the physical cheese to eat.
Figure 3.14. When a user purchases a small quantity of cheese, their account is created and then debited, and the cheese stock levels are reduced.
If Holly buys enough Wensleydale cheese, the stock levels will reduce to below the blue cheese levels, and the front page special offer will suggest that customers buy blue cheese instead.
What happens if Holly is more extravagant and buys three boxes of chocolates instead? See figure 3.15.
Figure 3.15. An attempt by Holly to buy three boxes of chocolates
This obviously shouldn’t work, because there’s not enough credit left in Holly’s account. As expected, the web page reports that there was an issue and that the purchase wasn’t successful (figure 3.16).
Figure 3.16. If a user tries to buy something that exceeds their credit limit, the purchase doesn’t succeed and their account isn’t debited. Unfortunately, the stock levels are reduced.

Looking at the web page more closely, though, it becomes clear that something is terribly wrong. The account wasn’t debited, but the chocolates were still taken out of the stock. Holly is happy, but giving away chocolates to people with inadequate credit ratings isn’t a sound way to run a business.
Making the Shop Robust
The core of the problem is the granularity of the transactions. The container-managed JTA is helpfully wrapping every method call to InventoryImpl or AccountingImpl in a transaction, and any failure in those methods will cause the transaction to be rolled back (figure 3.17). As you saw earlier, if a new customer doesn’t have a high enough credit limit for a purchase, the creation of their account will be reversed. (More accurately, the account creation is never committed, which looks the same from the outside.)
Figure 3.17. The transaction boundaries in the default case. If a purchase exceeds a customer’s credit limit, customer creation will be rolled back, but the purchased food will still be removed from the inventory.

But the shop purchase uses methods from both AccountingImpl and InventoryImpl. Any failure in either method should cause the whole purchase to be rolled back and all database changes undone. You could do this by catching exceptions in the purchase() method and then writing new database operations to undo everything, but you risk getting into a world of trouble quickly. What if the attempt to reverse the problematic transaction fails? What if a Throwable is thrown and you don’t remember to catch it?
By far the neater—and simpler—solution is to wrap the whole purchase in a single transaction (figure 3.18). That transaction is propagated to the removeStock and chargeToAccount methods. These methods need a transaction to be present when the method is entered, but there’s nothing in their Blueprint metadata that says it has to be a new transaction. Any exception in either method causes everything to be rolled back.
Figure 3.18. Better transaction boundaries. If a purchase exceeds a customer’s credit limit, no food will be removed from the inventory.

How do you create this broad-scope transaction? Blueprint, again! All that’s needed is to add the following line to the bean definition for ShopImpl:
<tx:transaction method="*" value="Required" />
This ensures that every method on the ShopImpl class gets a transaction. This transaction is propagated to other classes called by ShopImpl so that if one call within a method fails, the entire method is rolled back. What’s so cool about this is how tiny the change is. It takes more characters to explain than it does to implement!
The coolness isn’t over yet, though, because OSGi gives you something even cooler. The persistence bundle can be rebuilt and dropped into the load directory again without bouncing the OSGi framework. The runtime detects the new code in the load directory and then uses the OSGi API to update the application with the new code without having to restart anything. If you try a second time to buy lots of chocolates, the result is much more reasonable (figure 3.19).
Figure 3.19. With appropriately scoped transactions, an attempt to buy chocolate that’s beyond a customer’s means won’t result in a change to their balance or to the chocolate inventory levels.

We’re cheerfully ignoring security here—as well as lots of other things. For example, it’s still possible to remove stock or charge accounts without a surrounding transaction. This could easily be fixed by changing the transaction strategies for the remove-Stock and chargeToAccount methods from Required to Mandatory. Given these issues, we don’t suggest you take this code literally as the basis of your high-turnover online shopping website. On the bright side, if you did, the transactional integrity would be pretty good and the modularity and dynamism would be excellent.
Although JTA is most closely associated with JPA and database access, it’s not just for container-managed persistence classes. Any method, or set of methods, can be signed up for container-managed transactions.
3.4. Summary
A lot of code appeared in this chapter, so the Fancy Foods application is doing some powerful stuff now. It’s not quite ready to make your fortune as an enterprise-grade cheese management system, but it’s a lot closer than it was in chapter 2. You’ve got persistence fully integrated into your architecture without compromising modularity or dynamism. You know how to read from a database in a single line of code, and how to cocoon whole swathes of code in transactions with a single line of XML.
At this stage, the application has enough going on that it’s no longer a few bundles. Let’s move on to consider some of the patterns OSGi offers for packaging these more complex bundle groupings into self-contained applications.