
Chapter 9. IDE development tools
This chapter covers
- OSGi development with Eclipse PDE
- The bndtools Eclipse plug-in
- Eclipse Libra
- Other Eclipse plug-ins for enterprise OSGi
- OSGi support in NetBeans and IntelliJ IDEA
At the beginning of chapter 8, we mentioned that whichever build tool you choose, you’ll probably want to use it in concert with a complementary IDE. What choices do you have for IDEs? Do any of them offer special support for enterprise OSGi? The good news is that there’s rich support for OSGi in development tools, and support for enterprise OSGi is growing.
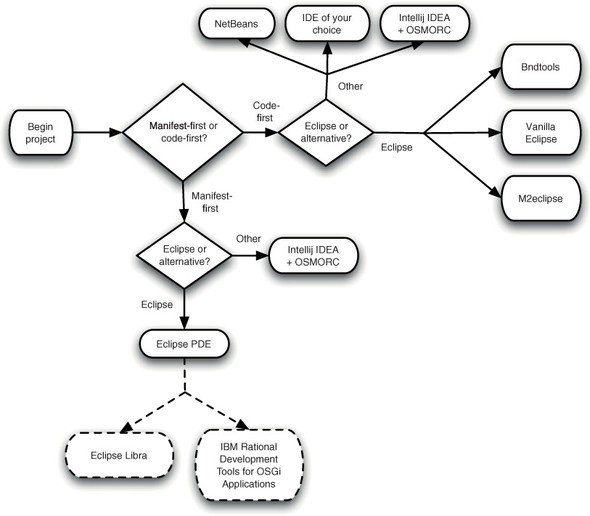
Your decision about which set of IDE tools to use will partly be determined by whether you prefer a code-first or manifest-first development style, and which build tools you’re using. On the other hand, you may already have an IDE in mind, and that might determine your choice of build tools! Figure 9.1 shows one possible route to making a decision about which IDE to use—but feel free to work from right to left instead if you already know which IDE you want to use.
Figure 9.1. When choosing an IDE, the most important factor to consider is whether you’re developing code-first or manifest-first. Good tools based on the Eclipse platform are available in both cases, but other options are also available, particularly in the code-first case. No matter which development style you’re using, if you’re using Eclipse as your IDE you may also want to use one of the development tools specifically designed to support the enterprise OSGi programming model.
Although the range of IDEs that support OSGi is growing, Eclipse is the most popular and mature platform for OSGi development, so we’ll start our discussion there.
9.1. Eclipse-based OSGi development
Why is the Eclipse IDE so popular for OSGi development? One reason is that Eclipse is generally popular, and this dominance has naturally extended into the OSGi space. More fundamentally, though, Eclipse itself is an OSGi application and supports OSGi natively.
9.1.1. Eclipse Plug-in Development Environment
Eclipse’s built-in OSGi development environment is known as the Plug-in Development Environment (PDE). It’s one of the quickest ways to get started developing bundles in Eclipse, although its manifest-first style isn’t to everyone’s taste. PDE comes integrated with many Eclipse distributions. You’ll need the Classic distribution, also known as the SDK distribution, rather than the default Java-development version.
As the name implies, PDE was originally designed to support development of plug-ins to Eclipse itself. In a sense, OSGi development is a side effect, and this shows in the naming of many of the perspectives and views. If you mentally substitute bundle for plug-in, the purpose of various GUI elements may become clearer!
Setting a Classpath
If you’ve done normal Eclipse development, you’ve probably spent a lot of time editing the project classpaths to add in all the libraries you need. One of the nice things about OSGi development in Eclipse PDE is that you never need to touch the .classpath file (or the classpath GUI) again. If you find yourself editing it, you’ve most likely done something wrong. Adjusting the classpath directly bypasses PDE’s manifest validation mechanism, so it’s both unnecessary and risky.
Instead of using a user-defined classpath, PDE creates a plug-in dependencies bucket and adds that to the project classpath. When you import a package from a bundle, PDE adds that bundle to the plug-in dependencies bucket. You can explore the contents of the imported bundles in the package explorer, as shown in figure 9.2.
Figure 9.2. Eclipse adds a plug-in dependencies container to each project’s classpath. Required projects and JARs from the target platform are added. If you’re curious about what’s on the classpath, you can look inside each bundle by expanding it.

Defining a Target Platform
The contents of the plug-in dependencies container are drawn from other projects in the workspace and the bundles in the target platform. By default, Eclipse uses itself as the target platform, but it’s easy to change it to point to a different runtime, folder, or remote site (or any combination of the above!).
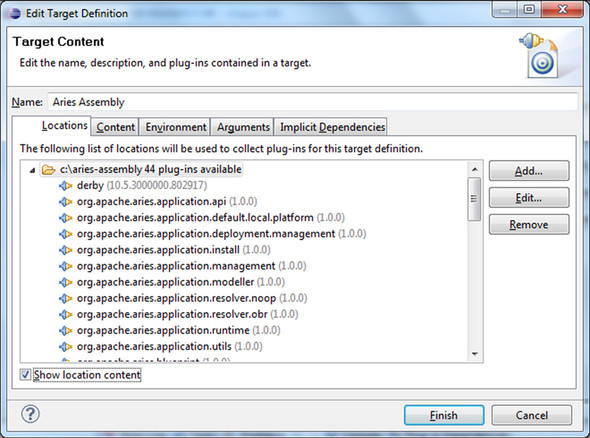
To define a new target platform, bring up the Eclipse preferences and navigate to Plug-in Development > Target Platform. Choose Add and accept the default on the next panel to start with nothing. You’re developing for the Apache Aries sample assembly, so point your target platform to your Aries install by clicking Add, and then Directory, and then navigating to the directory where you’ve built the Aries assembly. After clicking OK and selecting the Show Location Content check box, you can see that Eclipse has added all the bundles in the Aries runtime to its target platform (figure 9.3).
Figure 9.3. Eclipse PDE makes it easy to define a target platform from the Aries assembly. This platform is used for both compiling and running.
Sharing a Target Platform
The target platform definition can be saved as a .target file and checked into source control, which makes it easy to ensure all members of a team are developing against the same set of libraries.
If you’re using Tycho to build and generate your own p2 repository, you can—and probably should—use that repository as your target platform instead, by adding it as a repository of type Software site. Before the IDE will recognize your p2 repository, you’ll also need to follow some extra repository generation steps, creating at least one category for the repository, and then adding the repository contents to it.
Editing Manifests
Eclipse PDE is a manifest-first IDE, and as you’d expect it provides a sophisticated tabbed editor for bundle manifests (see figure 9.4).
Figure 9.4. Eclipse PDE offers a nice manifest editor. As well as a source view, there are tabs for controlling package imports, exports, and what’s packaged into a built bundle.
If you’re using Eclipse’s PDE to write your bundles, it’s easy to inadvertently use Require-Bundle instead of Import-Package. Require-Bundle should only be used in the case of split packages, and even then other alternatives should be sought! Historically, Eclipse used Require-Bundle internally, and the manifest editor still makes it slightly easier to require bundles than to import packages by positioning it more prominently on the dependencies panel.
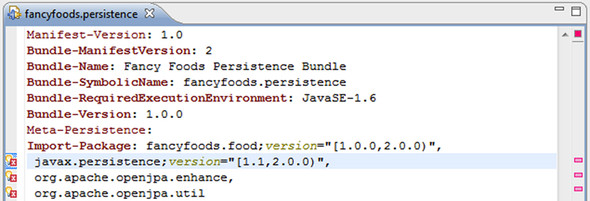
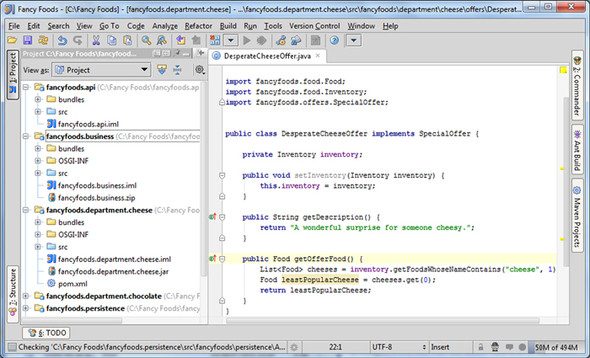
PDE uses the target platform to automatically validate package imports, and it can also do more advanced validation and visualization of a bundle’s dependencies. We mentioned earlier that accumulating dead layers of unused dependencies in your manifests is one of the hazards of manifest-first development. Eclipse PDE addresses this problem by providing an option to search for unused dependencies; sadly the detection isn’t always entirely reliable! See figure 9.5.
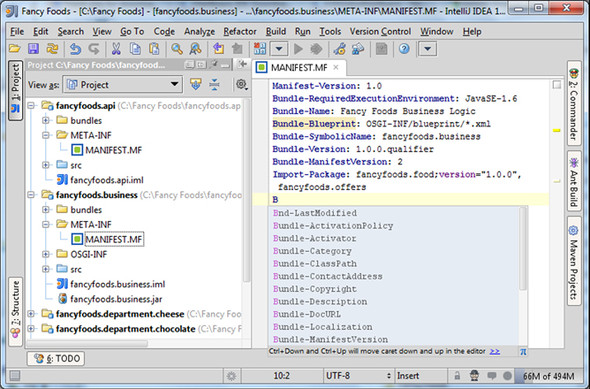
Figure 9.5. If imported packages aren’t available in the target platform, Eclipse will highlight them in the manifest. In this case, fancyfoods.food is available, because it’s another Eclipse project, but the javax.persistence and openjpa APIs can’t resolve.
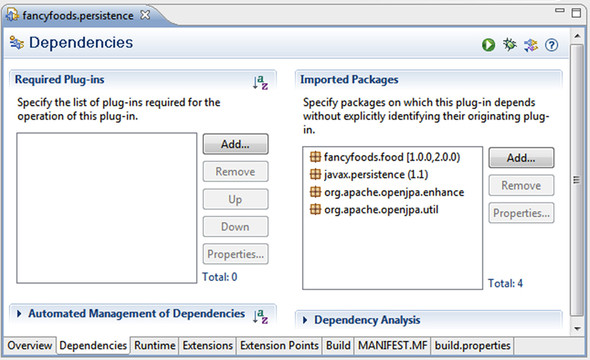
Eclipse also provides some tooling for visualizing and generating manifests. For example, clicking on the Dependency Analysis link in the Dependencies tab of the manifest editor (see figure 9.6) brings up a tree view of bundles that depend on the current bundle (see figure 9.7).
Figure 9.6. The manifest editor’s dependency analysis view shows which bundles depend on the current bundle, and also which bundles the current bundle depends on.
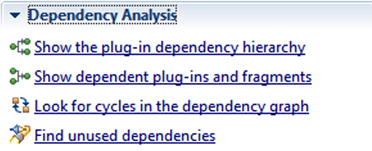
Figure 9.7. Eclipse PDE’s visualization of the dependency hierarchy of the Fancy Foods application.

For example, the dependency hierarchy of the Fancy Foods application is shown in figure 9.7.
Finally, Eclipse PDE includes support for declarative services components, although it’s well hidden! Choose New > Plug-in Development > Component Definition. Eclipse will bring up an editor with both GUI and source views. It will also update the project’s manifest to reference the SCR XML.
Although Eclipse PDE has a number of good features, none of them are much use to you if you don’t want to write your own manifests. But if you’re using bnd directly (or embedded into Ant) to generate your manifests, good Eclipse-based OSGi tools are still available to you.
9.1.2. Extending bnd into the GUI world with bndtools
The bndtools plug-in extends bnd’s code-first command-line support into the Eclipse environment. As well as providing syntax highlighting and a forms-based editor for .bnd files, it integrates into the Eclipse compiler so that Eclipse automatically produces OSGi bundles on compile.
Setting Up the Bnd Repository
Bndtools maintains a local bundle repository, which serves the same function as a Maven repository or an Eclipse PDE target platform. When developing your classes, there’s no need to explicitly add imports or project dependencies; bndtools will find your dependencies in its internal repository. Before this works, you’ll need to set up the repository.
When you create a new OSGi bundle project, bndtools will automatically set up a configuration project. This project includes useful Ant boilerplate, but its most important role is to define the bnd repository. Bndtools prepopulates the repository with various useful bundles, like JUnit and the Felix Declarative Services implementation, but you’ll need to add bundles for your enterprise OSGi runtime environment, like a Blueprint implementation, and perhaps a database.
You can populate the repository using the bnd file, but the simplest way is to use the bndtools’ Repository View, in the bottom left corner of the OSGi perspective, which has an Add Bundles to Repository icon. You’ll need to add your bundles to a specific repository, so the icon isn’t active unless an existing repository is highlighted (see figure 9.8).
Figure 9.8. Bnd maintains a list of bundle repositories that are used for compiling and running bundles. To ensure your compile-time dependencies are available, you can add them to the internal bndtools repository.

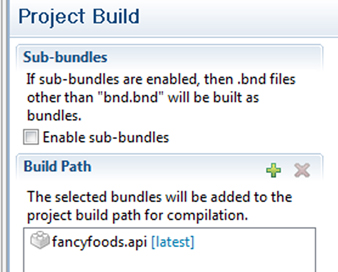
Setting the Bundle Build Path
Although the bnd repository is similar in several ways to the PDE target platform, the two aren’t the same. One important difference is that it’s not sufficient to add a bundle to the bnd repository for it to be part of a bundle’s compile path; the bundle must also be added to the bndtools build path. This makes getting everything compiling in bnd harder than it could be, but it does ensure no unwanted dependencies creep into a bundle’s package imports. In a way, setting the bnd build path is like adding package imports in PDE, although you’ll probably have to add fewer bundles to the build path than imported packages (see figure 9.9).
Figure 9.9. You’ll need to add the bundles your project depends on in the Build tab in the bndtools bnd file editor.
Editing Bnd Files
The bndtools include a nice .bnd file editor. As well as editing the .bnd source directly, you can use a GUI to specify your private and exported packages, and see bnd’s calculated imports (see figure 9.10).
Figure 9.10. Bndtools will show you the calculated imports for each bundle, which can help avoid runtime surprises. You can even see which classes are using the imported packages.

Like PDE, the bndtools bnd file editor also includes a nice GUI interface for defining Declarative Services. More accurately, bndtools provides a GUI to generate a bnd file, and the bnd file is then used to generate XML files that define the Declarative Services!
9.2. OSGi support in other IDEs
Although we’ve talked about a range of development tools, they’ve all been based on the Eclipse IDE. What if you prefer a different IDE? Well, you do have some options. Because of its early internal adoption of OSGi, Eclipse is dominant in the field of OSGi development, but other IDEs are catching up.
9.2.1. NetBeans
NetBeans is a free IDE that integrates closely with the GlassFish server. In recent years, both NetBeans and GlassFish have greatly increased their OSGi support. NetBeans has a concept of modules, and these modules map reasonably well to OSGi bundles; NetBeans modules encode module information in a module’s MANIFEST.MF, and these headers map nicely to OSGi headers. NetBeans modules have the notion of names, versions, public packages, and required module dependencies (but not package-level dependencies). When creating a NetBeans module, you can mark it as an OSGi bundle by ticking Generate OSGi Bundle (see figure 9.11).
Figure 9.11. NetBeans provides a GUI editor to choose which packages you want to export from a module.
Despite the similarities between OSGi bundles and NetBeans modules, NetBeans’ OSGi support is limited. Developing OSGi bundles in NetBeans is like doing code-first development, except instead of the code, NetBeans is guided by its project.xml file. For example, private packages are shown with a cute little padlock decorator, but this information is stored in the project file. Dependencies are also always per-module (or, equivalently, per-bundle) rather than OSGi’s preferred package-level dependencies (see figures 9.12 and 9.13).
Figure 9.12. The manifests for NetBeans OSGi bundles allow variable substitution. The editor doesn’t have autocompletion or error detection.

Figure 9.13. When you add a module explicitly to one of your NetBeans modules, it shows in the Libraries twisty of the module. This is similar to the plug-in dependencies twisty in Eclipse, and Eclipse’s referenced libraries twisty.

9.2.2. Osmorc and IntelliJ IDEA
Recent premium versions of the IntelliJ IDEA IDE bundle a set of OSGi tools called Osmorc. Osmorc is also available independently as a plug-in to IntelliJ’s Community Edition. One nice feature of Osmorc is that it supports both a manifest-first and a code-first approach to OSGi development. Existing manifests can be used to generate module dependencies, and manifests can also be generated from project bytecode. Like many OSGi tools, Osmorc embeds bnd for the manifest generation support.
If you’re curious what Osmorc stands for, it’s OSGi Module Layer and Eclipse RCP Support. The second part of the name has to do with another of Osmorc’s features, the ability to run applications based on the Eclipse Rich Client Platform GUI framework inside IDEA. It doesn’t have anything to do with the Eclipse IDE (confusingly!).
Figure 9.14 shows what the fancyfoods application looks like when edited with IntelliJ IDEA.
Like Eclipse PDE and bndtools, Osmorc allows you to set up a compile-time and runtime environment, called a framework instance.
Figure 9.14. The Osmorc IDE being used to develop the fancyfoods application
Working with Manifests
Osmorc provides syntax highlighting and autocompletion for manifest files, but no forms-based editor. In principle, it will automatically work out required bundles and add them to the dependencies of a project, although at the time of writing, it’s not clear if this feature works properly. Figure 9.15 shows Osmorc’s manifest editor in action.
Figure 9.15. Osmorc’s manifest editor has fewer features than Eclipse’s, but it does provide syntax highlighting, error-detection, and autocompletion.
Unlike most of the tools we’ve discussed, Osmorc is designed to support both manifest-first and code-first styles of development (see figure 9.16).
Figure 9.16. One nice feature of Osmorc is that it allows you to choose whether to manage your manifests yourself, or to have your manifests managed for you based on your module dependencies.

If you opt to have Osmorc manage your manifests for you, you have a choice between using Osmorc’s native support (which is based on bnd under the covers), providing .bnd files, or using SpringSource’s Bundlor. If you use the Osmorc support, there’s a GUI editor for specifying required properties like the bundle symbolic name. You can also specify extra required entries in a text box. These entries are passed to bnd before being written to the manifest file, so you’re not restricted to normal manifest syntax. This means you can use regular expressions and variable substitution. As with plain bnd, it’s important to specify your package exports, rather than allowing all your bundle internals to be exported (see figure 9.17).
Figure 9.17. When you opt to let Osmorc manage your manifests, you can point it to a bnd file, or fill in a simple panel on the module settings page with bnd-style settings. Don’t forget to narrow down the default package exports.
Neither Osmorc nor NetBeans provides OSGi support that’s as rich as that of bndtools and Eclipse PDE. If you’re using NetBeans as your development environment, you may have to make some compromises in terms of how you structure your OSGi bundles, or work against the IDE to some extent. Osmorc is more flexible and more closely aligned with OSGi best practices, but you may find that it’s adding only limited value compared to using IntelliJ IDEA in its normal mode alongside a bnd-based Maven build.
9.2.3. Do you need OSGi support in your IDE?
If you’re developing OSGi bundles using a code-first style, and you’re not writing your own bnd files, how much OSGi support any IDE—even Eclipse—can give you is limited. Luckily, this isn’t such disappointing news as you might initially think. One of the defining characteristics of the code-first style of OSGi development is that the code development itself doesn’t necessarily involve much OSGi. It arguably doesn’t involve any OSGi at all—the OSGi-ness gets added later, at build time. This means you can choose to develop with whatever development tools you’re most comfortable with.
If you’re using Maven and the bundle plug-in, a popular choice is to use the Maven Eclipse plug-in to align your IDE and your Maven build. The Eclipse plug-in creates Eclipse projects for each of your Maven modules and ensures Eclipse knows where to find all the source files and resources. If you’d like more complete integration, you can use Eclipse’s m2eclipse (m2e). The m2eclipse plug-in hooks the Eclipse compile process into the Maven build process, so that Maven builds get used by Eclipse to compile your code. This is the approach taken by the Apache Aries project, for example. Maven also integrates nicely with other IDEs, including some we’ve discussed, like NetBeans and IntelliJ IDEA, and some we haven’t, like Embarcadero’s JBuilder.
9.3. Tools for the enterprise OSGi extensions
Although they offer varying levels of support for core OSGi, none of the development tools we’ve discussed so far offer much support for the enterprise OSGi programming model. Bndtools and PDE do have handy built-in support for Declarative Services, but that’s about the extent of enterprise OSGi support in what we’ve seen so far. But there are several free tools built on top of Eclipse PDE that allow it to support development of enterprise OSGi applications. Although this support isn’t essential to code enterprise OSGi applications, you may find it useful.
9.3.1. IBM Rational Development Tools for OSGi Applications
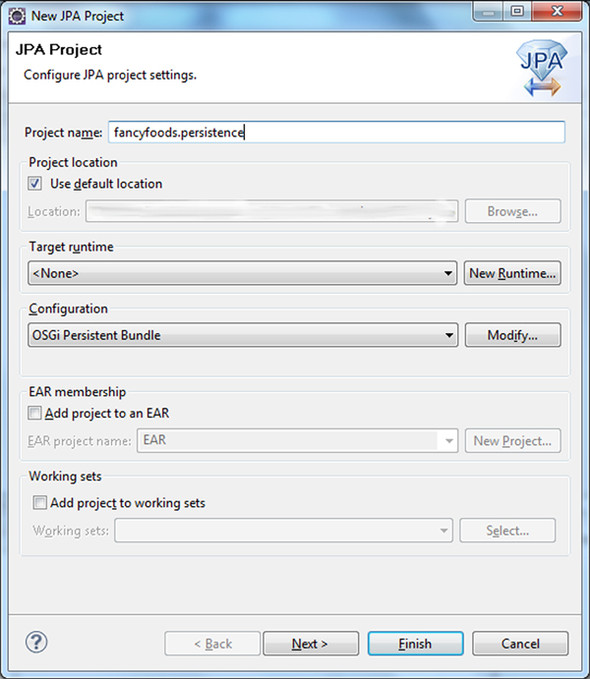
The more mature of these tools, IBM Rational Development Tools for OSGi Applications, is a set of free tools that support Apache Aries development. The Rational tools know about Blueprint, WABs, JPA persistence bundles, and also EBA applications. They also offer support for WebSphere Application Server concepts like composite bundles.
To install the tools, you’ll need the Java EE version of Eclipse, version 3.6 or higher. Bring up the Eclipse Marketplace from the Help menu and search for OSGi. The Rational tools should be the first option.
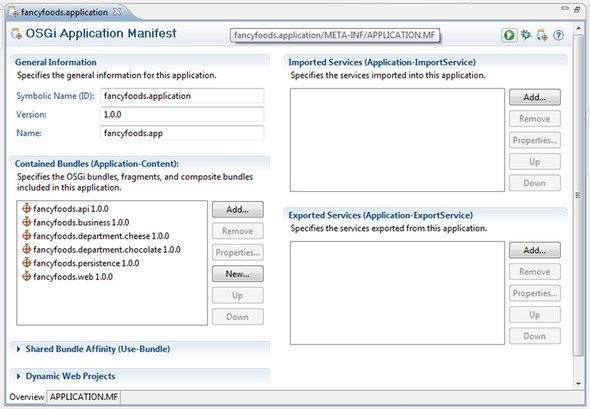
The Rational tools have special project types for OSGi bundles and applications, and nice editors for APPLICATION.MF files (see figure 9.18).
Figure 9.18. The Rational tools support Aries-style EBA applications. The APPLICATION.MF files may be edited as text files or in a GUI editor.
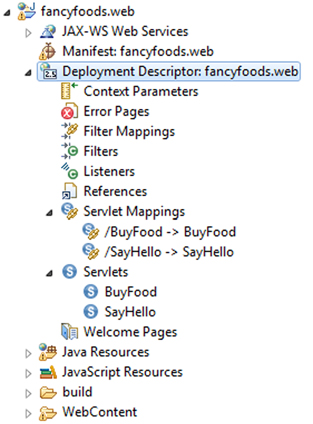
The Rational tools also allow you to take advantage of Eclipse’s existing support for programming models like servlets and JPA (see figure 9.19).
Figure 9.19. In the Java EE perspective, the web.xml files of OSGi bundles with the web facet can be easily visualized and manipulated.
The Rational tools do have a slightly different source layout, which you may find inconvenient if you’ve set your build up to use a normal PDE layout. On the other hand, if you’re used to using Eclipse’s WTP (Web Tools Platform) tools, you may find the code layout more natural. Certainly, its integration with both the enterprise and enterprise OSGi programming models may make it a handy addition to your toolkit.
9.3.2. Eclipse Libra
An alternative set of tools based on Eclipse PDE and the Eclipse Web Tools Platform is the Eclipse Libra project. Unlike the Rational tools, Libra’s scope is strictly what’s in the enterprise OSGi specification; extensions (like Aries applications or Virgo plans) won’t be supported.
Instead of starting with OSGi bundle projects and adding web or JPA facets, Libra reuses the existing JPA and web projects and adds an OSGi bundle facet (see figure 9.20).
Figure 9.20. Libra allows you to add OSGi facets to servlet and JPA projects.
Like the Rational tools, Libra integrates with Eclipse’s existing web, JPA, and OSGi tools rather than re-inventing wheels. This makes both tools attractive options if you’re used to using Eclipse for your Java EE development. At the time of writing, Libra is still an incubator project in the early phases of development, but it has significant promise as a development tool.
A good IDE isn’t a substitute for a good automated build system—instead, your IDE and your build system should work together. When chosen well, an IDE and an automated build complement each other, making code easier to write and debug. The same principles apply to testing code—for all but the smallest projects, you’ll need some sort of automated testing. But you’ll find your development process a lot slower if these tests can only be run from your automated framework.
9.4. Testing OSGi applications inside IDEs
In chapter 8, we mentioned that getting the runtime environment for your tests right can sometimes be as tricky as getting your tests functionally correct. A good IDE setup will allow you to run your tests so that you can debug the tests themselves, debug automation problems, and also debug your application.
9.4.1. Testing with Eclipse PDE
If you’re using PDE for your development, you’ll find it natural to run the tests in PDE as you write them. If you have the target platform set up to mirror your runtime environment, integration testing inside Eclipse PDE is simple. After you’ve written your unit tests, running them is a matter of right-clicking and choosing Run as > JUnit Plug-in Test (see figure 9.21).
Figure 9.21. Eclipse allows unit tests to be run in an OSGi framework from within the IDE using a simple menu option. The target platform is used to generate the list of bundles to install in the OSGi framework.

Results are presented in the same form as any other JUnit tests run from Eclipse (see figure 9.22).
Figure 9.22. Eclipse presents test results from JUnit tests that were run inside a framework in the same GUI format as normal JUnit results.

So far, so convenient. PDE’s test environment will allow you to run your integration tests and debug problems with your tests and applications. The one thing missing is deep integration with a command-line build system. If you’re using Tycho as your build system, you’ll find that Tycho and PDE use a different system for working out which bundles to include in the runtime environment. This means that the automated tests may not be running with exactly the same set of bundles as you’re using inside PDE, and in the worst case, this will cause behavior differences. PDE will launch your entire target platform when it runs tests, whereas Tycho will carefully provision a minimal runtime platform. Instead of launching every bundle it knows about, it will launch only your test bundle and any required bundles. If you’re not using Tycho, you can easily launch an OSGi framework that’s identical to your Eclipse target platform, but you may not have much command-line support for running the tests.
9.4.2. Testing with bndtools
If you’re using bndtools instead of Eclipse PDE, you still have options for running your unit tests inside Eclipse. To run a JUnit test from inside Eclipse, right-click on the test and choose Run As > OSGi JUnit Test (see figure 9.23).
Figure 9.23. Bndtools can run JUnit tests inside an OSGi framework from within Eclipse.

Just as Eclipse can use the target platform to provision and launch an OSGi framework, bndtools can provision a framework from its repository.
By default, Eclipse launches with the whole target platform, although subsets of the target platform can be specified in the run configuration. Bndtools, on the other hand, requires you to explicitly list each bundle from the repository that should be included in the run configuration. Bundles that your project explicitly depends on will be automatically included. (This may sound a lot like Tycho right about now!)
9.4.3. Pax Exam
Even Pax Exam includes some Eclipse support for testing. The 2.2 release of Pax Exam includes an Eclipse plug-in that flags common configuration problems as compile errors. Pax Runner also provides an Eclipse plug-in that provides launch configurations for all the OSGi frameworks Pax Runner supports.
9.5. Summary
One of the nice things about OSGi development is that you have a great deal of flexibility about whether you choose to use an IDE with OSGi support, or stick to your favorite IDE and add in your OSGi bits at build time. Some excellent IDE plug-ins for developing OSGi are available, but they’re by no means compulsory. Eclipse is the most popular base for developing OSGi, both because of the built-in PDE tooling and alternative toolsets, like bndtools and the Maven Eclipse plug-ins. Both bndtools and Eclipse PDE also allow you to run your tests inside the IDE as well as on the command line, which can make writing and debugging tests much faster.
Tools are only a small part of the OSGi ecosystem. In part 3, we’ll take a tour of the broader enterprise OSGi ecosystem—extra technologies, bigger and higher stacks, and the messy edges between the OSGi world and the non-OSGi world.