Chapter 3. Creating, updating, and deleting objects with CMIS
This chapter covers
- Creating folders
- Creating documents with and without content
- Updating properties on objects
- Checking content into and out of the repository
- Creating versions of documents
- Deleting objects
In the previous two chapters, you’ve learned how to access a CMIS repository as well as the objects contained within it, but you haven’t made any changes to those objects and you haven’t created new objects. You’ll learn how to do that in this chapter. As in previous chapters, you’ll continue using the CMIS Workbench to run Groovy code, but now you’ll create, update, version, and delete objects in the repository.
3.1. Creating objects
Traversing the folder structure in the repository and reading documents and their properties is all well and good, but at some point you’ll need to create new objects. Let’s look at how to create the two objects you know about so far: folders and documents. You’ll learn how to create instances of other objects in the CMIS domain model in later chapters.
3.1.1. Requirements for creating an object
At a minimum, a CMIS server will always need two pieces of information from you in order to create a new object: the name of the object and the type of object to create. Do you remember the list of properties common to all CMIS objects that was provided in chapter 2? If so, you may recognize the name and object type from the list:
- cmis:name (String)—The name of this object
- cmis:objectTypeId (ID)—The opaque identifier for this object’s type
Creating a new object is a matter of calling the appropriate method and passing in these two properties with the appropriate values.
3.1.2. Try it—create a folder
Let’s create a new folder called my first folder in the root of the InMemory Repository. You saw in the previous chapter how to grab an instance of the root folder using session.getRootFolder. That returns a folder object. If you look at the Javadoc for the folder interface, you’ll see a createFolder method. In fact, you’ll see two, but here you’ll use the one that only needs a properties map.
To create the folder, you first need a handle to the folder that will contain the new folder. Then you set up a properties map with the name and object type ID and pass the properties to the createFolder method, as shown in the next listing.
Listing 3.1. Creating a folder with Groovy

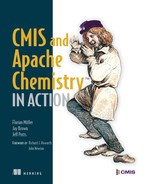
After running this code in the Groovy Console, you should be able to flip back over to the CMIS Workbench, refresh the root folder listing by clicking Go, and see your new folder in the list, as shown in figure 3.1.
Figure 3.1. The new folder shows up after you run the createFolder code in the Groovy console.
3.1.3. Things to think about when creating folders
Creating a folder is a straightforward process. Still, we should review a few things you might want to think about. We’ll do that in the following sections.
Folders—created contextually
In the previous example, you saw that the createFolder method was called on the rootFolder object. Folders are created contextually. In other words, CMIS has to know where to create the new folder.
Object type
In listing 3.1, you saw that cmis:folder was used as the object type ID. Many CMIS repositories have types that inherit from cmis:folder. These might be out-of-the-box types or even types that you’ve defined to make the schema match your specific business requirements. Any type that inherits from cmis:folder can be specified.
Folder name
The definition of what constitutes an allowable folder name is server-specific. It’s usually nearly identical to what you would expect when creating folders and files in a filesystem.
Are you allowed to create a folder?
In listing 3.1, you didn’t check to see whether or not you were allowed to create a folder in the root folder—you tried to create it and it worked. As you work through the rest of this book you’ll come across several actions that may not always be possible due to limitations of the underlying server, permissions, or the state of an object.
You can code defensively by checking to see if you’re allowed to do something before you do it. In this case, there’s an allowable action called CAN_CREATE_FOLDER. If you wanted to, you could make your createFolder call conditional on the presence of that allowable action, as follows:
if (Action.CAN_CREATE_FOLDER in
    rootFolder.allowableActions.allowableActions) {
    ...set up the properties, create the folder, etc.
}
You’ll see more examples of allowable actions later on in the book.
3.1.4. Try it—create a document
Creating documents isn’t much different from creating folders. You still need the name and object type at a minimum.
In this section, you’ll learn how to create documents. First you’ll create documents that don’t have content, and then you’ll create documents using files on your local filesystem.
The simplest example is to create a document that doesn’t have content (a file) associated with it. When you do that, it looks like you’re creating a folder. The only difference is the object type you’re passing in, as shown next.
Listing 3.2. Creating a document that has no content looks much like creating a folder.

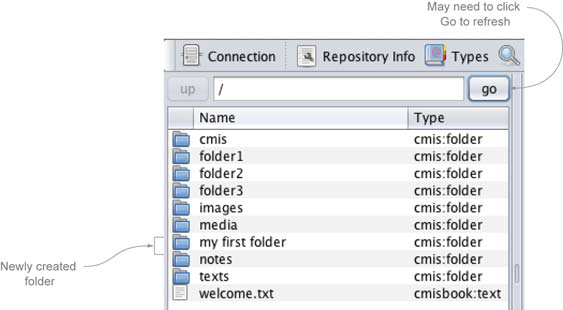
Now you should be able to navigate into the folder you created earlier and see the newly created document, as shown in figure 3.2.
Figure 3.2. The newly created document sitting in the folder you created earlier
The document you created doesn’t have any content, and there are times when you might need to create a document that includes a file. For example, a Company or an Employee object might only have metadata associated with it and no file content. In fact, in chapter 2 you learned that CMIS 1.1 includes a new type called cmis:item that can be used specifically for this purpose. If you were using CMIS 1.1, you might choose to create your Company or Employee objects as instances of cmis:item instead of instances of cmis:document.
Some repositories require document instances to always have a content stream. For example, the OpenCMIS InMemory Repository and Alfresco don’t require content streams, but SharePoint does. You can check whether or not your repository requires documents to have a content stream by inspecting the type definition for cmis:document.
You’ll learn about type definitions in chapter 4, but for now just know that the cmis:document type definition has an attribute called contentStreamAllowed. If the value of the attribute is required, then all instances of a document must have a content stream. Of course, you could work around this by creating a content stream with an empty string.
If you’re developing an application that’s exclusively made up of contentless objects, you might need to rethink your decision to use a content repository to persist your data. More often, most of your objects will have files associated with them, so let’s see how to create a document that includes a file.
The key difference is that you have to create a content stream and then pass that to the createDocument method. In listing 3.3, you can see a content stream being created from a local file. In this example, it’s a PDF.
Listing 3.3. Creating a document with a content stream

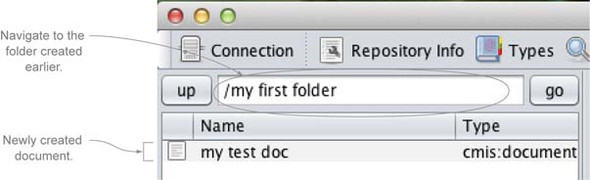
If you run that code in the Groovy console, you should see the new document in the CMIS Workbench (you may have to re-enter the folder or click Go to refresh the list). If you click the link in the right-hand pane (see figure 3.3), you’ll launch the document in its native application.
Figure 3.3. After creating a document that has a content stream, you can click the content URL to open the file.
You might be looking at listing 3.3 and thinking, “That seems like a lot of work just to add a file to the repository,” and you’re absolutely right. There is a shorter way to do it. The CMIS Workbench ships with a set of helper scripts that can be accessed from the Groovy console. The helper scripts include a function called createDocumentFromFile, which does the work of figuring out the mimetype, setting up the properties, establishing a contentStream, and creating the document. The result, shown next, is much more succinct.
Listing 3.4. Creating a document from a file by using the CMIS helper scripts
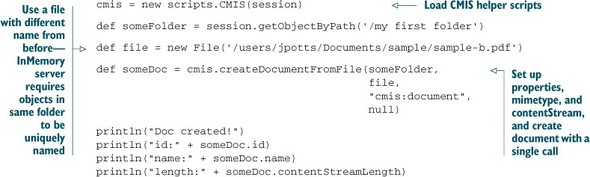
Either way, the result is the same—the document object is created and the local file is uploaded to the repository and set as the content stream on the document object.
Now you know how to create folders and documents, both with and without content. If you stopped here, you could do quite a lot. Got a fileshare full of contracts and legal documents? You could write a script to bulk load those into your company’s ECM repository. Or how about an imaging application to feed scanned invoices into the repository (which then might trigger an approval workflow if your repository supports it). That’s some decent process automation, and the beauty is that it works regardless of the repository you have now or decide to switch to at some point in the future, because you’re coding against an industry-standard API.
You saw how the CMIS helper scripts distributed with the CMIS Workbench can make your Groovy code more succinct. What other shortcuts are available? If you take a look at the source code for the CMIS Workbench, you’ll find the Groovy file that defines the CMIS helper scripts in /src/main/resources/scripts/CMIS.groovy. Consult that file for the full list.
These are a few you might be interested in:
- getObject(id),getFolder(id), getDocument(id)—Retrieve a CMIS object, folder, or document given its object ID.
- printProperties(id),printChildren(id),printRelationships(id),printRenditions(id), printObjectSummary(id)—Dump information about the object for the ID specified to the console.
- createFolder(), createTextDocument(), createRelationship()—Shortcut methods for creating documents, folders, and relationships. See the code for the method signatures.
- download(id, destination)—Downloads the file associated with the document represented by the specified ID to the specified destination.
These helper scripts will only work with your code running in the Groovy console. They aren’t part of the OpenCMIS API.
3.1.5. Things to think about when creating documents
There are a few things you may want to keep in mind when creating documents.
Copying documents
It’s possible to create new document objects using objects that already exist in the repository. The document object has a method called copy that takes a target folder as its only argument. If you want to copy sample-b.pdf to another folder called target folder, the code would look like the following.

Notice that the copy method doesn’t give you the opportunity to make any changes on the source object, including the name. If you need to do that, use createDocumentFromSource instead.
Only works with the Web Services binding
In CMIS version 1.0, createDocumentFromSource isn’t supported by the AtomPub binding—it only works when using the Web Services binding. The copy method relies on createDocumentFromSource. Unfortunately, this is one of the differences that exist between the two bindings. You’ll learn more about bindings later in the book. If you can’t wait to try out the Web Services binding, click the Connection button, select the Web Services binding, and specify http://localhost:8080/chemistry/services/DiscoveryService as the service URL.
Is a parent folder always required?
In the examples you’ve seen so far, you’ve been calling the createDocument method on the folder object where the document is to be stored. But some ECM repositories support the notion of unfiled documents. These documents are free-floating—they don’t live in a folder. To figure out whether or not your repository supports unfiled documents, you can query its capabilities, as follows:
session.repositoryInfo.capabilities.unfilingSupported
If this returns true and you need to create an unfiled document object, use the createDocument method on session instead of folder and pass in null as the folder ID.
Are you allowed?
As you saw earlier when creating folder objects, the repository might not always allow you to create a new document. Similar to Action.CAN_CREATE_FOLDER, you can check the folder’s allowable actions for Action.CAN_CREATE_DOCUMENT before attempting to create a document. Here’s an example:
if (Action.CAN_CREATE_DOCUMENT in
    someFolder.allowableActions.allowableActions) {
    ...set up the properties, create the folder, etc.
}
Now that you know how to create objects, it’s time to learn how to make changes to them after they’ve been created. That’s where we’re headed next.
3.2. Updating objects
Some content-centric applications are used only for archival purposes—they never need to change the documents once they’re stored in the repository. Most often, though, your content application will need to make updates to objects in the repository.
In the previous section, you saw that a document object has both metadata and a content stream. When updating objects, you can update only the properties, only the content, or both.
Let’s look at examples of both of these types of updates. In the first example, you’ll see how to change the name of one of the sample documents you created earlier. In the second, you’ll see how to update the content stream.
3.2.1. Try it—rename a document or a folder
The name of an object is stored in a property called cmis:name. To rename an object, all you have to do is provide a new value for that property. Let’s change the name of sample-a.pdf to sample-c.pdf. If you no longer have a document called sample-a.pdf, no problem. You should be able to use what you learned in the previous section to create one using code, or you can create one using the CMIS Workbench.
Recall from section 3.1.4 that one of the things you provided when creating a document was a properties map. To change the name of a document, you’ll provide a map of the properties you want to update, and then call updateProperties, as shown in the next listing.
Listing 3.5. Renaming a document by updating its cmis:name property

That’s it. Now you know how to rename a document. You can use this approach to change any property value.
Get defensive
Just like in the earlier creation examples, you can add a defensive check (Action.CAN_UPDATE_PROPERTIES) before doing the update if you want to. Defensive checks of the allowable actions allow you to not only head off error messages before they are thrown, but also to adapt the user interface based on what the server will allow. Hiding invalid choices from users is a good usability practice.
3.2.2. Try it—update the content stream
You’ve renamed the PDF sample-a.pdf to sample-c.pdf. But if you open the file associated with that document, it’s still sample-a content, as shown in figure 3.4.
Figure 3.4. You renamed the sample-a.pdf document to sample-c.pdf, but it still contains the original file content.

You can fix that by updating the content stream with a file from the local filesystem called sample-c.pdf.
This works much like creating a document. You need to set up a content stream and then call setContentStream on an existing document. This is shown in the following listing.
Listing 3.6. Updating the content stream of a document with a local file
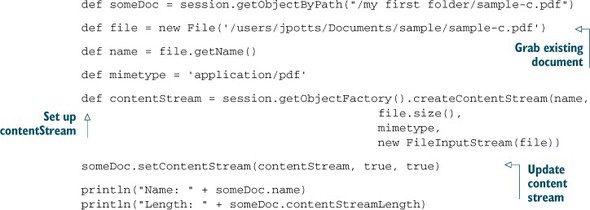
When you update the content stream, the first flag tells the method to overwrite the existing stream. If the document already has a content stream set, this must be set to true. The second flag tells it to refresh the object, which is the same concept you saw when updating the properties.
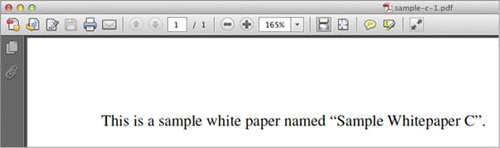
Now when you open the PDF associated with sample-c.pdf, it will contain the content from the sample-c.pdf file, as shown in figure 3.5.
Figure 3.5. The sample-c.pdf document now contains the content from the local file named sample-c.pdf.
Excellent. You can now change the content stream on a document when you need to update its content.
There’s an important caveat related to setting content streams. Different ECM repositories have different rules concerning when content streams can be updated. If you look at your repository’s capabilities, you’ll see that the InMemory Repository allows content stream updates any time (as shown in figure 3.6).
Figure 3.6. Some repositories don’t always allow content stream updates, but the InMemory Repository allows them at any time.

You can also perform this check through code, as follows:
session.repositoryInfo.capabilities.contentStreamUpdatesCapability
The other two possible values for the content stream updates capability are none and pwconly. none means what you think it means: once you set the content stream, you can never update it. Yikes! pwc refers to the Private Working Copy, and it has to do with versioning, which you’ll learn about in the next section. For now, know that when a repository supports content stream updates to the PWC only, it means that to make a change to the content stream, you’ll have to do a checkout on the document first, which returns a PWC. Then you can update the PWC and do a check-in to commit the change.
Now you know how to determine if and when, generally speaking, content streams can be updated in your repository. To check whether a specific content stream can be updated, inspect the allowable actions on the document. You’ve seen multiple examples of this, so it should be very familiar to you now. The allowable action you’re looking for is called CAN_SET_CONTENT_STREAM, and a conditional check would look something like the following:
if (Action.CAN_SET_CONTENT_STREAM in
    someDoc.allowableActions.allowableActions) {
    //...update the content stream
}
You can now create and update documents in your content repository, which is great.
Now suppose you’re a developer in a law firm. Using what you know so far, you could develop an application to help the firm’s attorneys collaboratively author contracts. You can imagine that a given contract might go through several iterations before it’s final. These are lawyers, after all. Inevitably, one of them is going to want to undo a change (or multiple changes). Setting the content stream directly, like you’ve been doing in this section, overwrites the file content—there’s no history, so the lawyers wouldn’t be able to go back to an earlier version. Wouldn’t it be nice if you could maintain older versions?
You can, and that’s the subject of the next section.
3.2.3. Understanding versioning
Have you ever seen a file with a name something like potts_contract_v2_jtp_jb_fm_ legal_final_signed.pdf?
This may seem like an extreme example, but it’s quite common. What’s going on here is that multiple people are reviewing, updating, and approving the document. The people involved in the process are attempting to keep track of the different versions of the document by adding things to the name of the file, like a version number (v2), or their initials (jtp), or the fact that this is the final round of edits for this document. It’s symptomatic of the fact that a plain filesystem isn’t rich enough to help you track the multiple rounds of edits that documents and other digital assets go through during routine business processes.
A CMIS repository that supports versioning fixes this problem. Documents go through their normal business process, and as they’re revised, the repository maintains a version history, as shown in figure 3.7.
Figure 3.7. CMIS repositories can keep track of versions so you don’t have to.

Users can revert back to previous versions at any time. Now the document’s name can stay simple and descriptive, because the repository is keeping track of the version history.
Before we try a versioning example, let’s talk about the mechanics of creating a version and some of the terminology that goes with it. Going back to the law firm example, suppose rather than one lawyer working on a contract, there’s a full legal team. If the legal team is working on the contract, and the contract lives in the CMIS repository, how would you make sure that two lawyers don’t edit the contract simultaneously? This problem is handled with checkout and check-in. Before making a change, the lawyer does a checkout on the contract. When it’s checked out, no other members of the legal team can make changes. When the changes are made, the lawyer does a check-in. Now it’s available to others to make their changes.
When you check out a document, you create a private working copy (PWC). As the name suggests, this is a copy of the document that only the person performing the checkout can change. It only exists as long as the document is checked out. Once the document is checked in, the PWC is no longer needed. Figure 3.8 shows a series of checkouts and check-ins happening over time, resulting in the version history you saw previously.
Figure 3.8. Checkouts create PWCs that are edited and then checked in to create new versions.

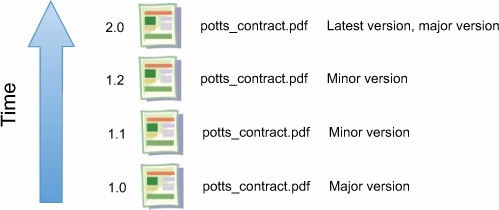
Now refer to figure 3.9. Notice that each version in the version history is identified with a number. This is called the version label. Also notice that the version labels follow a dot syntax and that there’s a gap between 1.2 and 2.0. Version labels that are not whole numbers (like “1.2”) are said to be minor versions, whereas version numbers that are whole numbers (like “2.0”) are called major versions. When you check in a document, you can tell CMIS whether you’re checking in a minor version or a major version. The decision is usually business-specific. Typically, documents that contain a small number of changes are checked in as minor versions, whereas more significant changes are checked in as major versions. The most recent version in a version history is called the latest version.
Figure 3.9. Major versions are whole numbers; minor versions are fractions. The latest version is the most recent version in the history.
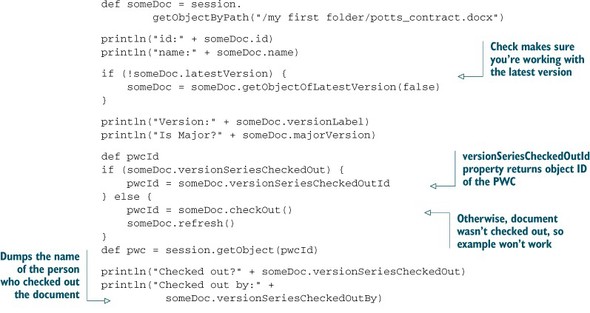
You may be curious as to why the PWCs in figure 3.8 don’t have version labels. That’s because a PWC isn’t a version. It’s a special kind of object that only exists while the object is checked out, so it doesn’t have a version label.
Now that you know how useful versioning can be and the terminology that goes with it, it’s time to jump back into the CMIS Workbench and learn how to create versions in Groovy.
3.2.4. Try it—upload a new version of a document
The best way to understand how versions work is to try it yourself. In this section, you’ll create a new document that you can then check out, modify, and check back in. We’ll break this into three separate scripts that you’ll run from the Groovy console in the CMIS Workbench as you’ve done in previous examples. First, you’ll write a script to create the initial version of a document, then one to check out the document, and finally one to check in a new version of the document.
Create a new document
This listing shows how to create the initial version of the document.
Listing 3.7. Creating the initial version of a document

You may have noticed that we used a custom type called cmisbook:officeDocument in the createInitialVersion.groovy script. In the OpenCMIS InMemory Repository, cmis:document isn’t versionable by default. In the InMemory Repository bundled with this book, we’ve included a versionable type called cmisbook:officeDocument, so we’re using that. If you’re building OpenCMIS from source, you can use VersionableType, which is a versionable type shipped with that repository.
Check out and download the document
Now you have an initial version of a document stored in the repository. It’s time to check it out and download the Private Working Copy locally.
You must authenticate to perform a checkout
The OpenCMIS InMemory Repository doesn’t require authentication, but if you don’t provide a username and password, the server won’t let you perform a checkout. If you haven’t done so already, go back to the connection dialog box and provide a username and password before you run the checkout code. Any values will work.
Listing 3.8 shows how to do the checkout. It’s one method call. Once the document is checked out, you can use the cmis.download shortcut script to download the file to the local machine.
Listing 3.8. Checking out the document and downloading it from the repository
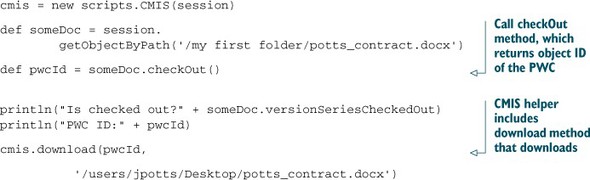
Make sure the target directory exists before you run this example, or you may end up with a checked-out file that doesn’t exist locally. If this happens to you, use the CMIS Workbench to cancel the checkout of the document, which is an action on the Actions tab.
After running this example, the document in the repository will be checked out and a copy of the document will be placed on the local filesystem in the path specified.
Modify the local file and check it in
The document in the repository is now checked out—that will keep others from making changes to it while you’ve got the PWC downloaded to your machine. You don’t have to modify the file, of course, but in real life you probably wouldn’t check it in unless it had been modified.
The next listing shows how to check in the modified local file as a new version.
Listing 3.9. Checking in a modified local file as a new version

In the preceding example, you pass a value of false to the checkIn method to indicate that the document should be checked in as a minor version. The check-in comment summarizes what’s changed.
After running this code, you should be able to use the CMIS Workbench to see that the version has been incremented. If you click the content URL, you should see that the file contains the new version of the content.
CMIS 1.1: batch updates
All of the updates shown in this section have been against one object at a time. If you’re processing a large list of objects, this results in more network traffic than you would probably like. New in CMIS 1.1 is the ability to perform bulk updates of properties. The new bulkUpdateProperties method takes an array of object IDs to update, as well as a map of properties to set on every object in the list. The method returns a list of object IDs that were successfully updated.
3.3. Deleting objects
You now know how to create and update objects in the repository. At some point, you’ll need to know how to delete objects. Let’s cover some requirements for deleting objects, and then you can try it yourself. After that we’ll discuss some special considerations to think about when deleting objects.
3.3.1. Requirements for deleting objects
It’s quite easy to delete an object from the repository—you call the object’s delete method. If the object’s allowable actions include CAN_DELETE_OBJECT, the call should succeed and the object will be deleted. The only decision you need to make is whether you want to delete all versions of the object or only the version you call the delete method on.
Deleted objects can’t be retrieved
Once you delete an object, that object is gone. You can’t get it back. Some repositories have the notion of soft deletes, and there are systems, like many source code repositories, that allow you to revert or undo a delete. But there is nothing in the CMIS specification that provides for this type of functionality. Even in CMIS repositories that support versioning, if you delete a specific version of an object, it’s gone forever. So be careful with that delete method.
Deleting documents differs slightly from deleting folders. Let’s delete the contract you created in the previous section, and then delete the folder it was sitting in.
3.3.2. Try it—delete an object
In section 3.2.4, you probably created a file called potts_contract.docx. If you didn’t, and you want to work through this example, create a test document—it doesn’t matter what it is because it isn’t going to be around for long. The next listing shows how to delete it.
Listing 3.10. Deleting a document

If you go into the CMIS Workbench and refresh the folder, you should see that your document is no longer in the repository.
Now let’s delete the folder. If you’ve been following along, the folder named my first folder isn’t yet empty. Like the document class, folder has a delete method. But if you call delete on a non-empty folder, you’ll get an exception. If you want to delete a folder and all of its descendents, call deleteTree instead of delete, as shown in this listing.
Listing 3.11. Deleting a folder
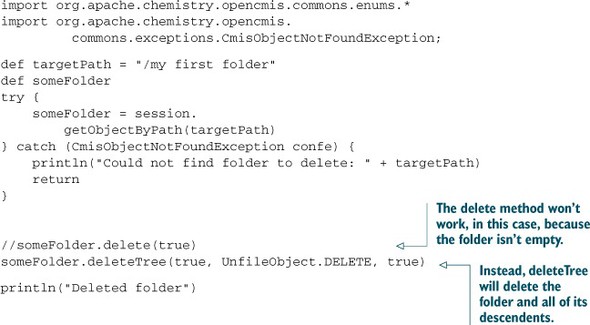
Note that when you call deleteTree, you must decide whether or not to delete all versions. You must also tell CMIS whether to delete or unfile the objects in the tree, if unfiling is supported by the repository. The last argument passed to deleteTree indicates what should happen if a failure occurs. In the preceding code, you pass in true so that if one object in the tree fails to get deleted, the delete operation continues with the rest of the objects in the tree.
After running this code, my first folder and everything in it will be completely removed from the repository.
3.3.3. Things to think about when deleting objects
We should mention a few things you might want to think about when deciding how to handle deletes in your CMIS application. We’ve already talked about delete versus deleteTree when deleting folders, and the fact that you can delete either specific versions of an object or every version. Let’s look at two other points.
Delete versus unfile
Repositories that support unfiling will allow you to unfile rather than delete an object, if that’s what you want to do. If you want to unfile a document, use the removeFromFolder method instead of the delete method.
Once a document is unfiled, you can’t navigate to it through the folder structure because it no longer lives in a folder. The document can be retrieved by its object ID, or by search, or, if you’re using the AtomPub binding, by asking the repository for its unfiled documents collection.
Deleting the content stream
You may want the object to stick around but to get rid of the content that’s associated with the object. In that case you don’t have to delete the entire object—you can delete only the content stream by calling deleteContentStream on the document object.
3.4. Summary
We’ve covered a lot of ground in this chapter. You can now create new folders and documents, with or without content. You also saw a few different ways to update documents. You can update them in place by updating properties or the content stream directly. But if you do that, the version history will be lost. One way to address that problem is to check out documents before checking them back in as new versions. This also prevents others from making changes to the same document at the same time.
Last, we talked about deletes. You learned that when folders are deleted, you can either delete only the folder, if it’s empty, or you can delete the folder as well as all of its descendents by using deleteTree instead of delete. When deleting an object with a version history, you can delete every version of the object or you can delete objects individually. For some repositories, you can choose to unfile an object to remove it from a folder instead of deleting it completely.
You can automate a lot of document processing in your organization, armed with what you’ve learned in this chapter. But so far you’ve only worked with generic types: folder and document. In reality, you’ll likely want to work with types that are specific to your business requirements. Diving deeper into types, properties, and other advanced metadata topics is the subject of the next chapter.