
Chapter 7. The Blend: read and query functionality
This chapter covers
- Retrieving metadata and content with OpenCMIS
- Error handling and mapping to OpenCMIS exceptions
- Paging and skipping lists
- Working with version series
- Queries
In part 1 of this book, you took your first steps with the OpenCMIS client library in the Groovy console. In this (and the next) chapter, you’ll learn how to develop an application with OpenCMIS. You’ll fill the framework that you set up in chapter 6 and build your own version of The Blend, step by step. By the end of chapter 8, you’ll have all the knowledge you need to build a complete CMIS solution in Java.
In this chapter, we’ll focus on the basics: reading and querying data.
The API we’ll cover in the next two chapters is the same for the Java SE version and the Android version of OpenCMIS. The differences between the two OpenCMIS versions are under the hood. For example, the Android version doesn’t support the Web Services binding. Chapter 10 includes more details on Android development.
DotCMIS is another Apache Chemistry subproject that provides a CMIS client library for .NET. Its interfaces and behavior are similar to OpenCMIS. You can transfer most of the concepts in this and the next chapter to DotCMIS. If you’re a .NET developer, keep reading; chapter 9 offers more on DotCMIS.
ObjectiveCMIS is yet another Apache Chemistry subproject. This CMIS client library for Objective-C loosely follows the OpenCMIS concepts. Although the interfaces are different, the basic design principles are the same. Chapter 10 has more on ObjectiveCMIS.
7.1. Building a browse page
Let’s start with something common in content-centric applications: folder browsing. The Blend has a basic browse page that displays the children of a folder with the following features:
- If the page has more than ten children, it provides links to navigate to the next or to the previous pages.
- If the user clicks on a child that’s a subfolder, the browse page is reloaded for this folder.
- If the displayed folder isn’t the root folder, the page will have a link to navigate to the parent folder.
These features are what you’d expect from a typical browse page, so we’ll build that first. Figure 7.1 shows the browse page in The Blend displaying the root folder’s children.
Figure 7.1. The Blend’s browse page showing the root folder

Besides the basic functions we’ve listed, the code behind this page will be able to handle error conditions. Also, access to the repository will be optimized to retrieve only the data required to populate the page.
7.1.1. Preparing the HTML part of the browse page
Copy the echo JSP from chapter 6 (listing 6.3), rename it to browse.jsp, and put it into the jsp folder. Next, remove everything between the line that includes the header JSP and the line that includes the footer JSP. The pseudo HTML between the header and the footer will be similar to the following listing.
Listing 7.1. Pseudocode for the browse JSP page
<h1>[name of the folder]</h1>

Path: [path of the folder]<br>
Number of children: [total number of children]<br>

<table>

[if folder has a parent folder]
<tr>
  <td>[link to parent folder]</td>
  <td></td>
  <td></td>
<tr>
[end if]

[loop over children]
<tr>
  <td>[name and link to the child]</td>
  <td>[if child is a document][MIME type][end if]</td>
  <td>[if child is a document][content size][end if]</td>
<tr>
[end loop]

</table>

[if there is a previous page][link to the previous page][end if]
[if there is a next page][link to the next page][end if]
You have a few things to do now. You have to find the folder you want to browse to learn its name and its path and to retrieve the children. For each child, you need its name (the cmis:name property) and its object ID for the link you’ll generate. If the child is a document, you also need its MIME type and content size. Finally, you have to determine whether you have previous and next pages. Let’s create a servlet that does that.
In the package com.manning.cmis.theblend.servlets, create a new class called BrowseServlet that extends AbstractTheBlendServlet, and then add the following XML snippet to the web.xml file:
<servlet>
 <servlet-name>BrowseServlet</servlet-name>
 <servlet-class>
   com.manning.cmis.theblend.servlets.BrowseServlet
 </servlet-class>
</servlet>
<servlet-mapping>
 <servlet-name>BrowseServlet</servlet-name>
 <url-pattern>/browse</url-pattern>
</servlet-mapping>
The servlet has two doGet methods, and you want to override the one that has three parameters. The last parameter is the OpenCMIS session that you’ll need to communicate with the CMIS repository.
The browse page needs two pieces of information: which folder and which page it should display. Let’s assume you accept the ID of the folder as a parameter. If it isn’t present, you’ll fall back to the application root folder. For paging, you accept a skip parameter that defines how many children should be skipped before the displayed page starts. If that isn’t present, assume the user wants the first page.
The first lines of the doGet method should look like the next listing.
Listing 7.2. Changes for the doGet method

Now you’re ready for the CMIS-specific part of this business: getting the folder object.
7.1.2. Getting the folder object
The OpenCMIS folder interface provides the getChildren method that you’ll call to get the children of the folder. First, you need the OpenCMIS folder object for the folder.
CMIS and OpenCMIS provide two ways to retrieve an object: the getObject operation and the getObjectByPath operation. These operations are similar to each other, with some subtle differences.
getObject takes an object ID as its parameter. Because all CMIS objects have a unique, unchangeable object ID, getObject can retrieve any of them.
getObjectByPath, on the other hand, can only retrieve filed objects—objects that are filed in a folder. This is because, as the name implies, it takes a path as its parameter, and only filed objects have a path. More specifically, this excludes relationship objects and unfiled documents, policies, and item objects. Because CMIS folders are always filed, getObjectByPath can reach all folder objects. Document, policy, and item objects that reside in more than one folder (multifiled objects) can be reached by more than one path.
A few repositories support version-specific filing, which means different versions of a document can reside in one or more folders. If version-specific filing isn’t supported, getObjectByPath usually returns the latest version of a document. It isn’t possible to retrieve an older version with getObjectByPath unless it’s explicitly filed. getObject, on the other hand, can retrieve older versions because all versions have a unique object ID.
Let’s get back to the folder object. Folders are easy, because they’re always filed, they have exactly one path, and they can’t be versioned. This means getObject and getObjectByPath would both work fine for the browse page. We’ll use the folder ID for uniformity.
In the doGet method, you already have a few lines that provide the folder ID. Let’s use them:
CmisObject object = session.getObject(id);
That doesn’t look like a folder object, does it? The CmisObject interface provides access to properties and operations that are common to all primary CMIS base types. To get access to the properties and operations that are specific to a base type, you have to cast it to the document, the folder, the relationship, the policy, or the item interface. Have a look at the OpenCMIS Javadoc to get an idea of the differences. You’ll find the URL in appendix E.
Before you do that cast, it’s always better to check whether the object is what you’ve expected. The code now looks like this:
CmisObject object = session.getObject(id);

Folder folder = null;

if (object instanceof Folder) {
  folder = (Folder) object;
}
else {
  throw new TheBlendException("Object is not a folder!");
}
Now you have a valid folder object that you can use for a getChildren call. Is there anything else about this folder that would be interesting for the browse page? As it turns out, you’ll only need the name and the path of the folder, so you should be good.
If you were to use a debugger (or the CMIS Workbench Groovy console) to inspect the folder object, you’d see that quite a lot of data is held in this object. At the least, you’ll see a lot of properties, and there can also be the allowable actions—data that you don’t need for the browse page. It took time and resources to compile that data on the repository side, transmit it, and parse it on the client side. You might argue that for most repositories, we’re only talking about a millisecond or two. Nothing to be concerned about, you might also say. But what if your browse page gets used by thousands of users simultaneously—every little bit of extra (and unnecessary) server work becomes magnified. If you don’t need it, you’re better off not asking for it. This leads us into the next topic, OperationContext.
7.1.3. Taking advantage of the OperationContext
The OperationContext object defines what data about the object(s) should be requested from the repository. Fetching as little data as possible is obviously better, as we’ve discussed. OpenCMIS gives you a nice set of knobs you can adjust to precisely control what you get back with every round trip to the server. For example, you can define a properties filter and a rendition filter. You can also turn on and off ACLs, allowable actions, policies, and path segments. Finally, you can define the order of items for operations like getChildren that return lists of objects.
Let’s set up an OperationContext to fetch the folder object so you can see exactly what this all looks like. The next listing shows your first OperationContext creation.
Listing 7.3. Creating your first OperationContext

Property and rendition filters can be set either as a comma-separated string or as a Set of strings. Remember, whenever properties are referenced, you have to use the query names of the properties. OpenCMIS automatically adds the properties cmis:objectId, cmis:baseTypeId, and cmis:objectTypeId to the property filter because it always needs these values internally to build a minimal and valid CmisObject.
Finally, our next listing shows how you could make use of the OperationContext in code.
Listing 7.4. Using your OperationContext

If no OperationContext is provided, OpenCMIS falls back to the default OperationContext of the session. For example, getObject(id) would use the default OperationContext. You can modify the default OperationContext, but it’s strongly recommended that you do this only between session creation and making the first call to the repository. Changing the default OperationContext later may have side effects in multithreaded environments.
You can get the default context like this and then modify it:
OperationContext context = session.getDefaultContext();
You can also set a completely new default context if you want, like this:
session.setDefaultContext(context);
But now back to that browse page. Let’s get those folder children.
7.1.4. Getting the folder children
With the folder object in hand, you can now call getChildren like so:
ItemIterable<CmisObject> children = folder.getChildren();
OpenCMIS hasn’t contacted the repository yet. It’s only created an object that knows how to contact the repository. You can now use this children object to iterate over the children of the folder.
Let’s do a quick test. You can try this in the CMIS Workbench:
for (CmisObject child : children) {
  System.out.println(child.getName());
}
That looks easy. When the children object is asked for the first object in the list, it contacts the repository and asks for a certain number of list entries. When this batch is consumed and the repository has more entries, the children object fetches the next batch until the application stops the loop or all list entries have been consumed. As you can see, the application code doesn’t notice that at all. It iterates over the children.
You can control the batch size if you want. The OperationContext is your friend if you need to do this, as shown here:
OperationContext childrenOpCtx = session.createOperationContext();
childrenOpCtx.setMaxItemsPerPage(10);
The OperationContext also provides control over the order of the returned list. For example, the following line requests the list to be ordered by the names of the objects. (Check the repository info first to determine whether the repository supports this feature or not. Most repositories do.)
childrenOpCtx.setOrderBy("cmis:name");
The syntax follows the ORDER BY clause of the CMIS Query language. That is, you can also sort by multiple properties and define whether they should be sorted in ascending or descending order.
And while you’re here, you can define which fields of the children you want back. How about the object ID, the object’s base type, the name, the content length, the MIME type, and the allowable actions? That should be enough to populate the browse page. The following listing shows how to create this OperationContext and shows its use in the getChildren call.
Listing 7.5. Using a filtering OperationContext with folder.getChildren()
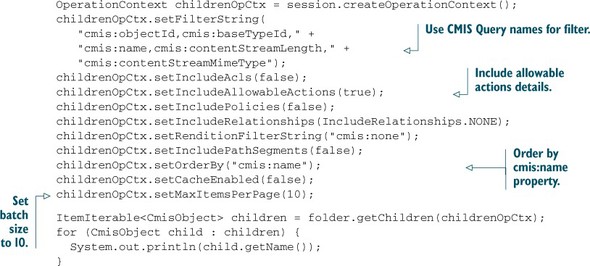
You’ve already created your second OperationContext. You might be thinking that you’re going to have to create a bunch of these, but this generally isn’t the case. Most applications only need a handful of OperationContexts. You can create those in one place, and then reuse them elsewhere in the application.
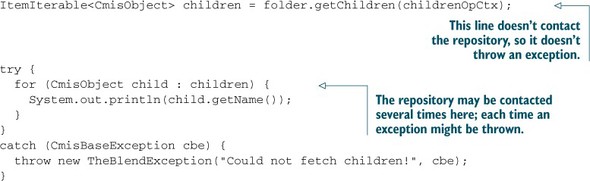
Finally, let’s not forget the exception handling, shown next.
Listing 7.6. Exception handling example for folder.getChildren()
The getChildren method has two siblings. The getDescendants method and the getFolderTree method can return more than one level of children. getDescendants returns all children (documents, folders, policies, and items), whereas getFolderTree only returns the subfolders. Both take a parameter called depth that defines how many levels should be returned. A depth of 1 is similar to getChildren. The special reserved depth value of -1 means you’re asking for the whole subtree (infinite depth).
Not all repositories support these two methods. You can check the repository capabilities to find out if the repository you’re talking to supports them, as shown in this snippet:
if (Boolean.TRUE.equals(
   session.getRepositoryInfo().
     getCapabilities().isGetDescendantsSupported())) {

   // getDescendants() is supported here
}

if (Boolean.TRUE.equals(
  session.getRepositoryInfo().
    getCapabilities().isGetFolderTreeSupported())) {

  // getFolderTree() is supported here
}
Generally, these methods are expensive operations. Use them with care. Calling getDescendants on the root folder of a populated repository with a depth of -1 may return hundreds of megabytes of data—or worse, an exception if the result set becomes too big for the repository.
Neither method supports paging or ordering. But you can and should set an OperationContext to narrow down the data that comes back from these calls.
So far, so good. But this returns all of the children, and the browse page should support paging. Something is missing. Next, let’s see how to get only a page at a time.
7.1.5. Paging
To extract a page from the list of children, you have to define at which offset the page should start and how long the page should be. The offset is the skip parameter that you’ve already extracted in the doGet method.
Let’s set the page size to 10:

That’s all you have to do for paging. The skipTo method lets you set any offset. If the offset is greater than the total number of children, the repository returns an empty list. The getPage method creates an ItemIterable object that will stop an iteration when the provided number of objects has been processed.
The skipTo and getPage methods don’t change the original ItemIterable object; the children object stays untouched. Instead, they create new ItemIterable objects with a different behavior.
The whole paging code now looks like the following snippet—note that the for loop only iterates over the page, as opposed to the whole children collection:
ItemIterable<CmisObject> children = folder.getChildren(childrenOpCtx);

ItemIterable<CmisObject> page = children.skipTo(skip).getPage(10);

try {
  for (CmisObject child : page) {
    System.out.println(child.getName());
  }
}
catch (CmisBaseException cbe) {
  throw new TheBlendException("Could not fetch children!");
}
The batch size in the OperationContext and the page size should be the same, to reduce the number of calls and the amount of transferred data.
Now let’s look at the paging navigation links. If the user is on the first page, you obviously don’t need to provide a link to a previous page. But is there a second page? Luckily, the page object knows the answer. The repository returns the hasMoreItems flag, which can be retrieved with the getHasMoreItems method, shown here:
if (page.getHasMoreItems()) {
  // prepare link to next page
}
else {
  // this is the last page
}
Another useful piece of information would be the total number of children in the folder. The page object provides this number as well. You only need to call getTotalNumItems. It’s important to note that returning this number is optional for repositories. Some repositories always return this number, some repositories never return it, and some repositories return it sometimes. If the repository didn’t provide this number, getTotalNumItems returns -1:
if (page.getTotalNumItems() > -1) {
  // repository returned the total number of children
}
Now you’re close to completing this browse page. You have the name and path of the folder. You can get a page from the list of all children of the folder, and you know which paging links you have to provide. You have the IDs of the children to create navigation links to subfolders. But you can’t navigate up yet. You have no information about the parent folder. Let’s look at how you can go about getting that next.
7.1.6. Getting the folder parent
All folders have exactly one parent folder. Only the root folder is the exception, which never has a parent. The CMIS specification defines two operations that deal with the parents of an object: getFolderParent returns the parent of a folder and throws an exception for the root folder; getObjectParents returns the list of all parents for fileable, nonfolder objects. If the object is unfiled, this list is empty. If the object is multifiled, the list contains two or more parents.
OpenCMIS combines these two operations into one. All fileable types provide a getParents method, which returns a list of Folder objects. For folders, this list contains exactly one object. For the root folder, this list is empty. Let’s use the getParents method to get information about the parent folder:

You can optimize this. getParents uses the default OperationContext, so you can reuse the OperationContext for the getChildren call, like this:
Folder parent = null;
if (!folder.isRootFolder()) {
   parent = folder.getParents(childrenOpCtx).get(0);
}
Now you have all the pieces together. Let’s assemble the browse page.
7.1.7. Assembling the browse page
First, gather all of the code snippets from the previous sections and compile the doGet method. In a real application, it’s better to create the OperationContext objects in a central place and reuse them. But for demonstration purposes, we’ll leave them as shown in the following listing.
Listing 7.7. The doGet() method for the browse page, all in one place
protected void doGet(HttpServletRequest request,
  HttpServletResponse response, Session session)
    throws ServletException, IOException, TheBlendException {

  // --- get parameters ---
  String id = getStringParameter(request, "id");
  if (id == null) {
    id = session.getRepositoryInfo().getRootFolderId();
  }

  int skip = getIntParameter(request, "skip", 0);
  if (skip < 0) {
    skip = 0;
  }

  request.setAttribute("skip", skip);
  // --- fetch folder object ---
  OperationContext folderOpCtx
           = session.createOperationContext();
  folderOpCtx.setFilterString("cmis:name,cmis:path");
  folderOpCtx.setIncludeAcls(false);
  folderOpCtx.setIncludeAllowableActions(false);
  folderOpCtx.setIncludePolicies(false);
  folderOpCtx.setIncludeRelationships(IncludeRelationships.NONE);
  folderOpCtx.setRenditionFilterString("cmis:none");
  folderOpCtx.setIncludePathSegments(false);
  folderOpCtx.setOrderBy(null);
  folderOpCtx.setCacheEnabled(true);

  CmisObject object = null;
  try {
    object = session.getObject(id, folderOpCtx);
  } catch (CmisBaseException cbe) {
    throw new TheBlendException("Could not retrieve folder!", cbe);
  }

  Folder folder = null;
  if (object instanceof Folder) {
    folder = (Folder) object;
  } else {
    throw new TheBlendException("Object is not a folder!");
  }

  request.setAttribute("folder", folder);
  // --- fetch children ---
  OperationContext childrenOpCtx = session.createOperationContext();
  childrenOpCtx.setFilterString("cmis:objectId,cmis:baseTypeId,"
      + "cmis:name,cmis:contentStreamLength,"
      + "cmis:contentStreamMimeType");
  childrenOpCtx.setIncludeAcls(false);
  childrenOpCtx.setIncludeAllowableActions(true);
  childrenOpCtx.setIncludePolicies(false);
  childrenOpCtx.setIncludeRelationships(IncludeRelationships.NONE);
  childrenOpCtx.setRenditionFilterString("cmis:none");
  childrenOpCtx.setIncludePathSegments(true);
  childrenOpCtx.setOrderBy("cmis:name");
  childrenOpCtx.setCacheEnabled(false);
  childrenOpCtx.setMaxItemsPerPage(10);

  ItemIterable<CmisObject> children =
      folder.getChildren(childrenOpCtx);
  ItemIterable<CmisObject> page = children.skipTo(skip).getPage(10);

  List<CmisObject> childrenPage = new ArrayList<CmisObject>();

  try {
    for (CmisObject child : page) {
      childrenPage.add(child);
    }
  } catch (CmisBaseException cbe) {
    throw new TheBlendException("Could not fetch children!");
  }

  request.setAttribute("page", childrenPage);
  request.setAttribute("total", page.getTotalNumItems());

  // --- determine paging links ---
  request.setAttribute("isFirstPage", skip == 0);
  request.setAttribute("isLastPage", !page.getHasMoreItems());

  // --- fetch parent ---
  Folder parent = null;
  if (!folder.isRootFolder()) {
     try {
         parent = folder.getParents(childrenOpCtx).get(0);
      } catch (CmisBaseException cbe) {
         throw new TheBlendException("Could not fetch parent folder!");
      }
  }

  request.setAttribute("parent", parent);

  // --- show browse page ---
  dispatch("browse.jsp", folder.getName() + ". The Blend.",
      request, response);
}
You might’ve noticed that the servlet calls request.setAttribute() a few times and hands over the results of the CMIS requests. You need those to transfer the objects to the JSP.
The second step is to retrieve the objects again in the JSP, shown next.
Listing 7.8. JSP code for getting the folder children data

Finally, you need to change the HTML pseudocode to real code. For clarity, we’re using the values that the repository delivers without encoding. In a real application, you should never do that because it can be abused for cross-site scripting (XSS) and other attacks. Make sure you always encode all values.
If you neglect to test the data that comes back from a CMIS repository, you make XSS attacks too easy. Property values can contain HTML and JavaScript snippets that are executed in the user’s browser. Because they’re running in the context of your CMIS application, they have access to everything the user has access to and the potential to add, remove, modify, or steal data.
You can find a lot of information on the internet about how to counteract such attacks. A good starting point is The Open Web Application Security Project (OWASP; www.owasp.org). It also provides libraries that help lower the risk of an attack; one of these libraries is used in The Blend code.
Compare the JSP code in listing 7.9 with the pseudocode listing 7.1.
Listing 7.9. JSP code for folder browse
<h1><%= folder.getName() %></h1>

Path: <%= folder.getPath() %><br>
Number of children:
  <%= (total == -1 ? "unknown" : String.valueOf(total)) %><br>

<table>

<% if (parent != null) { %>
<tr>
  <td><a href="browse?id=<%= parent.getId() %>">..</a></td>
  <td></td>
  <td></td>
<tr>
<% } %>

<% for (CmisObject child: childrenPage) { %>
<tr>
  <% if (child instanceof Folder) { %>
  <td>
    <a href="browse?id=<%= child.getId() %>"><%= child.getName() %></a>
  </td>
  <td></td>
  <td></td>

  <% } else if (child instanceof Document) { %>
  <%
       Document doc = (Document) child;

       String mimeType = doc.getContentStreamMimeType();
       if (mimeType == null) {
         mimeType = "";
       }

       String contentLength = "";
       if (doc.getContentStreamLength() > 0) {
         contentLength =
           String.valueOf(doc.getContentStreamLength()) + " bytes";
       }
  %>

  <td><a href="show?id=<%= doc.getId() %>"><%= doc.getName() %></a></td>
  <td><%= mimeType %></td>
  <td><%= contentLength %></td>

  <% } else { %>

  <td><%= child.getName() %></td>
  <td></td>
  <td></td>

  <% } %>
<tr>
<% } %>

</table>

<% if (!isFirstPage) { %>
<% String skipParam = (skip < 10 ? "0" : String.valueOf(skip - 10)); %>
<a href="browse?id=<%= folder.getId() %>&skip=<%= skipParam %>">
Previous Page<a>
<% } %>

<% if (!isLastPage) { %>
<a href="browse?id=<%= folder.getId() %>&skip=<%= skip + 10 %>">
Next Page<a>
<% } %>
That’s it. Your browse page should be working now. Follow the instructions in chapter 6 to restart the server and open the web application in a web browser. After you’ve logged in, append /browse to the URL in the address bar, and the browse page should appear. It should look like the screenshot in figure 7.2.
Figure 7.2. Your first simple browse page

Before we move on, we have a few things to note. Just as you checked to see if the requested object was a folder or a document, you also need to check each child in the JSP. If it’s a folder, you generate a link to the browse page with the ID of this folder. If the object is a document, you cast to the OpenCMIS document interface, which provides convenience methods to access document-specific properties. Here, you’re accessing the MIME type and the content length. You also generate a link to a page that’s supposed to display details about the document. We’ll build this page next.
A challenge for .NET developers
If you’re a .NET expert, we offer a challenge: try turning this into an ASP.NET application. We think you’ll be surprised by how similar the code will be. If you do this, let us know how it turned out on the Author Online forum. We love to hear feedback from readers, as well as stories of how you used CMIS to solve your own real-world problems.
7.2. Building a document page
Now you can browse folders. But you also want to handle documents, and in this section we’ll focus on only that. When you click on a document in The Blend, whether it’s an audio file, an image, or something similar, a page will load that displays details about the document. You’re now going to build a stripped-down version of that page.
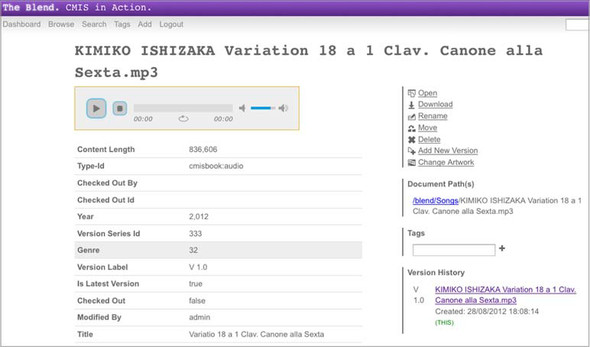
Figure 7.3 shows a screen from The Blend displaying document details for a song document object.
Figure 7.3. The Blend document (song) object details page
7.2.1. Preparing the HTML part of the document page
Similar to the previous section, we’ll prepare HTML pseudocode first. Copy the echo JSP from chapter 6, and rename it to show.jsp.
This time the page should have the name of the document, a thumbnail if available, a download link, a list of paths to the document, its allowable actions, and finally, all of its properties. The pseudocode for this is shown in the following listing.
Listing 7.10. JSP pseudocode for document detail page
<h1>[name of document]</h1>

[if document has thumbnail]
  [display thumbnail]
[end if]

[if document has content]
  [if current user is allowed to download content]
    [download link]
  [end if]
[end if]

<h2>Paths</h2>

<ul>
[loop over paths]
  <li>[path]</li>
[end loop]
</ul>

<h2>Allowable Actions</h2>

<ul>
[loop over allowable actions]
  <li>[allowable action]</li>
[end loop]
</ul>

<h2>Properties</h2>

<table>
[loop over properties]
<tr>
  <td>[property display name]</td>
  <td>[property value]</td>
</tr>
[end loop]
</table>
Again, you also need a servlet that prepares all that data. In the package com.manning .cmis.theblend.servlets, create a new class called ShowServlet that extends AbstractTheBlendServlet, and add the following XML snippet to the web.xml file:
<servlet>
 <servlet-name>ShowServlet</servlet-name>
 <servlet-class>
   com.manning.cmis.theblend.servlets.ShowServlet
 </servlet-class>
</servlet>
<servlet-mapping>
 <servlet-name>ShowServlet</servlet-name>
 <url-pattern>/show</url-pattern>
</servlet-mapping>
Similar to the browse page, you need to know which document to display. Again, you can use the ID to identify the document. That allows this page to display older versions of a document, not only the latest one. If the user doesn’t provide an ID, you can’t do anything except return an error message. These are the first lines of the doGet methods:
String id = getStringParameter(request, "id");
if (id == null) {
  throw new TheBlendException("No document id provided!");
}
Excellent. Now that you have the ID, you need to get this document.
7.2.2. Retrieving documents
From section 7.1, you already know how to fetch an object from a CMIS repository. For a quick start, let’s borrow and slightly modify some code from there, as shown in the next listing.
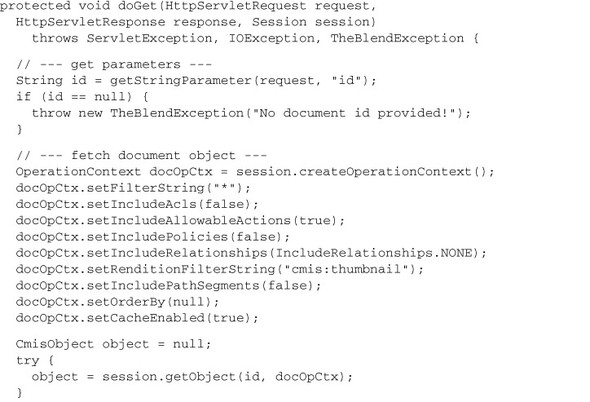
Listing 7.11. Retrieving a document with an appropriate OperationContext


The first thing you probably noticed is that this time the code tests whether the object is a document. The second important change is in the OperationContext. The filter is set to "*", which forces the repository to return all properties. This is different than not setting a filter at all. If no filter is set, the repository decides which properties are returned. It might exclude, for example, properties that are resource intensive to compute. Because the page that you’ll develop should display all properties, the filter must be "*".
The browse page didn’t distinguish between different CMIS errors, and the borrowed code doesn’t either. Let’s fix that before we move on.
Exception handling
The CMIS specification defines 13 exceptions. Five of them are general exceptions that might be thrown at any time. The others are specific exceptions that should only be thrown by certain operations. You might have noticed the word “should” in the last sentence. In reality, you should be prepared for all 13 exceptions at any time. Most CMIS repositories follow the specification, but a few don’t.
All CMIS exceptions have a counterpart in OpenCMIS with a similar name. For example, the CMIS exception invalidArgument is mapped to the CmisInvalidArgumentException in OpenCMIS. CMIS and OpenCMIS exceptions have a message and a code. The code isn’t used by many repositories and usually isn’t relevant. The quality of the messages depends on the repository. Some repositories provide only a generic error message, and some repositories provide detailed information.
Now let’s do a little exception handling and catch the case where the document doesn’t exist:

Because all CMIS exceptions are derived from CmisBaseException, the second catch block covers all other error cases.
Apart from the exceptions defined in the specification, there are a few other exceptions to cover in OpenCMIS dealing with connection and authorization issues. The most prominent example is the CmisConnectionException, which is thrown if the repository can’t be reached anymore. For a list of all exceptions, refer to the OpenCMIS Javadoc and the CMIS specification.
Getting details about the exceptions with getErrorContent
OpenCMIS exceptions have a getErrorContent method that provides the content that was sent with the exception. What that content is depends on the repository and the binding. In many cases, it contains valuable information. A server stack trace, for example, may tell you more than the error message. This content is nothing you can present to an end user, but it helps find issues during development.
Now you’re equipped with the tools to handle CMIS errors. You have a document object with all the properties and the allowable actions. What’s missing is the document, and the content.
Handling content streams
The OpenCMIS document interface provides a few getContentStream methods. The simplest getContentStream method requires no parameters and returns a ContentStream object, or null if the document has no content. If you want to check in advance whether the document has content, look at the content length:

The ContentStream object carries the stream, a filename, the MIME type of the stream, and the stream length. The filename should be the value of the cmis:contentStreamFileName property. The stream length isn’t always set, so don’t rely on it.
Dangling sockets, a warning
This is really important. If you’ve requested the content, consume and close the stream! Always. Even if it turns out that you don’t need it, consume it and close it. If you don’t do that, you’ll have a dangling socket connection to the repository. Depending on your environment, only a certain number of connections are allowed to the same host, and you’ll get stuck or get an exception in a subsequent call.
Before we move on, let’s look at the other getContentStream methods. There’s one that accepts an offset and a length parameter, and it allows you to retrieve an excerpt of the content. That helps you deal with big documents, or resume a download, or something similar. Before using it, check if the repository supports it. Some repositories ignore these parameters and always present the full stream. To test this, run one of the following lines in the CMIS Workbench console and count the bytes that come back:

OpenCMIS TCK
The OpenCMIS TCK (Test Compatibility Kit) also checks whether the repository supports content ranges. You start it in the CMIS Workbench by clicking the TCK button. You can either run all tests or select the Content Ranges Test. Note that the support for content ranges may work with one binding but not with another. To be sure, test all bindings. The TCK is covered in more detail in chapter 14.
Let’s look at another getContentStream method that takes a stream ID. If the stream ID isn’t set (is null), then it returns the content of the document. Other values represent renditions of the document or additional content streams depending on the repository.
How do you get to such a rendition stream ID? You may recall requesting the document thumbnails via the OperationContext:
docOpCtx.setRenditionFilterString("cmis:thumbnail");
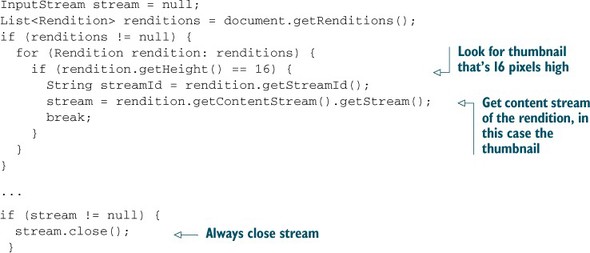
If the document has a thumbnail, you can find it in the renditions list:
List<Rendition> renditions = document.getRenditions();
In the OperationContext, you’ve defined that you’re only interested in thumbnails, but it’s also possible to request all renditions ("*") or renditions of a certain MIME type. See the “Rendition Filter Grammar” section in the CMIS specification (section 2.2.1.2.4.1) for details.
A document can have none, one, or multiple thumbnails. If the document has more than one, they usually differ by their size. The Rendition object contains the width and height of the thumbnail and several other details, including the stream ID that you can use to get the content of the thumbnail. Or you use the getContentStream method provided by the Rendition object:
Folder renditions
The CMIS specification defines that folders can also have renditions. A repository could, for example, provide a thumbnail as an icon for the folder. It’s also possible for a repository to provide a zip file that contains the contents of the folder and that’s created on the fly, as a rendition.
Paths
Next on the list and in the HTML pseudocode are the document’s paths—yes, plural. If the repository supports multifiling, documents can reside in more than one folder. To make it a bit more confusing, the last segment of the document’s paths might not match the cmis:name property.
Let’s illustrate that with an example. Suppose the document’s cmis:name property value is “Budget 2013” and it resides in two folders with the paths /engineering/development and /engineering/budgets/2013. The document might be filed under the paths /engineering/development/Budget 2013_01 and /engineering/budgets/2013 /Budget 2013.pdf, as shown in figure 7.4.
Figure 7.4. Multifiled document example
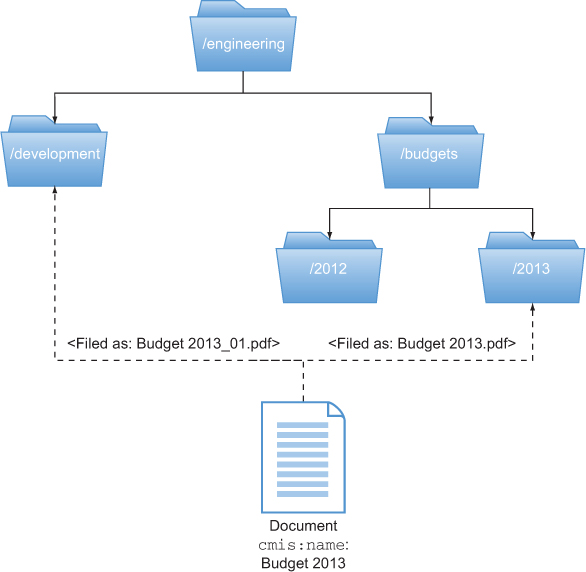
As you can see, it’s the same single document, but the last path segment is different. This isn’t common, but a repository can do that, for example, to avoid name clashes. Combining the path of a folder with the cmis:name property of the document doesn’t necessarily generate a valid path to the document, but OpenCMIS knows how to build the correct path.
Do you remember the IncludePathSegments flag in the OperationContext? It controls whether the repository should provide the document’s path segments when the children lists or parents lists are requested for an object. Luckily, that’s nothing you have to deal with. OpenCMIS hides all these details, and you can (and should) set the IncludePathSegments flag to false. All you need to call is getPaths on the object:
List<String> paths = document.getPaths();
It returns a list of all paths to the document with the correct path segments. But be careful with that method. It talks to the repository every single time you call it.
Allowable actions
Allowable actions are next in line. The allowable actions define what the current user can do with this object at this point in time. They help user interfaces to activate or to deactivate features. On the page, you’ll use them to decide whether or not to display a download link. A user might be allowed to know about the existence of a document, but might not be allowed to see its content. For demonstration purposes, we’ll also list all allowable actions.
In CMIS, the allowable actions are represented by a long list of Boolean values. In OpenCMIS they’re represented as a Set of Action enum values. You can check if an allowable action is set for an object by testing it in that set:
Set<Action> allowableActions =
   document.getAllowableActions().getAllowableActions();

if (allowableActions.contains(Action.CAN_DELETE_OBJECT)) {
   // the current user is allowed to delete the object
}
Properties
Finally, let’s look at the properties. Our web page doesn’t concern itself with the differences between the properties, so it lists them all. A CmisObject object provides the following three methods to access properties and property values:
- getProperties()—Returns a list of all properties that have been retrieved
- getProperty(String id)—Returns the property object for the given property ID
- getPropertyValue(String id)—A shortcut that directly obtains the value of a property
The CmisObject object contains only the properties that have been defined in the property filters of the OperationContext used when the object was fetched. Only if the property filter was set to "*" can you be sure to get all of the properties. But use "*" with care. Some repositories return more than 100 properties for a simple document, so only choose the ones you need.
Both getProperties and getProperty return Property objects. Those objects hold all kinds of information about the property, and it’s worth having a look into the OpenCMIS Javadoc. The most important data points are the data type of the property, a flag indicating if it’s a single-value or a multivalue property, and the property value itself. As we noted in chapter 4, the Property object carries both metadata about the property and the property itself.
Under the hood, all CMIS properties are transferred as lists of values. Single-value properties are lists that must not have more than one value. You can see these echoes of the original CMIS specification in various places in OpenCMIS. For example, the Property object provides a getValues method, which returns a list of values. It also provides a helper method primarily for single-valued properties named getFirstValue, which returns the first value in the list if the list isn’t empty. But both work for single- and multivalue properties.
The simplest way to get the value of a property is to call getValue on the Property object or use the shortcut and call getProperyValue on the CmisObject. In both cases, you only have to cast the right Java data type. If it’s a multivalue property, cast to a List of the Java data type. If the property isn’t set—that is, it has no value—OpenCMIS returns null. Here are a few examples:

That’s all you need for this web page. But something is different here, compared to the browse page. For this page you don’t just need the JSP that displays all of this data—you also need something that serves the content. Let’s assemble the JSP first and build a servlet that deals with the content later.
7.2.3. Assembling the document page
The code for the servlet is straightforward and speaks for itself. The OperationContext is in this code again, but you’re already an expert now, and you know that it should go in a central place and would be reused in a real application. The code for the doGet method is shown in the next listing.
Listing 7.12. doGet method for the document page

Next stop: JSP, which is shown in listing 7.13. Here, you fill in the blanks with the document data. Again, we haven’t encoded the data here for code clarity and brevity, but it would be careless to do this in a real-world application.
Listing 7.13. JSP code for loading the document


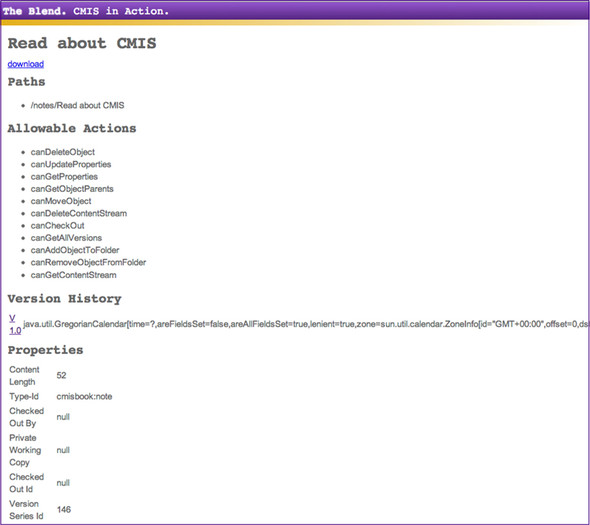
When you run the code you’ve built up to this point, you’ll notice that DateTime values aren’t nicely formatted, as you can see in figure 7.5. Also, if properties aren’t set, you’d like to see something other than “null” displayed. But because you have to encode these values anyway (remember the XSS attack issue), you can also use that code to nicely format property values. That’s an exercise for you to complete on your own if you wish. If you need some inspiration, have a look at the HTMLHelper class in The Blend code.
Figure 7.5. The document page
The last missing piece now is the content stream. Next up, we’ll build the download servlet.
7.2.4. The download servlet
For the download servlet, we don’t need HTML or a JSP. We want to stream the content from the repository directly to the browser.
As you now know, CMIS is based on HTTP, so why not use the content URLs that the CMIS repository provides? Why do we need our own download servlet?
In some scenarios it’s possible to use the CMIS content URLs, but let’s look at some of the downsides to that:
- The Web Services binding doesn’t provide a content URL. Only the AtomPub and the Browser bindings do. If your application should be binding-agnostic, the CMIS content URL isn’t an option. You’ll find more about the differences between the bindings in chapter 11.
- Usually, users have to provide their username and password again because the content URL doesn’t carry any authentication information. From a user-experience point of view, that’s a bad thing.
- Depending on the server setup, the end user’s web browser may not be able to contact the CMIS repository directly. In these cases, your content URL wouldn’t work.
You can see that use of URLs in this way is too fragile to rely on. But if you want to do it anyway, here’s the line of code you need to get to the URL:
String contentURL =
   ((LinkAccess)session.getBinding().getObjectService()).
    loadContentLink(session.getRepositoryInfo().getId(), documentId);
OK, wait. What happened here? That code looks complicated. A little background explanation is necessary.
The OpenCMIS client library consists of two layers: a high-level and a low-level API. Up to this point, you’ve only seen the high-level API. It provides a lot of conveniences and hides the cumbersome details. The low-level API is a bit more difficult to use, but it lets you access and control every CMIS detail, including the content URL. You’ll find more on these two APIs in chapter 11.
The loadContentLink method on the LinkAccess interface provides the content URL. If the current binding is the Web Services binding, it returns null. It needs the repository ID and the document ID to compile the URL. The repository ID can be found in the repository info. The LinkAccess interface is provided by all low-level services. To get hold of one of the service objects (in this example, it’s the object service), you have to get the entry point to the low-level API. The getBinding method on the session object provides this convenient entry point.
Now you’ll prepare the new DownloadServlet, as you did for the BrowseServlet earlier in this chapter. In the package com.manning.cmis.theblend.servlets, create a new class called DownloadServlet that extends AbstractTheBlendServlet, and then add the following XML snippet to the web.xml file:
<servlet>
 <servlet-name>DownloadServlet</servlet-name>
 <servlet-class>
   com.manning.cmis.theblend.servlets.DownloadServlet
 </servlet-class>
</servlet>
<servlet-mapping>
 <servlet-name>DownloadServlet</servlet-name>
 <url-pattern>/download</url-pattern>
</servlet-mapping>
You’ve already added two links from the document page to this servlet. One link provided only the document ID as a parameter. The second link provided the document ID and a stream ID to access a rendition: the thumbnail.
Next, let’s create the first half of the doGet method. Note the setFilterString in the following listing. You only select the cmis:contentStreamFileName property. This is because cmis:objectId, cmis:baseTypeId, and cmis:objectTypeId are added by OpenCMIS automatically, as we discussed earlier. The filename helps OpenCMIS in some cases to return the right filename in the ContentStream object.
Listing 7.14. First half of the download doGet() method
String id = getStringParameter(request, "id");
String streamId = getStringParameter(request, "stream");

OperationContext docOpCtx = session.createOperationContext();
docOpCtx.setFilterString("cmis:contentStreamFileName");
docOpCtx.setIncludeAcls(false);
docOpCtx.setIncludeAllowableActions(false);
docOpCtx.setIncludePolicies(false);
docOpCtx.setIncludeRelationships(IncludeRelationships.NONE);
docOpCtx.setRenditionFilterString("cmis:none");
docOpCtx.setIncludePathSegments(false);
docOpCtx.setOrderBy(null);
docOpCtx.setCacheEnabled(true);

CmisObject cmisObject = null;
try {
  cmisObject = session.getObject(id, docOpCtx);
} catch (CmisObjectNotFoundException onfe) {
  response.sendError(HttpServletResponse.SC_NOT_FOUND,
    "Document not found!");
  return;
} catch (CmisBaseException cbe) {
  response.sendError(HttpServletResponse.SC_INTERNAL_SERVER_ERROR,
    "Error: " + cbe.getMessage());
  return;
}

if (!(cmisObject instanceof Document)) {
  response.sendError(HttpServletResponse.SC_BAD_REQUEST,
    "Object is not a document!");
 return;
}

Document document = (Document) cmisObject;
You might’ve noticed that the error handling in the previous listing is different. It’s not throwing an exception that’s finally turned into a human-readable error page. Instead, it returns the proper HTTP status codes. That helps web browsers and other clients to distinguish real content from errors.
The code block in the next listing shows how to handle the ContentStream.
Listing 7.15. Second half of the download doGet() method


The second half of the doGet certainly isn’t surprising. If the stream ID has been provided, it will be used. If the return content stream is null, the document has no content or the stream ID wasn’t valid. Finally, the stream is forwarded to the web browser and the content stream is closed. Closing the stream is important in order to release all resources that are attached to it.
Now the document page is working, and you can finally download content. Great. Are you in the mood for more? How about also showing the version history of the document on the document page? Let’s do that next.
7.2.5. Adding the version series to the document page
Whether or not a document can have multiple versions depends on the type of the document. All versions of a document share the same version series. Following that logic, sorting all documents of a version series by their creation dates produces the version history.
If you want to attach the version history to the document’s page JSP, you need a bit of HTML code first. Here’s a pseudocode version of what that would look like:
[if versionable]
<h2>Version History</h2>

<table>
[loop over versions]
<tr>
  <td>[version label and link to version]</td>
  <td>[version creation date]</td>
  <td>[if major version] major [else] minor [end if]</td>
</tr>
[end loop]
</table>
[end if]
You only want to do this if the document is a versionable type. If it is, you list the version label with a link and the version’s creation date. Then display whether it’s a major or minor version. Checking if the document is versionable is easy:
DocumentType doctype = (DocumentType) document.getType();

if (Boolean.TRUE.equals(doctype.isVersionable())) {
  // document is versionable
} else {
  // document is not versionable
}
Getting all versions also isn’t difficult, as you can see here:
List<Document> versions = null;
try {
  versions = document.getAllVersions();
}
catch (CmisBaseException cbe) {
  throw new TheBlendException("Couldn't fetch doc versions!", cbe);
}
The method getAllVersions returns all members of the version series in reverse order by their creation date. That is, the latest version is at the top of the list; the first version is at the bottom of the list. If the version series is checked out, then the Private Working Copy (PWC) is on top of this list, followed by the latest version.
You see that getAllVersions returns a list of document objects. Does this ring a bell? Yes, you can use an OperationContext here. Note that you can’t change the order of the returned list. The order is defined, in this case, by the CMIS specification:

Let’s assemble this all together. First, add the previous code to the doGet method in ShowServlet.java, somewhere between getting the thumbnail and the dispatch call, and add this snippet:
List<Document> versions = null;

DocumentType doctype = (DocumentType) doc.getType();

if (Boolean.TRUE.equals(doctype.isVersionable())) {
    OperationContext versOpCtx = session.createOperationContext();
    versOpCtx.setFilterString("cmis:versionLabel,cmis:creationDate," +
       "cmis:isMajorVersion");
    versOpCtx.setIncludeAcls(false);
    versOpCtx.setIncludeAllowableActions(false);
    versOpCtx.setIncludePolicies(false);
    versOpCtx.setIncludeRelationships(IncludeRelationships.NONE);
    versOpCtx.setRenditionFilterString("cmis:none");
    versOpCtx.setIncludePathSegments(false);
    versOpCtx.setOrderBy(null);
    versOpCtx.setCacheEnabled(false);

    try {
      versions = doc.getAllVersions(versOpCtx);
    }
    catch (CmisBaseException cbe) {
      throw new
       TheBlendException("Could not fetch document versions!", cbe);
    }
}

request.setAttribute("versions", versions);
Next, extend the show.jsp. In the first block, you have to extract the versions for the attributes again, like this:
List<Document> versions = (List<Document>) request.getAttribute("versions");
Finally, append the snippet that displays the version history to the JSP, like so:
<% if (versions != null) { %>
<h2>Version History</h2>

<table>
<% for (Document version: versions) { %>
<tr>
  <td><a href="show?id=<%= version.getId() %>">
       <%= version.getVersionLabel() %></a></td>
  <td><%= version.getCreationDate() %></td>
  <td><% if (Boolean.TRUE.equals(version.isMajorVersion())) {
       %>major<% } else { %>minor<% } %> </td>
</tr>
<% } %>
</table>
<% } %>
If it works correctly, you should now be able to jump between different versions by clicking on the version labels. Each version is a full-blown document that will supply both metadata and content. But have a look at the allowable actions. Most repositories don’t allow you to change a document that isn’t the latest version. Some don’t even allow deleting an earlier version. Each version of a document carries additional information as well. For example, flags will help you find out if the version is the latest version or the latest major version, if it’s checked out, and if so by whom. Have a look at the Javadoc to discover the applicable methods.
Note that all versioning-related properties are often calculated properties. That is, the repository has to compute these properties values for each document every time. For many repositories, this is a relatively expensive operation, so you should only request those properties when, and if, you need them.
With the code you’ve seen up to this point, you can browse folders, show documents, and traverse the version history of a document. Indeed those are all critical features. But the most powerful way to discover content in a CMIS repository is a query. Let’s build a query page next.
Here’s one final remark on the code you’ve seen so far. Have a look at this line:
if (Boolean.TRUE.equals(version.isMajorVersion()) { ... }
That looks a bit cumbersome, doesn’t it? When you look through the OpenCMIS Javadoc, you’ll notice that most Boolean values are Boolean objects. The reason for this is that it’s possible that the repository won’t return a value. There are two reasons why this could happen: either the repository doesn’t follow the CMIS specification, or you haven’t requested the properties that back these methods. If you want the method isMajorVersion to return a non-null value, for example, you have to include the cmis:isMajorVersion property in your property filter. The same is true for similar methods like isLatestVersion and isVersionSeriesCheckedOut.
7.3. Building a query page
Chapter 5 explained the CMIS Query language, and you’ve probably played with it already in the CMIS Workbench. In this section, you’ll learn how to use it in an application. Let’s build a simple web page that allows the user to find documents by their names or parts of their names. A CMIS query can do much more than this, but we’ll start with the basics. This section provides only a blueprint for many other interesting, Query-based use cases.
In this example, we don’t check if the repository supports queries. We assume it does because our included repository does. But you can find this information in the repository capabilities and test it for your own use cases. Recall from chapter 2 how this is done:
if (session.getRepositoryInfo().getCapabilities().
  getQueryCapability() != CapabilityQuery.NONE) {
     // queries are supported
}
By this point in the chapter, creating a new page should be routine for you. Following the same pattern you’ve used for the previous new pages, prepare the new SearchServlet. In the package com.manning.cmis.theblend.servlets, create a new class called SearchServlet that extends AbstractTheBlendServlet, and then add the following XML snippet to the web.xml file:
<servlet>
 <servlet-name>SearchServlet</servlet-name>
 <servlet-class>
   com.manning.cmis.theblend.servlets.SearchServlet
 </servlet-class>
</servlet>
<servlet-mapping>
 <servlet-name>SearchServlet</servlet-name>
 <url-pattern>/search</url-pattern>
</servlet-mapping>
Next, you need an HTML skeleton. This has to be a simple form that takes the partial name and a list of results. Here’s the pseudocode:
<h1>Search</h1>

<form method="GET">
Enter the name of the document:
<input type="text" name="q" value="[query]">
<input type="submit" value="Search">
</form>

[if query performed]
<ul>
[loop over results]
  <li>[document name and link to show page]<li>
[end loop]
</ul>
[end if]
The form provides a parameter q to the servlet that’s backing this JSP. Getting this parameter is first thing to do in the doGet method:
String q = getStringParameter(request, "q");
The query that you want to execute looks like this:
SELECT cmis:objectId, cmis:name FROM cmis:document
  WHERE cmis:name LIKE '%[value of q]%'
You’re selecting the ID and the name of the document and looking for documents that contain the value of the parameter q in their name. The CMIS LIKE predicate works as it does in SQL. The % characters are wildcards for any character sequence. For more details on Query syntax, please refer back to chapter 5.
7.3.1. Ways to query: there be three
Sorry about that heading. We were temporarily possessed either by a pirate or an 1890s prospector. Anyway, OpenCMIS gives you three choices for how to build and execute the query. We’ll show you all of them in this section. They all have their advantages and disadvantages, so it’s up to you to pick the one that makes the most sense in your application. Let’s start with the most generic query call.
The query method
The OpenCMIS session object provides a query method. It takes two parameters: the query statement and a flag indicating whether all versions should be included in the query. Not many repositories support querying all versions; you can look up whether it’s supported in the repository capabilities. Also, not many application scenarios need it. In most cases, this flag will be set to false:
String statement = "SELECT cmis:objectId, cmis:name " +
  "FROM cmis:document " +
  "WHERE cmis:name LIKE '%" + q + "%'";

ItemIterable<QueryResult> results = session.query(statement, false);
First you assemble the query statement, and then you call the query method. The result is an ItemIterable object of type QueryResult.
You already know ItemIterable objects. They’re also returned by the getChildren method that we explained at the beginning of this chapter. Everything you’ve learned about skipping, paging, and iterating works here too. The query method doesn’t perform the query—it only creates an object that knows how to perform the query. You can then use this object to extract the page from the result set that you need:
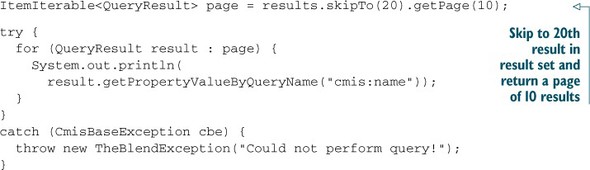
A QueryResult object represents one row in the result set. It doesn’t necessarily represent an object, though. For example, if the query contained a JOIN of multiple primary types, the QueryResult object would be a mix of data from multiple objects.
You can access the properties and the property values in a QueryResult object by property ID and by query name or alias:
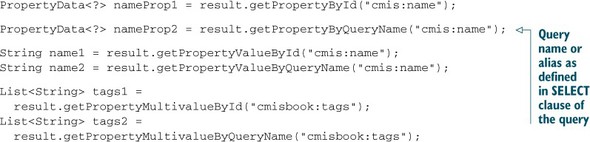
As you’ll recall, it’s recommended that you always use the query name for queries and filters. The CMIS specification makes it optional for repositories to send the property IDs, but repositories must always send the query names or aliases. Query names and aliases make particular sense if JOINs are involved. If two objects with the same properties are JOINed, the property ID can be ambiguous and all overlapping properties would be available twice with the same property ID. The aliases, on the other hand, are always unambiguous. If you try to use the same alias for two properties, the query would be invalid and wouldn’t be executed in the first place.
That all looks straightforward, but there’s an issue. Did you spot it? Look again at this query statement:
String statement = "SELECT cmis:objectId, cmis:name FROM cmis:document
  WHERE cmis:name LIKE '%" + q + "%'";
What if the parameter q contains a single quote? The query would break. A user could even use this flaw to extend the query with additional clauses. It’s your responsibility as an application developer to escape this value according to the CMIS Query language specification.
In the SQL world, this is known as “SQL injection.” It’s the same principle here, but the consequences aren’t as severe for two reasons. First, the CMIS Query language can’t change data, so an attacker can’t use it to add, remove, or modify data. Second, the repository only returns results that the user is allowed to see. Even if this attack was successfully used, it’s not possible to get data that the user doesn’t already have permissions to read. Attacks like this might break the application, though, or open other security holes. It’s for this reason (and others) that we’ve the createQueryStatement method, which we’ll cover in the next section.
The createQueryStatement method
Once again, OpenCMIS has the “SQL injection” issue handled with the QueryStatement object. The following code shows how to create and use one:
QueryStatement stmt = session.createQueryStatement(
   "SELECT cmis:objectId, cmis:name
    FROM cmis:document WHERE cmis:name LIKE ?");
stmt.setStringLike(1, "%" + q + "%");

ItemIterable<QueryResult> results = stmt.query(false);
If you’re familiar with JDBC PreparedStatements, you’ll probably recognize the idea. You create a query statement with placeholders, which are question marks (?). The placeholders can then be replaced by values. In this example, the LIKE predicate has a placeholder whose value is set by the setStringLike method. The first parameter of setStringLike determines which question mark should be replaced. The numbering starts with 1, following the example of the JDBC PreparedStatement class. This method not only replaces the placeholder, it also escapes the value according to the CMIS specification. There’s nothing extra you have to do.
Let’s look at more of these set. . .() methods for other data types. The particularly convenient methods are those that format DateTime values. Check the Javadoc of the QueryStatement interface. Let’s look at a few more examples.
This example sets String and DateTime values:
GregorianCalendar cal = new GregorianCalendar(2012, 7, 21, 10, 0, 0);

QueryStatement stmt = session.createQueryStatement(
  "SELECT * FROM cmisbook:poem
   WHERE cmisbook:author = ? AND cmis:creationDate < ?");
stmt.setString(1, "Edgar Allan Poe");
stmt.setDateTimeTimestamp(2, cal);

ItemIterable<QueryResult> results = stmt.query(false);
The following example sets a list of values:

Finally, this example sets properties, types, and values:
QueryStatement stmt = session.createQueryStatement(
   "SELECT ?, ? FROM ? WHERE ? = ?");
stmt.setProperty(1, "cmisbook:audio", "cmisbook:track");
stmt.setProperty(2, "cmisbook:audio", "cmisbook:title");
stmt.setType(3, "cmisbook:audio");
stmt.setProperty(4, "cmisbook:audio", "cmisbook:year");
stmt.setNumber(5, 2012);

ItemIterable<QueryResult> results = stmt.query(false);
This last example looks a bit funny. Even the properties and the type are set with placeholders. This technique is handy in some situations. You know that in queries, only query names of properties and types must be used. All CMIS specification–defined properties and types use the property ID duplicated as the query name, but that might not be the case for custom types because it isn’t required by the specification. For example, if the property ID doesn’t comply with the rules for query names, the repository must use a different value for the query name. As input, the setProperty method takes the type and property ID and then determines the query name for this property and sets it. That’s a task that you, as an application developer, don’t have to worry about anymore. The setType method works similarly. It takes the object type ID, determines the correct query name, and sets it.
The query method of the QueryStatement interface works exactly like the query method of the Session interface. It takes a flag specifying whether older versions should be included in the query and returns an ItemIterable object that can be used for skipping and paging. It also returns QueryResult objects.
The queryObjects method
As you can imagine, the QueryResult object is only a data container and doesn’t necessarily represent an object. But in some cases, they happen to also be relatively complete objects as well, and in those cases it would be handy to use them like CmisObjects. That is, use them to update properties, change permissions, delete them, and so on.
There’s no way to convert QueryResult objects into CmisObjects after the fact, but you can perform a query that returns CmisObjects in the first place. It’s called queryObjects, and here’s how you use it:

The important change in the previous code is that queryObjects returns an ItemIterable of full-blown CmisObjects. To get there, the query statement has been broken into multiple parts. The first parameter of queryObjects takes the type ID (not the query name). The second parameter takes the WHERE clause of the query, and it suffers from the same escaping issue that the vanilla query method has. We’ll solve this issue in a moment. The third parameter specifies whether older versions should be included in the query or not. Finally, the fourth parameter takes an OperationContext object that defines the SELECT clause and the ORDER BY clause of the query statement.
To get the WHERE clause escaping properly, you can combine a QueryStatement with the queryObject method, like so:

The only limitation of queryObjects is that you can’t use JOINs or aliases. But they wouldn’t make sense here anyway.
Let’s get back to building the query page. The QueryStatement option seems to work well for the page:

All you have to do now is gather the results. Because you only need the object ID and the name of the documents, you don’t need a sophisticated data structure. A LinkedHashMap is sufficient, and it keeps the order of the query results. Let’s use the object ID as the key and put the document name into the value:
LinkedHashMap<String, String> results =
  new LinkedHashMap<String, String>();

try {
  for (QueryResult result : page) {
    String docId = result.getPropertyValueByQueryName("cmis:objectId");
    String name = result.getPropertyValueByQueryName("cmis:name");
    results.put(docId, name);
  }
}
catch (CmisBaseException cbe) {
  throw new TheBlendException("Could not perform query!");
}
OK, that’s it. Next, let’s assemble the parts and build the search page.
7.3.2. Assembling the search page
Keeping up the pace on this marathon tour, and without any further ado, our next listing shows the servlet doGet code.
Listing 7.16. Search servlet doGet() code


The JSP code is equally straightforward, as shown next.
Listing 7.17. JSP code for the search page
<%
  String q = (String) request.getAttribute("q");
  Map<String, String> results =
    (Map<String, String>) request.getAttribute("results");
%>

<h1>Search</h1>

<form method="GET">
Enter the name of the document:
<input type="text" name="q" value="<%= (q == null ? "" : q) %>">
<input type="submit" value="Search">
</form>

<% if (results != null) { %>
<ul>
<% for (Map.Entry<String, String> result: results.entrySet()) { %>
  <li>
    <a href="show?id=<%= result.getKey() %>">
      <%= result.getValue() %></a>
  </li>
<% } %>
</ul>
<% } %>
Now you have a blueprint for all kinds of search pages. You can, for example, extend the HTML form and add more criteria to the query. You can display the thumbnail for each query result on the page. If you want to add paging for the query results, follow the pattern that we described for the browse page. It’s exactly the same here.
Searching and browsing are ways of finding objects in a CMIS repository. The CMIS specification also defines relationships to interconnect objects. In the next section, you’ll see to how to traverse relationships.
7.3.3. Accessing and traversing relationships
This section will be a dry run without an example page in The Blend because not many repositories support relationships. To check if a repository supports relationships, call getTypeChildren:
ItemIterable<ObjectType> types = session.getTypeChildren(null, false);
getTypeChildren returns all child types of a given type. The second parameter defines that you want the type definitions without all the property definitions. If the first parameter, the type, is set to null, the repository returns all supported base types. A CMIS repository must return at least the two types cmis:document and cmis:folder. A CMIS 1.0 repository might also return the cmis:relationship and cmis:policy types, if they’re supported. A CMIS 1.1 repository can additionally return the types cmis:item and cmis:secondary. To test whether the repository supports relationships, call getTypeChildren and check if cmis:relationship is in the list. If it is, then this repository supports relationships.
A relationship is an object, similar to a document or a folder, that connects two objects: a source and a target object. A relationship object has its own object ID and has (from a CMIS point of view) its own lifecycle. That is, if the source or target object disappears, the relationship object might still exist with a dangling link. It’s up to the repository to clean up dangling relationships where that makes sense, but it’s not required by the specification.
A relationship object can’t be filed, which means it can’t reside in a folder. You can access such a relationship object by knowing its object ID, performing a query, or discovering it from a source or target object.
The OperationContext is the key to getting hold of the relationships of an object. You can set the includeRelationships flag to the self-explanatory values NONE, SOURCE, TARGET, or BOTH:
docOpCtx.setIncludeRelationships(IncludeRelationships.BOTH);
If you need more fine-grained control over the list of relationships of an object, call getRelationships:
ItemIterable<Relationship> relationships =
  session.getRelationships(objectId, true,
    RelationshipDirection.EITHER, null, context);
The first parameter is the ID of the source or target object. The second and fourth parameters define which relationship types should be considered. In this example, all relationship types are selected. The third parameter defines whether the object is considered to be the source, the target, or either. The last parameter sets the OperationContext for the relationship objects. Here you could, for example, set a property filter.
Once you have a relationship object, you can get hold of the source and the target objects of the relationship:
try {
  CmisObject source = relationship.getSource();
  CmisObject target = relationship.getTarget();
}
catch (CmisObjectNotFoundException onfe) {
  ...
}
Because the source or target object might not exist anymore, be prepared for an exception. There are also getSource and getTarget methods that take an OperationContext. If you’re only interested in the IDs of the source and the target objects, you can get those as well:
ObjectId sourceId = relationship.getSourceId();
ObjectId targetId = relationship.getTargetId();
All four methods are backed by the properties cmis:sourceId and cmis:targetId. If you haven’t selected them in the OperationContext that was used to fetch the relationship object, these methods will return null. When you create a relationship, you have to set those two properties to create a proper relationship object.
7.4. Summary
This chapter has covered all of the read-only operations you usually need in a CMIS application. We only have a few things left to talk about now.
We haven’t mentioned permissions, ACLs, or policies yet. Chapter 12 will cover these areas. But in most scenarios, the allowable actions that were described in this chapter are probably the preferable path.
We also want to mention a feature called Change Log that falls into the read-only category. It provides the history of changes in a repository, and search engines can use it to index the repository, or tools can use it to synchronize content between repositories.
CMIS also provides a way to get a list of all documents that are checked out in a repository or in a specific folder. The next chapter covers how to do this.
Finally, to summarize what we’ve done in this chapter, you first learned how to gain access to content and metadata in a CMIS repository. You also learned how to use the OpenCMIS API to browse a folder, obtain metadata, stream the content of a document, fetch the version series of a document, and perform queries. In addition, you learned how to integrate these skills into a typical web application.
None of these operations have created, modified, or removed data in the repository. In the next chapter, you’ll learn how to do that.