
Chapter 7. Testing with Gradle
This chapter covers
- Understanding automated testing
- Writing and executing tests with different frameworks
- Configuring and optimizing test execution behavior
- Supporting unit, integration, and functional tests in your build
In the previous chapters, you implemented a simple but fully functional web application and learned how to build and run it using Gradle. Testing your code is an important activity of the software development lifecycle. It ensures the quality of your software by checking that it works as expected. In this chapter, we’ll focus on Gradle’s support for organizing, configuring, and executing test code. In particular, you’ll write unit, integration, and functional tests for your To Do application and integrate them into your build.
Gradle integrates with a wide range of Java and Groovy unit testing frameworks. By the end of this chapter, you’ll write tests with JUnit, TestNG, and Spock, and execute them as part of the build lifecycle. You’ll also tweak the default test execution behavior. You’ll learn how easy it is to control the test logging output and to add a hook or listener to react to test lifecycle events. We’ll also explore how to improve the performance of big test suites through forked test processes. Integration and functional tests require a more complex tooling setup. You’ll learn how to use the third-party tools H2 and Geb to bootstrap your test code.
Before you start exercising tests with your build, let’s do a quick refresher on the different types of testing as well as their individual advantages and disadvantages.
7.1. Automated testing
We’re not going to cover the details of why an automated testing approach is beneficial to the quality of your project. There are many excellent books that cover this topic. Long story short: if you want to build reliable, high-quality software, automated testing is a crucial part of your development toolbox. Additionally, it’ll help reduce the cost of manual testing, improve your development team’s ability to refactor existing code, and help you to identify defects early in the development lifecycle.
7.1.1. Types of automated testing
Not all automated tests are alike. They usually differ in scope, implementation effort, and execution time. We categorize three types of automated tests—unit tests, integration tests, and functional tests:
- Unit testing is performed as a task alongside the implementation of your production code and aims for testing the smallest unit of your code. In a Java-based project this unit is a method. In a unit test you want to avoid interacting with other classes or external systems (for example, the database or file system). References to other components from within the code under test are usually isolated by test doubles, which is a generic term for a replacement of a component for testing purposes, like a Stub or Mock. Unit tests are easy to write, should execute quickly, and provide invaluable feedback about your code’s correctness during development.
- Integration testing is used to test an entire component or subsystem. You want to make sure that the interaction between multiple classes works as expected. A typical scenario for an integration test is to verify the interaction between production code and the database. As a result, dependent subsystems, resources, and services have to be accessible during test execution. Integration tests usually take longer to execute than unit tests and are harder to maintain, and the cause of a failure may be harder to diagnose.
- Functional testing is used to test the end-to-end functionality of an application, including the interaction with all external systems from a user’s perspective. When we talk about the user’s perspective, we usually mean the user interface. Functional tests are the hardest to implement and the slowest to run, because they require emulating user interaction. In the case of a web application, the tooling for functional tests will need to be able to click a link, enter data into form fields, or submit a form within a browser window. Because user interfaces can change a lot over time, maintaining functional test code can become tedious and time-consuming.
7.1.2. Test automation pyramid
You may wonder which type of testing is the most appropriate for your project and to what extent. In a perfect world, you’d have a good mixture of all of these tests to ensure that your code is working correctly on different layers of architecture. However, the number of tests you write should be driven by the time and effort it takes to implement and maintain them. The easier a test is to write and the quicker it is to execute, the higher the return on investment (ROI). To optimize your ROI, your code base should contain many unit tests, fewer integration tests, and still fewer functional tests. This distribution of tests and their correlation to ROI is best illustrated by the test automation pyramid, introduced by Mike Cohn in his book Succeeding with Agile: Software Development Using Scrum (Addison Wesley, 2009). Figure 7.1 shows an adapted version of Cohn’s test automation pyramid.
Figure 7.1. Test automation pyramid

In the rest of this chapter, we’ll explore how to automate unit, integration, and functional tests with Gradle. Many of Gradle’s out-of-the-box testing capabilities are provided by the Java plugin. Let’s start by having a closer look at these features.
7.2. Testing Java applications
Traditionally, test code in Java is written in Java. Popular open source testing frameworks like JUnit and TestNG help you write repeatable and structured tests. To execute these tests, you’ll need to compile them first, as you do with your production source code. The purpose of test code is solely to exercise its test cases. Because you don’t want to ship the compile test classes to production systems, mingling production source and test code isn’t a good idea. Optimally, you’ll have a dedicated directory in your project that holds test source code and another that acts as a destination directory for compiled test classes.
Gradle’s Java plugin does all of this heavy lifting for you. It introduces a standard directory structure for test source code and required resource files, integrates test code compilation and its execution into the build’s lifecycle, and plays well with almost all of the popular testing frameworks. This is a significant improvement over implementing the same functionality in an imperative build tool like Ant. You’d easily have to write 10 to 20 lines of code to set up a testing framework for your code. If that wasn’t enough, you’d have to copy the same code for every project that wants to use it.
7.2.1. Project layout
In chapter 3 we talked about the default directory structure for placing production source code: src/main/java and src/main/resources. A similar pattern is followed for test source code. You put test source files into the directory src/test/java, and required resources files consumed by your test code into src/test/resources. After compiling test source code, the class files end up in the output directory build/classes/test, nicely separated from the compiled production class files.
All testing frameworks produce at least one artifact to indicate the results of the test execution. A common format to record the results is XML. You can find these files under the directory build/test-results. XML files aren’t very human-readable. They’re usually intended for further processing by other quality assurance tools that we’ll look at in chapter 12. Many testing frameworks allow for transforming the results into a report. JUnit, for example, generates an HTML report by default. Gradle places test reports under the directory build/reports/test. Figure 7.2 gives a visual overview of the standard test directories provided by the Java plugin.
Figure 7.2. Standard test source and output directories

With all this talk about testing frameworks, how do you tell Gradle to use a particular one? You’ll need to declare a dependency on an external library.
7.2.2. Test configurations
The Java plugin introduces two new configurations that can be used to declare dependencies on libraries required for test code compilation or execution: testCompile and testRuntime. Let’s look at an example that declares a compile-time dependency on JUnit:
dependencies {
   testCompile 'junit:junit:4.11'
}
The other test configuration, testRuntime, is used for dependencies that aren’t needed during the compilation phase of your tests, but are needed at runtime during test execution. Keep in mind that dependencies assigned to test configurations don’t influence the classpath of your production code. In other words, they’re not used for the compilation or packaging process. However, the test configurations extend specific configurations for handling dependencies needed for your production source code, as shown in figure 7.3. The configuration testCompile is automatically assigned the dependencies of the configuration compile. The configuration testRuntime extends the runtime and testCompile and their configuration parents.
Figure 7.3. Test configuration inheritance hierarchy

7.2.3. Test tasks
When executing earlier examples, you may have noticed that the task graph contained four tasks that were always up to date and therefore skipped. This is because you hadn’t written any test code that Gradle would need to compile or execute. Figure 7.4 shows the test tasks provided by the Java plugin and how they fit into the existing order of tasks.
Figure 7.4. Test tasks seamlessly integrate into the build lifecycle.

As shown in the figure, test compilation and execution happen after the production code is compiled and packaged. If you want to avoid executing the test phase, you can run gradle jar on the command line or make your task definition depend on the task jar.
7.2.4. Automatic test detection
Of the compiled test classes in build/classes/test, how does Gradle figure out which ones to run? The short answer is that all class files in that directory that match the following descriptions are inspected:
- Any class or superclass that extends either junit.framework.TestCase or groovy.util.GroovyTestCase.
- Any class or superclass that’s annotated with @RunWith.
- Any class or superclass that contains at least one method annotated with @Test. (The annotation can either be the JUnit or TestNG implementation.)
If none of these rules apply or the scanned class is abstract, it won’t be executed. It’s time to apply what you’ve learned in the context of a full example. In the following section, you’ll write unit tests with the help of different testing frameworks and execute them with Gradle.
7.3. Unit testing
As a Java developer, you can pick from a wide range of testing frameworks. In this section, you’ll use the traditional tools JUnit and TestNG, but also look at the new kid on the block, Spock. If you’re new to any of these testing frameworks, refer to their online documentation, because we won’t cover the basics of how to write a test.
7.3.1. Using JUnit
You’ll dive right in by writing a JUnit test for the storage implementation of your To Do application: InMemoryToDoRepository.java. To highlight commonalities and differences between the testing frameworks and their integration with Gradle, all unit tests will verify the functionality of the same class. However, you’ll adapt the test and build code to fit the needs of the particular testing framework.
Writing the test class
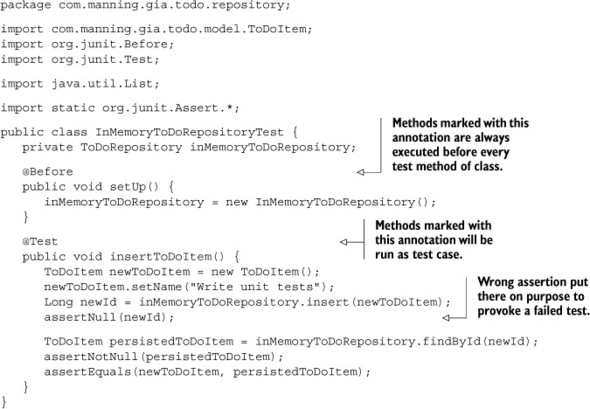
You’re going to write a test class for the subproject repository. The correct location to put this test is the standard test source directory. Create a new Java test class named InMemoryToDoRepositoryTest.java under the directory src/test/java:

In the spirit of test-driven development, you formulate the assertions in such a way that they’ll fail first. This gives you confidence later that your assumptions are correct. The following listing shows the JUnit test case implementation that verifies the correctness of the insert functionality.
Listing 7.1. Writing a test class using JUnit
With the test class in place, let’s look at adding test support to your build.
Adding the dependency
You already learned about the testCompile configuration. The following listing shows how to assign the JUnit dependency with version 4.11 to the configuration. The testCompile task will now be able to use JUnit on the classpath for compiling the test source files.
Listing 7.2. Declaring a dependency on JUnit in subproject repository

That’s all there is to it. You enabled your build to use JUnit as a test framework in your project. Next, you’ll prove your hypothesis about the failing assertion by executing the task test.
Executing the tests
You learned in the last section that the task test will first compile the production source, and then create the JAR file followed by test sources compilation and test execution. The following command-line output indicates a failed build due to a test assertion error:

In the console output, you can see that one of the assertions failed. This is exactly the result you expected. The displayed information doesn’t indicate why the test failed. The only thing you know is that an assertion failed on line 24. If you had a huge suite of tests, finding out the cause of any failed test would require you to open the test report. You can make the test output a bit chattier by running the task on the INFO logging level:
$ gradle :repository:test –i
...
com.manning.gia.todo.repository.InMemoryToDoRepositoryTest
   > testInsertToDoItem FAILED
     java.lang.AssertionError: expected null, but was:<1>
     at org.junit.Assert.fail(Assert.java:88)
     at org.junit.Assert.failNotNull(Assert.java:664)
     at org.junit.Assert.assertNull(Assert.java:646)
     at org.junit.Assert.assertNull(Assert.java:656)
     at com.manning.gia.todo.repository.InMemoryToDoRepositoryTest
      .testInsertToDoItem(InMemoryToDoRepositoryTest.java:24)
...
.testInsertToDoItem(InMemoryToDoRepositoryTest.java:24)
...
Changing the logging level through a command-line option isn’t the only way to control the test log output. Later in this chapter, we’ll cover options in your build script for configuration test logging.
In the stack trace, you can see that the failing assertion occurred on line 24 in the class InMemoryToRepositoryTest. You created the assumption that the value of newId should be null. The reality is that every record in a data store should be uniquely identifiable, so the field needs to have a value. You’ll fix the assertion in your test method by expecting a non-null ID value:
assertNotNull(newId);
Running the task test again shows that all tests are passing:
$ gradle :repository:test
:model:compileJava
:model:processResources UP-TO-DATE
:model:classes
:model:jar
:repository:compileJava
:repository:processResources UP-TO-DATE
:repository:classes
:repository:compileTestJava
:repository:processTestResources UP-TO-DATE
:repository:testClasses
:repository:test
Next, we’ll look at the generated HTML report.
Examining the test report
Gradle produces a more visually attractive test report than the ones created by Ant or Maven. As you learned earlier, you can find the HTML report under build/reports/test. Opening the index HTML page should render something like the screenshot shown in figure 7.5.
Figure 7.5. Successful JUnit HTML test report

The report gives you a summary of the number of run tests, the failure rate, and the execution duration. You can switch the view between test packages and classes by clicking the tabs. In the case of at least one failed test, another tab is shown that gives you the full stack trace of the unfulfilled assertion.
Navigating to the reports directory and double-clicking the HTML index file can become tedious over time. Sure, you could always bookmark the URL, but Gradle gives you a great shortcut for this manual task. On some operating systems, the outputted file URL in the console is clickable, which opens the HTML report in your primary browser:
- Linux: directly clickable in terminal
- MacOS: Cmd + double-click
- Windows: natively not supported
This feature is not only available to failed test execution. Any task that produces a report file offers a clickable URL in the console.
JUnit is the standard unit testing framework in Gradle; however, Gradle doesn’t stand in the way of giving you the option of picking a different solution. Let’s discuss how to integrate other unit testing frameworks or even use multiple frameworks together in a single project.
7.3.2. Using alternative unit testing frameworks
In your project, you may prefer to use a different unit testing framework than JUnit. The reasons for your choice might vary, but are usually based on the feature set, like out-of-the-box mocking support or the language you use to write the test. In this section, we’ll cover how to use two alternatives in your build: TestNG and Spock. We won’t go into detail about how to write the test classes with different unit testing frameworks. You’ll be able to find examples in the source code of the book, as well as online. Instead, let’s focus on the nuts and bolts of integrating these frameworks into your build.
Using TestNG
Let’s assume you wrote the same test class we discussed earlier as the TestNG test class. The package and class name will be the same. Internally, you use TestNG-specific annotations to mark relevant methods. To enable your build to execute TestNG tests, you’ll need to do two things:
- Declare a dependency on the TestNG library.
- Specify that TestNG should be used to execute tests by calling the method Test#useTestNG(). Additional options can be configured through the Closure parameter of type org.gradle.api.tasks.testing.testng.TestNGOptions. See the online manual for more information.
The following listing demonstrates TestNG integration in the context of the full build script.
Listing 7.3. Enabling test support for TestNG

After running gradle :repository:test on the example, you’ll notice that the task execution order is the same as in the JUnit example. Earlier versions of Gradle produced a different look and feel of the test report than the JUnit report. Starting with version 1.4, the test report looks exactly the same.
Using Spock
Spock is a testing and specification framework that follows the concepts of behavior-driven development (BDD). A test case written in a BDD style has a clear title and is formulated in a given/when/then narrative. Spock provides these tests through a Groovy DSL. The result is a very readable and expressive test case.
Spock is fully compatible with JUnit. Every test class needs to extend the base class for Spock specifications, spock.lang.Specification, which is part of the Spock library. This class is marked with the annotation @RunWith that allows running the tests with a specialized JUnit runner implementation.
Let’s assume you wrote your test class in Groovy using Spock. To be able to compile Groovy classes in the default source directory src/test/groovy, your project will need to apply the Groovy plugin. The Groovy plugin requires you to declare the version of Groovy you’d like to use in your project as a dependency. Because you need to use Groovy for test source code compilation, you’ll assign the library to the testCompile configuration. In addition to the Groovy library, you’ll also declare the version of the Spock library. The next listing illustrates the setup required for compiling and executing Spock tests.
Listing 7.4. Using Spock to write and execute unit tests

The produced HTML test report aligns with the look and feel of reports generated for JUnit and TestNG tests. Gradle presents you with a homogeneous reporting approach, no matter which testing framework you pick. You don’t have to make one determining decision about which unit testing framework you want to use. All of these frameworks can be incorporated into one project.
7.3.3. Multiple unit testing frameworks in harmony
Testing strategies may change over time for long-running projects. It’s not unusual for a team to switch from one testing framework to another. Clearly, you don’t want to rewrite all of your existing test classes with the new and shiny testing framework you’re planning to use. You want to keep them and run them as part of your build. On top of that, you want to generate a single test report that aggregates all test results. So how do you do that?
Defining test tasks
In the previous sections, we discussed how to integrate one unit testing framework at a time. Let’s assume you want to support the ability to write unit tests in all the frameworks we discussed before. One additional requirement you’ll introduce to the project is a naming convention for test classes:
- JUnit: All tests class names end with *Test.java.
- TestNG: All test class names end with *NGTest.java.
- Spock: All test class names end with *Spec.groovy.
You’ve seen that TestNG support needs to be configured by calling the useTestNG() method. However, the default test task executes either JUnit or TestNG tests. To enable support for both, you’ll have to add a new task of class type Test. Name that task testNG. This new task can easily be integrated into the test lifecycle by making the test task depend on it, as shown in figure 7.6.
Figure 7.6. Additional test tasks integrated into build lifecycle
![]()
The result is a build that executes all three test class types. JUnit and Spock tests are executed by the test task, and TestNG tests are executed by the testNG task. The following listing demonstrates the minor change to your existing build that provides support for multiple frameworks in one build.
Listing 7.5. Configuring build to execute JUnit, TestNG, and Spock tests

Aggregating the HTML test reports
Executing the build with gradle :repository:test reveals one shortcoming: the HTML report index page doesn’t contain all test results. This happens because the second run of the report generation overwrites the first one. Therefore, it only contains the JUnit and Spock test results. This can easily be fixed by merging the test results of both test tasks. The next listing shows how to create a new task of type org.gradle .api.tasks.testing.TestReport to generate the aggregate report.
Listing 7.6. Test report aggregation

To integrate this task into the build lifecycle, you added it as a dependent task to the verification task check, as shown in figure 7.7. Executing the task build will automatically aggregate the test reports.
Figure 7.7. Test report aggregation within build lifecycle

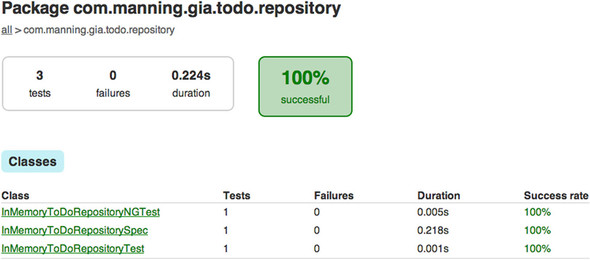
After running gradle build, you’ll find the aggregated HTML test report under the directory build/reports/test. It should look similar to the screenshot in figure 7.8.
Figure 7.8. Aggregated HTML test report
In practice, you’ll find yourself tweaking the test execution behavior to fit your needs. The next section explores available configuration options and how to apply them to your build.
7.4. Configuring test execution
Test execution is an essential and important phase in the lifecycle of your build. Gradle gives you a wide variety of configuration options in your build script, as well as command-line parameters to control the runtime behavior. How and when you apply these options depends on what you need in your build. This section will give you a short and sweet overview of frequently used functionality and the API classes behind these options. Let’s start with some helpful command-line options.
7.4.1. Command-line options
Projects with huge test suites call for fine-grained control of the tests you’d like to execute. Every so often, you’ll want to run just a single test or tests of a particular package or project. This situation quickly arises if one or more tests fail, and you’d like to fix and rerun them without taking the hit of executing the full test suite.
Executing tests by pattern
Gradle provides the following system property for applying a particular test name pattern: <taskName>.single = <testNamePattern>. Let’s say you’d like to execute Spock tests in all packages. Spock test classes in your project have the naming convention *Spec.groovy (for example, InMemoryToDoRepositorySpec.groovy). On the command line, express this as follows:
$ gradle -Dtest.single=**/*Spec :repository:test
This is just one simple example of defining the test name pattern. For the full breadth of pattern options, refer to the online documentation of the Java plugin.
Remote debugging of tests
The root cause of a failing test is sometimes hard to identify, especially if the test doesn’t run in isolation as a unit test. Being able to remotely debug your tests with an IDE is an invaluable tool to have in your toolbox. Gradle provides a convenient shortcut for enabling remote debugging: <taskName>.debug, which means you can use it for other tasks as well. Using this startup parameter will start a server socket on port 5005 and block task execution until you actually connect to it with your IDE:
$ gradle -Dtest.debug :repository:test
...
:repository:test
Listening for transport dt_socket at address: 5005
> Building > :repository:test
In the meantime, you can bring up the IDE of your choice, set break points in your code, and connect to the port. Once you’re connected, task execution will resume and you’ll be able to step through your code. The steps for connecting the remote debugger vary from IDE to IDE. Please consult the documentation for instructions.
While these command-line options come in handy during day-to-day business, you may want to configure test execution in a more permanent way: in your build script.
7.4.2. Understanding the Test API representation
The API entry point that enables you to configure specific behavior for your test execution is the class org.gradle.api.tasks.testing.Test. The class Test extends DefaultTask and can be used to create particular test tasks in your build script. In fact, the task test provided by the Java plugin is a preconfigured enhanced task of type Test. You can change the default behavior through its exposed API. Figure 7.9 shows the primary test API and its associated classes. The class diagram mainly shows the methods we’ll touch on in this chapter. For a deeper dive into the API, consult the DSL guide or Javadocs.
Figure 7.9. Relevant Test API classes

With this class diagram in mind, you’ll start by using some of these configuration options. The following scenarios will give you an idea of how to apply them.
7.4.3. Controlling runtime behavior
Gradle runs your tests in a forked JVM process. By doing so, you get all the benefits you usually have when starting up a Java process. You can pass in options to tweak garbage collection and performance tuning, or provide system properties for use in your code.
Let’s say you made some minor changes to your test method. Instead of inserting a single to-do item, you make the number of insertable to-do items configurable through a system property named items. The method createAndInsertToDoItems, shown in the following listing, takes the value of the provided system property and determines how well you fill up your list of tasks.
Listing 7.7. Evaluating system property to drive test execution

Now, how do you tell Gradle to consume a system property that drives the creation of to-do items in your test? You can simply call the method systemProperty on Test and provide a name and value as parameters. You can imagine that the higher the number of items, the easier you’ll fill up your memory. While you’re at it, you’ll also fine-tune the JVM memory settings by calling the method jvmArgs to avoid potential OutOf-MemoryErrors. The following listing demonstrates method calls on the test task.
Listing 7.8. Providing system properties and JVM parameters

Depending on the number you provide for the system property items, the time it takes to complete the test might vary. You don’t get direct feedback on whether the provided value is actually evaluated correctly. If you examine listing 7.7 closely, you may notice that you print out the provided number of items to the standard output stream. However, when you run the tests, you won’t see that output. Let’s see how to change this by taking control of test logging.
7.4.4. Controlling test logging
Being able to control logging can be tremendously helpful when trying to diagnose problems during test execution. The interface TestLoggingContainer, accessible via the property testLogging, is central to changing the default configuration. I encourage you to explore the class even further, because we won’t cover all options.
Logging standard streams
In listing 7.7, you tried to write a message to the standard output stream. One of Gradle’s Test configuration options is to flip a Boolean flag that prints standard output and error messages to the terminal, as shown in the following listing.
Listing 7.9. Logging standard streams to the terminal

As expected, running gradle :repository:test reveals your System.out.println statement on the terminal:
$ gradle :repository:test
...
:repository:test

com.manning.gia.todo.repository.InMemoryToDoRepositoryTest
   > testInsertToDoItems STANDARD_OUT
        Creating 20 To Do items.
...
Logging the exception stack trace
Earlier you saw how to print the exception stack trace for a failed test by running the build on the INFO logging level. The drawback to this approach is that your terminal will also fill up with other messages that are irrelevant for diagnosing the cause of a failed test. You can permanently change the format for logging test exceptions via the method exceptionFormat. The next listing provides the value full, which tells Gradle to print the full stack exception traces independent of the fact that you run your build on the INFO logging level.
Listing 7.10. Displaying exception stack traces

Logging test events
In its default settings, Gradle’s test execution doesn’t give away any information that would tell you how many tests were run, and which of these passed, failed, or were skipped. Only if at least one of your tests fails will a summary be printed. The method events allows you to pass in a list of event types you’d like to be logged. The following listing demonstrates how to log a message to the terminal every time a test is started, passed, skipped, or failed.
Listing 7.11. Logging specific test events

Executing tests with logging turned on for the events started, passed, skipped, and failed will produce the following result:
$ gradle :repository:test
...
:repository:test

com.manning.gia.todo.repository.InMemoryToDoRepositoryTest
   > testInsertToDoItem STARTED
com.manning.gia.todo.repository.InMemoryToDoRepositoryTest
   > testInsertToDoItem PASSED
...
Each event is logged on a single line and is color-coded. Events that didn’t occur—in this case, skipped and failed—aren’t logged. There are even more events to log. Refer to the online documentation to learn about all available options.
7.4.5. Parallel test execution
Gradle executes tests in a single, forked process. Executing huge test suites with thousands of test cases may take minutes if not hours, because they run sequentially. Given that today’s computers have blazingly fast multicore processors, you should use their computing powers to their fullest.
Gradle provides a convenient way to execute your tests in parallel. All you need to specify is the number of forked JVM processes. In addition, you can set the number of maximum test classes to execute per forked test process. The next listing uses a simple formula to calculate the number of forks by available processors on your machine.
Listing 7.12. Configuring forked test processes

Let’s visualize the execution behavior based on a test suite with 18 test classes. The listing shows that the number of parallel test processes is calculated based on the number of logical cores available to your JVM, either virtual or physical. Let’s assume this number is four. Therefore, the assigned value of the property maxParallelForks is 2. With the property forkEvery set to 5, each forked test process will execute a group of five test classes. Figure 7.10 demonstrates how the test execution will play out at runtime.
Figure 7.10. Test execution with two forked processes at a time

The assigned numbers in this example are not set in stone. How you configure parallel test execution in your project depends on the target hardware and the type of tests (CPU or I/O bound). Try experimenting with these numbers to find the sweet spot. For more information on how to find the optimal balance on your machine, I recommend reading Programming Concurrency on the JVM by Venkat Subramaniam (The Pragmatic Programmers, 2011).
7.4.6. Reacting to test lifecycle events
In chapter 4, you learned that you can easily hook into the build lifecycle to execute code whenever an event occurs. Gradle exposes lifecycle methods for any task of type Test. In particular, you can listen to the following events:
- beforeSuite: before a test suite is executed
- afterSuite: after a test suite is executed
- beforeTest: before a test class is executed
- afterTest: after a test class is executed
Figure 7.11 shows how these events fit into the build lifecycle when they’re registered for the default test task provided by the Java plugin.
Figure 7.11. Registering test lifecycle hooks

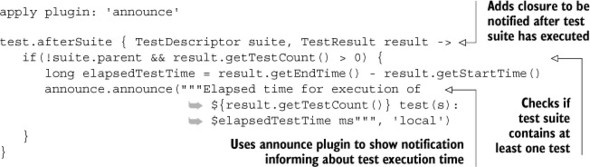
Let’s assume you want to find out how long it takes for the tests in your suite to finish. To figure this out, you’ll hook into the test lifecycle via the afterSuite method. The following listing demonstrates how to use the parameters passed into the closure to calculate the elapsed execution time and send this information as a notification to the desktop.
Listing 7.13. Execute code after test suite is executed
This is a simple and straightforward approach to displaying the test suite execution time. However, you won’t have any track record of previously run test suites. You could easily send this data to a database and visualize it in a graph over time.
Registering test event methods is great for ad hoc functionality. The drawback is that you can’t easily share it between projects. This is where a TestListener implementation comes into play.
7.4.7. Implementing a test listener
TestListener is an interface for listening to test execution events. You’ll implement the same functionality as discussed in the last section. You’ll create a new class called NotificationTestListener within the build script. The only method you’ll need to fill with life is afterSuite. All other methods will have empty implementations. The following listing shows the full listener implementation and how to register the class with the test task.
Listing 7.14. Adding a test listener to the default test task

In chapter 4, you learned that you can easily share classes between projects if you put them into the buildSrc directory. The same is true for TestListener implementations.
In this section, we took a quick flight over the most relevant configuration options. These options aren’t specific to tasks that handle unit tests. They can also be applied to integration and functional tests. Next, we’ll discuss how to write integration tests for your To Do application and integrate them into your build.
7.5. Integration testing
A unit test verifies that the smallest unit of code in your system, a method, works correctly in isolation. This allows you to achieve a fast-running, repeatable, and consistent test case. Integration tests go beyond the scope of unit tests. They usually integrate other components of your system or external infrastructure like the file system, a mail server, or a database. As a result, integration tests usually take longer to execute. Oftentimes they also depend on the correct state of a system—for example, an existing file with specific content—making them harder to maintain.
7.5.1. Introducing the case study
A common scenario for integration tests is verifying that your persistence layer works as expected. Currently, your application only stores objects in memory. You’ll change that by interacting with an SQL database. For your purposes, you’ll use an open source database engine called H2 (http://www.h2database.com/). H2 is easy to set up and provides fast startup times, which makes it a perfect fit for this example.
In chapter 3, you provided an interface for your persistence layer. That makes it easy to provide different implementations of ToDoRepository and interchange them in the web layer. H2 is fully compatible with JDBC. Any interaction with the database is implemented in the new class H2ToDoRepository that implements the interface. I don’t want to bore you with repetitive details of a class that uses JDBC, so I won’t discuss the code in detail. The downloadable code example contains all the relevant code if you want to dig deeper.
7.5.2. Writing the test class
It’s not unusual for projects to put all types of tests in the same source directory. Given that integration tests usually take longer to execute than unit tests, you’ll want to be able to separate them from each other by a naming convention. Developers will now be able to rerun unit tests on their local machine and get fast feedback about their code changes.
As the naming convention for integration tests in your project, let the test class names end with the suffix IntegTest. The integration test for the H2 repository implementation, H2ToDoRepositoryIntegTest, looks strikingly similar to the unit test. The only big difference is that the class under test is H2ToDoRepository, as shown in the following listing. The integration test code will live alongside the existing unit test class in the same package.
Listing 7.15. Testing H2 database persistence code
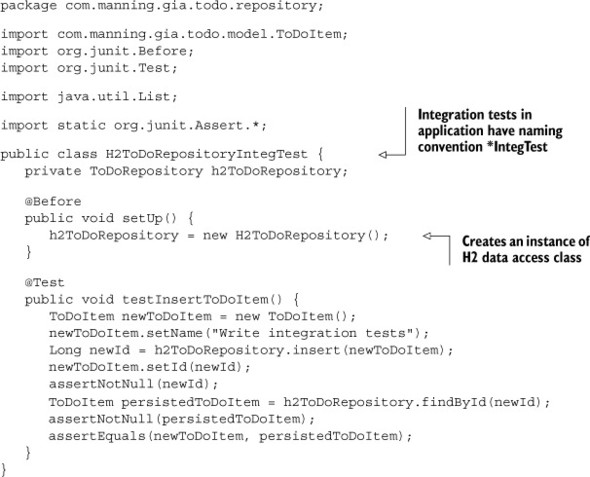
This test class verifies the same assertions as in the unit tests. In practice, you’d have many more test cases to test the interaction with the database. Next, you’ll take care of the build.
7.5.3. Supporting integration tests in the build
The test you wrote focuses on testing the integration point between the code and the database. That means you’ll need to have an accessible H2 database up and running that hosts the correct schema. It’s considered good practice to provide a database instance per environment (for example, development, QA, and production). In the following section, we’ll assume that you don’t have to deal with managing and configuring the database. It’s all set up for you. In your build, you want to support three basic requirements:
- Provide individual tasks for executing unit and integration tests.
- Separate unit and integration test results and reports.
- Make integration tests part of the verification lifecycle task check.
In the previous sections, you already learned the skills to achieve this goal. You use properties and method of the Test API. The following listing demonstrates how to include or exclude test class names with a specific naming pattern. You also override the default directory for test results and report.
Listing 7.16. Defining a task for running integration tests

Running gradle :repository:build on the command line will invoke the test tasks that run unit and integration tests. Mixing different types of tests in the same source folder might sound like a good idea at first. With an increasing number of test classes, the test sources in your project will become hard to navigate and differentiate. You’ll also have to teach every developer on your team to stick to the test class naming convention. If this pattern isn’t followed meticulously, a test class might be executed in an unintended phase of the build. As you learned, integration tests usually take longer to execute than unit tests, so this would be a significant drawback. With Gradle, you can do better. You can actually enforce your own conventions by separating unit and integration tests into different source sets.
7.5.4. Establishing conventions for integration tests
Let’s say you want to leave all your unit tests in the directory src/test/java but move the integration tests into the directory src/integTest/java. After creating the new test source directory for integration tests, the project structure should look like this:

Gradle provides a clean solution for separating different types of tests into source directories. In chapter 3, you learned how to reconfigure the default source directories provided by the Java plugin. Adding new source sets is another option. That’s what you’re going to do for your integration tests.
Defining a source set for integration tests
Source code in every source set definition needs to be compiled and copied to the correct directory before it can be executed. That’s also true for integration tests. Remember the days when you had to implement a similar requirement with Ant? You’d have to write code similar to what you would write for compiling and executing your unit tests. How did you solve this? Usually by copying and pasting the code and modifying the targeting directories, a generally bad practice. Advanced Ant users would consider writing a custom task.
With Gradle, the approach is different. This is where some declarative magic comes into play. In your project, you define what you want do: add a new test source code directory. The how, compiling the source code, you’ll leave to Gradle. In fact, Gradle automatically makes this decision for you and implicitly adds a new compilation task just for that new source set. The following listing shows how to define the new integration test source set in your project.
Listing 7.17. Defining a source set for integration tests

You can see in the source code example that the source set needs some additional configuration. It’ll require you to assign the compilation classpath, which consists of the production code classes and all dependencies assigned to the configuration testRuntime. You’ll also need to define the runtime classpath consisting of the compiled integration test classes directly accessible through the variable output and the compilation classpath.
Using the source set in the integration test task
Any task of class type Test will use the default configuration if not configured otherwise. Because the class output directory of your integration test source set deviates from the default directory, you need to point the integrationTest task to it. You also need to take care of reconfiguring the task’s classpath. The following code snippet shows the integrationTest task and the assigned property values:

Give it a shot. The following output shows the result of running the build task on the command line:
With this build code in place, you have a nice separation of concerns between unit and integration tests. Next, we’ll touch on the topic of automatically setting up the database on your local machine as part of the build.
7.5.5. Bootstrapping the test environment
There’s one drawback to integrating with external systems. They need to be accessible from the machine you’re executing the build on. If that isn’t the case, your integration tests will fail. To ensure a stable testing environment, you can bootstrap the required resources from your build.
H2 provides lightweight, Java-based tools to manage and control your database, which you can easily integrate into your build. Let’s say you want to model the integration test lifecycle by starting H2 first, rebuilding the whole schema through SQL scripts, running the tests against the database instance, and afterwards shutting down H2. The tasks you need to create could look similar to figure 7.12.
Figure 7.12. Starting, preparing, and stopping the database for integration testing

Bootstrapping your test environment in your build is very diverse, product-specific, and tailored to the requirements of your project. You may need to stand up a mail server or bring up another application to expose its web services. The important takeaway is that you can make this work if you need to.
It goes beyond the scope of this book to discuss the details of how to make this happen for your H2 database. However, the source code of the book provides a working sample that you can try out and explore. If you run the example, you’ll find that the output of the command line looks similar to this:

With a basic understanding on how to write integration tests, we’ll turn our attention to the top part of the test automation pyramid: functional testing.
7.6. Functional testing
Functional testing is ideal for verifying that the software meets the requirements from the end user’s perspective. In the context of your web application, this means simulating the user’s interactions with the browser, such as entering values into text fields or clicking links. Historically, functional tests have been hard to write and costly to maintain. You need a tool that automates bringing up the browser, manipulates the data object model (DOM) of the web page, and supports running these tests against different browsers. On top of that, you also need to integrate the functional tests into your build to be able to run them in an automated and repeatable fashion. Let’s look at a specific use case and an automation tool that can help you test-drive the tests.
7.6.1. Introducing the case study
When designing a functional test on the UI-level, it’s helpful to ask yourself the following questions:
- What functionality do you want to test? For example, a to-do list has to support pagination if the number of items reaches more than 10.
- What’s the high-level user workflow? For example, the user has to insert 11 to-do items before the list offers pagination.
- What are the technical steps to reach this goal? For example, the user opens a browser and enters the URL /all to view the list of to-do items. To insert a new to-do item, they enter a name for a new to-do Item and press Enter. This UI interaction calls the URL /insert, which adds the to-do item to the list. Repeat this 11 times, and verify that pagination is displayed.
For our purposes, we’ll pick a simple use case: open the URL to show the list of to-do items. Insert a new to-do item named “Write functional tests” into the text field and press Enter. Verify that it was successfully added to the list by inspecting its items. This test assumes that the list will start with zero to-do items. Figure 7.13 demonstrates the page workflow you’ll need to script.
Figure 7.13. Scripted page workflow

With these UI interactions in mind, let’s look at a tool that can help implement these requirements. An open source tool that can stand up to the challenge of these requirements is Geb (http://www.gebish.org/). Geb is built on top of the popular browser automation framework Selenium and allows you to define your tests with a very readable Groovy DSL. Test classes can be written with frameworks such as JUnit, TestNG, or Spock. This means that if you know any of these testing frameworks and poke through the Geb’s DSL documentation, you’re perfectly set up to write your first functional tests.
For now, you can assume that test classes for the business workflow described earlier are built with Geb using the test framework JUnit. This book will not teach how to write tests with Geb, as that could easily fill another one or two chapters. I’ll leave it to you to explore the provided code examples. All tests are configured to work exclusively against Mozilla Firefox. If you don’t have Firefox installed on your machine, now is a good time to do so. It’s worth mentioning that Geb allows for executing tests against other browsers as well. For more information, check the Geb online documentation and source code examples. Next, you’ll prepare the build for organizing and executing the tests.
7.6.2. Supporting functional tests in the build
Your functional tests require an up-and-running instance of the web application. Many organizations provide a specific runtime environment solely for this purpose. Let’s say you want to modify your build to support functional tests, given that you have access to such an environment. At first sight, the requirements for the build look similar to the ones you defined for integration tests:
- Define a new source set for functional tests.
- Provide a new task for executing functional tests and generate test results/reports into dedicated output directories.
- Integrate functional tests as part of the verification lifecycle.
Introducing and using custom functional test configurations
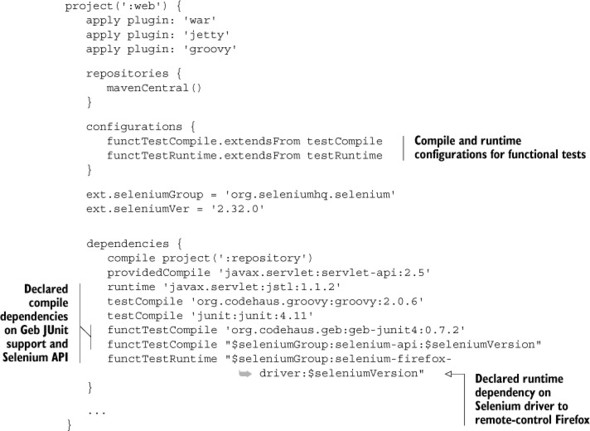
Geb comes with its own set of dependencies that need to be declared. For compiling the test code, you’ll need to assign the Geb JUnit implementation and the Selenium API if needed in the tests. For running the tests, you’ll need to provide the Selenium driver for Firefox to remote-control the browser.
You could easily assign these dependencies to the existing testCompile and testRuntime configurations. The drawback is that you’ll convolute the classpath for your unit and integration tests, which might cause version conflicts. To keep the classpath for functional tests as clean as possible and separated from other test types, we’ll look at two new configurations: functTestCompile and functTestRuntime. Figure 7.14 shows how they fit into the existing configuration hierarchy introduced by the Java plugin.
Figure 7.14. Configurations introduced for assigning functional test dependencies

The Geb tests work against the UI of your application. Therefore, it makes the most sense to add the test definitions to the web project. The following listing shows the basic setup for defining the configurations needed for functional test dependencies.
Listing 7.18. Declaring functional test configurations and dependencies
Defining the source set and test task
You may have noticed in listing 7.18 that the Groovy plugin was applied to your project. Geb tests are written in Groovy and need the assigned external library for compiling and running the tests. The following directory tree shows where the tests live in the example project:
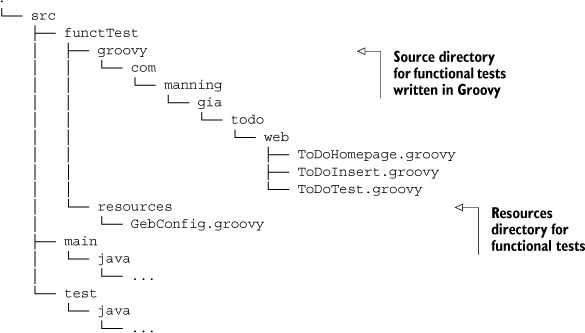
You’ll need to set up a new source set for the functional tests that point to the directories src/functTest/groovy and src/functTest/resources. This can be achieved similarly to the way you did this for the integration test source set. The big difference is that you have to assign the custom configurations to the relevant classpath properties, as shown in the next listing.
Listing 7.19. Functional test source set

After defining the new source set, you can use its class output directory and runtime classpath in a new enhanced task of class type Test. The following listing shows the functionalTest task, which writes its results and report to a custom directory.
Listing 7.20. Using the source set in the functionalTest task

Geb also requires you to set some mandatory system properties. One of these properties is the name of the browser you want to run tests against. If you want to run your tests against multiple browsers, you’ll need to create individual tests tasks and pass in the appropriate value. Please see the Geb documentation for more information.
With these additions to your build script, you can run the functional test against a network-reachable instance of your web application. Next, you’ll go the extra mile and provide a way to run the tests exclusively on your local machine.
Running functional tests against embedded Jetty
Running the functional tests on your local machine will require you to bring up the web application in an embedded Servlet container. It’ll serve up the pages for testing purposes. A benefit of this is that you don’t have to rely on a server to run your tests.
You already know how to use the Jetty plugin to deploy your application. By default, the task jettyRun will block further build execution until the user stops the process with the keystroke Ctrl + C. This doesn’t help you to run functional tests. Thankfully, the Jetty plugin can be configured to execute the embedded container in a background thread with the property daemon. For this purpose, you’ll create enhanced tasks for starting and stopping the Servlet container, as shown in the next listing.
Listing 7.21. Declaring enhanced Jetty tasks for use with functional tests

Now that you have two dedicated tasks for controlling the web application runtime environment, you can sandwich the functionalTest task in between. Figure 7.15 illustrates the order of Gradle tasks you need to model to fully integrate functional tests into the build.
Figure 7.15. Browser test automation tasks

Task dependency chaining is your best friend to help you achieve this goal. The last task in the chain should be the verification task check, as shown in listing 7.22. The check task is a lifecycle task provided by the Java plugin that depends on any of the verification tasks like test. This task is convenient if you want to automatically execute the whole chain of test tasks.
Listing 7.22. Integrating functional test tasks into build lifecycle

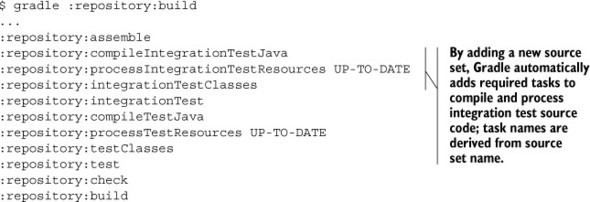
Executing the command gradle build for the web project commences the following actions: the functional test classes are compiled first, an embedded Jetty container is brought up in the background, and Firefox is automatically started and remote-controlled based on your functional test definitions. After all tests are run, Jetty is shut down. The console output of the command should look as follows:
$ gradle :web:build
...
:web:compileFunctionalTestJava UP-TO-DATE
:web:compileFunctionalTestGroovy
:web:processFunctionalTestResources
:web:functionalTestClasses
:web:functionalJettyRun
:web:functionalTest
:web:functionalJettyStop
...
7.7. Summary
Automated testing is an essential instrument for ensuring the correctness of your application’s functionality, and is a direct enabler for effective refactorings. Unit, integration, and functional tests differ in scope, implementation effort, and execution time. You saw how the test automation pyramid, introduced by Mike Cohn, shows these criteria in relation to the ROI for your project. The easier tests are to implement and the faster they can be executed, the higher the ROI ratio. And the higher the ROI of a test type, the more test cases of this type you should have.
Gradle’s Java plugin provides extensive out-of-the-box testing support. By applying the plugin, your project automatically knows where to search for test classes, compiles and executes them as part of the build lifecycle, exposes configurations for assigning required test dependencies, and produces a visually attractive HTML report.
In this chapter, you learned how to implement unit tests with the help of three popular testing frameworks: JUnit, TestNG, and Spock. Gradle’s Test API plays a significant role in configuring the test execution to your needs. The two examples we discussed in great detail can be directly applied to a real-world project. Being able to have fine-grained control over your test logging is a huge benefit when trying to identify the root cause of a failed test. Test classes that are part of large test suites can be run in parallel to minimize their execution time and utilize your hardware’s processing power to its full capacity.
Integration and functional tests are harder to write and maintain than unit tests. Integration tests usually involve calling other components, subsystems, or external services. We discussed how to test an application’s data persistence layer in combination with a running SQL database. Functional tests verify the correctness of your application from the user’s perspective. With the help of a test automation framework, you remote-controlled the browser and emulated user interaction. You configured your build to provide a source set for different types of tests, provided new test tasks, fully integrated them into the build lifecycle, and even bootstrapped the test environment where needed.
The next chapter will talk about how to extend your build script with a plugin. Not only will you implement a fully functional, real-world plugin and use it in your build, you’ll also expand on the topic of testing by verifying its functionality.