
Chapter 6. Controlling the observer-observable relationship
This chapter covers
- Creating observers without a fuss
- Controlling the length of the observer/observable relationship
- Adding and controlling side effects in the pipeline
Imagine you’re a singer with the most beautiful voice, the greatest lyrics, and the best performance moves. It doesn’t pay to be such a singer if you have no listeners. The same goes for observables; they sit there, doing nothing and wasting resources, if there’s no observer to subscribe to and receive their notifications. It’s also interesting to think about when the relationship between the singer and the listener begins and ends, especially if the music is coming from an album, and the listener can skip tracks or stop playing.
This chapter covers the methods you can use to create observers, and the importance of each action that observers need to implement. The subscription of the observer to the observable is also something you’ll need to maintain, but you can control when it begins and how long it lasts by the number of notifications or a timespan, a combination of the two, or with advanced logic that you define. All of these options are provided by a set of operators that you’ll learn about throughout this chapter. At the end of the chapter, you’ll combine them to create a fully reactive drawing application.
6.1. Creating observers
The observer is the consumer of the observable notifications. There can be many observers to a single observable, and there can be many observables that an observer observes, as shown in figure 6.1.
Figure 6.1. An observable can have multiple observers, and an observer can observe multiple observables.

Our goal with Rx is to simplify your event-processing code, so in this part I’ll show you how to create observers so you can pick the one that’s most suitable for your needs. This is a good place to review the role the observer plays in the communication protocol between the observable and observer.
6.1.1. The observable-observer communication
The protocol between the observable and the observer is shown in figure 6.2.
Figure 6.2. The communication protocol between the observable and the observer

This is how the communication protocol you see in figure 6.2 works:
- The communication between the observable and the observer begins by subscribing the observer to the observable.
- The observable returns a subscription object that implements the IDisposable interface.
- Once the observer is subscribed, the observable can emit notifications of different kinds to it. For example:
- The observable can emit any number of notifications by calling the observer’s OnNext method and passing the payload as an argument.
- When the observable reaches completion, meaning no more notifications will be emitted, it signals that to the observer by calling the OnCompleted method.
- If an error occurs in the observable, which also means that no more notifications will be emitted, the observer is notified with a call to the OnError method that takes the exception object as an argument.
- The OnCompleted and OnError methods are mutually exclusive, so the Rx protocol mandates that only one of them (or none) can be called on the observer.
- Anytime after the observer is subscribed, the subscription can be disposed of. The observable must ensure that after the subscription is disposed of, no more notifications of any kind will be emitted to the observer.
The next section covers ways to control the observer lifetime and the length of the subscription.
6.1.2. Creating observers without leaving the pipeline
By far, the most desirable way to create an observer is doing it without leaving your pipeline so that everything is centralized and, thus, easier to read and maintain. Luckily, it’s also the easiest and most straightforward way of creating an observer, as shown in figure 6.3. All it takes is using one of the overloads of the Subscribe extension method that resides under the static ObservableExtensions class, which is under the System namespace.
Figure 6.3. Creating the observer and subscribing it as part of the pipeline with the Subscribe operator

Here’s an example that creates and subscribes an observer that prints to the screen (much like the ConsoleObserver created in chapter 4). In this case, you pass all the observer’s functions as arguments to the Subscribe operator:

In the example, I provide lambda expressions as arguments to the Subscribe method. This results in an observer that prints to the screen every notification it receives.
The output for this example is
OnNext(1)
OnNext(2)
OnNext(3)
OnNext(4)
OnNext(5)
OnCompleted
The overloads of the Subscribe method let you specify different functions as arguments and create an observer that uses those functions as its implementation. Here’s a list of most of the overloads:
IDisposable Subscribe<T>(this IObservable<T> source,
    Action<T> onNext)
IDisposable Subscribe<T>(this IObservable<T> source,
    Action<T> onNext,
    Action<Exception> onError)
IDisposable Subscribe<T>(this IObservable<T> source,
    Action<T> onNext,
    Action onCompleted)
IDisposable Subscribe<T>(this IObservable<T> source,
    Action<T> onNext,
    Action<Exception> onError,
    Action onCompleted)
As you can see from the overloads shown, you can specify the implementation of each observer method (OnNext, OnCompleted, and OnError), and you can do it only for those methods you care about (for example, creating an observer by specifying only what happens in its OnNext method).
The nicest thing about creating an observer with the Subscribe method is that it allows you to keep everything together—the observable pipeline and the observer that subscribes to it.
Using the Subscribe overloads is easy and powerful. Although it’s tempting to use the simplest form of the Subscribe method (the one that requires only an onNext argument), it’s also a place that hides many bugs.
Consider the next example, where I create a pipeline to add a small math calculation on each number and deliberately create a condition to throw an exception after the two first notifications:

In this case when the exception is thrown, just as with regular exceptions, our application will crash. An application that crashes is undesirable. Worse than that are those instances where you don’t know how and why (let alone where) the application crashed. To avoid the worst-case scenario, you should add an implementation to the created observer OnError method. For example:

Now, the raised exception won’t crash the application; instead, the error-handling code will run, and the observer will be detached from the observable.
Leaving the error-handling code empty is possible, of course, just like creating an empty catch block, which is known as exception swallowing or error hiding,[1] but this is considered bad practice because doing so will hinder your ability to investigate any bugs in your application, especially when asynchroncity is involved.
For more about exception swallowing or error hiding, see https://en.wikipedia.org/wiki/Error_hiding.
6.1.3. Not passing OnError and asynchronous observables
In the previous chapter, you saw ways to create observables that perform asynchronous behaviors. Let’s explore what happens if you add asynchronicity to our example. What do you think will happen if you write this:
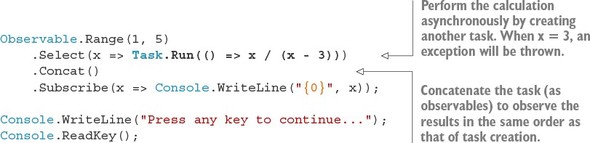
Running the example provides this output:
0
-2
Press any key to continue . . .
You know there’s an exception somewhere, but you don’t see it, and you’re not even aware that it happened. More puzzling is that in production, you’ll suddenly stop seeing the output (or other types of results) from your observable pipeline, and this isn’t a good thing.
When you create tasks that fail (unintentionally, of course) and don’t handle the exceptions within the task continuation or inside a catch block that wraps the await, your application continues to work although the task was kicked out of your system.
Tip
To capture and handle all the unhandled exceptions thrown from tasks, you can use the TaskScheduler.UnobservedTaskException event that will be triggered when a task is disposed of because its exception wasn’t observed. You can also change the default behavior so that the process will terminate by setting a configuration in your app.configweb.config file.[2]
More details on unhandled exceptions can be found on MSDN: http://mng.bz/57Fv.
I recommend that you always include some implementation of the OnError method; at the very least, log it so you can investigate it later. Chapter 11 provides more details about error handling and recovery.
6.1.4. Replacing the subscription disposal with cancellation
Another interesting variation of the Subscribe method is one that accepts a CancellationToken as a parameter and lets you replace the disposable subscription with a cancellation mechanism. For example:

These variations of Subscribe return void instead of IDisposable, so the ability to unsubscribe the observer needs to be provided in some other way. This is the job of CancellationToken. As figure 6.4 shows, Rx monitors CancellationToken for cancellation and, when this happens, it disposes of the inner subscription and disconnects the observer from the observable.
Figure 6.4. Rx monitors the CancellationToken for cancellation. When this happens, it will dispose of the inner subscription.

The next example uses the cancellation token to unsubscribe the observer 5 seconds after it subscribes to the observable:

Passing a cancellation token to the Subscribe method can be useful when you need to synchronize the cancellation of other parts of your system (such as other tasks).
6.1.5. Creating an observer instance
In the previous sections, the methods used in the overloads of the Subscribe method create the observer instance behind the scenes, so you have no real interaction with it.
Sometimes, you may want to access the observer instance. Let’s say you need to pass it to a method as an argument, or you need to create an observer inside a method and return it. In Microsoft StreamInsight (a high throughput, event-processing tool), you can create observables and deploy them to a remote server, and then you can create observers and pass them to a method that will attach them to the remote observables.
To create an implementation of the IObserver interface, you could, of course, create a new class and implement each of its methods, but that’s an error-prone and daunting task (much like creating an observable from scratch, as discussed in chapter 4).
Instead of creating new classes to implement new observers, I recommend an easier way using the Observer.Create method that resides in the System.Reactive namespace. This will save you time and errors:
IObserver<T> Create<T>(
     Action<T> onNext,
     Action<Exception> onError,
     Action onCompleted)
Like the Observable.Subscribe overloads, you can pass an implementation of the OnNext, OnError, and OnCompleted methods (or any subset of those) to Observer.Create, and it returns an object that implements the IObserver<T> interface, which calls the functions you provided.
Here’s a small example that creates an observer that prints only the notifications received in its OnNext method and then subscribes it to two observables:
var observer = Observer.Create<string>(x => Console.WriteLine(x));

Observable.Interval(TimeSpan.FromSeconds(1))
    .Select(x=>"X"+x)
    .Subscribe(observer);
Observable.Interval(TimeSpan.FromSeconds(2))
    .Select(x => "YY" + x)
    .Subscribe(observer);
Running this example for 5 seconds shows this output:
X0
YY0
X1
X2
YY1
X3
In the example, you create two observables—one that emits a value every 1 second (prefixed with X) and another that emits a value every 2 seconds (prefixed with YY). You then use the same observer to subscribe to both observables. Figure 6.5 shows the marble diagram of this program.
Figure 6.5. Subscribing the same observer to multiple observables lets you share and reuse the subscriber’s functionality.

In most cases, manually creating an instance of the observer is unnecessary, but when it’s needed, use Observer.Create. This will ensure that the observer behaves correctly with regard to the observable-observer protocol.
After an observer is created and subscribed, you might want to end the relationship at some point. In addition, you might want to gain better control of when the relationship starts. Rx gives you tools to control the lifetime of your observer.
6.2. Controlling the observable-observer relationship lifetime
Subscribing an observer to an observable is easy; it’s as simple as calling the Subscribe method. Unsubscribing is also easy. You need only to dispose of the subscription. You can, however, tweak the observable pipeline so that, even though the observer subscribes, notifications are observed at only a specific time (or condition) and stop being observed after a specific time (or condition), as shown in figure 6.6.
Figure 6.6. Given an observable, the beginning of the emissions observed by the observers as well as the end of the emissions are configurable and create an observation box.

Just like the singer and its audience, each listener in the audience is an observer (or subscriber) that can arrive at the show at any time, but is allowed to enter the hall only when the organizers decide. Moreover, the listener can leave the show whenever they decide to do so (disposing of the subscription). The singer, on the other hand, will start the show when they decide to do so and will stop the show as determined by some predefined condition, such as the number of songs, a specific duration, or when another singer is ready to perform onstage (another observable).
The same applies to observables. In some scenarios, you might want to configure the notifications to be observed after a certain time or to complete based on a particular condition. Instead of writing the code to handle those repeatable patterns yourself, Rx provides operators to make your job super easy.
6.2.1. Delaying subscription
Calling the Subscribe method will immediately make the observable aware of the observer and, from that point, emit notifications to it. For some scenarios, it may be necessary to delay the time the subscription is made. For example, if you’re planning a trip, you would want to observe notifications about the weather at your destination closer to the time of your flight and not necessarily when you booked the tickets.
The DelaySubscription operator receives a TimeSpan or DateTimeOffset that marks the point to make the subscription. This is how to delay the subscription 5 seconds:

Here’s the output:
Creating subscription at 06/09/2015 00:00:00
 - OnNext(1@05/09/2015 00:00:05 +00:00)
 - OnNext(2@05/09/2015 00:00:05 +00:00)
 - OnNext(3@05/09/2015 00:00:05 +00:00)
 - OnNext(4@05/09/2015 00:00:05 +00:00)
 - OnNext(5@05/09/2015 00:00:05 +00:00)
 - OnCompleted()
You can see that although you created the subscription at 00:00:00, the notification started at 00:00:05, meaning the subscription happened only at that time. Because the observable is cold (cold observables are described in the next chapter), a sequence of notifications will be generated the moment the observer subscribes. The observer will receive five notifications, but only from the moment it subscribes. Our observer won’t miss any emission.
These are the overloads for the DelaySubscription operator—one for relative time and one for absolute time:

It’s important to note that the relative TimeSpan is started only from the point the subscription is requested and not from the moment DelaySubscription is added to the pipeline as the next example shows:
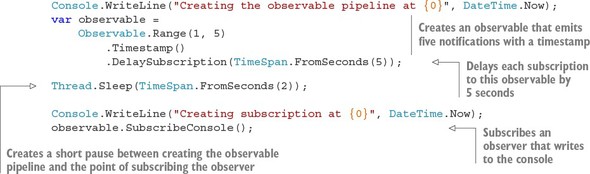
Now, when you run this example, you get these results:
Creating the observable pipeline at 06/09/2015 00:00:10
Creating subscription at 06/09/2015 00:00:12
 - OnNext(1@05/09/2015 00:00:17 +00:00)
 - OnNext(2@05/09/2015 00:00:17 +00:00)
 - OnNext(3@05/09/2015 00:00:17 +00:00)
 - OnNext(4@05/09/2015 00:00:17 +00:00)

 - OnNext(5@05/09/2015 00:00:17 +00:00)
 - OnCompleted()
Done
You can see from the results that the 5-second delay took place after the call to the Subscribe method and not when the DelaySubscription operator was added. Another important aspect of the observer lifetime is that you can control when it stops receiving the notifications, as you’ll see next.
6.2.2. Stop emitting notifications at a scheduled time
If you need the observable to complete and to stop emitting notifications at an absolute time (for example, at midnight January 1, 2020), there’s no reason to subscribe to its updates. Rather than creating a Timer and disposing of the subscription, there’s an easier way. You can use the TakeUntil operator.
The TakeUntil operator receives a DateTimeOffset, which is an absolute date and time in a specific time zone. When that time arrives, the observable will notify its observers that it has completed. There’s no relative time overload for TakeUntil, but here’s a simple example that uses the absolute time version to schedule the unsubscribe in a relative time of 5 seconds:

This generates the following output:
TakeUntil(time) - OnNext(07/09/2015 10:00:10 +03:00)
TakeUntil(time) - OnNext(07/09/2015 10:00:11 +03:00)
TakeUntil(time) - OnNext(07/09/2015 10:00:12 +03:00)
TakeUntil(time) - OnNext(07/09/2015 10:00:13 +03:00)
TakeUntil(time) - OnNext(07/09/2015 10:00:14 +03:00)
TakeUntil(time) - OnCompleted()
You can see from the output that the first notification was emitted at 10:00:10 and because you scheduled the observable to stop receiving notification after 5 seconds, you see that the last notification was received at 10:00:14 (5 seconds later). This is the complete signature for TakeUntil:

6.2.3. Discarding items when another observable emits
Rx makes it easy to combine observables to build powerful pipelines. Among those operators that allow combining observables is another variation of TakeUntil. This lets you make the observable stop emitting notifications based on external conditions that are represented by another observable emission, as shown in figure 6.7.
Figure 6.7. The TakeUntil operator allows notifications from the observable source to proceed until the other observable emits a notification.

If you want your observable to stop emitting notifications after a certain period (instead of an absolute time), you can write code like this:

Running this code produces
TakeUntil(observable) - OnNext(07/09/2015 18:39:18 +03:00)
TakeUntil(observable) - OnNext(07/09/2015 18:39:19 +03:00)
TakeUntil(observable) - OnNext(07/09/2015 18:39:20 +03:00)
TakeUntil(observable) - OnNext(07/09/2015 18:39:21 +03:00)
TakeUntil(observable) - OnNext(07/09/2015 18:39:22 +03:00)
TakeUntil(observable) - OnCompleted()
In this example, you can see that 5 seconds after the first notification (which is produced immediately when the observer subscribes), the OnCompleted message is received.
The method signature for the TakeUntil operator is shown next. Because the other observable can be of any type, you can use whatever observable you want to control the observations of the emissions.
![]()
Using observables as external triggers for TakeUntil
Of course, more-complex scenarios could determine when to stop receiving notifications. For example, you can specify that a chat message observer will stop “listening” to chat messages when a certain control message arrives:

Using observables as the parameter for an operator is seen frequently in Rx and is a flexible mechanism of control.[3]
This powerful mechanism is a result of the IObservable<T> being a monad. Good explanations of monads with .NET types can be found at http://mng.bz/E381andhttp://ericlippert.com/2013/02/21/monads-part-one/.
6.2.4. Skipping notifications
At times you might want to subscribe an observer to an observable, but receive notifications only when a particular condition is met. For instance, in a chat message, you could specify to receive messages only after a specific control message is sent. Or, you may want to skip a specified number of search results if you know in advance that the first results are irrelevant. The Where operator used in previous chapters (and explained in-depth in chapter 8) can filter notifications, but after you add a condition, you can’t disable it when it evaluates to true for the first time. Notifications will keep being pushed, even if not all of them survive the filtering.
Skipping until . . .
The SkipUntil operator, depicted in figure 6.8, lets you specify when to start receiving notifications from the observable source, giving you finer control over your application’s operations.
Figure 6.8. The SkipUntil operator lets you skip notifications from the observable source until the other observable emits a notification.

Suppose a chat application needs to start showing messages from a certain user only when a specific control message is sent, like the traffic cop who allows traffic to proceed only after receiving an order from the commander. This is how it could be done:

The SkipUntil operator has two overloads: one that accepts a DateTimeOffset for absolute time scheduling (which is relatively straightforward at this point) and one that accepts an observable that acts as an external trigger. For example:

Tip
You can also skip items based on relative time by using the Skip operator.
If you need to specify the number of items to skip, the Skip operator is what you’re looking for.
Skipping a number of notifications
Sometimes you want to skip notifications by a predefined number of items (for example, you want to combine an observable with a shifted version of itself, so you can process two adjacent notifications). Just as in LINQ, you can use the Skip operator to do that:
IObservable<TSource> Skip<TSource>(this IObservable<TSource> source,
    int count)
The following shows an example for bypassing the first two notifications:
Observable.Range(1, 5)
    .Skip(2)
    .SubscribeConsole("Skip(2)");
This example produces this output:
Skip(2) - OnNext(3)
Skip(2) - OnNext(4)
Skip(2) - OnNext(5)
Skip(2) - OnCompleted()
Tip
If you want to stop receiving notifications after a predefined number of notifications, just as in LINQ, use the Take operator that receives the number of elements you want as an integer.
6.2.5. Taking or stopping when a condition is met
If none of the methods for starting or stopping notifications is suitable for your needs, you can use the configurable TakeWhile or SkipWhile overloads, which receive a predicate that indicates when to start or stop:

Figures 6.9 and 6.10 show that when the predicate evaluates to true, something happens—either you start or you stop accepting notifications.
Figure 6.9. The TakeWhile operator accepts notifications while a predicate function evaluates to true and discards all items after the predicate evaluates to false.

Figure 6.10. The SkipWhile operator discards the notifications as long as a predicate evaluates to true and accepts all notifications after the predicate evaluates to false.

You can use the two operators together to observe only a subrange of values:
Observable.Range(1, 10)
    .SkipWhile(x => x < 2)
    .TakeWhile(x => x < 7)
    .SubscribeConsole();
This example allows only a range of numbers between 2 (inclusive) and 7 (exclusive) to be observed:
- OnNext(2)
- OnNext(3)
- OnNext(4)
- OnNext(5)
- OnNext(6)
- OnCompleted()
With operators that take or skip notifications, you can easily adjust the source observable you subscribe to and control the input your code responds to. How wonderful is that? After the observable you subscribe to completes, no matter whether it’s due to the completion of the source or because you discard further notifications, you can choose to start all over again, just as when you hear your favorite album and want to hear it one more time.
6.2.6. Resubscribing
After an observable completes, no more notifications are received by the observer. Sometimes, however, you may want to restart and subscribe to the observable. This is usually done when you have a cold observable (covered in chapter 7) that starts emitting notifications when the observer subscribes. Resubscribing will make the observable emit the notifications again. This can also occur with hot observables. For example, you can subscribe to a mouse movement observable until a click is made and then resubscribe to capture the movements until the next click happens, and so on.
To automatically resubscribe in Rx, you use the Repeat operator. For example, you can create an observable that emits the range 1 to 3 twice:
Observable.Range(1, 3)
    .Repeat(2)
    .SubscribeConsole("Repeat(2)");
This example generates this output
Repeat(2) - OnNext(1)
Repeat(2) - OnNext(2)
Repeat(2) - OnNext(3)
Repeat(2) - OnNext(1)
Repeat(2) - OnNext(2)
Repeat(2) - OnNext(3)
Repeat(2) - OnCompleted()
The Repeat operator has two overloads, as shown next. With both overloads, when the source observable completes successfully, an observer will be subscribed to it again:

Tip
Another operator that allows “repeating” an observable is DoWhile, which repeats the observable if a predicate is true.
You need to remember that Repeat calls the Subscribe method according to the number of times you specified. So if there’s a side effect taking place in the observable Subscribe method (such as connecting to an external source), it’ll repeat.
Side effects are another interesting topic. When thinking about observable pipelines, how can you add an invocation to an operation (such as logging) in the middle of the pipeline? We’ll discuss that next.
6.2.7. Adding side effects in the observable pipeline
In chapter 3, you learned that a side effect is a change in the environment that influences the way your application behaves. You also discovered that functional programming languages try to avoid creating side effects, but at times they’re necessary. And, frankly, many of your applications would be limited if they couldn’t change state or call operations to change the environment.
The important part about side effects is that you want them to be visible and discoverable. Until now, the only place that you could change state or call operations was inside the Rx observer methods, which means only at the end of the notification journey when something reacted to it. This is limiting. What if you wanted to do something simple like writing a log between operators?
To allow this kind of operation as part of your observable pipeline, Rx provides the Do operator (illustrated in figure 6.11).
Figure 6.11. Adding a side effect between operators

Here’s how to use the Do operator to add logs that’ll make it easy to debug your observable pipeline:
Observable.Range(1, 5)
    .Do(x=> { Console.WriteLine("{0} was emitted",x); })
    .Where(x=>x%2==0)
    .Do(x => { Console.WriteLine("{0} survived the Where()", x); })
    .Select(x=>x*3)
    .SubscribeConsole("final");
This little application creates an observable that emits a range of values (1 to 5), filters the odd numbers, and multiplies the even numbers by 3. Between each operator, you added code to print to the console with the Do operator. This is the output:
1 was emitted
2 was emitted
2 survived the Where()
final - OnNext(6)
3 was emitted
4 was emitted
4 survived the Where()
final - OnNext(12)
5 was emitted
final - OnCompleted()
Like the Subscribe operator, the Do operator has several overloads that let you add functionality to the various source observable emissions:

You can take the logging example one step further and create a reusable Log operator that prints all the source observable notifications for you. The Log operator will use Do to print various emissions coming from the observable source.
Listing 6.1. The Log operator
public static IObservable<T> Log<T>(this IObservable<T> observable,
                                    string msg="")
{
    return observable.Do(
        x => Console.WriteLine("{0} - OnNext({1})", msg, x),
        ex =>
        {
            Console.WriteLine("{0} - OnError:", msg);
            Console.WriteLine("	 {0}", ex);
        },
        () => Console.WriteLine("{0} - OnCompleted()", msg));
}
This Log operator is nice to play with when investigating your observable’s pipeline, and you might find it useful in your applications. Here’s how I use it in the example:
Observable.Range(1, 5)
    .Log("range")
    .Where(x => x%2 == 0)
    .Log("where")
    .Select(x => x*3)
    .SubscribeConsole("final");
range - OnNext(1)
range - OnNext(2)
where - OnNext(2)
final - OnNext(6)
range - OnNext(3)
range - OnNext(4)
where - OnNext(4)
final - OnNext(12)
range - OnNext(5)
range - OnCompleted()
where - OnCompleted()
final - OnCompleted()
As mentioned previously, adding side effects to the observable pipeline could introduce some confusion, but when used correctly, they can improve the code you write, in both readability and correctness. Next, I’ll show you how combining the operators you’ve learned about in this chapter can turn a large complex application into a small yet comprehensible one.
6.3. Putting it all together
All the operators you’ve learned about let you process complex events easily, especially when combining them. Did you ever think that your mouse could be treated as an observable? It’s an observable that’s capable of producing notifications about the state of the mouse buttons and, of course, the current cursor position.
You can take advantage of this to create a reactive drawing application. The application draws lines by adding points based on the mouse position in a window, starting when the mouse button is pressed down, and stopping when the mouse button is released. An example of a simple drawing is shown in figure 6.12.
Figure 6.12. The Reactive Draw application. A line is created by adding points based on the position of the mouse, starting from the point the mouse button is down and stopping when it’s up.

This is how the application looks when writing it in a WPF window.
First, you need to create observables from the traditional MouseDown, MouseUp, and MouseMove events:

Now, for each movement, you select the mouse position and add a point to a polyline drawn in the window’s inner panel:

This code creates an application that draws a continuous line, without stopping. So now you need to add a condition that will stop taking the movements when the mouse button is up. This is exactly the job for TakeUntil:

Here the mouseUp observable is passed to the TakeUntil operator. When a notification that that mouse button is up is emitted, the observer will be detached from the observable.
You still need to add the trigger to start drawing the line when the mouse button is down. This is achieved by using the SkipUntil operator. For example:

After a mouse-button-down notification is emitted, the mouse movements are observed by the observer that adds the points to the line. And when the mouse button is up, the observer stops.
This creates a situation in which only one transaction is allowed (only one cycle of a mouse-down and mouse-up event). For this application, you want to repeat this cycle again and again, which is (of course) the job of Repeat. For example:

Great, you now have an application that draws a line, but it always adds points to the same line. A drawing application that draws only one line, reactive as it may be, isn’t useful.
What you want is to add a new line when the mouse button is down and have the points received from the mouse move added to that line, which becomes the current line. This is a side effect you need to take care of. Luckily, you have the Do operator. The following listing shows the complete application code that handles the drawing. As always, you can find the entire application’s source code in the book’s Git repo (http://mng.bz/IZ4B).
Listing 6.2. Reactive Draw application—full code

This example shows the beauty of the operator composability you have in Rx. Each operator logically follows another to create a clear chain of execution, in which one observable created by an operator becomes the source observable of the next operator. You created a complete drawing application with just a few lines of code, and modifying our pipeline as you built it was simple.
6.4. Summary
Another chapter comes to its end, and this one was fundamental for understanding how to work correctly with the observer and observables. The concepts in this chapter aren’t easy to understand, so you should commend yourself for making it such a long way.
Here’s what you learned in this chapter:
- You can easily create and subscribe an observer by using the Subscribe extension method, which accepts the OnNext, OnError, and OnCompleted methods.
- If you want to use the observer more than once, you can create an observer instance with the Observer.Create method and subscribe it yourself.
- You can replace the disposable subscription object with a CancellationToken and then pass it to the Subscribe method.
- To delay the subscription of an observer to an observable, you use the DelaySubscription method and pass it the relative TimeSpan or the absolute DateTimeOffset.
- The TakeUntil operator lets you specify the time the observer will stop receiving notifications or lets you pass another observable that marks the stop by emitting a notification.
- The SkipUntil operator lets you specify the time the observer will start receiving notifications or lets you pass another observable that marks the start by emitting a notification.
- You can skip any number of notifications by using the Skip operator, and stop receiving notifications after a specified number by using the Take operator.
- You can set a condition to start receiving notifications and to stop receiving notifications by using the SkipWhile and TakeWhile operators, respectively.
- An observer can automatically be subscribed to an observable with the Repeat operator, which lets you specify a certain number of times or an indefinite number of times.
- To show a side effect explicitly as part of your observable pipeline, use the Do operator, where you can specify the actions to do in the OnNext, OnError, and OnCompleted notifications.
- The Reactive Drawing application you created in this chapter used many of these operators to make a powerful application with just a few lines of code.
- In the next chapter, you’ll explore the concept of an observable’s temperature and learn what cold and hot observables mean.