
Chapter 2. Becoming familiar with the Art Editor

You may think that game making is all about writing code, but think again. You’ve probably heard the acronym STEAM in school—it stands for science, technology, engineering, art, and math. These subjects all share similar thinking skills, which means learning how to draw can make you better at science and math.
Drawing is about angles and ratios and fractions. It’s about creative problem solving and figuring out how to take an idea from your mind and get it onto the screen. Thinking like an artist means understanding which colors go together, how to break down objects into smaller parts, and how to create depth with shading. These are all things you’ll learn with this book.
Pixel art is a lot more forgiving than paint and canvas; remember, you’re not creating Picassos, you’re creating Pac-Mans. Take a deep breath if you’re worried that you don’t have the talent to design your own sprites. I promise, you do.
You’ll practice recreating shapes using the shortcuts Scratch provides in its art workspace, such as the Line tool, Square tool, and Circle tool. This will get you comfortable with drawing on the screen with your mouse, which is different from drawing on paper. You’ll also learn how to build sprites pixel by pixel to give your images a retro feel like Dig Dug or Super Mario Bros.
Like the last chapter, this chapter is a tour, which means you’ll get to try out every tool in the Art Editor so you can get a feel for drawing your own sprites. In this chapter, you will learn
- How to navigate the Art Editor
- How to locate the tools you’ll use to draw your sprites
- Two ways to build a cat sprite
- How to add color to your sprites and backdrops
Let’s get started trying your hand at making art.
Making your first drawing
There are two separate but similar-looking Art Editors in Scratch: one for sprites and one for backdrops. You’ll use these to create your own, unique pixel art for your retro-style games.
To start making a new sprite
- Clear the Stage by clicking the scissor icon on the Grey Toolbar and clicking the default cat sprite.
- Navigate to the Sprite Zone and click the paintbrush icon to the right of the words New Sprite, as shown in figure 2.1.
Figure 2.1. To make your own sprite instead of using a premade sprite from the Scratch library, click the paintbrush icon in the Sprite Zone.

You should see the workspace that’s in figure 2.2 open on the right side of the screen where the Script Area used to be.
Figure 2.2. The blank canvas is surrounded by the three tool areas.

The grey and white checked canvas is surrounded by three tool spaces: the Top Toolbar, the Side Toolbar, and the Color Toolbar. Before you dive into trying out all the tools in the Art Editor, it helps to understand the base measurement unit of arcade art: the pixel.
Fix It: The Art Editor is Missing!
What if you’re not looking at a grey and white pixelated canvas? Navigate to the Block Menu and make sure the Costumes tab is chosen.
Learning about pixels
A pixel is a unit of measurement. One pixel equals a single dot or miniature square of light on the screen. As your body is constructed out of billions of tiny cells, digital images are constructed out of tiny picture cells, or pixels. Those mini squares combine together to form an image on the computer screen. The smaller the squares and the more there are on the screen, the smoother the picture will appear.
To give you a sense of a pixel’s size, an iPhone screen has about 326 pixels per inch. Take a ruler and draw a square measuring one inch on each side. Now divide up that square into 326 smaller squares, if you even can—your pencil line is probably thicker than a pixel on the screen!
What if there were only 25 pixels per inch? Take your ruler and divide up the square again. The individual squares are still tiny, but you can see each individual one. The fewer pixels per inch, the larger those squares will appear on the screen.
Old video games have a low number of pixels per inch, and that’s why the graphics look a little boxy, or pixelated. Take, for instance, the Scratch cat in its default form and the Scratch cat in a pixelated form, shown in figure 2.3. The image on the right is the look you’re ultimately working toward in this book.
Figure 2.3. Two Scratch cats! The one on the left has a smooth, modern look. The one on the right has a pixelated, retro-style look.

Let’s take a tour of the Side Toolbar so you can try out the tools and draw your first sprite.
Using art tools to make a sprite
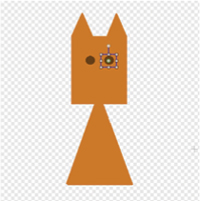
Let’s make the first of two sprites. You can use the grey and white pixelated background as a guide for creating your sprite’s shape, almost like a ruler. In honor of Scratch’s default cat, you’re going to make your own, unique cat as your first sprite, like the one shown in figure 2.4.
Figure 2.4. A simple cat sprite using basic shapes drawn with the Art Editor tools

You’ll start by choosing a color from the Color Toolbar and then use every tool on the Side Toolbar in order, moving from top (the icon that looks like a paintbrush) to bottom (the icon that looks like a stamp). This will not only help you create a cat, but you’ll get to try out all of the tools along the way.
Choosing a color
Let’s begin by choosing a color for your cat. I went with a simple orange, but you can choose any color you like from the Color Toolbar.
Fix It: I’m Worried I Didn’t Choose the Right Color!
This book contains color instructions whenever you’re making a sprite in order to help you focus on the skill you’re learning rather than worrying about picking a color. I’ll let you in on a little secret: you can always choose a different color if you want. Even when a color is used as part of the code, such as telling a sprite to stop moving when it touches something red, you can set those instructions to the colors you used on your sprites. When I tell you to choose a dark blue, don’t worry about whether I mean this blue or that blue. Just pick the one you like best.
To choose a new color using the paint sample squares
- Navigate to the Color Toolbar under the pixelated canvas.
- Click any of the paint sample squares.
Scratch gives you the 56 little color swatches seen in figure 2.5 to choose from, with the lightest shades at the top and darker shades at the bottom.
Figure 2.5. The 56 paint sample squares in the Color Toolbar, plus the current color box and the rainbow box

You can also change the color using the rainbow box:
- Click the small rainbow-colored box to the left of the paint sample squares. Note that it will switch places with the paint sample squares.
- Move the black bubble (seen in figure 2.6) around the rainbow until you find the color you want.
Figure 2.6. Choose a color from the rainbow box by moving around the black bubble. You can see the current color choice in the little square outside the top left corner of the rainbow box.

- Check the current color by looking at the top square to the left of the rainbow box. You don’t need to click anything to set the color. Instead, leave the bubble over the color you want.
- Use the slider on the right side of the rainbow box to make the shade of the color darker or lighter.
You can use either method to choose a color for your cat.
Drawing with the paintbrush
Begin by giving your cat a head by drawing a square with the Paintbrush tool, as in figure 2.7, the top icon on the Side Toolbar.
Figure 2.7. A freehand square drawn using the Paintbrush tool

By default, the Art Editor always begins with the Paintbrush tool ready to go. Use the Paintbrush tool to draw images, using the mouse as you would a pen or pencil. You need to have a steady hand to use this tool to make a straight line.
To use the Paintbrush tool
- Make sure the paintbrush icon on the Side Toolbar is chosen.
- Move the mouse pointer onto the canvas where you want your cat’s head to begin.
- Click and hold the mouse button to start the line.
- Move the mouse wherever you want the line to go.
- Release the mouse button and you will see the square both on the canvas and on the Stage.
As you can see, it’s hard to draw an even square with this tool.
Answer This: How to Draw a Smoother Line?
it’s hard to free draw with a mouse—is there something you can do to make it easier?
how about drawing your shape larger than you want and then using the Shrink tool on the Grey Toolbar to bring it down to the right size? Try drawing the cat’s head a second time. Does it look better? Sometimes drawing something large is a little easier than drawing something small.
There’s a second way you can draw a square for the cat’s head. Erase your wobbly square by clicking the Undo tool, the counterclockwise curved arrow above the canvas. Now get ready to try the Line tool.
Fix It: Erasing Lines when you’ve messed up
Don’t worry if you draw a line and don’t like it. Two buttons directly above the canvas on the Top Toolbar are super helpful in erasing (or putting back) your last action. The counterclockwise curved arrow on the left (the Undo tool) removes the last line you made on the canvas. The clockwise curved arrow on the right (the Redo tool) brings back the last action, returning the last thing you removed from the canvas.
Drawing with the Line tool
Use the Line tool to make straight lines. They can be vertical lines, horizontal lines, or diagonal lines, and they can be long or short. You can connect lines to form any shape—for instance a square, like the one in figure 2.8.
Figure 2.8. A slightly neater square, this time made using the Line tool
To draw your own square with the Line tool
- Click the line icon on the Side Toolbar.
- Move the mouse pointer onto the canvas where you want your square to begin.
- Click and hold the mouse button to start the first line and drag it until the line is a few centimeters long.
- Release the mouse button and you’ll see a line show up on the canvas and on the Stage.
- Continue your square by drawing another line leading off of the first line.
- Repeat until the four lines connect.
This time your square is a little neater than the one made using the Paintbrush tool. But wait! There’s a third way you can draw a square in Scratch, and this is the one you’re going to use for the cat’s head. Erase the square you made by clicking undo several times until your workspace is clear, or use the Clear button from the Top Toolbar, which will get rid of all lines in the Art Editor in one fell swoop.
Drawing with the Square tool
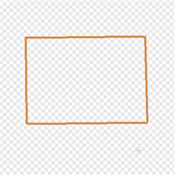
The third option from the top is the Square tool. You can use it to draw perfect rectangles and squares, like the one in figure 2.9.
Figure 2.9. This square will become the cat’s head.

To make the cat’s head with the Square tool
- Click the square icon on the Side Toolbar.
- Navigate to the two rectangles on the far left side of the Color Toolbar. One rectangle is an outline and the other is solid.
Click the solid rectangle so it is surrounded by a blue box, like the one in figure 2.10.
Figure 2.10. The blue square is around the filled square icon, which means the square will be a solid shape instead of an outline.

- Click and hold the mouse on the canvas, and then drag the mouse pointer to form a square. The farther you drag your mouse, the larger the shape.
- Release the mouse button when your square is a good size.
This tool helps you form a quick and perfect square. The Line tool is great for other shapes, such as triangles, but the Square tool is what you use when you need four even sides.
Answer This: Should You Use Outlines or Solid Shapes?
do you want to use a single color for the cat’s head, or outline the head in a slightly darker shade and then fill in the face in a lighter orange?
the choice is up to you because the Square tool and Circle tool both come with outline or solid options. In the previous example, you set your square to be one solid color, but you can experiment and try making an outline that you’ll fill later in this exercise. Set whether the square (or circle) is an outline or solid shape by clicking the correct box on the left side of the Color Toolbar. Which look do you like better: solid, continuous color or a darker outline with a lighter center?
Drawing with the Circle tool
If you thought squares were hard, try your hand at drawing tiny circle eyes for your cat with the Paintbrush. Mine looked like shriveled up raisins. Which brings us to the next tool down the Side Toolbar (fourth from the top): the Circle tool. This is used to draw easy ovals or circles, like the eye on the cat in figure 2.11.
Figure 2.11. You can make any size circle—from tiny eyes to large heads—with the Circle tool.

To make the cat’s eyes with the Circle tool
- Navigate to the Color Toolbar and switch from orange to dark brown by clicking the appropriate paint sample square.
- Click the circle icon on the Side Toolbar.
- Navigate to the two ovals on the far left side of the Color Toolbar (exactly as you did when drawing a solid square). One oval is an outline and the other is solid. Click the solid oval so it is surrounded by a blue box if the blue box is not currently around the solid oval.
- Click and hold the mouse pointer about a third of the way down the orange square (about where a cat’s eyes would be set) and then drag to form a tiny circle. The farther you drag your mouse, the larger the shape.
- Release the mouse button when your circle is a good size.
Your cat currently has a single eye. You’ll create the second, matching one in a moment using a different tool. But before you finish building your cat, let’s make it say something.
Drawing with the Text tool
What if you want your cat to be saying “Meow,” like the cat in figure 2.12?
Figure 2.12. Any text added to your sprite with the Text tool will move with the sprite once you program it.
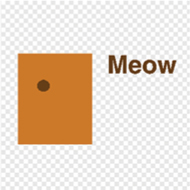
You can add words to any image by using the Text tool. This will allow you to make a Game Over icon to flash on the screen at the end of a game or write a name across a sprite’s shirt.
To make your cat say, “Meow”
- Click the Text tool, which is a T icon (which stands for text box) on the Side Toolbar.
- Click next to the cat’s head to bring up an empty text box.
- Use your keyboard to type the word Meow.
- Change the font by navigating to the bottom of the screen where you see the word Helvetica with a tiny triangle. That triangle is a drop-down menu, as seen in figure 2.13.
Figure 2.13. Use the drop-down menu at the bottom of the screen to change the font.

The word Meow is technically attached to the sprite, and if you move the sprite on the Stage, the word will travel with it.
Drawing with the Paint Bucket tool
Sometimes you don’t feel like coloring in your shape pixel by pixel. If you want every inch of your shape to be the exact same shade, use the Paint Bucket tool to fill the space with virtual paint. This is exactly how the cat’s ears were drawn in figure 2.14.
Figure 2.14. Two solid triangles are used for the cat’s ears, and these triangles were filled using the Paint Bucket tool.

Return to your cat and use the Line tool to draw two sets of diagonal lines on the top of the cat’s head for the ears, as shown in figure 2.15.
Figure 2.15. To use the Paint Bucket tool, first define the space you want to fill by creating an outline.

Now it’s time to fill in those ears with paint. Choose the same (or a similar) shade of orange you used for the cat’s body:
- Click the paint bucket icon in the Side Toolbar.
- Move your mouse pointer inside the first triangle.
- Click once inside the first triangle to spill the orange paint.
- Navigate to the second triangle and click again.
The ears are now solidly filled orange.
Fix It: The Paint Filled the Whole Screen!
What if you click inside the ear and the paint fills the entire screen, blotting out the cat? Don’t panic—just use the Undo button to remove the paint and start over. Usually, the paint stays inside the boundaries of the shape. But if even one pixel is open, the paint will spill out of the shape and into the rest of the canvas. Close off the shape using the Paintbrush or Line tool, and then switch back to the Paint Bucket tool to try again.
Drawing with the Eraser tool
If you make a mistake, you can immediately erase it with the Undo button in the Top Toolbar. But if you later change your mind about something you added to your picture and don’t want to rewind all the work that has occurred since the mistake, you can use the Eraser tool. For example, if you decide you don’t want the word Meow attached to your cat anymore, you can use the Eraser tool to remove it, which is what is happening in figure 2.16.
Figure 2.16. The clear bubble is an eraser. Slide it over any pixels you want to remove.

To remove an element of your drawing
- Click the eraser icon.
- Move your mouse over the word Meow inside the editor.
- Click and hold down the mouse button as you rub the mouse pointer over the word, removing it from the canvas.
The word Meow is now removed from your picture. In the future, you can use this tool either to remove sections of your sprite or shave a few pixels off an edge.
Answer This: Can You Make the Eraser Bigger?
the eraser is pretty small. Can you make it bigger?
sometimes you will want a small eraser for doing tiny detail work. Other times you want your eraser much larger to make the job faster. Look around the Art Editor; can you guess how to make the eraser bigger? Navigate down to the slider at the bottom of the screen in the Color Toolbar and move the slider toward the right in order to make the eraser bigger. Sliding it to the left makes the eraser smaller.
Drawing with the Select tool
The Select tool allows you to move a segment of your drawing. It will draw a box around the chunk of the image that you want to move, and then you can drag with your mouse to move that segment wherever you need it on the screen, which is how the body got under the head in figure 2.17.
Figure 2.17. The green circle in the center of the Select tool outline lets you know that the shape is ready to be moved.

Try out this tool by drawing the cat’s body somewhere else on the screen. The body is going to be a simple triangle made with the Line tool and then filled with the Paint Bucket tool, as seen in figure 2.18.
Figure 2.18. You can draw the body anywhere in the Art Editor, because you can move the triangle using the Select tool.

Now you need to move that triangle body into place under the head:
- Click the Select tool in the Side Toolbar.
- Outline the body using your mouse in the same way you would draw a square. Try to get the rectangle around the body as closely as possible.
- Notice the small, green circle in the center of the box, seen back in figure 2.17. That green circle is what indicates that the shape (and everything inside it) is moveable.
- Move your mouse pointer inside the Select outline.
- Click and hold the mouse button while dragging the body underneath the head. Release the mouse button when the body now touches the head.
Your sprite is beginning to look more and more like a cat.
Learn It: Layers
As you move the triangle close to the head, notice whether or not the triangle slips underneath the square head or slides on top of the head, blotting out the face. What you’re noticing are layers, and all image programs use them in order to add each element to the picture. The square is clearly the bottom layer. The eye is the next layer.
And the triangle body is the third layer. New elements to your sprite will always go on top of the last layer, so plan accordingly when building a sprite. It helps to draw out a sprite on paper and figure out the order you want to draw it on the screen. For instance, it makes sense to draw the face first and then the eyes, and not the other way around. If you draw the eyes first, they’ll be covered up when you go to draw the larger head.
Skip the next tool (you’ll return to the Remove Background tool at the end of this chapter) so you can give the cat a second eye with the final tool on the Side Toolbar.
Drawing with the Duplicate tool
It’s time to give your poor cat a second eye. You could have drawn a second circle, but those two circles may not have been the same size. The way you can ensure that the circles are the same size, as they are in figure 2.19, is to use the Duplicate tool.
Figure 2.19. The Duplicate tool makes it easy to have both eyes be identical.
To make a second eye using the first eye
- Click the stamp icon to choose the Duplicate tool in the Side Toolbar (not the Grey Toolbar).
- Use the mouse to draw a small box around the first eye and release the mouse button.
- Click inside the blue outline and drag your mouse pointer. Although it may not seem as if anything happened when you first released the mouse button, you’ll now see the copy of the circle appear.
- Release your mouse button when you get the new eye to the spot you want, similar to the Select tool.
Now your cat has two eyes.
Finishing the cat
You are almost done with your cat. Begin with the tail, which you’ll make in the same way that you made the two ears. Do you remember which tool you used to make those triangles? Make a triangle again, this time coming off the cat’s body, as shown in figure 2.20.
Figure 2.20. A simple triangle becomes a tail for the cat sprite.

Switch to the Line tool to make the tail:
- Make sure your color is still set to the orange used for the cat’s body and head.
- Draw a set of two diagonal lines.
- Switch to the Paint Bucket tool.
- Click inside the triangle to fill the shape with color.
Your cat now has an orange tail.
Next, navigate up to the face so you can make the mouth and whiskers, or nose and whiskers. It’s up to you how you want to view this cartoonish dot on the finished cat’s face, shown in figure 2.21.
Figure 2.21. A mouth (or nose?) and six whiskers finish off the cat’s face.

To finish the cat’s face
- Switch to the black paint sample square in the Color Toolbar.
- Switch to the Circle tool on the Side Toolbar.
- Draw a tiny black circle underneath and between the two eyes.
- Switch to the Line tool.
- Make six straight lines radiating out from the dot in the middle of the face.
Congratulations, you made your first sprite! Now that you know how to use each of the tools on the left sidebar, feel free to play around and make other sprites. When you’re ready, keep reading, because there is a second way to build sprites, getting even closer to the look of those old Atari games.
Making your own cat, pixel-by-pixel
You can also enlarge the Art Editor and draw your sprites pixel by pixel. Let’s make a cat like the one in figure 2.22.
Figure 2.22. The pixelated cat is outlined with dots and then filled using the Paint Bucket tool.

Start by making the canvas a little bigger. You can either clear the canvas and start fresh or draw this sprite next to your other sprite. To enlarge the canvas
- Navigate to the Color Toolbar and choose a darker orange (in the second column of the paint sample squares) for the outline of the cat.
- Notice the two magnifying glass icons underneath the canvas on the right side of the screen. The one on the right allows you to zoom into the image, and the one on the left allows you to zoom out.
- Zoom in by clicking the magnifying glass with a plus sign (seen in figure 2.23) three times to make the canvas 800% its normal size.
Figure 2.23. The two magnifying glasses at the bottom of the Art Editor are your friends when you get ready to make pixelated art.

Answer This: Should You Worry About Sprite Size?
does it matter how big you make your sprite?
not really. You can always use the Grow tool in the Grey Toolbar (or, if your sprite is too large for your game, the Shrink tool) after the sprite is made. You learned how to use these tools back in chapter 1. You’ll see your sprite growing on the Stage as you add each pixel, so you’ll be able to judge whether you’re getting close to the size you want. But don’t start over if you realize in the middle of making your cat that it’s too big or too small.
You’ll use the darker shade of orange to make the outline for the cat and then fill in the body and face of the cat in a lighter shade of orange.
Start again by making a square for the head, only this time you’ll make it out of dots:
- Select the Paintbrush tool on the Side Toolbar.
- Navigate to the Line Width tool, shown in figure 2.24, on the left side of the Color Toolbar.
Figure 2.24. The Line Width tool in the Color Toolbar controls the thickness of the line.

- Increase the line size until one click of the Paintbrush tool leaves a dot instead of a square. To test the size of the brush, make a single dot on the canvas. Why a dot instead of a square? It gives the cat a rough edge, almost like fur. Plus it makes it easier for you to see where to place the next dot by following the edges of the dots on the canvas.
- Move the mouse pointer to the canvas and start making a square out of dark orange dots. Make your square with six dots on each side.
- Make two dots, side by side, directly over the top corners of the square.
- Crown these two dots with another single dot in the center, as shown in figure 2.25. If you see any empty pixels at the top of the triangle, gently shift the mouse pointer and click again to fill them.
Figure 2.25. This square head is made out of dots topped by two pixelated dot ears.

Next, move below the square to draw the cat’s body and tail. Keep using the same shade of dark orange.
To draw the neck and top of the body
- Navigate to the two center dots at the bottom of the square.
- Draw two dots underneath those dots, side by side.
- Build out the body by attaching a line four dots across to the neck. Build down from the edges of the line with two dots down
on either side, as in figure 2.26.
Figure 2.26. Strategically placed dots start forming the top half of the cat’s body.

The body keeps getting wider as you move toward the bottom of the sitting cat. You’ll extend the body by making dots to the side followed by dots going downward.
To draw the rest of the body
- Draw a dot to either side of the descending lines and then make the new edge two dots down.
- Do this a second time, drawing a single dot to the side and then one dot down.
- Finish the bottom of the cat by drawing eight dots across to close off the tiered cat body.
- Begin to the left or right side of the bottom tier and draw an unconnected line extending outward for the cat’s tail.
In figure 2.27 you can see the outline of the cat.
Figure 2.27. The cat outline is made up of dark orange dots.

You can now use the Paint Bucket tool to fill the body with lighter orange pixels.
To fill the cat’s body
- Choose a shade of orange slightly lighter than the shade you used for the outline.
- Switch to the Paint Bucket tool.
- Click inside the empty spaces to fill them with the lighter orange color. Make sure the paint bucket icon is always over the grey-and-white canvas inside the outline and not on the outline itself.
Your cat is now completely orange, with the darker outline giving your cat a little depth, as shown in figure 2.28.
Figure 2.28. The orange pixelated cat still needs a face.

Fix It: IF You Accidentally Changed the Outline Color
Every once in a while, you’ll click the outline instead of the space inside the outline. When you do this, the outline will change to the same color as the inner pixels. Don’t panic. Use the undo arrow in the Top Toolbar of the Art Editor, and it will rewind the project to before the last paint spill. Check where the paint bucket icon is positioned and try clicking again to fill the space.
Lastly, you need to make the face, and you’ll do this using two line width sizes that you’ll set with the Line Width tool.
To make the eyes, mouth, and whiskers
- Switch to the black paint sample square in the Color Toolbar.
- Make two dots in the center of the head for the two eyes.
- Navigate down to the Line Width tool on the left side of the Color Toolbar.
- Move the slider to the left to make the line thinner.
- Switch to the Line tool.
- Draw a line going down between the two eyes and make a small line across at the bottom, like an upside-down T.
- Draw six lines radiating out of the cat’s face for whiskers.
You now have a finished pixelated cat like the one in figure 2.29 on your Stage. Which cat do you like better?
Figure 2.29. Your second sprite is now complete.

Now that you know how to make sprites, you need to learn how to make the backdrops you’ll use for your games. The two processes are similar, and the two Art Editors look a lot alike.
Making your first backdrop
The Backdrop Art Editor looks almost exactly like the Sprite Art Editor, so you don’t need a second introduction to the Top Toolbar, Side Toolbar, and Color Toolbar. All tools will work exactly as they do in the Sprite Art Editor.
The only difference is the canvas. When you were working with the Sprite Art Editor, the canvas was pixelated with grey and white boxes. The Backdrop Art Editor’s canvas is solidly white. If you’re ever in doubt about whether you’re making a sprite or a backdrop, check the canvas.
Navigating to the Backdrop Art Editor
To get into the Backdrop Art Editor
- Start a new project and navigate down to the Sprite Zone.
- Look at the left sidebar. You should see an option to create a new backdrop. Above the words “New backdrop” is an empty white
box labeled Stage, as shown in figure 2.30.
Figure 2.30. Click the white box in the Sprite Zone to get to the Backdrop Art Editor.

- Click the white Stage box, go to the Block Menu in the middle of your screen, and select the Backdrops tab.
Designing the backdrop
The backdrops in retro-style games tend to be simple in order to keep the attention on the sprites. You don’t want players to focus on tiny details you’ve put in the background; you want them to watch the sprite in the foreground. Let’s make a field with a blue sky and green grass, as in figure 2.31.
Figure 2.31. The Scratch cat walks across a green field in this simple backdrop.

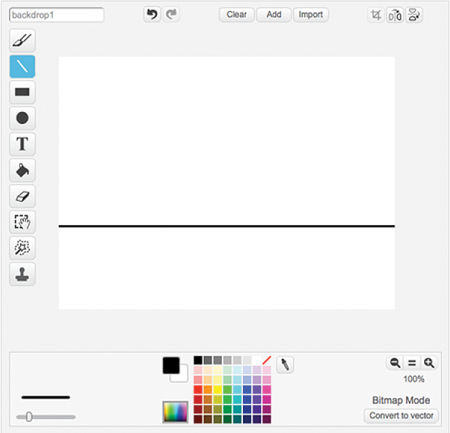
To begin, you’ll need to set the horizon line and then fill the large areas above and below the line with the Paint Bucket tool. This horizon line gives the player a three-dimensional understanding of a two-dimensional space.
To make the horizon line
- Return the Art Editor to normal size by clicking the magnifying glass with a minus sign in the bottom right corner. Make sure the Art Editor is set to 100%.
- Click the Line tool and draw a black line across the screen, as in figure 2.32. As you draw on the canvas, you’ll see the same line appear on the Stage. This is helpful because it lets you know whether
the line you’re drawing extends across the whole backdrop.
Figure 2.32. If your Art Editor is set to 100%, you’ll be able to make the line go across the entire canvas.
Fix It: My Line Is Too Short!
If your line doesn’t extend across the whole Stage, use the slider at the bottom of the canvas (not the slider for the Line Width tool) to extend the straight line. Scroll left and right (or up and down using the side slider) to continue drawing the line. You won’t see the slider if your Art Editor is set to 100%. You’ll only see it if you haven’t zoomed out.
Now you need to fill the space above and below the horizon line with color to simulate a field and sky.
To fill the ground and sky
- Switch to the Paint Bucket tool and choose any shade of blue from the paint sample squares in the Color Toolbar.
- Move the mouse pointer to the section above the black line and click the screen once to fill the sky area with your chosen shade of blue.
- Return to the Color Toolbar and choose any shade of green from the paint sample squares.
- Move the mouse pointer to the section below the black line and click the screen once to fill the field area with your chosen shade of green.
You now have the simple backdrop shown in figure 2.33 to use in a game.
Figure 2.33. Backdrops are drawn in a similar manner to sprites.

Backdrops will always be the same size as the Stage, and the Stage is where your game will ultimately play. Therefore, each backdrop stretches over the whole background, much like a set on a theater stage.
Wrapping up the tour
You now know your way around the Scratch workspace and the Art Editor. Once again, if you ever get lost drawing your sprites, return to this chapter to remember where all the tools are located.
Play in the workspace
During the tour, I skipped a tool on the Side Toolbar. Between the Select tool and the Duplicate tool, there is a tool that you won’t need for this book but that is still fun to try out. The Remove Background tool allows you to erase the background out of a photo and turn the subject of the image into a sprite.
Challenge
Can you turn yourself or your pet into a sprite? Upload a photo to Scratch by using the open folder icon next to the words New Sprite in the Sprite Zone, click the Remove Background tool, and start outlining the part of the photo you want to keep. By clicking and holding the mouse button down, you can drag the green dot around the section of the photograph that will become the sprite. After you release the mouse button, you may see a dotted line appear. Outline the section again and then click anywhere else on the screen. The background will disappear, and you will be left with the picture inside the outline.
What did you learn?
We covered many topics on our tour of the Art Editor. Let’s review before you move on to new information. If you see something unfamiliar on the list, back up and reread chapter 2.
Pause for a moment and think about everything you learned in this chapter:
- How digital space is measured in pixels
- How to navigate the Art Editor
- How to use the drawing tools on the Side Toolbar
- How to build a sprite pixel by pixel
- How to make a backdrop to go behind the sprites
Before you make your first game, Gabriel wants to introduce you to a few popular blocks and coding concepts that you’ll be using a lot in each of the games you make in this book. I know you’re excited to dive into making the games, and I promise that this is the final chapter in part 1. In chapter 3, you’ll build tiny scripts to see how they work, and this will help you to dive into creating future games. Turn the page and get started.