
Chapter 10. Designing a simple platformer

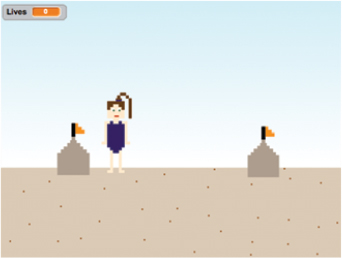
It’s a beautiful summer day, not a cloud in the sky, which makes it the perfect time for a beach trip. But Buffy finds a mess when she finally gets on the sand. There are ditches filled with water, snapping crabs, and to top it off, some kid has left a city of sandcastles behind that makes walking impossible, as you can see in figure 10.1. There’s a better patch of sand about a mile away, but how is she going to navigate that mile?
Figure 10.1. A game of Beach Blast requires three variations on the same backdrop, plus Beachy Buffy, a crab, a sandcastle, a vine, and two sideways barrier lines.

Beach Blast is a side-scrolling platformer like Activision’s 1982 game Pitfall. Pitfall follows the adventures of Pitfall Harry as he leaps over scorpions, sails over tar pits, and dodges rolling barrels. Beach Blast takes the mechanics of Pitfall but sets the jumping and swinging on the beach, making the obstacles water, crabs, and sandcastles.
To draw those obstacles, you’re going to learn an important art concept that you can use to tackle any problem in life: taking a large object and breaking it down into smaller parts.
In this chapter, you will learn
- How to look for basic shapes within an object
- How to break down a unique shape into smaller parts using the grid method to copy an object
- How to look at an image in segments
You’ll start off by making a beach backdrop, only this time you’re going to make three variations on the same setting in order to create a sense of movement.
Prepping the backgrounds
The games you’ve made so far have only required one backdrop. A side-scrolling platformer requires two or more backdrops to create the illusion of movement. Whenever Beachy Buffy touches the left or right side of the Stage, the backdrop will switch, making it look as if she is continuously running.
Making the open sand backdrop
The simple sandy backdrop in figure 10.2 can be tweaked to make the other two backdrops. This first one will be the backdrop you’ll use when she’s jumping over the sandcastle sprites that you’ll make later in this chapter.
Figure 10.2. The open sand backdrop can be tweaked to build the other two backdrops.
Open the Backdrop Art Editor and get ready to make the open sand backdrop:
- Open the rainbow box and choose a shade of tan for the sand, such as the one shown in figure 10.3.
Figure 10.3. Choose a light tan for the sand.

- Choose the Line tool and split the screen horizontally with a straight line across the Stage about one third of the way up from the bottom.
- Use the Paint Bucket tool to fill the bottom of the canvas.
- Look toward the boxes on the left side of the Color Toolbar where you’ll see the four fill options, shown in figure 10.4.
Figure 10.4. You’ll find four gradient (or fading) options on the left side of the Color Toolbar.

- Choose the bottom left gradient option, which concentrates the blue paint at the top of the screen and fades downward into white.
- Switch to a pale blue paint sample square to make the sky. Make sure the blue box is around the gradient tool as it is in
figure 10.5 to make the sky darkest at the top of the Stage, fading to white. Click anywhere in the empty, top two-thirds of the canvas.
Figure 10.5. The gradient tool makes a more realistic sky that fades as it moves closer to the horizon line.

- Select the dark brown paint sample square and click the Paintbrush tool. Make random dots across the sand to give the illusion of texture and graininess.
Your backdrop should look like the open sand background in figure 10.6.
Figure 10.6. The completed open sand backdrop is where Beachy Buffy will jump over sandcastles.

Making the hole in the sand backdrop
You need three backdrops to make Beach Blast, but you don’t have to start each time from scratch. This second backdrop takes the open sand backdrop and cuts out a hole for Beachy Buffy to land in when she’s trying to escape the crabs, as shown in figure 10.7.
Figure 10.7. Cutting a hole into the sand in the previous backdrop creates a different background.

To duplicate the open sand background, navigate to the Grey Toolbar, choose the Duplicator tool, and click the backdrop on the Costumes tab, as seen in figure 10.8.
Figure 10.8. The Duplicator tool saves you from needing to draw the backdrop from scratch.

You should now see two backdrops on the Costumes tab. Make sure the blue box is around backdrop2 and get ready to remove part of this backdrop in order to create the hole in the sand:
- Choose the Select tool and draw a small rectangle in the sand in the middle of the Stage, as in Step One in figure 10.9. If you’re having trouble selecting a thin rectangle of sand, zoom in to 200% for a larger workspace.
Figure 10.9. The hole in the sand is made out of three rectangles removed from the open sand backdrop.

- Press the delete or backspace key on the keyboard to remove this section of sand.
- Make a smaller rectangle underneath and touching the first rectangle, as in Step Two in figure 10.9. Repeat a second time, making an even smaller rectangle, like Step Three in figure 10.9.
You now have a safe space for Beachy Buffy to land when she’s dodging the pinching crabs, as shown in figure 10.10.
Figure 10.10. The completed hole in the sand backdrop

Making the water ditch backdrop
Similar to the hole in the sand backdrop, the water ditch backdrop tweaks the original open sand backdrop, this time making the dark blue rectangles seen in figure 10.11 instead of removing sections of sand.
Figure 10.11. The water obstacle is three blue rectangles drawn on top of one another. The vine sprite is drawn separately later in this chapter.

Once again, duplicate the original open sand backdrop on the Costumes tab and make sure the blue box is around the new backdrop3.
To make the water ditch
- Choose a dark greenish-blue for the seawater that has pooled in the ditch.
- Select the Square tool and draw a fat rectangle touching the top of the sand in the middle of the Stage, as in Step One in
figure 10.12.
Figure 10.12. The three rectangles are drawn on top of one another.

- Draw a longer, thinner rectangle on top of the first rectangle, as in Step Two in figure 10.12. Repeat this step a second time, drawing an even longer, thinner rectangle on top of the second rectangle, like Step Three in figure 10.12.
The three rectangles meld together to create the pool of water shown in figure 10.13.
Figure 10.13. The completed water ditch backdrop

You now have three backdrops. You’ll be able to program the game to switch between the backdrops to make it look as if Beach Buffy is running across the sand, switching environments. Which means it’s time to make Buffy.
Prepping the main sprites
There are four main sprites that you’ll need to make for Beach Blast: Buffy, a crab, a sandcastle, and a vine. All of them can be broken down into a series of basic shapes. Once you can see the shapes inside a larger, irregularly shaped object, you can create...anything. Make sure to get rid of the default cat sprite before you begin making your other sprites.
Making Beachy Buffy
Buffy is the player character in this game, and you’ll make her run and jump over obstacles. The best part about making Buffy, shown in figure 10.14, is that you’ll quickly realize that she’s a bunch of rectangles and squares.
Figure 10.14. Buffy is a series of squares and rectangles in different colors.

Open the Art Editor to make Beachy Buffy:
- Zoom in to 800% and get ready to start building Buffy near the light grey plus sign that marks the center of the canvas.
- Select any skin tone color from the rainbow box.
- Click the Paintbrush tool. Make a 6-by-6 square out of square dots. Fill the inside of the square using the Paint Bucket tool. (Make sure you’re on the solid fill and not the gradient tool!)
- Return to the Paintbrush tool and make two connecting horizontal square dots underneath the square for the neck.
- Begin one pixel beyond the left side of the head and start making a line of horizontal pixels running parallel to the bottom of the head. (It should be eight pixels across.)
- Make a thin vertical rectangle out of seven square dots extending off either end of the horizontal shoulder line. When you
get to the end, make one pixel out to the left or right depending on the side. Buffy should now look like figure 10.15.
Figure 10.15. Every part of Buffy is either a square or rectangle.

- Choose a dark purple from the paint sample squares.
- Draw a letter H out of square dots at the top of Buffy’s body to make the swimsuit straps. You can see how these dots touch
the neck in Step One of figure 10.16.
Figure 10.16. Even Buffy’s swimsuit can be broken down into squares and rectangles.

- Continue the side of the swimsuit, making two vertical lines of square dots that extend two pixels beneath the bottom of her arm. Close off the bottom of the swimsuit with two square dots, as seen in Step Two of figure 10.16.
- Fill the inside of the swimsuit using the Paint Bucket tool, as in Step Three of figure 10.16.
- Switch back to the Paintbrush tool and fill in the space between the arm and the swimsuit with square dots, as seen in Step Four of figure 10.16.
- Use the eyedropper to reselect the skin tone color.
- Make two vertical lines out of eight square dots beginning on either side of the bottom of the swimsuit. When you get to the
end, make one pixel out to the left or right depending on the side. Buffy now has legs, as seen in figure 10.17.
Figure 10.17. Buffy’s legs are made up of thin rectangles with square feet.

- Choose a dark brown from the paint sample squares. Begin at the top of the head in the center of the skin-tone square. Draw
two horizontal, brown, square dots to start the hairline. Make a two-pixel diagonal line from either end of the centered line,
as in Step One of figure 10.18.
Figure 10.18. Buffy’s hair is built pixel-by-pixel.

- Fill the three skin-tone pixels at the top of her head with the hair color, as shown in Step Two of figure 10.18.
- Make two side-by-side pixels to the right of center. You can see the placement in Step Three of figure 10.18, where the ponytail attaches to the head. Draw a single square dot on top of the two-pixel line. Starting in the top right corner of the single square dot, make a two-pixel horizontal line toward the right. Draw two pixels diagonally from the bottom right corner. Continue drawing a vertical line of six more pixels until the end of the ponytail is level with the end of Buffy’s head.
- Switch to the swimsuit purple, use the slider to make a smaller pixel size, and draw a tiny purple line where the ponytail meets the head, as shown in Step Four of figure 10.18.
- Select the white paint sample square. Keeping the Paintbrush tool on the thinnest setting, draw a square out of four pixels on the left side of Buffy’s face. Repeat this step on the right side of her face.
- Switch to the green paint sample square and draw a single pixel in one of the corners of the white square.
- Change to the red paint sample square and draw two horizontal pixels side-by-side, as shown in figure 10.19.
Figure 10.19. Squares and rectangles make Buffy’s face.

Buffy is now complete. Look at her body in figure 10.20 and you’ll notice that although you drew all of her body parts pixel-by-pixel, they add up to a lot of rectangles and squares. Don’t forget to name her Buffy in the Sprite Zone.
Figure 10.20. The completed Beachy Buffy sprite

Learn It: Breaking Down an Object Into Shapes
Many budding artists have trouble drawing people. A person is an irregular shape, and it’s hard to know where to begin. But once you start making Buffy, you can see that she breaks down into a series of rectangles and squares. The same can be said for every object you want to draw. You can replicate any irregularly shaped object by breaking down the larger shape into smaller basic shapes. Take, for example, the mouse in the sprite library. (See figure 10.21.) Look for the basic shapes that make up the irregularly shaped mouse. There are a cluster of four circles that form its head, body, and ears. There are also three tiny circles inside the face for the eyes and nose. The legs are squares with three circles attached at the end, and the tail is a thick, curved line. Always look for the basic shapes to make drawing easier.
Figure 10.21. The mouse is a series of circles stuck together.

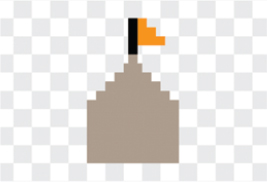
Making the sandcastle
Speaking of basic shapes, sandcastles are all about packing sand into square bricks or flying triangular seaweed flags. The sand castle in figure 10.22 will serve as an obstacle for Buffy to jump over as she runs down the beach.
Figure 10.22. The sandcastle is also a series of squares and rectangles.

Start a new sprite to make the sandcastle:
- Keep the Art Editor zoomed in to 800%.
- Open the rainbow box and click the Eyedropper tool. To pick up the color you used for the sand, click the thumbnail of the Stage in the Sprite Zone. This will open the backdrop so you can click anywhere on the sand to pick up the color using the Eyedropper tool. Switch back to the sandcastle sprite by clicking it in the Sprite Zone.
- Move the slider to the right of the rainbow box to make the color slightly darker than the original sand to show that the sand is damp.
- Go to the Paintbrush tool and make sure it’s on its default size. Make a 10-by-7 horizontal rectangle out of square dots. Fill in the center using the Paint Bucket tool.
- Switch back to the Paintbrush tool and staircase from the top sides of the rectangle toward the middle, connecting the square dots in the corner. Any dot you make on the left side, make on the right side too to keep it symmetrical. Top the sandcastle with a single pixel.
- Fill the middle of the sandcastle using the Paint Bucket tool. It should look like figure 10.23.
Figure 10.23. The symmetrical sandcastle is the same on the left and right side.

- Switch to the black paint sample square and make a four-pixel vertical line extending from the top sand pixel.
- Choose any color from the paint sample squares (I went with orange) to make the flag. At the top of the black line, make a single pixel to the right. Underneath that, starting at the black line again, make two side-by-side pixels to the right. Do this one more time, making a three-pixel line under the two-pixel line.
You can see the finished sandcastle in figure 10.24. Don’t forget to go to the Sprite Zone and name this new sprite Castle.
Figure 10.24. The completed sandcastle sprite
Making the crab
The little red crab may look complicated to make, but it’s once again basic squares and rectangles, with a few diagonal lines making its pincers.
The crab in figure 10.25 is a moving obstacle for Beachy Buffy to leap over on her way down the beach.
Figure 10.25. The crab is smaller than the sandcastle and the height of one of Buffy’s legs.

Start a new sprite to make the crab:
- Choose the bright red paint sample square and click the Paintbrush tool. Leave the Art Editor zoomed in to 800%.
- Make a rectangle six pixels by four pixels and then place four pixels, centered, along the top of the rectangle, and three pixels, centered, along the bottom of the rectangle.
- Make two pixels on top of the four-pixel line, leaving a space in between, as seen in figure 10.26.
Figure 10.26. The body of the crab is drawn in three steps.

- Make six sets of two-pixel diagonal lines off the main rectangle: two in the top two corners, two in the center, and two in
the bottom two corners, as seen in figure 10.27.
Figure 10.27. Diagonal lines of pixels extend off the body.

- Switch to any dark paint sample square and spill paint to fill the background of the canvas. This step will make it easier to draw the white eyes because it’s difficult to see white squares against the grey-and-white canvas.
- Choose the white paint sample square and make a four-pixel white square on top of the two red pixels using the Paintbrush
tool, as shown in figure 10.28.
Figure 10.28. The temporary grey background makes it easier to draw the eyes on the crab.

- Switch to the black and place a single pixel in the center of the white squares, also shown in figure 10.28.
- Return to the red paint sample square and fill the center of the crab’s body. Return the background to the clear, grey-and-white canvas by clicking the paint sample square with a line through it and then using the Paint Bucket to spill the clear paint.
- Click the eraser and use the slider to set the eraser on its smallest setting. Click the outer top corner of the two claw
pixels, as seen in figure 10.29. This removes a quarter of the pixel and completes the crab.
Figure 10.29. The Eraser tool removes a fraction of the pixel to make a pincer shape.

Don’t forget to go to the Sprite Zone and rename the sprite Crab.
Learn It: The Grid Method
Another way of reproducing an unusual shape is by using the grid method. Instead of looking for basic shapes inside the larger object, you turn each section of the image you’re copying into a square, and then draw the contents of that square. The idea is to take a large object and to break it into small, manageable parts. Take a look at the crab in figure 10.30, which is broken down into smaller parts with a grid. The idea is that instead of trying to reproduce a crab—which could be overwhelming if you don’t have step-by-step instructions—you try to copy everything inside the square on the grid. Don’t add in those grid squares in your copy; only use them to help you break down the original object into smaller parts. As you draw, make each new section touch the existing sections.
Figure 10.30. Draw the inside of each square in the grid rather than look at the whole crab.

Making the vine
The final sprite is the green vine that Buffy will use to sail over the water traps in the sand. You could make a simple green line, but the checkerboard pattern vine, seen in figure 10.31, adds depth and interest to a tool that Buffy will use to cross an obstacle.
Figure 10.31. The checkerboard pattern on the vine makes it stand out on the screen.

Start a new sprite to make the vine:
- Choose the darkest green paint sample square and click the Paintbrush tool. Leave the Art Editor zoomed in to 800%. Make sure the Paintbrush tool is back on its default size setting.
- Make a 60-pixel checkerboard pattern down the Art Editor, leaving empty spaces, as seen in the far left section of figure 10.32.
Figure 10.32. The checkerboard pattern adds depth to the green line vine.

- Return to the top of the checkerboard. Choose the next lightest shade of green from the paint sample squares. Fill in the empty spaces in the top 20 pixels of the vine.
- Go a step lighter and repeat this two more times with the remaining shades of green, going lighter each time. In the end, you should see the pattern in figure 10.32.
Your final sprite is complete! Go to the Sprite Zone and rename it Vine.
Prepping the odds and ends
Platformers also sometimes need barrier lines, only these lines will allow Scratch to switch between backdrops instead of counting missed ghosts.
Making the side barrier lines
You have made a lot of barrier lines at the bottom of the Art Editor in order to track whether a sprite has hit the bottom of the Stage. This time you need the barrier lines to run up and down the sides of the Stage, as in figure 10.33. Each time Buffy touches the left or right side of the Stage, the backdrop will switch, creating the illusion of running down the beach.
Figure 10.33. Side barrier lines are made the same way as bottom barrier lines, except they run vertically on the far left (or right) side of the Stage rather than horizontally across the bottom.
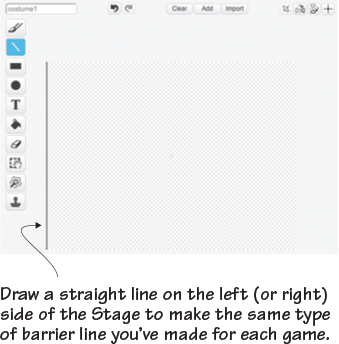
Start a new sprite to make the side barrier lines:
- Zoom out until you’re back at 100% so you can see the whole canvas.
- Choose the black paint sample square and use the Line tool to draw a straight line up and down the left side of the canvas.
- Go to the Sprite Zone and name this sprite Left Line.
- Start another new sprite and repeat these steps, this time making the line on the right side. Name this sprite Right Line.
You should have two barrier lines in the Sprite Zone, a Left Line and a Right Line, along with Buffy, the sandcastle, the crab, and the vine. Your sprites are now complete, and you’re almost ready to code.
Preparing to code
You’ve probably noticed that platformers require more sprites than ball-and-paddle or fixed shooter games. One sprite is the player character, and the rest of the sprites are obstacles or tools that the main sprite will use during the game. All will need to be programmed in chapter 11, which means there will be more scripts than the other games.
Play with the game
Currently you have three backdrops and three obstacles: the water, the sandcastles, and the crabs. But longer platformers contain many more boards and problems to solve.
Challenge
Make a fourth backdrop for Buffy to run past during the game. My brother will show you how to incorporate more boards into your game if you choose this challenge, so pause for a moment to duplicate that original beach scene and tweak it again to create a new scene for Buffy to encounter as she runs down the beach.
Challenge
Make another object to challenge or help Buffy as she makes her way down the beach. Think about other objects you may find on the beach, such as a loose umbrella that blows around the sand (and if it touches Buffy, she loses a life) or a seashell that she can collect to gain additional lives. Umbrellas and seashells are both irregular shapes. Look up a picture of an umbrella or seashell and then copy it using the grid method.
Challenge
Can you tweak Buffy (or Bert, if you want to change her into a boy) to look like you? What are your defining features? Or can you work dithering into the sprite to show depth so that Buffy or Bert looks three-dimensional?
What did you learn?
Taking a problem and breaking it down into smaller parts will help you in every area of STEAM. When you encounter a long math problem, you break it down into smaller sections using PEMDAS (parentheses, exponents, multiplication, division, addition, subtraction). That order of operations not only makes you solve the problem in the correct order, but it simplifies a big, unruly equation into manageable parts. The same goes for all the programming you’re doing in this book. You’re not attempting to make the whole program at once. Instead, you’re breaking down the program into smaller scripts so you can see how it fits together. That same idea is reflected in the concept of looking for basic shapes inside a large, irregular shape.
Pause for a moment and think about everything you learned in this chapter:
- How to copy a background and tweak it to make several backdrops
- How to look for shapes inside a larger object
- How to use a grid to break down an irregular shape into smaller parts for easier copying
- How to use the checkerboard pattern to add interest to a plain line
You have a player character. You have obstacles. You even have a vine that can help you get over those obstacles. It sounds like you’re ready to make a simple platformer—Beach Blast.