
Lesson 24. Adding User Authentication
In lesson 23, you learned about manual hashing of passwords and the importance of securing user data. In this lesson, you explore some popular and useful tools that make the hashing process less messy. You modify your hashing methods to use the passport-local-mongoose package, which uses passport and mongoose together to perform hashing for you behind the scenes. Next, you learn how to use Passport.js to authenticate user accounts on your application. This process involves session cookies, similar to the way that flash messages use them. By the end of this lesson, you’ll have a sign-up and login form that permits only true users of your application to have access.
This lesson covers
- Using the passport package to authenticate users throughout your application
- Implementing the passport-local-mongoose plugin on your user model
- Creating authentication actions before user login
You’ve added a popular hashing method to your application, but you’d like to simplify the code or, better, put it behind the scenes. It’s great to know how hashing works, and tools are available to perform the hashing you want without the need to manually set up your own criteria for hashing. Packages such as passport.js hash and authenticate user interactions without your needing to specify a password field in the schema. In this lesson, you look at the quickest and most efficient implementations of the passport package.
24.1. Implementing Passport.js
Passport.js is middleware used by Node.js to hash new user passwords and authenticate their activity on an application. Passport.js uses different methods to create and log in user accounts, ranging from basic login with username and password to login with third-party services such as Facebook. These login methods are called strategies, and the strategy you’ll use for your recipe application is a local strategy because you aren’t using external services.
These strategies check whether incoming data is authentic by managing hashing and comparison of passwords and data relating to the user’s login state. For more information about the Passport.js strategies, visit www.passportjs.org.
To start, install the necessary packages for your application. You need to install the passport package along with the passport-local-mongoose packages by running npm i passport passport-local-mongoose -S in your project’s terminal window. The modules from these packages work together to provide hashing and authentication methods and support to communicate directly with your Mongoose schemas. After you install these packages as dependencies, require them where needed in the application. Add the following lines from listing 24.1 to main.js.
Start by requiring the passport module. Passport.js uses methods called strategies for users to log in. The local strategy refers to the username and password login method. You initialize the passport module and have your Express.js app use it. Now you have passport ready as middleware in your application. passport.session tells passport to use whatever sessions you’ve already set up with your application. In this case, before this line, you have express-session set up for flash messaging.
Listing 24.1. Requiring and initializing passport in main.js
const passport = require("passport");       1
router.use(passport.initialize());          2
router.use(passport.session());             3
- 1 Require the passport module.
- 2 Initialize passport.
- 3 Configure passport to use sessions in Express.js.
Next, you need to set up your login strategy on the user model and tell passport to handle the hashing of user data in sessions for you. passport-local-mongoose makes this process simple and pretty much automatic. Add the lines in listing 24.2 to main.js.
Note
passport.session tells passport to use any previously used Express.js sessions defined. Sessions must be defined before this line.
You need to make sure that your user model is made available in main.js before you continue to connect it with passport. Normally, you’d need to set up some configurations to create a login strategy for a model, but because you’re using the default local login strategy, you only need to tell passport to use the strategy created for the user model. The next two lines tell passport to serialize and deserialize your users through the User model. These lines direct the process of encrypting and decrypting user data stored in sessions.
Listing 24.2. Setting up passport serializing in main.js
const User = require("./models/user");                  1
passport.use(User.createStrategy());                    2
passport.serializeUser(User.serializeUser());           3
passport.deserializeUser(User.deserializeUser());
- 1 Require the User model.
- 2 Configure the user’s login strategy.
- 3 Set up passport to serialize and deserialize your user data.
Passport serializes and deserializes user data to pass into a session. The session stores this serialized data—a condensed form of user information, which is sent back to the server to verify the user as the last one logged in from the client. Deserializing extracts the user data from its condensed version so that you can verify the user’s information.
When working with objects in an application, you want to preserve the data structure that allows you to access and modify properties easily. Your user objects, for example, allow you to retrieve information such as email or even to use the User model’s virtual attribute fullName. Although the model is particularly useful within your application, you have no straightforward way to send this user object, along with its methods and Mongoose object-document mapper (ODM) tools, to a client. As a result, you need to serialize the user data.
Serialization is the process of converting data from some data structure to a compact readable format. This data can take on many formats, such as JSON, YAML, and XML. The user data is flattened, often into strings, so that it can be sent within an HTTP transaction.
Passport.js performs the serialization process and encrypts your user’s data so that it can be stored as part of the session cookie on the client’s browser. Because this cookie contains information about the user, it lets your application server know, the next time a request occurs, that this user has logged in before, which is your way of validating some-one’s state in your application.
When the same user makes another request to your application, Passport.js deserializes the data to restore the user to its original model object form. When that process completes and you verify that the user is valid, you can use the user object again as before, applying model methods and using Mongoose queries.
The last step before building the authentication action to log users into your application is to connect your user model to the passport-local-mongoose module. Add const passportLocalMongoose = require("passport-local-mongoose") to the top of user.js, which is where you’ll add a Passport.js plugin to the user schema, as shown in listing 24.3. Using the Mongoose plugin method, you’re telling your userSchema to use passportLocalMongoose for password hashing and storage. You’re also telling passportLocalMongoose to use the email field as the user’s login parameter instead of a username because username is the default field for this module.
Note
This line must appear before you register your User model.
Listing 24.3. Adding the passport-local-mongoose plugin to the user schema
userSchema.plugin(passportLocalMongoose, {
  usernameField: "email"
});                                            1
- 1 Apply the passport-local-mongoose module as a plugin to the user schema.
When this line is in place, Passport.js automatically takes care of password storage, so you can remove the password property from userSchema. This plugin modifies your schema behind the scenes to add hash and salt fields to your User model in place of the normal password field.
You learned about hashing in lesson 24, but you let bcrypt perform the hashing process through an algorithm that you didn’t need to understand. Exactly how do bcrypt and Passport.js hash user passwords?
Modern hashing takes the user’s input password and converts it into an undecipherable hash. This hash is a jumble of characters and numbers, making it safer to store in a database than the plain-text password. If anyone hacks the database, he has only the hashed passwords. The best he can do at that point is enter his own guesses at a password into his own hashing function to see whether the resulting hash matches yours. That task is a tedious one, but it’s not impossible for hackers to find a way to crack your hashed passwords. Salts were introduced to battle this vulnerability.
Salts are short strings of random characters that are added to a plain-text password before the password is hashed. This way, if someone maliciously guessed your password, they would also need to know the salt associated with it and where to place it in the original password. Hacking has become a lot more difficult.
Passport.js stores both the hashed password and salt in your database so that you can perform hashing consistently within your application. When you register your first users with Passport.js, take a look at their data in MongoDB to see those values by following these steps:
- In a new terminal window, run mongo.
- Run use recipe_db to load your recipe database.
- Run db.users.find({}, { password: 1}) to view all user passwords.
- Compare the hashed and nonhashed passwords.
Note
Make sure that any reference to the password attribute in your application is removed. Because passport-local-mongoose adds new password fields to the User model, you won’t be using it anymore.
In the next section, you use the passport package to simplify the authentication process even more.
True or false: A salt is needed to hash passwords.
False. Salts help make the hashing of passwords stronger by mixing random text with plain-text passwords before they’re hashed, but salts aren’t required.
24.2. Modifying the create action to use passport registration
Using Passport.js has already simplified your code and made it easier to specify which models you’d like to hash and authenticate. The next step is modifying your create action, so instead of using your bcrypt hashing function before creating a user account, you’ll use Passport.js. By incorporating the Passport.js modules, you have access to a library of methods to streamline the account registration process. Change the create action in usersController.js to use the register method, as shown in listing 24.4.
Note
You must comment out or remove the userSchema.methods.passwordComparison and pre("save") hook for bcrypt in the User model. If you don’t remove these hooks, bcrypt will still try to hash user passwords before passport is able to, which also results in an unhandled promise error.
The register method comes with Passport.js. Because you’re using passport-local-mongoose as a plugin for the User model, you can use this method to register users. If you successfully save a new user, create a flash message and redirect to the /users route. Otherwise, handle any errors that occur by redirecting to the users/new route so that another attempt to create a user account can be made.
Listing 24.4. Registering new users in the create action in main.js
create: (req, res, next) => { if (req.skip) next(); let newUser = new User( getUserParams(req.body) ); User.register(newUser, req.body.password, (error, user) => { 1 if (user) { req.flash("success", `${user.fullName}'s account createdsuccessfully!`); res.locals.redirect = "/users"; next(); 2 } else { req.flash("error", `Failed to create user account because:
- 1 Register new users.
- 2 Set redirect for successful user creation.
- 3 Set redirect and log errors in flash messages.
With this action in place, you can use the form in /users/new.ejs to create user accounts through Passport.js. Try launching your application and creating a new user. You shouldn’t notice a change in behavior; your user account will be created, and you’ll see the success flash message.
If you look at the raw documents in MongoDB by typing mongo in a new terminal window, then type use recipe_db and db.users.find({}) to see the users in your database. Any users saved with bcrypt still have their password field with a hashed password saved. Your latest user has two properties added by Passport.js: salt and hash.
Tip
Update your seed.js file to register user accounts with passport instead of the Mongoose create method. This practice makes it easier to repopulate your database as your application grows in development.
Update your seed.js file to register user accounts with Passport instead of the Mongoose create method, which will make it easier to repopulate your database as your application grows in development.
Your users are still secure, but you still need a way to log them in. In the next section, you modify the login form to use Passport.js.
Why does Passport.js need you to save the hash and the salt in your database?
Passport.js saves the salt and the hash so that each user can have their own unique hashing factors. It’s possible to use the same salt for every user account and only store the hash in the database, but this approach is less secure.
24.3. Authenticating users at login
The final step in allowing users to log in to the application is replacing the bcrypt authentication method with passport middleware. Modify your authenticate action in usersController.js with the new action, as shown in listing 24.5. You also need to require passport into the users controller by adding const passport = require("passport") to the top of the file.
This authenticate action is set to call passport.authenticate method directly with passport redirect and flash-message options. When you call usersController.authenticate, you’re calling passport.authenticate. In this function, passport attempts to compare the incoming request data, describing a user, with the database records. If a user account is found and the input password aligns with the hashed password, you redirect from this action.
Listing 24.5. Adding passport authentication middleware in usersController.js
authenticate: passport.authenticate("local", {     1
  failureRedirect: "/users/login",                 2
  failureFlash: "Failed to login.",
  successRedirect: "/",
  successFlash: "Logged in!"
}),
- 1 Call on passport to authenticate a user via the local strategy.
- 2 Set up success and failure flash messages and redirect paths based on the user’s authentication status.
The login route no longer needs your usersController.redirectView action as a follow-up function. With your router.post("/users/login", usersController.authenticate); route set up from lesson 23, your application is ready to authenticate existing users. Restart your application, and log in with a user account you’ve created at /users/login. If you’re successful, you should see the success flash message.
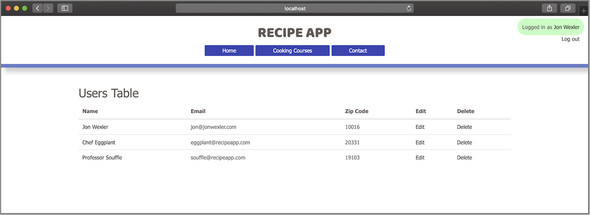
It would be nice to have a visual indication that you’re logged in and maybe a way to log out. Add the code from listing 24.6 to your navigation bar in layout.ejs. You’re checking whether the local variable loggedIn is set to true. If so, display the text Signed in as followed by the user’s fullName, which you get from the currentUser local variable. This list item is wrapped in an anchor tag that, when clicked, takes you to the currently logged-in user’s show page. If the loggedIn status is false, show a link to Sign In, taking you to the /users/login route.
Listing 24.6. Adding login status to navigation bar in layout.ejs
<% if (loggedIn) { %> 1 Logged in as <a href="<%=`/users/${currentUser._id}`%>">
If you refresh your application, you may not see anything change in the navigation bar yet. You need to create the loggedIn and currentUser variables so that they appear locally in each view. To do so, add some custom middleware so that on every new request, you add these variables to the response. Because you’ve already created a middleware function to set up flashMessages as a local object, you can add the code in listing 24.7 within that middleware function in main.js.
isAuthenticated is a method provided by Passport.js, which you can call on the incoming request to see whether an existing user is stored in the request’s cookies. loggedIn is either true or false. If a user is in the request, you can pull it out and assign it to your own currentUser variable. After adding this code, you gain access to both of these variables, along with flashMessages, on every page.
Listing 24.7. Adding local variables to custom middleware
res.locals.loggedIn = req.isAuthenticated();          1
res.locals.currentUser = req.user;                    2
- 1 Set up the loggedIn variable to reflect passport login status.
- 2 Set up the currentUser to reflect a logged-in user.
Restart your application to see whether your name appears in the navigation bar. Your screen may look like figure 24.1.
Figure 24.1. Example of a successful login in the browser
This figure includes a logout link in the navigation bar. To create this link, add <a href="/users/logout">Log out</a> below the line where the name of the currentUser appears. To get this link working, you need to create a route and action for logging out. First, add router.get("/users/logout", usersController.logout, usersController.redirect-View) to main.js next to where your login routes are located. Then add the logout action from listing 24.8 to usersController.js.
This action uses the logout method provided by Passport.js on the request to clear the user’s session. During the next pass through your custom middleware, isAuthenticated returns false, and there’ll no longer be a current user. Follow this operation with a flash message to indicate that the user has been logged out and a redirect to the home page through the redirectView action.
Listing 24.8. Adding a logout action in usersController.js
logout: (req, res, next) => {            1
  req.logout();
  req.flash("success", "You have been logged out!");
  res.locals.redirect = "/";
  next();
}
- 1 Add an action to log users out.
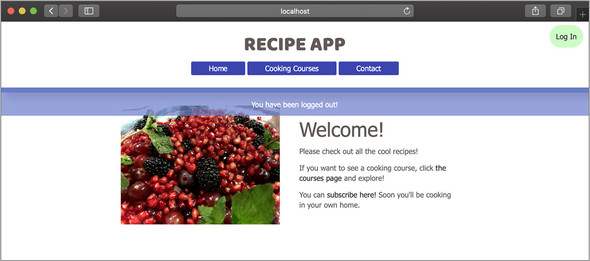
With this action in place, it’s time to test the full login process. Restart your application, log in, and then click the logout link in the navigation bar (figure 24.2). Your session should be cleared and your account successfully logged out.
Figure 24.2. Example of a successful user logout in the browser
In lesson 25, you apply user authentication to the capstone project.
How do you have access to Passport.js methods on the request throughout the application?
Because you added the passport module as middleware within Express.js, you have access to the library of methods provided by Passport.js. These methods are extended to the request as it enters the application. As that request is passed through the middleware chain, you can call these passport methods on it anywhere you like.
Summary
In this lesson, you added a few Passport.js packages to assist in the encryption and authentication of user data. By connecting an additional validation action to your user-login middleware chain, you can ensure that user passwords are secure and the login experience is consistent. In the next capstone lesson (lesson 25), you apply these validation, hashing, encryption, and authentication techniques to improve the Confetti Cuisine application experience.
You’ve successfully implemented Passport.js to work with your User model and Mongoose ODM. Because Passport.js does a lot of the heavy lifting for you, it may seem that there isn’t much else to add to the login process, but you always have room for more middleware. Add a middleware function, called logEmail, between validation and encryption. This middleware should log to console the user’s email address domain (such as gmail, yahoo, or live) and pass to the next middleware function.