
Lesson 31. Saving Chat Messages
Your chat feature is coming together, and you can take it in many directions to improve it. Though the chat feature allows for real-time communication, when you refresh your page, all messages disappear. The next step is persisting these messages in your database. In this lesson, you implement a simple model to represent each chat message. Then you connect that model to the user model, allowing senders to associate with their own messages. Last, you query the database for the most recent messages whenever a page is reloaded. When you complete these steps, the chat will start to resemble ones that you’ve used on familiar websites and in familiar applications.
This lesson covers
- Creating a message model
- Saving messages in a socket.io event handler
- Querying messages upon new socket connections
You have a chat page working, finally allowing users to talk to one another. As soon as a user refreshes their page, their chat history is gone. Although this feature could be marketed as a security implementation, it’s impractical. You want to save the message and do so without interrupting the fast-paced, event-driven system on which your chat application functions. In this lesson, you use Mongoose and your existing application structure to support saving and loading chat messages.
31.1. Connecting messages to users
In lesson 30, you created a chat feature for your application, allowing users to trigger a message event, prompting the server to respond with the same "Hello" text-message content. You can improve this feature by sending the actual content you type in the chat input box to the server. To do so, modify your client-side code so that your event handler on form submission looks like listing 31.1.
This small change allows you to grab the text the user typed right after he clicks the submit button. Then you send the text within an object as you emit the message event to the server.
Listing 31.1. Emitting an event from the client in recipeApp.js
$("#chatForm").submit(() => {
  let text = $("#chat_input").val();       1
  socket.emit("message", {
    content: text
  });                                      2
  $("#chat_input").val("");
  return false;
});
- 1 Grab text from the view input field.
- 2 Emit form data to the server.
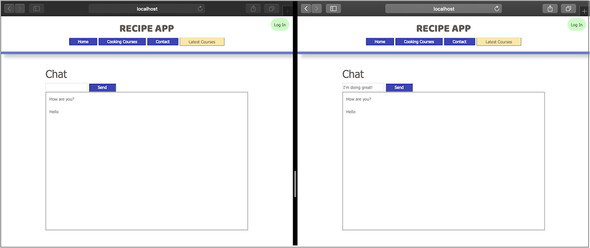
In response, have the server emit this form data to all listening clients. You can do so by modifying the message event handler in the chat controller to emit the data back to all clients. Change the code around the io.emit line in chatController.js to the code in listing 31.2. Here, you grab the data from the client and emit it back. If you relaunch your application and try to type a new chat message, that specific message appears in the chat box. You can also open a second browser window to mimic two users, and these two browsers allow for multiple socket connections to submit data and display new messages in the other browser’s chat box in real time (figure 31.1).
Figure 31.1. Displaying chats with two sockets
Listing 31.2. Change emit message to data in chatController.js
client.on("message", data => {                          1
  io.emit("message", { content: data.content });        2
});
- 1 Collect data as a parameter.
- 2 Return data in the message event as content.
The next thing you want to do is add some information about the user who posted the chat message. Currently, you’re sending only the message content to the server, but you can send the user’s name and ID as well. Modify your chat form to include two pieces of hidden data, as shown in listing 31.3. In this example, you check whether a currentUser is logged in, using data on the response provided by passport. If there’s a user, use that user’s _id attribute in the form as a hidden field. Then this value can be passed to the server when you submit your message.
Listing 31.3. Adding hidden fields in chat form in chat.ejs
<% if (currentUser) { %> 1 <h1>Chat</h1> <form id="chatForm"> <input id="chat-input" type="text"> <input id="chat-user-name" type="hidden"value="<%= currentUser.fullName %>"> <input id="chat-user-id" type="hidden"
Now that you’ve included a user field in your chat form, you’ll display the chat box only if a user is signed in. Try loading /chat before logging in. Then try again after logging in with one of your local user accounts. The second try yields the chat-page contents.
Next, modify your custom client-side JavaScript to pull these values when the form is submitted. Replace your form-submission event listener with the code in the next listing. In this modified code, you grab the user’s ID and pass the value to the server, using the same local variable name.
Listing 31.4. Pulling hidden field values from chat form in recipeApp.js
$("#chatForm").submit(() => {
  let text = $("#chat-input").val(),
    userId = $("#chat-user-id").val();      1
  socket.emit("message", {
    content: text,
    userId: userId
  });                                       2
  $("#chat-input").val("");
  return false;
});
- 1 Pull hidden field data from the form.
- 2 Emit an event with message content and user data.
Now you can handle this data on the server side by changing your code in the message event handler in chatController.js to collect all the individual attributes passed to the server (listing 31.5). By saving these values to a new object, you can filter out any unwanted values outside what you specify in the messageAttributes object. Then emit those values containing the message contents and user information to the other clients.
Note
This code must exist within the io.on("connection"... block. You can listen for specific events only from client sockets that are connected.
Listing 31.5. Receiving socket data in chatController.js
client.on("message", (data) => {
  let messageAttributes = {
    content: data.content,
    userName: data.userName,
    user: data.userId
  };                                           1
  io.emit("message", messageAttributes);       2
});
Last, you need to arrange this data and display it appropriately in the view. Back in recipeApp.js, change the code in displayMessage to match the code in listing 31.6. This function adds an HTML class attribute to the messages associated with the logged-in user. By comparing the ID of the user in the form with the ID associated with the chat message, you can filter out the logged-in user’s messages.
To accomplish this task, add getCurrentUserClass to determine whether the message in the chat belongs to the user who’s currently logged in. If so, add a current-user class, which you can use to distinguish the messages for that user visually. After this change, each message identified as belonging to the current signed-in user will have this style class associated. Because you’re using the user’s ID and message content in this function, you need to pass the entire message object, not only the message content as you did before, to displayMessage.
Note
Change your call displayMessage(message.content) to displayMessage (message) so that you can use all properties of the message object.
Listing 31.6. Pulling hidden field values from chat form in recipeApp.js
let displayMessage = (message) => {
  $("#chat").prepend(
    $("<li>").html(`
<div class="message ${getCurrentUserClass(message.user)}">
${message.content}                                         1
</div>`)
  );
};

let getCurrentUserClass = (id) => {
  let userId = $("#chat-user-id").val();
  return userId === id ? "current-user": "";               2
};
- 1 Display the message contents along with the user name in chat box.
- 2 Check whether the message’s user ID matches the form’s user ID.
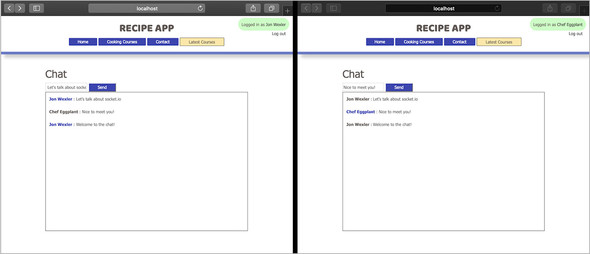
Now add some styling to the current-user class elements and distinguish chat messages from one another. With two browser windows side by side, and two users logged in, the chat can look like figure 31.2.
Figure 31.2. Styling user messages with two sockets

You’ve implemented the logic to associate messages with users and distinguish those messages on the view. This chat still seems to lack a few points, however. Although the logged-in user can identify their own messages, they don’t know the identity of the other users. In the next section, you add user names to the chat messages.
Why do you need to compare the chat message’s user ID with the user ID on the chat form in the client-side JavaScript?
The form’s user ID reflects that of the logged-in user. If the user ID in the chat’s message matches the one in the form, you can safely mark that message as belonging to the logged-in user and apply styling to indicate that fact.
31.2. Displaying user names in chat
The closer you get to coupling messages with the user accounts that created them, the easier it will be for users to communicate with one another. To eliminate confusion, you want to use the user’s name as an identifier on the chat message. To do so, implement a few small changes in your code from section 1.
You’ve already added a hidden input field on the chat form to submit the user’s fullName. When the logged-in user submits their chat message, their name is sent along too.
Next, grab this field value in recipeApp.js by pulling the value from the #chat_user_name input on form submission, and save it to a variable. The new submit event handler looks like the code in the next listing. Then emit that value within the same object paired with the userName key. You’ll use this key in the server later.
Listing 31.7. Pulling an additional hidden field value from chat form in recipeApp.js
$("#chatForm").submit(() => {
  let text = $("#chat-input").val(),
    userName = $("#chat-user-name").val(),    1
    userId = $("#chat-user-id").val();
  socket.emit("message", {
    content: text,
    userName: userName,
    userId: userId
  });                                         2
  $("#chat_input").val("");
  return false;
});
- 1 Pull the user’s name.
- 2 Emit a custom event with message contents to the server.
On the server, you need to include this user name in the message attributes you collect so that they can be emitted to other client sockets. You could use the user’s ID to retrieve their name, but this approach saves you from communicating with the database. In the message event handler in chatController.js, your message attributes variable assignment should read let messageAttributes = {content: data.content, userName: data.userName, user: data.userId}.
Last, arrange this data, and display it appropriately in the view. Back in recipeApp.js, change the code in the displayMessage function to the code in listing 31.8. This change displays the name of the user associated with the posted message. You can still use the getCurrentUserClass function to determine whether the message in the chat belongs to the currently logged-in user.
Listing 31.8. Displaying the user name in the chat in recipeApp.js
$("#chat").prepend($("<li>").html(` <strong class="message ${getCurrentUserClass(
- 1 Display the user name in bold and stylize if currentUser.
After implementing these changes, you can see the names of the users posting in the chat (figure 31.3).
Figure 31.3. Showing user names with two sockets
With this improvement, users can identify the author of specific chat messages by that sender’s name. This feature is great, as it reduces the anonymity of chat and allows registered users to connect with one another. You still have the problem of chat messages disappearing with each page load, however. You need to connect these chat messages to your database, and the best way to do so is through a Mongoose data model. In the next section, you explore the model schema needed for a chat message.
Why do you pass the user’s name to the server instead of using the user’s ID to find the name in your database?
Using the user’s ID to look up their name can work, but it adds another layer of work involving the database. With no immediate need to use your database for this chat, you can pass the extra string values.
31.3. Creating a message model
To make this chat page worth revisiting, you need to save the messages being shared. To do so, you need to save the messages to your database, and you have a few ways to save them:
- You can modify your user schema to save an array of messages. With each new message that any user submits, that message is added to the user’s messages array. This approach can work, but you’ll quickly end up with long lists that aren’t efficient or necessary to store in the user model.
- You could also create a new model to represent the chat and its messages. This approach requires a new model module but ultimately saves you some work and makes it easier to understand exactly what data you’re working with and saving.
In this section, you build a Message model to contain the values you’ve been working with in this lesson. Create a new message.js file in your project’s models folder, and add the code in listing 31.9 to that file.
In this code, you’re defining a message schema that contains content, userName, and user properties. The content of the chat message is required, as are the user’s name and ID. In essence, every message needs some text and an author. If someone tries to save a message somehow without logging in and authenticating, your database won’t allow the data to save. You also set timestamps to true so that you can keep track of when the chat message was added to your database. This feature allows you to show the timestamp in the chat box, if you want.
Listing 31.9. Creating the message schema in message.js
const mongoose = require("mongoose"),
  { Schema } = require("mongoose");
const messageSchema = new Schema({
  content: {
    type: String,
    required: true
  },                           1
  userName: {
    type: String,
    required: true
  },                           2
  user: {
    type: Schema.Types.ObjectId,
    ref: "User",
    required: true
  }                            3
}, { timestamps: true });      4

module.exports = mongoose.model("Message", messageSchema);
- 1 Require content in each message.
- 2 Require the user’s name with each message.
- 3 Require a user ID with each message.
- 4 Save the timestamp with each message.
Next, require this new model in chatController.js by adding const Message = require ("../models/message") to the top of the file.
Note
../models/message means you’re stepping out of the controllers folder and into the models folder to find message.js.
To start saving incoming data to message models, you need to use your messageAttributes as the properties of a new message object. Then try to save that message to your MongoDB database, and emit the message if you’re successful. Modify your code with the code in the next listing to change the client.on("message") block in chatController.js.
Listing 31.10. Saving a message in chatController.js
client.on("message", (data) => {                      1
  let messageAttributes = {
      content: data.content,
      userName: data.userName,
      user: data.userId
    },
    m = new Message(messageAttributes);
  m.save()                                            2
    .then(() => {
      io.emit("message", messageAttributes);          3
    })
    .catch(error => console.log(`error: ${error.message}`));
});
- 1 Create a new message object with messageAttributes.
- 2 Save the message.
- 3 Emit the message values if the save is successful, or log any errors.
That’s all it takes to start saving your messages. You can relaunch your application, log in, and send messages to have them save behind the scenes. You won’t notice any changes, because as soon as you refresh the chat page, you still wipe the chat history, even though messages are saved in your database. To correct this problem, you need to load some recent chat messages whenever a user reconnects to the chat socket. Within chatController.js, add the code in listing 31.11 to find the ten most recent chat messages and emit them with a new custom event. Use sort({createdAt: -1}) to sort your database results in descending order. Then chain limit(10) to limit those results to the ten most recent. When you emit your custom "load all messages" events on the client socket, only newly connected users’ chat boxes will refresh with the latest chat messages. Reverse the list of messages with messages.reverse() so that you can prepend them in the view.
Listing 31.11. Loading most recent messages in chatController.js
Message.find({})
  .sort({ createdAt: -1 })
  .limit(10)
  .then(messages => {                                           1
    client.emit("load all messages", messages.reverse());       2
  });
- 1 Query the ten most recent messages.
- 2 Emit a custom event with ten messages to the new socket only.
The last step is handling this new custom event in your client-side JavaScript. In recipeApp.js, add the event handler in listing 31.12. This code listens for the "load all messages" event emitted to this specific socket. Any data received here is handled by sending each message in the data array to your displayMessage function to prepend the message contents to your chat box.
Listing 31.12. Displaying most recent messages in recipeApp.js
socket.on("load all messages", (data) => {     1
  data.forEach(message => {
    displayMessage(message);                   2
  });
});
- 1 Handle ‘load all messages’ by parsing incoming data.
- 2 Send each message to displayMessage to display in the chat box.
Try comparing views of two adjacent sockets before and after one of the sockets refreshes its connection. A user’s new connection refreshes the chat box with messages from the database. Now it’s much easier for users to participate in the chat with a preserved history of messages shared.
What is the purpose of the “load all messages” event?
“load all messages” is a custom event you created to communicate with your client socket to load database messages to the chat box as soon as they connect. You can use any custom event name. This unique name is descriptive and can be handled however you like in the client-side JavaScript.
Summary
In this lesson, you learned how to curate messages in your chat box to display information about the message’s author. You also displayed the names of users alongside their messages to increase transparency in the chat page. At the end of the lesson, you created a Message model and started saving messages to your application’s database. This implementation allows messages to persist across multiple socket connections. By loading the most recent messages on every new socket connection, you immediately involve users in the conversation. In lesson 32, you look at one way to use socket.io events to notify users of new messages even when they aren’t actively on the chat page.
Now that you have messages saving to your database and associated with user accounts, add another layer of security at the controller layer. Although you’re saving user IDs to the message, you aren’t making sure that the user ID is valid in your database. Add some code within the promise chain where the message is saved in chat-Controller.js to check the database for a user by the same ID and verify it before you officially save the message. For this task, you need to require the user model in this controller.