
Chapter 7. Preparing data for components
- Introducing selectors
- Organizing state in the store
- Using advanced selectors for deriving data
- Memoizing selectors with reselect
Our task management application, Parsnip, has everything it needs to be a successful production application, but there are still several optimizations that can be made to make the code more performant, better organized, and more maintainable. In this chapter, we’ll explore selectors: functions used to compute derived data from the Redux store. Conveniently, the selector pattern manages to offer all three benefits.
Up to now, you’ve done a fine job of breaking down your code into manageable pieces by leveraging actions and reducers. Actions help model what is happening in the app; reducers allow you to apply updates to state in a centralized, testable way. Actions and reducers help in two more ways: they allow you to clean up your views (React components) by reducing the number of things the views are responsible for, and they help you decouple and modularize the different types of work happening in your application. Selectors may be slightly lesser known than actions and reducers, but as a software pattern, they offer similar benefits.
By the end of this chapter, you’ll be ready to wield selectors in the battle against bloated and non-reusable React components.
7.1. Decoupling Redux from React components
We’ve covered the idea of decoupling concerns in previous chapters, particularly in relation to actions and reducers, but it’s worth revisiting here as we prepare for a discussion about selectors. As a refresher, when you say things in a software system are coupled, you’re talking about the relationships between them. If entity A relies on entity B to do its job, you can say that A and B are coupled. This, on its own, isn’t necessarily a bad thing. After all, modern software systems are collections of different entities interacting to achieve a goal. In your application, those entities are actions, reducers, and components.
Where you can start to run into trouble is when different entities become too aware of, and reliant on, the implementation details of another entity. When this is the case, the entities are often referred to as being tightly coupled. You can figure out the degree to which components are coupled by thinking about what it will take to make a change to the system. If you update A, will you also have to make an update in B? If the answer is “yes,” chances are you have entities that are tightly coupled, making maintenance more of a chore than it needs to be.
Decoupling has a few key benefits, namely, resilience to change and flexibility. When you have entities that have few responsibilities and don’t know too much about the internals of other parts of the system, you can make changes with less fear of a ripple effect.
Flexibility is also a primary concern. Say you weren’t using Redux for Parsnip, and the logic to create and update tasks was implemented directly within a React component. If you received new requirements to add that functionality elsewhere in the app (maybe in a modal or a new page), you’d likely have to shuffle around a good chunk of code to make sure the right props would be available to all components. By decoupling the tasks logic from React, you can reuse existing actions and reducers, with minimal to no impact on the components leveraging them.
If you agree that decoupling is something to shoot for, the good news is that you’re already partway there. We’ve extracted a few major responsibilities out of the components with actions and reducers: the update logic and state management. If you’re wondering if you can go further, making components even simpler and more flexible, you’ve come to the right place.
Another responsibility of your application architecture is to take application state from Redux and pass it to React via some plumbing code. React can then render the data received from the store to the page. On one hand, you could pass the entire Redux store to React and let the components figure out what they need. This could work for simpler cases, and might even be convenient and easy, but what if you need the same data in a different part of the app? Suddenly, you may need to duplicate logic that gets or transforms data from Redux. A better approach is to define more generic props for the components and extract out any logic to prepare data from Redux for React in one place.
What exactly are you decoupling in this case? You’re decoupling the knowledge of the shape of the data in the Redux store from the React components that will eventually render that data. Nothing says that the React components you write need to know about Redux. You can, and most of the time should, write components in a way that’s agnostic to the data source, allowing you to potentially use them in different configurations.
Maybe a day comes where you do a big store refactor. By keeping components generic, you need to update code in only one place—the plumbing code that connects Redux and React. Or maybe a day comes where you need to swap out Redux altogether. You can plug in existing components directly without requiring massive changes to the UI code.
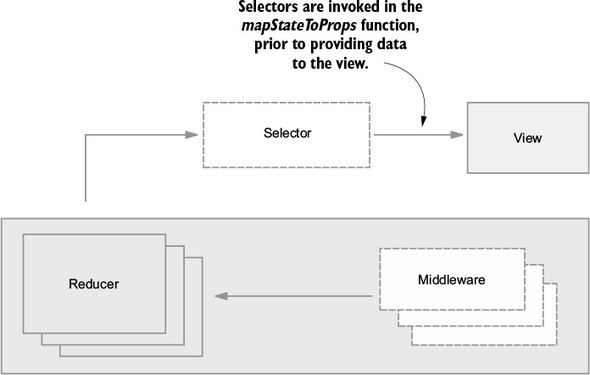
We covered briefly in chapter 2 that at the highest level there are three things that make up a Redux application: Redux, React, and code that forms a bridge between them. In this chapter, we’re mainly focused on the plumbing that connects React (the view) and Redux (the application state). Let’s take another look at the high-level diagram (figure 7.1) that shows how Redux and React work together, focusing on the middle section, which provides the plumbing code.
Figure 7.1. Where selectors fit into the larger picture
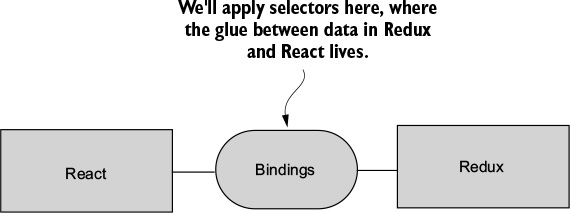
Certain components necessarily must interact with the Redux store and do so using the mapStateToProps function that gets passed into the connect function. Up until now, the mapStateToProps function hasn’t needed to do much complex logic, so it acts mostly as a pass-through for data from Redux into React. We haven’t drawn too much attention to it yet, but the goal of this chapter is to explore the ideas behind mapStateToProps, how to use it effectively, and how you can create reusable selector functions that ensure you need to do the same work only once.
The intention of the mapStateToProps function is to make it easy for even connected components to accept and render data passed to them. Instead of massaging or deriving data from the Redux store in the component, you typically reserve that role for the mapStateToProps function. In prior chapters, you saw how you could use mapStateToProps to effectively whitelist one or more slices of the Redux store that a connected component can read from.
Each slice of the Redux store is specified by what’s sometimes called a transform. See the mapStateToProps function of the App component in listing 7.1 for an example of a transform. Thanks to the ES6 destructuring feature, the second line in the mapStateToProps function is effectively three transforms, one for each key: tasks, isLoading, and error. The implementation and outcome of these transforms are straightforward: for each key returned from the Redux store, make their data available to the component via props.
Listing 7.1. mapStateToProps - src/App.js
...
function mapStateToProps(state) {
 const { tasks, isLoading, error } = state.tasks;            1
 return { tasks, isLoading, error };
}
...
- 1 A transform of the Redux store specifies which data to make available to the component.
That’s roughly all that needs to be said about simple transforms. The remainder of this chapter will describe and discuss advanced transforms. These may be called transform functions, or more popularly, selectors.
7.2. What are selectors?
Selectors are functions that accept a state from the Redux store and compute data that will eventually be passed as props to React. Selectors are often thought of in terms of the reselect library, which you’ll use later in the chapter, but any function that performs this role can be considered a selector. They’re pure functions, meaning they don’t produce any side effects. And like all pure functions, they’re easy to write and maintain. This also makes them easy to memoize, an optimization you can apply which will store the result of each computation based on the arguments passed into a selector. More on that later when we get to reselect.
Let’s look again at your overall architecture, seen in figure 7.2. Here you can see in greater detail where selectors fit into your architecture. Data comes out of the store, you run it through selectors, and the view (React, in your case) accepts selector output and takes care of any rendering.
Figure 7.2. Selectors are optional entities that sit between the Redux store and components.

Selectors, like all programming concepts, exist to solve a problem. The problem: without selectors, components would be coupled directly to the shape of the Redux store. If the structure of the store changes, you must update every component that may have relied on that structure.
Your end goal is to write your React components in a way that if the Redux structure changes, you won’t need to update any of the components as a result. You lock in an interface at the component level and let code upstream take care of the changing shape of the data. Not only do you not have to update components in response to changes in Redux, but it also means your components are generic enough to be used in different contexts. This might not be immediately relevant for you, but as applications grow, it can make a big difference.
To give you an idea of a real-world example, we once ran into this problem during a large Backbone refactor. Far too many components accepted Backbone models directly as props and operated on the models to get the data they needed to render something to the page. When you started to move away from Backbone, a huge effort to update each affected component was necessary. What was the lesson? If we’d written our components to accept simpler data types such as strings, numbers, and objects, we’d have saved a colossal effort because we’d have needed to update only the plumbing that connected the source of the data to the components.
7.3. Implementing search
The transforms used in Parsnip so far have been relatively straightforward. You have a single mapStateToProps function that takes care of bridging the gap between Redux and React. The value of introducing selectors becomes clearer when a more complicated feature necessitates doing so.
In this section, we’ll introduce a new feature, search, to add complexity and better illustrate the point. Search is a classic example because it allows us to demonstrate how selectors are meant to compute derived data based on several inputs from the Redux store. As a reminder, when we discuss derived data, we’re typically referring to any calculation or mutation of Redux state for displaying the data in a React component.
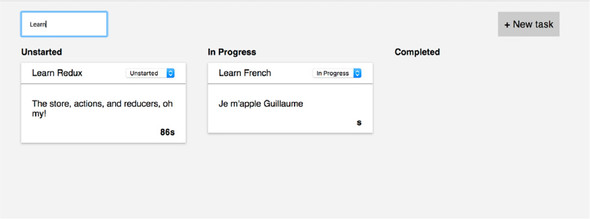
Coming up, you’re going to add a text input where a user can type a search term and expect to have the tasks on the page filter to display only those with titles that match the search input. See figure 7.3 for a screenshot of the final result.
Figure 7.3. A screenshot of Parsnip with the completed search feature
One of the biggest advantages of selectors is they allow you to store the minimal possible state representation in Redux. For example, there’s nothing stopping you from storing the list of filtered tasks directly in the store. Whenever the filter action is dispatched, you can apply the filter directly in the reducer and store the result in a key such as filteredTasks, and then pass that directly to React. You’d end up with a structure that looks something like the following listing.
Listing 7.2. filteredTasks persisted in Redux
{
  tasks: [
    {id: 1, title: 'foo'},
    {id: 2, title: 'bar'},
  ],
  filteredTasks: [
    {id: 1, title: 'foo'},
  ],
  searchText: 'foo',
}
Even an implementation like this hits two of your goals:
- Because the filter is applied directly in a reducer, the logic exists in only one place.
- Because the result is stored directly in the state tree, the value won’t be recomputed after every render.
But something feels off about this implementation. The major issue is that you now have a task that’s denormalized, meaning the same representation exists in multiple places. What happens if you want to edit a task? Now you have to make sure you find every reference in the state tree and update it accordingly, instead of updating one canonical representation.
Tip
One rule of thumb for Redux is to try and always store a minimal representation of state. Selectors can be used to compute derived data like a filtered list of tasks.
Every new piece of data you add to the store is a piece of data you’re now responsible for updating and keeping in sync. Or, it’s one more place for bugs to creep in if that data ever becomes stale. More data in Redux, more problems.
Having written a few features, do you have a sense of how to implement this search functionality? As you’ve done in prior chapters, you’ll start by fleshing out the UI, then move on to wiring up the Redux functionality. This is particularly relevant for you now, because one of your big goals is to have your components accept generic data as props and not have direct knowledge of Redux or the shape of the store. By starting from the outside in and defining the components first, you can decide up front what kind of interface you want. This will help clarify the kinds of selectors you eventually write to hook up real data to the components.
7.3.1. Scaffolding out the UI
Remember, starting with the UI helps you understand what you’ll need from Redux and to decouple the views from the application logic. You can declare an interface (props) that makes sense from the component’s perspective, without taking anything Redux-specific into consideration.
For this feature, little code is required to get a scaffold of the UI up. Ultimately, all that’s required is a text input element. The ideal user experience is for visible tasks to update on each new character typed in the search field. No button is necessary to initiate the search.
Let’s suppose that designs are ready and you’ve received marching orders from the product manager that the search field needs to be in the header, near the New Task button. You’re tasked with this unit of work. Where do you jump in?
A reasonable starting point is to navigate to the TasksPage component and insert a text input above the New Task button. A good question to ask is, “Should this search form be its own component?” Maybe. This decision-making process is more of an art than a science. As a rule of thumb, we tend to prototype the UI for smaller features in an existing component before concluding whether it makes sense to refactor out into another component.
Many factors play into this decision. If a group of elements is a good candidate for reuse elsewhere in the app, for example, then you’ll be much quicker to promote those elements to their own component. Don’t panic if this decision-making process feels unnatural. Component composition is a fundamental React skill that takes time to hone.
Within the TasksPage component, add an input field alongside the New Task button. Because you’ll want to perform the task filtering on every character added to or removed from the input, you’re going to want to leverage the onChange callback. For now, that callback will log out the value of input.
In the TasksPage component, you added an input element with an onChange callback. This UI makes clear what the next required steps are. You want your search term to bubble up to the connected parent component, App, and ultimately affect which tasks are displayed, as shown in the following listing.
Listing 7.3. Adding the search input – src/components/TasksPage.js
...
 onSearch = e => {                                 1
   console.log('search term', e.target.value);     1
 };                                                1

 render() {
   if (this.props.isLoading) {
     return <div className="tasks-loading">Loading...</div>;
   }

   return (
     <div className="tasks">
       <div className="tasks-header">
         <input                                    2
           onChange={this.onSearch}                2
           type="text"                             2
           placeholder="Search..."                 2
         />                                        2

         <button className="button button-default"
  onClick={this.toggleForm}>
           + New task
         </button>
       </div>
...
onClick={this.toggleForm}>
+ New task
</button>
</div>
...
- 1 On every character typed, this callback will execute.
- 2 A text input captures search terms.
We don’t make a habit of including styles, but let’s also add a few styles to ensure the text input appears in the top left of the page, as shown in the following listing.
Listing 7.4. Adding styles – src/index.css
...
.tasks-header {
  font-size: 18px;
  margin-bottom: 20px;
  text-align: right;
  display: flex;                      1
  justify-content: space-between;     1
}
...
- 1 Adding flex and ensuring that the search input and the New Task button will appear at the top-left and top-right of the page, respectively
The next question you’re confronted with is whether to handle the functionality within local state or Redux state. Can the filtering be handled within local state? If so, should it be? What do you think?
7.3.2. Local state versus Redux state
It’s a good exercise to consider what functionality can and should be handled by local state versus Redux state. To answer the first question posed: it’s absolutely possible to filter tasks using a search term that is stored in local state. The second question is a more philosophical one: Should you handle it with local state? For an example implementation, see the following listing. In this example, searchTerm is stored in local state and used with a regular expression to pare down all tasks to those that match the term.
Listing 7.5. Search with local component state – src/components/TasksPage.js
...
 renderTaskLists() {
   const { onStatusChange, tasks } = this.props;

   const filteredTasks = tasks.filter(task => {                          1
     return task.title.match(new RegExp(this.state.searchTerm, 'i'));    2
   });

   return TASK_STATUSES.map(status => {
     const statusTasks = filteredTasks.filter(task => task.status ===
  status);
     return (
       <TaskList
         key={status}
         status={status}
         tasks={statusTasks}
         onStatusChange={onStatusChange}
       />
     );
   });
 }
- 1 Before displaying tasks, filter down to those that match the search term.
- 2 Keeps track of the searchTerm in the local state of the App component
That sure isn’t much code. Is there any reason not to go this route? You can make the argument for using Redux state for this feature on a couple of grounds. First, using local state and requiring the component to calculate which tasks it should render couples the logic to the component. Remember, separating logic from the views is a major perk of using Redux. Second, there are performance gains to be had by using Redux and selector functions. You’ll get into the details of this point later in the chapter.
The cost of implementing the feature using Redux state is the usual suspect: more boilerplate code. This is a tradeoff we’ve regularly examined throughout the book. Often, a little more code can result in an application that’s easier to reason about and maintain.
7.3.3. Dispatching a filter action
As we’ve discussed, the first thing you’ll wire up is the invoking of an action creator, which eventually will dispatch an action. Because TasksPage isn’t a connected component, the dispatching will have to take place in its parent component, App. App will pass a callback to TasksPage to dispatch an action every time a character is added to or deleted from the search field. See the following listing for the additions to the App component.
Listing 7.6. Adding onSearch to App – src/App.js
...
import { createTask, editTask, fetchTasks, filterTasks } from './actions'; 1

class App extends Component {
 ...
 onSearch = searchTerm => {
   this.props.dispatch(filterTasks(searchTerm));                           2
 };

 render() {
   return (
     <div className="container">
       {this.props.error && <FlashMessage message={this.props.error} />}
       <div className="main-content">
         <TasksPage
           tasks={this.props.tasks}
           onCreateTask={this.onCreateTask}
           onSearch={this.onSearch}                                        3
           onStatusChange={this.onStatusChange}
           isLoading={this.props.isLoading}
         />
       </div>
     </div>
   );
 }
}
 ...
- 1 Imports the soon-to-be-created action creator, filterTasks
- 2 A callback invokes the action creator.
- 3 Passes the callback down to the component with the search field
Passing callbacks to a child component is something you’ve done a few times now, so nothing about this listing should be surprising. To finish out the views’ portion of the Redux workflow, you need a final tweak to the TasksPage component, as shown in the following listing. Instead of logging out the search term, execute the onSearch callback you wrote in the previous listing.
Listing 7.7. Using the onSearch prop – src/components/TasksPage.js
...
onSearch = e => {
 this.props.onSearch(e.target.value);        1
};
...
- 1 Trades out the console log for the callback execution
You’re finished with the components for now. Refreshing the application in your browser will result in an error: “'./actions' does not contain an export named 'filterTasks'. That’s handy. It describes exactly where to direct your attention next: you need to implement the filterTasks action creator.
This is a good crossroads to pause at and plan ahead. What should happen inside this new filterTasks action creator? Will you need to use a thunk and handle any asynchronous activity? Your earlier local state exercise provides plenty of insight into these answers. No asynchronous activity was required to implement task filtering then, so you can expect the same here. All the Redux store needs to keep track of is the search term, so you’re back in synchronous territory. See the following listing for the result in the actions file.
Listing 7.8. Adding a new action creator – src/actions/index.js
...
export function filterTasks(searchTerm) {                     1
 return { type: 'FILTER_TASKS', payload: { searchTerm } };    2
}
...
- 1 Exports the new action creator
- 2 Returns an action with the search term
The application should compile now. Test the feature by typing a few characters into the search field. With your Redux DevTools open, you should see whether you’ve followed along correctly by the appearance of the FILTER_TASKS actions being logged out in the Inspector Monitor. See figure 7.4.
Figure 7.4. Each new character produces a new action logged by the Redux DevTools.
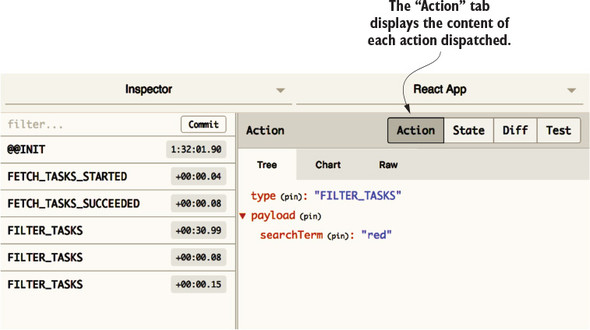
In this example, you typed “red” into the search field with the intention of displaying only tasks that include “Redux” in the title. An action is fired for each of the three characters you typed, as you can see in the figure. As you’d expect, the value of searchTerm is the complete contents of the search field after each change. The first action’s searchTerm is r, the second’s is re, and it’s red in the final action.
With this success indicator, you can begin to consider the receiving end of actions. As it stands, no reducers are listening for FILTER_TASKS actions, so they float through without affecting the application. In the next section, we’ll remedy that.
7.3.4. Handling filter actions in a reducer
Whenever handling a new action type, you should ask yourself if it makes sense to handle the action in an existing reducer or in a new reducer. Again, each reducer is meant to handle a logical domain or grouping of actions. There may be a case to make for introducing a new reducer that handles global UI concerns. Chapter 8 explores this topic more deeply.
In this case, the tasks reducer is still an appropriate place to handle an action that filters tasks. See the following listing for an example implementation. You’ll augment the initialState and add one more case statement to the body of the reducer.
Listing 7.9. Adding update logic to the tasks reducer – src/reducers/index.js
const initialState = {
 tasks: [],
 isLoading: false,
 error: null,
 searchTerm: ''                                                  1
};

export default function tasks(state = initialState, action) {
 switch (action.type) {
 ...
 case 'FILTER_TASKS': {                                          2
   return { ...state, searchTerm: action.payload.searchTerm };   3
 }
 ...
}
- 1 Adds blank searchTerm to the initialState
- 2 Has the reducer listen for the new action type
- 3 Updates the searchTerm upon receiving the appropriate action
Now, whenever a character is added to that search field, a change in the Redux store will result. You can confirm this by observing the Redux DevTools when you type “red” in the input again. See figure 7.5.
Figure 7.5. The state Diff indicates that Redux state is updating as a result of the action.
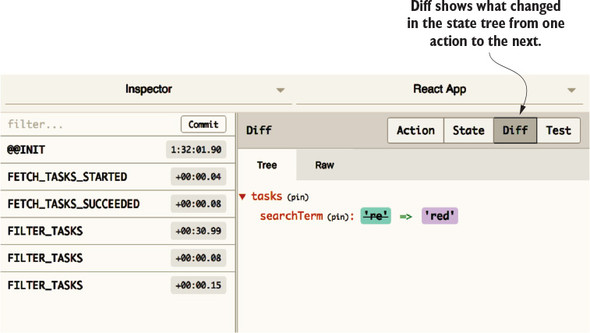
Great! That’s the whole Redux workflow playing nicely together. The Diff tab in the Inspector Monitor reveals that the searchTerm within the tasks key is updated after each FILTER_TASKS action. In the next section, we’ll introduce a selector function and finish implementing the task filter.
7.3.5. Writing your first selector
Thinking back to the local state example implementation, the Redux store was unaware of the search term, so the filtering had to be done in the component. The advantage of using Redux is that you can complete the filtering before the component knows it’s happened. All it has to do is accept and render whatever list of tasks you provide it.
The opportunity to derive data before making it available to a connected component is in the mapStateToProps function. Recall that mapStateToProps is where you add any plumbing code that bridges the gap between data in Redux and data that ultimately makes it into the component tree as props. It’s where selectors in general should be applied (figure 7.6).
Figure 7.6. Selectors calculate data required by the view.
You don’t want the components to have to accept a list of tasks and a search term. Instead, you want to treat this as the end of the line for certain details about the state of our application, and let the components receive more generic data.
In listing 7.10, you derive the list of tasks before making them available as props in the App component. The filtering and matching based on a regular expression is effectively the same implementation you used the first time around with local state. The match function takes a regular expression as the first argument and any modifiers as the second. In this case, i makes the matching case-insensitive. Nothing else in the App component needs to change.
Listing 7.10. Applying the filter in mapStateToProps – src/App.js
...
function mapStateToProps(state) {
 const { isLoading, error, searchTerm } = state.tasks;        1

 const tasks = state.tasks.tasks.filter(task => {             2
   return task.title.match(new RegExp(searchTerm, 'i'));      2
 });                                                          2

 return { tasks, isLoading, error };
}
...
- 1 Removes tasks from the import and adds searchTerm
- 2 Creates a new tasks variable that is a collection of filtered tasks
This is decoupling in action. Because you declared a boundary between Redux and React, you can change how the data is transformed before it’s passed into the component tree without requiring any changes to the components themselves. By implementing logic in a middleman function, mapStateToProps, you’ve allowed your components to be more generic and flexible. They know only what they need to do their job, and what they don’t know can’t hurt them. They render whichever tasks they’re given and don’t particularly care, or need to care, that a filter has been applied.
Technically, you’ve written a selector! The tasks made available using props are now derived from the search term and the list of all tasks. As we’ve discussed, there’s much to like about this implementation. Components are decoupled from presentation logic and are easier to test.
Although it’s an improvement, there are more optimizations to do. What if you needed half a dozen selector functions for one component? The mapStateToProps function could balloon to become as large as the component itself. What if you wanted to reuse selectors across multiple connected components? It makes no sense to write the same logic for each component.
A popular convention is to extract selectors out of the mapStateToProps function and into separate, reusable selector functions. Typically, you’ll find these selectors collocated in the reducer file that best fits its domain. In the following listing, you’re relocating the selector into the file containing the tasks reducer.
Listing 7.11. Moving filter logic into the tasks reducer – src/reducers/index.js
...
export function getFilteredTasks(tasks, searchTerm) {            1
 return tasks.filter(task => {                                   2
   return task.title.match(new RegExp(searchTerm, 'i'));
 });
}
- 1 Exports the generalized selector function
- 2 Tweaks tasks to use those passed in as an argument
Now, getFilteredTasks can be imported and used more than once, if the need arises. Conveniently, it can also be tested in isolation. Let’s import it in the App component and finish the refactor in the following listing.
Listing 7.12. Importing and using the selector – src/App.js
...
import { getFilteredTasks } from './reducers/';                            1
...
function mapStateToProps(state) {
 const { tasks, isLoading, error, searchTerm } = state.tasks;              2

 return { tasks: getFilteredTasks(tasks, searchTerm), isLoading, error };  3
}
- 1 Imports the selector from the reducer
- 2 Adds tasks back to the list of imports
- 3 Uses the selector to determine which tasks to provide to the component
This refactor cleans up the mapStateToProps function by abstracting selectors into more appropriate places. You may be tempted to ask why selectors are placed in reducer files. It’s a convention that you can choose to follow if you want. Selectors will generally be used in the domain of one reducer, but this may not always be the case. Remember, the default export of the reducer file is, of course, the reducer itself. Importing selectors from the same file requires the curly brackets to specify the specific export.
7.4. Introducing reselect
The getFilteredTasks is our first proper selector, and as far as functionality, it’s perfectly fine as is. It does exactly what you want a selector to do: it takes one or more pieces of state from the Redux store and computes a value that you intend to pass directly to your React component tree. A popular library called reselect can be used for writing selectors; it also provides a few key benefits: memoization and composability. If you decide to use selectors in any kind of significant way in your apps, it’s worth looking at reselect and getting to know its toolset.
7.4.1. Reselect and memoization
Memoization is another one of those terms in software that sounds more complicated than it is. In short, memoization is when a function stores the results of past computations and uses them for future calls. Let’s use a simple double function as an example. The double takes a single number as an argument, and returns the value multiplied by two. Let’s call the function a few times in the following listing. This code won’t be part of Parsnip, so you can follow along in an interactive console by typing node in a terminal window or by using the JavaScript console in your browser’s dev tools.
Listing 7.13. Exploring memoization
function double(x) {
  return x * 2;
}

double(2)          1

double(2)          2
- 1 The first call to add runs the computation and returns 4.
- 2 The second call to add reruns the computation and returns the same result.
The double is a pure function, meaning it accepts only a value and returns a value, producing no side effects. You also know that pure functions always return the same result given the same arguments. Can you use this to your advantage? You sure can. Look at listing 7.14.
Why don’t you store the results of past computations and use them if double is called with the same arguments multiple times?
Listing 7.14. Adding memoization to double
const memoized = {};                                                      1

function double(x) {
  if (memoized[x]) {                                                      2
    console.log('Returning memoized value!');
    return memoized[x];
  }

  console.log('No memoized value found, running computation and saving')  3
  const result = x * 2;
  memoized[x] = result;

  return result;
}

double(2);
double(2);
- 1 Creates an object to store the result of each function call
- 2 When the function runs, first check whether the value has already been computed.
- 3 If the value hasn’t been computed, run the computation and store the result for future use.
Figure 7.7 is what you should see as far as console output.
Figure 7.7. Console output for the double function
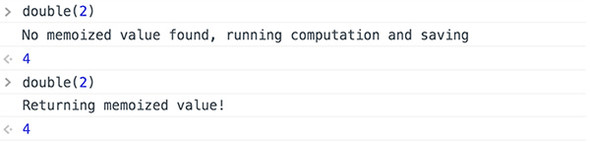
Notice how you skipped running x * 2 the second time around? This is the heart of memoization. Memoization, as it’s implemented in reselect, is slightly more complicated, but the core ideas are the same. In short
- When a function is called, check whether the function has been called with these arguments.
- If so, use the stored value.
- If not, run the computation and store the value for future use.
It might not make much of a difference with a function that takes a number and doubles it, but for more expensive operations, it can make a huge difference. Using reselect gives you this functionality out of the box for free.
7.4.2. Reselect and composition
Composition is the other major selling point of reselect. It means that selectors created with reselect can be chained together. The output of one selector can be used as an input to another. This is best demonstrated with a real example, so let’s jump right into adding reselect to Parsnip and you can see selector composition in action.
7.5. Implementing reselect
Right now, you have a getFilteredTasks selector that takes two arguments: a list of tasks, and a search term. It filters the list of tasks using the search term and returns the result. The mapStateToProps is still doing a few more things that you can extract into selectors:
- Getting the list of tasks
- Getting the visibility filter
You want to extract as much as you can from mapStateToProps. If logic is implemented in mapStateToProps, it’s “trapped” in a sense. If you need that logic elsewhere in your application, you have to go through the trouble of extracting as you add a new feature. It’s always ideal to affect only the components directly relevant to whatever feature or change you’re trying to implement, so you can do work upfront to make Parsnip slightly more modular. Here’s a high-level look at what you’ll do:
- Create two new selectors, getTasks and getSearchTerm.
- Update getFilteredTasks to be a reselect selector using the createSelector function.
- Use getTasks and getSearchTerm as inputs to getFilteredTasks.
First, let’s start by defining your desired API by adjusting the code in mapStateToProps in App. All you’re doing is modifying the arguments being passed to getFilteredTasks, as shown in the following listing. We’ll leave it up to the selector to figure out where tasks and the search term live within the Redux store.
Listing 7.15. Updating mapStateToProps – src/App.js
...
function mapStateToProps(state) {
  const { isLoading, error } = state.tasks;

  return { tasks: getFilteredTasks(state), isLoading, error };        1
}
If you were to ever connect another component that needs a list of the filtered tasks, it wouldn’t have to know tasks are available at state.tasks.tasks and the search term is available at state.tasks.searchTerm. You centralized that logic, making sure it doesn’t leak out of getFilteredTasks.
Next, let’s take a first look at how we’d use reselect. First, install the package:
npm install reselect
In the reducer, import the package, then create the getTasks and getSearchTerm selectors. Next, create a memoized getFilteredTasks selector via the createSelector function provided by reselect. This ensures that getFilteredTasks won’t recompute the list of tasks when it receives the same arguments, as shown in the following listing.
Listing 7.16. Creating new selectors – src/reducers/index.js
  import { createSelector } from 'reselect';                     1
  ...
  const getTasks = state => state.tasks.tasks;                   2
  const getSearchTerm = state => state.tasks.searchTerm;         3

export const getFilteredTasks = createSelector(                  4
  [getTasks, getSearchTerm],
  (tasks, searchTerm) => {
    return tasks.filter(task => task.title.match(new RegExp(searchTerm,
  'i')));
  },
);
- 1 Imports createSelector, which creates a memoized selector
- 2 Adds a selector for tasks
- 3 Adds a selector for the search term
- 4 Changes getFilteredTasks to be a memoized selector
Both getTasks and getSearchTerm are known as input selectors. They aren’t memorized; they’re simple selectors intended to be used as inputs to other memoized selectors. The getFilteredTasks is a memoized selector, created using the createSelector function. The createSelector takes two arguments: an array of input selectors, and a transform function. The transform function’s arguments will be the result of each input selector.
The goal is to run only the transform function when the result of the input selectors changes. Remember that because the transform function is pure, you can safely store the result of previous calls and use those results on subsequent calls. Input selectors declare which slices of the Redux store a memoized selector cares about. If the full list of tasks changes, or the search term changes, you want to compute a new result. Conversely, you want to avoid recalculating state unnecessarily, whenever possible.
Remember when we mentioned composition as a major benefit of reselect? This is selector composition in action. Use getTasks and getSearchTerm as inputs to getFilteredTasks, and you’re completely free to use them as input to other selectors as well. You can even use getFilteredTasks as input to other selectors.
7.6. Exercise
Feeling good about selectors? One more task that components are currently responsible for seems like a good candidate for a selector. Currently, you group tasks by status when you render them (unstarted, in-progress, or completed), with a column for each status. If you recall, you’re doing that work in the TasksPage component. To jog your memory, look at the following listing.
Listing 7.17. Grouping tasks by status – src/components/TaskPage.js
  renderTaskLists() {
    const { onStatusChange, tasks } = this.props;

    return TASK_STATUSES.map(status => {
      const statusTasks = tasks.filter(task => task.status === status);
      return (
        <TaskList
          key={status}
          status={status}
          tasks={statusTasks}
          onStatusChange={onStatusChange}
        />
      );
    });
  }
The filtering of tasks seems like a good example of logic you can extract from a component into a selector. What if you decide to build out a new UI, where tasks are grouped in a list format instead of by columns? It’s more convenient to have the component accept a pre-grouped list of tasks as a prop, where the keys are each status, mapped to a list of tasks. That data structure might look something like the following listing.
Listing 7.18. Grouped tasks
  {
    'Unstarted': [...],
    'In Progress': [...],
    'Completed': [...]
  }
Using what you’ve learned so far in the chapter, can you take a stab at a pre-filtered task implementation using one or more selectors?
7.7. Solution
Let’s outline a few steps you can take to reach your goal:
- Update the component to expect a pre-grouped list of tasks instead of a flat list.
- Create a new selector in src/reducers/index.js that takes care of grouping the tasks by status.
- Import and use this selector in mapStateToProps in the App component.
Starting again from the outside in with the UI, let’s update src/TasksPage.js to use the new expected structure. You’ll remove a few key pieces of logic from the component:
- The TASK_STATUSES constant. The component doesn’t need to know or care about the types of statuses, because it knows to render a column for each. This removes a dependency and makes the component easier to test.
- The logic for getting all tasks given a specific status. Again, you render whatever data you get.
Listing 7.19. Updating task rendering – src/components/TasksPage.js
...
renderTaskLists() {
    const { onStatusChange, tasks } = this.props;

    return Object.keys(tasks).map(status => {          1
      const tasksByStatus = tasks[status];
      return (
        <TaskList
          key={status}
          status={status}
          tasks={tasksByStatus}                        2
          onStatusChange={onStatusChange}
        />
      );
    });
  }
...
- 1 Iterates over each status in the object
- 2 For each status, render a TaskList component with the appropriate tasks.
Let’s also create a new home for the TASK_STATUSES constant, as shown in the following listing. It’s common to maintain a module or set of modules for application-wide constants, so create a new constants/ directory, and in it, create a file named index.js.
Listing 7.20. Create a new constants module – src/constants/index.js
export const TASK_STATUSES = ['Unstarted', 'In Progress', 'Completed'];
Next let’s add a new getGroupedAndFilteredTasks selector, and use it within the mapStateToProps function in App (listings 7.21 and 7.22).
Listing 7.21. Creating the new selector – src/reducers/index.js
   import { TASK_STATUSES } from '../constants';

   ...

export const getGroupedAndFilteredTasks = createSelector(               1
  [getFilteredTasks],                                                   2
  tasks => {
    const grouped = {};

    TASK_STATUSES.forEach(status => {                                   3
      grouped[status] = tasks.filter(task => task.status === status);
    });

    return grouped;
  },
);
- 1 Creates the new selector
- 2 Uses the result of another selector, getFilteredTasks, as an input
- 3 Builds up the object with each status as a key
Listing 7.22. Importing and using the new selector – src/App.js
...

   import { getGroupedAndFilteredTasks } from './reducers/';               1

...
function mapStateToProps(state) {
  const { isLoading, error } = state.tasks;

  return { tasks: getGroupedAndFilteredTasks(state), isLoading, error };   2
}
- 1 Imports the new selector
- 2 Uses the selector to populate the tasks prop
The most noteworthy thing you did here was use the existing memoized selector getFilteredTasks as an input selector to the newly created getGroupedAndFilteredTasks. Selector composition in action!
Selectors play an important role in optimizing a Redux application. They prevent business logic from piling up inside components and boost performance by forgoing unnecessary renders via memoization.
The next chapter is heavily intertwined with the content of this chapter. Using selectors often has the biggest payoff when used with normalized data. Up next, we’ll discuss and implement a normalized Redux store.
Summary
In this chapter you learned the following:
- The philosophy of decoupling logic from components
- Additional advantages of using Redux state over local state
- The role selectors play and how to implement them
- How to leverage reselect to gain clarity and performance when computing deriving data