
Chapter 10. Performance
- Measuring Redux/React performance with tools
- Using connect and mapStateToProps effectively
- Working with memoization
- Batching actions
Redux is “fast” out of the gate. It’s an extremely lightweight library, so Redux dragging performance down isn’t an issue, even at scale. Remember, all Redux provides is a way to store state and broadcast changes. Fear not, you have plenty of opportunities to squander your app’s performance. Whether it’s using Redux features in non-optimal ways or allowing changes in the store to re-render views such as React components too often, as a user of Redux you need to ensure you’re doing what it takes to keep your apps running smoothly.
This chapter focuses on strategies for keeping Redux applications fast. Consistent with the rest of the book, we’ll address Redux within a React context. The key to maintaining a performant React/Redux application is reducing or eliminating unnecessary computation and rendering.
Coming up, you’ll first look at tools to profile performance in a React application. Spotting the waste is the first step in cleaning it up. Then you’ll dig into the Redux-specific performance strategies, such as using connect to prevent unnecessary re-renders, memoizing with selectors, batching actions, and caching.
If you aren’t interested in React-specific optimizations, feel free to skip to the Redux optimizations in section 10.3. Please note, though, that optimizing Redux can only do so much for your application’s performance if the underlying stack implementation is inefficient.
10.1. Performance-assessment tools
To address any inefficiencies, you must first identify them. A few different tools exist to do the job. One important thing to note before you jump in: in development mode, React does additional work to produce helpful warnings. For a genuine performance assessment, you’ll want to profile a minified production build.
Note
Generally, the tools in this section are to be used in development, so they serve to identify relatively expensive renders rather than definitive measurements.
10.1.1. Performance timeline
The first tool you’ll look at it is the performance timeline feature. It leverages a User Timing API feature implemented by many browsers to visualize the component lifecycle of React components. Using this tool couldn’t be any simpler, requiring you add ?react_perf to the end of your URL. While looking at the Parsnip app in development, you need only plug localhost:3000/?react_perf as the URL, then check the Performance tab within the Google Chrome developer tools.
This tool is particularly useful for visually identifying components that are egregiously re-rendering. In figure 10.1, you can see the timeline of react-redux’s Provider component, the connected App component, and each additional component mounting. Each orange-colored bar represents a component process. You’ll find the component name, as well as the lifecycle method taking place, listed within each of the bars. A stacked list of bars indicates one component tree’s sequence of updates.
Figure 10.1. The performance timeline feature
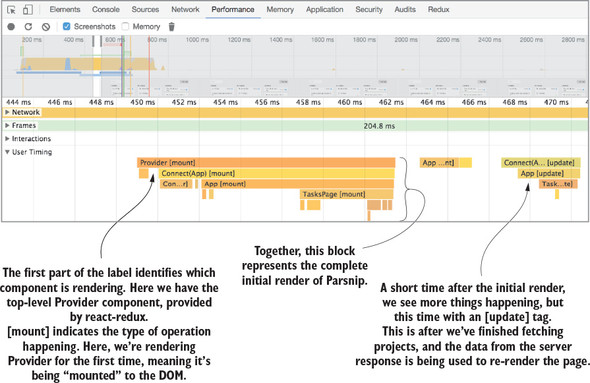
The depth of the graph is often a dead giveaway for unnecessary rendering. Each time a component renders, a new row is added to the graph. If something caused a component to re-render multiple times, this graphical representation makes it much easier to diagnose. It also keeps an eye on how long each component needs to render. The longer the row, the longer a component takes to render. Use this feature to profile different pages of your application and see if anything stands out as particularly problematic.
10.1.2. react-addons-perf
The react-addons-perf package is from the React team and provides an alternate window of similar data found in the performance timeline. Please note that React 16 isn’t supported by this tool at the time of writing. Using react-addons-perf involves more manual configuration to specify what you’d like to benchmark, but with it comes more control over what you’d like to measure.
Once you’ve imported the Perf object, you can wrap what you want to measure in Perf.start() and Perf.stop(). You have several choices for how you want to print the outcome of the measurement, but one of the more interesting options is the printWasted method, which reveals the number of unnecessary renders made and the amount of time that took. See the documentation for a more detailed look at the API and several implementation articles at https://facebook.github.io/react/docs/perf.html.
10.1.3. why-did-you-update
The why-did-you-update package is a diagnostic tool that provides actionable feedback. This tool is specifically valuable for identifying unnecessary component renders. Once it’s installed, console logs will alert you to components that are re-rendered despite having identical props. With that information, you can take appropriate action. Figure 10.2 provides an annotated version of the example in the package’s README.
Figure 10.2. Example output from why-did-you-update

The why-did-you-update option performs a diff of the props passed to a given component and lets you know if those props are identical or potentially identical. As you can see in figure 10.2, this works for primitives, such as numbers and strings, and objects (including nested objects!). Functions, on the other hand, can’t be diffed with as much confidence, and instead produce a warning. The tool can check each individual property of an object to see if two objects have identical values, but functions, even with identical bound arguments using Function.prototype.bind, will fail an equality check. For installation and usage instructions, see the package README at https://github.com/maicki/why-did-you-update. If this doesn’t do exactly what you’re looking for, Mark Erikson maintains a list of similar tools at https://github.com/markerikson/redux-ecosystem-links/blob/master/devtools.md#component-update-monitoring.
10.1.4. React developer tools
The React developer tools come packaged in a Chrome or Firefox extension and provide insight into the data each component uses to render. Clicking a component reveals its prop values and allows you to edit those props directly in the browser to aid in your bug hunting. One useful performance feature is “Highlight Updates,” which can help you see which components re-render most often.
With the developer tools open, select the “Highlight Updates” option. Now, whenever you interact with the application, colored boxes will appear around each component. The color ranges from a light green to a dark red and indicates the relative frequency that the component is updating; the redder the box, the more frequently it re-renders.
Note that because something is red doesn’t necessarily indicate a problem. In Parsnip, for example, when you type quickly into the search box, it and several other components go from green to red in a hurry. This is expected, though, because you want each character typed into the text field to update the list of tasks instantly. See figure 10.3 for an example display.
Figure 10.3. The “Highlight Updates” option provides a color-coded indication of how frequently updates are made.
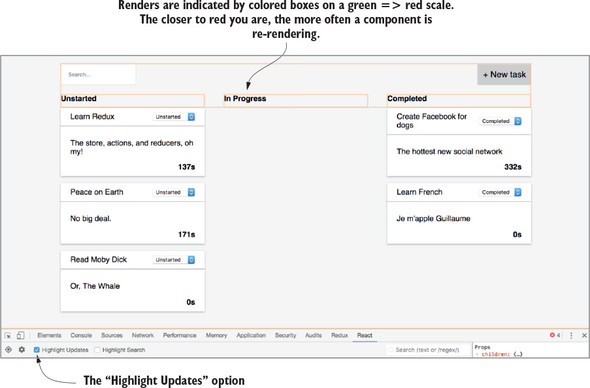
This figure was produced by typing several characters in the search field, then taking a screenshot after rapidly deleting them. You’ll notice that the orange coloring isn’t around the tasks themselves, because they update infrequently by design.
10.2. React optimizations
Now that you have tools to identify problematic components, let’s look at how to address them. Before Redux even enters the picture, though, there are always ways to get more out of your view library. In your case, that happens to be React. In this section, we’ll quickly cover tips for optimizing React components. Again, React is plenty performant if you stick to best practices and keep the number of re-renders to a minimum.
10.2.1. shouldComponentUpdate
The shouldComponentUpdate lifecycle method is one of your first lines of defense against unnecessary component renders. The default behavior of React components is to re-render when setState has been called, or a parent component has rendered; you can use this lifecycle callback to prevent that from happening more than is necessary. It’s common for a parent component to re-render, but to pass the same props to a child as the previous render. Without intervention on your part, the child component will re-render with the same data.
When a re-render is triggered, there are a handful of lifecycle methods that get called: componentWillReceiveProps, shouldComponentUpdate, componentWillUpdate, render, and componentDidUpdate. Once the component becomes aware of the incoming props using componentWillReceiveProps, shouldComponentUpdate is where you’re given an opportunity to cancel the rest of the update cycle. The component has access to the potential next props and state, giving you the opportunity to make custom comparisons with current props or state, and ultimately returning a boolean to indicate whether to continue with the re-render.
As a semi-contrived example, let’s say you want to prevent a re-render of a component for as long as an ID in the URL remains unchanged. The code for accomplishing this might look like listing 10.1. In this snippet, the return value evaluates to a boolean after comparing the present and future values of the parameter, id. If the values are the same, the buck stops here, and the re-render is avoided. If the values are unique, the component proceeds with the rest of the update cycle, eventually re-rendering the component.
Listing 10.1. shouldComponentUpdate example
shouldComponentUpdate(nextProps, nextState) {
 return nextProps.params.id !== this.props.params.id;
}
React’s diffing algorithm handles most component updates efficiently, but it won’t catch all the optimization opportunities that are unique to your use cases. This technique is a great strategy for manually fine-tuning your application.
10.2.2. PureComponent
React.PureComponent was introduced with React 15.3 and is an alternative to React.Component. You can use PureComponent to get a simple shouldComponentUpdate implementation for free. Using PureComponent gives you a shallow equality check of state and props between renders, and bails out of the update cycle if there are no perceived changes.
When should you use PureComponent? Our research produced conflicting answers. Certain teams prefer to write functional stateless components as often as possible, citing the simplicity of pure functions as most valuable. Others stand by writing PureComponents as often as possible, swearing by the performance implications. Functional stateless components don’t have lifecycle callbacks, so they’ll render each time their parent does. But you don’t need all components to implement shouldComponentUpdate; a few strategically placed higher in the component tree will do the trick.
In practice, you’ll likely find bigger fish to fry. The choice between a PureComponent and functional stateless component usually won’t make a noticeable difference, but for the rare case that it does, consider PureComponent. Make sure not to mutate state or props in a PureComponent, or you’ll end up bug hunting. See the official documentation for more details on PureComponent at https://reactjs.org/docs/react-api.html#reactpurecomponent.
10.2.3. Pagination and other strategies
Pagination—the process of displaying content (usually lists) as separate pages—isn’t unique to React or Redux, but it’s a useful tool you’ll want to use if you’re rendering potentially large amounts of content. Generally, if you’re rendering a list and you have a sense that the list could be large, use pagination. After all, the best way to improve rendering performance is to render fewer things.
If you’re working with large enough datasets, at a certain point you’ll find that the standard optimization techniques won’t be enough. This problem isn’t unique to React, but there are multiple React-specific approaches to handling large datasets.
Certain React packages, such as react-paginate, provide logic and components to facilitate pagination. You can view the demos and implementation details on the project’s GitHub page at https://github.com/AdeleD/react-paginate. Alternatively, an example project within the Redux documentation contains a more manual, Redux-specific pagination implementation at https://github.com/reactjs/redux/tree/master/examples/real-world.
A more recent spin on pagination is the infinite scroll technique. Infinite scroll, used, for example, in most apps with an activity feed, is a popular feature where more items are loaded as you scroll to the end of the current list. A couple popular packages make writing the feature simpler, but react-infinite is most popular by GitHub stars (see https://github.com/seatgeek/react-infinite).
If pagination and infinite scrolling won’t cut it for your use case, maybe react-virtualized will. This package is as good as it gets for rendering massive lists and tabular data. It supports tables, grids, lists, and other formats. If you need your large dataset rendered up front, read more about the project on its GitHub page at https://github.com/bvaughn/react-virtualized.
10.3. Redux optimizations
Using tools such as PureComponent can take you far, but there’s a good deal you can do in Redux-land that can help. In fact, connect has a similar feature and can help save you from having to use shouldComponentUpdate in the first place. Both accomplish something similar, but with connect, the bulk of the work is done for you. Instead of comparing old and new props, you define the data a component needs in mapStateToProps, and connect will put the right checks in place.
You can also dispatch fewer actions unnecessarily, which will cause connected components to try to re-render. We’ll look, too, at caching in the next section, which can greatly help reduce load on your server by re-using data already stored in the browser.
10.3.1. Connecting the right components
The Parsnip example application didn’t get large enough to merit a thoughtful discussion about which components should be connected, but your production application inevitably will. Earlier in the book, we described a simple strategy for deciding when to connect components: start with presentational components by default, and wrap them with connect once they become too cumbersome to maintain without access to the Redux store. Again, the description is intentionally vague to give teams the freedom to decide where to draw the line of “too cumbersome.”
We’ll provide one more guiding principle now: if it saves you costly re-renders, connect the component. Use the foundational React knowledge learned in or refreshed by this chapter; by default, an updated React component will re-render its children, unless the children guard against re-renders with a custom shouldComponentUpdate method or by using PureComponent.
10.3.2. A top-down approach
One of the benefits of Redux is that data is potentially available to all components, which means you have a lot of flexibility in how you want data to flow through the application. Up to now, you’ve used a simple strategy of connecting a single component, App, which passes down any data its children may need. Here’s a refresher in figure 10.4.
Figure 10.4. Parsnip’s main React/Redux configuration
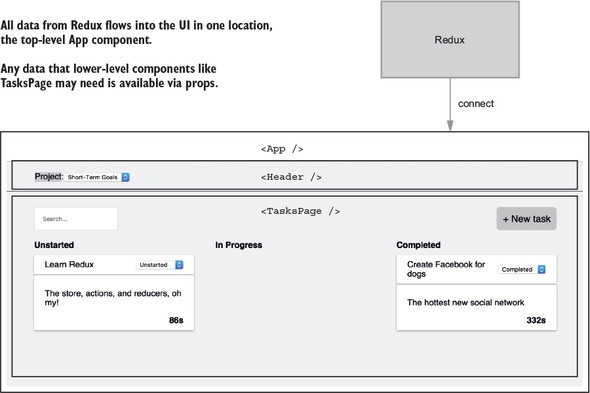
This approach, although simple, has held up well so far. The main advantage of having a single point of entry, meaning using connect in one top-level component, is simplicity. The bindings between Redux and React have a small footprint, and the rest of the app gets to function as any React application would, by receiving props.
But there are at least two major downsides. First, as applications grow they inevitably stand to benefit more and more from connecting additional components, mainly to avoid giant prop-passing chains between components that become difficult to maintain and understand.
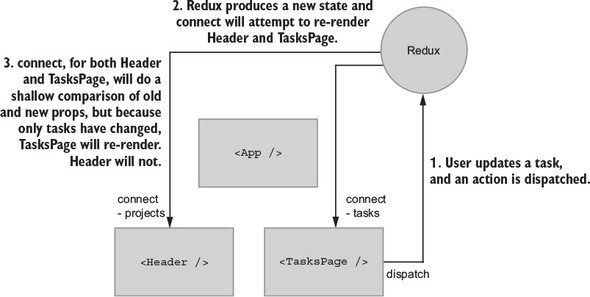
More importantly for the purposes of this chapter, it also has a performance cost. Because you have a single point of entry, whenever data from Redux changes, such as projects or tasks being updated, the entire app will attempt to re-render. Take the two major components from figure 10.4, for example. Because they’re both children of App, any time App re-renders (after an action is dispatched), both Header and TasksPage will attempt to re-render as well. Let’s look at one specific interaction: updating a task. Figure 10.5 demonstrates what a single “cycle” might look like, as data flows from React via a user interaction, through Redux, and then back into the component tree. Think about the Header and TasksPage components and what they require to successfully fulfill their responsibilities. Header needs to render a list of projects in a drop-down. TasksPage needs to render tasks.
Figure 10.5. A single “cycle” after a user updates a task
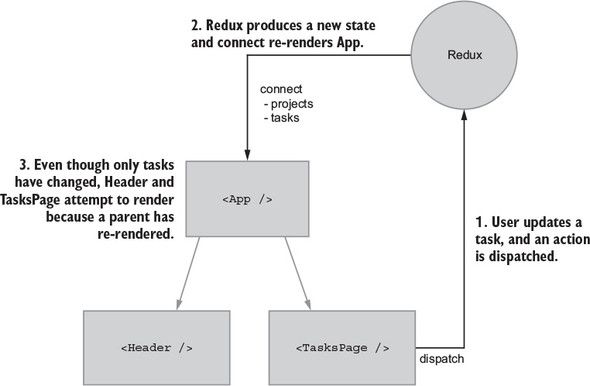
The main problem is that Header attempts to re-render when unrelated data changes. Header doesn’t need tasks to fulfill its responsibilities, but because it’s a child of App, it will re-render whenever tasks are updated, unless you add a shouldComponentUpdate check. This problem isn’t something that’s unique to Redux: it’s a fundamental part of React. As mentioned, one way to solve this is by using shouldComponentUpdate to tell React not to complete a render when non-Header related data changes. This is a perfectly fine solution, but what if you could solve this upstream with Redux?
10.3.3. Connecting additional components to Redux
Under the hood, like shouldComponentUpdate, connect and mapStateToProps will do a shallow comparison of old and new props, bypassing a render if no relevant data has changed. Proper usage of connect can save you from having to write your own shouldComponentUpdate logic. What if you connect Header and TasksPage directly to Redux? Each component will use selectors to get only the data they need—no more, no less.
You’ll write the code to do this in a moment, but first let’s update the diagram from figure 10.5 to match the setup you’re going for (see figure 10.6). We like to think in terms of data dependencies—what data does a component need to fulfill its intended role? Take note that Header and TasksPage are connected only to data they specifically require. Restricting components to only the data they need with connect is a powerful idea: you can use connect for performance over custom shouldComponentUpdates, and it’s also great for organizing and decoupling growing apps.
Figure 10.6. Instead of connecting one top-level component, you’ll connect multiple lower-level components.
When tasks in the state tree are modified, Header won’t re-render because 1) no parents re-rendered because of the change, and 2) Header isn’t subscribed to the tasks portion of the Redux store. Adding connect will run Header’s mapStateToProps function, see that the old and new results are equal using a shallow comparison, and bail out, preventing an unnecessary re-render.
Performance work is all about measuring and improving, so you need something to measure. Your goal is to change how you use connect to prevent unnecessary re-renders, so let’s add a few logging statements so you know when both Header and TasksPage are rendering, as shown in the following listings. Many tools can help with render debugging, but plain old console.log will do fine here.
Listing 10.2. Log renders in TasksPage – src/components/TasksPage.js
...
class TasksPage extends Component {
  ...
  render() {
    console.log('rendering TasksPage')

    if (this.props.isLoading) {
      return <div className="tasks-loading">Loading...</div>;
    }

    return (
      <div className="tasks">
        ...
      </div>
    );
  }
}
Listing 10.3. Log renders in Header – src/components/Header.js
...
class Header extends Component {
  render() {
    console.log('rendering Header')
    ...
  }
}
Refresh your browser, and you should see both components rendering. Update a task by moving it to “In Progress” or “Completed.” Only the tasks portion of the state tree changed, but your highly advanced log debugging confirms that both components re-rendered. Let’s see what you can do about that.
10.3.4. Adding connect to Header and TasksPage
You’ll need to make a few major changes:
- Removing most of the functionality from App
- Moving Header-specific data and actions to Header
- Moving TasksPage-specific data and actions to TasksPage
Makes sense, right? The changes were motivated by performance, but this also starts to make more sense from a separation-of-responsibilities perspective. As your applications grow over time, connecting additional components the way you’re about to do can keep any one module from becoming too bloated and tangled.
Start with App by removing most of the code having to do with Header and TasksPage, as shown in listing 10.4. For imports, you’ll remove all the action/selector imports except for one. Later, you’ll move those imports to their respective components. You’ll leave one action, fetchProjects, which is responsible for fetching data for the initial page load.
As far as Header and TasksPage, you’ll remove all props. They’ll still require the same data, but instead of props being passed by the parent App, you’ll inject the data directly from Redux with connect, as shown in the following listing.
Listing 10.4. Refactoring header/tasks code out of App – src/App.js
import React, { Component } from 'react';
import { connect } from 'react-redux';
import Header from './components/Header';                1
import TasksPage from './components/TasksPage';          1
import FlashMessage from './components/FlashMessage';    1
import { fetchProjects } from './actions';               1

class App extends Component {
  componentDidMount() {
    this.props.dispatch(fetchProjects());                2
  }

  render() {
    return (
      <div className="container">
        {this.props.error && <FlashMessage message={this.props.error} />}
        <div className="main-content">
          <Header />                                  3
          <TasksPage />                               3
        </div>
      </div>
    );
  }
}

function mapStateToProps(state) {
  const { error } = state.projects;

  return { error };                                   4
}

export default connect(mapStateToProps)(App);
- 1 Remove most of the action/selector imports.
- 2 Continues to do the initial projects fetch
- 3 Updates props for Header/TasksPage
- 4 Radically simplifies mapStateToProps
Header is currently the only component that renders anything projects-related, so it makes sense to migrate its major functionality out of App: querying projects from the store and dispatching an action when the user selects a new project, as shown in the following listing.
Listing 10.5. Adding connect to Header – src/components/Header.js
import React, { Component } from 'react';
import { connect } from 'react-redux';                                    1
import { setCurrentProjectId } from '../actions';                         1
import { getProjects } from '../reducers/';                               1

class Header extends Component {
  onCurrentProjectChange = e => {                                         2
    this.props.setCurrentProjectId(Number(e.target.value));
  };

  render() {
    console.log('rendering Header');
    const projectOptions = this.props.projects.map(project => (
      <option key={project.id} value={project.id}>
        {project.name}
      </option>
    ));

    return (
      <div className="project-item">
        Project:
        <select onChange={this.onCurrentProjectChange} className="project-
 menu">                                                                 2
          {projectOptions}
        </select>
      </div>
    );
  }
}

function mapStateToProps(state) {
  return {
    projects: getProjects(state),                                         3
  };
}

export default connect(mapStateToProps, { setCurrentProjectId })(Header); 4
menu"> 2
{projectOptions}
</select>
</div>
);
}
}
function mapStateToProps(state) {
return {
projects: getProjects(state), 3
};
}
export default connect(mapStateToProps, { setCurrentProjectId })(Header); 4
- 1 Adds the imports you extracted out of App
- 2 Dispatches an action when a new project is selected
- 3 Uses a selector to get the list of projects
- 4 Passes any required actions to connect
The Header is now responsible for dispatching the SET_CURRENT_PROJECT_ID action, when previously that was App's responsibility. You’ve now transitioned Header away from being a presentational component that accepted props to a container component that’s fully aware of Redux. Container components are typically hooked up to data directly from Redux, instead of relying on a parent component passing props, and are where the bulk of the action handling logic is.
You’ll follow a similar set of changes for TasksPage. To do its job, TasksPage needs at least tasks from the store and behavior for creating, editing, and filtering tasks in the form of Redux actions. Using App, previously the main container component and hub of functionality within Parsnip, used to take care of passing TasksPage the right props, including callback functions that would dispatch actions. The same way you did with Header, now you’ll convert TasksPage into a container component that deals with Redux-specific tasks logic, including selectors and actions. Like you did with Header, you’ll add connect and mapStateToProps, which uses selectors to retrieve the right data from the Redux store. And you’ll also move any task-related action handling out of App and in to TasksPage.
Two notable additions are bindActionCreators and mapDispatchToProps, which together allow you to conveniently bind dispatch to the actions you imported. Instead of using dispatch directly in a component, this.props.dispatch(createTask(...)), connect accepts a second argument, a function conventionally named mapDispatchToProps. connect will pass dispatch as an argument to the mapDispatchToProps function, where you can bind it directly, allowing components to use more generic prop names. See the following listing.
Listing 10.6. Adding connect to TasksPage – src/components/TasksPage.js
import React, { Component } from 'react';
import { connect } from 'react-redux';
import { bindActionCreators } from 'redux';                       1
import TaskList from './TaskList';
import { createTask, editTask, filterTasks } from '../actions';   2
import { getGroupedAndFilteredTasks } from '../reducers/';        2

class TasksPage extends Component {
  ...
  onCreateTask = e => {                                           3
    e.preventDefault();

    this.props.createTask({
      title: this.state.title,
      description: this.state.description,
      projectId: this.props.currentProjectId,
    });

    this.resetForm();
  };

  onStatusChange = (task, status) => {                            3
    this.props.editTask(task, { status });
  };

  onSearch = e => {
    this.props.onSearch(e.target.value);
  };

  renderTaskLists() {
    const { tasks } = this.props;

    return Object.keys(tasks).map(status => {
      const tasksByStatus = tasks[status];

      return (
        <TaskList
          key={status}
          status={status}
          tasks={tasksByStatus}
          onStatusChange={this.onStatusChange}
        />
      );
    });
  }

  render() {
    ...
  }
}

function mapStateToProps(state) {
  const { isLoading }  = state.projects;

  return {
    tasks: getGroupedAndFilteredTasks(state),
    currentProjectId: state.page.currentProjectId,
    isLoading,
  };
}

function mapDispatchToProps(dispatch) {                          4
  return bindActionCreators(                                     5
    {                                                            5
      onSearch: filterTasks,                                     5
      createTask,                                                5
      editTask,                                                  5
    },                                                           5
    dispatch,                                                    5
  );                                                             5
}                                                                5

export default connect(mapStateToProps, mapDispatchToProps)(TasksPage);
- 1 Imports bindActionCreators, a helper for binding dispatch to actions
- 2 Adds task-specific imports you extracted out of App
- 3 Updates create/edit handlers
- 4 Defines a mapStateToProps function that accepts the store’s dispatch function as an argument
- 5 Passes any actions you need as an object and dispatch to bindActionCreators
10.3.5. mapStateToProps and memoized selectors
After all this code, did you achieve your goal of preventing Header from re-rendering when updating a task? If you check the browser console and look for console.log statements from each component’s render method after updating a task, you’ll still see Header re-rendering after updating a task. Ugh.
You’ve successfully split out the projects and tasks portions of state in the store, and Header and TasksPage are now successfully self-contained. That part seems to work properly, so the answer lies in something more fundamental—reference checks in JavaScript and connect's shallow comparison. Listing 10.7 shows the getProjects selector, which you use in Header to find and prepare project state. This is a simple selector, where you translate the projects object, which is keyed by ID in the Redux store, into an array that’s friendlier for components to render.
Listing 10.7. getProjects selector - src/reducers/index.js
...
export const getProjects = state => {
  return Object.keys(state.projects.items).map(id => {
    return projects.items[id];
  });
}
...
The trouble comes when you consider how connect checks whether any props have changed. Using connect stores the return value of mapStateToProps and compares against new props when a render is triggered. This is a shallow equality check, meaning it will go over each field and check if oldPropA === newPropA, without diving deeper into any nested objects should they exist.
Value types in JavaScript, primitives such as numbers and strings, work as you expect with the === operator. 2 === 2 and "foo" === "foo" both return true. Reference types, such as objects, are different. Try running {} === {} in your preferred JavaScript console. You should see false returned, because each new copy of an object has a totally separate object reference.
How does this relate to Header and why the component is still unnecessarily re-rendering-? getProjects runs after every state change in Redux, but it’s return value isn’t memoized. Every time you call getProjects, regardless of whether the data has changed or not, a new object will be returned. As a result, connect's shallow equality check will never pass, and react-redux will think that Header has new data to render.
The solution is to use reselect to change getProjects to be a memoized selector, as demonstrated in listing 10.8. The bulk of the logic for retrieving projects from the store is the same, but now you’re going to memoize the return value. Reselect will memoize, or cache, return values based on given arguments. If getProjects sees for the first time a set of arguments, it will compute a return value, store it in the cache, and return it. When getProjects is called again with the same arguments, reselect will check the cache first and return the existing value. You’ll return the same object reference instead of returning a new object for every call.
Listing 10.8. Making getProjects a memoized selector – src/reducers/index.js
export const getProjects = createSelector(             1
  [state => state.projects],
  projects => {
    return Object.keys(projects.items).map(id => {
      return projects.items[id];
    });
  },
);
- 1 Uses reselect’s createSelector to create a memoized selector
Give updating tasks another go. The most effective performance optimization out there is “do less stuff,” and that’s what you achieved here. You should now see only Header renders on initial page load, but not on subsequent task updates. With Header, by adding connect and returning only the data you need using mapStateToProps, you let react-redux do the heavy lifting and Header only re-renders when relevant data has changed. Using connect/mapStateToProps lets you be more declarative about what data should cause a component to re-render. You don’t need to check old and new props manually; you declare what data matters and let the framework handle the rest.
10.3.6. Rules of thumb for advanced connect usage
We’ve covered much ground with connect, so here are a few general rules of thumb:
- The connect command gives you shouldComponentUpdate for free. Using connect to try to provide components with only the data they require can help eliminate the need for manual shouldComponentUpdate usage.
- Use connect in a more granular way than you did with Header/TasksPage; this works best with normalized data. Due to Redux’s immutability restrictions, if projects and tasks were nested, updates to tasks would cause all ancestors (projects) in the tree to be updated. New object references mean shallow comparisons (such as shouldComponentUpdate) will fail. Even if you used connect more frequently the way you did here, updates to nested data would still result in unwanted renders.
- Using connect like this is an architectural choice, and it’s one that could bite you under certain circumstances. Having App be the only entry point for data from Redux meant that you were potentially free to make changes to major page sections without too much of a refactoring cost. The more stable an app is, typically the easier it is to introduce connect optimizations like this.
10.3.7. Batching actions
As you’ve seen, one of the central goals in optimizing Redux is trying to minimize unnecessary renders. We’ve looked at strategies such as using shouldComponentUpdate to check whether props changed before going through with a render, and using connect effectively to make sure components aren’t dependent on unrelated data, which may cause them to re-render when given data that won’t affect their output in any way.
Another case we haven’t covered is multiple actions being dispatched close together timewise. Take the initial page fetch, for example, where you dispatch two actions, one to load the tasks from the response into the store and another to choose a default project. Remember that each dispatch will trigger a re-render in any connected components. Here when you dispatch RECEIVE_ENTITIES and SET_CURRENT_PROJECT_ID one after another, you trigger two renders within fractions of a second of each other. It won’t have a noticeable difference here because Parsnip is still small, but it’s worth always keeping an eye on too many actions being dispatched within a short span of time. This can happen anywhere, but one place it tends to happen often is when handling successful requests, like you are in the following listing. For example, you could do any or all of loading data in to multiple reducers, setting error states, and making decisions based on the server response.
Listing 10.9. fetchProjects action – src/actions/index.js
export function fetchProjects() {
  return (dispatch, getState) => {
    dispatch(fetchProjectsStarted());

    return api
      .fetchProjects()
      .then(resp => {
        const projects = resp.data;

        const normalizedData = normalize(projects, [projectSchema]);

        dispatch(receiveEntities(normalizedData));           1

        // Pick a board to show on initial page load
        if (!getState().page.currentProjectId) {
          const defaultProjectId = projects[0].id;
          dispatch(setCurrentProjectId(defaultProjectId));   2
        }
      })
      .catch(err => {
        fetchProjectsFailed(err);
      });
  };
}
Batching actions is something you could implement on your own, but to keep things simple you’ll use a small package named redux-batched-actions. Listing 10.10 shows how you can batch action dispatches in the fetchProjects async action creator to cut down on an unnecessary re-render. In src/index.js where you handle most of Parsnip’s configuration, import enableBatching from redux-batched-actions and wrap the rootReducer when configuring the store.
Listing 10.10. Configuration for batching actions – src/index.js
...
import { enableBatching } from 'redux-batched-actions';            1

...

const store = createStore(
  enableBatching(rootReducer),                                     2
  composeWithDevTools(applyMiddleware(thunk, sagaMiddleware)),
);
- 1 Imports the enableBatching higher order reducer
- 2 Wraps the rootReducer to support batch dispatches
The enableBatching function wraps your rootReducer, enabling you to use the batchActions method, which you’ll import and use in fetchProjects. Note that in the previous example you’re batching two synchronous actions; not having to worry about async flow control greatly simplifies things. Batching here is as straightforward as taking each action object, getting new state from the reducers, and dispatching an action with the combined results, as shown in the following listing.
Listing 10.11. Batching fetchProjects dispatches – src/actions/index.js
   import { batchActions } from 'redux-batched-actions';       1


...

export function fetchProjects() {
  return (dispatch, getState) => {
    dispatch(fetchProjectsStarted());

    return api
      .fetchProjects()
      .then(resp => {
        const projects = resp.data;

        const normalizedData = normalize(projects, [projectSchema]);

        dispatch(
          batchActions([                                      2
            receiveEntities(normalizedData),                  2
            setCurrentProjectId(projects[0].id),              2
          ]),
        );
      })
      .catch(err => {
        fetchProjectsFailed(err);
      });
  };
}
- 1 Imports batchActions, which accepts an array of actions
- 2 Calls batchActions with an array of synchronous actions
Figure 10.7 is a look at the final payload generated by batchActions. It combines the result of dispatching both RECEIVE_ENTITIES and SET_CURRENT_PROJECT_ID and dispatches a single BATCHING_REDUCER.BATCH action.
Figure 10.7. A look at how batched actions have state changes rolled into a single dispatch
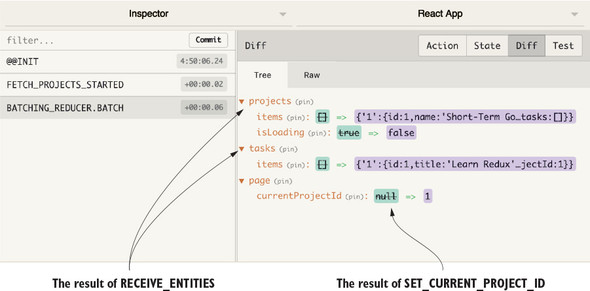
One small downside here is that you lose part of the benefits of the Redux DevTools, because individual actions will no longer be logged—a small price to pay. Batching actions is certainly not a requirement for Redux and may not be necessary at all for use cases that don’t run into these kinds of frequent dispatch issues. When it is an issue, simple batching strategies such as the one provided by redux-batched-actions are more than sufficient.
10.4. Caching
Network requests are one of the big bottlenecks in web applications. Data travels fast, but the most noticeable delays for your users will happen while a network request is in progress. Typically, this is when you’re fetching data to populate the page, and no one likes loading times. They’re expected and tolerated by users to a certain degree, but too much too often means your app will be perceived as unresponsive. One surefire way to mitigate this is to not make extraneous requests in the first place. By determining which pieces of data are cacheable, meaning the possibility of showing stale data to users is OK, you can greatly reduce server load and make the experience feel more responsive by fetching data less frequently.
How you determine which data is cacheable is up to you and your use case. Take financial data for example—probably not a great idea to rely on a cache because accuracy is what matters. You’ll take waiting an extra second over seeing a stale bank balance. It’s something you access infrequently, and you won’t mind the extra wait.
But what about something like a newsfeed for a social network like Facebook? That kind of content can be expensive to generate, and though elements of it are likely cached at the server level, you can still improve performance by caching data on the client with Redux.
Here’s one approach to caching data on the client, based on how long ago the resource was fetched from the server:
- Fetch a resource such as tasks.
- Add a lastUpdated field to store when tasks were last fetched from the server.
- Define a “time to live,” or TTL, which could be anything from 1 second to 1 minute, which represents how long you can comfortably cache tasks without them becoming too stale. What exactly you set this to will depend on context. Is the data important? Is it OK to potentially show stale data to users?
- When subsequent calls to fetch tasks are made, check the lastUpdated field against the TTL.
- If you’re still inside the TTL bounds, don’t make the request.
- If it’s been too long (for example with TTL of one minute, and you haven’t fetched tasks in 70 seconds), fetch fresh data from the server.
10.5. Exercise
Earlier in the chapter, we looked at a few different ways to reduce unnecessary re-renders, such as using connect and adding shouldComponentUpdate lifecycle methods where appropriate. Another popular strategy for cutting down on extra work that’s specific to lists is connecting each list item instead of connecting a common parent. Currently, tasks data enters the UI through the App component and is passed down through props to each individual Task. Instead, you’ll pass only task IDs as props, and allow each Task to fetch its own data using connect and mapStateToProps.
Take the list of tasks in Parsnip as an example. Any time a single item in the list is updated, the entire list will have to reconcile. Add more logging and see for yourself. Add the console.log from the following listing to the Task component.
Listing 10.12. Logging Task renders – src/components/Task.js
import React from 'react';

import { TASK_STATUSES } from '../constants';

const Task = props => {
  console.log('rendering Task: ', props.task.id)
  ...
}
You’re looking for which Task components render and how often. Refresh Parsnip in the browser, where you’ll see output for each Task from the initial mount. Update an object by updating its status and look back at the console. You should see every Task re-render, even though data from only a single task changed. This is a result of the component hierarchy and how data from Redux connects to React. TasksPage, through connect, receives a new list of tasks (including the task object you updated), and renders TaskList, which renders each Task.
How can you fix it? Instead of passing the task object as a prop to Task, you can pass only the task’s ID. Then you can add connect to Task and use the task’s ID to pull the correct task out of the store. As a result, when a list item changes, only that one list item will re-render.
Figure 10.8 is what you have now. Because data flows from the TasksPage down, each Task component will try to re-render whenever any task changes.
Figure 10.8. The tasks component tree before attempting to connect each Task component

A structure like this isn’t necessarily a bad thing. In fact, most React/Redux apps render lists in this way. It’s the most straightforward, simple way to approach lists. Redux offers a unique opportunity to highly optimize lists, with little in the way of wasted renders.
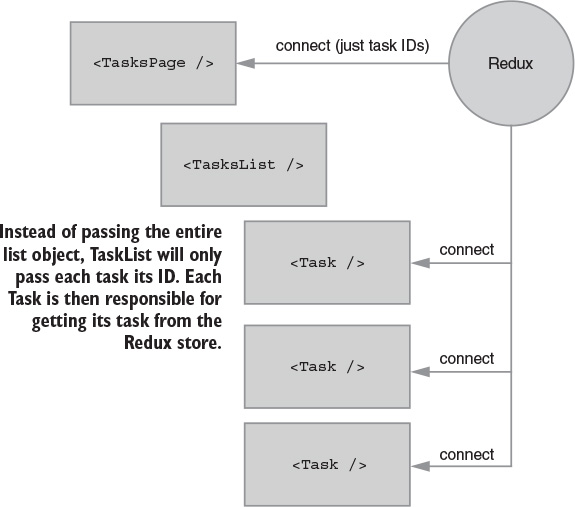
Figure 10.9 is what you’re going for. To summarize, you want to
- Stop passing tasks from Redux into TasksPage.
- Have TasksPage take a list of IDs and pass them to children as props.
- Add connect to each Task, where mapStateToProps will take the task ID passed in as a prop and find the right task from the Redux store.
Figure 10.9. The desired Redux/React configuration
10.6. Solution
You won’t need major changes to each individual component, but you’ll need to make significant changes around how data flows through the component tree. First, make the big change in Task and work your way up from there. Listing 10.13 adds connect to the Task component. You’ll take two pieces of data, the task ID provided as a prop by TaskList (which you’ll take care of in a moment), and the list of tasks from the state tree. You’ll then use the ID to get the right task in mapStateToProps.
Listing 10.13. Connecting the Task component – src/components/Task.js
import React from 'react';
import { connect } from 'react-redux';                       1

import { TASK_STATUSES } from '../constants';

const Task = props => {
  return (
    <div className="task">
      <div className="task-header">
        <div>
          {props.task.title}
        </div>
        <select value={props.task.status} onChange={onStatusChange}>
          {TASK_STATUSES.map(status => (
            <option key={status} value={status}>
              {status}
            </option>
          ))}
        </select>
      </div>
      <hr />
      <div className="task-body">
        <p>
          {props.task.description}
        </p>
        <div className="task-timer">
          {props.task.timer}s
        </div>
      </div>
    </div>
  );

  function onStatusChange(e) {
    props.onStatusChange(props.task, e.target.value);
  }
};

function mapStateToProps(state, ownProps) {                  2
  return {
    task: state.tasks.items[ownProps.taskId]                 3
  };
}


export default connect(mapStateToProps)(Task);               4
- 1 Imports connect
- 2 Accepts state, but also accepts ownProps as an argument
- 3 Uses the ID provided as a prop to find the correct task in the Redux store
- 4 Applies connect
Notice anything interesting about the markup? It didn’t have to change! You’ve seen this several times so far in the book, and it’s one of the benefits of using Redux to handle the bulk of the logic around state and behavior. You can adjust the plumbing by using connect to get the right task instead of passing the object using props, but Task doesn’t need to know or care where that data comes from. The backbone of your UI can be made up of these data-agnostic components. And because they’re decoupled from Redux, experimenting with new data patterns is easy.
Many of the concepts here are familiar, such as connect and mapStateToProps. The ownProps as an argument to mapStateToProps is new, which is an object of any props passed to the component by a parent. In this case, you have TaskList pass the task’s taskId.
Now you need to go up the component tree and make sure TaskList and TasksPage are passing the correct props. Starting with TaskList, listing 10.14 makes two changes:
- TaskList should now expect a taskIds prop instead of tasks.
- Instead of passing the entire task object to each Task component, now you’ll pass only the ID.
The general theme here is that where you were previously passing full task objects between components, now you’ll only pass IDs.
Listing 10.14. Updating TaskList – src/components/TaskList.js
import React from 'react';
import Task from './Task';

const TaskList = props => {
  return (
    <div className="task-list">
      <div className="task-list-title">
        <strong>{props.status}</strong>
      </div>
      {props.taskIds.map(id => (                                           1
        <Task key={id} taskId={id} onStatusChange={props.onStatusChange} />2
      ))}
    </div>
  );
};

export default TaskList;
- 1 Instead of mapping over tasks, now map over taskIds.
- 2 Passes IDs to each Task
You have Task and TaskList covered, so the final changes will be one step higher in the component tree, with TasksPage. The major change in listing 10.15 involves importing a new getGroupedAndFilteredTaskIds selector, which functions identically to the existing getGroupedAndFilteredTasks. The only difference is that you’ll return an array of IDs, instead of an array of task objects. In TasksPage, import the selector, apply it in mapStateToProps, and then replace the tasks prop with taskIds when rendering TaskList.
Listing 10.15. Updating TasksPage – src/components/TasksPage.js
...
import { getGroupedAndFilteredTaskIds } from '../reducers';      1

class TasksPage extends Component {
  ...
  renderTaskLists() {
    const { taskIds } = this.props;                              2

    return Object.keys(taskIds).map(status => {                  2
      const idsByStatus = taskIds[status];

      return (
        <TaskList
          key={status}
          status={status}
          taskIds={idsByStatus}                                  2
          onStatusChange={this.onStatusChange}
        />
      );
    });
  }

  render() {
    ...
  }
}

function mapStateToProps(state) {
  const { isLoading } = state.projects;

  return {
    taskIds: getGroupedAndFilteredTaskIds(state),               3
    currentProjectId: state.page.currentProjectId,
    isLoading,
  };
}
...

export default connect(mapStateToProps, mapDispatchToProps)(TasksPage);
- 1 Imports the selector
- 2 Operates on taskIds instead of tasks when rendering TaskList
- 3 Applies the selector
You still need to implement the selector, so the final change will be in your main reducers file, as shown in the following listing. The only difference between the existing getGroupedAndFilteredTasks selector is returning IDs versus raw task objects.
Listing 10.16. Adding the new selector – src/reducers/index.js
...
export const getGroupedAndFilteredTaskIds = createSelector(
  [getFilteredTasks],
  tasks => {
    const grouped = {};

    TASK_STATUSES.forEach(status => {
      grouped[status] = tasks
        .filter(task => task.status === status)
        .map(task => task.id);                      1
    });

    return grouped;
  }
);
...
- 1 After applying a search filter to the raw list of objects, map to return only the IDs.
To quickly recap the changes, we went with another outside-in approach, starting with the last component to be rendered, Task, and working our way up the tree to TaskList and TasksPage:
- In Task, accept an ID as a prop, and use connect to get the correct task from Redux.
- In TaskList, accept taskIds as a prop instead of tasks, and pass each ID down to Task.
- In TasksPage, use a new getGroupedAndFilteredTaskIds selector to pass a list of raw IDs down to TasksPage.
- In src/reducers/index.js, implement the new ID-only selector.
With everything in place, refresh your browser and keep an eye on how often Task renders in the console. Previously, after updating a task you’d see every Task re-render, effectively meaning an update to a single list element would cause the entire list to reconcile and re-render. By connecting each Task component, and passing only the ID as a prop, you ensure that when any one task changes, only its corresponding Task component will re-render. The key takeaways here are the potential performance and maintainability improvements from being picky about only making components aware of the data they need. By using connect effectively, you can eliminate the need for manual shouldComponentUpdate checks.
One of the great things about React and Redux is the conceptual refresh whenever state changes occur. You don’t have to worry about finding and updating individual UI elements when data in Redux changes; you only need to define templates and the dynamics they require, declaratively. Data in, UI out.
It’s now up to you as the developer to prevent too much rendering from happening. Your main goal in optimizing Redux with React is to “do less stuff,” or, prevent components from re-rendering when unrelated data has changed.
Summary
- Rendering performance in the browser can be measured.
- Best practices for general front end performance.
- How to control the flow of data to prevent unnecessary rendering.