
- Deploying a multi-cloud load balancer
- Federating Nomad and Consul clusters with Terraform
- Deploying containerized workloads with the Nomad provider
- Comparing container orchestration architectures with those for managed services
Terraform makes it easy to deploy to the multi-cloud. You can use all the same tools and techniques you’ve already been using. In this chapter, we build on everything we have done so far to deploy a massively multiplayer online role-playing game (MMORPG) to the multi-cloud.
Multi-cloud refers to any heterogeneous architecture that employs multiple cloud vendors. For example, you may have a Terraform project that deploys resources onto both AWS and GCP; that would be multi-cloud. In comparison, the closely related term hybrid cloud is more inclusive: it specifically refers to multi-cloud where only one of the clouds is private. So, hybrid cloud is a mix of private and public cloud vendors.
The significance of multi-cloud versus hybrid cloud has less to do with nomenclature and more to do with the kinds of problems you may be expected to face. For example, hybrid-cloud companies normally don’t want to be hybrid-cloud; they want to be mono-public-cloud. These companies want to migrate legacy applications to the cloud as swiftly as possible so that their private data centers can be shut down. On the other hand, multi-cloud companies are presumably more mature in their journey to the cloud and may already be entirely cloud-native.
As multi-cloud becomes more mainstream, such stereotypes about cloud maturity become less accurate. It’s fair to say that most companies, even those that are mature in the cloud, would never adopt a multi-cloud strategy if they were not forced to do so by external factors, such as mergers and acquisitions. For example, if a large enterprise company uses AWS and acquires a smaller startup that uses GCP, the enterprise suddenly has a multi-cloud architecture whether it intended to or not.
Regardless of whether you choose to adopt multi-cloud or are forced into it, there are several advantages compared to the mono-cloud:
-
Flexibility—You can choose the best-in-class services from any cloud.
-
Cost savings—Pricing models vary between cloud vendors, so you can save money by choosing the lower-price option.
-
Avoiding vendor lock-in—It’s generally not a good idea to lock yourself into a particular vendor because doing so puts you in a weak negotiating position.
-
Resilience—Multi-cloud architectures can be designed to automatically fail over from one cloud to the other, making them more resilient than single-cloud architectures.
-
Compliance—Internal or external factors may play a role. For example, if you want to operate out of China, you are forced to use AliCloud to comply with government regulations.
In this chapter, we investigate several approaches for architecting multi-cloud projects. First, we deploy a hybrid-cloud load balancer that distributes traffic evenly to virtual machines (VMs) located in AWS, Azure, and GCP. This is a fun project meant to demonstrate the ease of deploying multi-cloud or hybrid-cloud projects with Terraform.
Next is my favorite part. We deploy and automatically federate Nomad and Consul clusters onto AWS and Azure. Once the infrastructure is up and running, we deploy a multi-cloud workload for BrowserQuest, an MMORPG created by Mozilla. This game is surprisingly fun, especially if you like RPG games. A preview of BrowserQuest is shown in figure 8.1.
Finally, we redesign the MMORPG project to use managed services. Managed services are a great alternative to container orchestration platforms, but they also force you to learn the intricacies of the different clouds.
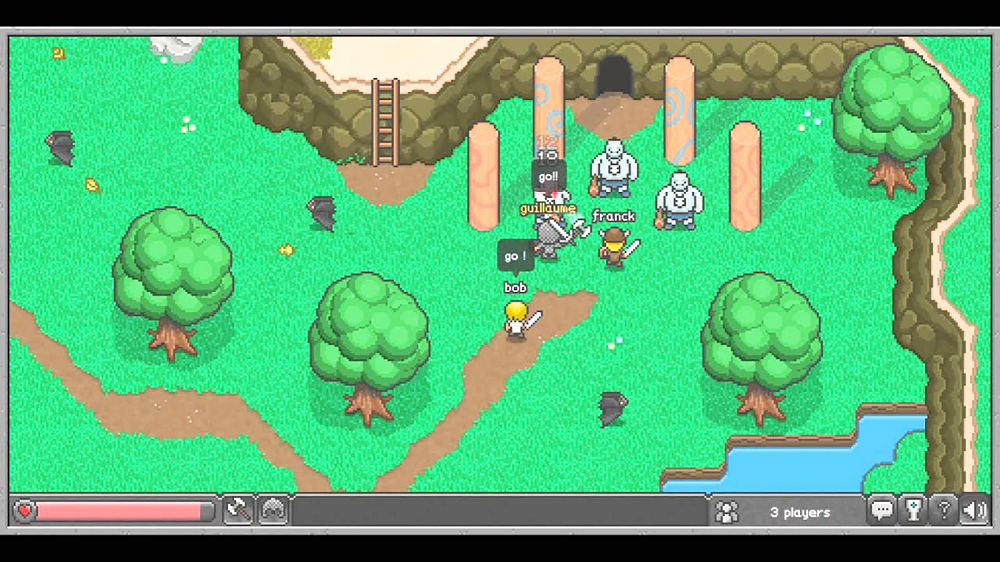
Figure 8.1 BrowserQuest is a massively multiplayer HTML5 game that you can play through a browser.
8.1 Hybrid-cloud load balancing
We start by deploying a load balancer with a twist. It’s a hybrid-cloud load balancer, meaning it will be deployed locally as a Docker container but will load-balance machines residing in AWS, GCP, and Azure. Load balancing is performed with round-robin DNS, so each time the page is refreshed, it takes you to the next machine in the list. Each machine serves HTTP/CSS content with some text and colors letting you know what cloud it’s on (see figure 8.2).

Figure 8.2 Each time the page is refreshed, it cycles to the next machine on the list.
Note This scenario is meant to be fun and to demonstrate how easy it is to get started with multi-cloud/hybrid-cloud on Terraform. It’s not meant for production use.
8.1.1 Architectural overview
Load balancers distribute traffic across multiple servers, improving the reliability and scalability of applications. As servers come and go, load balancers automatically route traffic to healthy VMs based on routing rules while maintaining a static IP. Typically, all instances that make up the server pool are collocated and networked on the same private subnet (see figure 8.3).
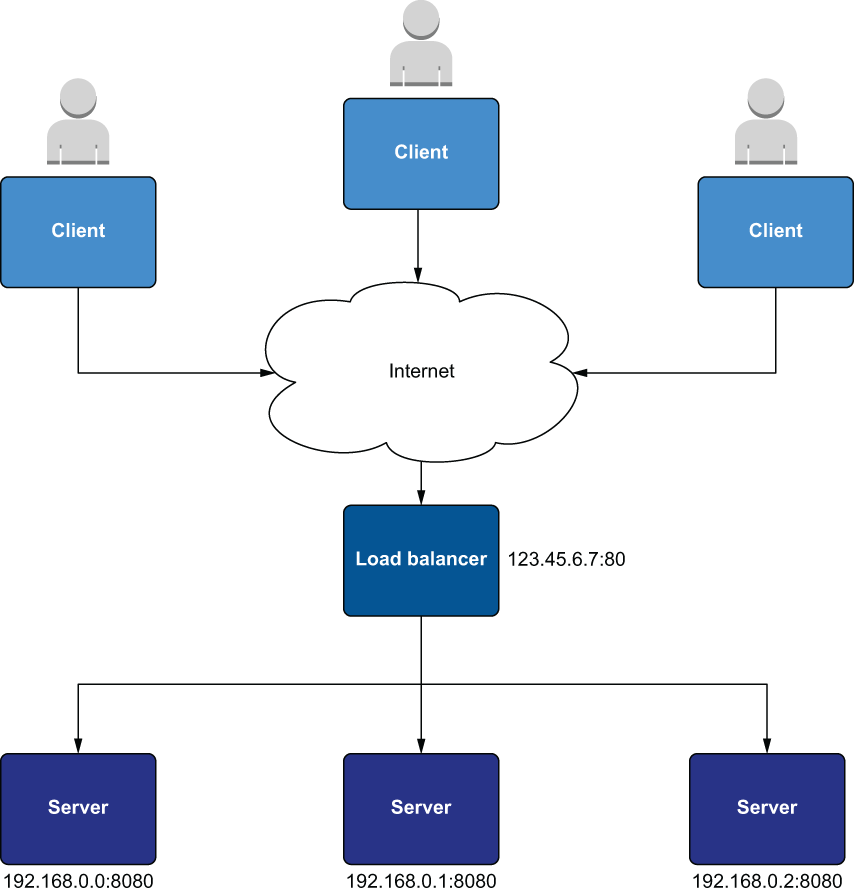
Figure 8.3 A classic load balancer setup. Clients talk to the load balancer over the internet, and all the servers behind the load balancer are on the same private network.
In contrast, the hybrid-cloud load balancer we will deploy is rather unconventional (see figure 8.4). Each server lives in a separate cloud and is assigned a public IP to register itself with the load balancer.
Note It’s not recommended to assign a public IP address to VMs behind a load balancer. But since the VMs live in different clouds, it’s simpler to use a public IP than to tunnel the virtual private clouds together.
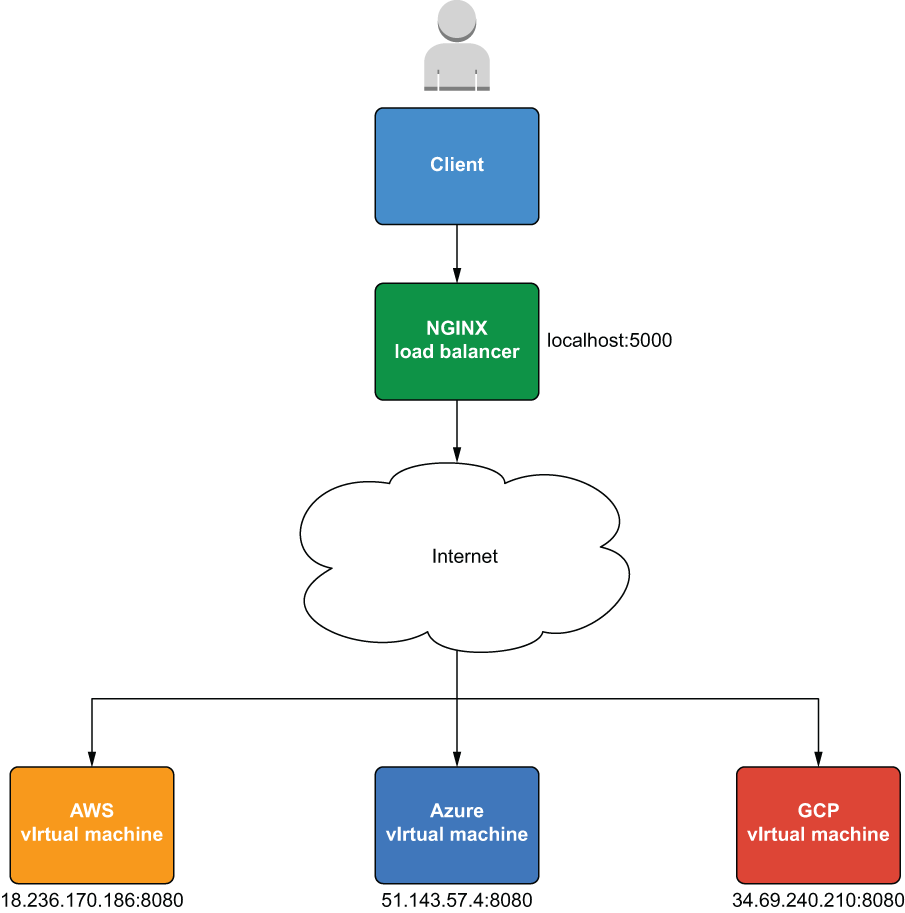
Figure 8.4 Hybrid-cloud load balancing with a private cloud load balancer and public cloud VMs
Although the VMs are in public clouds, the load balancer itself will be deployed as a Docker container on localhost. This makes it a hybrid-cloud load balancer rather than a multi-cloud load balancer. It also gives us an excuse to introduce the Docker provider for Terraform. We’ll use a total of five providers, as shown in figure 8.5.
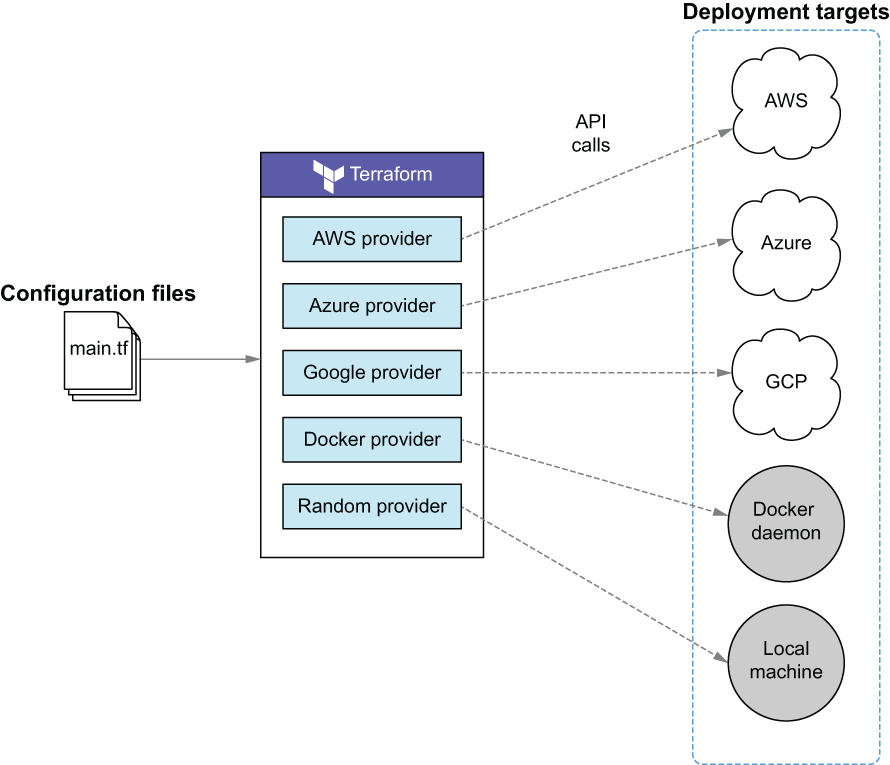
Figure 8.5 The workspace uses five providers to deploy infrastructure onto both public and private clouds.
8.1.2 Code
This scenario’s configuration code is short, mainly because most business logic is encapsulated in modules. This is done to simplify the code, because otherwise it would be too long to fit in the chapter. Don’t worry, though—you aren’t missing anything that we haven’t already covered in previous chapters. Of course, you can always take a look at the source code for the modules on GitHub if you want to learn more.
Tip This scenario also works with fewer than three clouds. If you choose not to deploy to all three clouds, simply comment out the configuration code and references to the undesired provider(s) in listing 8.1 and subsequent code listings.
Start by creating a providers.tf file to configure provider information. I will assume you are using the authentication methods described in appendices A, B, and C.
Note If you want to authenticate providers using alternative methods, you are more than welcome to. Just because I do things one way doesn’t mean you have to do them the same way.
provider "aws" {
  profile = "<profile>"
  region  = "us-west-2"
}

provider "azurerm" {
  features {}
}

provider "google" {
  project = "<project_id>"
  region  = "us-east1"
}

provider "docker" {}             ❶
❶ The Docker provider can be configured to connect to local and remote hosts.
The relevant code is shown in the following listing. Create a main.tf file with this content.
module "aws" {
  source = "terraform-in-action/vm/cloud//modules/aws"               ❶
  environment = {
    name             = "AWS"                                         ❷
    background_color = "orange"                                      ❷
  }
}

module "azure" {
  source = "terraform-in-action/vm/cloud//modules/azure"             ❶
  environment = {
    name             = "Azure"
    background_color = "blue"
  }
}

module "gcp" {
  source     = "terraform-in-action/vm/cloud//modules/gcp"           ❸
  environment = {
    name             = "GCP"
    background_color = "red"
  }
}

module "loadbalancer" {
  source = "terraform-in-action/vm/cloud//modules/loadbalancer"      ❸
  addresses = [
    module.aws.network_address,                                      ❹
    module.azure.network_address,                                    ❹
    module.gcp.network_address,                                      ❹
  ]
}
❶ These modules exist in separate folders of the same GitHub repo.
❷ Environment variables customize the website.
❸ These modules exist in separate folders of the same GitHub repo.
❹ Each VM registers itself with the load balancer using a public IP address.
The outputs are shown in the next listing. This is purely for convenience.
output "addresses" {
  value = {
    aws          = module.aws.network_address
    azure        = module.azure.network_address
    gcp          = module.gcp.network_address
    loadbalancer = module.loadbalancer.network_address
  }
}
Finally, write the Terraform settings to versions.tf as presented in listing 8.4. This step is required because HashiCorp no longer owns the Docker provider. If you didn’t include this block, Terraform wouldn’t know where to find the binary for the Docker provider.
terraform {
  required_providers {
    docker = {
      source  = "kreuzwerker/docker"
      version = "~> 2.11"
    }
  }
}
8.1.3 Deploy
Depending on how Docker is installed on your local machine, you may need to configure the host or config_path attribute in the provider block. Consult the Docker provider documentation (http://mng.bz/8WzZ) for more information. On Mac and Linux operating systems, the defaults should be fine. Windows, however, will need to override at least the host attribute.
If you are having difficulties, you can always comment out the Docker provider and module declarations from the preceding code. I show an alternate approach shortly.
Note Providers that interact with local APIs must be configured to authenticate to those APIs. This is unique to your environment, so I cannot prescribe a one-size-fits-all approach.
When you are ready to deploy, initialize the workspace with terraform init and then run terraform apply:
$ terraform apply
...
      + owner_id               = (known after apply)
      + revoke_rules_on_delete = false
      + vpc_id                 = "vpc-0904a1543ed8f62a3"
    }

Plan: 20 to add, 0 to change, 0 to destroy.

Changes to Outputs:
  + addresses = {
      + aws          = (known after apply)
      + azure        = (known after apply)
      + gcp          = (known after apply)
      + loadbalancer = "localhost:5000"
    }

Do you want to perform these actions?
  Terraform will perform the actions described above.
  Only 'yes' will be accepted to approve.

  Enter a value:
After approving and waiting a few minutes, you get the output addresses for each of the three VMs along with that of the load balancer:
module.aws.aws_instance.instance: Creation complete after 16s [id=i-
08fcb1592523ebd73]
module.loadbalancer.docker_container.loadbalancer: Creating...
module.loadbalancer.docker_container.loadbalancer: Creation complete after
1s [id=2e3b541eeb34c95011b9396db9560eb5d42a4b5d2ea1868b19556ec19387f4c2]

Apply complete! Resources: 20 added, 0 changed, 0 destroyed.

Outputs:

addresses = {
    "aws" = "34.220.128.94:8080"
    "azure" = "52.143.74.93:8080"
    "gcp" = "34.70.1.239:8080"
    "loadbalancer" = "localhost:5000"
}
If you don’t have the load balancer running yet, you can do so by concatenating the three network addresses with a comma delimiter and directly running the Docker container on your local machine:
$ export addresses="34.220.128.94:8080,52.143.74.93:8080,34.70.1.239:8080"
$ docker run -p 5000:80 -e ADDRESSES=$addresses -dit swinkler/tia-loadbalancer
When you navigate to the load-balancer address in the browser, you will first hit the AWS VM (see figure 8.6). Each time you refresh the page, you will be served by a VM in a different cloud.

Figure 8.6 An example of the AWS landing page. When you refresh, you will see the Azure page (blue) and then GCP (red).
Note It may take a few minutes for all the VMs to start up. Keep refreshing the page until all three appear.
When you are done, remember to clean up with terraform destroy:
$ terraform destroy -auto-approve
...
module.gcp.google_compute_instance.compute_instance: Still destroying...
[id=gcp-vm, 4m40s elapsed]
module.gcp.google_compute_instance.compute_instance: Still destroying...
[id=gcp-vm, 4m50s elapsed]
module.gcp.google_compute_instance.compute_instance: Destruction complete
after 4m53s
module.gcp.google_project_service.enabled_service["compute.googleapis.com"]
: Destroying... [id=terraform-in-action-lb/compute.googleapis.com]
module.gcp.google_project_service.enabled_service["compute.googleapis.com"]
: Destruction complete after 0s

Destroy complete! Resources: 20 destroyed.
Note If you ran the Docker container manually on your local machine, you need to manually kill it as well.
8.2 Deploying an MMORPG on a federated Nomad cluster
Clusters are sets of networked machines that operate as a collective unit. Clusters are the backbone of container orchestration platforms and make it possible to run highly parallel and distributed workloads at scale. Many companies rely on container orchestration platforms to manage most, if not all, of their production services.
In this section, we deploy Nomad and Consul clusters onto both AWS and Azure. Nomad is a general-purpose application scheduler created by HashiCorp that also functions as a container orchestration platform. Consul is a general networking tool enabling service discovery and is most similar to Istio (a platform-independent service mesh: www.istio.io).
Each Nomad node (i.e., VM) registers itself with its respective Consul cluster, which can then discover the other clouds’ Consul and Nomad nodes via federation. An architecture diagram is shown in figure 8.7.
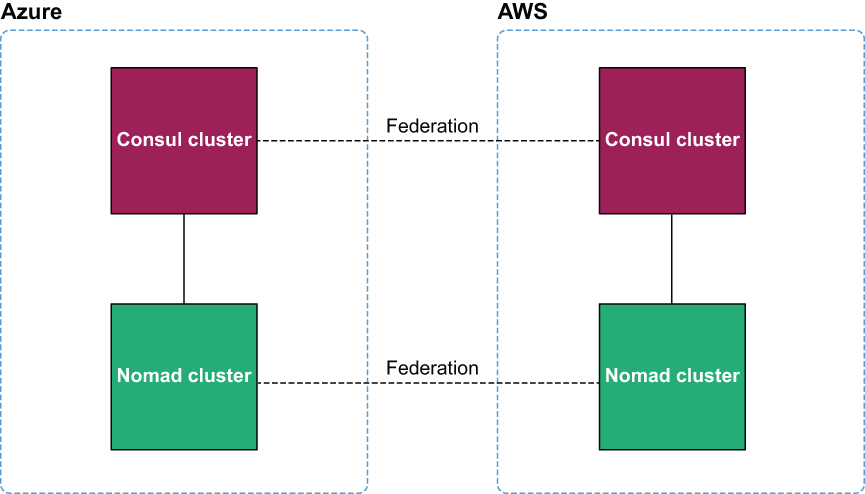
Figure 8.7 Each Nomad cluster registers itself with a local Consul cluster. Federation enables the multi-cloud clusters to behave as a single unit.
Once the infrastructure is up, we will use the Nomad provider for Terraform to deploy the MMORPG service. At the end of this section, we will have a complete and playable multi-cloud game.
8.2.1 Cluster federation 101
Google’s Borg paper (https://ai.google/research/pubs/pub43438) was the foundation for all modern cluster technologies: Kubernetes, Nomad, Mesos, Rancher, and Swarm are all implementations of Borg. A key design feature of Borg is that already-running tasks continue to run even if the Borg master or other tasks (a.k.a. Borglets) go down.
In Borg clusters, nodes may be designated as either client or server. Servers are responsible for managing configuration state and are optimized for consistency in the event of a service outage. Following the Raft consensus algorithm (https://raft.github .io), there must be an odd number of servers to achieve a quorum, and one of these servers is elected leader. Client nodes do not have any such restrictions. You can have as many or a few as you like; they simply form a pool of available compute on which to run tasks assigned by servers.
Cluster federation extends the idea of clustering to join multiple clusters, which may exist in different datacenters. Federated Nomad clusters allow you to manage your shared compute capacity from a single control plane.
8.2.2 Architecture
This project deploys a lot of VMs because the Raft consensus algorithm requires a minimum of three servers to establish a quorum, and we have four clusters. This means we need at least 12 VMs plus additional VMs for client nodes.
All the VMs will be part of the Consul cluster, but only a subset of those will be part of the Nomad cluster (see figure 8.8).
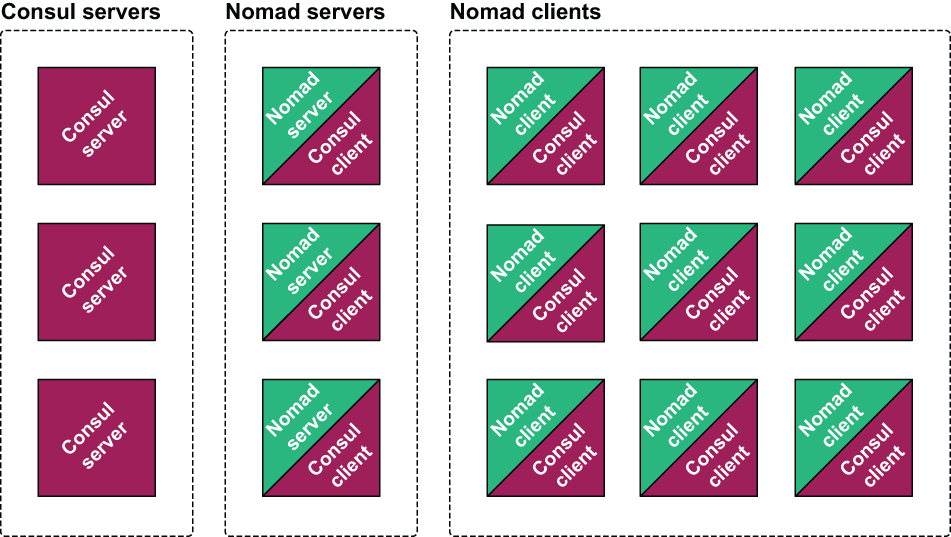
Figure 8.8 There are three groups of VMs: one group runs the Consul server, one group runs the Nomad server, and the third group runs the Nomad client. All of the VMs running Nomad also run the Consul client. Effectively, there is one large Consul cluster, with a subset that is the Nomad cluster.
These three groups of VMs are replicated in both clouds, and like-to-like clusters are federated together. A detailed architecture diagram is shown in figure 8.9.
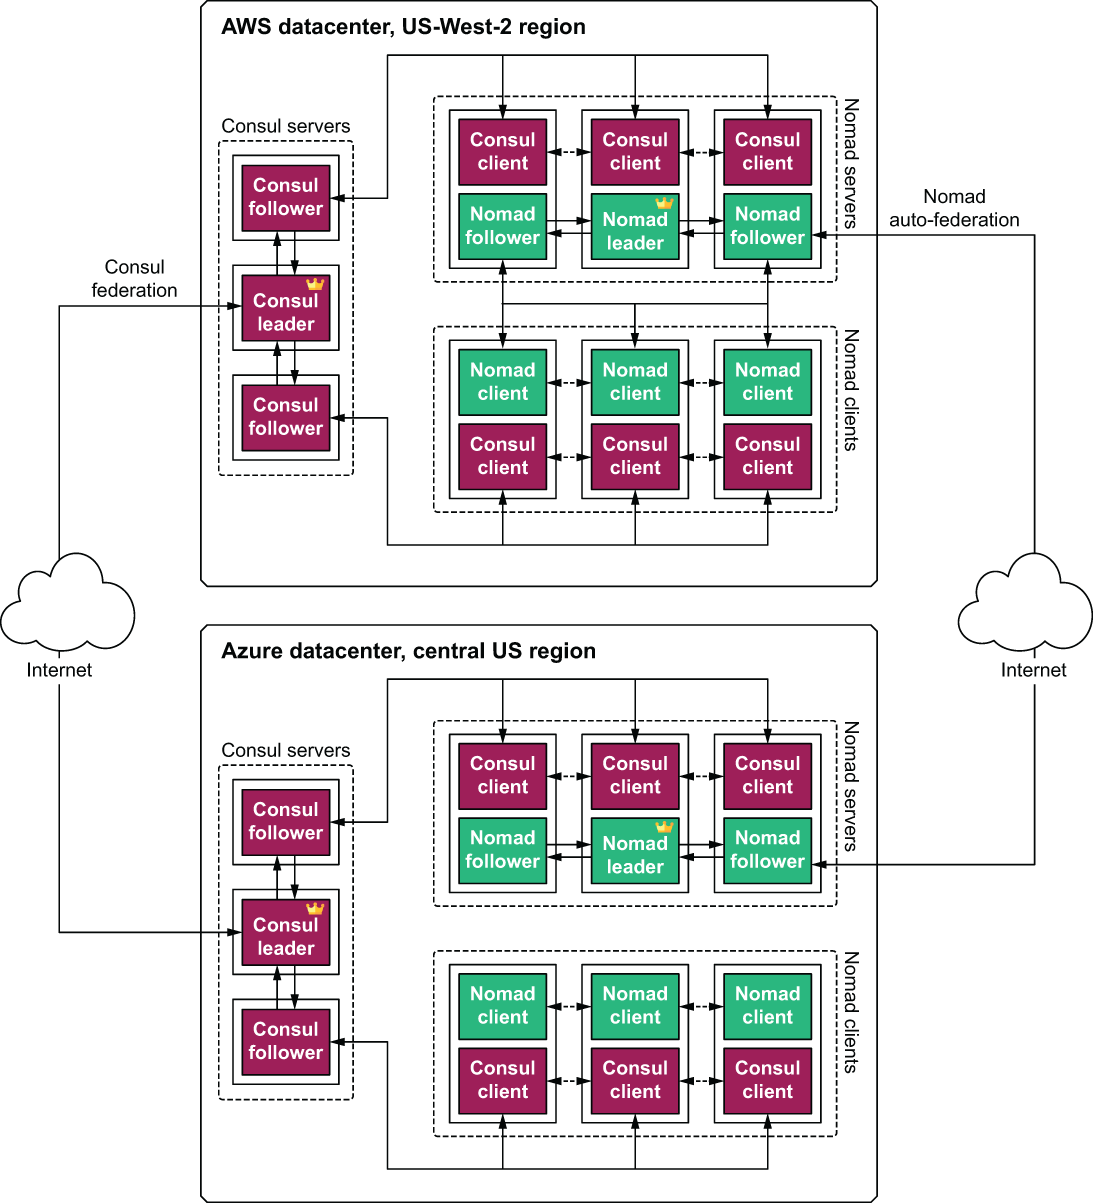
Figure 8.9 Detailed architecture diagram of how federation occurs between the Consul servers and Nomad servers, respectively. The little crowns represent server leaders.
Once the clusters are running and federated together, we will deploy Nomad workloads onto them, following a two-stage deployment technique described in chapter 7 (see figure 8.10). The only difference is that the second stage will be deployed using Terraform rather than a separate CI/CD pipeline.

Figure 8.10 Deployment is done in two stages. First the static infrastructure is provisioned, and then the dynamic infrastructure is provisioned on top of that.
Figure 8.11 shows a detailed network topology for the application layer (stage 2). The application layer is composed of two Docker containers: one for the web app and one for the Mongo database. The web app runs on AWS, and the Mongo database runs on Azure. Each Nomad client runs a Fabio service for application load balancing/routing. Fabio is exposed to the outside world through an external network load balancer that was deployed as part of stage 1.
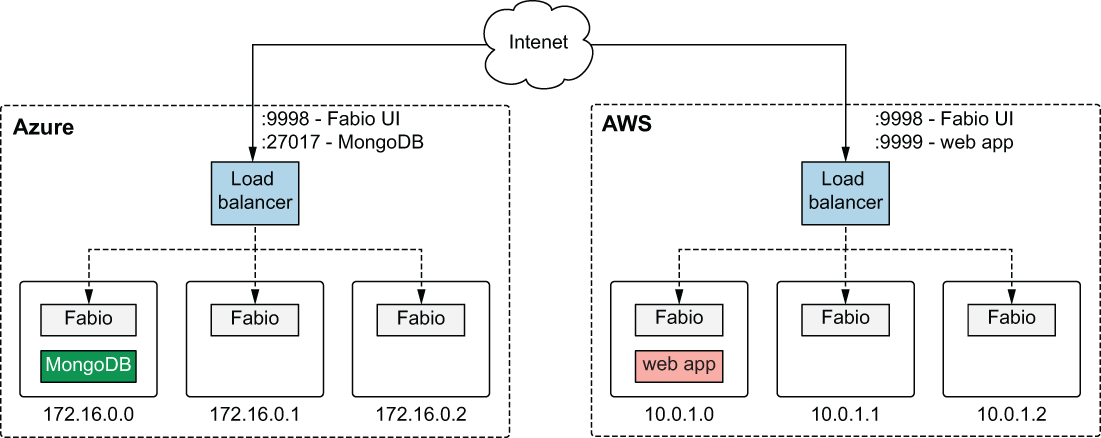
Figure 8.11 Network topology for the application layer. The web app runs in AWS, MongoDB runs on Azure, and Fabio runs on every Nomad client for application load balancing.
Note Fabio (https://fabiolb.net) is an HTTP and TCP reverse proxy that configures itself with data from Consul.
8.2.3 Stage 1: Static infrastructure
Now that we have the background and architecture out of the way, let’s start writing the infrastructure code for stage 1. As before, we make heavy use of modules. This is mainly because the complete source code would be long and fairly uninteresting—we covered most of it in chapter 4. Again, if you would like to know more, feel free to peruse the source code on GitHub. The complete code is shown in the following listing.
terraform {
  required_version = ">= 0.15"
  required_providers {
    azurerm = {
      source  = "hashicorp/azurerm"
      version = "~> 2.47"
    }
    aws = {
      source  = "hashicorp/aws"
      version = "~> 3.28"
    }
    random = {
      source  = "hashicorp/random"
      version = "~> 3.0"
    }
  }
}

provider "aws" {
  profile = "<profile>"
  region  = "us-west-2"
}

provider "azurerm" {
  features  {}
}

module "aws" {
  source               = "terraform-in-action/nomad/aws"
  associate_public_ips = true                                          ❶

  consul = {
    version              = "1.9.2"
    servers_count        = 3
    server_instance_type = "t3.micro"
  }

  nomad = {
    version              = "1.0.3"
    servers_count        = 3
    server_instance_type = "t3.micro"
    clients_count        = 3
    client_instance_type = "t3.micro"
  }
}


module "azure" {
  source               = "terraform-in-action/nomad/azure"
   location = "Central US"
  associate_public_ips = true                                          ❷
  join_wan             = module.aws.public_ips.consul_servers          ❸

  consul = {
    version              = "1.9.2"
    servers_count        = 3
    server_instance_size = "Standard_A1"
  }

  nomad = {
    version              = "1.0.3"
    servers_count        = 3
    server_instance_size = "Standard_A1"
    clients_count        = 3
    client_instance_size = "Standard_A1"
  }
}

output "aws" {
  value = module.aws
}
output "az" {
  value = module.azure
}
❶ Because we do not have a VPN tunnel between Azure and AWS, we have to assign public IP addresses to the client nodes to join the clusters.
❷ Because we do not have a VPN tunnel between Azure and AWS, we have to assign public IP addresses to the client nodes to join the clusters.
❸ The Azure Consul cluster federates itself with the AWS Consul cluster using a public IP address.
Warning These modules expose Consul and Nomad over insecure HTTP. Production use necessitates encrypting traffic with SSL/TLS certificates.
Let’s now provision the static infrastructure. Initialize the workspace with terraform init, and run terraform apply:
$ terraform apply
...
Plan: 96 to add, 0 to change, 0 to destroy.

Changes to Outputs:
  + aws = {
      + addresses  = {
          + consul_ui = (known after apply)
          + fabio_lb  = (known after apply)
          + fabio_ui  = (known after apply)
          + nomad_ui  = (known after apply)
        }
      + public_ips = {
          + consul_servers = (known after apply)
          + nomad_servers  = (known after apply)
        }
    }
  + az  = {
      + addresses = {
          + consul_ui = (known after apply)
          + fabio_db  = (known after apply)
          + fabio_ui  = (known after apply)
          + nomad_ui  = (known after apply)
        }
    }

Do you want to perform these actions?
  Terraform will perform the actions described above.
  Only 'yes' will be accepted to approve.

  Enter a value:
After you approve the apply and wait 10-15 minutes for it to complete, the output will include your AWS and Azure addresses for Consul, Nomad, and Fabio:
...
module.azure.module.consul_servers.azurerm_role_assignment.role_assignment:
Still creating... [20s elapsed]
module.azure.module.consul_servers.azurerm_role_assignment.role_assignment:
Creation complete after 23s [id=/subscriptions/47fa763c-d847-4ed4-bf3f-
1d2ed06f972b/providers/Microsoft.Authorization/roleAssignments/9ea7d897-
b88e-d7af-f28a-a98f0fbecfa6]

Apply complete! Resources: 96 added, 0 changed, 0 destroyed.

Outputs:

aws = {
  "addresses" = {
    "consul_ui" = "http://terraforminaction-5g7lul-consul-51154501.us-west-
2.elb.amazonaws.com:8500"
    "fabio_lb" = "http://terraforminaction-5g7lul-fabio-
8ed59d6269bc073a.elb.us-west-2.amazonaws.com:9999"
    "fabio_ui" = "http://terraforminaction-5g7lul-fabio-
8ed59d6269bc073a.elb.us-west-2.amazonaws.com:9998"
    "nomad_ui" = "http://terraforminaction-5g7lul-nomad-728741357.us-west-
2.elb.amazonaws.com:4646"
  }
  "public_ips" = {
    "consul_servers" = tolist([
      "54.214.122.191",
      "35.161.158.133",
      "52.41.144.132",
    ])
    "nomad_servers" = tolist([
      "34.219.30.131",
      "34.222.26.195",
      "34.213.132.122",
    ])
  }
}
az = {
  "addresses" = {
    "consul_ui" = "http://terraforminaction-vyyoqu-
consul.centralus.cloudapp.azure.com:8500"
    "fabio_db" = "tcp://terraforminaction-vyyoqu-
fabio.centralus.cloudapp.azure.com:27017"
    "fabio_ui" = "http://terraforminaction-vyyoqu-
fabio.centralus.cloudapp.azure.com:9998"
    "nomad_ui" = "http://terraforminaction-vyyoqu-
nomad.centralus.cloudapp.azure.com:4646"
  }
}
Note Although Terraform has been applied successfully, it will still take a few minutes for the clusters to finish bootstrapping.
Verify that Consul is running by copying the URL from either aws.addresses.consul_ui or azure.addresses.consul_ui into the browser (since they are federated, it does not matter which you use). You will get a page that looks like figure 8.12.
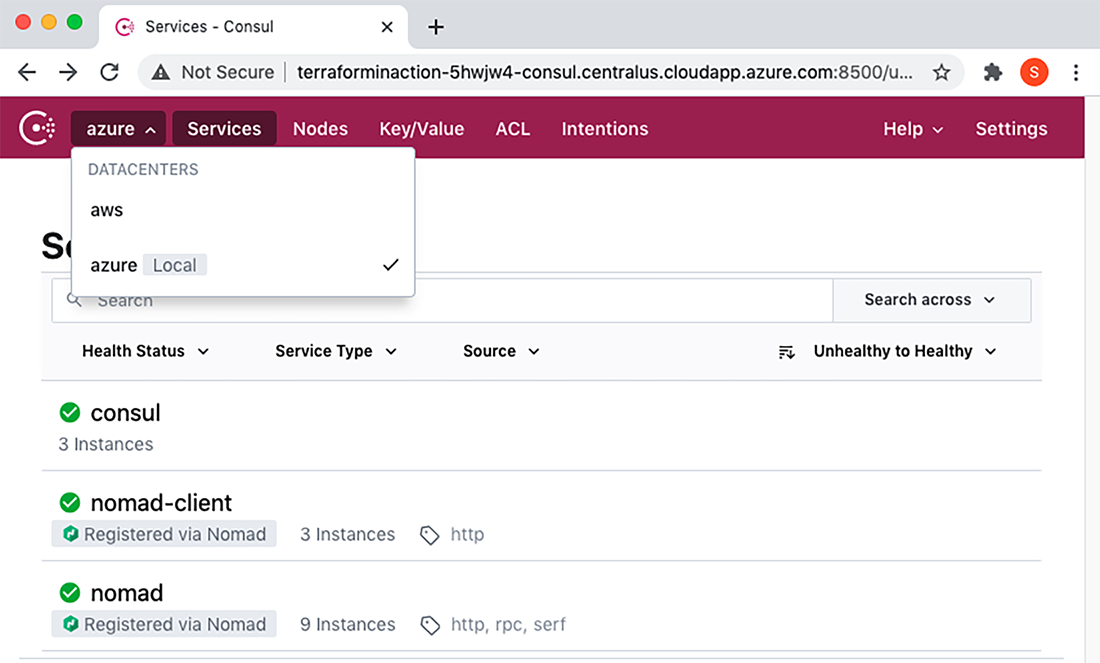
Figure 8.12 AWS Consul has started up and been federated with the Azure Consul, and Nomad servers and clients have automatically registered themselves. Clicking the Services tab lets you toggle between the AWS and Azure datacenters.
Once the Nomad servers are registered, you can view the Nomad control plane by copying the URL for either aws.addresses.nomad_ui or azure.addresses .nomad_ui into the browser. You can verify the clients are ready by clicking the Clients tab (see figure 8.13).

Figure 8.13 Nomad clients have joined the cluster and are ready to work. At top left, you can click the Regions tab to switch to the AWS datacenter.
8.2.4 Stage 2: Dynamic infrastructure
We are ready to deploy the MMORPG services onto Nomad. We’ll use the Nomad provider for Terraform, although it is more of a teaching opportunity than a real-world solution. In practice, I recommend deploying Nomad or Kubernetes workloads with the SDK, CLI, or API as part of an automated CI/CD pipeline.
Create a new Terraform workspace with a single file called nomad.tf containing the code in the following listing. You will need to populate it with some of the addresses from the previous section.
terraform {
  required_version = ">= 0.15"
  required_providers {
    nomad = {
      source  = "hashicorp/nomad"
      version = "~> 1.4"
    }
  }
}

provider "nomad" {                                   ❶
  address = "<aws.addresses.nomad_ui>"
  alias   = "aws"
}

provider "nomad" {                                   ❶
  address = "<azure.addresses.nomad_ui>"
  alias   = "azure"
}

module "mmorpg" {
  source   = "terraform-in-action/mmorpg/nomad"
  fabio_db = "<azure.addresses.fabio_db>"            ❷
  fabio_lb = "<aws.addresses.fabio_lb>"              ❷

  providers = {                                      ❸
    nomad.aws   = nomad.aws
    nomad.azure = nomad.azure
  }
}

output "browserquest_address" {
  value = module.mmorpg.browserquest_address
}
❶ The Nomad provider needs to be declared twice because of an oddity in how the API handles jobs.
❷ The module needs to know the address of the database and load balancer to initialize. Consul could be used for service discovery, but that would require the two clouds to have a private network tunnel to each other.
❸ The providers meta-argument allows providers to be explicitly passed to modules.
Next, initialize Terraform and run an apply:
$ terraform apply
...
      + type                    = "service"
    }

Plan: 4 to add, 0 to change, 0 to destroy.

Changes to Outputs:
  + browserquest_address = "http://terraforminaction-5g7lul-fabio-
8ed59d6269bc073a.elb.us-west-2.amazonaws.com:9999"

Do you want to perform these actions?
  Terraform will perform the actions described above.
  Only 'yes' will be accepted to approve.

  Enter a value:
Confirm the apply, and deploy the services onto Nomad:
...
module.mmorpg.nomad_job.aws_browserquest: Creation complete after 0s
[id=browserquest]
module.mmorpg.nomad_job.azure_fabio: Creation complete after 0s [id=fabio]
module.mmorpg.nomad_job.azure_mongo: Creation complete after 0s [id=mongo]

Apply complete! Resources: 4 added, 0 changed, 0 destroyed.

Outputs:
browserquest_address = "http://terraforminaction-5g7lul-fabio-
8ed59d6269bc073a.elb.us-west-2.amazonaws.com:9999"
The Nomad services are now deployed and have registered themselves with Consul and Fabio (see figures 8.14-8.16).
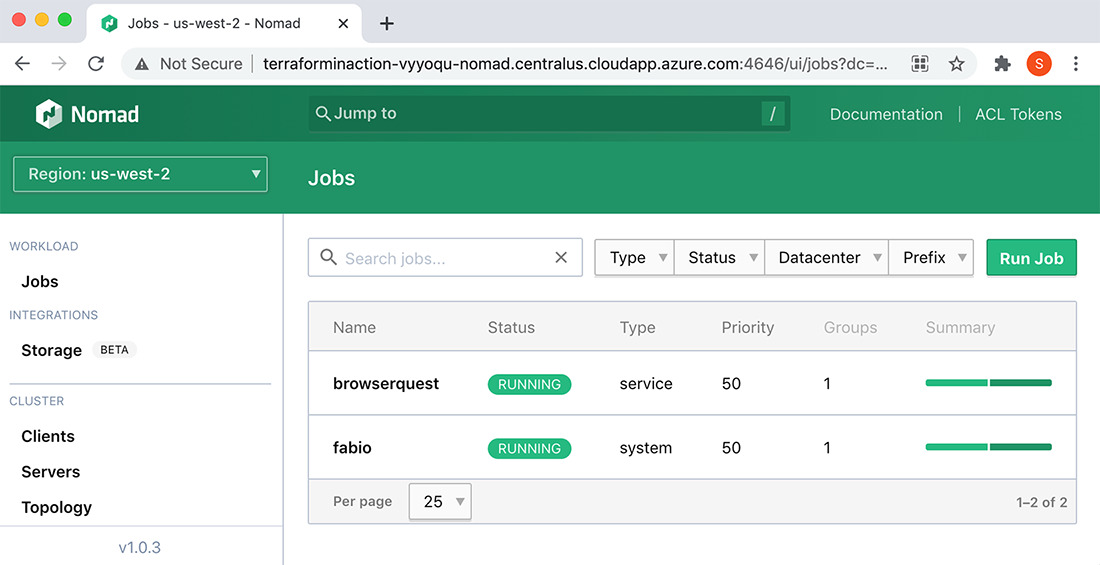
Figure 8.14 In the Nomad UI, you can see that BrowserQuest and Fabio are currently running in the AWS region. Click the Regions tab to switch to the Azure region and view Fabio and MongoDB running there.

Figure 8.15 Jobs register themselves as services with Consul, which can be seen in the Consul UI.
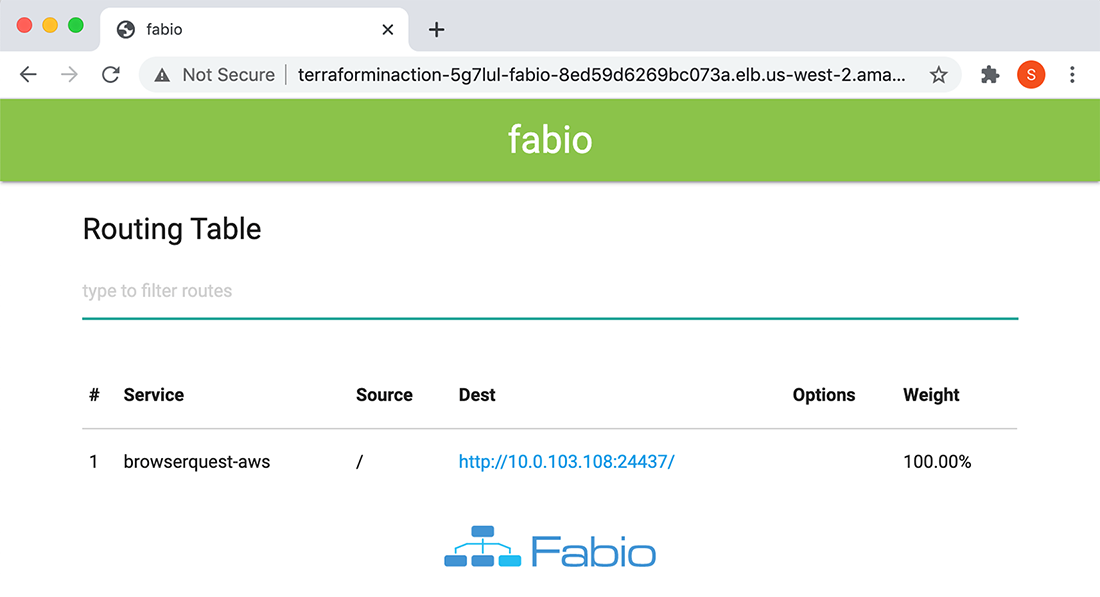
Figure 8.16 After the services are marked as healthy by Consul, they can be detected by Fabio. In AWS, Fabio routes HTTP traffic to the dynamic port that BrowserQuest is running on. In Azure, Fabio routes TCP traffic to the dynamic port MongoDB is running on.
8.2.5 Ready player one
After verifying the health of the services, you are ready to play! Copy the browserquest_address output into your browser, and you will be presented with a screen asking to create a new character (see figure 8.17). Anyone who has this address can join the game and play too.
Note The title screen says Phaser Quest instead of BrowserQuest because it is a re-creation of the original BrowserQuest game using the Phaser game engine for JavaScript. Credit goes to Jerenaux (www.github.com/Jerenaux/phaserquest).
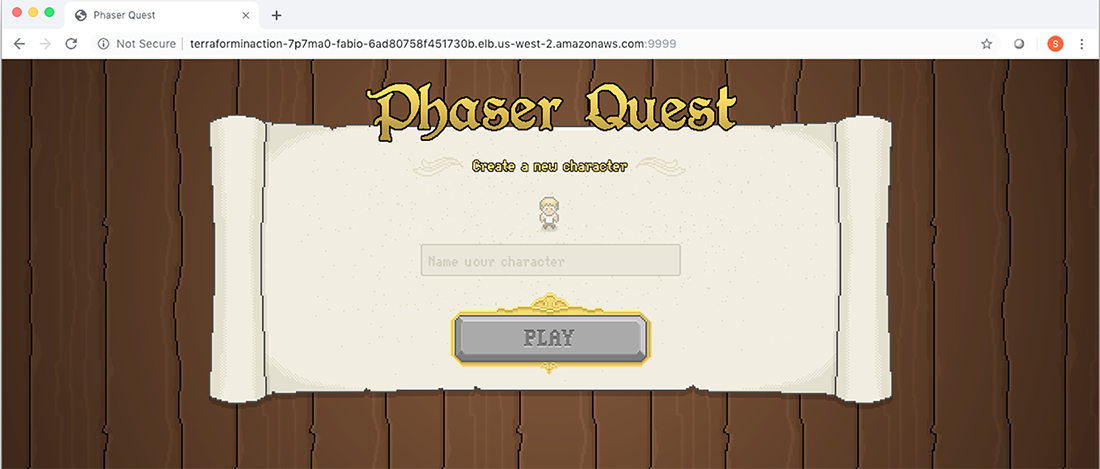
Figure 8.17 Welcome screen for the BrowserQuest MMORPG. You can now create a character, and anyone who has the link can play with you.
When you are done, tear down the static infrastructure before proceeding (it does not matter whether you destroy the Nomad workloads):
$ terraform destroy -auto-approve
...
module.azure.module.resourcegroup.azurerm_resource_group.resource_group:
Destruction complete after 46s
module.azure.module.resourcegroup.random_string.rand: Destroying...
[id=t2ndbvgi4ayw2qmhvl7mw1bu]
module.azure.module.resourcegroup.random_string.rand: Destruction complete
after 0s

Destroy complete! Resources: 93 destroyed.
8.3 Re-architecting the MMORPG to use managed services
Think of this as a bonus section. I could have ended the chapter with the previous section, but I feel the overall story would have been incomplete. The magical thing about multi-cloud is that it’s whatever you want it to be. Multi-cloud doesn't have to involve VMs or federating container orchestration platforms; it can also mix and match managed services.
By managed services, I mean anything that isn’t raw compute or heavy on the operations side of things; both SaaS and serverless qualify under this definition. Managed services are unique to each cloud. Even the same kind of managed service will differ in implementation across cloud providers (in terms of APIs, features, pricing, etc.). These differences can be perceived either as obstacles or as opportunities. I prefer the latter.
In this section, we re-architect the MMORPG to run on managed services in AWS and Azure. Specifically, we use AWS Fargate to deploy the app as a serverless container and Azure Cosmos DB as a managed MongoDB instance. Figure 8.18 shown an architecture diagram.
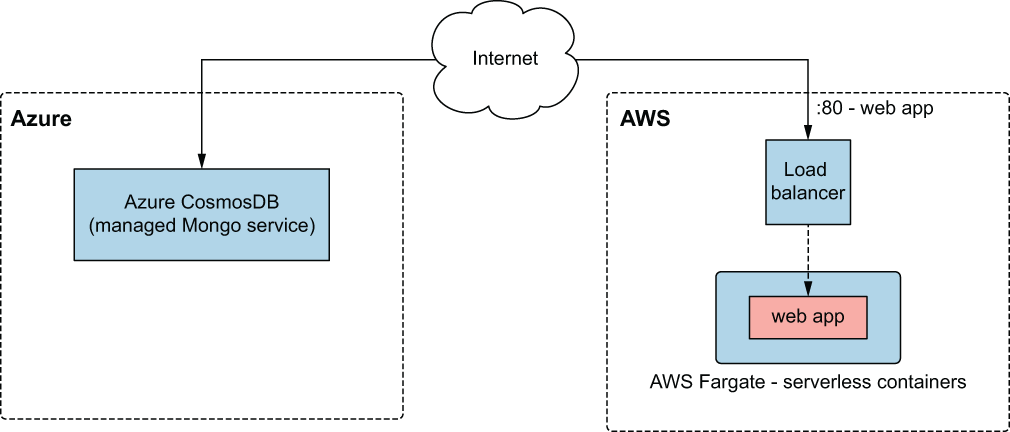
Figure 8.18 Architecture for the multi-cloud deployment of the MMORPG using managed services
8.3.1 Code
The chapter is already long, so I will make this quick. You need to create only one file, and it has everything required to deploy this scenario. Create a new workspace with a player2.tf file.
terraform {
  required_version = ">= 0.15"
  required_providers {
    azurerm = {
      source  = "hashicorp/azurerm"
      version = "~> 2.47"
    }
    aws = {
      source  = "hashicorp/aws"
      version = "~> 3.28"
    }
    random = {
      source  = "hashicorp/random"
      version = "~> 3.0"
    }
  }
}

provider "aws" {
  profile = "<profile>"
  region = "us-west-2"
}

provider "azurerm" {
  features {}
}

module "aws" {
  source = "terraform-in-action/mmorpg/cloud//aws"
  app = {
    image   = "swinkler/browserquest"
    port    = 8080
    command = "node server.js --connectionString
    ➥ ${module.azure.connection_string}"
  }
}

module "azure" {
  source    = "terraform-in-action/mmorpg/cloud//azure"
  namespace = "terraforminaction"
  location  = "centralus"
}

output "browserquest_address" {
  value = module.aws.lb_dns_name
}
8.3.2 Ready player two
We are ready to deploy! Wasn’t that easy? Initialize the workspace with terraform init followed by terraform apply. The result of terraform apply is as follows:
$ terraform apply
...
      + owner_id               = (known after apply)
      + revoke_rules_on_delete = false
      + vpc_id                 = (known after apply)
    }

Plan: 37 to add, 0 to change, 0 to destroy.

Changes to Outputs:
  + browserquest_address = (known after apply)

Do you want to perform these actions?
  Terraform will perform the actions described above.
  Only 'yes' will be accepted to approve.

  Enter a value:
Confirm, and wait until Terraform finishes applying:
...
module.aws.aws_ecs_task_definition.ecs_task_definition: Creation complete
after 1s [id=terraforminaction-ebfes6-app]
module.aws.aws_ecs_service.ecs_service: Creating...
module.aws.aws_ecs_service.ecs_service: Creation complete after 0s
[id=arn:aws:ecs:us-west-2:215974853022:service/terraforminaction-ebfes6-
ecs-service]

Apply complete! Resources: 37 added, 0 changed, 0 destroyed.

Outputs:

browserquest_address = terraforminaction-ebfes6-lb-444442925.us-west-
2.elb.amazonaws.com
Copy the browserquest_address into the browser, and you are ready to play (see figure 8.19)! Be patient, though, because it can take a few minutes for the services to finish bootstrapping.
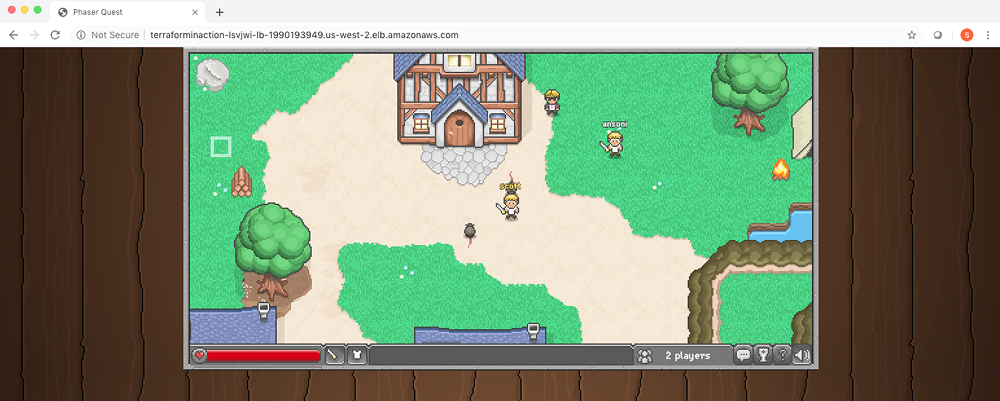
Figure 8.19 Multi-cloud means multiplayer!
TIP Remember to tear down the infrastructure with terraform destroy to avoid incurring additional costs!
8.4 Fireside chat
Terraform is the glue that binds multi-cloud architectures together. We started by deploying a hybrid-cloud load balancer with VMs in AWS, GCP, and Azure. This was as easy as declaring a few provider and module blocks. Multi-cloud architectures don’t have to be complex; they can be as simple as deploying an app using Heroku and configuring DNS with Cloudflare.
The next scenario we looked at involved a two-stage deployment to launch a container-orchestration platform and deploy services on top of that. Our container-orchestration platform consisted of two Nomad clusters federated together and using Consul for service discovery. Federated clusters are a practical way to approach multi-cloud because they allow you to treat compute like a commodity. Applications can be deployed without concern for the underlying infrastructure or cloud. Furthermore, by using a networking tool like Consul, it’s possible to improve resiliency by performing automated failovers via dynamic routing.
We followed up the container-orchestration scenario by redesigning our MMORPG app to use managed services. The frontend was deployed as a serverless container onto AWS and connected to a managed MongoDB instance on Azure. The point was that you don’t have to go all in on Kubernetes or Nomad if you don’t want to. Managed services are a fantastic alternative to container-orchestration platforms because of their reduced operational overhead.
Summary
-
Terraform can orchestrate multi-cloud and hybrid-cloud deployments with ease. From a user perspective, it is not much different than deploying to a single cloud.
-
Not all Terraform providers are worthwhile. For example, the Docker and Nomad providers for Terraform offer questionable value at best. It may be easier to call the APIs directly than to incorporate these providers into your workflows.
-
Cluster federation can be performed automatically as part of
terraform apply, although the clusters won’t necessarily be ready when Terraform finishes applying. This is because the applications running on the clusters may still be bootstrapping. -
Terraform can deploy containerized services, whether in the traditional sense—via container orchestration platforms—or using managed services.