
- Tainting and rotating AWS access keys provisioned by Terraform
- Refactoring module expansions
- Migrating state with
terraformmvandterraformstate - Importing existing resources with
terraformimport - Testing IaC with
terraform-exec
The ancient Greek philosopher Heraclitus is famous for positing that “Life is flux.” In other words, change is inevitable, and to resist change is to resist the essence of our existence. Perhaps nowhere is change more pronounced than in the software industry. Due to changing customer requirements and shifting market conditions, software is guaranteed to change. If not actively maintained, software degrades over time. Refactoring and testing are steps that developers take to keep software current.
Refactoring is the art of improving the design of code without changing existing behavior or adding new functionality. Benefits of refactoring include the following:
-
Maintainability—The ability to quickly fix bugs and address problems faced by customers.
-
Extensibility —How easy it is to add new features. If your software is extensible, then you are more agile and able to respond to marketplace changes.
-
Reusability—The ability to remove duplicated and highly coupled code. Reusable code is readable and easier to maintain.
Even a minor code refactoring should be thoroughly tested to ensure that the system operates as intended. There are (at least) three levels of software testing to consider: unit tests, integration tests, and system tests. From a Terraform perspective, we typically do not worry about unit tests because they are already implemented at the provider level. We also don’t care much about developing system tests because they are not as well defined when it comes to infrastructure as code (IaC). What we do care about are integration tests. In other words, for a given set of inputs, does a subsystem of Terraform (i.e., a module) deploy without errors and produce the expected output?
In this chapter, we begin by writing configuration code to self-service and rotate AWS access keys (with terraform taint). There are problems with the code’s maintainability, which we improve on in the next section using module expansions. Module expansions are a Terraform 0.13 feature allowing the use of count and for_each on modules. They are quite powerful, and a lot of old code could benefit from their use.
To deploy the code into production, we need to migrate state. State migration is tedious and somewhat tricky, but as we’ll see, with the proper use of terraform mv, terraform state, and terraform import, it’s achievable.
The last thing we investigate is how to test Terraform code with terraform-exec (https://github.com/hashicorp/terraform-exec). Terraform-exec is a HashiCorp golang library that makes it possible to programmatically execute Terraform commands. It’s most similar to Gruntwork’s Terratest (https://terratest.gruntwork.io) and lets us write integration tests for Terraform modules. Let’s get started.
10.1 Self-service infrastructure provisioning
Self-service is all about enabling customers to service themselves. Terraform, being a human-readable configuration language, is ideal for self-service infrastructure provisioning. With Terraform, customers can service themselves by making pull requests (PRs) against repositories (see figure 10.1).

Figure 10.1 Customers make PRs against a version-controlled source repository. This PR triggers a plan, which is reviewed by a management team. When the PR is merged, an apply runs and the resources are deployed.
But wait, haven’t we been doing self-service infrastructure provisioning all along? In a way, yes—but also no. This whole time, we’ve been looking at IaC more from a developer or operations perspective rather than a customer perspective. Remember that not everyone has equal experience with Terraform. Creating a successful self-service model is as much designing an easy-to-use workflow as it is choosing a technology.
Self-service infrastructure provisioning sounds great on paper, but in practice, it quickly becomes chaos if rules aren’t established about what can and cannot be provisioned. You have to make life easy for the customer, and you also have to make life easy for yourself.
Suppose you are part of a public cloud team responsible for gating AWS access to teams and service accounts within the company. In this arrangement, employees are not allowed to provision AWS Identity and Access Management (IAM) users, policies, or access keys themselves; everything must be approved by the public cloud team. In the past, such requests may have come through an internal IT ticketing system, but that approach is slower and (of course) not self-service. By storing your infrastructure as code, customers can directly make PRs with the changes they want. Reviewers only need to examine the result of terraform plan before approving. In chapter 13, we see how even this minuscule governance task can be automated with Sentinel policies. For now, we’ll assume this is a purely manual process.
10.1.1 Architecture
Let’s make a self-service IAM platform. It needs to provision AWS IAM users, policies, and access keys with Terraform and output a valid AWS credentials file. The module structure we’ll go with is a flat module design, meaning there will be many little files and no nested modules. Each service will get its own file for declaring resources, and shared code will be put in auxiliary files (see figure 10.2).
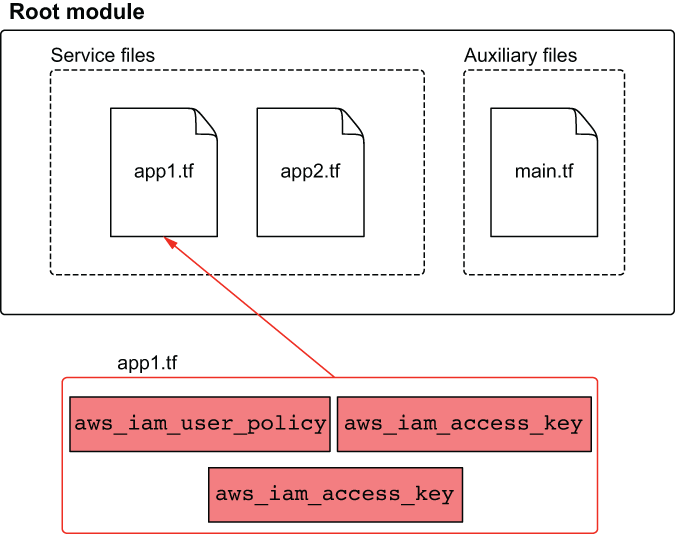
Figure 10.2 The module has two kinds of files: service and auxiliary. Service files keep all managed IAM resources together for a particular service. Auxiliary files are supporting files that organize and configure the module as a whole.
10.1.2 Code
We’ll jump right into writing the code. Create a new directory with three files: app1.tf, app2.tf, and main.tf. The first file, app1.tf, contains the code for deploying an AWS IAM user called app1-svc-account, attaches an inline policy, and provisions AWS access keys.
resource "aws_iam_user" "app1" {
  name          = "app1-svc-account"
  force_destroy = true
}

resource "aws_iam_user_policy" "app1" {
  user   = aws_iam_user.app1.name
  policy = <<-EOF
    {
      "Version": "2012-10-17",
      "Statement": [
        {
          "Action": [
            "ec2:Describe*"
          ],
          "Effect": "Allow",
          "Resource": "*"
        }
      ]
    }
  EOF
}

resource "aws_iam_access_key" "app1" {
  user = aws_iam_user.app1.name
}
The second file, app2.tf, is similar, except it creates an IAM user called app2-svc-account with a policy that allows it to list S3 buckets.
resource "aws_iam_user" "app2" {
  name          = "app2-svc-account"
  force_destroy = true
}

resource "aws_iam_user_policy" "app2" {
  user   = aws_iam_user.app1.name
  policy = <<-EOF
    {
      "Version": "2012-10-17",
      "Statement": [
        {
          "Action": [
            "s3:List*"
          ],
          "Effect": "Allow",
          "Resource": "*"
        }
      ]
    }
  EOF
}

resource "aws_iam_access_key" "app2" {
  user = aws_iam_user.app2.name
}
In main.tf, we have a local_file resource that creates a valid AWS credentials file (see http://mng.bz/rmrB).
terraform {
  required_version = ">= 0.15"
  required_providers {
    aws = {
      source = "hashicorp/aws"
      version = "~> 3.28"
    }
    local = {
      source = "hashicorp/local"
      version = "~> 2.0"
    }
  }
}

provider "aws" {
    profile = "<profile>"
    region = "us-west-2"
}

resource "local_file" "credentials" {           ❶
  filename           = "credentials"
  file_permission    = "0644"
  sensitive_content  = <<-EOF
    [${aws_iam_user.app1.name}]
    aws_access_key_id = ${aws_iam_access_key.app1.id}
    aws_secret_access_key = ${aws_iam_access_key.app1.secret}

    [${aws_iam_user.app2.name}]
    aws_access_key_id = ${aws_iam_access_key.app2.id}
    aws_secret_access_key = ${aws_iam_access_key.app2.secret}
  EOF
}
❶ Outputs a valid AWS credentials file
Note Provider declarations are usually put in providers.tf, and Terraform settings are usually put in versions.tf. Here we have not done so, to conserve space.
10.1.3 Preliminary deployment
Deployment is easy. Initialize with terraform init, and deploy with terraform apply:
$ terraform apply -auto-approve
...
aws_iam_access_key.app2: Creation complete after 3s
[id=AKIATESI2XGPIHJZPZFB]
local_file.credentials: Creating...
local_file.credentials: Creation complete after 0s
[id=e726f407ee85ca7fedd178003762986eae1d7a27]

Apply complete! Resources: 7 added, 0 changed, 0 destroyed.
After the apply completes, you will have two new sets of IAM users with inline policies and access keys (see figure 10.3).

Figure 10.3 Terraform has provisioned two new IAM users with inline policies and created access keys for those users.
An AWS credentials file has also been generated using local_file. The credentials file can be used to authenticate to the AWS CLI:
$ cat credentials
[app1-svc-account]
aws_access_key_id = AKIATESI2XGPIUSUHWUV
aws_secret_access_key = 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

[app2-svc-account]
aws_access_key_id = AKIATESI2XGPIHJZPZFB
aws_secret_access_key = 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
Note Instead of writing secrets in plain text to a credentials file, it’s better to store these values in a centralized secrets management tool like HashiCorp Vault or AWS Secrets Manager. We cover this in more depth in chapter 13.
Terraform is managing only two service accounts at the moment, but it’s easy to imagine how more service accounts could be provisioned. All that needs to be done is to create a new service file and update local_file. Although the code works, some problems emerge when scaling up. Before we discuss what improvements could be made, let’s first rotate access keys with terraform taint.
10.1.4 Tainting and rotating access keys
Regular secrets rotation is a well-known security best practice. Even the ancient Romans knew this; sentries would change camp passwords once a day. Since access keys allow service accounts to provision resources in AWS accounts, it’s a good idea to rotate these as frequently as possible (at least once every 90 days).
Although we could rotate access keys by performing terraform destroy followed by terraform apply, sometimes you wouldn’t want to do this. For example, if there was a permanent resource fixture, such as a Relational Database Service (RDS) database or S3 bucket included as part of the deployment, terraform destroy would delete these and result in data loss.
We can target the destruction and re-creation of individual resources with the terraform taint command. During the next apply, the resource will be destroyed and created anew. We use the command as follows:
terraform taint [options] address
Note address is the resource address (see http://mng.bz/VGgP) that uniquely identifies a resource within a given configuration.
To rotate access keys, we first list the resources in the state file to obtain resource addresses. The command terraform state list does this for us:
$ terraform state list
aws_iam_access_key.app1
aws_iam_access_key.app2
aws_iam_user.app1
aws_iam_user.app2
aws_iam_user_policy.app1
aws_iam_user_policy.app2
local_file.credentials
It looks like our two resource addresses are aws_iam_access_key.app1 and aws_iam_access_key.app2. Go ahead and taint these resources so they can be re-created during the next apply:
$ terraform taint aws_iam_access_key.app1
Resource instance aws_iam_access_key.app1 has been marked as tainted.
$ terraform taint aws_iam_access_key.app2
Resource instance aws_iam_access_key.app2 has been marked as tainted.
When we run terraform plan, we can see that the aws_access_key resources have been marked as tainted and will be re-created:
$ terraform plan
...
Terraform will perform the following actions:

  # aws_iam_access_key.app1 is tainted, so must be replaced
-/+ resource "aws_iam_access_key" "app1" {
      + encrypted_secret  = (known after apply)
      ~ id                = "AKIATESI2XGPIUSUHWUV" -> (known after apply)
      + key_fingerprint   = (known after apply)
      ~ secret            = "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" ->
(known after apply)
      ~ ses_smtp_password = "AiLTGCR7lNIM1u8Pl3cTOHu10Ni5JbhxULGdb+4z6inL"
-> (known after apply)
      ~ status            = "Active" -> (known after apply)
        user              = "app1-svc-account"
    }
...
Plan: 3 to add, 0 to change, 3 to destroy.
Note If you ever taint the wrong resource, you can always undo your mistake with the complementary command: terraform untaint.
If we apply changes, the access keys are re-created without affecting anything else (except, of course, dependent resources like local_file). Apply changes now by running terraform apply:
$ terraform apply -auto-approve
...
aws_iam_access_key.app1: Creation complete after 0s [id=AKIATESI2XGPIQGHRH5W]
local_file.credentials: Creating...
local_file.credentials: Creation complete after 1s
[id=ea6994e2b186bbd467cceee89ff39c10db5c1f5e]

Apply complete! Resources: 3 added, 0 changed, 3 destroyed.
We can verify that the access keys have indeed been rotated by cat-ing the credentials file and observing that it has new access and secret access keys:
$ cat credentials
[app1-svc-account]
aws_access_key_id = AKIATESI2XGPIQGHRH5W
aws_secret_access_key = 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

[app2-svc-account]
aws_access_key_id = AKIATESI2XGPLJNKW5FC
10.2 Refactoring Terraform configuration
While the code may be suitable for the current use case, there are deficiencies that will result in long-term maintainability issues:
-
Duplicated code —As new users and policies are provisioned, correspondingly more service files are required. This means a lot of copy/paste.
-
Name collisions—Because of all the copy/paste, name collisions on resources are practically inevitable. You’ll waste time resolving silly name conflicts.
-
Inconsistency—As the codebase grows, it becomes harder and harder to maintain uniformity, especially if PRs are being made by people who aren’t Terraform experts.
To alleviate these concerns, we need to refactor.
10.2.1 Modularizing code
The biggest refactoring improvement we can make is to put reusable code into modules. Not only does this solve the problem of duplicated code (i.e., resources in modules only have to be declared once), but it also solves the problems of name collisions (resources do not conflict with resources in other modules) and inconsistency (it’s difficult to mess up a PR if not much code is being changed).
The first step to modularizing an existing workspace is to identify opportunities for code reuse. Comparing app1.tf with app2.tf, the same three resources are declared in both: an IAM user, an IAM policy, and an IAM access key. Here is app1.tf:
resource "aws_iam_user" "app1" {
    name          = "app1-svc-account"
    force_destroy = true
  }

  resource "aws_iam_user_policy" "app1" {
    user   = aws_iam_user.app1.name
    policy = <<-EOF
      {
        "Version": "2012-10-17",
        "Statement": [
          {
            "Action": [
              "ec2:Describe*"
            ],
            "Effect": "Allow",
            "Resource": "*"
          }
        ]
      }
    EOF
  }

  resource "aws_iam_access_key" "app1" {
    user = aws_iam_user.app1.name
  }
resource "aws_iam_user" "app2" {
  name          = "app2-svc-account"
  force_destroy = true
}

resource "aws_iam_user_policy" "app2" {
  user   = aws_iam_user.app1.name
  policy = <<-EOF
    {
      "Version": "2012-10-17",
      "Statement": [
        {
          "Action": [
            "s3:List*"
          ],
          "Effect": "Allow",
          "Resource": "*"
        }
      ]
    }
  EOF
}

resource "aws_iam_access_key" "app2" {
  user = aws_iam_user.app2.name
}
There are slight differences between the policy configurations, of course, but they can be easily parameterized. We’ll move the three resources into a common module called iam (see figure 10.4).

Figure 10.4 Consolidating common IAM resources in a Terraform module
Next, we need to clean up main.tf. This file is responsible for provisioning a credentials text document containing the AWS access and secret access keys, but the way it does so is inefficient as it requires explicitly referencing each resource:
resource "local_file" "credentials" {
  filename           = "credentials"
  file_permission    = "0644"
  sensitive_content  = <<-EOF
    [${aws_iam_user.app1.name}]                                     ❶
    aws_access_key_id = ${aws_iam_access_key.app1.id}               ❶
    aws_secret_access_key = ${aws_iam_access_key.app1.secret}       ❶

    [${aws_iam_user.app2.name}]                                     ❷
    aws_access_key_id = ${aws_iam_access_key.app2.id}               ❷
    aws_secret_access_key = ${aws_iam_access_key.app2.secret}       ❷
  EOF
}
❶ Explicitly references app1 resources
❷ Explicitly references app2 resources
Each time a new IAM user is provisioned, you’ll need to update this file. At first, this may not seem like a big deal, but it becomes a hassle over time. This would be a good place to use template strings. A three-line snippet with the profile name, AWS access key ID, and AWS secret access key can be produced by the IAM module and dynamically joined with other such snippets to form a credentials document.
10.2.2 Module expansions
Consider what the interface for the IAM module should be. At the very least, it should accept two input parameters: one to assign a service name and another to attach a list of policies. Accepting a list of policies is better than how we previously had it—we were only able to attach a single policy. Our module will also produce output with a three-line template string that we can join with other strings (see figure 10.5).

Figure 10.5 Inputs and outputs for the IAM module
Until recently, we would have had to declare each instance of a module like this separately:
module "iam-app1" {                                ❶
  source   = "./modules/iam"
  name     = "app1"
  policies = [file("./policies/app1.json")]
}

module "iam-app2" {                                ❶
  source   = "./modules/iam"
  name     = "app2"
  policies = [file("./policies/app2.json")]
}
❶ Two instances of the same module used to have to be declared separately.
This isn’t terrible, but it also isn’t ideal. Even though we modularized the code, we would still have to copy/paste each time we wanted a new module instance. It diminished a lot of the benefit of using nested modules and was a major reason many people favored using flat modules.
Fortunately, there is now a solution. With the advent of Terraform 0.13, a new feature was released called module expansions. Module expansions make it possible to use count and for_each on a module the same way you can for a resource. Instead of declaring a module multiple times, now you only have to declare it once. For example, assuming we had a map of configuration stored in a local.policy_mapping value, figure 10.6 shows how a single module declaration could expand into multiple instances.
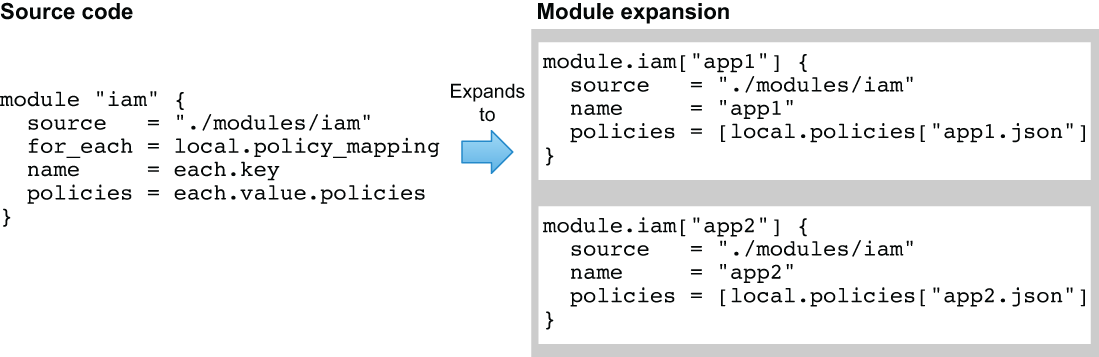
Figure 10.6 Expanding a Terraform module with for_each
Like for_each on resources, for_each on a module requires providing configuration via either a set or a map. Here we will use a map, with the keys being the name attribute and the values being an object with a single attribute called policies. Policies are of type list(string) and contain the JSON policy documents for each policy that will be attached to the IAM user.
locals {
  policy_mapping = {
    "app1" = {
      policies = [local.policies["app1.json"]],
    },
    "app2" = {
      policies = [local.policies["app2.json"]],
    },
  }
}

module "iam" {
  source   = "./modules/iam"
  for_each = local.policy_mapping            ❶
  name     = each.key
  policies = each.value.policies
}
❶ Module expansion creates a separate instance for each element of for_each.
10.2.3 Replacing multi-line strings with local values
We are refactoring an existing Terraform workspace to aid readability and maintainability. One of the key aspects is how to make it easy for someone to configure the workspace inputs. Remember that we have two module inputs: name (pretty self-explanatory) and policies (which needs further explanation). In this case, policies is an input variable of type list(string) designed to accept a list of JSON policy documents to attach to an individual IAM user. We have a choice about how to do this; we can either embed the policy documents inline as string literals (which is what we’ve been doing) or read the policy documents from an external file (the better option of the two).
Embedding string literals, especially multi-line string literals, is generally a bad idea because it hurts readability. Having too many string literals in Terraform configuration makes it messy and hard to find what you’re looking for. It is better to keep this information in a separate file and read from it using either file() or fileset(). The following listing uses a for expression to produce a map of key-value pairs containing the filename and contents of each policy file. That way, policies can be stored together in a common directory and fetched by filename.
locals {
  policies = {
    for path in fileset(path.module, "policies/*.json") : basename(path) =>
file(path)
  }
  policy_mapping = {
    "app1" = {
local.policies["app1.json"]],
    },
    "app2" = {
      policies = [local.policies["app2.json"]],
    },
  }
}

module "iam" {
  source   = "./modules/iam"
  for_each = local.policy_mapping
  name     = each.key
  policies = each.value.policies
}
To give you an idea of what the fancy for expression does, the calculated value of local.policies, which is the result of the for expression, is shown here:
{
  "app1.json" = "{
    "Version": "2012-10-17",
    "Statement":
[
      {
        "Action": [
          "ec2:Describe*"

],
        "Effect": "Allow",
        "Resource": "*"
      }

]
  }
  "
  "app2.json" = "{
    "Version": "2012-10-17",
    "Statement": [
        {
            "Action": [
                "s3:List*"

],
            "Effect": "Allow",
            "Resource": "*"

}
    ]
}
"
}
As you can see, we can now reference the JSON policy documents for individual policies by filename. For example, local.policies["app1.json"] would return the contents of app1.json. Now all we need to do is make sure these files actually exist.
Create a policies folder in the current working directory. In this folder, create two new files, app1.json and app2.json, with the contents shown in listings 10.6 and 10.7, respectively.
{
  "Version": "2012-10-17",
  "Statement": [
    {
      "Action": [
        "ec2:Describe*"
      ],
      "Effect": "Allow",
      "Resource": "*"
    }
  ]
}
{
    "Version": "2012-10-17",
    "Statement": [
        {
            "Action": [
                "s3:List*"
            ],
            "Effect": "Allow",
            "Resource": "*"
        }
    ]
}
10.2.4 Looping through multiple module instances
Remember how the IAM module returns a credentials output? This is a little three-line string that can be appended with other such strings to produce a complete and valid AWS credentials file. The credentials string has this form:
[app1-svc-account]
aws_access_key_id = AKIATESI2XGPIQGHRH5W
aws_secret_access_key = 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
If each module instance produces its own output, we can join them together with the built-in join() function. The following for expression loops through each instance of the module.iam expansion, accesses the credentials output, and joins them with a newline:
join("
", [for m in module.iam : m.credentials])
The complete main.tf code, with the included Terraform settings block and provider declarations, is as follows.
terraform {
  required_version = ">= 0.15"
  required_providers {
    aws = {
      source = "hashicorp/aws"
      version = "~> 3.28"
    }
    local = {
      source = "hashicorp/local"
      version = "~> 2.0"
    }
  }
}

provider "aws" {
    profile = "<profile>"
    region = "us-west-2"
}

locals {
  policies = {
    for path in fileset(path.module, "policies/*.json") : basename(path) =>
file(path)
  }
  policy_mapping = {
    "app1" = {
      policies = [local.policies["app1.json"]],
    },
    "app2" = {
      policies = [local.policies["app2.json"]],
    },
  }
}

module "iam" {                          ❶
  source   = "./modules/iam"
  for_each = local.policy_mapping
  name     = each.key
  policies = each.value.policies
}

resource "local_file" "credentials" {
  filename = "credentials"
  content  = join("
", [for m in module.iam : m.credentials])
}
❶ The IAM module doesn’t exist yet, but it will soon.
10.2.5 New IAM module
Now it’s time to implement the IAM module that will deploy three IAM resources (user, policy, and access key). This module will have two input variables (name and policy) and one output value (credentials). Create a file with relative path ./modules/iam/main.tf, and insert the code from listing 10.9.
Note A standard module structure would have code split into main.tf, variables.tf, and outputs.tf; again, for the sake of brevity, I have not done this.
variable "name" {
  type = string
}

variable "policies" {
  type = list(string)
}

resource "aws_iam_user" "user" {
  name          = "${var.name}-svc-account"
  force_destroy = true
}

resource "aws_iam_policy" "policy" {                          ❶
  count  = length(var.policies)
  name        = "${var.name}-policy-${count.index}"
  policy      = var.policies[count.index]
}

resource "aws_iam_user_policy_attachment" "attachment" {
    count  = length(var.policies)
  user       = aws_iam_user.user.name
  policy_arn = aws_iam_policy.policy[count.index].arn
}

resource "aws_iam_access_key" "access_key" {
  user = aws_iam_user.user.name
}

output "credentials" {                                        ❷
  value = <<-EOF
    [${aws_iam_user.user.name}]
    aws_access_key_id = ${aws_iam_access_key.access_key.id}
    aws_secret_access_key = ${aws_iam_access_key.access_key.secret}
  EOF
}
❶ Support for attaching multiple policies
At this point, we are code complete. Your completed project should contain the following files:
.
├── credentials
├── main.tf
├── modules
│   └── iam
│        └── main.tf
├── policies
│    ├──app1.json
│    └── app2.json
└── terraform.tfstate

3 directories, 6 files
10.3 Migrating Terraform state
After reinitializing the workspace with terraform init, calling terraform plan reveals that Terraform intends to destroy and re-create all resources during the subsequent terraform apply:
$ terraform plan
...
  # module.iam["app2"].aws_iam_user.user will be created
  + resource "aws_iam_user" "user" {
      + arn           = (known after apply)
      + force_destroy = true
      + id            = (known after apply)
      + name          = "app2-svc-account"
      + path          = "/"
      + unique_id     = (known after apply)
    }

  # module.iam["app2"].aws_iam_user_policy_attachment.attachment[0] will be
created
  + resource "aws_iam_user_policy_attachment" "attachment" {
      + id         = (known after apply)
      + policy_arn = (known after apply)
      + user       = "app2-svc-account"
}

Plan: 9 to add, 0 to change, 7 to destroy.              ❶

------------------------------------------------------------------------
❶ All resources will be destroyed and re-created.
This happens because Terraform does not know that resources declared in the IAM module are the same as previously provisioned resources. Often, it isn’t an issue of resources being destroyed and re-created; it’s an issue of data loss. For example, if you had a deployed database, you would certainly want to avoid deleting it. For the IAM scenario, we do not have any databases; but let’s says we want to avoid deleting IAM users because the associated AWS CloudWatch logs are important. We’ll skip migrating IAM policies or access keys because there is nothing special about them.
Unfortunately for us, Terraform state migration is rather difficult and tedious. It’s difficult because it requires intimate knowledge about how state is stored, and it’s tedious because—although it isn’t entirely manual—it would take a long time to migrate more than a handful of resources.
Note HashiCorp has announced that improved imports could be a deliverable of Terraform 1.0 (see http://mng.bz/xGWW). Hopefully, this will alleviate the worst sufferings of state migration.
10.3.1 State file structure
Let’s now consider what goes into Terraform state. If you recall from chapter 2, state contains information about what is currently deployed and is automatically generated from configuration code as part of terraform apply. To migrate state, we need to move or import resources into a correct destination resource address (see figure 10.7).
There are three options when it comes to migrating state:

Figure 10.7 Current vs. future structure of the state file. We want to move resources from where they were in the old configuration to where they will be in the new version. This will prevent the resource from being destroyed and re-created during the next apply.
Of the three methods, the first is the most flexible, but it is also the most dangerous because of the potential for human error. The second and third methods are easier and safer. In the following two sections, we see these methods in practice.
Warning Manually editing the state file is not recommended except in niche situations, such as correcting provider errors.
10.3.2 Moving resources
We have to move the existing IAM users’ state from their current resource address to their final resource address so they won’t be deleted and re-created during the next apply. To accomplish this, we will use terraform state mv to move the resource state around. The command to move a resource (or module) into the desired destination address is
terraform state mv [options] SOURCE DESTINATION
SOURCE and DESTINATION both refer to resource addresses. The source address is where the resource is currently located, and the destination address is where it will go. But how do we know the current resource addresses? The easiest way to find it is with terraform state list:
$ terraform state list
aws_iam_access_key.app1
aws_iam_access_key.app2
aws_iam_user.app1
aws_iam_user.app2
aws_iam_user_policy.app1
aws_iam_user_policy.app2
local_file.credentials
Note If you haven’t already done so, use terraform init to download providers and install modules.
All we need to do is move the IAM users for app1 and app2 into the iam module. The source address for app1 is aws_iam_user.app1, and the destination address for app1 is module.iam["app1"]. Therefore, to move the resource state, we just need to run the following command:
$ terraform state mv aws_iam_user.app1 module.iam["app1"].aws_iam_user.user
Move "aws_iam_user.app1" to "module.iam["app1"].aws_iam_user.user
Successfully moved 1 object(s).
$ terraform state mv aws_iam_user.app2 module.iam["app2"].aws_iam_user.user
Move "aws_iam_user.app2" to "module.iam["app2"].aws_iam_user.user
Successfully moved 1 object(s).
By listing the resources in the state file again, you can verify that the resources have indeed been moved successfully:
$ terraform state list
aws_iam_access_key.app1
aws_iam_access_key.app2
aws_iam_user_policy.app1
aws_iam_user_policy.app2
local_file.credentials
module.iam["app1"].aws_iam_user.user
module.iam["app2"].aws_iam_user.user
Note You can move a resource or module to any address, even one that does not exist within your current configuration. This can cause unexpected behavior, which is why you have to be careful that you get the right address.
10.3.3 Redeploying
Our mission was to migrate existing IAM users to their future position in Terraform state so they won’t be deleted when the configuration code is updated, based on our refactoring. We did make a stipulation that we don’t want IAM users to be deleted and re-created (because reasons), but we didn’t make this condition for IAM access keys or policies, because having these be rotated is a desirable side effect.
A quick terraform plan verifies that we have indeed accomplished our mission: now only seven resources are slated to be created and five destroyed, as opposed to the nine and seven from earlier. This means the two IAM users will not be destroyed and re-created, as they are already in their correct position:
$ terraform plan
...
  # module.iam["app2"].aws_iam_user_policy_attachment.attachment[0] will be
created
  + resource "aws_iam_user_policy_attachment" "attachment" {
      + id         = (known after apply)
      + policy_arn = (known after apply)
      + user       = "app2-svc-account"
    }

Plan: 7 to add, 0 to change, 5 to destroy.

_____________________________________________________________________________
We can now apply the changes with confidence, knowing that our state migration has been accomplished:
$ terraform apply -auto-approve
...
module.iam["app2"].aws_iam_user_policy_attachment.attachment[0]: Creation
complete after 2s [id=app2-svc-account-20200929075715719500000002]
local_file.credentials: Creating...
local_file.credentials: Creation complete after 0s
[id=270e9e9b124fdf55e223ac263571e8795c5b6f19]

Apply complete! Resources: 7 added, 0 changed, 5 destroyed.
10.3.4 Importing resources
The other way Terraform state can be migrated is by deleting and reimporting resources. Resources can be deleted with terraform state rm and imported with terraform import. Deleting resources is fairly self-explanatory (they are removed from the state file), but importing resources requires further explanation. Resource imports are how unmanaged resources are converted into managed resources. For example, if you created resources out of band, such as through the CLI or using another IaC tool like CloudFormation, you could import them into Terraform as managed resources. terraform import is to unmanaged resources what terraform refresh is to managed resources. We will use terraform import to reimport a deleted resource into the correct resource address (not a traditional use case, I’ll grant, but a useful teaching exercise nonetheless).
Note Check with the relevant Terraform provider documentation to ensure that imports are allowed for a given resource.
Let’s first remove the IAM user from Terraform state so we can reimport it. The syntax of the remove command is as follows:
terraform state rm [options] ADDRESS
This command allows you to remove specific resources/modules from Terraform state. I usually use it to fix corrupted states, such as when buggy resources prevent you from applying or destroying the rest of your configuration code.
Tip Corrupted state is usually the result of buggy provider source code, and you should file a support ticket on the corresponding GitHub repository if this ever happens to you.
Before we remove the resource from state, we need the ID so we can reimport it later:
$ terraform state show module.iam["app1"].aws_iam_user.user
# module.iam["app1"].aws_iam_user.user:
resource "aws_iam_user" "user" {
    arn           = "arn:aws:iam::215974853022:user/app1-svc-account"
    force_destroy = true
    id            = "app1-svc-account"
    name          = "app1-svc-account"
    path          = "/"
    tags          = {}
    unique_id     = "AIDATESI2XGPBXYYGHJOO"
}
The ID value for this resource is the IAM user’s name: in this case, app1-svc-account. A resource’s ID is set at the provider level and is not always what you think it should be, but it is guaranteed to be unique. You can see what it is using terraform show or figure it out by reading provider documentation.
Let’s delete the app1 IAM user from state with the terraform state rm command and pass in the resource ID from terraform state show:
$ terraform state rm module.iam["app1"].aws_iam_user.user
Removed module.iam["app1"].aws_iam_user.user
Successfully removed 1 resource instance(s).
Now Terraform is not managing the IAM resource and doesn’t even know it exists. If we were to run another apply, Terraform would attempt to create an IAM user with the same name, which would cause a name conflict error—you cannot have two IAM users with the same name in AWS. We need to import the resource into the desired location and bring it back under the yoke of Terraform. We can do that with terraform import. Here is the command syntax:
terraform import [options] ADDRESS ID
ADDRESS is the destination resource address where you want your resource to be imported (configuration must be present for this to work), and ID is the unique resource ID (app1-svc-account). Import the resource now with terraform import:
$ terraform import module.iam["app1"].aws_iam_user.user app1-svc-account
module.iam["app1"].aws_iam_user.user: Importing from ID "app1-svc-account"...
module.iam["app1"].aws_iam_user.user: Import prepared!
  Prepared aws_iam_user for import
module.iam["app1"].aws_iam_user.user: Refreshing state... [id=app1-svc-account]

Import successful!

The resources that were imported are shown above. These resources are now in
your Terraform state and will henceforth be managed by Terraform.
An interesting thing to note is that the state we import doesn’t match our configuration. In fact, if you call terraform plan, it will suggest performing an update in place:
$ terraform plan
...
An execution plan has been generated and is shown below.
Resource actions are indicated with the following symbols:
  ~ update in-place

Terraform will perform the following actions:

  # module.iam["app1"].aws_iam_user.user will be updated in-place
  ~ resource "aws_iam_user" "user" {
        arn           = "arn:aws:iam::215974853022:user/app1-svc-account"
      + force_destroy = true
        id            = "app1-svc-account"
        name          = "app1-svc-account"
        path          = "/"
        tags          = {}
        unique_id     = "AIDATESI2XGPBXYYGHJOO"
    }

Plan: 0 to add, 1 to change, 0 to destroy.

____________________________________________________________________________
If you inspect the state file, you’ll notice that the force_destroy attribute is set to null instead of true (which is what it should be):
...
    {
      "module": "module.iam["app1"]",
      "mode": "managed",
      "type": "aws_iam_user",
      "name": "user",
      "provider": "provider["registry.terraform.io/hashicorp/aws"]",
      "instances": [
        {
          "schema_version": 0,
          "attributes": {
            "arn": "arn:aws:iam::215974853022:user/app1-svc-account",
            "force_destroy": null,                                        ❶
            "id": "app1-svc-account",
            "name": "app1-svc-account",
            "path": "/",
            "permissions_boundary": null,
            "tags": {},
            "unique_id": "AIDATESI2XGPBXYYGHJOO"
          },
          "private": "eyJzY2hlbWFfdmVyc2lvbiI6IjAifQ=="
        }
      ]
    }, ...
❶ force_destroy is null instead of true.
Why did this happen? Well, importing resources is the same as performing terraform refresh on a remote resource. It reads the current state of the resource and stores it in Terraform state. The problem is that force_destroy isn’t an AWS attribute and can’t be read by making an API call. It comes from Terraform configuration, and since we haven’t reconciled the state yet, it hasn’t had a chance to update.
It’s important to have force_destroy set to true because occasionally a race condition exists between when a policy is destroyed and when the IAM user is destroyed, causing an error. force_destroy deletes an IAM resource even if there are still attached policies. The easiest and best way to fix this is with terraform apply, although you could also update the state manually:
$ terraform apply -auto-approve
...
local_file.credentials: Refreshing state... [id=4c65f8946d3bb69c819a7245fe700838e5e357fb]
module.iam["app1"].aws_iam_user.user: Modifying... [id=app1-svc-account]
module.iam["app1"].aws_iam_user.user: Modifications complete after 0s
[id=app1-svc-account]

Apply complete! Resources: 0 added, 1 changed, 0 destroyed.
Now that we’re back in a good state, we can clean up as usual with terraform destroy:
$ terraform destroy -auto-approve
...
module.iam["app2"].aws_iam_policy.policy[0]: Destruction complete after 1s
module.iam["app2"].aws_iam_user.user: Destruction complete after 4s
module.iam["app1"].aws_iam_user.user: Destruction complete after 4s

Destroy complete! Resources: 9 destroyed.
This concludes the IAM scenario. In the next section, we move on and discuss how to test infrastructure as code.
10.4 Testing infrastructure as code
Testing infrastructure as code is a bit different than testing application code. Generally, when testing application code, you have at least three levels of testing:
-
Integration tests—Do combined parts function as a component?
-
System tests—Does the system as a whole operate as intended?
With Terraform, we don’t usually perform unit tests, as there isn’t really a need to do so. Terraform configuration is mostly made up of resources and data sources, both of which are unit-tested at the provider level. The closest we have to this level of testing is static analysis, which basically makes sure configuration code is valid and has no obvious errors. Static analysis is done with either a linter, such as terraform-lint (https://github.com/terraform-linters/tflint), or a validation tool, such as terraform validate. Despite being a shallow form of testing, static analysis is useful because it’s so quick.
Note Some people claim that terraform plan is equivalent to a dry run, but I disagree. terraform plan is not a dry run because it refreshes data sources, and data sources can execute arbitrary (potentially malicious) code.
Integration tests make sense as long as you are clear about what a component is. If a unit in Terraform is a single resource or data source, it follows that a component is an individual module. Modules should therefore be relatively small and encapsulated to make them easier to test.
System tests (or functional tests) can be thought of as deploying an entire project, typically consisting of multiple modules and submodules. If your infrastructure deploys an application, you might also layer regression and performance testing as part of this step. We don’t cover system testing in this section because it’s subjective and unique to the infrastructure you are deploying.
We are going to write a basic integration test for a module that deploys an S3 static website. This integration test could also be generalized to work for any kind of Terraform module.
10.4.1 Writing a basic Terraform test
HashiCorp has recently developed a Go library called terraform-exec (https://github.com/hashicorp/terraform-exec) that allows for executing Terraform CLI commands programmatically. This library makes it easy to write automated tests for initializing, applying, and destroying Terraform configuration code (see figure 10.8). We’ll use this library to perform integration testing on the S3 static website module.

Figure 10.8 Testing a Terraform module requires calling Terraform CLI commands programmatically.
Listing 10.10 shows the code for a basic Terraform test. It downloads the latest version of Terraform, initializes Terraform in a ./testfixtures directory, performs terraform apply, checks the health of the application, and finally cleans up with terraform destroy. Create a new directory in your GOPATH, and insert the code into a terraform-_module_test.go file.
Listing 10.10 terraform_module_test.go
package test

import (
    "bytes"
    "context"
    "fmt"
    "io/ioutil"
    "net/http"
    "os"
    "testing"

    "github.com/hashicorp/terraform-exec/tfexec"
    "github.com/hashicorp/terraform-exec/tfinstall"
    "github.com/rs/xid"
)

func TestTerraformModule(t *testing.T) {
    tmpDir, err := ioutil.TempDir("", "tfinstall")
    if err != nil {
        t.Error(err)
    }
    defer os.RemoveAll(tmpDir)

    latestVersion := tfinstall.LatestVersion(tmpDir, false)
    execPath, err := tfinstall.Find(latestVersion)                         ❶
    if err != nil {
        t.Error(err)
    }

    workingDir := "./testfixtures"
    tf, err := tfexec.NewTerraform(workingDir, execPath)                   ❷
    if err != nil {
        t.Error(err)
    }

    ctx := context.Background()
    err = tf.Init(ctx, tfexec.Upgrade(true), tfexec.LockTimeout("60s"))    ❸
    if err != nil {
        t.Error(err)
    }

    defer tf.Destroy(ctx)                                                  ❹
    bucketName := fmt.Sprintf("bucket_name=%s", xid.New().String())
    err = tf.Apply(ctx, tfexec.Var(bucketName))                            ❺
    if err != nil {
        t.Error(err)
    }

    state, err := tf.Show(context.Background())
    if err != nil {
        t.Error(err)
    }

    endpoint := state.Values.Outputs["endpoint"].Value.(string)            ❻
    url := fmt.Sprintf("http://%s", endpoint)
    resp, err := http.Get(url)
    if err != nil {
        t.Error(err)
    }

    buf := new(bytes.Buffer)
    buf.ReadFrom(resp.Body)
    t.Logf("
%s", buf.String())

    if resp.StatusCode != http.StatusOK {                                  ❼
        t.Errorf("status code did not return 200")
    }
}
❶ Downloads the latest version of the Terraform binary
❷ Reads the configuration from ./testfixtures
❹ Ensures that terraform destroy runs even if an error occurs
❺ Calls terraform apply with a variable
❼ Fails the test if the status code is not 200
Tip In CI/CD, integration testing should always occur after static analysis (e.g., terraform validate) because integration testing takes a long time.
10.4.2 Test fixtures
Before we can run the test, we need something to test against. Create a ./testfixtures directory to hold the test fixtures. In this directory, create a new main.tf file with the following contents. This code deploys a simple S3 static website and outputs the URL as endpoint.
provider "aws" {
    region = "us-west-2"
}

variable "bucket_name" {
    type = string
}

resource "aws_s3_bucket" "website" {
  bucket = var.bucket_name
  acl = "public-read"
  policy = <<-EOF
    {
      "Version": "2008-10-17",
      "Statement": [
        {
          "Sid": "PublicReadForGetBucketObjects",
          "Effect": "Allow",
          "Principal": {
            "AWS": "*"
          },
          "Action": "s3:GetObject",
          "Resource": "arn:aws:s3:::${var.bucket_name}/*"
        }
      ]
    }
  EOF

  website {
    index_document = "index.html"
  }
}

resource "aws_s3_bucket_object" "object" {
  bucket = aws_s3_bucket.website.bucket
  key    = "index.html"
  source = "index.html"
  etag = filemd5("${path.module}/index.html")        ❶
  content_type = "text/html"
}

output "endpoint" {                                  ❷
  value = aws_s3_bucket.website.website_endpoint
}
❶ The website home page is read from a local index.html file.
❷ The test uses endpoint to check the application’s health.
We also need an index.html in the ./testfixtures directory. This will be the website home page. Copy the following code into index.html.
<html>
<head>
    <title>Ye Olde Chocolate Shoppe</title>
</head>
<body>
  <h1>Chocolates for Any Occasion!</h1>
  <p>Come see why our chocolates are the best.</p>
</body>
</html>
Your working directory now contains the following files:
.
├── terraform_module_test.go
└── testfixtures
    ├── index.html
    └── main.tf

1 directory, 3 file
10.4.3 Running the test
First, import dependencies with go mod init:
$ go mod init
go: creating new go.mod: module github.com/scottwinkler/tia-chapter10
Then set the environment variables for your AWS access and secret access keys (you could also set these as normal Terraform variables in main.tf):
$ export AWS_ACCESS_KEY_ID=<your AWS access key>
$ export AWS_SECRET_ACCESS_KEY=<your AWS secret access key>
Note You could also generate access keys using the IAM module from the previous section, as long as you gave it an appropriate deployment policy.
We can now run the test with go test -v. This command may take a few minutes to run because it has to download providers, create infrastructure, run tests, and destroy infrastructure:
$ go test -v
=== RUN   TestTerraformModule
    terraform_module_test.go:63:
        <html>
        <head>
            <title>Ye Olde Chocolate Shoppe</title>
        </head>
        <body>
          <h1> Chocolates for Any Occasion!</h1>
          <p> Come see why our chocolates are the best.</p>
        </body>
        </html>
--- PASS: TestTerraformModule (70.14s)
PASS
ok      github.com/scottwinkler/tia-chapter10    70.278s
10.5 Fireside chat
Code should not only be functional, it should also be readable and maintainable. This is especially true for self-service infrastructure such as centralized repositories used by public cloud and governance teams. That being said, there is no question that refactoring Terraform configuration is difficult. You have to be able to migrate state, anticipate runtime errors, and not lose any stateful information in the process.
Because of how hard refactoring can be, it’s often a good idea to test your code at the module level. You can do this with either Terratest or the terraform-exec library. I recommend terraform-exec because it was developed by HashiCorp and is the more polished of the two. Ideally, you should perform integration testing on all modules within your organization.
Summary
-
terraformtaintmanually marks resources for destruction and re-creation. It can be used to rotate AWS access keys or other time-sensitive resources. -
A flat module can be converted into nested modules with the help of module expansions. Module expansions permit the use of
for_eachandcounton modules, as with resources. -
The
terraformstatemvcommand moves resources and modules around, whileterraformstatermremoves them. -
Unmanaged resources can be converted to managed resources by importing them with
terraformimport. This is like performingterraformrefreshon existing resources. -
Integration tests for Terraform modules can be written using a testing framework such as Terratest or terraform-exec. A typical testing pattern is to initialize Terraform, run an
apply, validate outputs, and destroy infrastructure.