
- Understanding the syntax of HCL
- Fundamental elements and building blocks of Terraform
- Setting up a Terraform workspace
- Configuring and deploying an Ubuntu virtual machine on AWS
Terraform is a deployment technology for anyone who wants to provision and manage their infrastructure as code (IaC). Infrastructure refers primarily to cloud-based infrastructure, although anything that could be controlled through an application programming interface (API) technically qualifies as infrastructure. Infrastructure as code is the process of managing and provisioning infrastructure through machine-readable definition files. We use IaC to automate processes that used to be done manually.
When we talk about provisioning, we mean the act of deploying infrastructure, as opposed to configuration management, which deals mostly with application delivery, particularly on virtual machines (VMs). Configuration management (CM) tools like Ansible, Puppet, SaltStack, and Chef are extremely popular and have been around for many years. Terraform does not supplant these tools, at least not entirely, because infrastructure provisioning and configuration management are inherently different problems. That being said, Terraform does perform many of the functions once reserved by CM tools, and many companies find they do not need CM tools after adopting Terraform.
The basic principle of Terraform is that it allows you to write human-readable configuration code to define your IaC. With configuration code, you can deploy repeatable, ephemeral, consistent environments to vendors on the public, private, and hybrid clouds (see figure 1.1).
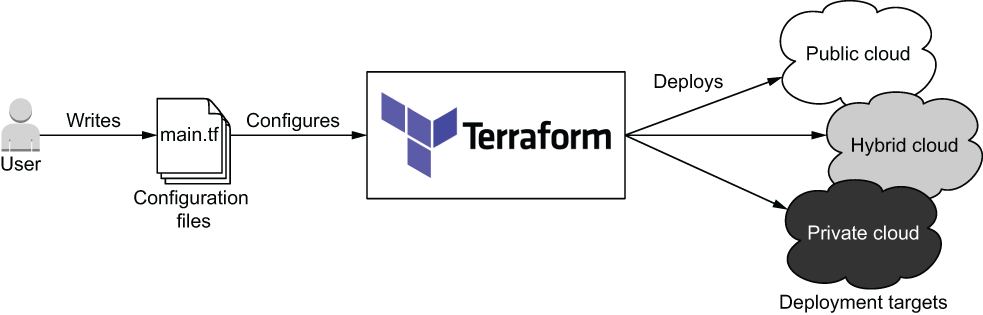
Figure 1.1 Terraform can deploy infrastructure to any cloud or combination of clouds.
In this chapter, we start by going over the distinguishing features of Terraform. We talk about the comparative advantages and disadvantages of Terraform in relation to other IaC technologies and what makes Terraform the clear winner. Finally, we look at the quintessential “Hello World!” of Terraform by deploying a single server to AWS and improving it by incorporating some of Terraform’s more dynamic features.
1.1 What makes Terraform so great?
There’s been a lot of hype about Terraform recently, but is any of it justified? Terraform isn’t the only IaC technology on the block—plenty of other tools do the same thing. How is it that Terraform, a technology in the highly lucrative software deployment market space, can compete with the likes of Amazon, Microsoft, and Google? Six key characteristics make Terraform unique and give it a competitive advantage:
-
Provisioning tool—Deploys infrastructure, not just applications.
-
Expressive and extendable—You aren’t limited by the language.
Table 1.1 compares Terraform and other IaC tools.
Table 1.1 A comparison of popular IaC tools
|
Ansible (www.ansible.com) |
||||||
|
Chef (www.chef.io) |
||||||
|
Puppet (www.puppet.com) |
||||||
|
SaltStack (www.saltstack.com) |
||||||
|
Terraform (www.terraform.io) |
||||||
|
Pulumi (www.pulumi.com) |
||||||
|
AWS CloudFormation (https://aws.amazon .com/cloudformation) |
||||||
|
GCP Deployment Manager (https://cloud.google.com/deployment-manager) |
||||||
|
Azure Resource Manager (https://azure.microsoft.com/features/resource-manager) |
||||||
1.1.1 Provisioning tool
Terraform is an infrastructure provisioning tool, not a CM tool. Provisioning tools deploy and manage infrastructure, whereas CM tools like Ansible, Puppet, SaltStack, and Chef deploy software onto existing servers. Some CM tools can also perform a degree of infrastructure provisioning, but not as well as Terraform, because this isn’t the task they were originally designed to do.
The difference between CM and provisioning tools is a matter of philosophy. CM tools favor mutable infrastructure, whereas Terraform and other provisioning tools favor immutable infrastructure.
Mutable infrastructure means you perform software updates on existing servers. Immutable infrastructure, by contrast, doesn’t care about existing servers—it treats infrastructure as a disposable commodity. The difference between the two paradigms can be summarized as a reusable versus disposable mentality.
1.1.2 Easy to use
The basics of Terraform are quick and easy to learn, even for non-programmers. By the end of chapter 4, you will have the skills necessary to call yourself an intermediate Terraform user, which is kind of shocking, when you think about it. Achieving mastery is another story, of course, but that’s true for most skills.
The main reason Terraform is so easy to use is that the code is written in a domain-specific configuration language called HashiCorp Configuration Language (HCL). It’s a language invented by HashiCorp as a substitute for more verbose configuration languages like JSON and XML. HCL attempts to strike a balance between human and machine readability and was influenced by earlier attempts in the field, such as libucl and Nginx configuration. HCL is fully compatible with JSON, which means HCL can be converted 1:1 to JSON and vice versa. This makes it easy to interoperate with systems outside of Terraform or generate configuration code on the fly.
1.1.3 Free and open source software
The engine that powers Terraform is called Terraform core, a free and open source software offered under the Mozilla Public License v2.0. This license stipulates that anyone is allowed to use, distribute, or modify the software for both private and commercial purposes. Being free is great because you never have to worry about incurring additional costs when using Terraform. In addition, you gain full transparency about the product and how it works.
There’s no premium version of Terraform, but business and enterprise solutions are available for running Terraform at scale: Terraform Cloud and Terraform Enterprise. We’ll go through what these are in chapter 6; and in chapter 12, we’ll develop our own bootleg version of Terraform Enterprise.
1.1.4 Declarative programming
Declarative programming means you express the logic of a computation (the what) without describing the control flow (the how). Instead of writing step-by-step instructions, you describe what you want. Examples of declarative programming languages include database query languages (SQL), functional programming languages (Haskell, Clojure), configuration languages (XML, JSON), and most IaC tools (Ansible, Chef, Puppet).
Declarative programming is in contrast to imperative (or procedural) programming. Imperative programming languages use conditional branching, loops, and expressions to control system flow, save state, and execute commands. Nearly all traditional programming languages are imperative (Python, Java, C, etc.).
Note Declarative programming cares about the destination, not the journey. Imperative programming cares about the journey, not the destination.
1.1.5 Cloud-agnostic
Cloud-agnostic means being able to seamlessly run on any cloud platform using the same set of tools and workflows. Terraform is cloud-agnostic because you can deploy infrastructure to AWS just as easily as you could to GCP, Azure, or even a private datacenter (see figure 1.2). Being cloud-agnostic is important because it means you aren’t locked in to a particular cloud vendor and don’t have to learn a whole new technology every time you switch cloud vendors.
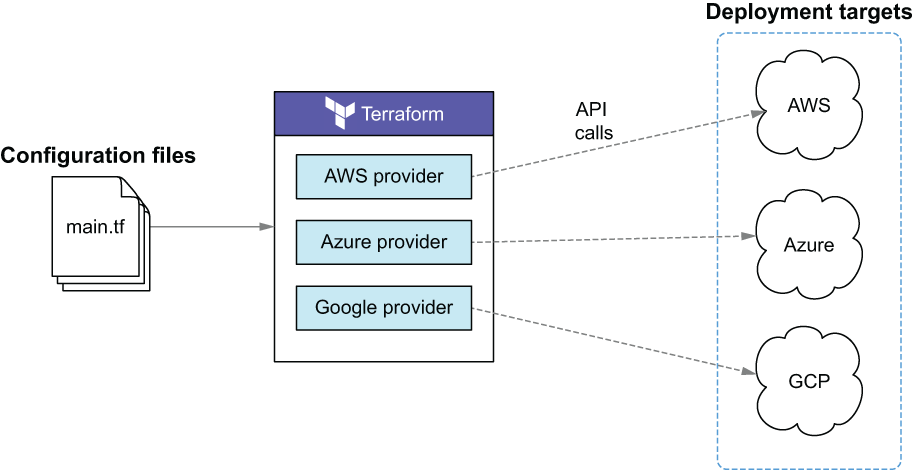
Figure 1.2 Deploying to multiple clouds concurrently with Terraform
Terraform integrates with different clouds through Terraform providers. Providers are plugins for Terraform that are designed to interface with external APIs. Each cloud vendor maintains its own Terraform provider, enabling Terraform to manage resources in that cloud. Providers are written in golang and distributed as binaries on the Terraform Registry (https://registry.terraform.io). They handle all the procedural logic for authenticating, making API requests, and handling timeouts and errors. There are hundreds of published providers on the registry that collectively enable you to manage thousands of different kinds of resources. You can even write your own Terraform provider, as we discuss in chapter 11.
1.1.6 Richly expressive and highly extensible
Terraform is richly expressive and highly extensible when compared to other declarative IaC tools. With conditionals, for expressions, directives, template files, dynamic blocks, variables, and many built-in functions, it’s easy to write code to do exactly what you want. A tech comparison between Terraform and AWS CloudFormation (the technology that inspired Terraform) is shown in table 1.2.
Table 1.2 Tech comparison between the IaC tools in Terraform and AWS CloudFormation
1.2 “Hello Terraform!”
This section looks at a classical use case for Terraform: deploying a virtual machine (EC2 instance) onto AWS. We’ll use the AWS provider for Terraform to make API calls on our behalf and deploy an EC2 instance. When we’re done, we’ll have Terraform take down the instance so we don’t incur ongoing costs by keeping the server running. Figure 1.3 shows an architecture diagram for what we’re doing.
As a prerequisite for this scenario, I expect that you have Terraform 0.15.X installed (see https://learn.hashicorp.com/terraform/getting-started/install.html) and that you have access credentials for AWS. The steps we’ll take to deploy the project are as follows:
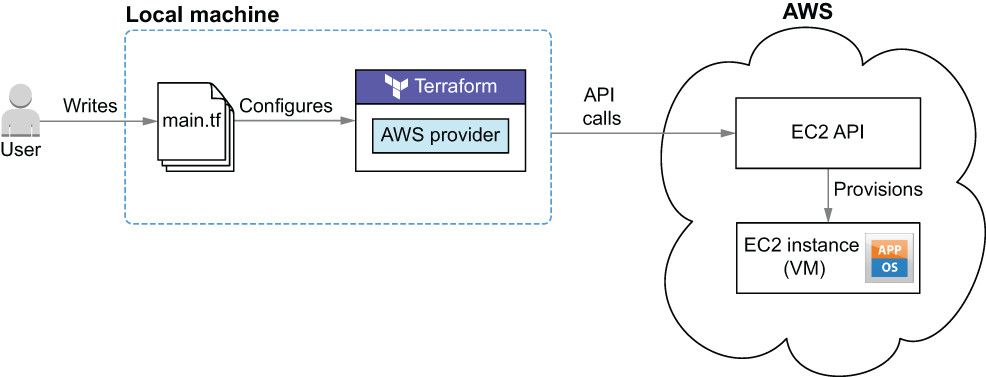
Figure 1.3 Using Terraform to deploy an EC2 instance to AWS
Figure 1.4 illustrates this flow.

Figure 1.4 Sequence diagram of “Hello Terraform!” deployment
1.2.1 Writing the Terraform configuration
Terraform reads from configuration files to deploy infrastructure. To tell Terraform we want it to deploy an EC2 instance, we need to declare an EC2 instance as code. Let’s do that now. Start by creating a new file named main.tf with the contents from the following listing. The .tf extension signifies that it’s a Terraform configuration file. When Terraform runs, it will read all files in the working directory that have a .tf extension and concatenate them together.
NOTE All of the code from this book is available on GitHub (https://github .com/terraform-in-action/manning-code).
Listing 1.1 Contents of main.tf
resource "aws_instance" "helloworld" {       ❶
ami-09dd2e08d601bff67"                       ❷
  instance_type = "t2.micro"                 ❷
  tags = {                                   ❷
    Name = "HelloWorld"                      ❷
  }                                          ❷
}
❶ Declares an aws_instance resource with name “HelloWorld”
❷ Attributes for the EC2 instance
Note This Amazon Machine Image (AMI) is only valid for the us-west-2 region.
The code in listing 1.1 declares that we want Terraform to provision a t2.micro AWS EC2 instance with an Ubuntu AMI and a name tag. Compare this to the following equivalent CloudFormation code, and you can see how much clearer and more concise Terraform is:
{
    "Resources": {
        "Example": {
            "Type": "AWS::EC2::Instance",
            "Properties": {
                "ImageId": "ami-09dd2e08d601bff67",
                "InstanceType": "t2.micro",
                "Tags": [
                    {
                        "Key": "Name",
                        "Value": "HelloWorld"
                    }
                ]
            }
        }
    }
}
This EC2 code block is an example of a Terraform resource. Terraform resources are the most important elements in Terraform, as they provision infrastructure such as VMs, load balancers, NAT gateways, and so forth. Resources are declared as HCL objects with type resource and exactly two labels. The first label specifies the type of resource you want to create, and the second is the resource name. The name has no special significance and is only used to reference the resource within a given module scope (we talk about module scope in chapter 4). Together, the type and name make up the resource identifier, which is unique for each resource. Figure 1.5 shows the syntax of a resource block in Terraform.
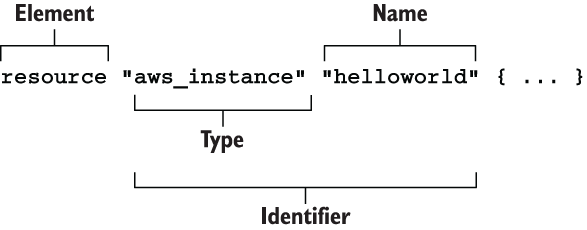
Figure 1.5 Syntax of a resource block
Each resource has inputs and outputs. Inputs are called arguments, and outputs are called attributes. Arguments are passed through the resource and are also available as resource attributes. There are also computed attributes that are only available after the resource has been created. Computed attributes contain calculated information about the managed resource. Figure 1.6 shows sample arguments, attributes, and computed attributes for an aws_instance resource.
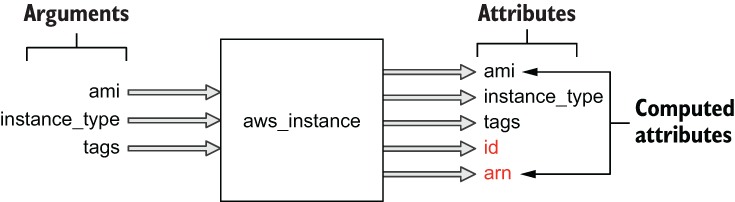
Figure 1.6 Sample inputs and outputs for an aws_instance resource
1.2.2 Configuring the AWS provider
Next, we need to configure the AWS provider. The AWS provider is responsible for understanding API interactions, making authenticated requests, and exposing resources to Terraform. Let’s configure the AWS provider by adding a provider block. Update your code in main.tf as shown next.
"aws" {                        ❶
"us-west-2"                    ❷
}

resource "aws_instance" "helloworld" {
  ami           = "ami-09dd2e08d601bff67"
  instance_type = "t2.micro"
  tags = {
    Name = "HelloWorld"
  }
❷ Configures a deployment region
Note You will need to obtain AWS credentials before you can provision infrastructure. These can be stored either in the credentials file or as environment variables. Refer to appendix A for a guide.
Unlike resources, providers have only one label: Name. This is the official name of the provider as published in the Terraform Registry (e.g. “aws” for AWS, “google” for GCP, and “azurerm” for Azure). The syntax for a provider block is shown in figure 1.7.
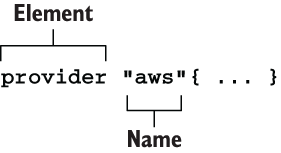
Figure 1.7 Syntax of a provider block
Note The Terraform Registry is a global store for sharing versioned provider binaries. When Terraform initializes, it automatically looks up and downloads any required providers from the registry.
Providers don’t have outputs—only inputs. You configure a provider by passing inputs, or configuration arguments, to the provider block. Configuration arguments are things like the service endpoint URL, region, and provider version and any credentials needed to authenticate against the API. This process is illustrated in figure 1.8.

Figure 1.8 How the configured provider injects credentials into aws_instance when making API calls
Usually, you don’t want to pass secrets into the provider as plaintext, especially when this code will later be checked into version control, so many providers allow you to read secrets from environment variables or shared credential files. If you are interested in secrets management, I recommend reading chapter 13, where we cover this topic in greater detail.
1.2.3 Initializing Terraform
Before we have Terraform deploy our EC2 instance, we first have to initialize the workspace. Even though we have declared the AWS provider, Terraform still needs to download and install the binary from the Terraform Registry. Initialization is required at least once for all workspaces.
You can initialize Terraform by running the command terraform init. When you do this, you will see the following output:
$ terraform init

Initializing the backend...

Initializing provider plugins...
- Finding latest version of hashicorp/aws...
- Installing hashicorp/aws v3.28.0...                                      ❶
- Installed hashicorp/aws v3.28.0 (signed by HashiCorp)

Terraform has created a lock file .terraform.lock.hcl to record the
provider selections it made above. Include this file in your version
control repository so that Terraform can guarantee to make the same
selections by default when you run "terraform init" in the future.

Terraform has been successfully initialized!                               ❷

You may now begin working with Terraform. Try running "terraform plan" to
see any changes that are required for your infrastructure. All Terraform
commands should now work.

If you ever set or change modules or backend configuration for Terraform,
rerun this command to reinitialize your working directory. If you forget,
other commands will detect it and remind you to do so if necessary.
❶ Terraform fetches the latest version of the AWS provider.
❷ The only thing we really care about
Note You need to have Terraform installed on your machine for this to work, if you do not have it already.
1.2.4 Deploying the EC2 instance
Now we’re ready to deploy the EC2 instance using Terraform. Do this by executing the terraform apply command.
Warning Performing this action may result in charges to your AWS account for EC2 and CloudWatch Logs.
$ terraform apply

An execution plan has been generated and is shown below.
Resource actions are indicated with the following symbols:
  + create

Terraform will perform the following actions:

  # aws_instance.helloworld will be created
  + resource "aws_instance" "helloworld" {
      + ami                          = "ami-09dd2e08d601bff67"             ❶
      + arn                          = (known after apply)
      + associate_public_ip_address  = (known after apply)
      + availability_zone            = (known after apply)
      + cpu_core_count               = (known after apply)
      + cpu_threads_per_core         = (known after apply)
      + get_password_data            = false
      + host_id                      = (known after apply)
      + id                           = (known after apply)
      + instance_state               = (known after apply)
      + instance_type                = "t2.micro"                          ❷
      + ipv6_address_count           = (known after apply)
      + ipv6_addresses               = (known after apply)
      + key_name                     = (known after apply)
      + network_interface_id         = (known after apply)
      + outpost_arn                  = (known after apply)
      + password_data                = (known after apply)
      + placement_group              = (known after apply)
      + primary_network_interface_id = (known after apply)
      + private_dns                  = (known after apply)
      + private_ip                   = (known after apply)
      + public_dns                   = (known after apply)
      + public_ip                    = (known after apply)
      + security_groups              = (known after apply)
      + source_dest_check            = true
      + subnet_id                    = (known after apply)
      + tags                         = {                                   ❸
          + "Name" = "HelloWorld"
        }
      + tenancy                      = (known after apply)
      + volume_tags                  = (known after apply)
      + vpc_security_group_ids       = (known after apply)

      + ebs_block_device {
          + delete_on_termination = (known after apply)
          + device_name           = (known after apply)
          + encrypted             = (known after apply)
          + iops                  = (known after apply)
          + kms_key_id            = (known after apply)
          + snapshot_id           = (known after apply)
          + volume_id             = (known after apply)
          + volume_size           = (known after apply)
          + volume_type           = (known after apply)
        }

      + ephemeral_block_device {
          + device_name  = (known after apply)
          + no_device    = (known after apply)
          + virtual_name = (known after apply)
        }

      + metadata_options {
          + http_endpoint               = (known after apply)
          + http_put_response_hop_limit = (known after apply)
          + http_tokens                 = (known after apply)
        }

      + network_interface {
          + delete_on_termination = (known after apply)
          + device_index          = (known after apply)
          + network_interface_id  = (known after apply)
        }

      + root_block_device {
          + delete_on_termination = (known after apply)
          + device_name           = (known after apply)
          + encrypted             = (known after apply)
          + iops                  = (known after apply)
          + kms_key_id            = (known after apply)
          + volume_id             = (known after apply)
          + volume_size           = (known after apply)
          + volume_type           = (known after apply)
        }
    }

Plan: 1 to add, 0 to change, 0 to destroy.                                 ❹

Do you want to perform these actions?
  Terraform will perform the actions described above.
  Only 'yes' will be accepted to approve.

  Enter a value:                                                           ❺
Tip If you receive an error saying “No Valid Credentials Sources Found,” Terraform was not able to authenticate to AWS. Refer to appendix A for a guide to obtaining credentials and configuring the AWS provider.
The CLI output is called an execution plan and outlines the set of actions that Terraform intends to perform to achieve your desired state. It’s a good idea to review the plan as a sanity check before proceeding. There shouldn’t be anything odd here unless you made a typo. When you are done reviewing the execution plan, approve it by entering yes at the command line.
After a minute or two (the approximate time it takes to provision an EC2 instance), the apply will complete successfully. Following is some example output:
aws_instance.helloworld: Creating...
aws_instance.helloworld: Still creating... [10s elapsed]
aws_instance.helloworld: Still creating... [20s elapsed]
aws_instance.helloworld: Creation complete after 25s [id=i-070098fcf77d93c54]

Apply complete! Resources: 1 added, 0 changed, 0 destroyed.
You can verify that your resource was created by locating it in the AWS console for EC2, as shown in figure 1.9. Note that this instance is in the us-west-2 region because that’s what we set in the provider.
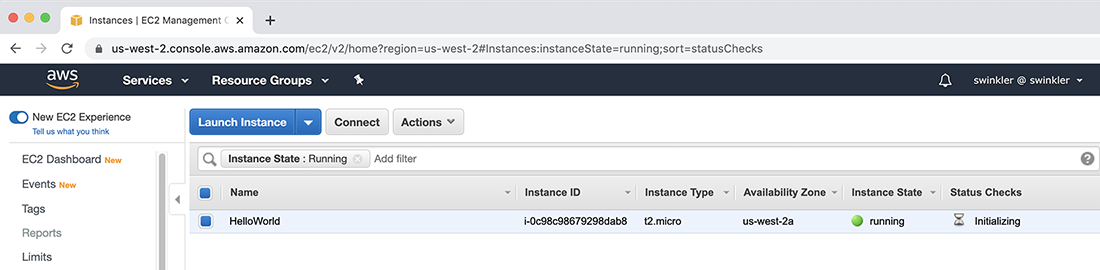
Figure 1.9 The EC2 instance in the AWS console
All of the stateful information about the resource is stored in a file called terraform .tfstate. Don’t let the .tfstate extension fool you—it’s really just a JSON file. The terraform show command can be used to print human-readable output from the state file and makes it easy to list information about the resources that Terraform manages. An example result of terraform show is as follows:
$ terraform show
# aws_instance.helloworld:
resource "aws_instance" "helloworld" {
    ami                          = "ami-09dd2e08d601bff67"
    arn                          =
       ➥ "arn:aws:ec2:us-west-2:215974853022:instance/i-070098fcf77d93c54"
    associate_public_ip_address  = true
    availability_zone            = "us-west-2a"
    cpu_core_count               = 1
    cpu_threads_per_core         = 1
    disable_api_termination      = false
    ebs_optimized                = false
    get_password_data            = false
    hibernation                  = false
    id                           = "i-070098fcf77d93c54"                   ❶
    instance_state               = "running"
    instance_type                = "t2.micro"
    ipv6_address_count           = 0
    ipv6_addresses               = []
    monitoring                   = false
    primary_network_interface_id = "eni-031d47704eb23eaf0"
    private_dns                  =
       ➥ "ip-172-31-25-172.us-west-2.compute.internal"
    private_ip                   = "172.31.25.172"
    public_dns                   =
       ➥ “ec2-52-24-28-182.us-west-2.compute.amazonaws.com”
    public_ip                    = “52.24.28.182”
    secondary_private_ips        = []
    security_groups              = [
        “default”,
    ]
    source_dest_check            = true
    subnet_id                    = “subnet-0d78ac285558cff78”
    tags                         = {
        “Name” = “HelloWorld”
    }
    tenancy                      = “default”
    vpc_security_group_ids       = [
        “sg-0d8222ef7623a02a5”,
    ]

    credit_specification {
        cpu_credits = “standard”
    }

    enclave_options {
        enabled = false
    }

    metadata_options {
        http_endpoint               = “enabled”
        http_put_response_hop_limit = 1
        http_tokens                 = “optional”
    }

    root_block_device {
        delete_on_termination = true
        device_name           = “/dev/sda1”
        encrypted             = false
        iops                  = 100
        tags                  = {}
        throughput            = 0
        volume_id             = “vol-06b149cdd5722d6bc”
        volume_size           = 8
        volume_type           = “gp2”
    }
}
❶ id is an important computed attribute.
There are a lot more attributes here than we originally set in the resource block because most of the attributes of aws_instance are either optional or computed. You can customize aws_instance by setting some of the optional arguments. Consult the AWS provider documentation if you want to know what these are.
1.2.5 Destroying the EC2 instance
Now it’s time to say goodbye to the EC2 instance. You always want to destroy any infrastructure you are no longer using, as it costs money to run stuff in the cloud. Terraform has a special command to destroy all resources: terraform destroy. When you run this command, you are prompted to manually confirm the destroy operation:
$ terraform destroy
aws_instance.helloworld: Refreshing state... [id=i-070098fcf77d93c54]

Terraform used the selected providers to generate the following execution plan.
Resource actions are indicated with the following symbols:
  - destroy

Terraform will perform the following actions:

  # aws_instance.helloworld will be destroyed
  - resource “aws_instance” “helloworld” {
      - ami                          = "ami-09dd2e08d601bff67" -> null
      - arn                          = "arn:aws:ec2:us-west-2:215974853022:
instance/i-070098fcf77d93c54" -> null
      - associate_public_ip_address  = true -> null
      - availability_zone            = "us-west-2a" -> null
      - cpu_core_count               = 1 -> null
      - cpu_threads_per_core         = 1 -> null
      - disable_api_termination      = false -> null
      - ebs_optimized                = false -> null
      - get_password_data            = false -> null
      - hibernation                  = false -> null
      - id                           = "i-070098fcf77d93c54" -> null
      - instance_state               = "running" -> null
      - instance_type                = "t2.micro" -> null
      - ipv6_address_count           = 0 -> null
      - ipv6_addresses               = [] -> null
      - monitoring                   = false -> null
      - primary_network_interface_id = "eni-031d47704eb23eaf0" -> null
      - private_dns                  =
              ➥ "ip-172-31-25-172.us-west-2.compute.internal" -> null
      - private_ip                   = “172.31.25.172” -> null
      - public_dns                   =
              ➥ “ec2-52-24-28-182.us-west-2.compute.amazonaws.com” -> null
      - public_ip                    = "52.24.28.182" -> null
      - secondary_private_ips        = [] -> null
      - security_groups              = [
          - "default",
        ] -> null
      - source_dest_check            = true -> null
      - subnet_id                    = "subnet-0d78ac285558cff78" -> null
      - tags                         = {
          - “Name” = “HelloWorld”
        } -> null
      - tenancy                      = “default” -> null
      - vpc_security_group_ids       = [
          - “sg-0d8222ef7623a02a5”,
        ] -> null

      - credit_specification {
          - cpu_credits = “standard” -> null
        }

      - enclave_options {
          - enabled = false -> null
        }

      - metadata_options {
          - http_endpoint               = "enabled" -> null
          - http_put_response_hop_limit = 1 -> null
          - http_tokens                 = "optional" -> null
        }

      - root_block_device {
          - delete_on_termination = true -> null
          - device_name           = "/dev/sda1" -> null
          - encrypted             = false -> null
          - iops                  = 100 -> null
          - tags                  = {} -> null
          - throughput            = 0 -> null
          - volume_id             = "vol-06b149cdd5722d6bc" -> null
          - volume_size           = 8 -> null
          - volume_type           = “gp2” -> null
        }
    }

Plan: 0 to add, 0 to change, 1 to destroy.                    ❶

Do you really want to destroy all resources?
  Terraform will destroy all your managed infrastructure, as shown above.
  There is no undo. Only ‘yes’ will be accepted to confirm.

  Enter a value:
❶ Summary of actions Terraform intends to take
WARNING It is important not to manually edit or delete the terraform.tfstate file, or Terraform will lose track of managed resources.
The destroy plan is just like the previous execution plan, except it is for the delete operation.
Note terraform destroy does exactly the same thing as you deleting all configuration code and running terraform apply.
Confirm that you wish to apply the destroy plan by typing yes at the prompt. Wait a few minutes for Terraform to resolve, and then you will be notified that Terraform has finished destroying all resources. Your output will look like the following:
aws_instance.helloworld: Destroying... [id=i-070098fcf77d93c54]
aws_instance.helloworld: Still destroying...
➥ [id=i-070098fcf77d93c54, 10s elapsed]
aws_instance.helloworld: Still destroying...
➥ [id=i-070098fcf77d93c54, 20s elapsed]
aws_instance.helloworld: Still destroying...
➥ [id=i-070098fcf77d93c54, 30s elapsed]
aws_instance.helloworld: Destruction complete after 31s

Destroy complete! Resources: 1 destroyed.
You can verify that the resources have indeed been destroyed by either refreshing the AWS console or running terraform show and confirming that it returns nothing:
$ terraform show
1.3 Brave new “Hello Terraform!”
I like the classic “Hello World!” example and feel it is a good starter project, but I don’t think it does justice to the technology as a whole. Terraform can do much more than simply provision resources from static configuration code. It’s also able to provision resources dynamically based on the results of external queries and data lookups. Let us now consider data sources, which are elements that allow you to fetch data at runtime and perform computations.
This section improves the classic “Hello World!” example by adding a data source to dynamically look up the latest value of the Ubuntu AMI. We’ll pass the output value into aws_instance so we don’t have to statically set the AMI in the EC2 instance resource configuration (see figure 1.10).
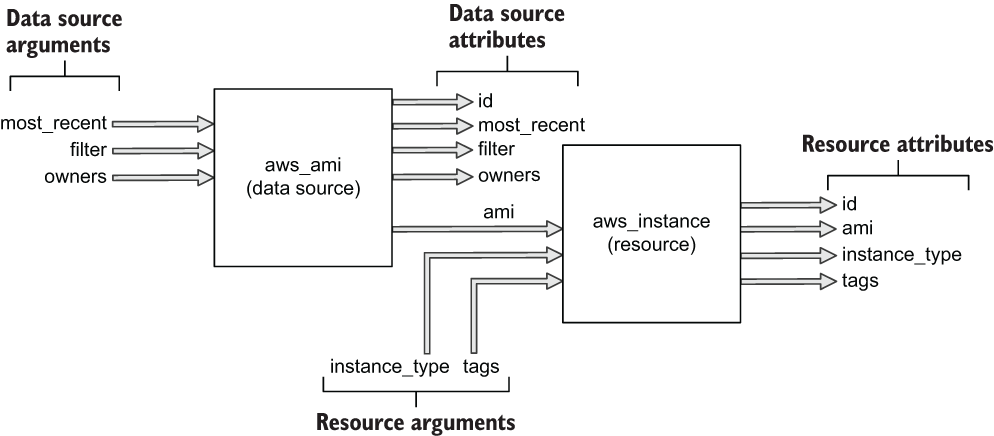
Figure 1.10 How the output of the aws_ami data source will be chained to the input of the aws_instance resource
Because we’ve already configured the AWS provider and initialized Terraform with terraform init, we can skip some of the steps we did previously. Here, we’ll do the following:
This flow is illustrated in figure 1.11.
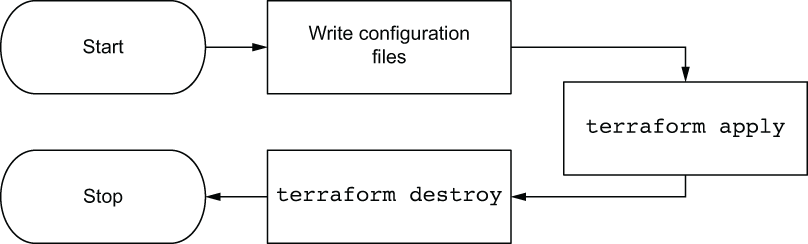
Figure 1.11 Deployment sequence diagram
1.3.1 Modifying the Terraform configuration
We need to add the code to read from the external data source, allowing us to query the most recent Ubuntu AMI published to AWS. Edit main.tf to look like the following listing.
provider "aws" {
  region = "us-west-2"
}

data "aws_ami" "ubuntu" {                                                  ❶
  most_recent = true

  filter {                                                                 ❷
    name   = "name"
    values = ["ubuntu/images/hvm-ssd/ubuntu-focal-20.04-amd64-server-*"]
  }

  owners = ["099720109477"]                                                ❸
}

resource "aws_instance" "helloworld" {
  ami           = data.aws_ami.ubuntu.id                                   ❹
  instance_type = "t2.micro"
  tags = {
    Name = "HelloWorld"
  }
}
❶ Declares an aws_ami data source with name “ubuntu”
❷ Sets a filter to select all AMIs with name matching this regex expression
❸ Canonical Ubuntu AWS account id
Like resources, data sources are declared by creating an HCL object with type “data” having exactly two labels. The first label specifies the type of data source, and the second is the name of the data source. Together, the type and name are referred to as the data source’s identifier and must be unique within a module. Figure 1.12 illustrates the syntax of a data source.

Figure 1.12 Syntax of a data source
The contents of a data source code block are called query constraint arguments. They behave exactly the same as arguments do for resources. The query constraint arguments are used to specify resource(s) from which to fetch data. Data sources are unmanaged resources that Terraform can read data from but that Terraform doesn’t directly control.
1.3.2 Applying changes
Let’s go ahead and apply our changes by having Terraform deploy an EC2 instance with the Ubuntu data source output value for AMI. Do this by running terraform apply. Your CLI output will be as follows:
$ terraform apply

Terraform used the selected providers to generate the following execution plan.
Resource actions are indicated with the following symbols:
  + create

Terraform will perform the following actions:

  # aws_instance.helloworld will be created
  + resource "aws_instance" "helloworld" {
      + ami                          = "ami-0928f4202481dfdf6"        ❶
      + arn                          = (known after apply)
      + associate_public_ip_address  = (known after apply)
      + availability_zone            = (known after apply)
      + cpu_core_count               = (known after apply)
      + cpu_threads_per_core         = (known after apply)
      + get_password_data            = false
      + host_id                      = (known after apply)
      + id                           = (known after apply)
      + instance_state               = (known after apply)
      + instance_type                = "t2.micro"
     // skip some logs
    }

Plan: 1 to add, 0 to change, 0 to destroy.

Do you want to perform these actions?
  Terraform will perform the actions described above.
  Only 'yes' will be accepted to approve.

  Enter a value:
❶ Set from the output of the data source
Apply the changes by entering yes at the command line. After waiting a few minutes, your output will be as follows:
aws_instance.helloworld: Creating...
aws_instance.helloworld: Still creating... [10s elapsed]
aws_instance.helloworld: Creation complete after 19s [id=i-0c0a6a024bb4ba669]

Apply complete! Resources: 1 added, 0 changed, 0 destroyed.
As before, you can verify the changes by either navigating through the AWS console or invoking terraform show.
1.3.3 Destroying the infrastructure
Destroy the infrastructure created in the previous step by running terraform destroy. You’ll receive another manual confirmation:
$ terraform destroy
aws_instance.helloworld: Refreshing state... [id=i-0c0a6a024bb4ba669]

Terraform used the selected providers to generate the following execution plan.
Resource actions are indicated with the following symbols:
  - destroy

Terraform will perform the following actions:

  # aws_instance.helloworld will be destroyed
  - resource "aws_instance" "helloworld" {
      - ami                          = "ami-0928f4202481dfdf6" -> null
      - arn                          = "arn:aws:ec2:us-west-2:215974853022
      ➥ :instance/i-0c0a6a024bb4ba669" -> null
      - associate_public_ip_address  = true -> null
// skip some logs
    }

Plan: 0 to add, 0 to change, 1 to destroy.

Do you really want to destroy all resources?
  Terraform will destroy all your managed infrastructure, as shown above.
  There is no undo. Only 'yes' will be accepted to confirm.

  Enter a value:
After manually confirming and waiting a few more minutes, the EC2 instance is now gone:
aws_instance.helloworld: Destroying... [id=i-0c0a6a024bb4ba669]
aws_instance.helloworld: Still destroying...
➥ [id=i-0c0a6a024bb4ba669, 10s elapsed]
aws_instance.helloworld: Still destroying...
➥ [id=i-0c0a6a024bb4ba669, 20s elapsed]
aws_instance.helloworld: Still destroying...
➥ [id=i-0c0a6a024bb4ba669, 30s elapsed]
aws_instance.helloworld: Destruction complete after 30s

Destroy complete! Resources: 1 destroyed.
1.4 Fireside chat
In this introductory chapter, not only did we discuss what Terraform is and how it compares to other IaC tools, but we also performed two real-world deployments. The first was the de facto “Hello World!” of Terraform, and the second was my personal favorite because it utilized a data source to demonstrate the dynamic capabilities of Terraform.
In the next few chapters, we go through the fundamentals of how Terraform works and the major constructs and syntax elements of the Terraform HCL language. This leads to chapter 4, when we deploy a multi-tiered web application onto AWS.
Summary
-
Terraform is a declarative IaC provisioning tool. It can deploy resources onto any public or private cloud.
-
Terraform is (1) a provisioning tool, (2) easy to use, (3) free and open source, (4) declarative, (5) cloud-agnostic, and (6) expressive and extensible.
-
The major elements of Terraform are resources, data sources, and providers.
-
Code blocks can be chained together to perform dynamic deployments.
-
To deploy a Terraform project, you must first write configuration code, then configure providers and other input variables, initialize Terraform, and finally apply changes. Cleanup is done with a
destroycommand.