
- Organizing your tests comprehensively
- Writing assertions that are flexible and robust
- Isolating and instrumenting parts of your code for tests
- Defining strategies for choosing what to test and what not to
- Learning what code coverage is and how to measure it
Well-written tests have two main qualities: they break only when the application misbehaves, and they tell you precisely what’s wrong. In this chapter, we will focus on techniques that help you achieve these two goals.
If you’ve written a test for the addToCart function, for example, you don’t want it to break if that function is still working. If the test does break, it will generate extra costs because you will have to spend time updating it. Ideally, your tests should be sensitive enough to catch as many bugs as possible but sufficiently robust so that they fail only when necessary.
Considering that your tests for the addToCart function broke for a good reason, they still wouldn’t be particularly helpful if their feedback was undecipherable or if 10 other unrelated tests failed when they shouldn’t. A carefully architected test suite provides you with high-quality feedback to fix problems as quickly as possible.
In this chapter, to achieve high-quality feedback and robust yet sensitive tests, I will focus on how to organize tests, write assertions, isolate code, and choose what to test and how to test it.
Learning how to organize your tests comprehensively will result in better feedback and less duplication. It will make tests easier to read, write, and update. Well-organized tests are the very beginning of highly effective testing practices.
Extending Jest’s assertions, understanding their semantics, and learning how to choose the most accurate assertions for each particular case will help you get better error messages and make your tests more robust without depriving them of sensitivity to bugs. Isolating your code will help you write tests quicker and reduce the size of the unit under test, making it easier to determine what the root cause of a bug is. Sometimes, it might even be impossible to test specific parts of your code without using isolation techniques.
But none of these disciplines is valuable if you can’t determine what you will test and, most importantly, what you won’t, which is what I will cover at the end of this chapter. You will learn how to use these techniques to reduce the number of tests you have to write without diminishing your quality threshold, therefore decreasing costs.
As there’s no one-size-fits-all approach to software testing, I will explain the trade-offs involved in each kind of situation and focus on empowering you to make the optimal decisions on each case. This outcome-focused approach will help you find a better balance between tests that are sensitive and provide useful feedback, but that won’t increase your software’s maintenance burden.
Additionally, in the last section of this chapter, you will learn about code coverage. In it, I will explain how to understand what pieces of code your tests cover and, most importantly, which they do not. Furthermore, you will understand how to act on code coverage reports and why coverage measurements can be misleading sometimes.
Improving the way you write your tests will save you development time and create more reliable guarantees. It will help you deliver more software, faster, and more confidently.
3.1 Organizing test suites
In Louis’s bakery, every assistant and pastry chef can easily find any ingredient at any time. Each kind of ingredient has its own separate shelf, which, in turn, has its own special place in the bakery, depending on when that ingredient is more commonly used in the baking process. There’s a clear logic to how items are organized. Flour, for, example, is kept right next to the shelf that has eggs, close to the countertop where the baker turns these ingredients into a silky-smooth batter.
This systematic arrangement makes it easier for the bakery’s employees to work in parallel and to find and use whatever items they need. Because ingredients of the same kind are all kept together, it’s also easy to know when to order more. Louis’s bakery doesn’t let any of them rot or run out of stock.
Well-organized tests have the same effect on the making of software as an organized kitchen has on the making of cakes. Organized tests facilitate collaboration by enabling developers to work in parallel with as few conflicts as possible. When developers put tests together cohesively, they decrease the application’s overall maintenance burden. They make software easy to maintain because they reduce repetition while increasing readability. The first step in organizing your tests is to decide what criteria you will use to separate them.
Let’s consider that you’ve split the code for placing and tracking orders into two separate modules: cartController and orderController, shown in figure 3.1.

Figure 3.1 The module for placing orders and the module for tracking orders
Even though these modules integrate, they have different functionalities, and, therefore, their tests should be written in separate files. Separating tests for cartController and orderController into different files is already a great start, but separating the functions within these modules is equally valuable.
To create different groups of tests within a file, you can nest them within a describe block. For the cartController module, for example, your test file could look as follows.
Listing 3.1 cartController.test.js
describe("addItemToCart", () => {                  ❶
    test("add an available item to cart", () => {
        // ...
    });

    test("add unavailable item to cart", () => {
        // ...
    });

    test("add multiple items to cart", () => {
        // ...
    });
});

describe("removeFromCart", () => {                ❷
    test("remove item from cart", () => {
        // ...
    });
});
❶ Groups different tests into a block called addItemToCart
❷ Groups different tests into a block called removeFromCart
You can also use Jest’s describe blocks to keep helper functions within the scope of a single group of tests. If you had, for example, a utility function to add items to the inventory, instead of adding it to the file’s entire scope, you could place it within the describe block that needs it, as shown next and illustrated by figure 3.2.
Listing 3.2 cartController.test.js
describe("addItemToCart", () => {
  const insertInventoryItem = () => {                             ❶
    // Directly insert an item in the database's inventory table
  };

  // Tests...
  test("add an available item to cart", () => {
    // ...
  });
});
❶ This function is available only within the describe block’s callback.

Figure 3.2 The grouping for addIteToCart’s tests and its helper function
Nesting utility functions within describe blocks helps to indicate which tests need them. If insertInventoryItem is within the describe block for the addItemToCart function, you can be sure that it’s necessary only for that group of tests. When you organize tests this way, they become easier to understand and quicker to change because you know where to look for the functions and variables they use.
These describe blocks also change the scope of hooks. Any beforeAll, afterAll, beforeEach, and afterEach hooks become relative to the describe block in which they’re located, as in the example in figure 3.3. For example, if you want to apply a specific setup routine to a few tests in a file, but not to all of them, you can group those tests and write your beforeEach hook within the describe block for those tests as follows.
Listing 3.3 cartController.test.js
describe("addItemToCart", () => {
  const insertInventoryItem = () => { /* */ };

  let item;
  beforeEach(async () => {                   ❶
    item = await insertInventoryItem();
  });

  // Tests...
  test("add an available item to cart", () => {
    // You can use `item` here
  });
});

describe("checkout", () => {
  test("checkout non-existing cart", () => {
    // The previous `beforeEach` hook
    // does not run before this test
  });
});
❶ Runs once before each test in the addItemToCart describe block

Figure 3.3 How nesting determines the tests to which a hook will be applied
NOTE In the example above, Jest will wait for the hook with insertInventoryItem to resolve before proceeding with the tests.
Just like when you have asynchronous tests, asynchronous hooks will run to completion before Jest proceeds. If a hook returns a promise or takes done as an argument, Jest will wait for either the promise to resolve or for done to be called before running any of the file’s other hooks or tests.
The same applies to every hook. If you use a beforeAll hook, for example, it will run once before all the tests within the describe block it’s placed, as shown next and illustrated by figure 3.4.
Listing 3.4 cartController.test.js
describe("addItemToCart", () => {
  const insertInventoryItem = () => { /* */ };

  let item;
  beforeEach(async () => {                   ❶
    item = await insertInventoryItem();
  });

  // Tests...
});

describe("checkout", () => {
  const mockPaymentService = () => { /* */ };

  beforeAll(mockPaymentService);             ❷

  test("checkout non-existing cart", () => { /* */ });
});
❶ Runs before each test in the addItemToCart describe block
❷ Runs once before all tests in the checkout describe block

Figure 3.4 How different kinds of hooks apply to different groups of tests
By default, hooks that are outside of any describe blocks apply to the whole scope of a test file, as shown next.
Listing 3.5 cartController.test.js
beforeEach(clearDatabase);                      ❶

describe("addItemToCart", () => {
  const insertInventoryItem = () => { /* */ };

  let item;
  beforeEach(async () => {                      ❷
    item = await insertInventoryItem();
  });

  test("add an available item to cart", () => { /* */ });
});

describe("checkout", () => {
  const mockPaymentService = () => { /* */ };

  beforeAll(mockPaymentService);                ❸

  test("checkout nonexisting cart", () => { /* */ });
});

afterAll(destroyDbConnection)                   ❹
❶ Runs before each test in the file, no matter in which describe block the test is
❷ Runs before each test in the addItemToCart describe block
❸ Runs once before all tests in the checkout describe block
❹ Runs once after all tests in the file finish
Jest executes hooks from the outermost to the innermost block. In the previous example, the order of execution would be the following:
Nesting life cycle hooks has benefits that are similar to nesting utility functions. You know exactly where to look for them and the scope to which they apply.
3.1.1 Breaking down tests
Ideally, tests should be as small as possible and focus on checking a single aspect of the unit under test.
Let’s use the tests for the route that adds items to a cart as an example. This time, let’s consider that it will also update the inventory when adding items to a cart. To comply with the new spec, you will modify the route written in chapter 2 that adds items to a cart.
const Koa = require("koa");
const Router = require("koa-router");

const app = new Koa();
const router = new Router();

const carts = new Map();                                       ❶
const inventory = new Map();                                   ❷

router.post("/carts/:username/items/:item", ctx => {           ❸
  const { username, item } = ctx.params;
  if (!inventory.get(item)) {                                  ❹
    ctx.status = 404;
    return;
  }

  inventory.set(item, inventory.get(item) - 1);
  const newItems = (carts.get(username) || []).concat(item);   ❺
  carts.set(username, newItems);                               ❻
  ctx.body = newItems;                                         ❼
});

app.use(router.routes());

module.exports = {
  app: app.listen(3000),                                       ❽
  inventory,
  carts
};
❶ Stores the content of the users’ carts. Each username leads to an array of strings representing the items in the cart.
❷ Stores the inventory’s state. Each item name leads to a number representing its quantity.
❸ Handles requests to POST /carts/:username/items/:item, adding items to a user’s cart
❹ Proceeds to add an item to the cart only if the item is in stock; if it’s not, responds with a 404 status
❺ Creates a new array of items including the item in the request’s parameters
❻ Updates the user’s cart with the new array of items
❼ Responds with the new array of items
❽ Binds the server to the port 3000, and exports it through the app property
NOTE This time I want to focus only on the route that adds items to a cart. Because you will not write end-to-end-tests, you should export inventory and carts. The tests we will write in this chapter can coexist with the end-to-end tests you have already written because they have different levels of granularity.
Even though the previous end-to-end tests are more loosely coupled and provide stronger guarantees from a user’s point of view, the tests in this chapter take less time to run and can cover smaller parts of your application at a time, as you will notice when we break down the tests.
Now, write the test file for this route as follows.
const { app, inventory, carts } = require("./server");
const fetch = require("isomorphic-fetch");

const apiRoot = "http://localhost:3000";

const addItem = (username, item) => {
  return fetch(`${apiRoot}/carts/${username}/items/${item}`, {
    method: "POST"
  });
};

describe("addItem", () => {
  test("adding items to a cart", async () => {
    inventory.set("cheesecake", 1);                                  ❶
    const addItemResponse = await addItem("lucas", "cheesecake");    ❷
    expect(await addItemResponse.json()).toEqual(["cheesecake"]);    ❸
    expect(inventory.get("cheesecake")).toBe(0);                     ❹

    expect(carts.get("lucas")).toEqual(["cheesecake"]);              ❺

    const failedAddItem = await addItem("lucas", "cheesecake");      ❻
    expect(failedAddItem.status).toBe(404);                          ❼
  });
});

afterAll(() => app.close());
❶ Arrange: sets the number of cheesecakes in the inventory to 1
❷ Act: sends a request to the route that adds a cheesecake to the cart
❸ Assert: checks whether the response is an array including only the newly added cheesecake
❹ Assert: verifies that the number of cheesecakes in the inventory is 0
❺ Assert: verifies that the user’s cart contains only the newly added cheesecake
❻ Act: sends a request to add another cheesecake to the user’s cart
❼ Assert: checks whether last response’s status was 404
Despite the test for addItem being rigorous, it asserts on too many aspects of the route it’s testing. It verifies the following:
If the application doesn’t fulfill any of these expectations, the test will fail. When this test fails, because you rely on four different assertions, you won’t immediately be able to tell what the problem is. Because tests halt when an assertion fails, once you fix the test, you will also need to keep rerunning it to see if any assertions after the broken one will also fail.
If we separate those checks into multiple tests, on a single execution we can instantly tell what all the problems with the addItem route are, as follows.
const { app, inventory, carts } = require("./server");
const fetch = require("isomorphic-fetch");

const apiRoot = "http://localhost:3000";

const addItem = (username, item) => {
  return fetch(`${apiRoot}/carts/${username}/items/${item}`, {
    method: "POST"
  });
};

describe("addItem", () => {
  beforeEach(() => carts.clear());                                   ❶
  beforeEach(() => inventory.set("cheesecake", 1));                  ❷

  test("correct response", async () => {                             ❸
    const addItemResponse = await addItem("lucas", "cheesecake");
    expect(addItemResponse.status).toBe(200);
    expect(await addItemResponse.json()).toEqual(["cheesecake"]);
  });

  test("inventory update", async () => {                             ❹
    await addItem("lucas", "cheesecake");
    expect(inventory.get("cheesecake")).toBe(0);
  });

  test("cart update", async () => {                                  ❺
    await addItem("keith", "cheesecake");
    expect(carts.get("keith")).toEqual(["cheesecake"]);
  });

  test("soldout items", async () => {                                ❻
    inventory.set("cheesecake", 0);
    const failedAddItem = await addItem("lucas", "cheesecake");
    expect(failedAddItem.status).toBe(404);
  });
});

afterAll(() => app.close());
❶ Empties all carts before each test in the addItem describe block
❷ Before each test, sets to 1 the number of cheesecakes available in the inventory
❸ Tries to add one cheesecake to a user’s cart, and validates the response’s body and status
❹ Validates the number of cheesecakes in the inventory after adding an item to a user’s cart
❺ Tries to add one cheesecake to a user’s cart, and validates the cart’s contents
❻ Validates the response for a request that should fail when an item is unavailable
Because these tests are much smaller, they are also easier to read.
The fewer assertions per test you have, the more granular the feedback, and the less time it takes for you to identify defects.
3.1.2 Parallelism
If you have four test files that take one second each, sequentially running them would take, in total, four seconds, as shown by figure 3.5. As the number of test files increase, so does the total execution time.

Figure 3.5 What happens when running tests sequentially
To speed up your tests, Jest can run them in parallel, as figure 3.6 demonstrates. By default, Jest will parallelize tests that are in different files.
Parallellizing tests Parallellizing tests mean using different threads to run test cases simultaneously.

Figure 3.6 What happens when running tests in parallel
Parallellizing tests can be beneficial if they are well isolated, but it can be problematic if they share data. For example, if you have two test files using the same database table, you may have different results depending on the order in which they run.
If you can’t isolate your tests, make them run sequentially by passing Jest the runInBand option. It’s better to make your tests slow and reliable than fast and flaky.
Flaky tests A test is said to be “flaky” when its results may change, even though the unit under test and the test itself remain the same.
# To run tests sequentially
jest --runInBand

# Or, if you have encapsulated the `jest` command into an NPM script
npm test -- --runInBand
In case you have tests that can run simultaneously within a test suite, you can use test.concurrent to indicate which ones Jest should execute concurrently, as follows.
Listing 3.9 addItemToCart.test.js
describe("addItemToCart", () => {
  test.concurrent("add an available item to cart", async () => { /* */ }); ❶
  test.concurrent("add unavailable item to cart", async () => { /* */ });  ❶
  test.concurrent("add multiple items to cart", async () => { /* */ });    ❶
});
❶ These tests will run concurrently, so make sure to isolate the data used by each one of them.
To control how many tests run at a time, you can use the --maxConcurrencyOption and specify how many tests Jest can run simultaneously. To manage the number of worker threads spawned to run tests, you can use the --maxWorkers option and specify how many threads to spawn.
Parallelizing tests can dramatically speed up execution time. And, because tests that run fast incentivize you to run them more often, I highly recommend you to adopt this approach. Its only downside is that you must be careful to make sure that tests are well isolated.
➝ Throughout the book, I will explain the importance of having deterministic tests in the context of each kind of application you will build.
3.1.3 Global hooks
Sometimes you may need to perform hooks before all tests begin or after all tests finish. You may need, for example, to start or stop a database process.
Jest allows you to set up global hooks through two configuration options: globalSetup and globalTeardown. You can specify these options in your jest.config.js file. If you haven’t created one yet, you can place it right next to the package.json file in the root of your project.
TIP You can use Jest’s CLI to create a configuration file quickly. When you run jest --init, you will be prompted to answer a few questions that will be used to generate your jest.config.js file.
The filenames passed to globalSetup and globalTeardown should export the functions that Jest will call before and after all your tests run, as follows.
module.exports = {
  testEnvironment: "node",
  globalSetup: "./globalSetup.js",           ❶
  globalTeardown: "./globalTeardown.js"      ❷
};
❶ Jest runs this file’s exported async function once before all tests.
❷ Jest runs this file’s exported async function once after all tests.
A setup file that, for example, initializes a database would look something like this:
const setup = async () => {
  global._databaseInstance = await databaseProcess.start()
};

module.exports = setup;
Values assigned to the global object, like the one shown previously, will be available on the globalTeardown hook, too.
Considering you have set up a database instance and assigned it to _databaseInstance on your globalSetup, you can use that same variable to stop that process once the tests have finished, as follows.
Listing 3.12 globalTeardown.js
const teardown = async () => {
   await global._databaseInstance.stop()
};

module.exports = teardown;
In case the setup and teardown functions are asynchronous, like the ones we’ve just written, Jest will run them to completion before proceeding.
3.1.4 Atomicity
When organizing tests, consider that any test should be capable of running adequately, even when isolated from all others. Running a test on its own should be no different from running it among another one thousand tests.
Consider, for example, a few of the tests that you have previously written for the addItem function. For the sake of this example, I have removed the beforeEach hooks from the following describe block.
// ...

describe("addItem", () => {
  test("inventory update", async () => {                        ❶
    inventory.set("cheesecake", 1);
    await addItem("lucas", "cheesecake");
    expect(inventory.get("cheesecake")).toBe(0);
  });

  test("cart update", async () => {                             ❷
    await addItem("keith", "cheesecake");
    expect(carts.get("keith")).toEqual(["cheesecake"]);
  });

  test("soldout items", async () => {                           ❸
    const failedAddItem = await addItem("lucas", "cheesecake");
    expect(failedAddItem.status).toBe(404);
  });
});

// ...
❶ Sets to 1 the number of cheesecakes available, and checks whether adding one cheesecake to a cart updates the inventory adequately
❷ Tries to add a piece of cheesecake to a user’s cart, and checks whether the cart’s content is an array containing a single cheesecake
❸ Tries to add a cheesecake, and expects the server’s response’s status to be 404
In this case, the second test will always fail if the first one has run. On the other hand, the third test depends on the first to succeed.
When tests interfere with one another, it can be hard to determine the root cause of bugs. Tests that are not atomic cause you to wonder whether the problem is in your test or your code.
Having atomic tests also helps you get quicker feedback. Because you can run a test separately from all others, you don’t need to wait for a long test suite to finish before knowing whether the code you have written works.
To keep tests atomic, it’s crucial to remember to write good setup and teardown hooks. For the sake of atomicity, add a beforeEach hook that adds a cheesecake to the inventory to the previous example and another that empties the user’s cart, as shown next.
// ...

describe("addItem", () => {
  beforeEach(() => carts.clear());                     ❶
  beforeEach(() => inventory.set("cheesecake", 1));    ❷

  test("inventory update", async () => {
    await addItem("lucas", "cheesecake");
    expect(inventory.get("cheesecake")).toBe(0);
  });

  test("cart update", async () => {
    await addItem("keith", "cheesecake");
    expect(carts.get("keith")).toEqual(["cheesecake"]);
  });

  test("soldout items", async () => {
    const failedAddItem = await addItem("lucas", "cheesecake");
    expect(failedAddItem.status).toBe(404);
  });
});

// ...
❶ Before each test, clears all carts
❷ Before each test, sets the number of cheesecakes in the inventory to 1
Now, even with these hooks, the last test will fail. The first beforeEach hook you’ve added inserts a cheesecake into the inventory and, therefore, doesn’t cause the addItem function in the last test to fail.
Because this last test is the only one that doesn’t require a cheesecake to be available, it’s better to avoid another hook. Instead, you can simply set the number of cheesecakes to zero within the test itself, as shown next.
// ...

describe("addItem", () => {
  beforeEach(() => carts.clear());
  beforeEach(() => inventory.set("cheesecake", 1));

  test("inventory update", async () => {
    await addItem("lucas", "cheesecake");
    expect(inventory.get("cheesecake")).toBe(0);
  });

  test("cart update", async () => {
    await addItem("keith", "cheesecake");
    expect(carts.get("keith")).toEqual(["cheesecake"]);
  });

  test("soldout items", async () => {
    inventory.set("cheesecake", 0);                               ❶
    const failedAddItem = await addItem("lucas", "cheesecake");
    expect(failedAddItem.status).toBe(404);
  });
});

// ...
❶ Sets the number of cheesecakes in the inventory to 0
Despite being excellent for encapsulating repetitive behavior in a clean and concise way, hooks can make your tests harder to read because they increase the distance between your test and its setup and teardown process.
Avoiding hooks for particular cases makes tests more understandable because it causes all the relevant information to be closer to the actual testing code.
When deciding whether to write a hook or an utility function, I’d advise you to think about how often you need to reproduce a certain scenario. If the scenario is needed for almost every test in a suite, I’d advise you to use a hook and consider it as “precondition” for the tests in that suite. On the other hand, if you don’t need to set up or tear down the exact same elements on every test, an utility function would probably be a better choice.
3.2 Writing good assertions
It takes a unique baker to recognize a unique cake. When examining a batter’s consistency or a cake’s texture, an excellent pastry chef knows what to look for. Without rigorous quality control, you can’t bake tasty desserts.
In the same way, excellent engineers know what to look for in the software they write. They write robust and precise assertions, catching as many bugs as possible without significantly increasing maintenance costs.
In this section, I will teach you techniques to help you write better assertions. You will learn how to make them catch as many bugs as possible, without having to update tests too often, adding extra maintenance burden.
3.2.1 Assertions and error handling
A test without assertions fails only if the application code can’t run. If you have a sum function, for example, you must add assertions to ensure it does what it must do. Otherwise, it might as well be doing anything else. Without assertions, you simply ensure that the sum function runs to completion.
To ensure that your tests contain assertions, Jest provides you with utilities that make your tests fail in case they don’t run the number of assertions you expect.
Consider, for example, an addToInventory function that adds items to the store’s inventory and returns the new quantity available. If the amount specified is not a number, it should fail and should not add any items to the inventory, as follows.
Listing 3.16 inventoryController.js
const inventory = new Map();

const addToInventory = (item, n) => {
  if (typeof n !== "number") throw new Error("quantity must be a number");
  const currentQuantity = inventory.get(item) || 0;
  const newQuantity = currentQuantity + n;
  inventory.set(item, newQuantity);
  return newQuantity;
};

module.exports = { inventory, addToInventory };
When testing this function, you must be careful not to create an execution path that could lead to no assertions ever running. Let’s use as an example the following test.
Listing 3.17 inventoryController.test.js
const { inventory, addToInventory } = require("./inventoryController");

beforeEach(() => inventory.set("cheesecake", 0));

test("cancels operation for invalid quantities", () => {
  try {
    addToInventory("cheesecake", "not a number");
  } catch (e) {
    expect(inventory.get("cheesecake")).toBe(0); )      ❶
  }
});
❶ An assertion that runs only when the addToInventory call throws an error
This test will pass, but you won’t know whether it passed because the addToInventory function didn’t add an item to the inventory or because it didn’t throw any errors.
If you comment the line that throws an error and rerun the test, as shown next, you will see that, despite the function being incorrect, the test still passes.
Listing 3.18 inventoryController.js
const inventory = new Map();

const addToInventory = (item, n) => {
  // Commenting this line still makes tests pass
  // if (typeof n !== "number") throw new Error("quantity must be a number");
  const currentQuantity = inventory.get(item) || 0;
  const newQuantity = currentQuantity + n;
  inventory.set(item, newQuantity);
  return newQuantity;
};

module.exports = { inventory, addToInventory };
To guarantee that your test will run assertions, you can use expect.hasAssertions, which will cause your test to fail if the test doesn’t run at least one assertion.
Go ahead and ensure that your test will run an assertion by adding expect.hasAssertions to it.
Listing 3.19 inventoryController.js
const { inventory, addToInventory } = require("./inventoryController");

beforeEach(() => inventory.set("cheesecake", 0));

test("cancels operation for invalid quantities", () => {
  expect.hasAssertions();                                  ❶

  try {
    addToInventory("cheesecake", "not a number");
  } catch (e) {
    expect(inventory.get("cheesecake")).toBe(0);
  }
});
❶ Causes the test to fail if it doesn’t execute at least one assertion
Now consider that you also want to add an assertion that ensures that the inventory has only one item.
Listing 3.20 inventoryController.test.js
const { inventory, addToInventory } = require("./inventoryController");

beforeEach(() => inventory.set("cheesecake", 0));

test("cancels operation for invalid quantities", () => {
  expect.hasAssertions();

  try {
    addToInventory("cheesecake", "not a number");
  } catch (e) {
    expect(inventory.get("cheesecake")).toBe(0);
  }

  expect(Array.from(inventory.entries())).toHaveLength(1)       ❶
});
❶ An assertion that is always executed
The previous test could still pass, even if the catch block was not executed. The expect.hasAssertions call within the test will ensure only that any assertions run, not that all of them run.
To solve this problem, you can use expect.assertions to explicitly determine how many assertions you expect to run. For example, if you want two assertions to run, use expect.assertions(2). Using expect.assertions will cause your tests to fail whenever the number of assertions executed doesn’t match what you determined, as shown next.
Listing 3.21 inventoryController.test.js
const { inventory, addToInventory } = require("./inventoryController");

beforeEach(() => inventory.set("cheesecake", 0));

test("cancels operation for invalid quantities", () => {
  expect.assertions(2);                                   ❶

  try {
    addToInventory("cheesecake", "not a number");
  } catch (e) {
    expect(inventory.get("cheesecake")).toBe(0);
  }

  expect(Array.from(inventory.entries())).toHaveLength(1)
});
❶ Causes the test to fail if it doesn’t execute two assertions
Because assertion counting is not always practical, a simpler and more readable alternative would be to check whether a function call throws an error. To perform this assertion, use Jest’s toThrow, as shown next.
Listing 3.22 inventoryController.test.js
// ..

test("cancels operation for invalid quantities", () => {
  expect(() => addToInventory("cheesecake", "not a number")).not.toThrow();❶
  expect(inventory.get("cheesecake")).toBe(0);
  expect(Array.from(inventory.entries())).toHaveLength(1)
});
❶ Causes the test to fail if the addToInventory function throws an error
Because toThrow usually makes tests less verbose and easier to read, I tend to prefer it. I use it to validate both functions that should throw errors and functions that shouldn’t.
3.2.2 Loose assertions
The goal of writing tests is for them to fail when your application doesn’t do what you want. When writing assertions, you want to ensure that they will be sensitive enough so that they can make tests fail whenever anything goes wrong.
Again, let’s use your addToInventory function as an example. For this function, you could write an assertion that ensures that the result of addToInventory is a Number.
Listing 3.23 inventoryController.test.js
const { inventory, addToInventory } = require("./inventoryController");

beforeEach(() => inventory.clear());               ❶

test("returned value", () => {
  const result = addToInventory("cheesecake", 2);
  expect(typeof result).toBe("number");            ❷
});
❷ Checks whether the result is a number
Now think of how many possible results this assertion allows. Numbers in JavaScript can go from 5e-324 to precisely 1.7976931348623157e+308. Given this enormous range, it’s clear that the set of possible results accepted by the assertion is too big, as illustrated in figure 3.7. This assertion can guarantee that the addToInventory function won’t return, for example, a String or a boolean, but it can’t guarantee that the number returned is correct. By the way, you know what else is considered a Number in JavaScript? NaN, which stands for not a number.
console.log(typeof NaN); // 'number'

Figure 3.7 The range of results accepted by the type assertion
The more values an assertion accepts, the looser it is.
One way of making this assertion accept fewer values—make it “tighter”—is to expect the result to be bigger than a particular value, as shown next.
Listing 3.24 inventoryController.test.js
const { inventory, addToInventory } = require("./inventoryController");

beforeEach(() => inventory.clear());

test("returned value", () => {
  const result = addToInventory("cheesecake", 2);
  expect(result).toBeGreaterThan(1);                 ❶
});
❶ Expects the result to be greater than 1
The toBeGreaterThan assertion drastically reduces the number of accepted results, as you can see in figure 3.8, but it is still way looser than it should be.

Figure 3.8 The range of results accepted by the toBeGreaterThan assertion
The tighter and most valuable assertion you can write is an assertion that allows only a single result to pass, as shown in the following listing and illustrated by figure 3.9.

Figure 3.9 The range of results accepted by the tight toBe assertion
Listing 3.25 inventoryController.test.js
const { inventory, addToInventory } = require("./inventoryController");

beforeEach(() => inventory.clear());

test("returned value", () => {
  const result = addToInventory("cheesecake", 2);
  expect(result).toBe(2);                           ❶
});
❶ Expects the result to be exactly 2
Ideally, your assertions should accept a single result. If your assertions customarily allow many results, it can be a sign that your code is not deterministic or that you don’t know it well enough. Loose assertions make it easier for tests to pass, but they make those tests less valuable because they might not fail when the application produces invalid output. Writing tighter assertions makes it harder for your tests to pass when the application code has problems, making it easier to catch bugs.
Deterministic code A code is said to be deterministic when, given the same input, it always produces the same output.
An assertion that, for example, verifies whether an array includes a value usually tells that you don’t know what the entire array should look like. Ideally, you should have written an assertion that checks the whole array.
Negated assertions—assertions that ensure an output does not match another value—also generate loose assertions. For example, when you assert that an output is not 2, you accept an enormous range of values (all values, of all types, but 2), as shown in figure 3.10. Avoid writing negated assertions whenever possible.
Writing loose assertions is acceptable when you want tests not to be tied to factors you can’t control, like true randomness. Assume that you are testing a function that generates an array with random numbers. When testing this function, you probably want to check the length of the array and the type of its items but not the array’s exact content.

Figure 3.10 The range of results accepted by a negated assertion
TIP Even though Jest has a diverse set of assertions—which you can find at https://jestjs.io/docs/en/expect—I’d recommend readers to stick to toBe and toEqual whenever possible, because they are extremely strict.
To make it easier to control how loose your assertions are, Jest has asymmetric matchers. Asymmetric matchers allow you to determine which aspects of a particular output Jest should validate loosely and which ones it should validate tightly.
Assume you have a function that returns the content of your inventory indexed by name. For auditing purposes, this function will also include the date at which the information was generated, as follows.
Listing 3.26 inventoryController.js
const inventory = new Map();

// ...

const getInventory = () => {
  const contentArray = Array.from(inventory.entries());
  const contents = contentArray.reduce(                   ❶
    (contents, [name, quantity]) => {
      return { ...contents, [name]: quantity };
    },
    {}
  );

  return { ...contents, generatedAt: new Date() };        ❷
};

module.exports = { inventory, addToInventory, getInventory };
❶ Creates an object whose keys are the inventory item’s names and whose values are each item’s respective quantities
❷ Returns a new object including all the properties in contents and a date
When testing this function, your date will change whenever the test runs. To avoid asserting on the exact time the inventory report was generated, you can use an asymmetric matcher to ensure that the generatedAt field will contain a date. For the other properties, you can have tight assertions, as shown in the following code excerpt.
Listing 3.27 inventoryController.test.js
const { inventory, getInventory } = require("./inventoryController");

test("inventory contents", () => {
  inventory
    .set("cheesecake", 1)
    .set("macarroon", 3)
    .set("croissant", 3)
    .set("eclaire", 7);
  const result = getInventory();

  expect(result).toEqual({              ❶
    cheesecake: 1,
    macarroon: 3,
    croissant: 3,
    eclaire: 7,
    generatedAt: expect.any(Date)       ❷
  });
});
❶ Expects the result to match the object passed to the toEqual method
❷ Allows the generatedAt property to be any date
Asymmetric matchers can perform many different kinds of verifications. They can, for example, check whether a string matches a regular expression or whether an array contains a specific item. Check Jest’s documentation to see which matchers are available out of the box.
3.2.3 Using custom matchers
In the previous section, we’ve seen that, even though we want our assertions to be as strict as possible, in some instances, it’s still necessary to be flexible when it comes to verifying values.
Just like when you encapsulate behavior into functions, you can encapsulate your verifications into new matchers.
Let’s say, for example, that you are writing a test to ensure that the generatedAt field in the getInventory is not a date in the future. One of the ways you could do this is by manually comparing timestamps, as shown next.
Listing 3.28 inventoryController.test.js
const { inventory, getInventory } = require("./inventoryController");

test("generatedAt in the past", () => {
  const result = getInventory();

  const currentTime = Date.now() + 1;                                   ❶

  const isPastTimestamp = result.generatedAt.getTime() < currentTime;   ❷
  expect(isPastTimestamp).toBe(true);                                   ❸
});
❶ Adds one millisecond to the current timestamp to ensure that the timestamps compared won’t be the same. Alternatively, you could wait for one millisecond before calling Date.now.
❷ Checks whether the result’s generatedAt property is smaller than the one generated by the test and stores a Boolean value
❸ Checks whether the stored Boolean value is true
This test can be great when it passes, but when it fails, its feedback may not be as clear as you’d expect. Try, for example, to set the year in the generatedAt property to 3000 so that you can see what happens when the test fails.
Listing 3.29 inventoryController.js
const inventory = new Map();

// ...

const getInventory = () => {
  const contentArray = Array.from(inventory.entries());
  const contents = contentArray.reduce((contents, [name, quantity]) => {
    return { ...contents, [name]: quantity };
  }, {});

  return {
    ...contents,
    generatedAt: new Date(new Date().setYear(3000))      ❶
  };
};

module.exports = { inventory, addToInventory, getInventory };
❶ Creates a date in the year 3000
Running your tests should yield the following output:
FAIL  ./inventoryController.test.js
 ✕ generatedAt in the past (7ms)

 ● generatedAt in the past

   expect(received).toBe(expected) // Object.is equality

   Expected: true
   Received: false
As you can see, the diff generated by Jest doesn’t provide much information. It says that you expected true to be false, but it doesn’t tell you anything about what the subject of your assertion was. When a test fails with such a generic difference, you will need to reread its code to determine what went wrong and what the exact difference was between the actual and expected results.
To get access to more precise assertions, we will use jest-extended. The jest-extended module extends Jest’s assertions, providing you with even better and more flexible checks.
NOTE You can find the documentation for jest-extended and its assertions at https://github.com/jest-community/jest-extended.
Go ahead and install jest-extended as a dev dependency.
To set up jest-extended so that you can use its assertions, update your jest .config.js, and add jest-extended to the list of files that should run after setting up the test environment, as follows.
module.exports = {
  testEnvironment: "node",
  setupFilesAfterEnv: ["jest-extended"]      ❶
};
❶ Extends Jest with assertions from jest-extended
Once you have done this, you will be able to use any of the assertions shipped with jest-extended.
To make the test’s feedback clearer, we will use the toBeBefore assertion, which checks whether a Date is before another. Update your test so that it uses this new assertion, as shown next.
Listing 3.31 inventoryController.test.js
const { getInventory } = require("./inventoryController");

test("generatedAt in the past", () => {
  const result = getInventory();
  const currentTime = new Date(Date.now() + 1);          ❶
  expect(result.generatedAt).toBeBefore(currentTime);    ❷
});
❶ Creates a date that is one millisecond ahead of the current time. Alternatively, you could wait for a millisecond before generating a Date.
❷ Expects the result’s generatedAt property to be before the date generated in the line above
Now, when this test fails, the feedback provided by Jest will be way more precise:
FAIL  ./inventoryController.test.js
 ✕ generatedAt in the past (11ms)

 ● generatedAt in the past

   expect(received).toBeBefore()

   Expected date to be before 2020-02-23T15:45:47.679Z but received:
     3000-02-23T15:45:47.677Z
Now you know exactly what the test was checking and what the difference is between the two dates.
Using precise assertions enables you to improve the quality of your test’s feedback by indicating what kind of output Jest should produce.
Tests with precise assertions are way easier to read and take less time to fix because it’s easier to understand what went wrong.
3.2.4 Circular assertions
Circular assertions are assertions that compare your application’s code to itself. You should avoid circular assertions because when comparing your code’s results to themselves, your tests will never fail.
Let’s say, for example, that you create a route for returning the inventory’s content. This route uses the getInventory function you already have, as follows.
// ...

router.get("/inventory", ctx => (ctx.body = getInventory()));

// ...
To facilitate testing this route, you may feel tempted to use getInventory again within your test.
// ...

test("fetching inventory", async () => {
  inventory.set("cheesecake", 1).set("macarroon", 2);
  const getInventoryResponse = await sendGetInventoryRequest("lucas");

  // For the sake of this example, let's not compare the `generatedAt` field's value
  const expected = {                                             ❶
    ...getInventory(),
    generatedAt: expect.anything()                               ❷
  };

  // Because both the route and `expected` were generated based on `getInventory`
  // you are comparing two outputs which come from the exact same piece of code:
  // the unit under test!
  expect(await getInventoryResponse.json()).toEqual(expected);   ❸
});

// ...
❶ Copies to a new object the properties in the getInventory function’s result, and includes a generatedAt property whose value is an asymmetric matcher
❷ Allows the generatedAt property to have any value
❸ Compares the server’s response to the object created within the test
The problem with this approach is that, because both the route and the test depend on the same piece of code (getInventory), you end up comparing the application to itself. If there’s a problem in the getInventory route, it won’t cause this test to fail because the result you expect was also incorrect.
Try, for example, changing getInventory so that it returns 1000 as the quantity for each item.
const inventory = new Map();

const getInventory = () => {
  const contentArray = Array.from(inventory.entries());          ❶
  const contents = contentArray.reduce((contents, [name]) => {   ❷
    return { ...contents, [name]: 1000 };
  }, {});

  return { ...contents, generatedAt: new Date() };               ❸
};

module.exports = { inventory, addToInventory, getInventory };
❶ Uses the inventory’s entries to create an array of key and value pairs
❷ Creates an object whose keys are the inventory item names and whose values are always set to 1000 and represent each item’s respective quantities
❸ Copies every property in contents to a new object, which also contains a generatedAt key whose value is a Date
Even though the quantity of items in the inventory is now wrong, the test for your route will still pass.
Circular assertions don’t tend to be a big problem if you are already testing the different parts of your application separately. In the previous case, for example, even though the route’s tests didn’t catch the bug, thorough tests for the inventoryController itself would have.
Regardless of whether you could have caught that in a separate test, the tests for the route will pass even when they shouldn’t. This inaccurate feedback could cause confusion and, if you didn’t have rigorous tests for inventoryController, could have let the bug slip into production.
A test that contains the expected result explicitly written into the assertion would have been far better. It would make the test more readable and facilitate debugging, as shown next.
// ...

test("fetching inventory", async () => {
  inventory.set("cheesecake", 1).set("macarroon", 2);
  const getInventoryResponse = await sendGetInventoryRequest("lucas");
  const expected = {                                                   ❶
    cheesecake: 1,
    macarroon: 2,
    generatedAt: expect.anything()
  };

  // Notice how both the `actual` and `expected`
  // outputs come from different places.
  expect(await getInventoryResponse.json()).toEqual(expected);         ❷
});

// ...
❶ Creates an object literal without using any dependencies
❷ Expects the server’s response to match the object literal created within the test
Whenever possible, create separate utility functions for your tests instead of just reusing the application’s code. It’s preferable to have a bit of duplication or hardcoded expected results than to have tests that never fail.
3.3 Test doubles: Mocks, stubs, and spies
Mocks, stubs, and spies are objects used to modify and replace parts of your application to ease or enable testing. As a whole, they’re called test doubles.
-
Spies record data related to the usage of a function without interfering in its implementation.
-
Stubs record data associated with the usage of a function and change its behavior, either by providing an alternative implementation or return value.
-
Mocks change a function’s behavior, but instead of just recording information about its usage, they have expectations preprogrammed.
NOTE Engineers often conflate the terms mocks, stubs, and spies, even though, formally, these terms have different definitions.
Especially in the context of Jest, you will frequently see people referring to stubs and spies as mocks. This confusion happens because Jest’s API and documentation tends to use the name mock for every kind of test double.
Ironically, if we adhere to the most accepted definition of a mock, it’s the only kind of test double that Jest does not include.
For the sake of readability and to conform with most people’s vocabulary, throughout this book I’ve used the term mock as a verb that means “to replace with a test double.”
For our first example, let’s consider that, because of accountability purposes, you want to keep logs for whenever someone adds an item to the inventory.
To implement this functionality, you’ll use pino, a lightweight library whose documentation you can find at https://getpino.io. Go ahead and install pino as one of your application’s dependencies, as shown in the next listing. Then, create a logger file, which will contain the logger instance you will use. We will use it to expose only the logging functions we want.
const pino = require("pino");

const pinoInstance = pino();

const logger = {
  logInfo: pinoInstance.info.bind(pinoInstance),      ❶
  logError: pinoInstance.error.bind(pinoInstance)     ❶
};

module.exports = logger;
❶ Thanks to bind, the this value within these functions will always be the Pino instance in this file, not the logger object.
Now that you have a logger, modify the addToInventory function so that it logs whenever an item is added to the inventory, as shown next.
Listing 3.37 inventoryController.js
const logger = require("./logger");

const inventory = new Map();

const addToInventory = (item, quantity) => {
  if (typeof quantity !== "number")
    throw new Error("quantity must be a number");
  const currentQuantity = inventory.get(item) || 0;
  const newQuantity = currentQuantity + quantity;
  inventory.set(item, newQuantity);
  logger.logInfo({ item, quantity }, "item added to the inventory");    ❶
  return newQuantity;
};

module.exports = { inventory, addToInventory };
❶ Logs the item added to the inventory
You can see that the logging works by running node’s REPL and executing the following code:
$ node
> const { addToInventory } = require("./inventoryController");
> addToInventory("cheesecake", 2);
which will cause your logger to write something like this to your console:
{
    "level":30,
    "time":1582531390531,
    "pid":43971,
    "hostname":"your-machine",
    "item":"cheesecake",
    "quantity":2,
    "msg":"item added to the inventory",
    "v":1
}
Given how crucial this requirement is, let’s say you decide to add a test to enforce that the addToInventory properly logs all items passed to it.
In this case, logging is a side effect that you can’t easily observe from outside the addToInventory function. How will you ensure that the logging happened if your tests can’t access it?
To solve this problem, you’ll use a spy. A spy can record any calls to a function. In this case, you’ll use a spy to track calls to the logger.logInfo function so that you can assert on these calls later.
NOTE We don’t want to test if the logging actually happens. Testing the logging library (pino) is the responsibility of the library’s authors. In the examples above, I’ve chosen to trust that the logger works. Instead of adding redundant tests, I simply check if the logging methods are called with the expected arguments.
Verifying calls instead of the logger’s actual behavior simplifies the testing and makes it quicker, but it does not necessarily guarantee that the unit under test logs any information.
Verifying the logging itself would depend on an end-to-end test. A test of that kind would have access to the files or streams to which the logger writes.
Choosing the kinds of tests to write, as we’ve discussed in the previous chapter, depends on your goal and how much you can spend to achieve it.
To experiment with your first spy, create a test for the logging capability, and spy on the logger.logInfo function by using jest.spyOn. Once you have a spy for logger .logInfo, call the addInventory function and log logger.logInfo to see what’s inside it.
Listing 3.38 inventoryController.js
const logger = require("./logger");
const { addToInventory } = require("./inventoryController");

test("logging new items", () => {
  jest.spyOn(logger, "logInfo");      ❶
  addToInventory("cheesecake", 2);
  console.log(logger.logInfo);
});
❶ Wraps the logger’s logInfo method into a spy
The console.log in your test will show you that Jest wrapped logger.logInfo into a function that has plenty of properties that let you access and manipulate data about the usage of logInfo, as follows:
{ [Function: mockConstructor]
  _isMockFunction: true,
  getMockImplementation: [Function],
  mock: [Getter/Setter],
  mockClear: [Function],
  mockReset: [Function],
  mockRestore: [Function],
  mockReturnValueOnce: [Function],
  mockResolvedValueOnce: [Function],
  mockRejectedValueOnce: [Function],
  mockReturnValue: [Function],
  mockResolvedValue: [Function],
  mockRejectedValue: [Function],
  mockImplementationOnce: [Function],
  mockImplementation: [Function],
  mockReturnThis: [Function],
  mockName: [Function],
  getMockName: [Function]
}
Within the spy you’ve just logged, the property that contains the records with each call’s information is mock. Update your console.log to log logger.logInfo.mock instead. When running your test again, you should see the following:
{
  calls: [ [ [Object], 'item added to the inventory' ] ],
  instances: [ Pino { ... } ],
  invocationCallOrder: [ 1 ],
  results: [ { type: 'return', value: undefined } ]
}
In your test, you want to make sure that logger.logInfo is called with the correct values, so you will use logger.logInfo.mock.calls to compare the actual arguments with what you expected, as shown next.
Listing 3.39 inventoryController.js
const logger = require("./logger");
const { addToInventory } = require("./inventoryController");

test("logging new items", () => {
  jest.spyOn(logger, "logInfo");
  addToInventory("cheesecake", 2);                                      ❶

  const firstCallArgs = logger.logInfo.mock.calls[0];                   ❷
  const [firstArg, secondArg] = firstCallArgs;

  // You should assert on the usage of a spy only _after_ exercising it
  expect(firstArg).toEqual({ item: "cheesecake", quantity: 2 });        ❸
  expect(secondArg).toEqual("item added to the inventory");             ❹
});
❶ Exercises the addToInventory function, which should then call the logger’s logInfo function, which is wrapped into a spy
❷ The arguments passed to the logInfo function’s first invocation
❸ Expects the first invocation’s first argument to match an object that includes the item’s name and quantity
❹ Checks whether the first invocation’s second argument matches the expected message
Each new call to logger.logInfo adds a new record to logger.logInfo.mock.calls. That record is an array containing the arguments with which the function was called. For example, if you want to ensure that logger.logInfo is called only once, you can assert on the length of logger.logInfo.mock.calls.
Listing 3.40 inventoryController.test.js
const logger = require("./logger");
const { addToInventory } = require("./inventoryController");

test("logging new items", () => {
  jest.spyOn(logger, "logInfo");
  addToInventory("cheesecake", 2);

  expect(logger.logInfo.mock.calls).toHaveLength(1);     ❶

  const firstCallArgs = logger.logInfo.mock.calls[0];
  const [firstArg, secondArg] = firstCallArgs;

  expect(firstArg).toEqual({ item: "cheesecake", quantity: 2 });
  expect(secondArg).toEqual("item added to the inventory");
});
❶ Expects the logger’s logInfo function to have been called once
To demonstrate spying throughout multiple tests, add logging to the getInventory function so that we can write a test for it, as follows.
Listing 3.41 inventoryController.js
const logger = require("./logger");

const inventory = new Map();

// ...

const getInventory = () => {
  const contentArray = Array.from(inventory.entries());
  const contents = contentArray.reduce((contents, [name, quantity]) => {
    return { ...contents, [name]: quantity };
  }, {});

  logger.logInfo({ contents }, "inventory items fetched");     ❶
  return { ...contents, generatedAt: new Date() };
};

module.exports = { inventory, addToInventory, getInventory };
❶ Logs a message and the inventory’s contents every time getInventory runs
Now that getInventory has logging capabilities, add a test for it. Because you will need to spy on logger.logInfo and clear the inventory before each test, use what you’ve learned in the previous chapter to organize the necessary hooks.
Listing 3.42 inventoryController.test.js
const logger = require("./logger");
const {
  inventory,
  addToInventory,
  getInventory
} = require("./inventoryController");

beforeEach(() => inventory.clear());                           ❶

beforeAll(() => jest.spyOn(logger, "logInfo"));                ❷

describe("addToInventory", () => {
  test("logging new items", () => {
    addToInventory("cheesecake", 2);

    expect(logger.logInfo.mock.calls).toHaveLength(1);

    const firstCallArgs = logger.logInfo.mock.calls[0];
    const [firstArg, secondArg] = firstCallArgs;

    expect(firstArg).toEqual({ item: "cheesecake", quantity: 2 });
    expect(secondArg).toEqual("item added to the inventory");
  });
});

describe("getInventory", () => {
  test("logging fetches", () => {
    inventory.set("cheesecake", 2);
    getInventory("cheesecake", 2);                             ❸

    expect(logger.logInfo.mock.calls).toHaveLength(1);         ❹

    const firstCallArgs = logger.logInfo.mock.calls[0];
    const [firstArg, secondArg] = firstCallArgs;

    expect(firstArg).toEqual({ contents: { cheesecake: 2 } }); ❺
    expect(secondArg).toEqual("inventory items fetched");      ❻
  });
});
❶ Empties the inventory before each test
❷ Spies on the logger’s logInfo function once before all tests
❸ Exercises the getInventory function, which should then call the spy that wraps the logger’s logInfo function
❹ Expects the logger’s logInfo function to have been called once
❺ Checks whether the first argument passed to the logger’s logInfo function matches the expected inventory contents
❻ Expects the second argument passed to the logger’s logInfo function to match the expected message
When running these two tests, you will notice that the second one will fail. Jest will tell you that it expected logger.logInfo.mock.calls to have been called only once, but that it has actually been called twice, as follows:
getInventory
  ✕ logging fetches (5ms)

● getInventory › logging fetches

  expect(received).toHaveLength(expected)

  Expected length: 1
  Received length: 2
  Received array:  [
    [
      {"item": "cheesecake", "quantity": 2},
      "item added to the inventory"
    ],
    [
      {"item": "cheesecake", "quantity": 2},
      "item added to the inventory"
    ]
  ]
Looking at the diff, we can see that the received array still contains the record for the call in the first test. This happens because, just like all other kinds of objects, spies retain their states until you reset them.
To reset the state of the logger.logInfo spy, you can use an afterEach to call logger.logInfo.mockClear after each test. The spy’s mockClear function will reset both the spy.mock.calls and spy.mock.instances arrays, as shown next.
Listing 3.43 inventoryController.test.js
const logger = require("./logger");

// ...

beforeAll(() => jest.spyOn(logger, "logInfo"));

afterEach(() => logger.logInfo.mockClear());      ❶

// ...
❶ After each test, resets the test double’s usage information recorded in its mock property
Clearing the mock after each test should make your tests pass again.
TIP When your tests contain multiple test doubles, instead of manually clearing each one of them, you can reset all doubles at once by using jest.clearAllMocks within a single beforeEach hook.
Alternatively, you can add a clearMocks property to your jest.config.js file with the value true to automatically clear all test doubles’ records before each test.
Try adding some more logging and test it yourself. Try, for example, using logger .logError to log whenever addToInventory fails because the quantity argument passed is not a number.
Once you have done that, rerun your tests as follows and check Jest’s output:
PASS  ./inventoryController.test.js
  addToInventory
    ✓ logging new items (7ms)
    ✓ logging errors (1ms)
  getInventory
    ✓ logging fetches (1ms)

{"level":30,"time":1582573102047,"pid":27902,"hostname":"machine","item":"cheesecake","quantity":2,"msg":"item added to the inventory","v":1}
{"level":30,"time":1582573102053,"pid":27902,"hostname":"machine","contents":{"cheesecake":2},"msg":"inventory items fetched","v":1}
Test Suites: 1 passed, 1 total
Tests:       2 passed, 2 total
Snapshots:   0 total
Time:        2.873s
Ran all test suites.
Perfect! All tests are passing, but your summary still gets polluted with the actual messages written by the logger.
These messages are still written to the console because spies do not replace the actual method that you are spying on. Instead, they wrap that method in a spy and allow calls to pass through.
To avoid polluting your test’s output, replace the logger.logInfo function’s implementation with a dummy function. To do that, call the spy’s mockImplementation method, and pass it a dummy function created with jest.fn.
TIP You can use jest.fn to quickly create stubs. You can either create a stub that does nothing besides tracking its usage, or you can pass it a function to wrap.
Because your tests are well-organized, you just need to update the beforeAll hook that sets up the spy, as shown next.
Listing 3.44 inventoryController.test.js
const logger = require("./logger");
const {
  inventory,
  addToInventory,
  getInventory
} = require("./inventoryController");

beforeEach(() => inventory.clear());

beforeAll(() => {                                               ❶
  jest.spyOn(logger, "logInfo").mockImplementation(jest.fn())
});

afterEach(() => logger.logInfo.mockClear());

describe("addToInventory", () => {
  test("logging new items", () => {
    addToInventory("cheesecake", 2);

    expect(logger.logInfo.mock.calls).toHaveLength(1);

    const firstCallArgs = logger.logInfo.mock.calls[0];
    const [firstArg, secondArg] = firstCallArgs;

    expect(firstArg).toEqual({ item: "cheesecake", quantity: 2 });
    expect(secondArg).toEqual("item added to the inventory");
  });
});

// ...
❶ Replaces the logger’s logInfo implementation with a dummy function
Now that you have replaced logger.logInfo with a dummy function, you won’t see the actual logging in your test summary anymore.
By replacing the logger.logInfo function with your own implementation, you have created a stub. A stub replaces the original implementation of a function. Stubs, just like spies, track the usage of a function so that you can assert on it later.
Important In Jest, all stubs are spies, but not all spies are stubs.
In your previous test, you have replaced logger.logInfo with a dummy function, but you could actually have passed any function to mockImplementation. The function passed to mockImplementation would then replace the one you specified in spyOn, and it would still have all the same capabilities as a spy.
To demonstrate this, try updating addToInventory as shown in the next listing so that it includes the process’s memory usage on every log entry. For that, we’ll use Node’s process.memoryUsage function, whose docs can be found at https://nodejs .org/api/process.html#process_process_memoryusage.
Listing 3.45 inventoryController.js
// ...

const addToInventory = (item, quantity) => {
  if (typeof quantity !== "number")
    throw new Error("quantity must be a number");
  const currentQuantity = inventory.get(item) || 0;
  const newQuantity = currentQuantity + quantity;
  inventory.set(item, newQuantity);
  logger.logInfo(                                                ❶
    { item, quantity, memoryUsage: process.memoryUsage().rss },
    "item added to the inventory"
  );
  return newQuantity;
};

// ...
❶ Logs the item’s name, its quantity, and the process’s memory usage whenever an item is added to the inventory
This new field should now make your test for addToInventory fail because it doesn’t expect the log entry to include memoryUsage.
You could solve this by using an asymmetric matcher and expecting memoryUsage to contain any Number. The problem with this approach is that it does not guarantee that the Number in the memoryUsage field comes from process.memoryUsage().rss.
To make your tests pass again and ensure that the memoryUsage field comes from the right place, you can provide mockImplementation your own function and assert on the value that you know will be returned, as shown next.
Listing 3.46 inventoryController.test.js
// ...

describe("addToInventory", () => {
  beforeEach(() => {                          ❶
    jest.spyOn(process, "memoryUsage")
      .mockImplementation(() => {
        return { rss: 123456, heapTotal: 1, heapUsed: 2, external: 3 };
      });
  });

  test("logging new items", () => {
    addToInventory("cheesecake", 2);

    expect(logger.logInfo.mock.calls).toHaveLength(1);

    const firstCallArgs = logger.logInfo.mock.calls[0];
    const [firstArg, secondArg] = firstCallArgs;

    expect(firstArg).toEqual({
      item: "cheesecake",
      quantity: 2,
      memoryUsage: 123456                     ❷
    });
    expect(secondArg).toEqual("item added to the inventory");
  });
});

// ...
❶ Before each test, replaces the process’s memoryUsage function with a test double that returns an object containing static values
❷ Expects the information registered by the logger’s logInfo function to include the memory in the object returned by the test double
Warning The more stubs you use, the less your tests resemble what your program does at run time, and, therefore, the weaker the quality guarantees they create are.
If the memoryUsage function had been deprecated, for example, your tests would still pass, even though your program wouldn’t work.
Be thoughtful when using stubs. Use them to make tests run faster and to isolate dependencies or factors you can’t control, but make sure that you also have end-to-end tests to cover cases your stubs won’t.
You can make the beforeEach hook even shorter by using mockReturnValue, as shown next. It allows you to provide a canned response without having to create a function yourself.
Listing 3.47 inventoryController.test.js
// ...

beforeEach(() => {
  jest
    .spyOn(process, "memoryUsage")
    .mockReturnValue({               ❶
      rss: 123456,
      heapTotal: 1,
      heapUsed: 2,
      external: 3
    });
});

// ....
❶ Causes the process’s memoryUsage function to always return an object with the same values
Just like spies, stubs will persist their states, including the canned behavior you defined, until they are reset. To reset a stub, you can call its mockReset method. Calling mockReset will cause it to reset all call records and any mocked behavior, but it will remain a spy. To completely restore the original implementation, you should call mockRestore instead.
-
mockClearerases a test double’s records but keeps the double in place. -
mockReseterases a test double’s records and any canned behavior but keeps the double in place. -
mockRestorecompletely removes the double, restoring the original implementation.
TIP All of Jest’s reset methods have global functions that allow you to clear, reset, or restore all test doubles at once. To help you avoid having to write hooks on each test manually, Jest also allows you to add options to jest .config.js that automatically reset doubles for you. These options are clearMocks, resetMocks, and restoreMocks.
In case you want to try different memory values for multiple invocations, by using mockReturnValueOnce, you can determine canned responses for individual calls, as shown next. This function makes it much easier to set up canned responses for tests that depend on multiple calls to a function.
Listing 3.48 inventoryController.test.js
// ...

beforeEach(() => {
  jest
    .spyOn(process, "memoryUsage")
    .mockReturnValueOnce({            ❶
      rss: 1,
      heapTotal: 0,
      heapUsed: 0,
      external: 0
    });
    .mockReturnValueOnce({            ❷
      rss: 2,
      heapTotal: 0,
      heapUsed: 0,
      external: 0
     });
    .mockReturnValueOnce({            ❸
      rss: 3,
      heapTotal: 0,
      heapUsed: 0,
      external: 0
    });
});

// ....
❶ Specifies which object to return on the first call
❷ Specifies which object to return on the second call
❸ Specifies which object to return on the third call
3.3.1 Mocking imports
So far we haven’t had any problems in mocking properties on the logger object we import. But now let’s see what happens if you try to import and use its methods directly. Start by changing your import so that you get the logInfo and logError functions straightaway.
Listing 3.49 inventoryController.js
const { logInfo, logError } = require("./logger");       ❶

// ...
❶ Extracts the exported logInfo and logError functions, and binds them to same names
Then, instead of calling logger.logInfo or logger.logError, directly call the functions you have imported in the previous step. The addToInventory function, for example, would look like the following listing.
Listing 3.50 inventoryController.js
const { logInfo, logError } = require("./logger");

const inventory = new Map();

const addToInventory = (item, quantity) => {
  if (typeof quantity !== "number") {
    logError(                                                     ❶
      { quantity },
      "could not add item to inventory because quantity was not a number"
    );
    throw new Error("quantity must be a number");
  }
  const currentQuantity = inventory.get(item) || 0;
  const newQuantity = currentQuantity + quantity;
  inventory.set(item, newQuantity);
  logInfo(                                                        ❷
    { item, quantity, memoryUsage: process.memoryUsage().rss },
    "item added to the inventory"
  );
  return newQuantity;
};

// ...
❶ Directly calls the logError function exported by the logger
❷ Directly calls the logInfo function exported by the logger
If you start directly using these functions, you will see that your tests start failing. By looking at the diffs, you might see that none of your test doubles are recording any calls, as if they never took effect. To understand why that happens, let’s first understand how spyOn works.
When you use spyOn, you replace a reference to a function by a reference to a function wrapped in a test double, as shown by figure 3.11. Using spyOn essentially does a reassignment to the specified property.

Figure 3.11 What happens when using spyOn
By importing and using a function from logger directly, you end up not accessing the reference that jest.spyOn has replaced. In this case, you get the reference to the original function right when you require it, but what Jest replaces is the reference in logger, as you can see in figure 3.12.

Figure 3.12 What happens when using spyOn when you have direct references
To solve this, you could simply go back to importing logger and accessing properties in it, but in many cases, you will not be able to do that. If you are importing modules that directly export functions or if you simply don’t want to assign your functions to an object, you need a better alternative. Here’s when jest.mock comes into play.
The jest.mock function allows you to determine what should be given back when modules are imported. By using jest.mock, you could, for example, replace the original logger that inventoryController receives when importing ./logger, as shown next.
Listing 3.51 inventoryController.test.js
// ...

jest.mock("./logger", () => ({     ❶
  logInfo: jest.fn(),
  logError: jest.fn()
}));

// ...
❶ Causes importing the logger to resolve to an object whose logInfo and logError functions are test doubles
Using jest.mock in this way will change what modules receive when they import logger, including your test. Instead of receiving the original logger, they will now get the value returned by the function you passed to jest.mock.
Adding the code snippet above to your inventoryController.test.js should now make all tests pass again.
NOTE The jest.fn() function returns empty test doubles. They will record information about their usage but won’t have any canned behavior configured. Their API is the same as the one for test doubles created with spyOn. You can still use methods like mockReturnValue or mockReturnValueOnce.
To get the original logger module within your test again, you can use jest.requireActual as follows.
Listing 3.52 inventoryController.test.js
// ...

const originalLogger = jest.requireActual("./logger");     ❶

jest.mock("./logger", () => ({
  logInfo: jest.fn(),
  logError: jest.fn()
}));

// ...
The jest.requireActual function can be handy when you want to replace some of a module’s exports but not all of them. In that case, you can just merge the original module with the one containing your test doubles, as shown next.
Listing 3.53 inventoryController.test.js
// ...

jest.mock("./logger", () => {                               ❶
  const originalLogger = jest.requireActual("./logger");    ❷
  const partiallyMockedLogger = { logInfo: jest.fn() };
  return { ...originalLogger, ...partiallyMockedLogger };   ❸
});

// ...
❶ Causes importing the logger to resolve to the object returned by the callback function
❸ Returns a new object by merging the properties in the original logger with an object whose logInfo property is a test double
In case you need to mock a module too frequently, Jest has an alternative to help you avoid having to pass a replacement function to jest.mock every time you use it.
By creating a directory named __mocks__ in the directory immediately adjacent from where the module is, all the imports to that module will automatically resolve to the eponymous file within __mocks__ once jest.mock is called for that file. This kind of mock is called a manual mock.
To avoid having to mock logger in multiple tests, you could, for example, restructure your application’s directory like this:
.
|---- logger.js
|---- __mocks__
|   |---- logger.js
|
|---- inventoryController.js
|---- inventoryController.test.js
|---- node_modules
|---- package.json
|---- package-lock.json
Within __mocks__/logger.js, you must export a value that will replace the original logger, as shown next.
Listing 3.54 __mocks__/logger.js
module.exports = {
  logInfo: jest.fn(),
  logError: jest.fn()
};
Once you have done this, instead of having to pass a replacement function to jest.mock in every file, you can simply call jest.mock and give it the logger’s path.
Listing 3.55 inventoryController.test.js
// ...

jest.mock("./logger");      ❶

// ...
❶ Causes the imports to logger to resolve to the object exported by the __mocks__/logger.js file
If you want to avoid calling jest.mock at all, you can add a property called automock to your jest.config.js file and set its value to true. The automock option, when turned on, will cause all imports to resolve to your manual mocks regardless of whether you have called jest.mock before.
NOTE In this section, we have seen a few different ways to create a test double. To choose which one you are going to use, think about what is it that you are trying to “mock.”
-
If you are mocking an object’s property, you should probably use
jest.spyOn. -
If you are mocking an import, you should probably use
jest.mock. -
In case you have to use the same replacement in multiple test files, you should, ideally, use a manual mock placed on the
__mocks__folder.
3.4 Choosing what to test
Louis’s bakery produces more desserts than any other place in town, with half the staff and twice the flavor. To keep up the pace and the quality, Louis has carefully thought about which quality control checks to perform and when. He is familiar with the Pareto principle and has focused on the 20% of tests which generate 80% of the results.
Like Louis, we, as engineers, can focus on the 20% of tests that produce 80% of the results. Knowing what to test is valuable, but it’s even more relevant to determine what not to test.
Ideally, you should have tests that touch every single line of your application, run every single branch of execution, and assert on all the behavior you want to enforce. But, in reality, things are not as sweet as they are in Louis’s bakery. Real-world projects have tight deadlines and limited resources. It’s up to you to make your software as safe as possible and your costs as low as you can.
Having many tests can be great when it comes to quality assurance, but it might be too burdensome to update all of them. Refactoring a large codebase that has an immense amount of tests may require you to spend more time updating the tests than updating the codebase itself. It’s because of this cost that having few tests with stronger quality guarantees is better than having many tests that don’t instill confidence.
3.4.1 Don’t test third-party software
Choosing responsible suppliers, for example, might have taken Louis some time, but it did save him many headaches. Because he can trust that his suppliers provide him with high-quality ingredients, he has to spend less time inspecting them when they get to the bakery.
In the same way that Louis is picky about his suppliers, we should be extremely picky about the third-party software we use. As long as other people’s software is well-tested, we don’t have to spend time testing it ourselves. You should test only the software that you write.
As we have seen in chapter 2, it is advisable to have end-to-end tests that make sure that you are using third-party software as you should, but you should not write tests that cover only the third-party piece of software itself.
Let’s again consider the addItem function we saw in chapter 2, shown in the next listing. This function adds an item to a cart by inserting a row into the database.
const db = require("knex")(require("./knexfile").development);

const addItem = (cartId, itemName) => {
  return db("carts_items").insert({ cartId, itemName });
};

module.exports = { createCart };
What you don’t want to do in this case is test if knex is inserting items in the database. That’s the responsibility of the library’s authors.
In this case, you have the following two options: a) replace knex with a test double, and check if it’s called correctly; or b) spin up a test database, call createCart, and check the database to see if the row was inserted as you expected.
In neither of these cases do you test knex itself. You always focus on your use of the library. Testing other people’s libraries is a wasted effort. It almost always means that you are spending time to write tests that already exist elsewhere.
Even if the tests you add for the library do not exist in the project’s own repository, it’s better to submit them to the upstream version than to keep them in your own codebase. When you add tests to the upstream project, everyone using it benefits, including you, who won’t be the only one responsible for keeping them up-to-date. Collaboration creates a virtuous cycle of safe and well-tested software.
3.4.2 To mock, or not to mock: That’s the question
In the ideal world of tests, every project should have tests with different levels of isolation. You should have unit tests, which isolate a function as much as possible. You should have integration tests, which have some degree of mocking but still verify whether different pieces of your software work together. And you should have end-to-end tests, which barely do any mocking, if at all.
In reality, we usually can’t afford to be so methodical about the way we write tests, and, therefore, we have to decide which parts of your code we will isolate and which we won’t.
Again, consider the same addItem function we’ve seen in the previous section.
const db = require("knex")(require("./knexfile").development);

const addItem = (cartId, itemName) => {
  return db("carts_items").insert({ cartId, itemName });
};

module.exports = { createCart };
Because we don’t want to test knex, as we’ve already mentioned, we can choose to either replace knex with a test double—a “mock”—or call the function and then check the database directly.
In the ideal world, we’d have time to write both tests: one with the test double and one without. In the real world, however, we must choose which one delivers the most value for the lowest cost in time and effort.
In this case, mocking knex would require a tremendous amount of work. For that, you would need to create a piece of software that essentially emulates a database and replicates how knex interacts with it.
Creating a test double for knex is not only time-consuming but also error-prone. It would be so complicated that you would probably need tests for your tests. And then, when there’s an update in knex, you’d have to update your test double, too.
Now consider how hard it would be to not replace knex with a test double.
Without a test double, you would have to spin a database and make sure that your test is well isolated from others. Those extra steps would make the test a bit slower, but they make it way easier and quicker to write.
Look, for example, at the test we’ve written for this function in chapter 2.
const { db, closeConnection } = require("./dbConnection");
const { createCart } = require("./cart");

test("addItem adds an item to a cart", async () => {
  await db("carts_items").truncate();
  await db("carts").truncate();

  const [cartId] = await createCart("Lucas da Costa");
  await addItem("cheesecake");

  const result = await db.select().from("carts_items");
  expect(result).toEqual([{ cartId, itemName: "cheesecake" }]);
  await closeConnection();
});
This test is almost as simple as a test that checks only the return value of a function. The only difference is that instead of saving the returned value to a variable, you have to access the database to get the result before you can check it.
Comparing the difficulties of mocking knex and the small benefits it produces with how easy it is to write an integration test and the immense value it generates, it’s clear that an integration test is the best option for this scenario.
As a rule of thumb, if mocking a dependency is too complicated, don’t mock it.
Replace only the parts of your software that are either easy to replace or that can’t be used in your tests at all, such as integration with paid third-party services.
Being able to write tests with different levels of isolation is great for obtaining precise feedback, but it creates a large amount of unnecessary overlap. These overlapping tests then become somewhat redundant and add costs without providing significant benefits when it comes to quality.
How much mocking is too much mocking?
When you mock a particular layer of your application, you prevent your tests from reaching everything underneath it.
Consider, for example, that you have a route that uses the cartController module. The cartController uses a notifier module, which, in turn, calls a third-party API.
By mocking CartController, you are choosing not to test all the layers underneath it; you are not running code that’s in the notifier module or in the third-party API.
The more superficial the layer you choose to mock, the more you choose not to test. The more you want to hide complexity, the earlier you should mock.
Mocking can be especially beneficial when working with legacy applications or applications that have no tests, for example. By using mocks, you can hide the layers that you haven’t yet refactored and therefore avoid testing code that is not ready to be tested yet. In figure 3.13, you can see which layers get hidden depending on where you place a test-double.
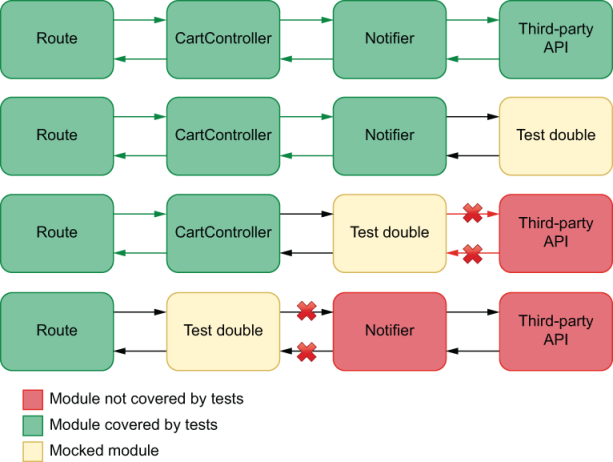
Figure 3.13 How much complexity is hidden by mocking each layer of your application
A downside of writing mocks is that they distance your test scenarios from real use-case scenarios. Therefore, tests that have more mocks provide weaker quality guarantees and make you less confident.
In general, too much mocking is when you mock pieces of software that you could easily test without a mock.
3.4.3 When in doubt, choose integration tests
Unit tests provide blazing fast and extremely precise feedback, but they don’t provide us with strong quality guarantees. End-to-end tests, on the other hand, are the strongest quality guarantees we can get, but they usually take a lot of time to run, provide generic feedback, and tend to be time-consuming to write.
Somewhere in between unit tests and end-to-end tests are integration tests, which can give us the best of both worlds. They provide considerably strong quality guarantees, run reasonably fast, and tend to be quick to write. Sometimes, integration tests are even quicker to write than more isolated tests, given that we have to do less mocking.
Once again, for your addItem function, think about what each kind of test would have to do.
const db = require("knex")(require("./knexfile").development);

const addItem = (cartId, itemName) => {
  return db("carts_items").insert({ cartId, itemName });
};

module.exports = { createCart };
-
A very isolated unit test would mock
knexand check only whetheraddItemusesknexcorrectly. -
An integration test would call
addItemand check the database. -
A full-blown end-to-end test would spin up the server, open a browser, click the button that adds items to a cart, and check the cart listing page.
In this case, a unit test would not provide solid guarantees. It would also be hard to write due to all the mocking you’d have to do, as I previously mentioned.
An end-to-end test would instill high confidence that the software works. But it would be challenging to write and take a lot of time to run.
The integration test, on the other hand, is quick to write, because we don’t have to use any mocks, and runs way faster than an end-to-end test. Because this test touches the database, it creates a secure guarantee that the function will work as expected. It is the kind of test that costs less to write and provides the most significant benefit.
Integration tests usually balance cost and benefit better, so, whenever in doubt, choose integration tests.
NOTE Ideally, you should try to stick to the pyramid shape, but also having a high proportion of integration tests can help you cut costs.
3.5 Code coverage
Code coverage is a metric that indicates how much of your code is executed when you run tests.
To understand how code coverage works, think about which lines of the removeFromCart function run depending on which test you execute.
// ...

const addToInventory = (item, quantity) => {
  if (typeof quantity !== "number") {
    logError(
      { quantity },
      "could not add item to inventory because quantity was not a number"
    );
    throw new Error("quantity must be a number");
  }
  const currentQuantity = inventory.get(item) || 0;
  const newQuantity = currentQuantity + quantity;
  inventory.set(item, newQuantity);
  logInfo(
    { item, quantity, memoryUsage: process.memoryUsage().rss },
    "item added to the inventory"
  );
  return newQuantity;
};

// ...
If you run a test that passes a quantity argument whose type is a number, for example, none of the lines within the first if statement will run.
Listing 3.61 inventoryController.test..js
const { addToInventory } = require("./inventoryController");

jest.mock("./logger");                    ❶

test("passing valid arguments", () => {   ❷
  addToInventory("cheesecake", 2);
});
❶ Replaces logger with a test double to make sure the test’s output won’t be polluted with the logger’s messages
❷ A test that covers approximately 80% of the lines in the addToInventory function
If you consider this function exclusively, you’ll notice that your test covers approximately 80% of the addToInventory function’s lines. In case any invalid statements are within those lines, your tests will be able to catch them. If, however, you have an invalid statement in the 20% of lines that are uncovered, your tests won’t detect it.
By looking at the parts of your code your tests aren’t reaching, you can detect possible blind spots and create tests to cover them.
In this case, for example, you can write a test that passes a string as the second argument to addItemToCart so that you cover the remaining lines of that function, as shown next.
Listing 3.62 inventoryController.test..js
// ...

test("passing valid arguments", () => {           ❶
  addToInventory("cheesecake", 2);
});

test("passing invalid arguments", () => {         ❷
  try {
    addToInventory("cheesecake", "should throw");
  } catch (e) {
    // ...
  }
});
❶ A test that covers approximately 75% of the lines in the addToInventory function
❷ A test that covers the remaining lines in the addToInventory function
By paying attention to your test’s coverage, you were able to detect a blind spot in your test suite and make it more thorough.
Important By measuring which parts of your code are covered and, most importantly, which aren’t, you can make sure that all the possible branches of execution run during your automated testing process.
3.5.1 Automated coverage reports
To see a report that indicates exactly which parts of the code your tests execute, run the project’s Jest executable with the --coverage option.
TIP If you’re using NPM scripts to run your tests, as I recommend, you can obtain coverage reports with npm test -- --coverage.
Once Jest finishes running tests and collecting data about the parts of code your tests are executing, it will create a folder named coverage in the root of your project. This new folder contains a complete coverage report.
Finally, to see which parts of your code are covered, try using your browser to open the index.html within the lcov-report folder that’s inside the coverage directory. This report will highlight in red any pieces of code not executed by your tests.
TIP In addition to using these reports to understand your blind spots, you can use the other “machine-friendly” files that Jest generates to keep track of your coverage using automated tools.
You could, for example, upload your coverage reports to a third-party tool that allows you to track how your code coverage changed over time.
Furthermore, you could use version-control checks, about which you’ll learn in chapter 12, to prevent others from merging code that reduces the amount of code covered by tests.
3.5.2 Coverage types
When automatically generating code coverage reports with Jest, you should have seen a table at the bottom of your test’s summary indicating the percentage of code covered in the target files.
That table contains four measurements of coverage: statement coverage, branch coverage, function coverage, and lines coverage. All of these measurements represent which parts of your code your tests execute, but their units of measurement are different, as follows:
-
Statement coverage considers the total number of statements in your code and how many of them run.
-
Branch coverage considers how many execution paths your tests have gone through considering the total number of paths that could’ve been taken.
-
Function coverage considers how many functions run out of the total number of functions your code contains.
-
Line coverage considers how many lines of code your tests execute, regardless of how many statements they contain or in which execution paths these lines are.
All of these types of coverage are important, but the one to which I pay the most attention tends to be branch coverage.
Branch coverage indicates that, during my tests, my code has gone through all the possible paths of execution it could’ve gone through. Therefore, it guarantees that whenever my code has to “make a choice,” all the possible choices are validated.
3.5.3 What coverage is good for and what it isn’t
Code coverage does not indicate how good your tests are. It’s perfectly possible to cover 100% of your code and still let bugs slip by.
Imagine, for example, that you have a function that sums two numbers if they’re both even and divides one by the other if at least one is odd, as shown next.
function sumOrDivide(a, b) {
  if (a % 2 === 0 && b % 2 === 0) {
    return a + b;
  } else {
    return a / b;
  }
}
If you write tests that run both of this function’s execution branches but don’t perform any assertions, you will have 100% coverage, but you won’t catch any bugs you may introduce.
test("sum", () => {
  sumOrDivide(2, 4);
});

test("multiply", () => {
  sumOrDivide(2, 6);
});
In case you change this function so that it always returns "cheesecake", for example, your coverage will remain at 100%, and your tests will still pass.
Without making the necessary observations by writing assertions, you may have a high coverage but not catch any bugs.
Additionally, your coverage may indicate your tests run all of your code’s possible execution branches but not all the possible faulty inputs.
If you passed 1 as the first argument to this function and 0 as the second, for example, your function would return Infinity, which may not be the result you desire.
Coverage represents how much of your code your tests cover, not how many of the possible inputs it passes. Therefore, you can’t guarantee you will find bugs unless you test all possible inputs, which is a pretty difficult task.
TIP To understand why testing all possible inputs is difficult, if not impossible, think about how many different numbers you can represent in JavaScript.
Another problem with coverage measurements is that they indicate which possible execution branches run, but not all the possible combinations of those branches.
Suppose a specific combination of execution paths throws an error. In that case, you may not see it, because even though all branches are covered, the particular combination of branches necessary for the bug to occur may not run.
Because of these reasons, code coverage on its own is a bad metric. It may show which parts of a program’s code are covered, but it doesn’t indicate which of its possible behaviors are covered, as James O. Coplien explains in his brilliant article “Why Most Unit Testing Is Waste” (https://rbcs-us.com/site/assets/files/1187/why-most-unit-testing-is-waste.pdf).
I define 100% coverage as having examined all possible combinations of all possible paths through all methods of a class, having reproduced every possible configuration of data bits accessible to those methods, at every machine language instruction along the paths of execution. Anything else is a heuristic about which absolutely no formal claim of cor-rectness can be made. The number of possible execution paths through a function is mode-rate: let’s say 10. The cross product of those paths with the possible state configurations of all global data (including instance data which, from a method scope, are global) and formal parameters is indeed very large. And the cross product of that number with the pos-sible sequencing of methods within a class is countably infinite. If you plug in some typical numbers you’ll quickly conclude that you’re lucky if you get better coverage than 1 in 1012.
Important The only guarantee code coverage gives you is that your program can run, not that it runs correctly.
Instead of using code coverage as a metric on its own, I use it to understand which parts of my program I’ve forgotten to cover and to ensure that my team is always progressing toward more coverage, not less.
Summary
-
Organize your tests by nesting different groups of tests within
describeblocks. -
Nesting your tests into multiple blocks enables you to encapsulate variables, functions, and even hooks, which become relative to the block of tests in which they are placed.
-
When organizing your tests, avoid overlap. Each test should assert on a single aspect of the unit under test so that it generates accurate feedback.
-
Tests in different files will, by default, run in parallel. Running tests in parallel can make tests run faster and, therefore, incentivizes developers to run them more often.
-
Any particular test should not depend on any others. Tests should be atomic so that you can easily determine the cause of a bug and whether you have a problem in your tests or your application code.
-
Always make sure that your tests run assertions. A test without assertions does not check whether the unit under test does what it’s supposed to do. It ensures only that the application code can run and nothing else.
-
Assertions should allow as few results to pass as possible. Ideally, an assertion should allow only a single result to pass.
-
Loose assertions—assertions that allow multiple outputs to pass—can be useful to deal with nondeterminism, like when dealing with true randomness or dates.
-
Circular assertions use parts of your application to test itself. They can cause problems because if the part you’re using in your test has a bug, they will also produce an incorrect expected output.
Test doubles: Mocks, stubs, and spies
-
Mocks, stubs, and spies are objects used to modify and replace parts of your application to ease or enable testing.
-
Whereas spies just record data related to the usage of a function, stubs allow you to modify its behavior by providing alternative results or even alternative implementations.
-
Having a large number of tests is helpful to create reliable quality guarantees, but they can be burdensome to update. Therefore, it’s as crucial to determine what to test as it is to determine what not to.
-
Avoid testing third-party software. That’s the responsibility of the third-party software’s authors. If you want to add tests for it, contribute to the library’s repository instead, so that everyone benefits from it, including you, who won’t have to maintain those tests on your own.
-
More mocking makes tests less similar to reality and, therefore, less valuable. If mocking is too difficult, or if it will cause your test not to be valuable because it touches very few parts of your application, avoid mocking.
-
Different kinds of tests can generate a significant amount of overlap. If you have to choose only one type of test, it’s better to choose an integration test. Integration tests run reasonably quickly, tend to be easy to write, and provide reliable quality guarantees.
-
Code coverage is a metric that indicates how much of your code is executed when you run tests.
-
By measuring code coverage, you can understand which parts of your code you’ve forgotten to test and, therefore, add the necessary validations for them.
-
Code coverage can be measure against statements, branches, functions, or lines.
-
Having a high percentage of code coverage does not mean your tests are good. It’s possible to have 100% of your code covered and still let bugs slip through because code coverage doesn’t take into account all the possible inputs that can be passed to your program or all the possible combinations of its execution branches.
-
You should use code coverage reports to understand which pieces of code you’ve forgotten to test and to guarantee your team is committing tests and progressing toward more coverage, not to determine the quality of your tests.