PROCESS & PROCEDURE
In this initial chapter, we will explore the arrangement of the drawing surface for maximum effectiveness, how holding a pencil can make a difference in the way a drawing looks, how making marks on a drawing surface can represent a dimensional reality, and how to successfully build a drawing from the understanding and use of a few key fundamental steps. Remember: A long journey begins with small steps.

Getting Started
Drawing & Viewing Arrangement
The ideal way to see a subject and the drawing surface simultaneously is to elevate the drawing surface as vertically as possible, while maintaining a comfortable and accessible drawing position. The artist’s eyes should be the only things that move, back and forth or up and down, from the subject to the paper. The more a drawing surface is angled away from the artist’s line of sight, the less the artist will be able to comfortably view the subject. Working at an easel is an advantageous position for a variety of reasons. Most importantly, the less the artist has to move his or her head the better.

An easel allows the artist to simultaneously face the paper and the subject while drawing. Set up the easel slightly to one side of the subject so that you can see it as well as the paper with a slight back-and-forth motion of the eyes. Another advantage is the ability to more easily step back from the easel to critically evaluate the process.

You may also choose to use a drawing table, which can be elevated to a height similar to the viewing situation an easel would provide. Elevate the table as close to a 90-degree viewing angle as possible, while still being able to see the subject over the elevated table edge.
Holding the Pencil
There are two ways to hold a pencil while drawing. The first is the basic overhand, or “handwriting,” position. The pencil sits in the crook between the thumb and first finger, with the palm of the hand parallel to the paper. Most people instinctively hold a pencil this way because it is comfortable and how we are typically taught to write. This is a good way to hold the pencil if you are working on detail and want more control.
The second way to hold a pencil is in the “underhand” position. The pencil sits comfortably in the palm of the hand, with the barrel balanced and supported by the thumb and the first and second fingers. There are several variations of this position. The palm may be placed parallel to the paper or at a right angle to the paper’s surface. The pencil may be gripped at the point for more control or further up the pencil barrel for more expressive mark-making.

Overhand

Underhand

Mark-Making
The idea of making a mark to record an interpretation of an object is, and has always been, a primary goal of humanity across all cultures. All representational drawing is based on this abstract concept: the accumulation of marks or lines meant to represent reality. Marks can also be purely ornamental or nonrepresentational, but here we refer to mark-making as a method that leads to a perception of reality and an understanding of a subject. Mark-making can be as varied as the tools used to make it.

Line Weight

The weight of a line refers to the lightness or darkness of the line based on how much pressure the artist chooses to apply with his or her pencil. A weighted, or variable, line weight is much livelier and more interesting than a line that remains consistently the same. Imagine a lilting delivery of a Shakespeare soliloquy by an accomplished actor, and then compare it with a flat, monotone approach.
Line weight and variety in a drawing can convey texture, weight, and lighting on the surface of a form. It can also serve to focus the viewer’s eye on a certain part of the drawing—strong line weight draws the eye more than weak line weight. This is helpful in demonstrating visual hierarchy, when one object is in front of another.
Variable line weight can be used to lead a viewer through the journey of a drawing, creating a dialogue between the artist and the viewer.
Gesture Drawing & Contour Line Drawing
Gesture drawing and contour line drawing are two opposite approaches to the drawing process; however, they can be used together. Gesture drawing is a very quick, all-encompassing glimpse of the subject. Contour line drawing is a slow, methodical, detailed observation of the subject. When used together, these two differing approaches to drawing the subject can become the foundation for a successful drawing.
Blind Contour Line Drawing

Blind contour line drawing is a valuable exercise in learning and refining your observational skills. Drawing a subject on paper without looking at the paper while you draw involves a careful approach to observation and good hand-eye coordination. Start drawing anywhere on the form, and imagine that the tip of the pencil is touching the actual form. As you move the pencil slowly around the form in a continuous line, only look at the subject, not the paper. You may stop at any time and glance at the paper to relocate your pencil on the form, but don’t start drawing again until you are looking only at the subject.
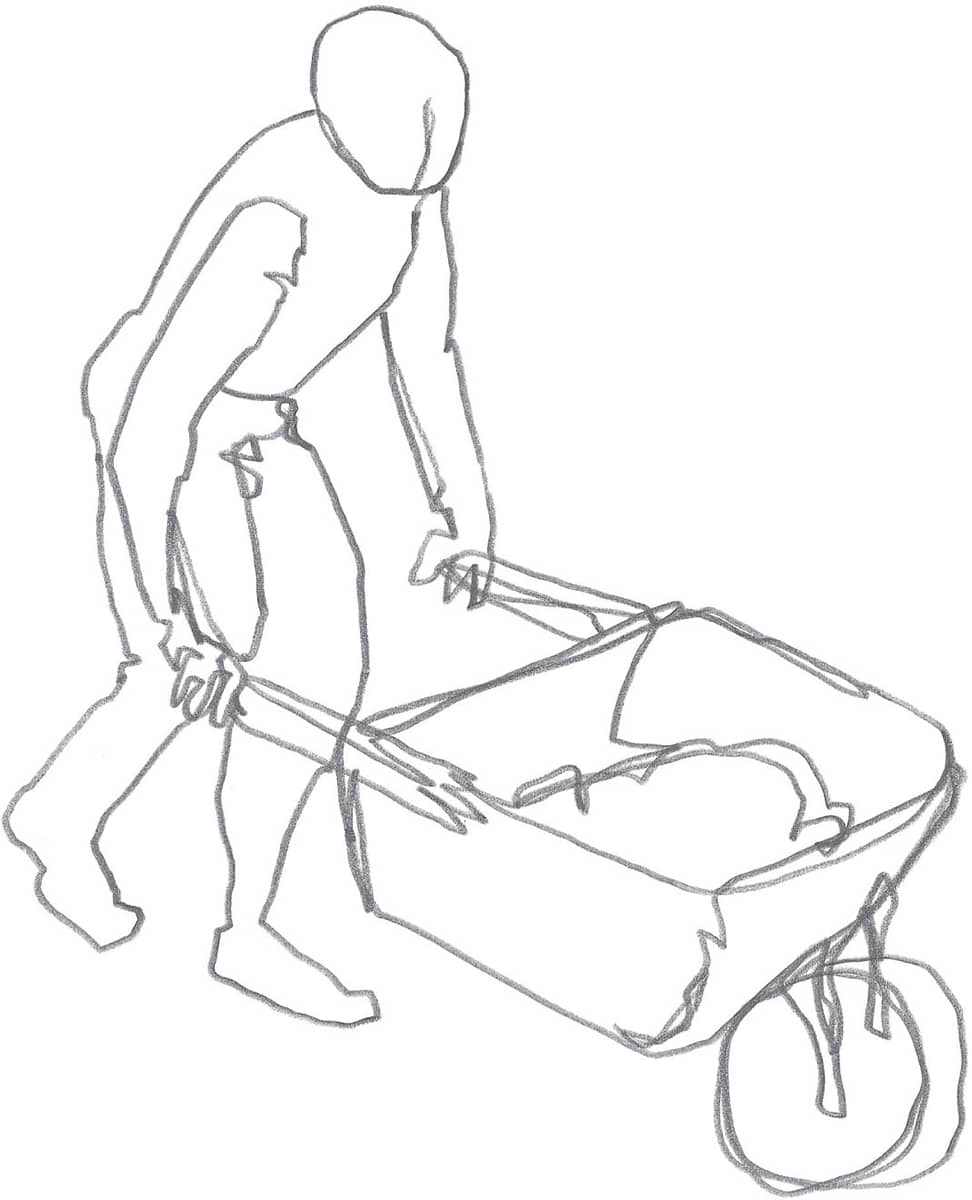
Gesture Drawing

A gesture drawing conveys an interpretation of the subject through continuously flowing, rhythmic line, without any sense of detail or refinement. Drawing in this manner can be used to warm up your hand, like exercising. A gesture drawing can also act as a preliminary sketch for a more detailed drawing. This method employs continuous movement of the arm and hand without lifting the pencil off the paper or using short, choppy lines or strokes. Imagine that the pencil is actually on the form itself and not merely touching the paper. This takes practice and patience to do well, but it is very much worth the effort.
Contour Line Drawing
Contour line drawing is a detailed interpretation of the subject matter, without employing tone or shading. This type of drawing is not just a simple outline of the outer edges of a subject, however, which would give the impression only of a flat shape or silhouette. Dimensionality is achieved through a careful investigation of all inner and outer “touchable” edges. To develop and implement the sensitivity and skill that this type of drawing requires, the eye and the drawing hand should travel around the form of the subject at a slow, searching pace, without hurried sketching.
Cross-Contour Drawing

Cross-contour drawing is an effective technique that conveys the feeling of a three-dimensional form on a two-dimensional surface. This technique builds on contour drawing by describing the mass and volume of an object, in addition to its shape.
This technique employs sensitive line application, including variable weight lines across the entire surface of a subject, not just the touchable edges. This continuous line application is ideal for conveying the variations inherent in natural, organic forms.
To understand how to start this type of drawing, think of a basic three-dimensional geometric form, such as a sphere, and understand how horizontal and vertical lines would look across it’s surface. As these parallel lines move toward the tops and sides of the sphere, notice how they appear closer together until they almost converge. This is known as foreshortening.

Applying this technique to a more organic shape, such as an apple, demonstrates how this type of mark-making shows the exterior shape of an apple as well as the subtle variations within the form. Imagine wrapping a string or wire around the form to represent drawn lines as they would appear on the object’s surface.

To create even more three-dimensionality and a sense of volume, use a variable weight line across the form’s surface, which can elicit a feeling of depth (nearness or distance from the viewer), as darker lines tend to come forward and lighter lines tend to recede. This is also an effective way to show the effects of light on the form, as lighter lines suggest areas facing a light source and darker lines suggest those in shadow.
Additional Considerations
Foreshortened Forms

When an elongated subject, such as a shoe, is viewed at a certain angle (sometimes called “straight on”), the overall length of the subject seems much smaller, or shorter in length, than we actually know it to be. This is the result of compression of space within the form. This compression is best explained by the overlapping of forms in a “foreshortened” manner. We will discuss this more thoroughly in the chapter on how we see and interpret our subjects.
Shapes
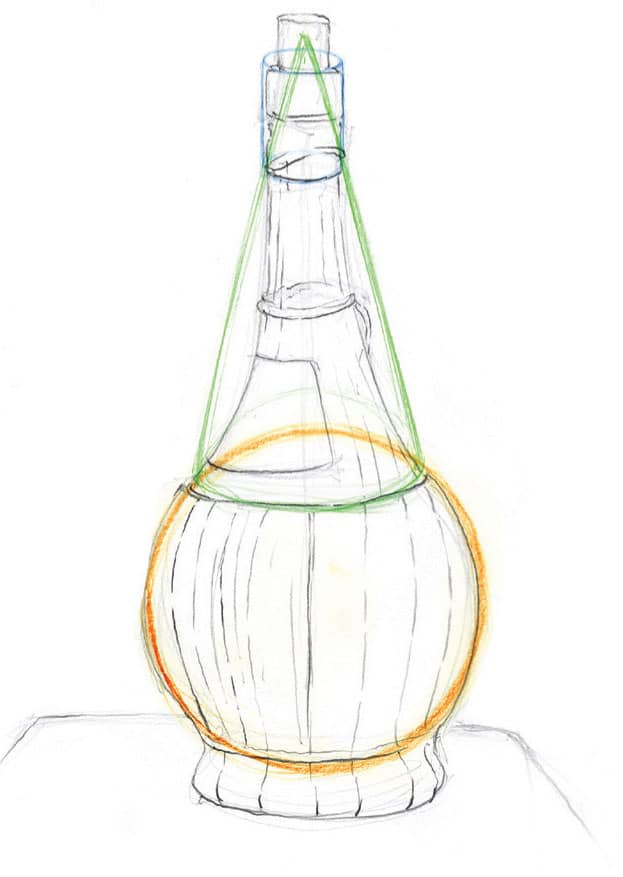
An important aspect of the initial gesture block-in sketch is to always start with the basic geometric shapes that most resemble the form or forms you see. The most common shapes found within most forms, either organic or man-made, are the square, sphere, cylinder, and cone.
Overlapping Objects
When combining multiple objects in a small composition, start with a gesture drawing of the furthermost object. As the objects advance toward you and overlap each other, sketch them in loosely and lightly over the object behind it. If you sketch each object’s initial shape, each object retains its own three-dimensional space or volume (also called its “footprint”).
When you are finished with the blocked-in gesture sketch, complete a contour line drawing over the light gesture sketch of the object that is closest to you in the foreground. This method allows you to maintain control over overlapping shapes. Finish the contour line drawing for the nearest object before you start on the object behind it so that you don’t cross over a line or form that is meant to be in front of the furthermost object.

Transferring an Image
A quick way to achieve an accurate drawing, without the initial stages of sketching, is to transfer the main lines of a photographic reference onto your drawing paper. First, print out your reference at the size you plan to draw it. Then place a sheet of tracing paper over the printout and trace the outlines. Coat the back of the tracing paper with an even layer of graphite and place it over a clean sheet of drawing paper, graphite-side down. (Instead of coating the back of the tracing paper, you might choose to purchase and use transfer paper, which already has one side coated with graphite.) Tape or hold the papers together and lightly trace your outlines with a ballpoint pen or stylus. The lines of your tracing paper will transfer to the drawing paper below.

While tracing the lines, occasionally lift the corner of the sketch (and the transfer paper, if present) to make sure the lines that have transferred aren’t too light or too dark.
Learning to “See”
Many beginners draw without really looking carefully at their subject; instead of drawing what they actually see, they draw what they think they see. Try drawing something you know well, such as your hand, without looking at it. Chances are your finished drawing won’t look as realistic as you expected. That’s because you drew what you think your hand looks like. Instead, you need to forget about all your preconceptions and learn to draw only what you really see. The following contour drawing exercises are great for training your eye and hand to work together to represent what is truly in front of you.
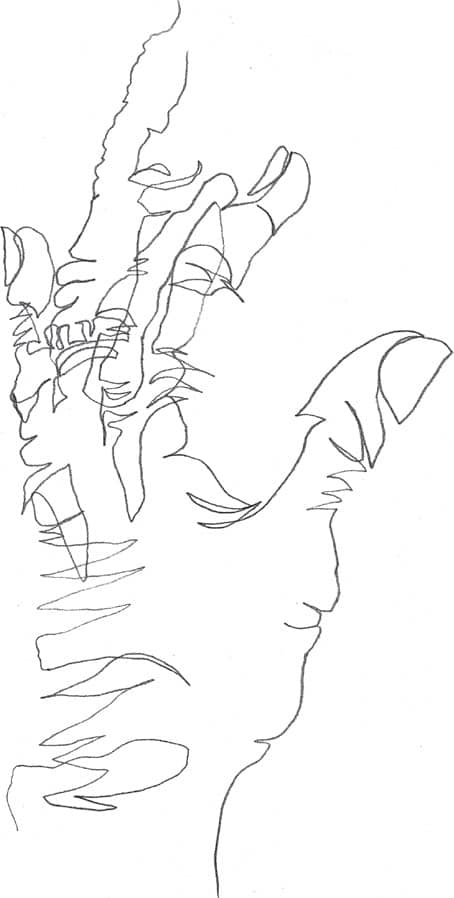
Contour Drawing
In contour drawing, you pick a starting point on your subject and then draw only the contours—or outlines—of the shapes you see. Because you’re not looking at your paper, you’re training your hand to draw the lines exactly as your eye sees them. Try doing some contour drawings of your own; you’ll be surprised at how well you’re able to capture the subjects.
DRAWING WITH A CONTINUOUS LINE When drawing this figure, glance only occasionally at your paper to check that you are on track. Concentrate on looking at the subject and tracing the outlines you see. Do not lift your pencil between shapes; keep the lines unbroken by freely looping back and crossing over previous lines. This simple technique effectively captures the subject.
YOUR HOMEWORK
For your first homework assignment, we will focus on some of the most important areas of study in this chapter. Pick subject matter that interests you, but is organic in nature—inherently simple in shape and form—and presents an opportunity to draw contours inside the form, as well as outer contour edges. This type of seashell is a perfect example.

STEP 1 Use an H or HB pencil to develop a quick gesture sketch of the object, taking no more than 2 to 3 minutes to block in the entire structure. Don’t worry about details or dark lines.

STEP 2 Slow down, and draw a weighted contour line drawing over the gesture. Take your time; spend 20 to 30 minutes on this part of the exercise. Remember to contour draw all of the touchable edges of the form, not just the outside contours. See how much information you can give the viewer about your chosen subject matter, without resorting to shading. Use B and/or 2B graphite pencils for the finishing contour.
EXERCISES FOR PRACTICE
You can create a variety of effects, lines, and strokes with pencil simply by alternating hand positions and shading techniques. Many artists use two main hand positions for drawing. The writing position is good for detailed work that requires hand control. The underhand position allows for a freer stroke with arm movement and motion that is similar to painting.
Shading Techniques
The shading techniques below can help you learn to render everything from a smooth complexion and straight hair to shadowed features and simple backgrounds. Whatever techniques you use, always remember to shade evenly.

HATCHING This basic method of shading involves filling an area with a series of parallel strokes. The closer the strokes, the darker the tone.

CROSSHATCHING For darker shading, place layers of parallel strokes on top of one another at varying angles. Make darker values by placing the strokes closer together.

GRADATING To create graduated values (from dark to light), apply heavy pressure with the side of your pencil.

SHADING DARKLY By applying heavy pressure to the pencil, you can create dark, linear areas of shading.

SHADING WITH TEXTURE For a mottled texture, use the side of the pencil tip to apply small, uneven strokes.

BLENDING To smooth out the transitions between strokes, gently rub the lines with a tortillon or tissue.
Other Pencil Techniques
Below are a few more techniques for experimenting in graphite. For these exercises, you will need hard and soft pencils, as well as a water-soluble pencil.

CREATING A GRAPHITE WASH Shade an area with water-soluble pencil and blend the strokes with a wet brush. Always use water-soluble pencil on thick paper, such as vellum board, and avoid using too much water on the brush.

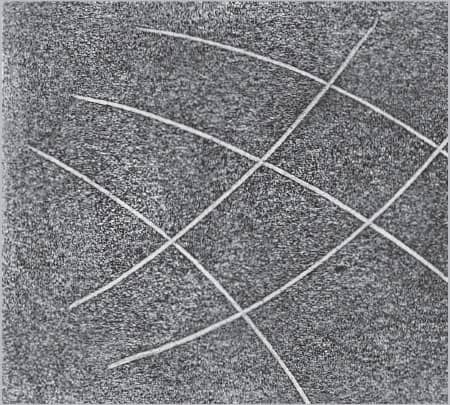
RUBBING Place paper over an object and rub the side of your pencil lead over the paper. The strokes of your pencil will pick up the pattern underneath and replicate it on the paper. Choose an object with a strong textural pattern, such as a wire grid, as shown at left.

LIFTING OUT Blend a soft pencil on smooth paper, and then lift out the desired area with a kneaded eraser. You can create highlights and other interesting effects with this technique.
PRODUCING INDENTED LINES “Draw” a pattern or design with a sharp, non-marking object such as a knitting needle or stylus. Next, shade over the area with the side of your pencil to reveal the pattern.
Practicing Lines
When drawing lines, it is not always necessary to use a sharp point. In fact, sometimes a blunt point may create a more desirable effect. When using larger lead diameters, the effect of a blunt point is even more evident. Play around with your pencils to familiarize yourself with the different types of lines they can create.

DRAWING WITH A SHARP POINT The lines above were drawn with a sharp point. Draw parallel, curved, wavy, and spiral lines; then practice varying the weight of the lines as you draw. Os, Vs, and Us are some of the most common alphabet shapes used in drawing.
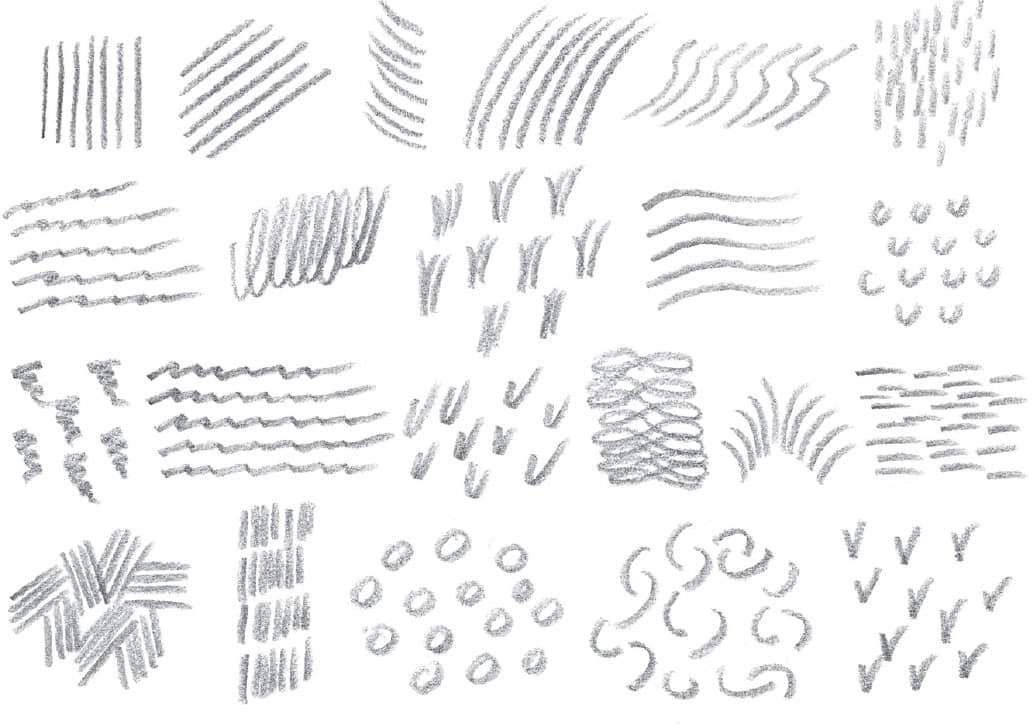
DRAWING WITH A BLUNT POINT The shapes above were drawn using a blunt point. Note how the blunt point produced different images. You can create a blunt point by rubbing the tip of the pencil on a sandpaper block or on a rough piece of paper.
Smudging
Smudging is an important technique for creating shading and gradients. Use a tortillon or chamois cloth to blend your strokes. It is important that you do not use your finger; your hands produce natural oils that can damage your artwork.
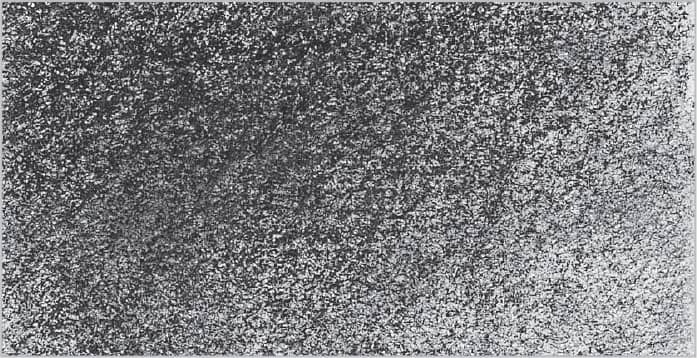
SMUDGING ON ROUGH SURFACES For a granular effect, use a 6B pencil on vellum-finish Bristol board. Stroke with the side of the pencil; then blend with a tortillon.

SMUDGING ON SMOOTH SURFACES Use a 4B pencil on plate-finish Bristol board. Stroke with the side of the pencil; then blend with a tortillon.