From Field to Studio

When I return from an outing or having been on location for a few days or weeks, I am brimming with ideas. Most of them are fairly ambiguous, and I know I need to let my mind settle or steep for a little while. I spend this time looking at photos and my sketchbook, doing little studies or starting to work on thumbnails for potential paintings. As a professional, there’s always emails to answer, the phone, and my family to distract me. In this aspect, the business of being a working artist means that I dedicate time to my personal life, but when I go into the studio and close the door, I might as well be 10 miles away in an office. This works fairly well and I try to keep “normal” business hours, but I do secretly enjoy the early morning or weekends alone when I know no one will interrupt me.
Once I have settled on a scene, I begin my studio process. If I’ve done a lot of work onsite, I am fairly ahead of the game. I may do a few thumbnail studies to work on composition and light, but then I move quickly into working. I try not to put pressure on myself and rely on my process, which I describe on the next few pages.
When on location, I use site photography, along with my sketchbook or easel, so I have a lot of reference material to work from. I start with little studies, maybe 3” x 4”, to see the big shapes. For the purposes of this lesson, I have enlarged the final studies to full-size for clarity. This study painting was done on a half sheet of Saunders Waterford 140lb rough.
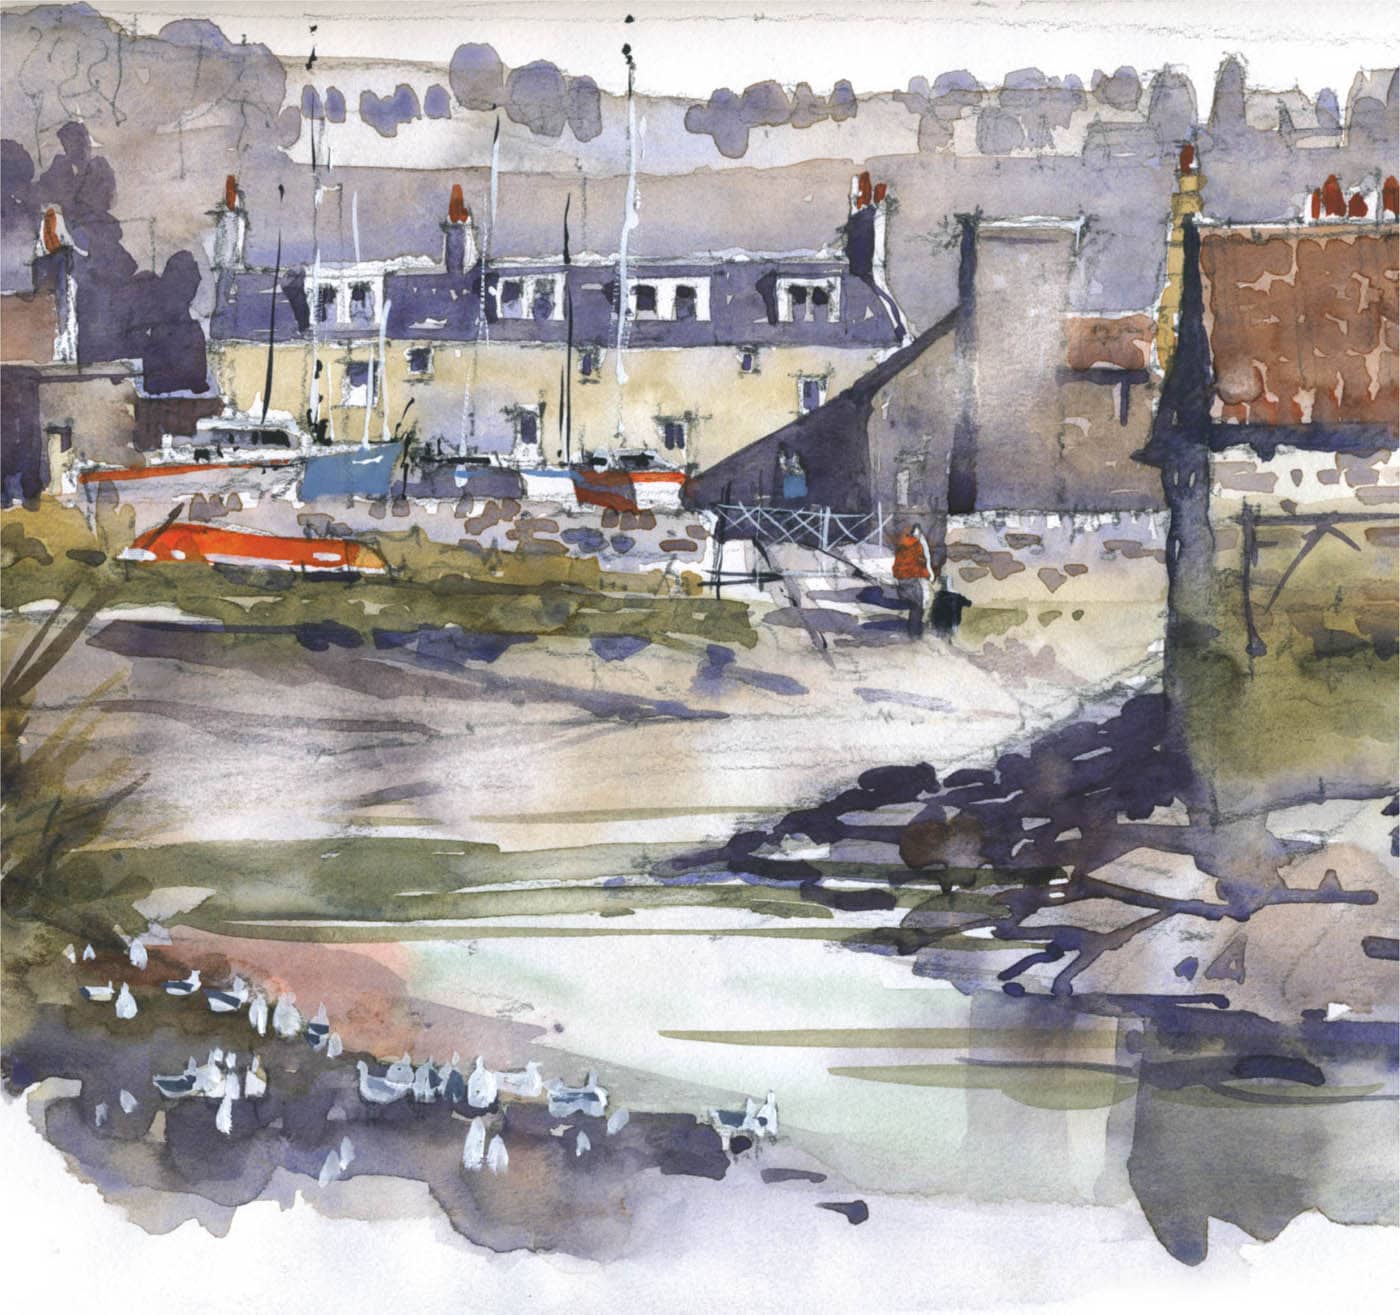
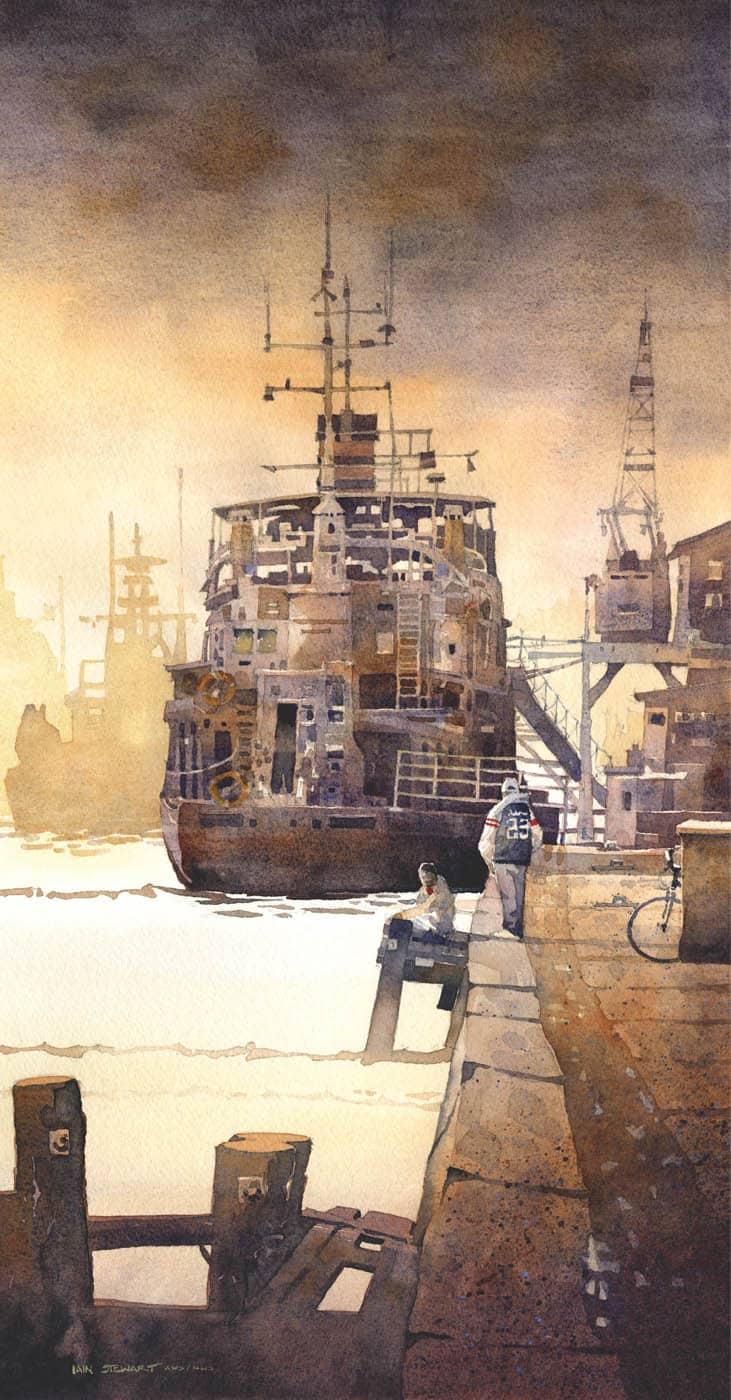
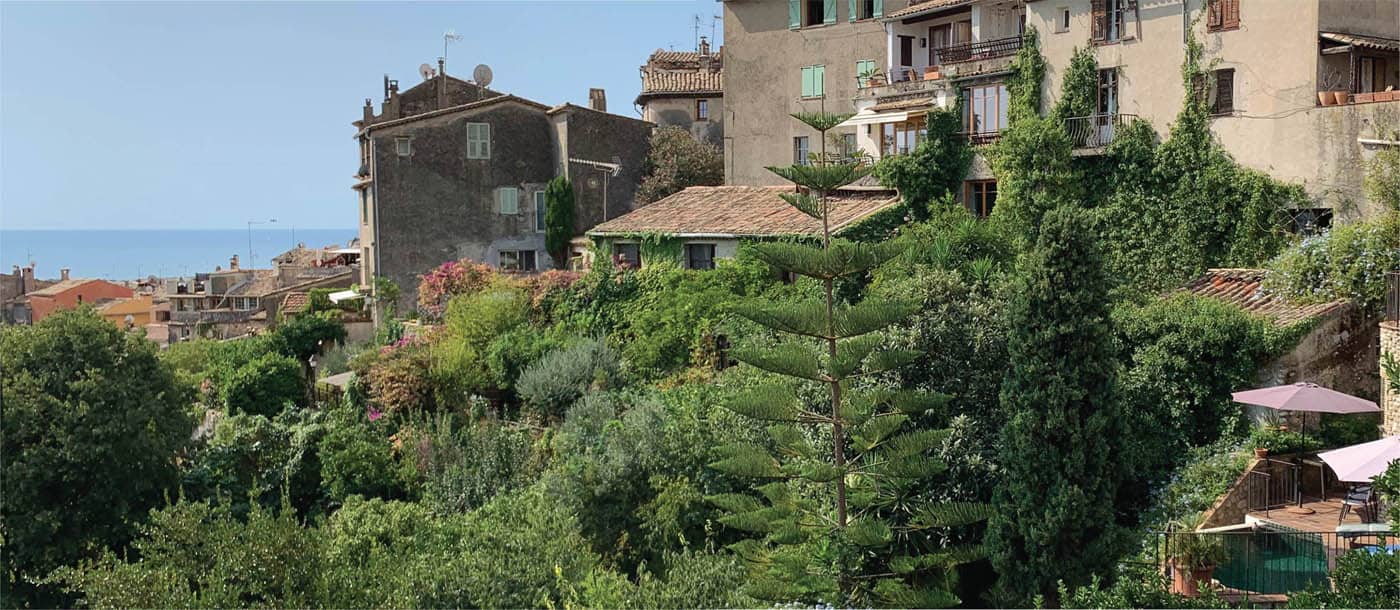
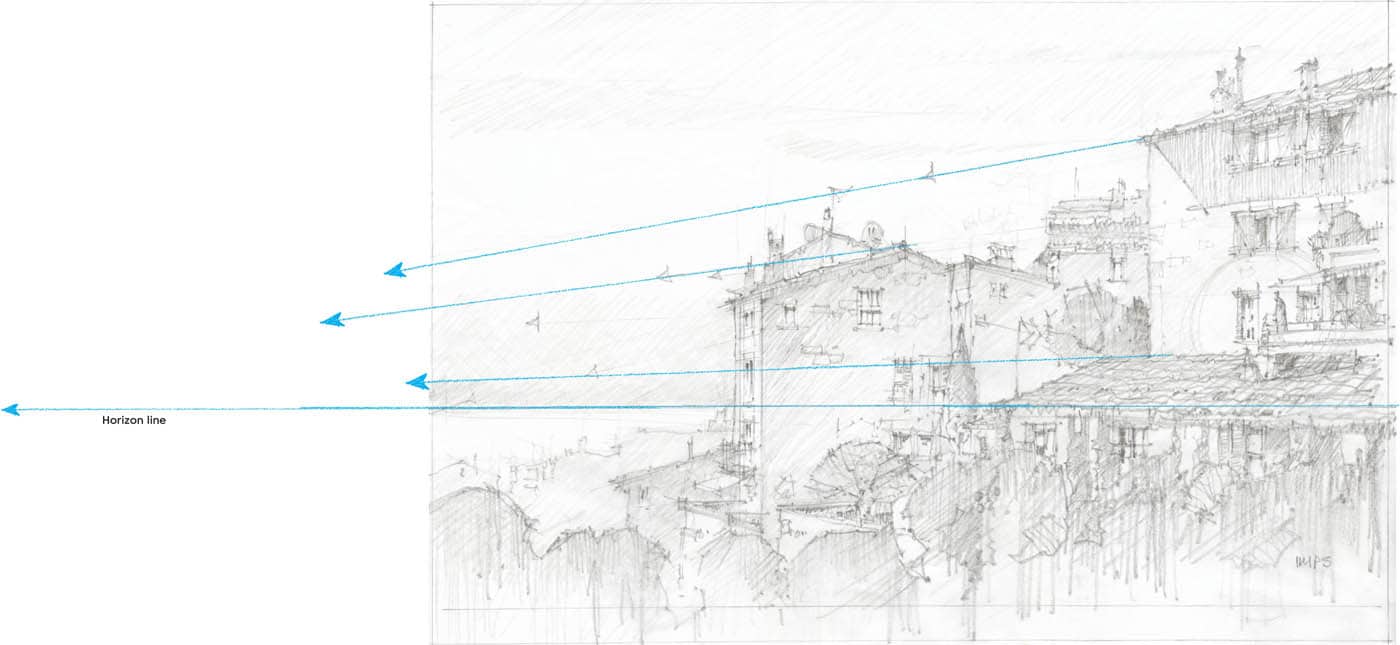
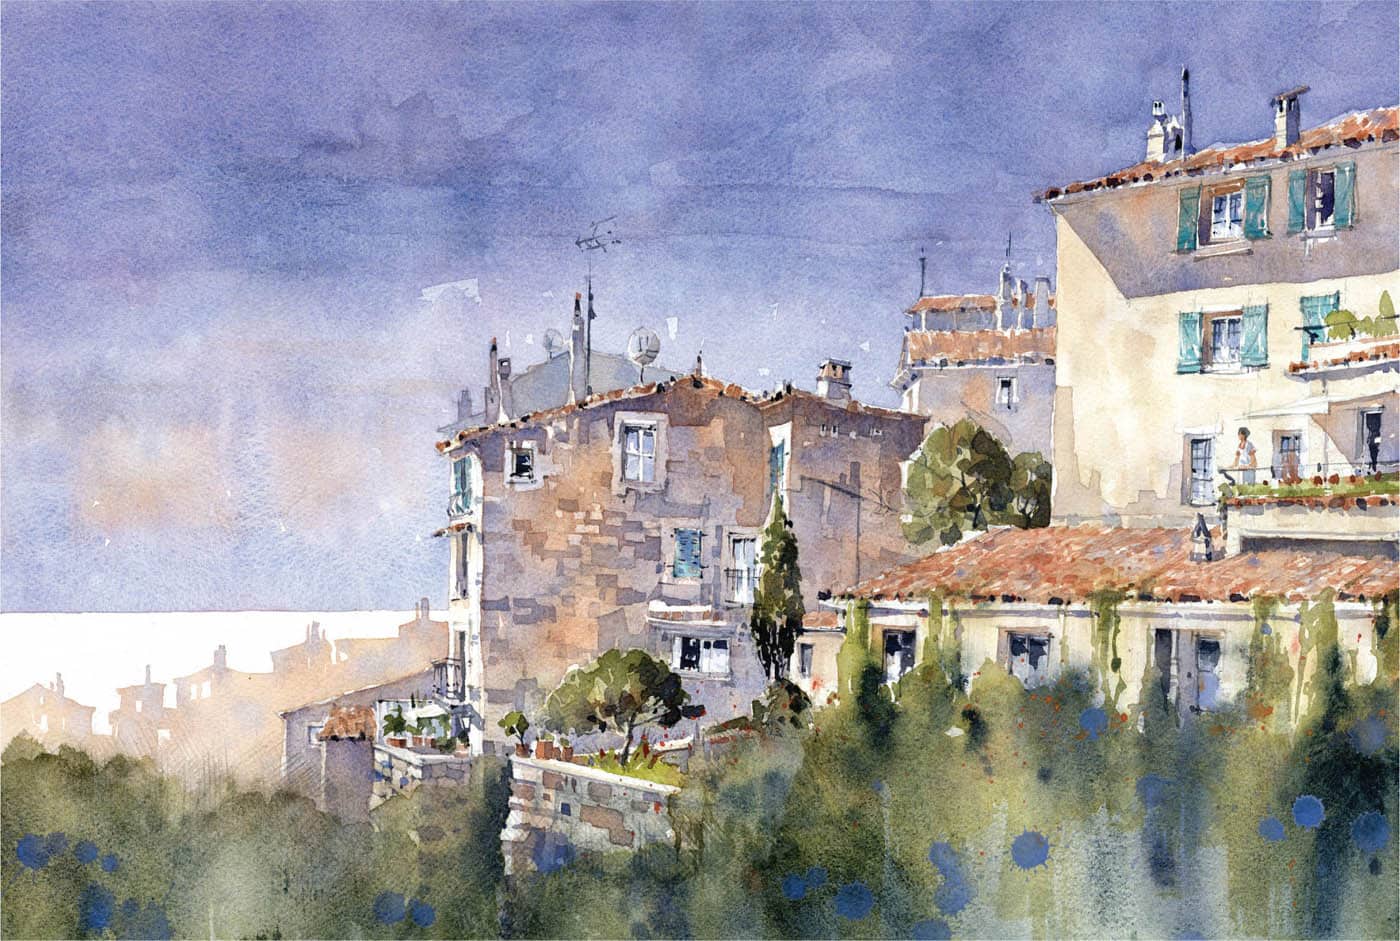
I was particularly taken with this scene from the walls of Cagnes-sur-Mer and the houses and sea in the distance. The goal here was to focus on the quirky architectural elements of this old French village and find a way to frame it in a manner that showed more than my initial sketch onsite, while still retaining some semblance of being there. I wanted more sea and less of the foreground buildings. My methodology for drawing a complex scene is an absolute copy of how I was taught to refine drawings in architecture school. I use a roll of architect’s semi-transparent tracing paper and use that to “onion skin” the drawing. Each layer of trace gets more detailed and the proportions moved until I am satisfied with the final drawing. Depending on the complexity, I may end up with four or five layers drawn on top of one another. I remove the final line drawing and tape down another sheet of clean trace. On this, I tape the final transfer drawing down in reverse so the original line work is facing down. (I am basically making my own carbon paper.) I put on another layer of clean trace and carefully trace the lines I want to transfer with a 4B lead. I don’t need to put in all the details. I just need the major shapes. The reason for putting down the extra sheets of trace is to protect your drawing surface from transferred graphite. I can also lift the top sheet to see if I’ve transferred all of the important line work before removing it. The result is a very clean base drawing that I can add detail to as I see fit. Using an HB lead, I begin to add detail to the image. I am still using line weight to my benefit—I like to see some drawing beneath the watercolor, but I do not transfer lines that I don’t need. I typically paint these areas using the brush. Next, take your transfer drawing and tape it right side up on a sheet of watercolor paper. Very carefully use an HB lead with a good point to transfer the 4B lines to your watercolor paper. Be sure to use a light touch as you do not want to create a groove on the paper. I want the lines light enough to see just barely so I am still free to make changes on the final drawing should I wish. The next step is quite possibly the most important and one that many choose to skip. Embrace the process and all the steps required. I do a value study of the piece using the pencil to shade; then I study how I would like the final painting to work tonally. This is the road map for the entire painting. Without it, I would only be guessing at what might work. Draw in the horizon and place the lower roof in the foreground at the horizon line. I also indicate where some of the vanishing points lead to, depending on how each house is oriented. In preparation for the painting, I explore the different colors I may use and how they will interact (see the color palette on opposite page): Here (opposite), I’ve used a mixture of the first blue, mingling some clear water and Burnt Sienna for the first sky wash. In the lower area, I’ve tested out some Raw Sienna with Burnt Sienna highlights for the silhouette of the city beyond. For this piece, I have chosen to paint around the sea. This is a good opportunity to allow the white of the paper to play a larger role in the composition. These little tests help me see a few steps ahead. Never start to paint without a plan. Never test out a new technique on a painting that is important to you. In varying degrees, these are the colors I use for the entire painting. At times I will use less viscous applications. As I run out, I will mix more, allowing the remnants of the previous mixture to combine with the new. I will call out specific colors that are not on this chart, as necessary. Horizon study Like chess, the more moves ahead you can see before starting a painting, the better chance you have at success. And the more time you spend practicing these techniques, the more comfortable you will be in putting them into action as you need them. Watercolor relies on timing. Whether you are adding an object as the previous wash dries or dropping in color, timing is important. Wet paint will mingle with other colors, creating a seamless variegated wash; wait too long and you will create blooms. Using mixtures 1, 2, and 4, begin a variegated wash that moves toward the horizon. As you near the buildings, begin adding mixtures 6 and 3 for the lightest colors of the buildings. Reserve the white of the paper at the horizon and in areas where the sun is shining directly on the buildings. Drop in a little cobalt and a light mixture of 4 to give the buildings a sense of aged rock. Come back and do the chimneys and details on dry paper, rather than painting around them. As the wash dries, use mixture 5 to give the roofs the lightest notes. At this point, if the colors run or bloom, that’s okay. There are many more washes to come. Notice how the cobalt is dropped in against the orange red of the tiles. These subtle moves help tie your washes together. Begin using clear water to take out some strength near the bottom. Spritz with a little clear water and create the next colors while it dries. Protect the light. If you go too strong with this wash, it will push all the values stronger in the latter washes. TIP Here I start defining the light source and shadow areas. I also begin the underpainting for the foliage and trees in the foreground. Using mixes 7, 8, and 12, I paint the shaded areas and begin to define shape. The white of the paper that I have saved around the leading edges of the trees and buildings are much more noticeable now. I’ll address that later in the painting. The goal is not to lose the light and keep things from getting too dark. Look at how the variegated wash and drop-ins of pure color begin to have some impact. I don’t like flat color. I want my paintings, especially the shadows, to breathe. Remember: The correct tone will look too dark when it is wet and will dry to the desired value. Using the same mixtures from the last step, I strengthen the shadows and begin to add some texture to the roof. For the roof, I will rely on the drawing, while also understanding that a slow build-up of pure Cadmium Scarlet Light will help bring the color to life. Let your reds mingle, and make sure you are not creating a pattern; drop in some blues here and there to settle them. The shutters are a mix of Cobalt Teal Blue and a touch of Cadmium Red Scarlet. Again go low chroma on the first pass. We can pop the color later, as needed. After looking at the painting, I decide to bring the sky up in strength. Starting at top right, I begin making light cloud shapes with my brush and adding more water to the mix as I come down the page. The last brushstrokes are barely noticeable, but they are still effective. Using the same mixtures, again slightly darker, I create texture and age on the building surface by painting around stones and the like. I use mixes 8, 9, and 10 to paint the major trees and details, such as the railings (in pure Sodalite), areas of darker shadow, and the shutter louvres, windows, shadow under the tiles, and figure on the balcony. I use a somewhat stronger mix of pure Cadmium Red Scarlet to give the final pops of color to the tiles. I go back over the vegetative areas and spritz it with a good amount of water to allow the brushstrokes underneath to show through. I use Sodalite wet-in- wet to suggest shadows in the trees and define the darkest darks. I also use my mottler to break up the trees at the far left. I use a very dry brush and crosshatch with mix 9. Finally, using a small glass dropper, I make a mixture of pure lavender and drop it here and there in the foreground. Notice where I have left the white of the paper, even in the shadows. This allows the painting to take on a little sparkle and keeps it from getting too bogged down in heavy tone. Use your darkest darks wisely. I know I have more work to do, but I need a break, so I leave the painting overnight so I can come back to it with fresh eyes. Putting a painting in “time-out” is one of the best things you can do for your work. Tired eyes will miss important elements. You’re not on a deadline, so give yourself a rest. This is when I study the painting for what will help it. Overall, I believe the piece is working well. The foreground foliage needs a few pops of additional color to add a little zest. To finalize, I also think a few lifts will soften the areas that are receiving full sunlight. The most important part of this final stage is deciding if changes are truly needed. Make sure they will not distract from the overall piece and will help move your eye through the painting. I spritz my paper with clear water; then I drop in pure Green Gold. As that dries, I take a strong mixture of Sodalite and shape where the foliage is facing the sun and where it is in shadow. I can keep adding more Sodalite to certain areas to emphasize the shadows and give them depth. Understanding how long you can work wet-in-wet is essential. Practice these techniques on scrap paper first. It’s always a good idea to stop, rather than plow through, when you are tired. TIP Limit the number of layered greens you use. Once you are in shade on a green, move to a gray to shape it. Layering pure greens, even if they are dark, will lead to muddy paintings. Once that has dried, I move up and add pops of pure cobalt to some windows and a little Cobalt Teal to the shutters again. I add a few more dark details and step back to let it dry. The final moves are the lifts. Taking an old brush and clean water, I gently scrub the paper using the belly of the brush in a circular motion. I use a clean paper towel to lift some color out and soften some hard edges. This atmospheric effect brings light back into the painting in specific areas. Use the most pressure on the brush at the center of the lift and back off as you move away from that area so the “lift” does not have a discernible edge. Make sure you rotate your paper towel as you dab the color or you will just put it back on your painting. Resist the urge to overdo this or to create patterns. Make your lifts of varying size and shape. Squint at your paper to help you see in value and shape rather than color. You want to visualize the light. As a final textural effect, I take a thick mixture of Naples Yellow Gouache and gently splatter the foreground. Cagnes-sur-Mer, French Riviera 54cm x 36cm St. Andrews in Fife is one of my favorite places to paint. The sketch is in a horizontal format, but in the final studio piece, I switched it to vertical. This allowed me to tighten the composition and force the eye upward toward the masts and chimneys. I also changed the time of day and made the scene moodier. The more time you spend onsite, the more you will remember specific atmospheric conditions that you can draw from later. I added the sun shining through a hazy cloud in the water to ease some of the tension in the piece. Sketch: St. Andrews Harbour Studio Piece: St. Andrews Harbour This specific piece demonstrates breaking down a scene into manageable parts before tackling a larger painting. The sketch helped me work out the figures in the scene, as well as identify the big shapes. In the final, I once again changed the atmosphere and added more context. The boys are not lost in the composition, but are part of it. The warship is still deceptively simple, and I only suggest the other boats through silhouettes. Trust shape, and it will work for you every time. Sketch: Two Boys and a Boat, Gothenburg Two Boys and a Boat, GothenburgCagnes-sur-Mer, France Step-by-Step
The Study


The Drawing


The Color Study
Horizon Study

The Painting
Step One: The Underpainting

Step Two: Defining Shape

Step Three: Give Your Shapes Form

Step Four: Details
Step Five: Final Painting