TECHNIQUES USING BLOCK & STAMP

After exploring basic block prints, you’re ready to start experimenting with more advanced and creative block-printing techniques. In this section, we’ll build on the skills you’ve developed and explore unique techniques for creating block prints with multiple colors and multiple blocks. Some of these projects may look complicated, but don’t worry—with the tips and tricks I provide, you’ll find it’s easy to achieve beautiful, fine-art-quality prints with just a few simple techniques.
Bonus Templates
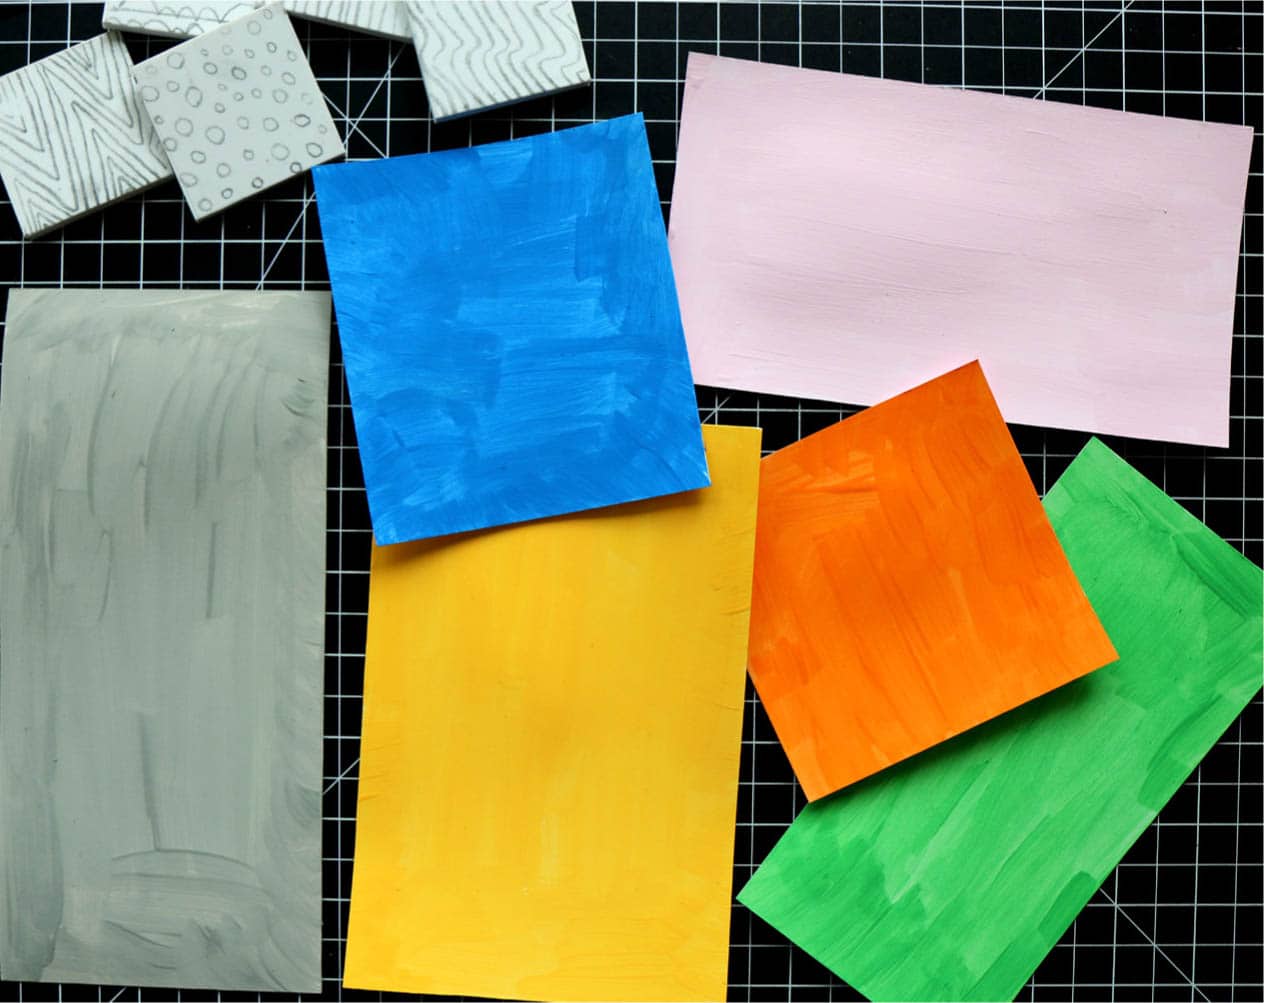
Visit www.quartoknows.com/page/block-print-for-beginners to download bonus templates for a selection of projects in the following sections.
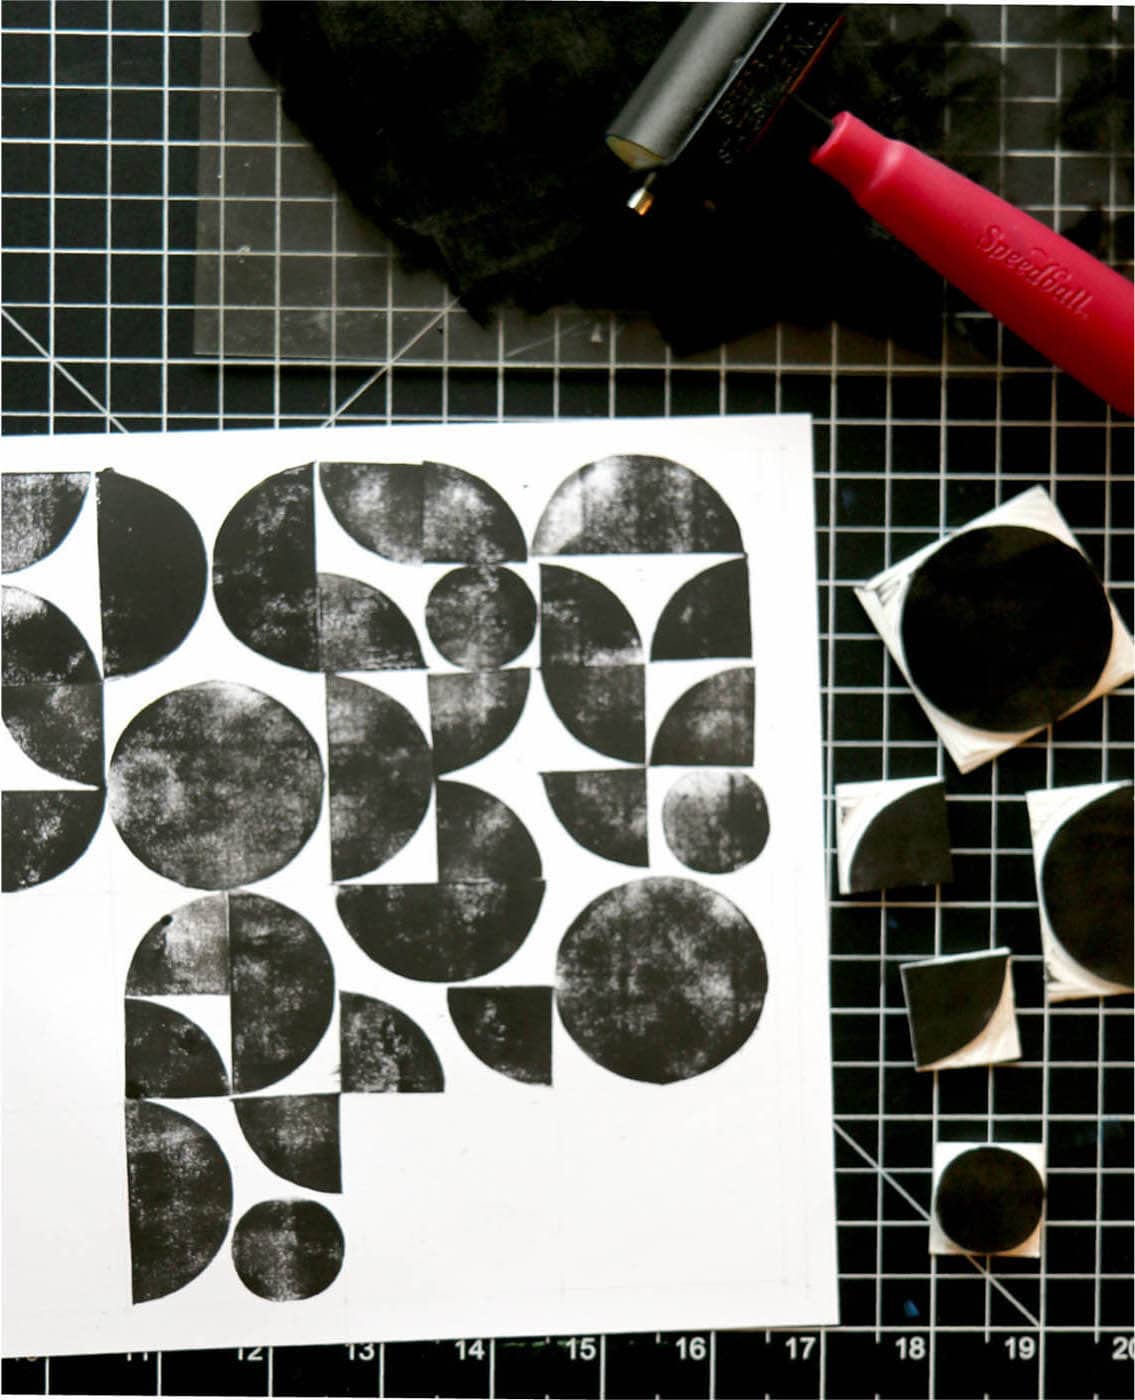
Abstract art is often represented by colors, lines, and shapes. Artists use various shapes as a language to express the world: circles, triangles, rectangles, diamonds, simple dotted lines, etc. In this project, we’ll explore how to create an abstract print with geometric shapes and simple colors. The composition of simple elements can yield strong visual effects that may change dramatically through shape arrangement and color choice. There is unexpected joy of creation and the wonder of printmaking during this process—feel free to explore your own way of arranging the shapes. Project Materials & Tools STEP 1: Sketch the design on drawing paper with a soft-lead pencil. For this project, use basic shapes, such as circles, arcs, triangles, or rectangles. Try to make clean and precise lines. Place a piece of tracing paper on the sketch and trace the design. You can use a few pieces of masking tape on the corners to keep the papers in place. Then place the tracing paper facedown on the prepared block and rub the back with a bone folder, following each detailed line. Since this block will be divided by the lines between shapes, it’s especially important to make bold, even lines to help you achieve consistent lines throughout the carving process. STEP 2: Use a craft knife to separate the individual shapes. Then start carving the lines with your finest V-shaped gouges. It’s important to keep the lines consistent, with similar thickness during the carving process. After the outlines are carved out, move on to the rest of the area with U-shaped wide gouges. STEP 3: Once you finish carving the block, prepare for the inking process. In this project, each column in the design has a similar width. Using a ruler and a pencil, make guidelines on the printing paper. After the printing process, these pencil lines will be erased, so draw lightly. Find the template for this design at www.quartoknows.com/page/block-print-for-beginners. STEP 4: Once the print paper is prepared, gather the materials for the inking process. Apply a small amount of ink to the inking plate, gently lay the brayer on the edge of the ink and roll it back and forth to get a thin, even layer of ink on the brayer. Roll the brayer gently on the block, covering the surface completely. Then place the inked block on the printing paper. Gently press the back side of the block with a baren or both your hands. Once you are satisfied with the ink transfer, slowly pull the block from the paper. Repeat the same process with different orientations of the block to create a unique design. STEP 5: Repeat the inking process with different block shapes to create your abstract print. Tip: It’s helpful to choose a brayer that is similar in width to the block. STEP 6: There are endless options for arrangement and placement of shapes. If you’re not happy with the first result, simply try again! If you’re not comfortable with printing impromptu, make a sketch in advance to plot where you’ll place the various shapes. Once you set up the composition, just follow the procedure at your own pace.PRINTING ABSTRACT FORMS


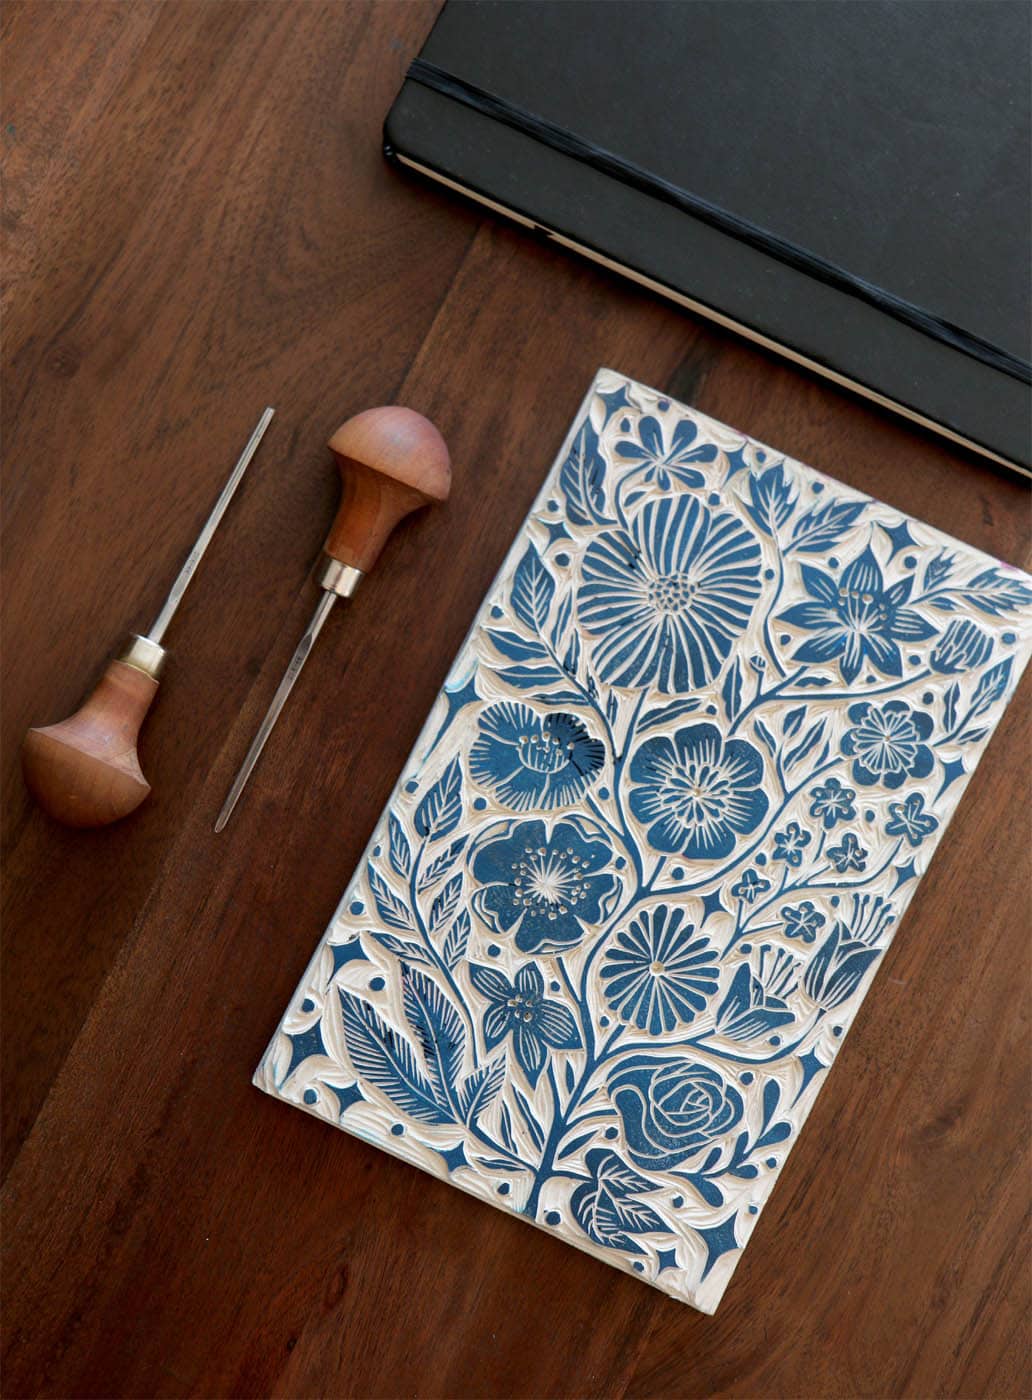
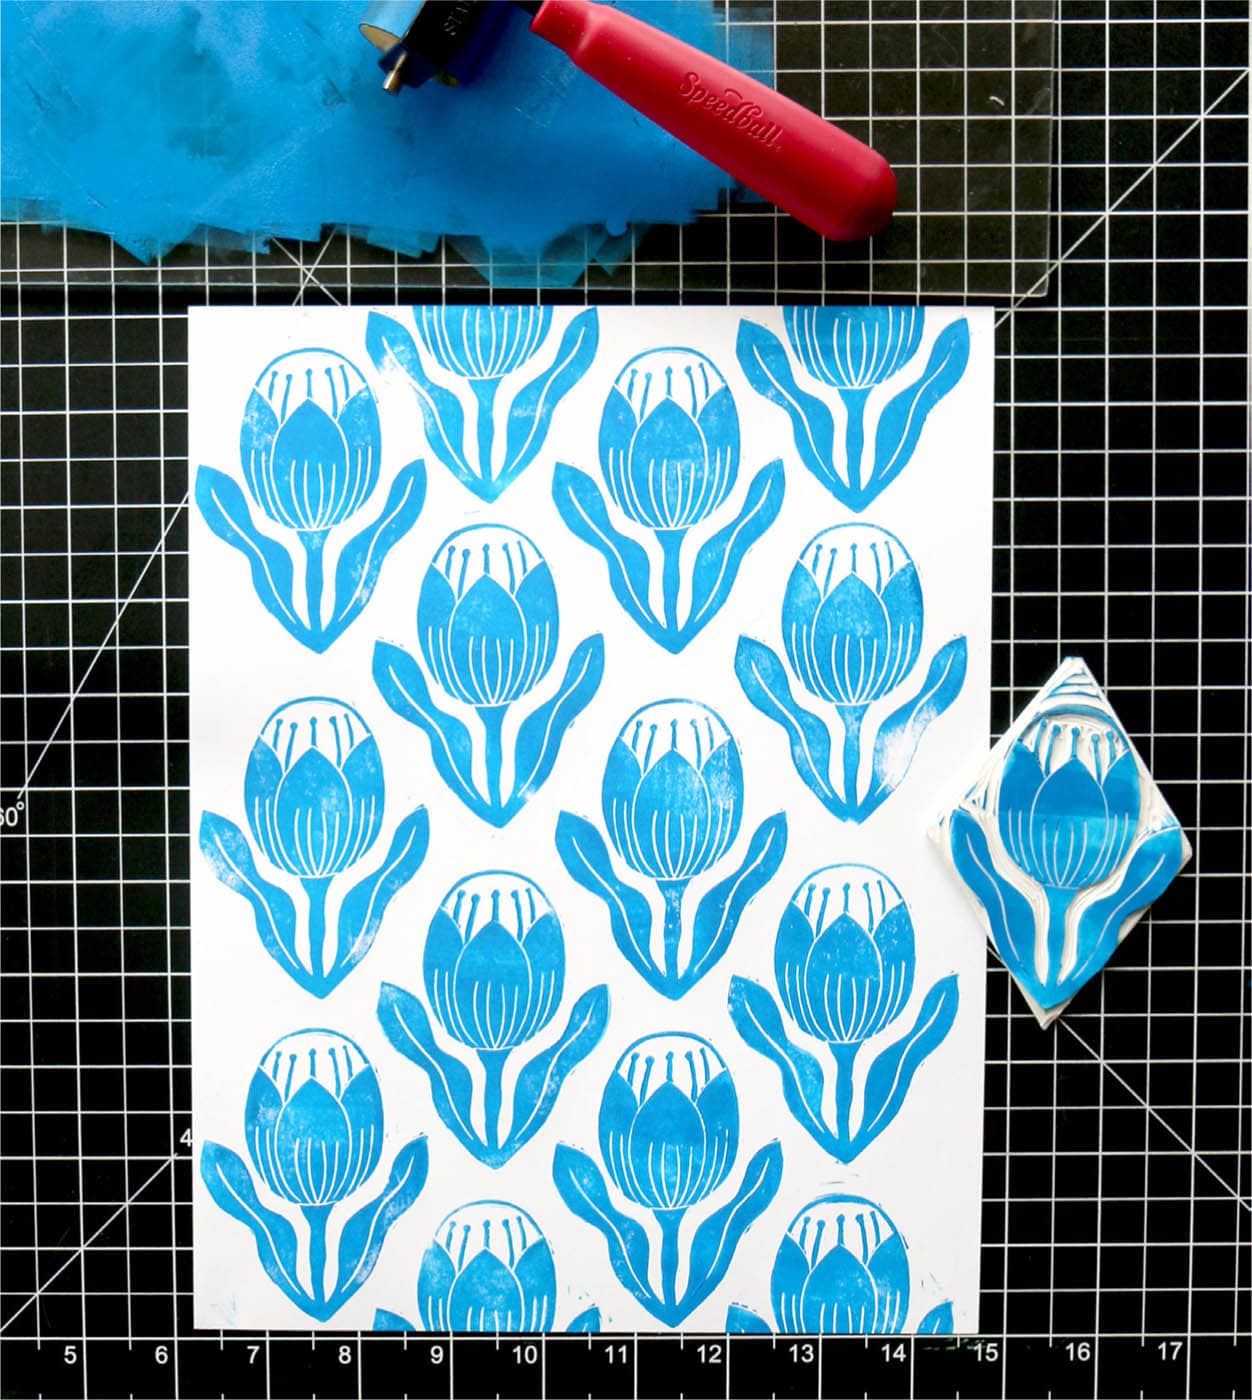
Our world is filled with innumerable patterns that appear on everything from clothing, furniture, and wallpapers to buildings and streets, as well as in nature. Creating repeated patterns with blocks is a long-time tradition in surface pattern design. In this project, we’ll learn how to make handmade patterns with a single motif, and then generate adaptations by adjusting color, space, alignment, and shading. Although I use a single-color pattern here, one of the easiest ways to achieve a dynamic effect in a surface pattern is to apply different color combinations. Project Materials & Tools STEP 1: Start by sketching the motif on drawing paper with a soft-lead pencil. I’ve drawn a single floral image, which I’ll use to make multiple patterns. Trim the block into a rhombus shape, which will help to make arrangements through patterning lines. After you complete the drawing, place a sheet of tracing paper on the sketch and trace the lines. Then transfer the traced image to the block, placing the tracing facedown and burnishing the back with a bone folder. Use masking tape as needed to hold the papers in place. Find the template for this design at www.quartoknows.com/page/block-print-for-beginners. STEP 2: Use a craft knife to trim the edges of the block to create the rhombus shape. Then begin carving the design, beginning with the outline using V-shaped gouges. Move on to the background area with U-shaped or wider gouges. When you carve the fine drawing lines in negative relief, work slowly to create accurate lines. STEP 3: When the image is fully carved, prepare for the printing process. In this project, we’ll make patterns with a single block, so it’s best to start with a small amount of ink on the plate—you can always add more. Gently lay the brayer on the edge of the ink and roll it back and forth. Repeat until the whole surface of the brayer is covered completely with a thin layer of ink. Then roll the brayer gently onto the carved block, covering the surface of the block entirely. STEP 4: Carefully place the block facedown and press with your hands or a baren and wooden spoon. Gently pull the block up with both hands, while ensuring the ink is applied evenly to the print paper. In this project, we’ll use a straight repeat pattern. This method is repetitive and regular, so the same motif is placed at constant intervals following the guideline. To achieve this, use an acrylic ruler to provide a consistent and accurate guideline. STEP 5: Repeat the inking and printing process to continue developing the pattern to fill the page. STEP 6: After making a straight repeat pattern, try other repeat types following the same procedure. Pattern Repeat Types Straight Repeat Half Drop Repeat Brick Repeat Random RepeatPRINTING IN REPEATED PATTERNS


A layout in which the repeating unit is directly on the same horizontal line to the right or left of the original unit.
A layout in which the repeating unit is arranged at the halfway point of the vertical interval to the right or left of the original unit, creating alternate vertical spacing between units. 
Similar to the half drop repeat, a layout in which the spacing between units is alternated horizontally rather than vertically, generating a pattern that resembles a brick wall.
A layout in which the repeating unit is placed without any order and scattered without fixed orientation or spacing. Unequal and random arrangement over the surface yields a free vibe.
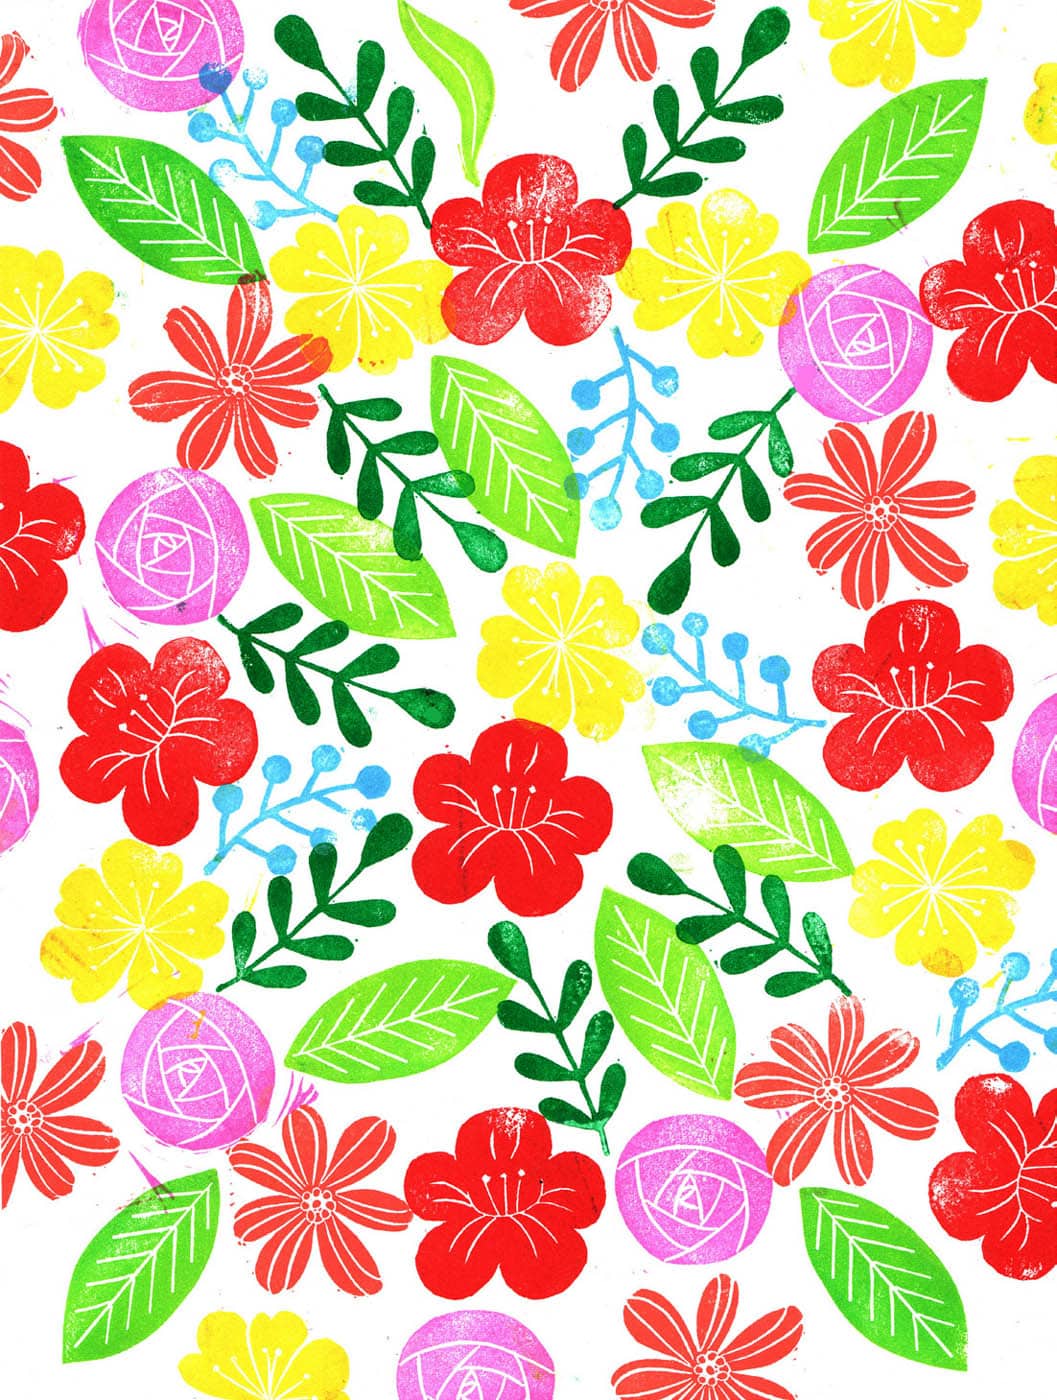
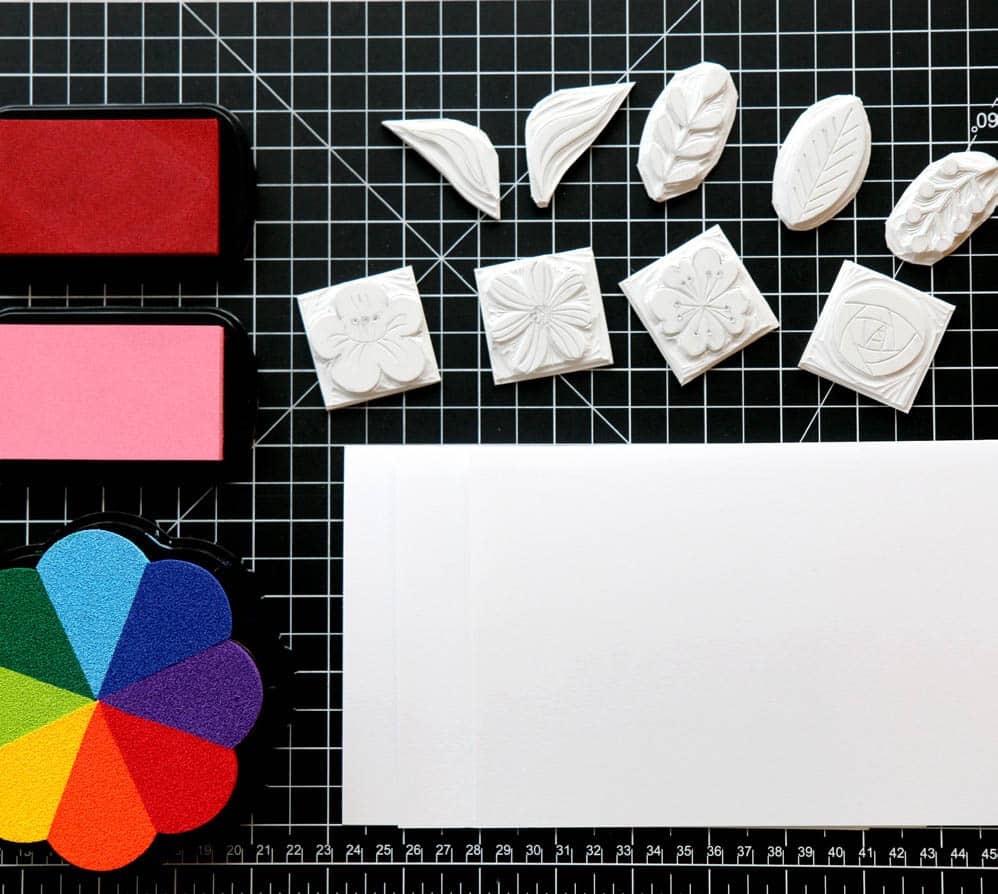
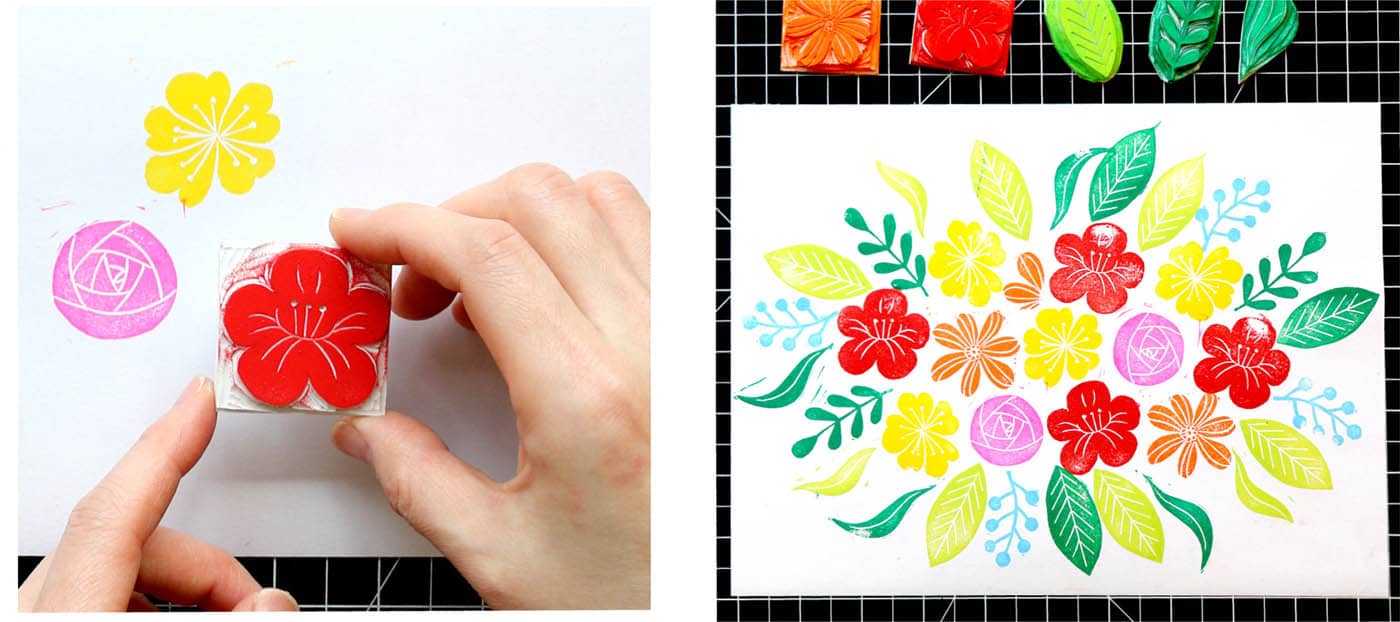
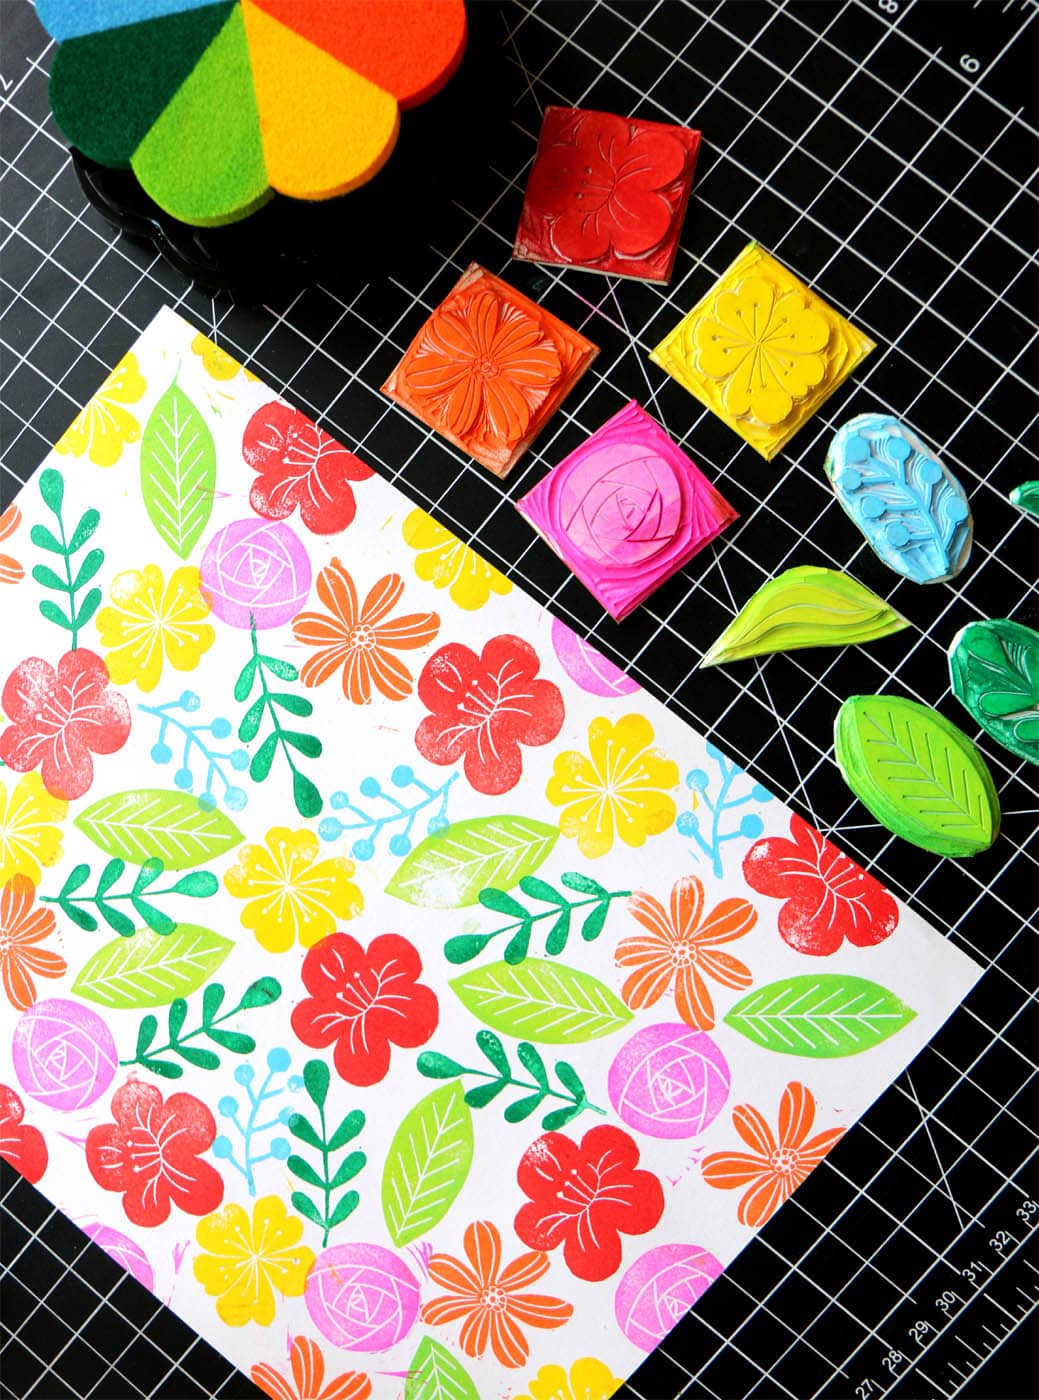
One of the simplest ways to create lively prints is to apply different colors using stamp inks. Without the typical printing processes, you can easily apply various colors on the block, resulting in vivid effects. Try as many color combinations as you wish; similar colors or tones generate peaceful and calm effects, while contrasting colors make the shapes “pop” on the print. Project Materials & Tools STEP 1: Draw your design on drawing paper with a soft-lead pencil. During the sketching process, it’s helpful to consider what kinds of techniques you’ll use for printing. In this project, each block element will be separated for the stamping process, so make sure all the separating lines are marked clearly and accurately. Place a sheet of tracing paper over the finished sketch and trace all the details. STEP 2: Place the tracing paper facedown on the block and attach the top and bottom with masking tape to hold in place. Gently press down on the back of the paper with a bone folder to transfer the pencil lines to the block. Then use a craft knife to separate each element into its own block. Be sure to hold the knife vertically and apply even pressure toward the dividing lines to ensure the trimmed edge of each block is a 90-degree angle. STEP 3: Start carving with the narrow and finest V-shaped gouges to make the outlines. When you carve curves or circular shapes, turn the block with your non-carving hand instead of rotating the carving tool. Once you complete the outlines, carve out the rest of the area with a large U-shaped gouge. STEP 4: Prepare all the materials for the stamping process. Start with a key element (flowers) to create balance in the elements over the space. Press a stamp pad over the top of the carved block, and place the inked block carefully on the print paper. Make sure to hold the block in the right position as you apply pressure. When the stamp ink is transferred completely from the block, pull the block from the printing paper. It’s not uncommon to get an unbalanced result in the first test run, so keep experimenting until you figure out the most satisfactory combination. Tip: In this project, each block will be stamped in a different color, so it’s important to plan how you will arrange each element on the printing paper effectively. You may find it helpful to make rough sketches for the placement first. Once the arrangement is finalized, decide what color you’ll use for each block. Find the template for this design at www.quartoknows.com/page/block-print-for-beginners.PRINTING WITH COLORFUL STAMP INK


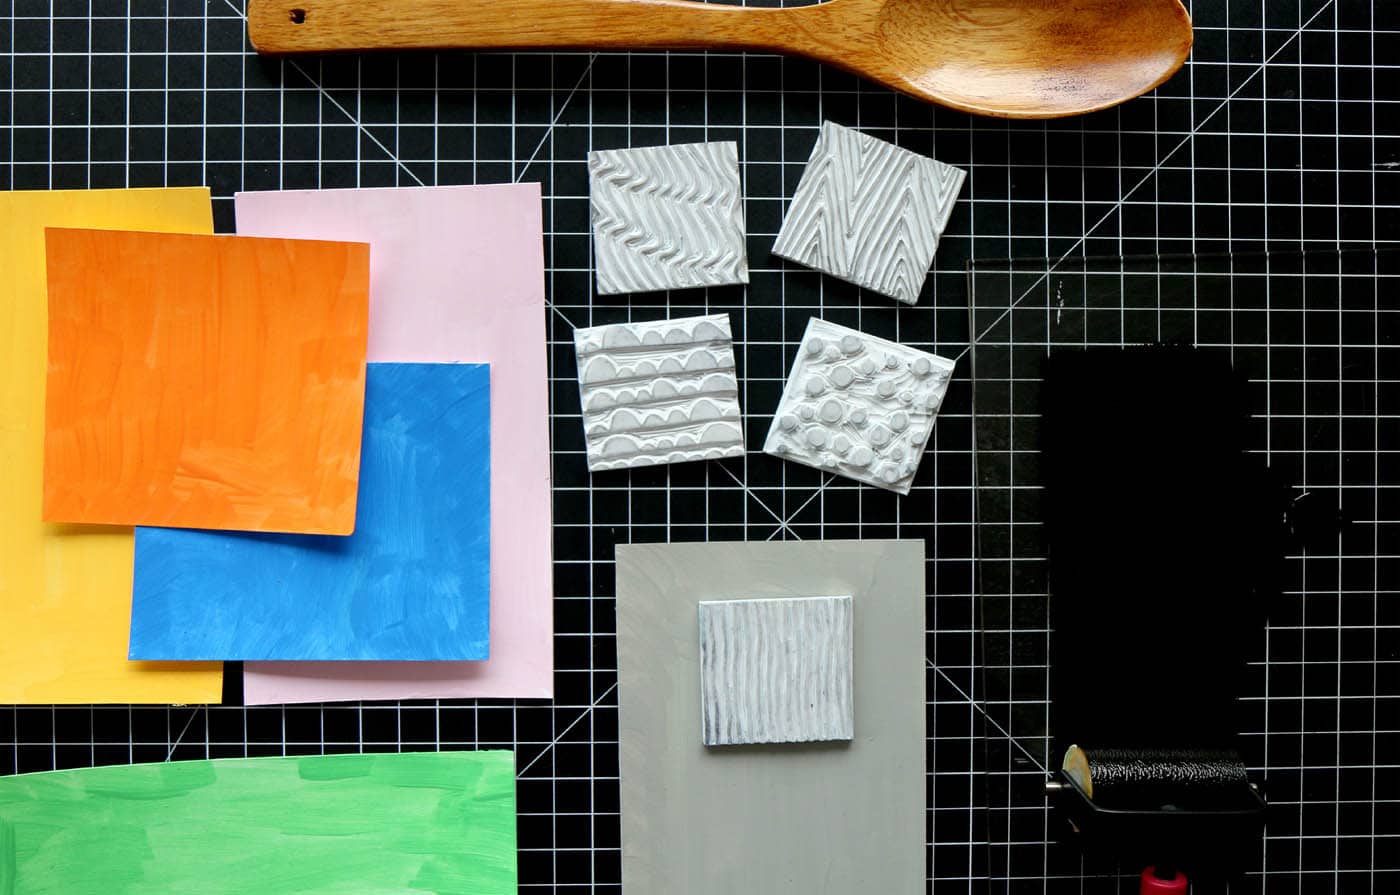
Collage originated from the French term papier collé (or découpage), a technique in which pieces of paper or various textures are added or pasted onto the original paper. For this project, we’ll explore how to use geometric patterns of block-printed papers to create playful collage pieces. Using geometric shapes and lines on the block add a modern look to the surface. Mixed with colorful pieces of paper, carved print lines make each piece unique. One advantage of this technique is that you can reproduce many of the color surfaces with multiple arrays once you prepare a simple shape block. Project Materials & Tools STEP 1: Draw a detailed image with a soft lead pencil. Each block will have a different design for contrasting effect. Once you are happy with your design, place the tracing paper over the original drawing, and trace the image with a soft lead pencil. STEP 2: Place the tracing paper facedown on the prepared carving blocks to trace the image. Tape the top of the tracing paper to the block, while making sure that each corner of the tracing paper and block is aligned. Carefully press down and rub the bone folder over each detailed line of the drawing. STEP 3: Use acrylic paint for the base of the papers, but feel free to experiment with watercolors, markers, block print color inks, and more. Using a paintbrush, simply paint the surface of each paper and let them dry completely before applying inked blocks. STEP 4: Once you’ve traced the patterns onto the individual blocks, start the carving process. In this example, the blocks have positive designs, such as simple lines and circles. Using the fine V-shaped gouge, carve out the outlines of the image. Then clear out the rest of the background using a wide U-shaped gouge. STEP 5: After carving the blocks, you are ready to print! Apply a small amount of ink on the inking plate and slowly roll out the brayer. STEP 6: Apply a thin coat to the block. It is helpful to use a small brayer to fit a single block. Gently place the block down over the painted paper. Using a baren, slowly press the block down against the print paper. Double-check that the image has been transferred from the block to the paper completely. Once the ink has been transferred, carefully pull the block from the paper and let it dry. Repeat the same process for the rest of the area. STEP 7: Repeat steps 5 and 6 for inking and printing the other blocks and papers. In most cases, you’ll want to use black ink (or another contrasting color) to create a distinct and detailed image over colored paper. Repeat the process using other carved blocks, adding each pattern over other paper colors. STEP 8: Once all of the patterned papers are prepared, make a plan for the final print in your sketchbook. There aren’t any rules to follow. Just remember that the space should be filled with all sorts of colors and patterns. STEP 9: Once you’ve decided on a plan, cut out the patterned papers using scissors. Try to keep the cut lines simple. Place all of the pieces over the final print paper. Find an appropriate arrangement before applying adhesive. STEP 10: Once you decide on the final arrangement, apply adhesive and paste each colored paper to the final print. Be careful not to damage the front side of the papers. Although the ink and paints are dried completely, adhesives may leave some stains during the process. Let the piece dry completely, and enjoy a piece of block printed collage art!PRINTING COLLAGE PIECES