
PROJECTS
Flora neogeo Watch
Make a styling LED timepiece with GPS navigation and compass modes built in. Written by Becky Stern and Tyler Cooper
Time Required:
A Weekend
Cost:
$140
John de Cristofaro for dafruit
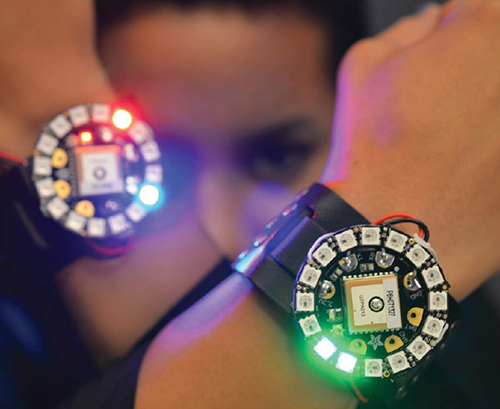
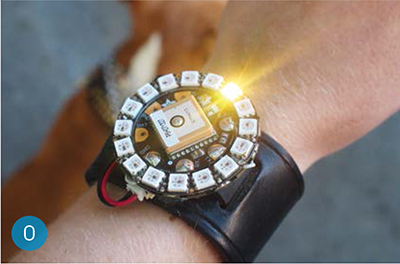
USE THE FLORA WEARABLE MICROCONTROLLER AND ITS GPS MODULE TO TELL TIME WITH A STUNNING RING OF PIXELS. A leather cuff holds the circuit and hides the battery. The watch is a bit chunky, but it still looks and feels great on tiny wrists!
The circuit sandwich becomes the face of the watch, and you’ll use a tactile switch to select its three modes: timekeeping, compass, and GPS navigation. Customize your waypoint in the provided Arduino sketch, and the LEDs will point the way and then tell you when you’re arriving at your destination.
This is an intermediate-level project requiring soldering and some precision crafting. Before you begin, read the following guides at learn.adafruit.com: Getting Started with Flora, Flora Wearable GPS, Flora Accelerometer, and Adafruit NeoPixel Überguide.
This project is adapted from our book Getting Started with the Adafruit Flora, Maker Shed item #9781457183225-P at makershed.com. Project help and modeling from Risa Rose.
1. Assemble the circuit
1a. Prepare the components
Start by soldering small stranded wires to your electronics components, about 2" long each.
Flora is Adafruit’s Arduino- compatible wearable electronics platform. Measuring only 1¾" in diameter, it’s small enough to embed into any wearable project, and it has large pads for sewing with conductive thread. The round shape means there are no sharp corners to poke through your garment, and the 14 pads are laid out to make it easy to connect a variety of sensors and modules, such as Flora NeoPixels: addressable, color-changing LED pixels.
With its powerful ATmega32u4 microprocessor, Flora has built-in USB support. It’s programmed via Mac or PC with free software you download online. Adafruit publishes hundreds of tutorials and dozens of free code libraries for Arduino-compatible boards, so you’ll never be lacking project ideas or sample code to get you started.
Becky Stern for Adafruit
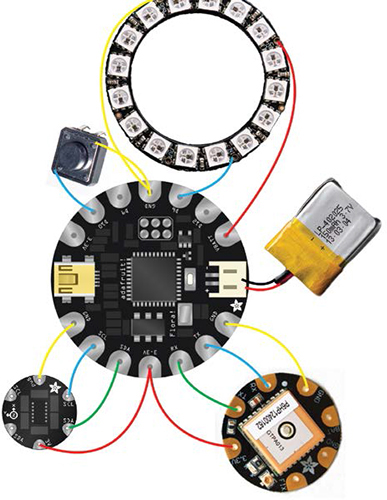
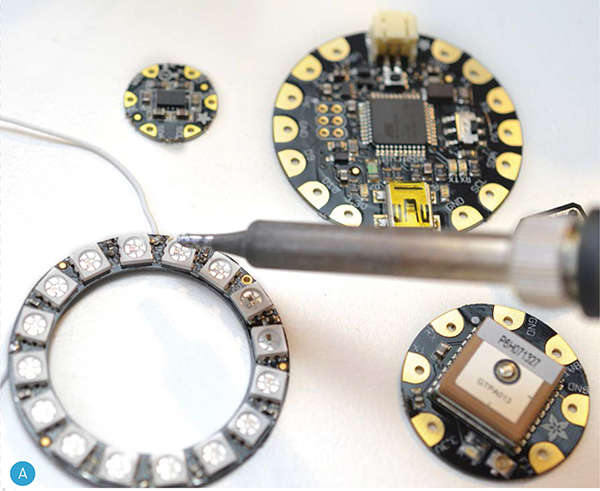
Strip the wire ends and twirl the stranded core to make it pass easily through the circuit boards’ holes. Solder wires to the NeoPixel ring’s IN, Vcc, and Gnd pads on the back of the board (Figure A on the following page).
Also solder wires to the GPS module (3.3V, RX, TX, and GND) and the accelerometer/compass module (3V, SDA, SCL, and GND) (Figure B).

Trim off any wire ends with flush snips.
1b. Mount the GPS and accelerometer
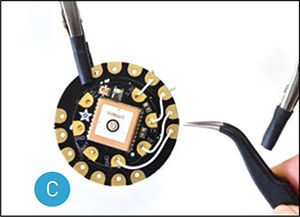
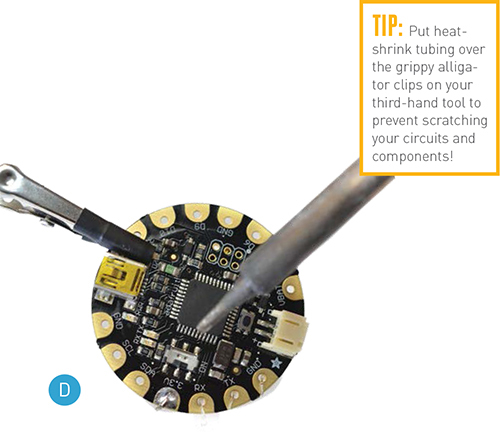
Use double-stick tape or E6000 glue to mount the GPS in the center back of Flora. Wire the GPS connections to Flora according to the circuit diagram on the right, keeping the wires short and flush to the board (Figure C).
Flip the circuit over and solder the wires to the Flora main board (Figure D). Trim any excess wire ends.
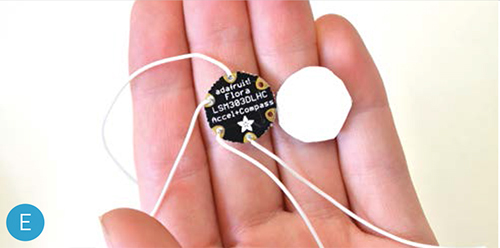
Use double-sided foam tape to mount the accelerometer in the center of the Flora, on top of the 32u4 microcontroller chip. The foam helps distance the boards from one another to avoid short circuits (Figure E on page 357).
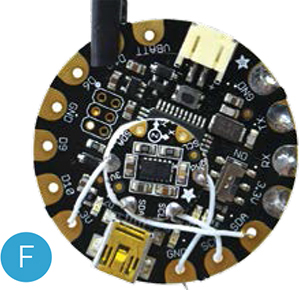
Trim, strip, and solder the wire connections for the accelerometer/compass (Figure F).
BECKY STERN (sternlab.org) is a DIY guru and director of wearable electronics at Adafruit. She publishes a new project video every week and hosts a live show on YouTube. She lives in Brooklyn, N.Y., and belongs to art groups Free Art & Technology and Madagascar Institute.


TYLER COOPER
Tyler Cooper is a creative engineer at Adafruit Industries, where he helps develop the Adafruit Learning System. In 2010, he co-founded the open-source hardware company Coobro Labs. He’s also co-owner of the Minneapolis/St. Paul, Minn., makerspace Nordeast Makers.
» Adafruit Flora microcontroller board Maker Shed #MKAD58, makershed.com or Adafruit #659, adafruit.com
» Flora Wearable Ultimate GPS Module Adafruit #1059, or get both the Flora and its GPS module in the Flora GPS Starter Pack, Maker Shed #MKAD51 or Adafruit #1090
» NeoPixel RGB LED ring, 16 LEDs Maker Shed #MKAD75 or Adafruit #1463
» Flora Accelerometer/Compass Sensor Adafruit #1247
» Tactile switch Adafruit #1119
» Battery, LiPo, 3.7V 150mAh, with charger Adafruit #1317 and #1304
» Leather watch cuff Check out Labyrinth Leather on Etsy.
» Scrap of fabric
» E6000 craft adhesive
» Binder clips
» Thin-gauge stranded wire
» Double-stick foam tape
» Black gaffer’s tape
» Soldering iron
» Solder, rosin core, 60/40
» Multimeter
» Scissors
» Flush snips
» Wire cutters / strippers
» Pliers
» Tweezers (optional)
» Helping hand tool (optional)
1c. Mount the switch
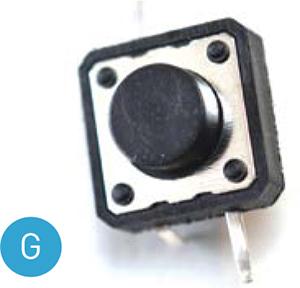
To prepare the tactile switch, flatten and snip off any 2 diagonal pins (Figure G on the next page).
Insert the switch into D10 and GND on the component side of the Flora board (Figure H). Bend out the leads to hold it in position and solder the joints. This big tactile button makes it easy to switch watch modes by holding down the whole face of the watch for a few seconds.

1d. Test your work
Use a multimeter to verify that your solder connections are secure.
Before you proceed, test the GPS and the accelerometer with the sample sketches provided in their respective code libraries.
1e. Mount the NeoPixel ring
Trim, strip, and solder the NeoPixel ring’s wires to the Flora according to the circuit diagram, routing them inside the ring. Load the NeoPixel test code to be sure the ring is connected and functioning properly.
Glue the NeoPixel to Flora, lining up the PCB edges exactly. Don’t pinch the boards together too much — there should be a cushion of glue between (Figure I).
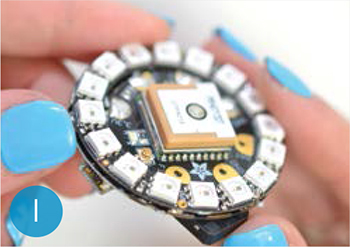
Allow the glue to set for at least 1 hour. The circuit is finished!
2. Assemble the watch
The circuit is held in place by the small strap on a leather watch cuff. The USB and JST ports line up perpendicular to the band for easy access, and the switch is on the “top” of the watch.
Unthread the small strap from one half of the cuff and lay it over the component side of the Flora board. Then glue 2 small strips of fabric onto the circuit board to make “belt loops” (Figure J). Clamp with binder clips until dry.

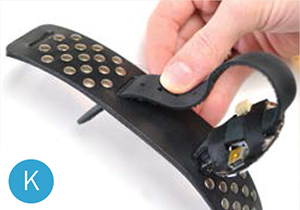
Glide your watch face toward the buckle side and thread the free end back through the cuff (Figure K).
3. Upload the code
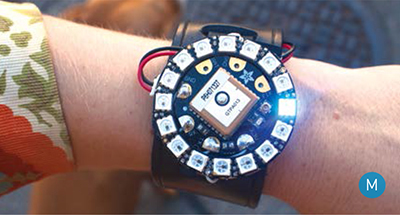
Grab the NeoGeo watch sketch from makezine.com/neogeo and upload it to Flora. The Flora NeoGeo Watch is very easy to use. The watch fetches the time of day from GPS satellites, so when it first powers on, it needs to get a GPS fix by directly seeing the sky. Once set, the watch automatically displays the current time, with one pixel lit for the hour and another for the minute (Figure L on the following page).

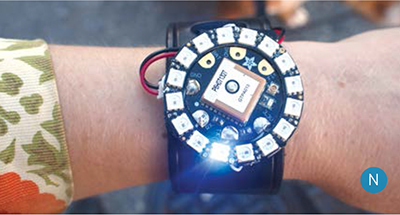
To change modes after calibration, you'll press and hold the tactile switch near the top of the watch. Compass mode lights up blue in the direction of north (Figure M and Figure N), no matter which way you turn.
GPS navigation mode points toward the coordinates you configure in the Arduino sketch (Figure O on page 359), and grows redder the closer you get to your destination.
The code for the Flora NeoGeo Watch is straightforward. We’re using the standard Adafruit GPS Library, Time Library, Pololu’s LSM303 accelerometer/compass library, and the Adafruit NeoPixel Library. You’ll find links to all required libraries on the NeoGeo Watch Github page. Follow the NeoPixel tutorial to install the library and run the strandtest.ino sample code.
NOTE: The watch code will allow you to adjust which LED is at 12 o’clock, so the orientation of the ring doesn’t matter.

Then follow the Flora GPS tutorial to test your GPS module. Make sure your GPS has a direct view of the sky.
Next, calibrate the compass module. Follow the steps on the Pololu LSM303 Github page on how to use the calibration sketch (github.com/pololu/LSM303). Then take the numbers from the calibration sketch and dump them into the NeoGeo Watch sketch in the Calibration values section of the code.
In the WAYPOINTS section of the code, dump in a location, such as your home, so you’ll always be able to find your way home. We like iTouchMap (itouchmap.com) for finding latitudes and longitudes online.
Now you’ll calibrate your watch. First calibrate your NeoPixel Ring. Simply light up each pixel using the NeoPixel code to determine which one is your TOP_LED pixel (from 0–15).
Then make sure your watch knows which way north is. Select the compass mode. Then, using a compass on your smartphone, or the old-fashioned kind, point your TOP_LED north. Count clockwise how many pixels away the lit LED is away from the TOP_LED. So, if you aim your TOP_LED north, and the LED 4 spots over is lit up, you would change the 0 in the LED_OFFSET code above and replace it with 4.
That’s it. Upload the code to your Flora, and start using your NeoGeo Watch!
4. Wear it
Plug in a tiny LiPo battery and tuck it into one of the “side pockets” where the cuff overlaps the strap. A bit of gaffer’s tape holds it nicely.
Flora’s onboard power switch is hidden under the part of the watch closest to you. Use a fingernail or other pointy, nonconductive object to flip the switch.
Place the watch on a windowsill or go for a walk outdoors to get a GPS fix — the clock will then set automatically, and you'll be ready to navigate through space and time. Enjoy your new Neo Geo Watch! ![]()

John de Cristofaro for Adafruit
NOTE: It can take several minutes to acquire a GPS fix, but it only needs to do this once on power-up. An optional backup battery will allow the GPS to keep its fix at all times.
WATCH MODE — Shows the “hour hand” as an orange LED, the “minute hand” as a yellow LED, and if both hands are on top of each other, the LED will glow purple. Once the GPS locks on, it will automatically update the time for you. If you lose GPS signal, it will remember the time.
NAVIGATION MODE — Points an LED in the direction you need to go to reach the coordinates you entered in the sketch. When you get close to your destination, the LED will change from yellow to red. Requires a constant GPS lock.
COMPASS MODE — A blue LED always points to the north.
To change between modes, press and hold the button for 2–3 seconds. Hold down the button longer and it will cycle through all 3 modes.
CAUTION: This watch is not waterproof! Take it off and power it down if you get stuck in the rain. Don’t wear it while doing the dishes, etc.