
PIPE DREAMS
Build sturdy furnishings with PVC pipe and a few tricks.
By Larry Cotton and Phil Bowie
Humble PVC drain pipe is cheap, widely available, easy to work with, and almost endlessly useful for making everything from patio furniture to elegant sculptures.
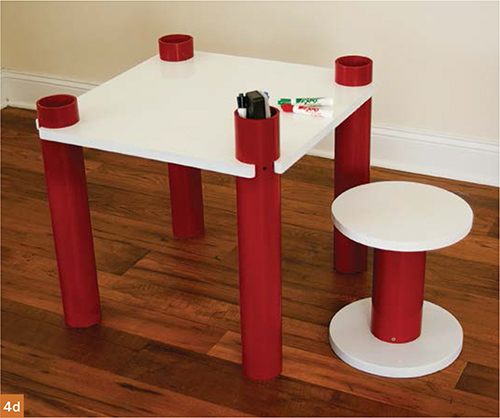
Here are four family-friendly projects that use 3"- or 4"-ID (inside diameter) PVC pipe. In a weekend you can easily make all four: a kids’ table with a dry-erase top and matching stool, a two-faced clock to help you remember friends in another time zone, a hanging planter, and an accent lamp that seems to float on light.
You can make them with handheld tools, but bench tools such as a band saw or table saw with a fine-toothed blade work best for making square and accurate cuts. PVC also bends easily when heated in boiling water, which opens up all kinds of new shapes and design possibilities.
If cutting pipe from a 10' length, ask a friend to help support it. Use a face mask and ear protection for cutting and sanding.
Fill any dings with automotive body filler and/or glaze. Then sand the pipe parts with 180-grit sandpaper, prime, and paint. If you want to skip the primer, there are new spray paints that adhere directly to plastic.
![]() WARNING: PVC pipe tends to roll while cutting on a table saw, so hold it firmly and cut slowly. Gripper gloves help. For cutting off sections on a table saw, set the blade just slightly higher than the pipe wall thickness. Don’t use a ruler or tape to set blade height; instead, make trial cuts in a scrap of wood and measure the cuts. Always wear eye protection when using power saws.
WARNING: PVC pipe tends to roll while cutting on a table saw, so hold it firmly and cut slowly. Gripper gloves help. For cutting off sections on a table saw, set the blade just slightly higher than the pipe wall thickness. Don’t use a ruler or tape to set blade height; instead, make trial cuts in a scrap of wood and measure the cuts. Always wear eye protection when using power saws.
Larry Cotton is a semi-retired power-tool designer and part-time community college math instructor. He loves music and musical instruments, computers, birds, electronics, furniture design, and his wife — not necessarily in that order.
Phil Bowie is a lifelong freelancer with 300 magazine articles published. He has three acclaimed suspense novels and a short story collection available on Amazon. Visit him at philbowie.com.

Gregory Hayes
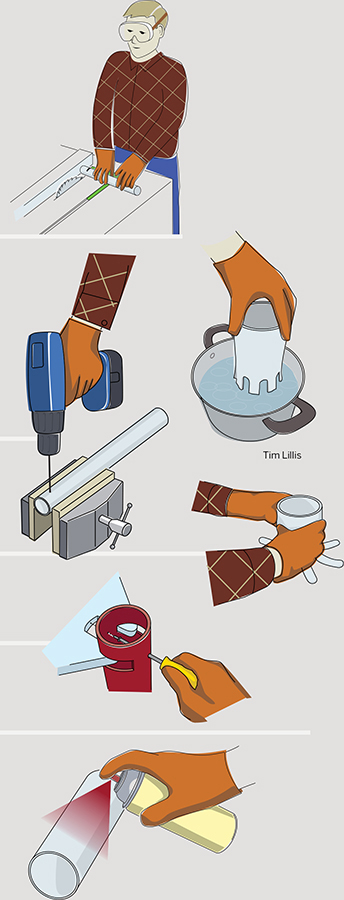
Polyvinyl chloride (PVC) plastic pipe is strong, works like wood, and accepts various fillers and finishes. It’s also thermoplastic, so it can do something wood can’t — bend into new shapes with the application of heat. Here are techniques for making your own furnishings from PVC.
PVC pipe is easily cut with small-toothed hand-saws. A hacksaw is slow but relatively accurate.
For straighter cuts, you can use a table saw, band saw, or miter saw (aka chop saw). To avoid chip-outs and minimize the danger of kickback, use a sharp, fine-toothed blade and move the work piece into the blade very slowly. On a table saw, use a rip fence and miter gauge to keep cuts square. On a band saw, set the upper guard properly.
To keep pipe from rolling while you’re cutting, clamp it to a workbench or in a vise (with a handsaw), or to the fence (with a miter saw), and wear gripper gloves with any power saw.
When drilling PVC, the bit will grab the plastic firmly — so commit to your drilling motion and follow through. Stopping halfway can leave chunky waste material in the hole, or cause chip-outs. Grip the pipe in a vise or clamp it in a V-groove in a board to prevent rolling.
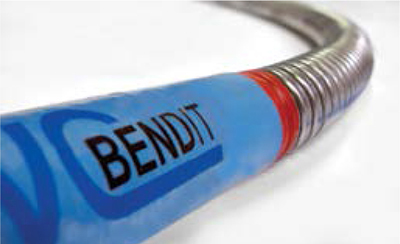
PVC is thermoplastic; heat it up and bend it into any shape you like. In this project you’ll use boiling water; we also like the PVC Bendit heating tool (see box, following page).
Wood screws or self-tapping sheet metal screws provide a strong hold in PVC pipe. The kids’ table in this project also makes use of interlocking slots for a stronger connection.
Flaws in PVC are easily filled using automotive epoxy putties and glazing and filling compounds.
PVC sands like wood and accepts automotive primer before painting. A new generation of spray paints will bond directly to PVC without primer.
PVC is also easily stained — see “Stain PVC Any Color” on page 375. Acetone will clean off most factory markings.
SET UP
Gregory Hayes
COOL NEW TOOL
The PVC Bendit wasn’t used in these projects but it does a nice job creating PVC furniture and structures. This new gadget gently heats plastic pipe up to 4" in diameter, making it pliable so you can bend it to any shape. MAKE Labs tested it and it works great.
MATERIALS
TABLE AND STOOL
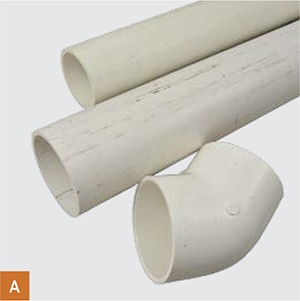
A. PVC pipe:
» White, 4" ID × ¼" wall, 10½" Iength for the stool. Buy a 10' length, Lowe’s part #23838, and use it for the other projects too. We used cheap, foam-core Schedule 40 sewer-and-drain PVC but other types of PVC will work.
» White, 3" ID × ¼" wall, 10' length Lowe’s #23834, for table legs
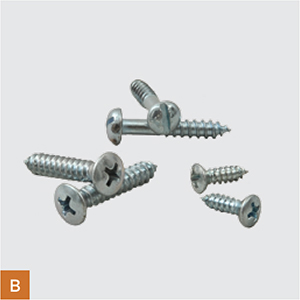
B. Screws:
» Sheet metal screws, #10×1" Phillips head (4)
» Wood screws, #8×1" flathead (12)
» Plywood, ¾" thick: 2'×2' (1); 12" diameter rounds (2); 4" diameter rounds (2)
» Dry-erase board, about 48"×32" Lowe’s #61082, for table and stool tops
» Contact cement, Weldwood (“The Original”), 14oz
» Wood dowel, ¼" diameter, 6" length
» Scrap wood for making a miter gauge extension
CLOCK
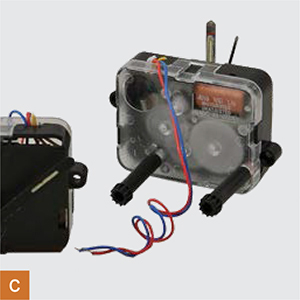
C. Clock movements, 21/8"×21/8"×5/8", with hands (2) for 12- or 24-hour time.
» PVC fitting for 4" ID pipe, white, 45° elbow with 1/8" wall Lowe’s #24124. This has a 1/8" wall at the openings.
» Plywood, ¾", 4½" diameter (2)
» Hardboard, 1/8", 4½" diameter (2) or dry-erase board
» Photo paper, white, heavyweight
» Sheet metal screws, #6×½" (2)
» Batteries, AA (2)
LAMP
» PVC pipe, white, 4" ID × ¼" wall, 14" length
» Switch, SPST, with round bushing and nut Lowe’s #71393
» Plywood, ½", 4" diameter round
» Threaded nipple, 1"× 3/8" diameter Lowe’s #46816
» Socket, for standard lamp bulb Lowe’s #70826
» Wire nut
» Lamp cord, 120V rated
» Lamp bulb, 40W maximum, frosted incandescent or CFL
» Acrylic rod, ¼" diameter, 10" length for the feet. You can also use a tilt wand for Venetian blinds.
» Cyanoacrylate glue aka super glue or crazy glue
PLANTER
» PVC pipe, white, 4" ID × ¼" wall, 8" length
» Nylon monofilament fishing line
» Clay or plastic pot, 4" diameter
For all projects:
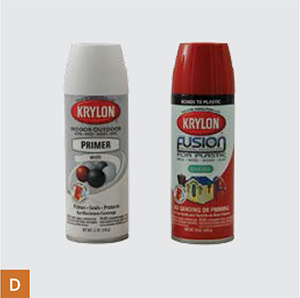
D. Paint and primer:
» Spray paint various colors. If you’re using primer, you can use most any paint. To skip the primer, use Krylon Fusion or Rust-OIeum Paint for Plastic; they’re formulated to bond directly to plastic.
» Spray automotive primer (optional) Rust-Oleum or equivalent
» Automotive body filler putty and/or automotive glaze such as Bondo filler or DuPont 315 glaze
» Sandpaper, 180 grit
» Masking tape
» Hot glue and/or epoxy
TOOLS
» Saw for cutting plastic pipe. Handheld saws will work, but we recommend a band saw or a table saw with a miter gauge and a fine-toothed blade.
» Drill and drill bits: 1/16", 1/8", ¼", 3/2", ¾" spade, countersink
» Combination square (optional)
» Marking compass or ¾" dowel.
» Jigsaw with fine-toothed blade for cutting plywood
» File or high-speed rotary tool (optional) such as a Dremel
» Screwdriver or long driver bit, Phillips head
» Measuring tape
» Hot glue gun (optional)
MAKE IT.

BUILD YOUR PVC FURNITURE
Time: A Few Hours
Complexity: Easy
KIDS’ TABLE AND STOOL
This small table fits young kids perfectly — and they can scribble to their hearts’ content on the dry-erase tabletop.
1. MAKE THE TABLE LEGS
1a. Cut them from a 10' length of 3"-ID pipe. It’s best to use a table saw with a rip fence and a miter gauge to keep the slots and pipe ends square and parallel.

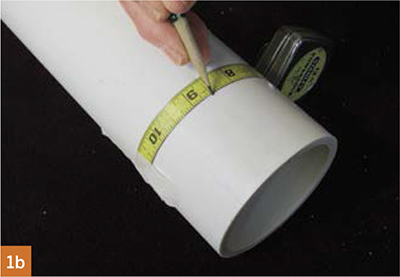
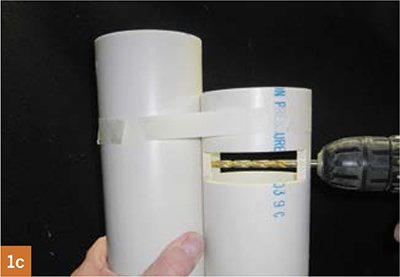
1b. Wrap a measuring tape around one end of a leg and put marks at the starting point and at exactly half the distance around the leg. Drill — from the outside, not straight across — 1/8" holes through both sides of the legs. Then drill straight across to enlarge both holes to ¼".

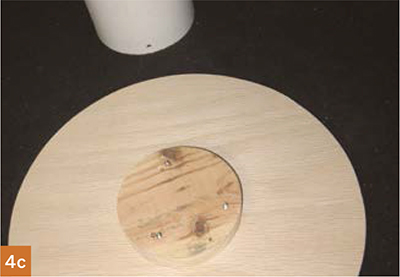
1c. Using this technique and the first leg as a guide, drill the holes in the other 3 legs. All holes are 19½" from the bottom ends.
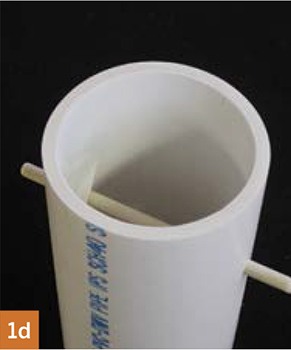
1d. Insert a 6"-long, ¼"-diameter wood dowel in the first leg, held by tape inside.
Larry Cotton and Phil Bowie
NOTE: One leg is longer than the others (for storing markers and an eraser).
1e. Slot one leg to mate with the tabletop. The dowel in the pipe will ride on its top surface so the finished leg slots will be perfectly aligned.

NOTES: If you use a table saw, first make a miter-gauge extension from ¾"-thick scrap wood as shown in this diagram.

While cutting, make multiple small passes and be sure the side of the dowel always stays in contact with the miter-gauge extension.
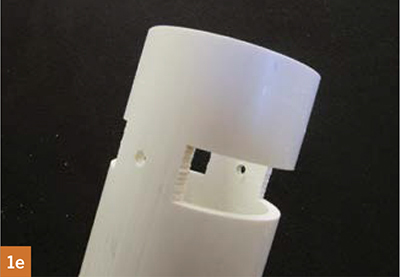
Set the table-saw blade depth to exactly 1". Using the miter-gauge extension, cut the slots in the leg. The slot dimensions and positions are critical to ensure that your table is sturdy and all 4 legs are perpendicular to the top.
1f. Remove the dowel. (The holes will be used to attach the legs to the table.)
1g. Repeat Steps 1d–1f for the other legs. When slotting the longer one, the rip fence (parallel to the blade) must be moved to accommodate that leg’s extra length.
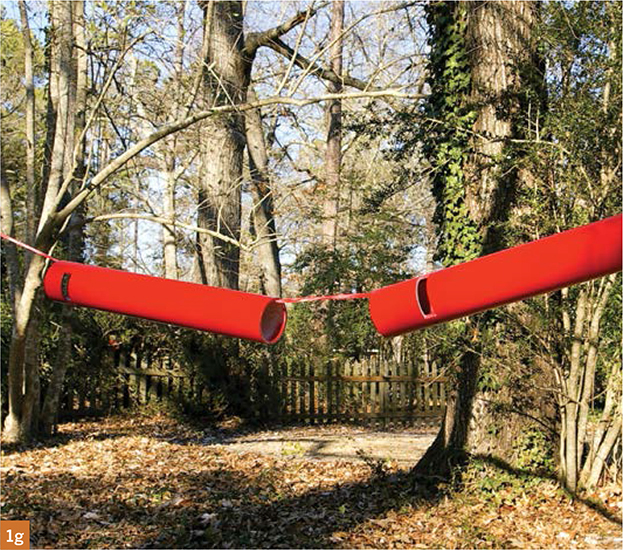
Paint the legs a bright color. Hanging the legs horizontally while painting helps.
2. MAKE THE TABLETOP
2a. For the tabletop core, we used smooth ¾" plywood, 2'×2'. For more durability, use exterior plywood. The top surface is 1/8" dry-erase board.
2b. Cut a slightly oversized piece of dry-erase board and laminate it to the plywood using Weldwood (“The Original”) contact cement. Follow the container directions exactly. After pressing the 2 pieces tightly together, trim all sides and sand the edges smooth. Avoid scratching the dry-erase surface.
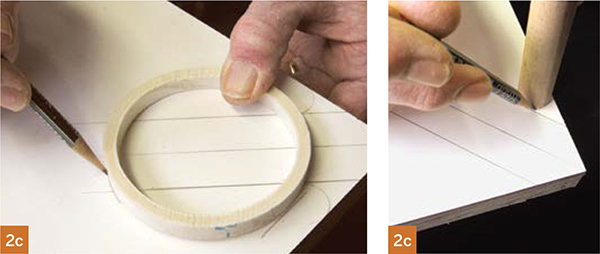
2c. Lay out the 4 identical corners. A combination square is helpful. Draw the radius at the back of each slot with a thin ring of 3"-ID pipe, then use a compass or the end of a ¾" dowel to mark the 8 radii at the slot ends.

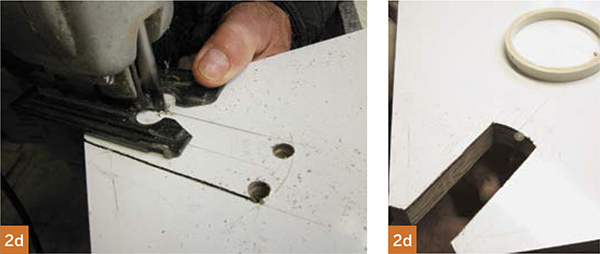
2d. To facilitate cutting, drill 3/8"-diameter holes in the corners of each slot, then cut with a handheld jigsaw with a fine-toothed blade. Sand, file, or Dremel the slots until the legs fit snugly into them. This will ensure the table doesn’t wobble.
2e. Fill any imperfections in the legs and the top’s edges with Bondo and/or glazing putty. Mask the top and paint its edges white. Paint its bottom for more durability.
3. ASSEMBLE THE TABLE
3a. Use four #10×1" Phillips-head sheet metal screws to screw the legs into the tabletop.

3b. To cap the legs, cut 3" disks from the dry-erase board and drop them into the tops of the legs.
4. MAKE THE STOOL
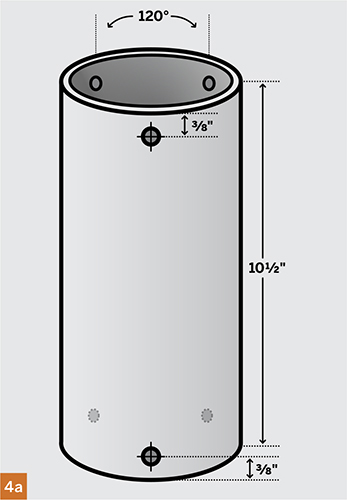
4a. For the column, cut a 10½" length of 4"-ID pipe and drill 6 clearance holes in it as shown in the diagram. Countersink them so the #8 screws will sit flush.
4b. Cut 2 disks of ¾" plywood to fit snugly into the 4" pipe. Cut 2 more ¾" plywood disks 12" in diameter for the stool’s top and bottom.
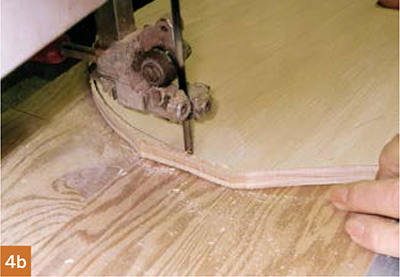
![]() TIP: For speed and accuracy, cut plywood disks on a band saw and pivot the plywood on a brad with its head snipped off.
TIP: For speed and accuracy, cut plywood disks on a band saw and pivot the plywood on a brad with its head snipped off.
4c. Attach the small disks to the centers of the large disks using three #8×1" screws each.
Laminate an oversized disk of dry-erase board to one of the disks for the top.
4d. Trim, sand, and finish the top and bottom to match the tabletop.

Assemble the stool with six #8×1" flathead wood screws.
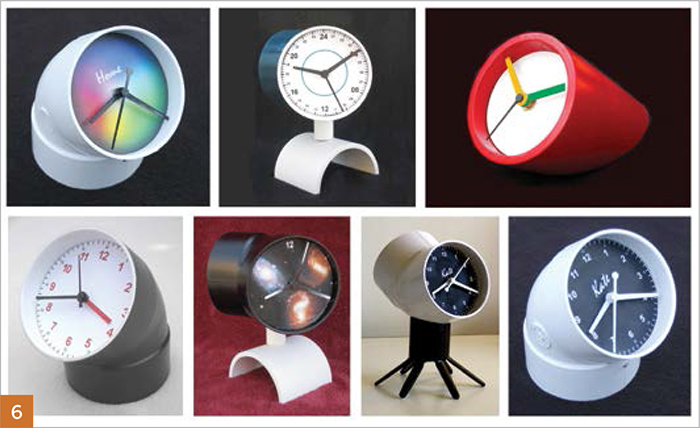
TWO-FACED CLOCK
If you and a friend or relative live in different time zones, keep track with this two-faced clock. The housing is a 45° PVC elbow for 4" ID pipe. Be sure to get the lighter one with 1/8" walls. The clock movements are the ubiquitous AA-battery plastic boxes. Remove them from old clocks or buy them online.
1. MAKE SPACERS
Cut two ¾" plywood spacers to slip-fit into the elbow ends and core them out with a jigsaw or band saw to clear the clock movements.
2. MAKE FACE BACKING PLATES
Cut 2 disks from dry-erase board to slip-fit on top of the spacers. Sand the edges.

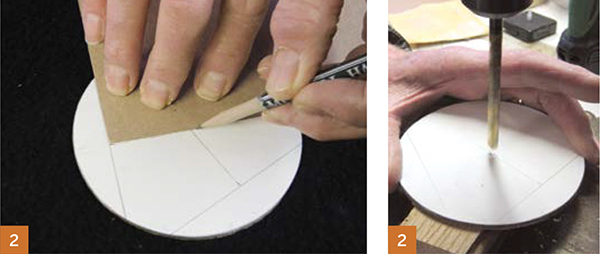
To drill the exact center of a disk, you can draw 2 chords, bisect them with perpendicular lines, and drill where the lines intersect.
3. MAKE CLOCK FACES
Use your imagination to design 2 clock faces, then print them on thick paper. Add names to the faces to match whichever time zone your friend or relative lives in.
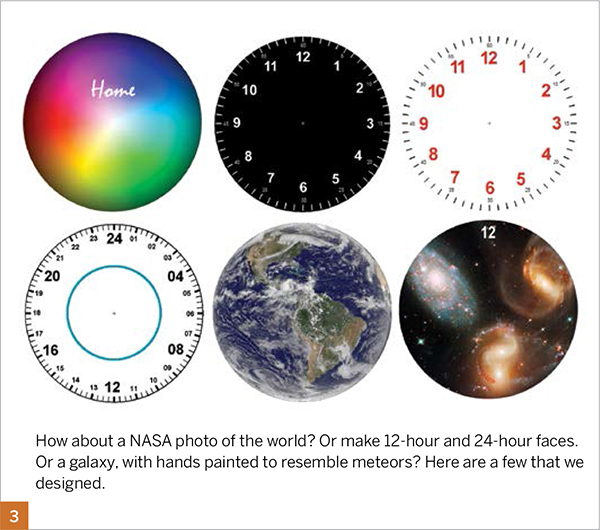
How about a NASA photo of the world? Or make 12-hour and 24-hour faces. Or a galaxy, with hands painted to resemble meteors? Here are a few that we designed.
4. ASSEMBLE THE CLOCKS
Glue the faces, backing plates, and spacers together. Add the movements, mounting nuts, and AA batteries.
Clip the hands to fit (if necessary), push them onto their respective spindles, and set their times.
5. INSTALL THE CLOCKS
Orient one face carefully (the seam on the elbow can help), then insert the assembly into the elbow. Affix it with one #6×½" sheet metal screw. Repeat for the other opening.
6. GO FURTHER
We left our elbow unmodified (including bar code label), but here are a few suggestions for other clocks and bases using PVC pipe.
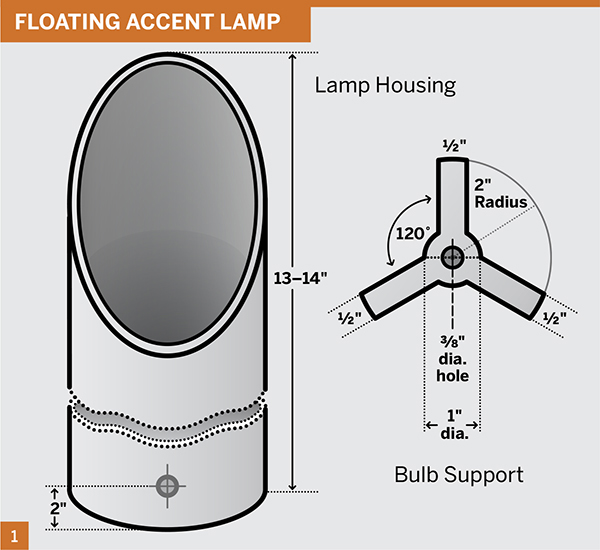
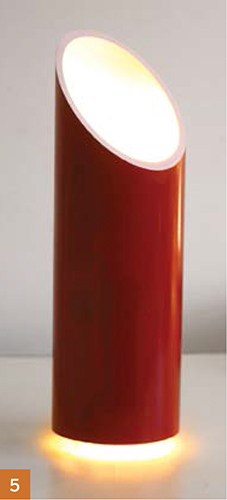
FLOATING ACCENT LAMP
This lamp adds a romantic glow to any room. Designed to provide good airflow around the bulb, it seems to float magically on a soft ring of light around its base.
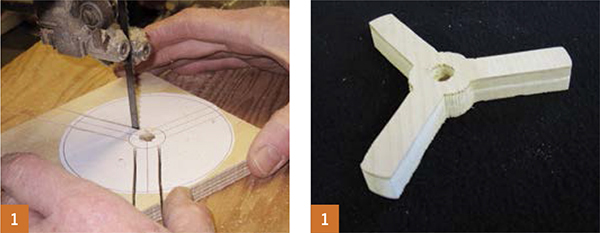
1. MAKE THE HOUSING
Cut and drill the bulb support from ½" plywood, following the diagram.
One 45°-angled cut in the 4" PVC easily allows you to make 2 lamp housings if you wish. Drill the hole in back to fit your switch, 2" from the pipe bottom. Thoroughly sand the angle and the bottom surfaces.
2. ASSEMBLE THE LAMP PARTS
Thread the nipple through the bulb support, add the socket, and wire up the switch. Ensure that all electrical connections are tight and insulated.
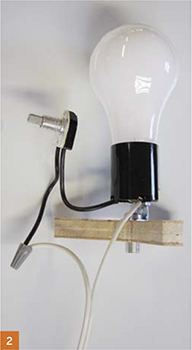
Screw in a 40W (maximum) frosted or CFL bulb and test.
3. PAINT
Mask the inside of the PVC housing, then sand and paint the outside a bright color.
Reverse the masking and paint the elliptical rim, the bottom rim, and the inside white.
4. INSTALL THE LAMP ASSEMBLY
Mount the switch, and then hot-glue the bulb support assembly into the lamp about 1" from the bottom.
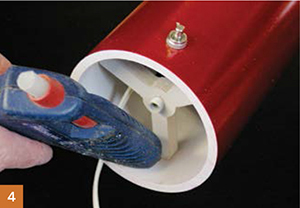
IMPORTANT: Make sure the bulb is centered in the pipe.
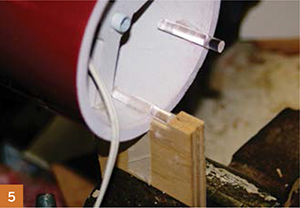
5. GLUE ON THE FEET
Super-glue at least six ¼"-diameter, 1½"-long clear feet inside the bottom rim. We used acrylic rod. Sand the mating surfaces thoroughly before gluing. Notch a scrap of wood and use it as a jig to ensure that the feet protrude the same amount.
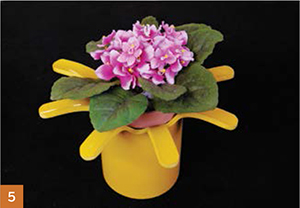
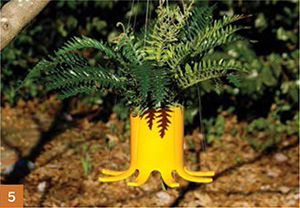
PLANT HOLDER
This versatile and attractive plant holder holds a standard 4" flowerpot in a variety of ways. You can set the pot in either end and use the holder upside down or right side up. In either position, you can hang it, or just place it on any surface.
1. CUT AND DRILL THE PIPE
Cut an 8" length of 4"-ID pipe and mark 8 evenly spaced spots 3" from one end to drill holes.


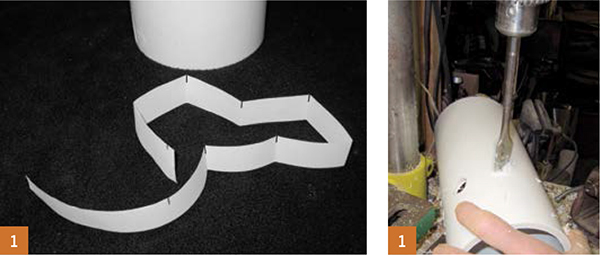
To space the holes, wrap a strip of paper around the pipe and mark a line across both ends. Hold the strip in front of a light to align the marks and fold the strip in half. Then fold in half twice more. Mark the pipe at the fold lines.
Using a spade bit, drill eight ¾" holes.
2. MARK AND CUT SLOTS
Draw lines from each hole to the pipe end. Then cut the slots with a handheld jigsaw.

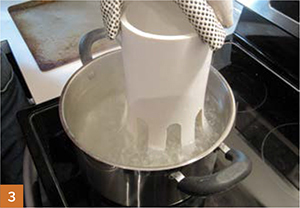
3. BEND THE LEGS
Boil 3½" of water in a large cooking pot. Using gloves, immerse the slotted pipe end until the legs become very pliable. Bend the legs out away from the body a bit.
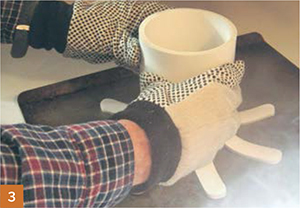
Remove the pipe from the water, then while keeping the pipe perpendicular, push the legs down onto a cookie sheet. The legs will splay out. Allow to cool for a minute. Repeat if you need to correct any faults.
4. FINISH THE LEGS
Round the leg ends with a disc sander, then file and sand the legs smooth. To hang your plant holder, drill a 1/16" hole in the center of each leg end.
5. FIT A FLOWER POT AND PAINT
Some pots fit the holder better if you chamfer the inside top edge. Use the pot itself as a backing surface for coarse sandpaper.
Spray it a bright color or leave it white. Attach monofilament line to each leg for hanging. ![]()
![]() TEST BUILDER: Max Eliaser, MAKE Labs
TEST BUILDER: Max Eliaser, MAKE Labs