Building a Basic GUI
Labels are widgets that are used to display short pieces of text. Here we create a Label that belongs to the root window—its parent widget—and we specify the text to be displayed by assigning it to the Label’s text parameter.
| | import tkinter |
| | |
| | window = tkinter.Tk() |
| | label = tkinter.Label(window, text='This is our label.') |
| | label.pack() |
| | |
| | window.mainloop() |
Here is the resulting GUI:

Method call label.pack() is crucial. Each widget has a method called pack that places it in its parent widget and then tells the parent to resize itself as necessary. If we forget to call this method, the child widget (in this case, Label) won’t be displayed or will be displayed improperly.
Labels display text. Often, applications will want to update a label’s text as the program runs to show things like the name of a file or the time of day. One way to do this is simply to assign a new value to the widget’s text using method config:
| | import tkinter |
| | |
| | window = tkinter.Tk() |
| | label = tkinter.Label(window, text='First label.') |
| | label.pack() |
| | label.config(text='Second label.') |
Run the previous code one line at a time from the Python shell to see how the label changes. (This code will not display the window at all if you run it as a program because we haven’t called method mainloop.)
Using Mutable Variables with Widgets
Suppose you want to display a string, such as the current time or a score in a game, in several places in a GUI—the application’s status bar, some dialog boxes, and so on. Calling method config on each widget every time there is new information isn’t hard, but as the application grows, so too do the odds that we’ll forget to update at least one of the widgets that’s displaying the string. What we really want is a string that “knows” which widgets care about its value and can alert them itself when that value changes.
Python’s strings, integers, floating-point numbers, and Booleans are immutable, so module tkinter provides one class for each of the immutable types: StringVar for str, IntVar for int, BooleanVar for bool, and DoubleVar for float. (The use of the word double is historical; it is short for “double-precision floating-point number.”) These mutable types can be used instead of the immutable ones; here we show how to use a StringVar instead of a str:
| | import tkinter |
| | |
| | window = tkinter.Tk() |
| | data = tkinter.StringVar() |
| | data.set('Data to display') |
| | label = tkinter.Label(window, textvariable=data) |
| | label.pack() |
| | |
| | window.mainloop() |
Notice that this time we assign to the textvariable parameter of the label rather than the text parameter.
The values in tkinter containers are set and retrieved using the methods set and get. Whenever a set method is called, it tells the label, and any other widgets it has been assigned to, that it’s time to update the GUI.
There is one small trap here for newcomers: because of the way module tkinter is structured, you cannot create a StringVar or any other mutable variable until you have created the root Tk window.
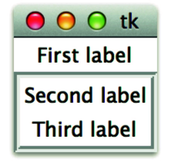
Grouping Widgets with the Frame Type
A tkinter Frame is a container, much like the root window is a container. Frames are not directly visible on the screen; instead, they are used to organize other widgets. The following code creates a frame, puts it in the root window, and then adds three Labels to the frame:
| | import tkinter |
| | |
| | window = tkinter.Tk() |
| | frame = tkinter.Frame(window) |
| | frame.pack() |
| | first = tkinter.Label(frame, text='First label') |
| | first.pack() |
| | second = tkinter.Label(frame, text='Second label') |
| | second.pack() |
| | third = tkinter.Label(frame, text='Third label') |
| | third.pack() |
| | |
| | window.mainloop() |
Note that we call pack on every widget; if we omit one of these calls, that widget will not be displayed.
Here is the resulting GUI:

In this particular case, putting the three Labels in a frame looks the same as when we put the Labels directly into the root window. However, with a more complicated GUI, we can use multiple frames to format the window’s content and layout.
Here’s an example with the same three Labels but with two frames instead of one. The second frame has a visual border around it:
| | import tkinter |
| | |
| | window = tkinter.Tk() |
| | frame = tkinter.Frame(window) |
| | frame.pack() |
| | frame2 = tkinter.Frame(window, borderwidth=4, relief=tkinter.GROOVE) |
| | frame2.pack() |
| | first = tkinter.Label(frame, text='First label') |
| | first.pack() |
| | second = tkinter.Label(frame2, text='Second label') |
| | second.pack() |
| | third = tkinter.Label(frame2, text='Third label') |
| | third.pack() |
| | |
| | window.mainloop() |
We specify the border width using the borderwidth keyword argument (0 is the default) and the border style using relief (FLAT is the default). The other border styles are SUNKEN, RAISED, GROOVE, and RIDGE.
Here is the resulting GUI:
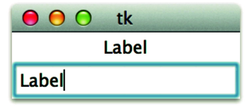
Getting Information from the User with the Entry Type
Two widgets let users enter text. The simplest one is Entry, which allows for a single line of text. If we associate a StringVar with the Entry, then whenever a user types anything into that Entry, the StringVar’s value will automatically be updated to the contents of the Entry.
Here’s an example that associates a single StringVar with both a Label and an Entry. When the user enters text in the Entry, the StringVar’s contents will change. This will cause the Label to be updated, and so the Label will display whatever is currently in the Entry.
| | import tkinter |
| | window = tkinter.Tk() |
| | |
| | frame = tkinter.Frame(window) |
| | frame.pack() |
| | var = tkinter.StringVar() |
| | label = tkinter.Label(frame, textvariable=var) |
| | label.pack() |
| | entry = tkinter.Entry(frame, textvariable=var) |
| | entry.pack() |
| | window.mainloop() |
Here is the resulting GUI: