

5 A Brief History of Flash
Faraday Theatre. The Royal Institution of Great Britain, London, England. It was here in 1864 that one of the earliest known flash portraits was taken before an amazed Victorian public. However, this photograph is illuminated not by magnesium wire, but by a single Elinchrom Universal 750S monolight triggered by a Pocket-Wizard radio remote. The studio flash was positioned where the demonstration would have taken place all those years ago. EOS 5D, 1/60 sec at f/11, ISO 100, MC Zenitar 16mm fisheye.
This is an example of radio control over manual studio flash.
The very first photographers could only take their pictures in bright sun, since those early photographic processes reacted very slowly to light. The oldest known photograph, taken in 1826 by French pioneer Joseph Nicéphore Niépce, actually took a whole day to expose. The invention of the Daguerreotype process cut this down to minutes, but artificial light was still too weak for most photography. In fact, one of the principal requirements for a photographic studio in Victorian times was a skylight to provide adequate illumination.
Scientists and inventors labored throughout the 1800s to devise artificial photographic lighting, many intuitively understanding that a brief bright burst of light could illuminate a scene just as effectively as dimmer light used for a longer period of time: a concept that’s fundamental to all flash photography. As early as 1851, Briton William Henry Fox Talbot demonstrated how electric sparks could capture freeze-frames of moving objects. By the late 1870s, studios in rainy London were proudly advertising their use of electric lighting for portrait photography. But these early light sources, including electric arcs, oxyhydrogen (limelight) lamps, and battery lamps, weren’t very bright, or relied on large generators.

5.1 Michael Faraday’s magnetic laboratory at the Royal Institution of Great Britain, London. It was most likely in this lab, restored in 1972 to appear as it did in the 1850s, that Fox Talbot first demonstrated photographic flash. EOS 5D, on-camera ST-E2 trigger, 580EX to camera left with 1/2 CTO filter, 580EX with 1/2 CTO filter, 420EX on floor unfiltered.
5.1Pyrotechnics
Fox Talbot’s pioneering spark experiments were frustrated by the limited power produced by the batteries of the day. The first viable form of artificial photographic illumination was the intense white light created by burning magnesium. The metal’s potential was recognized before the widespread use of electric lights, and one of the first documented public demonstrations was performed by Alfred Brothers at the Royal Institution in 1864.
The following year Scottish-Italian astronomer Charles Piazzi Smyth, notorious for his bizarre theories tying the Egyptian pyramids to Biblical prophecy, burned magnesium wire to photograph the interior of the Great Pyramid of Giza. Some two decades later in Germany, Adolf Miethe and Johannes Gaedicke added an oxidizing agent to powdered magnesium, commercializing Blitzlichtpulver, or “powder for producing lightning-like light.”
Magnesium powder became more than a flash in the pan when Jacob Riis, a Danish-born journalist living in the U.S., used it to document the poverty and privation of New York City slums. His book of photo illustrations and muckraking essays, titled How the Other Half Lives, shocked the American public of 1890, including a then-police commissioner by the name of Theodore Roosevelt.
The technique employed by Riis was quite dangerous. He would set up a camera in a dark or dimly lit room, pour some powdered magnesium and an oxidizer into a frying pan, open the shutter, and then ignite the powder. The result was a brilliant burst of light, startled subjects, and a billowing cloud of noxious smoke and ash. While his photos changed American views of immigrant housing, he is said to have set his clothes and surroundings on fire on a number of occasions.

5.2 From left to right: Eastman (Kodak) flash “pistol” circa 1900–1905, a device for igniting magnesium flash cartridges. The leather guard was meant to protect the photographer’s hands from burns. Kodak magnesium ribbon dispenser, circa 1915–1920. The thin ribbon could be measured out in length (and thus time), and was used mainly for exposing photographic paper. Flash sheets, which had shorter burn times, were more commonly used for portraits.
Magnesium powder sold in teabag-like envelopes by Seuthelin, circa 1925. A long paper strip dangled down and was lit as a simple self-timer, like Wile E. Coyote lighting a track of gunpowder.
Magnesium was used, packaged in various forms such as cartridges and sheets, well into the 20th century. Textbooks and instruction manuals of the era speak quite matter-of-factly about techniques required to minimize the risk of accidents and fire.
5.2Flash bulbs
A breakthrough in photographic safety was developed in Germany in 1929–30 when Johannes Ostermeier patented the first mass-market flash bulb, sold under the Sashalite (GE) and VacuBlitz (Osram) names. These foil-filled glass bulbs, when connected to a low electric current, would burst with white light and a loud pop.
Press photographers from the 1930s through the ’60s, immortalized by scenes on the courtroom steps in countless films, burned through huge quantities of disposable bulbs. They also burned their fingers, as the bulbs were quite hot after firing. A later innovation was a lacquer or plastic coating to reduce the risk of subjects being injured by flying glass if the bulb shattered. Bulbs designed for color photography had blue-tinted lacquer to improve the color balance.

5.3 A three-cell Graflex flash handle, reflector, and flash bulbs. These were used with Speed Graphic press cameras in the 1940s and ’50s.
Trivia note: a handle of this type was used as Luke Skywalker’s light saber in the original Star Wars movie released in 1977.
Flash bulbs eventually shrank down and became incorporated into consumer products such as the FlashCubes, MagiCubes, and FlipFlashes, which illuminated countless birthday parties and family snapshots in the ’60s and ’70s. ![]() 5.4
5.4
Ultimately, however, such single-use flash bulbs were an evolutionary dead end. Flash bulbs are mainly used today for historical reenactments (e.g., period movies), theatrical special effects, and special applications such as cave photography because they can produce massive amounts of light despite their small size.

5.4 Household flash photography in the 1960s and ‘70s looked like this. A Polaroid SX-70 instant camera from 1972, equipped with a flashbar. Next to it are a FlipFlash and an assortment of MagiCubes and FlashCubes. The photos were taken using Artistic Time Zero film manufactured during the final production run at Polaroid’s last factory before it was sold to the Impossible Film Project.
5.3Electronic flash
It was the xenon flash tube, first developed for photographic purposes in the 1930s by American researcher Harold Edgerton, which brought about the demise of the flash bulb. Edgerton’s work at MIT initially focused on freezing motion for engineering research, but it soon became clear that flash tubes would be convenient for general photographic lighting as well. For years, flash tubes mainly stayed in the studio because of their hungry power demands. Early portable electronic flash systems were also heavy: a battery-powered unit built by Kodak in the early 1940s weighed 16 pounds! But by the 1960s and early 1970s, improvements in battery and capacitor technology made electronic flash affordable, convenient, and portable.
All electronic flash units (except for white LEDs used in phone cameras) have the same basic design. First, a component known as a capacitor is charged up with electricity. The accumulated energy is then sent to a glass tube filled with the inert gas xenon. The electricity causes the gas to ionize, producing a split-second electrical discharge that emits a brilliant burst of white light.
Flash tubes are ideal for photography because they can be fired many times, their outputs can be precisely controlled, they allow for brief motion-freezing exposures, and their basic design can scale from tiny pocket flash units all the way up to huge studio equipment.
But there were two fundamental technical problems that had to be solved before electronic flash could become the widespread lighting solution that it is today: synchronization and metering. Both problems stem from the fact that flash usually involves a single brief burst of light rather than a continuous and steady glow.
5.5 The flash tube from a Quantum Instruments unit. While most units have straight bare tubes, this one is pretzel-shaped to maximize tube length in a small space. It is enclosed in a protective glass shell.
5.4The first challenge: flash synchronization
Flash synchronization simply means firing the flash simultaneously with the shutter opening up so the light correctly exposes the film or image sensor. Ambient lighting doesn’t require synchronizing with anything because the output from the sun or a light bulb is constant and doesn’t vary much through the course of an exposure. But if a flash fires before the shutter has opened or after the shutter has closed, then it’ll obviously be pretty useless.
5.5Open flash
The simplest way to synchronize a flash with the shutter is to do it manually, just like Riis with his magnesium powder. The camera is put into a dark or low-light area, the shutter is opened up, the flash is fired by hand, and then the shutter is closed. “Open flash” works, but the technique is obviously limited to dark or near-dark conditions. Requiring long exposure times and careful manual work, this method was the only way to synchronize flash until around the 1930s.
It may be simple, but open flash is still used today for special purposes such as night photography. It can also be used for high-speed flash photography, as described in section 15.9. ![]() 5.6
5.6
KEY POINT
The millisecond pulse of light from a flash unit must be precisely timed—or synchronized—with the camera’s shutter for proper exposure.
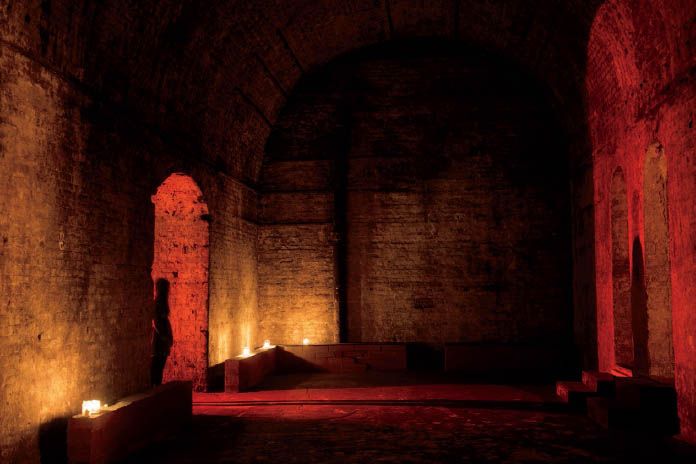
5.6 This shot was lit by two light sources: the candles and a red-filtered 580EX II, which was fired manually twice at full power on the other side of the left-hand portal. EOS 5D Mark II, 30 sec at f/4, ISO 200, 35mm.


5.7 Landschaftspark Duisburg-Nord, Germany: What was once a bustling and polluted steel mill is now a park and monument to German industrial history.
To create the whirling sparks, echoing the mill’s original purpose, I spun some burning steel wool on a chain. However, in the first image, the towers ended up as dark silhouettes despite the 30-second exposure. For the second photo I spun the wire for longer, creating a bigger wheel, and then fired off two full-power bursts from a Speedlite 580EX, pointing at the blast furnaces. This open flash helped pick up details in the structure.
5.6Flash sync
Because open flash is inconvenient—and useless in bright ambient light situations—automatic flash synchronization was developed. At first glance, flash sync doesn’t seem very complicated. After all, a flash could simply be rigged to fire when the shutter release button is pressed. But this approach doesn’t actually work, because flash pulses are incredibly short in duration. Even the quickest mechanical shutters aren’t fast enough. By the time they open fully, the brief pulse of electronic flash will already be over. Flash must therefore be fired after the shutter has opened all the way up, and not before.
KEY POINT
Automatic flash sync fires the flash once the camera shutter is fully open. All EOS cameras have this basic capability.
By the 1950s, most quality cameras had shutters equipped with switches to detect when they were open and ready for the flash to fire. Sync for electronic flash became known as “X-sync,” probably in reference to xenon gas. (X-sync can also refer to maximum shutter speed with flash, which is described in section 7.11.) ![]() 5.8
5.8

5.8 The shutter mechanism from a Canon EOS camera. The copper coils are electromagnets which move the silver-colored paddles, opening and closing the shutter blades. The tiny thin gold fingers are metal contacts that open or close as the shutter mechanism operates, enabling flash sync.
Other forms of flash sync, now very much obsolete, include M sync for “medium-speed” flash bulbs and FP sync for bulbs for “focal plane” shutters. The metal burning inside flash bulbs took a little time to reach optimum brightness. Such bulbs actually had to be fired before the shutter was fully open, hence the different sync modes.
5.7Controlling flash exposure
In regular (non-flash) photography, you’ve got three basic ways to control the exposure of an image.
- Shutter speed. The length of time that the shutter is open affects the duration of the exposure, since ambient light is essentially constant.
- Lens aperture. The adjustable size of the diaphragm on most lenses governs the quantity of light that enters the camera.
- Sensitivity of the digital sensor (ISO) or the film speed.
There is one critical way in which flash differs from ambient lighting. As noted on the previous page, flash bursts are so brief—sometimes just a few milliseconds—that a mechanical shutter is too slow to control how much light from a flash unit will hit the film or sensor (an exception being high-speed sync mode, discussed in section 7.12). Therefore, shutter times only affect the exposure of ambient light.
KEY POINT
Regular flash exposure usually isn’t affected by shutter speed settings.
There are five basic ways to control exposure when using a flash unit, though the first four have drawbacks because they affect other things as well.

5.9 The size of the lens aperture controls the amount of light (ambient or flash) that enters the camera.
- Lens aperture: Aperture settings also affect the amount of ambient light striking the film or sensor, as well as the picture’s depth of field.
- Distance from the flash unit to the subject: The amount of light illuminating an object decreases the farther it is from the light source. This follows known physical laws (the inverse square, section 7.14) and can be reliably calculated. Moving the light around might be acceptable in a studio setting but would be a hassle for casual or journalistic photography. Also, altering flash unit / subject distances affects the relative size of the flash light source, which in turn affects the quality of the light and shadows.
- Sensitivity (ISO setting) of the digital sensor or film speed: This affects both ambient and flash exposure, and also the noisiness / graininess of the image.
- Diffusers or light baffles between the flash unit and subject: These can be inconvenient, and they also affect the quality of light.
- Adjustments to the energy output or the duration of the flash pulse: This last method is the most useful since it doesn’t affect ordinary exposure of ambient light in any way. The adjustments simply affect the intensity of the flash produced.
KEY POINT
Flash metering is the technique for determining the correct light output of a flash unit in order to expose a scene correctly. EOS cameras can handle this process automatically or let the photographer do it manually.
5.8The second challenge: flash metering
Flash metering, or figuring out how bright the flash unit’s pulse of light has to be, is a more complex issue than synchronization. In most SLR cameras, metering for available light occurs when the photographer looks through the viewfinder and presses the shutter release halfway down. The evaluative (ambient) light sensor, located inside the viewfinder assembly, has light shining on it whenever you can see things through the viewfinder. ![]() 5.10
5.10
When the mirror lifts up and the shutter opens to expose the film or sensor, light stops reaching the viewfinder and the ambient sensor. So a subject-illuminating flash pulse can’t be measured by the ambient light sensor when the shutter is open. Over the years engineers have come up with four basic ways to get around this problem and meter for flash: one manual and three automatic. ![]() 5.11
5.11

5.10 The red line indicates light entering an SLR camera, bouncing off the mirror and prism, and hitting the internal light sensor.

5.11 However, when an SLR’s mirror raises to take a photo, light no longer hits the sensor, so the camera can’t record light levels anymore.
5.8.1Manual metering
The oldest way to meter for flash is to do it by hand. You can manually measure some test flashes using a special handheld flash meter, perform distance calculations based on the known power output of the flash unit, or just take some trial and error shots while reviewing the camera’s preview screen, if you’re shooting digital. You then set the output level of the flash unit by adjusting the device manually.
KEY POINT
All-manual flash metering, while technically very simple, has gained a new lease on life in the digital age.
5.8.2Automatic flash-based (autoflash) metering
Amazingly, a fast-reacting electronic system can measure the strength of a flash pulse while it’s actually being emitted. Such a system detects light reflecting off the subject back to the flash unit, and cuts off power to the flash tube when adequate exposure is accomplished. This is done via a special flash sensor built into the unit itself, and is the basis for the autoflash metering used by many flash units sold in the 1970s.
5.8.3Automatic camera-based (TTL) metering
This method is the similar to above, but the flash sensor is inside the camera and thus measures light directly entering the body, hence the name “through the lens.” TTL is compatible with film cameras only.
KEY POINT
Automatic through-the-lens (TTL) flash metering is used by EOS film cameras, and indeed most film SLRs sold in the 1980s and 1990s.
5.8.4Automatic camera-based preflash (E-TTL) metering
Here the flash unit fires a test pulse (preflash). The camera measures the reflected light using the same light meter that it uses for ambient light. Then the camera mirror is raised, its shutter is opened, and the flash unit fires the actual scene-illuminating flash. Canon refers to this method as E-TTL, for evaluative through-the-lens flash metering.
To summarize, there are three basic methods for automatic flash metering. Of those three, autoflash is rarely used today. Pre-1995 Canon EOS film cameras employ TTL metering, whereas later EOS film cameras and all EOS digital cameras use E-TTL (preflash) metering. Other systems employing preflash metering include Nikon iTTL, Pentax P-TTL, and Sony Pre-flash TTL.
KEY POINT
Automatic flash metering with preflash (E-TTL) is used by EOS digital cameras and post-1995 EOS film cameras.