
6The Exposure Tool Tab

6.1 Adjustments to exposure are one of the core elements of photography in general and of the Capture One workflow in particular. Along with the tools offered in the Color tool tab, the tools in this tab are what a raw converter is really all about.
The Exposure tool tab contains all the tools you need to adjust and correct exposure errors and get your creative juices flowing. These tools are all about light rather than color, which is why they’re grouped in the same tab, even if the grouping appears illogical at first glance.
6.1The Basics: Contrast, Saturation, Brightness, and Exposure
The Saturation, Exposure, Contrast, and Brightness settings offered by the Exposure tool are the same as those in even the simplest image-processing applications, such as Apple’s Preview or Microsoft Image Viewer, but they deliver much better quality than most of these alternatives. With Capture One Pro 9, Contrast and Brightness were overhauled; they deliver cleaner and more predictable results, and in many cases, replace the need for more complex work with the Curve tool.
Every digital image contains a range of tonal values, and the Exposure tool tab enables you to adjust their distribution and how they relate to each other.
If you click the Auto Exposure button (the A icon in the tool’s title bar), the program shifts the exposure slider in an attempt to create an “average” histogram. It bases its adjustment on the values shown in the Exposure Evaluation panel (see section 5.2) and a mathematically calculated medium gray tone. This approach means that the Auto option will fail for certain types of images. The matrix and scene modes built into today’s cameras evaluate exposure based on the content of the image—Capture One doesn’t.

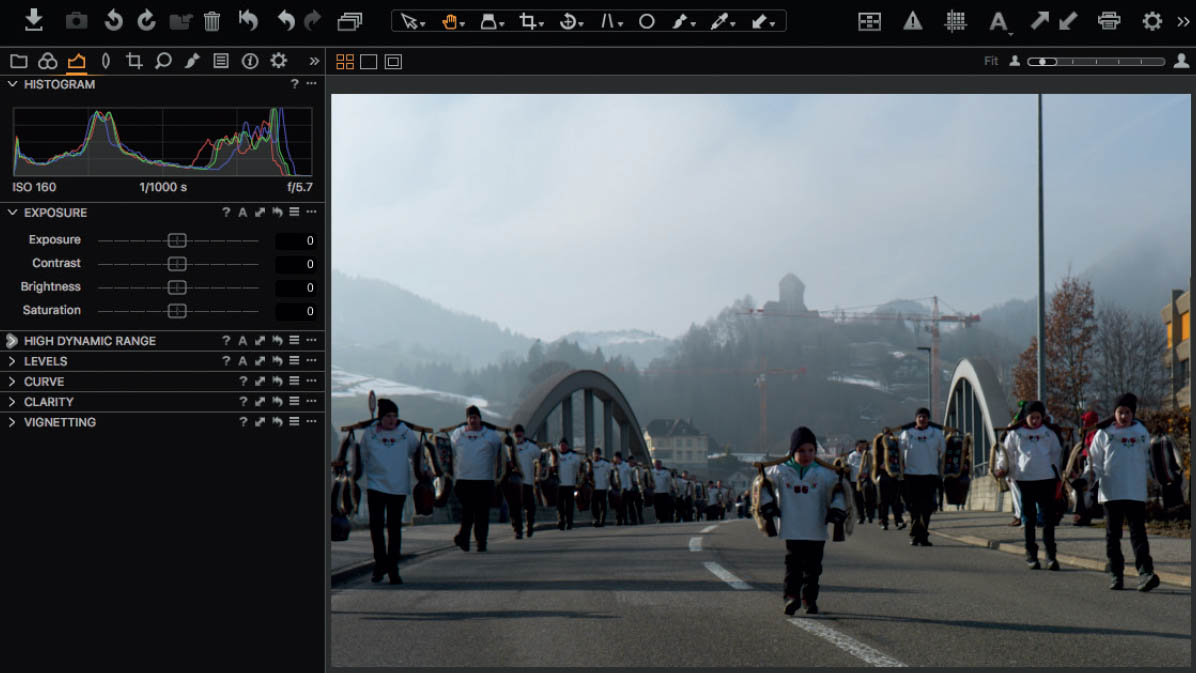
6.2 Capture One offers the same basic exposure sliders as most other image-processing programs.
Exposing for “medium gray” (that is, the average exposure that Capture One aims for) is the right approach for many subjects. In other words, Capture One’s Auto Exposure function makes a good starting point for adjustments and fine-tuning. Nevertheless, if you do end up photographing the infamous black cat in a coal cellar or white rabbit in the snow, don’t use the Auto Exposure function.
6.2High Dynamic Range
The tool’s name is actually rather confusing, because it has little to do with merging multiple source photos to create a single high dynamic range (HDR) image.
Photo cameras have a fixed dynamic range that is often expressed in terms of f-stops. This means that when you’re photographing a high-contrast scene, you have to decide which details are most important and expose appropriately for the shadows, midtones, or highlights. In such situations, it’s impossible to capture all of the subject’s detail in a single image.
The High Dynamic Range tool doesn’t produce “real” multiexposure HDR images and is instead aimed at recovering lost shadow detail and rescuing burned-out highlights, often producing HDR-style results.
If you want to capture all the detail in a scene, you have to use a bracketing sequence with varying exposure settings to capture source images that you can merge into one later on. The camera’s dynamic range covers only a portion of the overall range of brightness in the subject, and HDR software merges the sequence of portions you capture to create an image that covers the entire range of contrast in the subject.

6.3 The High Dynamic Range tool has only two sliders.
Capture One’s High Dynamic Range tool doesn’t work with multiple images and can therefore only adjust the data captured by the camera in a single image. The functionality offered by the tool is the same as that offered by the Lightroom Recovery tool, which uses an algorithm to brighten shadows and midtones while simultaneously recovering highlight detail, hopefully without creating additional artifacts or banding effects. This simulates a greater dynamic range but actually compresses the range of tonal values to achieve its effect, thus creating a narrower dynamic range than that of the original.
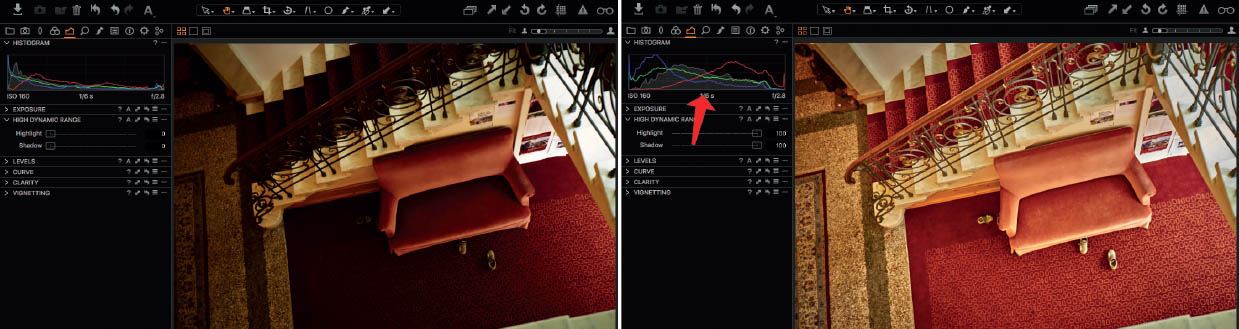
6.4 The histogram on the left displays the entire dynamic range of the original image, whereas the one on the right shows the dynamic range created by applying the High Dynamic Range tool. The overall range of tonal values has been compressed, creating a dynamic range that is—mathematically at least—narrower than that of the original. However, the image itself appears more “dynamic” with more visible detail.
So much for the theory. In practice, the tool is actually very good at brightening shadows.

6.5 There is a drummer in the band after all.
The High Dynamic Range tool is easy to use. The Highlight slider attempts to recover overexposed highlights by analyzing the surrounding pixels for remaining detail and combining what it finds with the colors in the Bayer pattern microfilters located in front of the image sensor (see section 9.2). This works well in moderately overexposed image areas but fails where all three color channels are completely overexposed, because the algorithm no longer has any reliable color data on which to base its extrapolations.

6.6 The High Dynamic Range tool is great for recovering highlight detail in a range of situations, but the quality of the results is often quite random.
The Shadow slider works in a similar way; it attempts to guess the colors in the pixels surrounding ones in which “swamped” detail is no longer visible. Brightening shadows usually increases noise, although you can counteract this effect using the Noise Reduction tool in the Details tool tab (see section 9.3). One thing is certain: Extreme adjustments produce extreme results that are often relatively poor. The High Dynamic Range tool is great for rescuing images that you would otherwise have to trash and is good at making images visually more attractive, but it doesn’t represent a real alternative to exposing correctly during a shoot.
QUICK TIP
Because the results were often unpredictable, with the release of version 8, Phase One reduced the range of adjustments you can make with the High Dynamic Range tool. However, if you still need to apply greater values than the standard tool allows, HDR is also available as a local adjustment, enabling you to use it multiple times on separate layers for added effect. See chapter 10 for more on local adjustments.
6.3Understanding Levels and Curves
You saw in section 5.2 that the Curve and Levels tools are closely related, although they actually function quite differently from one another. The Levels tool enables you to adjust the position of the shadow, midtone, and highlight areas within the tone curve as well as the range for each (either for all three color channels simultaneously or for each separately), whereas the Curve tool modulates the shape of the tone curve that the Levels tool produces. Depending on what you wish to achieve, it can make sense to use the Luma panel rather than the RGB panel. As mentioned in section 5.5, Luma works on the actual luminosity values captured in the raw file, rather than the ones the demosaicing process created by calculating RGB values according to your sensor’s color filter.

6.7 The Levels and Curve tools both adjust tonal values but in very different ways.
By default, the automatic Levels function bases its calculations on what could be called “total tonality”: the combination of red, green, and blue color channels, represented by the gray curve inside the Levels tool. This is a great default behavior for photographers who don’t enjoy working with different color channels, but rather prefer the “grand total.” If you tend to tweak color channels anyway, it can make sense to switch this behavior in what Phase One calls “Channel Mode.” In the application preferences, check the Exposure tab and switch Channel Mode from “RGB Channel” to “Red, Green, and Blue Channels.” Both automatic adjustments and the shadow and highlight eyedroppers in the Levels tool will now max out each color channel individually (rather than the “grand total” as mentioned earlier).
The Levels tool displays a histogram and provides six values that you can adjust to reduce, increase, and compress the range of tonal values in your image. You can enter your chosen values directly in the appropriate boxes or drag the top and bottom sliders for each. You can also use the Shadow and Highlight Picker tools (the eyedroppers located at the left- and right-hand ends of the histogram curve) to select white and black points in the Viewer.
The results of Levels adjustments form the input for further adjustments using the Curve tool.

6.8 Shadows, midtones, and highlights each have two sliders—the upper ones determine the input and the lower ones the output values. You can also set black and white points by clicking the appropriate area in the viewer with the Shadow and Highlight Pickers.
QUICK TIP
It helps to imagine the lines drawn by the shadow, midtone, and highlight sliders as a kind of funnel. If it’s broader at the top than the bottom (that is, V-shaped), the input tonal values have been compressed, the histogram curve shortened, and contrast increased. If the funnel is broader at the bottom (that is, A-shaped), contrast is reduced and the image will have less punch. In other words, the Levels tool adjusts the distribution of tonal values to form either a narrow jet or a broad spray but always using the tonal values available in the original image file. The tool cannot create and add new tonal values.
Once you’ve adjusted the levels, you can modulate the results using the Curve tool. Here, you can emphasize shadows, midtones, and highlights individually; for the Luma curve; or for all three RGB color channels simultaneously by adjusting the shape and steepness of the curve. To adjust the curve, click on it and drag the handle that appears to the desired position.

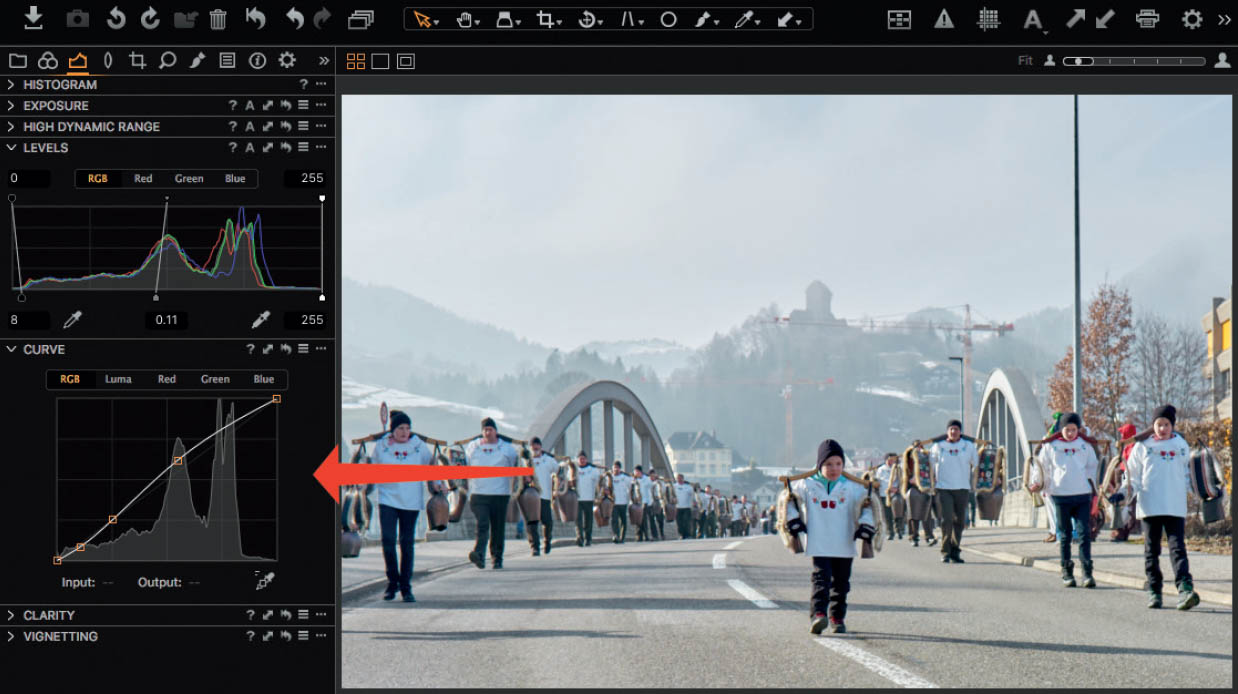
6.9 The Curve tool modulates the output values produced by the Levels tool—in this case using the Contrast: Luma preset to increase overall contrast.
QUICK TIP
The Curve tool is aimed at experienced users who are familiar with Photoshop or other high-end image-processing programs. As explained in section 5.4, the Curve tool can be used to create split toning effects that adjust image data in selected image areas. It can also be used to adjust the linear data captured by the camera’s sensor to suit human visual expectations, or used creatively to emphasize select details.
Although these are all things you can do using other Capture One tools, it’s useful to work with the Curve tool. If you’re a beginner, you can stick to using the presets provided with the program. With practice, you’ll learn which curve shapes suit which types of image, how to optimize individual images, how to develop your own styles for application to multiple images, and how to simulate the look of analog film. This will also help you to judge when the program’s other tools are suitable for the job at hand. If you keep an eye on the histogram (introduced in section 5.2) while you work, you’ll soon learn to recognize when you’ve overlooked a particular setting and when your output is likely to display banding or other artifacts.
6.3.1Correcting Exposure and Optimizing Levels
With such a wide range of tools on offer, it’s sometimes difficult to know which is best suited to which type of task. Every photographer has his or her own background and approach to processing, and some get on better than others with certain concepts. This example uses all the available exposure tools—not because it’s necessary but rather to help you decide when to use which tool in the context of your own personal workflow.
- 1. Open a tricky image. Our sample image has a dynamic range that was almost too much for the camera’s sensor—it was deliberately underexposed to preserve the sky, which resulted in the foreground being way too dark.
- 2. We began by using the tools in the Exposure tool tab to regulate the settings for contrast, exposure, and brightness as we would in the camera. The result isn’t too bad, but there are still some “problem” areas.

- 3. Increasing the Exposure setting created additional burned-out highlights, so we used the High Dynamic Range tool to tone these down until the faint cloud cover is visible again.

- 4. We’re still not quite on target. Our next step was to use the High Dynamic Range tool to open up the shadows some.
- 5. A quick look at the histogram shows that the distribution of tonal values is still not ideal and there are no really dark blacks any more, even if the overall look is well suited to the subject. We used the Levels tool to select a new black point.

- 6. Not surprisingly, the tonal values have been squeezed through a fairly narrow “funnel” and the image is now oversaturated and overall too dark. We combatted this by shifting the midtone area up and reducing overall saturation using the Saturation slider.

- 7. So far, so good. However, our image still lacks punch, so we applied the Contrast preset in the Curve tool.
If you’re thinking we could’ve used the Contrast slider in the Exposure tool to perform step #7, you’re absolutely right. There are many ways to achieve the same visual goal, but the approach you take will influence the shape of your overall workflow. Contrast settings made using the Exposure tool are handed on to the Levels tool, whereas adjustments you make to contrast using the Curve tool are not. Because any subsequent adjustments you make using the Curve tool don’t affect a whole raft of other settings, they usually produce predictable results. If you simply increase the Contrast setting, you’ll probably have to adjust any HDR or Levels settings to match. Different approaches involve more tools whereas others involve fewer. It’s up to you to decide which approach is simpler or more intelligible, or that makes the most sense in the context of your own workflow.
6.4The Clarity Tool
Clarity tools are now built into most popular raw developers. This adjustment enables you to make a lifeless image more dramatic with a single drag of the mouse. On the other hand, reducing Clarity produces a softer look that can be quite flattering in portrait shots. As usual, the secret lies in applying the right amount—too high a value quickly makes an image look artificial, and setting it too low produces an overly soft, smeared look.
The Clarity and Structure sliders alter local contrast and saturation.
The Capture One Clarity tool is more flexible than the equivalents found in Lightroom, Aperture, and DxO OpticsPro but has too many side uses for inclusion in the Exposure tool tab. It is more appropriate to make it part of the Details tool tab instead. The Clarity slider affects coarse textures whereas the Structure slider affects finer details.

6.10 The Clarity tool offers four different algorithms or “methods.” The Clarity slider adjusts the look of the whole image, and the Structure slider enables you to adjust details.
QUICK TIP
To help you understand the difference between the Clarity and Structure sliders, imagine a photo of a tree. Adjusting Clarity alters contrast between the silhouette of the tree and the background, whereas the Structure slider adjusts contrast in the finer branches and the bark (that is, local contrast within the silhouette). The Clarity tool is part of the hierarchy of tools that affect image sharpness, and the Sharpening tool in the Details tool tab is used to sharpen details that are finer than those affected by the Structure slider. See chapter 9 for more on the sharpening hierarchy.
The four Clarity methods influence how strongly the Clarity and Structure sliders affect an image. The Punch and Neutral methods affect local contrast the same, as do Classic and Natural, though those are less severe. Also, Punch and Natural increase or decrease saturation somewhat (depending on whether you use negative or positive values), with Punch doing so more aggressively. On the other hand, Classic and Natural don’t directly influence saturation, but as you’re changing image contrast with these two options, images may appear more or less saturated.
The following scenarios will help you to decide which method to use and when.

6.11 An image detail processed using the four Clarity methods. From top left to bottom right: Punch, Neutral, Classic, and Natural.
- Punch and Classic: Use for dramatic images of billowing clouds, backlit subjects, sunsets, and subjects that you select and separate from the background. Classic is a legacy Capture One method; Punch was added later due to user requests for a more vigorous effect.
- Neutral: Use to give all types of images extra verve, whether landscapes, street scenes, wildlife, or portraits. Neutral works especially well in images where you have already dialed in more contrast with tools like the Contrast slider or the Curve tool. Take care not to dial in too much.
- Natural: Use for images in which you don’t want the effect to be too obvious, such as portraits, product photos, or documentary work. Because it mostly affects local contrast, Natural is ideal for producing soft focus and blur effects. Negative Structure values reduce the visual effect of wrinkles and veins in portraits without affecting the colors too much.
It is, of course, up to you which method you use. The default setting is Natural, which is subtle enough to use with most cameras. Values from 5 to 10 are usually sufficient to give most images a slightly crisper look without falsifying colors or eliciting cries of “Photoshopped!” from viewers.
As mentioned earlier, the Clarity tool is also good for sharpening details. See chapter 9 for more details on this particular approach.
6.5The Vignetting Tool
The term “vignette” is often used to describe brightness falloff. Without delving too deeply into the theory, it suffices to say that this usage is simply wrong. A vignette is a deliberately created effect, whereas falloff is an indication of weakness in an optical system and is usually an unwanted side effect. The effect of both, however, can be quite appealing, and darker edges always steer the viewer’s gaze toward the center of the frame. Bright edges often produce an esoteric, dreamlike look.
The Vignetting tool in the Exposure tool tab is a purely creative tool. Stick to the tools in the Lens Correction tab if you need to remove soft edges and the like.

6.12 Different types of vignette affect the (emotional) perception of an image in different ways.
Capture One’s Vignetting tool has an Amount slider and three shape options, and will probably disappoint Lightroom users who are used to having more control.
The Amount slider sets the strength of the vignette in a range between –4 and +4 fstops, where positive values indicate a bright vignette. In the Method drop-down list, you can decide between circular and elliptical shapes and whether the vignette should scale to the new frame if you crop your image (see also chapter 8).
Even if it isn’t really powerful enough, you can still use the Vignetting tool to produce effects that subtly emphasize the content or message of an image. If you need more vignette shapes and tools, you’ll have to either use Photoshop or a similar image editor, or apply your effect manually using Capture One’s local adjustments. See chapter 10 for more details.

6.13 The Vignetting tool is too simple for many users.