
9The Details Tool Tab

9.1 The Details tool tab in the workflow pipeline
The Details tool tab contains nearly all the tools you need to sharpen, reduce noise, and generally pep up (or soften) your images. I say nearly because Capture One’s default settings place the Clarity tool in the Exposure Tool tab (see section 6.4). Also, output sharpening options are found in your Process Recipes, rather than in the Details tool tab (see chapter 13). More on that later.
If you prefer tool tabs to floating tool panels, you’re better off if you move the Clarity tool to the Details tool tab, which is a more logical home for it. To include a tool in a tool tab, right-click anywhere within the tab and select the Add Tool command from the context menu.
This chapter introduces and explains the Details tools in, ahem, detail. We’ll also discuss how to achieve ideal sharpness and reduce noise, and how to combine the two adjustments for each individual image. Unfortunately, Capture One cannot perform miracles, and sharpening always increases image noise.
9.1The Navigator and the Focus Tool
As its name suggests, the Navigator is designed to give you an overview of where you are in the active image. It is simple to use, with a frame that shows the current detail and an action menu for switching between zoom levels.
The Navigator helps you find your way around a zoomed image.

9.2 The Navigator is possibly the simplest of all Capture One Pro’s tools.
To navigate around a zoomed image, either click on a detail in the Navigator window or drag the Navigator frame to the appropriate position using your mouse.
In section 1.8.1, we compared the Loupe tool with the corresponding feature in Apple Aperture. The most obvious difference between the two is that the Capture One Loupe interface disappears when you let go of the mouse button. To open a “permanent” magnifying window, use the Focus tool.
The Focus tool fulfills a similar function to the Loupe cursor tool but remains positioned at the focus point you select.

9.3 The Focus tool displays a zoomed view of the detail you select using its loupe function, activated by clicking the magnifier icon at the bottom right in the Focus tool panel. The stepless zoom range covers 25–400%.
The tool is simple to use. Click the loupe icon at the bottom right in the Focus tool panel and click a detail in the Viewer or the Browser preview. Use the slider to select an appropriate zoom factor. The “head and shoulders” icons at the right- and left-hand ends of the scale toggle between 25% and 100% views.
QUICK TIP
The selected focus point remains the same when you switch between images (for example, on your model’s eye in a fashion shot). This is a great way to select the sharpest images in a sequence, especially if you’re evaluating a sequence shot you focused manually.
9.2Sharpening
Starting with version 10, Capture One finally approaches image sharpening as an all-encompassing task. This means it tackles sharpening in different parts of the workflow pipeline: Lens Corrections (Diffraction Correction), Details and Local Adjustments (the classic Sharpening tool), tools found in the Exposure tool tab and as Local Adjustments (Clarity/Structure), and in the Output stage (Process Recipe). All of these different options to sharpen your images use the data stored in your raw files—hence, all sharpening happens nondestructively, even if used creatively (e.g., for making a model’s eyes “pop” more). This also means that your sharpening results will benefit directly from improved render engines or algorithms with future Capture One versions—no need to ditch your work, just adjust your settings accordingly.
Capture One Pro 10 covers pretty much all the sharpening tasks you can think of, including those you might have accomplished with tools such as Photoshop or Nik Sharpener Pro in the past.
The plethora of sharpening options might sound confusing, but don’t worry, after the next couple of subsections, you’ll understand when and how to use what tool to improve the image quality of your photos considerably.
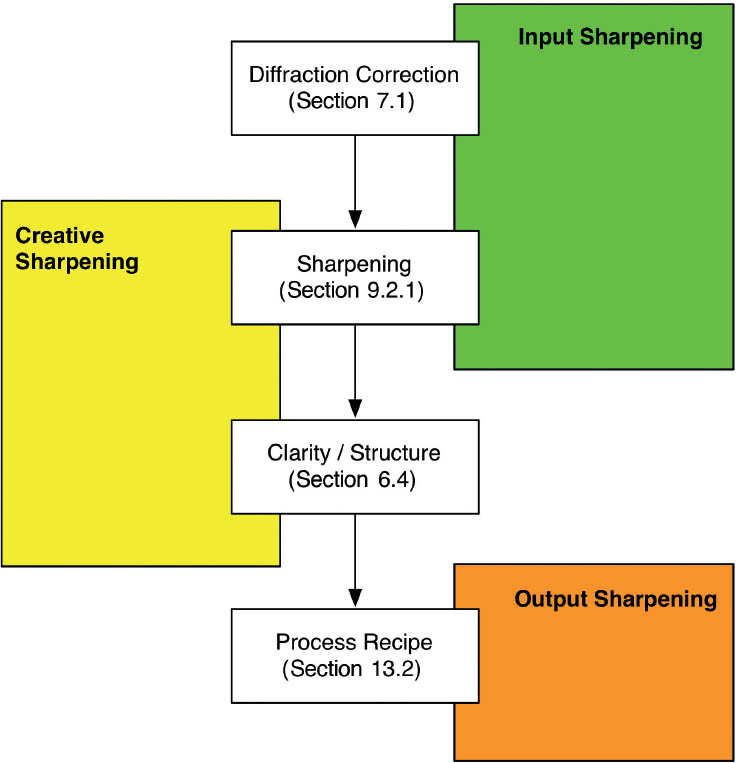
9.4 Each of your files follows the same path through Capture One’s sharpening pipeline.
There are three different stages of sharpening in photography:
- 1.Input sharpening: Reducing softness in your images due to hardware restrictions (sensor technology, lens quality)
- 2.Creative sharpening: Emphasizing specific parts of your image through sharpness, or creating an overall crisp look
- 3.Output sharpening: Retaining detail after exporting your images (usually scaled down), such as for display on the Internet (see sections 9.5.2 and 13.2)
As you can see in the diagram of Capture One’s sharpening pipeline, with version 10, Capture One finally covers all of these stages, and some of the tools deal with multiple parts of your sharpening workflow. In previous versions of Capture One, the Sharpening tool in the Details tool tab was primarily used for input sharpening, but nowadays, it’s perfectly suited for both input sharpening and creative sharpening. There are two reasons for this. First, the Sharpening tool can be used as a local adjustment (chapter 10). Second, there’s the new Halo Suppression slider, which enables you to dial in far higher values of sharpening than in previous versions. Along with the well-known tool for Clarity/Structure, you now have everything at your hands for getting the sharpest-looking images, both figuratively and literally.
9.2.1The Technical Side of Input Sharpening
Most digital camera sensors capture image data in black and white, and are only capable of differentiating between luminosity levels (that is, differing brightness). When a light ray hits a sensor pixel, the electrical charge it generates is measured and stored in a grayscale raw image file.
Input sharpening counteracts some of the technical shortcomings of digital camera sensors.

9.5 The right-hand image shows how the camera sensor “sees” the subject.
Most cameras use one of two major techniques to transform grayscale image data into a color image:
- The sensor consists of separate layers of pixels for each RGB color channel. Filters are located between the layers to prevent light of the “wrong” color from reaching the layer. The camera’s firmware constructs a full-color image from the three single-color images that result. This type of sensor is an exotic niche product and is dwindling into oblivion.
- An array of red-, green-, and blue-colored microfilters is located in front of a single layer of pixels, and each pixel records data for the wavelengths allowed through by the filter. Once again, the camera firmware constructs a full-color image from the resulting data.
Sigma cameras with Foveon-brand sensors use the multilayer approach and have a reputation for excellent sharpness, but they provide lower light sensitivity than other sensor types.

9.6 A Bayer pattern microfilter array
Sensors with microfilter arrays are by far the most widely used in today’s cameras, offering average pixel sharpness as a trade-off for greater light sensitivity. This approach requires examining multiple pixels in the immediate neighborhood of each target pixel in order to compute (interpolate) the two missing values (R&G, G&B, or R&B) that were not recorded for this pixel. Therefore, “color” image resolution is different than what it would have been if each sensor pixel had been able to record the three RGB values instead of a single value; for each pixel, only one of the three RGB values is “real” and the other two are computed (interpolated).
And this is where input sharpening comes in. Once the color data generated by the microfilter array has been combined with the grayscale luminosity data from the sensor (a process called demosaicing), the resulting image is sharpened. The raw developer software knows the precise luminosity values for each sensor pixel (rather than just the average value from two, three, or four pixels used in an image pixel) and is thus able to reconstruct a large portion of the sharpness in the original subject—ideally without producing too many additional color errors and artifacts in high-contrast areas.
Depending on the camera and sensor models involved, the various raw developers on the market produce results of wide-ranging quality, and some programs cope better with cameras from one particular manufacturer. Technological progress has ironed out a lot of these differences over the years, but most raw developers still have obvious idiosyncrasies. Capture One is said to harmonize well with the sensors used in Fujifilm’s X-series cameras and in general with the charge-coupled device (CCD) sensors used in earlier Phase One digital backs and some older Leica models.
9.2.2Understanding Sharpening in Capture One
A big part of your input sharpening needs are covered semi-automatically in Capture One. Diffraction Correction is relegated to an on/off switch (see section 7.1), and more sharpening is handled during the demosaicing process inside Capture One’s render engine. So let’s concentrate on the Sharpening tool in the Details tool tab.
This section deals with input sharpening and creative sharpening. We will discuss output sharpening in detail in sections 9.5.2 and 13.2.
The settings for Amount and Radius are pretty straightforward. Amount determines how strongly the tool sharpens, and Radius determines the number of pixels by which the tool sharpens. The Amount range of 0–1000 ensures finely differentiated sharpening settings. Halo Suppression tries to counteract artifacts that may appear in your images at very high sharpening settings. These appear as, well, a halo around high-contrast edges. Halo Suppression is a new tool to Capture One, but it worked flawlessly in the version 10 betas. If you tend to aggressively sharpen your images, keep an eye on this slider.

9.7 Similar, but not the same: Capture One’s Sharpening tool (on the left) and Unsharp Mask in Photoshop.

9.8 Halo Suppression considerably reduces high-contrast artifacts at extreme sharpening settings.
The Threshold setting determines which areas of an image are affected. The Threshold value is a little trickier to come to grips with. Put simply, it defines how little contrast there has to be between image areas before the sharpening effect kicks in. Low values equate to low contrast (that is, more image areas), whereas higher values equate to more contrast (that is, fewer, more precisely defined areas, such as edges or backlit mesh patterns).
The Sharpening tool’s defaults are “fine weather” settings designed to counteract only a little of the unsharpness caused by demosaicing. The default settings assume that you captured a shake-free image at the camera’s lowest standard ISO setting, so Capture One will only sharpen gently where ultra-fine contrast exists—that is, where fine details have probably been lost due to demosaicing.
As an example, let’s take a look at the Soft Image Sharpening 3 preset, which is designed to rescue details that have turned out too soft. The preset has an Amount setting of 300 (about 30%) for everything above the Threshold value of 0.5—in other words, nearly every pixel. The Radius setting of 2.0 ensures that the effect is generously applied.

9.9 These two images, captured with a Leica M9, show the result of applying no input sharpening (left) and Capture One’s default input sharpening settings (right).

9.10 From left to right: The results of applying no sharpening, applying the default input sharpening settings, and applying the Soft Image Sharpening 3 preset.
QUICK TIP
The aim of input sharpening is to make softer image areas crisper without creating too many additional artifacts in high-contrast areas. The overarching aim at this stage is to counterbalance the technical shortcomings of the image capture process and to prepare the image for further processing, not to apply sharpening fit for online or print output.
Creative sharpening, on the other hand, tries to mold the effects of sharpness in an image, be it locally—say, to accentuate a weird car sticker on an old-timer—or overall sharpness so an image looks “crisper” (or softer, for that matter). In Capture One, apart from the Sharpening tool, the tools you will use most often for such creative sharpening effects are Clarity and Structure. All three of these tools can be used as local adjustments; you can precisely define what parts of an image should get the sharpness treatment and what parts shouldn’t. You will learn when better to use Clarity/Structure or the Sharpening tool in section 9.5.2. We won’t deal with local adjustments just yet; for more information on Adjustment Layers see section 10.1.
9.2.3Finding the Right Sharpening Settings
Learning to find the right compromise between “sharp enough” and “over-sharpened” takes practice. If you’re preparing small images for online publication, you can simply ignore the Sharpening tool or leave the default settings in place.
The presets provided cover most situations, although they are quite general and are designed specifically for use with Phase One cameras. The following steps explain how to find and save the right settings for your particular camera:
- 1.Open a shake-free image with a low or medium ISO setting, neutral exposure, a well-defined focal plane, and no creative light and shade effects.
- 2.Switch to the 100% view and set all four Sharpening sliders to 0. Use the Navigator to find where the image is sharpest.

- 3.Drag the Amount slider all the way to the right.
- 4.Increase the Radius setting until the fine details lost during demosaicing are once again well defined. To increase the Radius setting by increments of 0.1, click in the value box and use the up/down arrow keys.

- 5. Once you’ve found the right Radius setting, switch to a dark area. This doesn’t have to be on the focal plane, since the next step is about noise rather than sharpness.

- 6. In step 4 you increased the level of visible sensor noise. Let’s now reduce this effect using the Threshold setting. Click in the Threshold value box, and once again, use the arrow keys to find the optimum value.

- 7.Switch to the Amount setting, starting with a value of 100.
- 8.Use the Navigator to shift the zoomed detail back to the focal plane and start to increase the Amount value. To adjust it in increments of 10, click in the value box and use the up/down arrow keys. Hold down the Shift key to adjust it in increments of 100, instead.

You’ve now found the optimum settings for a “normal” image. To save these settings for the camera that captured it, open the action menu (the button with three dots in the Sharpening panel) and select “Save as Defaults for. . . .” To make these settings available generally, open the Manage and Apply menu (the button with three horizontal lines) and select Save User Preset.

9.11 To reset the default values, open the action menu and select “Reset Defaults for. . . .”
IMPORTANT
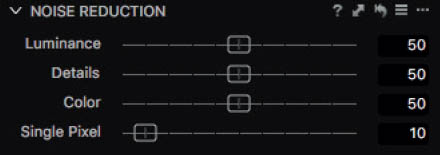
Noise reduction also influences the amount of (input) sharpening you need to apply. To find the appropriate values for your camera, set Noise Reduction to its default values (for Capture One Pro 10, this means Luminance 50, Details 50, Color 50, Single Pixel 10). This ensures that any sharpening presets you create can be more universally applied—when no noise reduction is required, you won’t need to apply as much input sharpening, but you can still use the settings for a variety of source images captured at widely differing ISO levels.
9.3Noise Reduction
The Noise Reduction sliders are largely self-explanatory. Luminance adjusts the amount of luminance noise and Color the amount of color noise, whereas Details is designed to restore details affected by the noise reduction process. The Single Pixel slider is used to reduce or eliminate “hot pixel” effects. We’ll look at these effects in more detail in section 9.4.
As with all raw developers, noise reduction in Capture One works in tandem with sharpening, and the less you reduce noise in an image, the less sharpening is required. If you sharpen a high-noise, high-ISO image, you’ll have to perform more noise reduction when you’re done sharpening.
Compared with other raw developers, Capture One offers added functionality that automatically adjusts Noise Reduction settings to suit the camera and ISO setting you use. Noise Reduction settings of Luminance 50 and Color 50 always attempt to produce a balanced-looking image, whether you used a Leica, a Canon, or a Phase One back to capture it, and regardless of whether you shot at ISO 10,000 or ISO 160. The results will always show the same apparent level of noise reduction.
Noise reduction is adjusted to suit your camera model and the ISO setting you used. This means you won’t have to use the Noise Reduction sliders much for correctly exposed images.
9.12 With a little luck, you won’t ever have to use three of these four sliders.
Capture One uses profiles in which the level of noise reduction depends on the ISO setting for all the cameras it supports. Phase One calls the process “adaptive noise reduction,” and its aim is to enable you to retain standard noise settings regardless of the ISO setting or the type of camera you use. However, you can still adjust the level of noise reduction without having to ask yourself whether a specific ISO value will cost you too much detail.
This unique approach makes it tricky to compare sharpening and noise reduction settings for different cameras. It also makes comparing the quality of Capture One’s performance with that of other programs virtually impossible. It’s quite possible that an Amount setting of 50 in Capture One reduces noise in an ISO 1600 image more than a setting of 75% in Adobe Camera Raw (ACR). In contrast, you may find that the same setting doesn’t affect an ISO 100 image at all, whereas a setting of 10% in ACR causes a significant loss of detail.
However your images turn out, you can always use the Luminance, Color, and Details sliders to fine-tune the way they look. See section 9.5 for a hands-on example.

9.13 At ISO 640, even adaptive noise reduction can’t compensate for this much underexposure.
9.4Single Pixel
Camera sensors aren’t perfect, and they often show their weaknesses in tricky lighting conditions. One of the more irritating technical shortcomings, especially in aging sensors, is the issue of “hot pixels.” These are pixels that always register a full charge and appear brighter than they should, regardless of the state of the surrounding pixels. The result is random green, red, or blue dots in your image. If you’re lucky, there won’t be many, although older cameras can have as many as several hundred.
“Hot pixels” can be removed with a single click.

9.14 Hot pixels are a sign of an aging but not necessarily broken camera.
Fortunately, the Capture One Single Pixel slider offers a simple way to counteract the effect of hot pixels.
All you have to do is shift the slider until any visible hot pixels disappear, but you have to take care finding the right value if you don’t want to affect areas without hot pixels.
Perhaps surprisingly, the best way to find the optimum setting is with the help of the Contrast slider:
- 1.Switch to the Exposure tool tab.
- 2.Drag the Contrast slider all the way to the left (–50).
- 3.Zoom in to a 100–300% view and check darker image areas for hot pixels.
- 4.Drag the Single Pixel slider to the right until the hot pixels are no longer visible. To make fine adjustments to the slider’s setting, click in the value box and use the up/down arrow keys to adjust the value in increments of 1.

9.15 Low Single Pixel values are often sufficient to eliminate the effects of hot pixels.
9.5Enhanced Noise Reduction: Details and Film Grain
Capture One includes the Film Grain tool in the Details tool tab, which may not appear entirely logical at a first glance, especially when you consider that film grain effects usually obscure fine details. So why are we lumping them together here in a single section?
The effects of noise reduction, sharpening, the Film Grain tool, and the Clarity slider are closely knit.
The answer is that Capture One’s film grain effect is not produced by simply adding noise, but rather by an algorithm that’s based on the image data that exists before sharpening and denoising is performed. This means you can recover details by adding film grain while simultaneously producing images with a more “organic” look.
9.5.1All About Film Grain
Up to and including version 7, Capture One’s Film Grain tool offered a simple “fine-grained” effect designed to retain fine details while producing a look reminiscent of analog film. The aim of the tool was to reduce the artificial, rubbery feel that plagues so many digital images and to give them a more natural, more familiar analog-style look.
Capture One’s Film Grain effect doesn’t just add noise but instead simulates the behavior of analog film in a chemical developer solution.
The tool was completely reworked in later versions. It’s still simple to use but offers a range of different algorithms that simulate various film types. Together with the Impact and Granularity sliders, you can now produce hundreds of different color and monochrome styles and fine-tune each to suit individual images.

9.16 The Film Grain effects, clockwise from top left: Fine Grain, Silver Rich, Soft Grain, Cubic Grain, Tabular Grain, Harsh Grain
The Granularity slider determines how fine the grain rendered will appear, and Impact specifies its strength. Instead of adding a layer full of random noise artifacts the way other programs do, Capture One creates its grain effects by reinterpolating the image data based on brightness and contrast, thus simulating the look of analog film. The Type setting determines the overall look and distribution of the grain pattern and how it reacts to the settings you make for the tool’s variable parameters.

9.17 The upper image has only a little added grain, whereas the lower one has more. Details in the lower image are more strongly emphasized but aren’t swamped by noise, and white areas remain white.
Black-and-white fans are sure to like the way the grain effect reacts to adjustments to exposure, just like real film. This means that monochrome images will still contain genuinely white and black areas, even if you’ve added a grain effect. ![]() 9.17
9.17
QUICK TIP
The effects of the Film Grain tool are based on the size of your original image files and work best in images destined for print output. Use the 100% view to try out the various algorithms and check the effects of your settings. If you’re preparing images for online publication and you want to retain the look you have created in the 100% view, you’ll have to increase the strength of the effect. Here’s a good rule of thumb: every time you halve the surface area, increase Impact by 30. For example, if your original file measures 5000×3000 pixels and an Impact setting of 30 produces the right effect in the 100% view, you need to set it to 90 for a version scaled to 2500×1500 pixels for web viewing (one quarter of the original surface area means you have to add 2×30 to the Impact setting). Use Recipe Proofing (the glasses icon in the toolbar) to check your settings. The Viewer will then show your images as if you had already created your output files, including your Film Grain choices.
9.5.2Producing Crisp, Natural-Looking Images

9.18 This workflow will help you produce crisp-looking images.
This section details the steps required to transform a poorly exposed photo into a usable image.

9.19 Can we transform this underexposed photo into a usable image?
Our sample image is underexposed by at least two stops and the camera was already set to its highest usable ISO level. The exposure time was long enough to produce some shake. So where do we start putting things right?
Because we need some areas with at least medium brightness to estimate where to set the white point, we begin by adjusting exposure followed by a correction to the color temperature.

9.20 There’s no point in adjusting the colors (right) until we’ve fixed the exposure (left).
The shadows in the subject’s face are still too harsh, so we use the High Dynamic Range tool to lighten them.

9.21 A reflector or fill flash would’ve produced much better results, but we’ve nevertheless managed to improve exposure for the subject’s face. The downside of this adjustment is additional noise in the shadows.
Before we deal with the noise in the shadows, we perform some sharpening, starting with the Clarity tool to improve edge definition.

9.22 To keep the edges soft enough for a portrait shot, we select the Natural Clarity method.
To gain a better impression of the effect of our adjustment, we zoom in to a 50% view. Zooming to 100% doesn’t help because we need to retain an overview of what we’re doing. We now work through the sharpening hierarchy (see section 6.4). We’ve already improved the look of the subject’s head and upper body using the Clarity tool, so we can concentrate on the details in her eyes and nose. We switch to the 100% view and adjust the Structure setting (a smaller view doesn’t provide enough detail to judge the effect of the setting).

9.23 A low Structure value of 15–40 is sufficient to emphasize the details in the eyes, ears, and nose.
The final step in the sharpening process is to fine-tune the details such as our subject’s hair and eyelashes without emphasizing her pores. To do this, we remain in the 100% view and switch to the Sharpening tool.

9.24 The Soft Image Sharpening 1 preset underscores the detail in our subject’s hair without emphasizing the pores in her skin. A small amount of Halo Suppression makes sure the hair won’t appear over-sharpened.
First, we need to reduce color noise. It is easier if you zoom in to 300% and look for a darkish area in your image. When you do this, color noise will hit you squarely in the face.

9.25 Always use the lowest possible values—reducing color noise always reduces overall detail sharpness.
We now use a relatively dark area to adjust luminance noise.

9.26 Less is more, especially when it comes to preserving detail.
Too much adjustment makes our image look artificial and textureless, so we use the Cubic Grain setting in the Film Grain tool to give it a more natural, analog-style look.

9.27 Our image is still quite noisy, but the random effect of the Film Grain tool gives it a more pleasing, natural look.
As you can see, the Film Grain tool has helped to preserve detail. As a final step, we increase the Details setting in the Noise Reduction tool to bring back some of the details our other adjustments have suppressed.

9.28 We switch back and forth between the Luminance and Details sliders until we find the right compromise between the two settings.
A few general adjustments help to consolidate the look we’ve created. (In our example: Reduce Saturation to –50 and add a strong vignette of –1.7.) Next, we prepare the image for output, using a Process Recipe optimized for printing.

9.29 The Process Recipe lets you choose between sharpening for screen or sharpening for printing.
For this book, 6 megapixels are enough. So let’s set Scale to 3000×2000 and select JPEG at 90% quality. To check the effects of your output sharpening settings, turn on Recipe Proofing. Since the image is supposed to look as “analog” as possible, use a pretty high Threshold setting to accentuate broader structure rather than fine detail. Because people don’t tend to read books with only an inch or so between their nose and the page, set Distance to 300% of the image’s diagonal.

9.30 Our unusable original has been transformed into a portrait with its own highly pleasing look and feel.
Film grain simulations use a lot of processing power. If you’re using a computer with a graphics card that isn’t supported by Capture One’s OpenCL implementation (see section 2.2), only experiment with film grain when you’re done with all your other adjustments—otherwise, every adjustment you make will take forever.
9.6Eliminating Moirés
Venetian blinds, brick walls, chain-link fences, the spokes in a bicycle wheel, and paving stones are all subjects that tend to produce moirés, which also appear in photos of tessellated patterns in fabrics. Camera manufacturers have experimented with optical, mechanical, and software-based methods of moiré prevention with varying results. All digital photographers encounter moirés at some point.
Moirés are unwanted patterns that appear when fine textures in the subject interfere with the grid formed by the pixels that make up the image sensor. Some moirés can be easily eliminated whereas others can’t be completely removed, so there’s no ideal setting for the Moiré tool.
But what exactly is a moiré? Digital images consist of data collected when light rays hit the pixels in an image sensor, which are arranged in a grid. The resulting image is rasterized, as opposed to a vector image that’s created by transforming mathematical formulas into lines and patterns. When two similar raster patterns are superimposed, the interference they generate creates unwanted artifacts in the resulting image. If the resolution of the sensor isn’t sufficient to suppress such patterns, all sorts of subjects can end up producing moirés. Because most cameras use red, green, and blue microfilters to extrapolate color data (see section 9.2), the resulting moirés are often colored as well.

9.31 This isn’t modern art—it’s just a moiré.
The Amount slider in the Moiré tool determines the degree of moiré removal. The Pattern slider specifies the degree to which the critical pattern interferes with the pixel grid in the sensor.
Moiré removal is an imprecise science and is difficult to automate. Software cannot easily differentiate between patterns in the subject and unwanted artifacts. This means that moiré removal in Capture One can be quite fiddly:
- 1.Zoom in to 100% in the Viewer and use the Navigator to locate the area affected by moirés.
- 2.Adjust the Amount and Pattern sliders alternately in small increments until the moirés are reduced to your satisfaction.
- 3.Reduce both settings a little to ensure that you don’t affect “real” patterns in the subject.

9.32 The Amount and Pattern sliders in the Moiré tool
QUICK TIP
The Moiré tool is available as a local adjustment, enabling you to apply it selectively and avoid destroying patterns you wish to retain. See chapter 10 for more on local adjustments and adjustment layers.
9.7Dusty Sensors and Spot Removal
Dust is a pain not only at home but also when it finds its way onto your camera sensor or the rear element of a lens. No matter how carefully you work, and even if your camera has an automatic sensor-cleaning feature, time and again you’ll find images with obvious dust artifacts. In addition to the LCC tool (see section 7.4) and Clone and Heal layers (see chapter 10), the Spot Removal tool in the Details tool tab will help you remedy this inescapable issue.

9.33 The Spot Removal tool
The Spot Removal tool is a Cursor tool (see section 1.5.1) but also has its own tool panel. To activate it, either click the circular button in the Toolbar or use the O shortcut. The cursor is then transformed into a kind of circular brush, whose Radius you can adjust in the tool panel or by right-clicking in the Viewer.
The tool differentiates between Dust and Spot artifacts (available in the Type drop-down list) and the brush behaves differently depending on which you select.

9.34 The Dust brush (left) and the Spot Brush (right) in the Spot Removal tool
With the Dust option, the program attempts to reconstruct the area you select using a context-sensitive algorithm. This means that the affected area is continually refreshed, even if you apply your current settings to a different image. The algorithm is designed to detect dust particles on the sensor or the rear lens element and does its job extremely well. However, it doesn’t work for complex details such as insects or blemishes in a portrait subject’s face.

9.35 The Dust Removal tool is context-sensitive and always attempts to rebuild the background. It works very well for dust but usually fails when applied to other types of artifacts like the one highlighted here.
The Spot option attempts to fill the selected area with colors and textures similar to those it finds in surrounding areas. This means you can use it to remove irregular artifacts such as insects, but only as long as the surrounding areas contain enough uniform detail.

9.36 Spot Removal works best with uniform surrounding details like the green surface of the trash can in this example.
The Spot Removal tool creates a mask that you can copy to other images, too. This enables you to remove identical dust artifacts from an entire sequence of images. Only use this function if you’re using the Dust option. Other types of artifacts don’t remain consistent throughout a sequence and can’t be reliably detected and removed by the algorithm.
The tool works the same way for the Dust and Spot options:
- 1.Select the Spot Removal tool using the O shortcut or by clicking its icon in the Toolbar.
- 2.Adjust the size of the brush circle using the Radius slider in the tool panel or the context menu and select either the Dust or Spot option in the Type drop-down menu. Click on the detail you wish to remove in the Viewer.
- 3.In the Spot drop-down menu, you can directly select the spots you’ve already applied and adjust their Radius and Type values. Click the “–” button next to the drop-down menu to remove the selected spot from the mask.
 9.37
9.37
The Spot Removal tool is great for retouching minor details but starts to leave obvious traces if you use it more than four or five times in a single image. For complex retouching, you’re better off using the Clone and Heal tools in the Local Adjustments tool tab, since those are a lot smarter. More on Clone and Heal follows in section 10.2.

9.37 You can adjust and move the spots you’ve applied at any time.
Reliably Detecting Dust on the Sensor
Detecting dust particles isn’t always easy, and you’ll often find that you discover them only when you’re editing your images, you’ve finished processing, or you’ve uploaded an image to flickr. The following steps explain how to reliably detect and remove unwanted dust:
- 1.Select an image with as much uniform detail and as little texture as possible, such as a cloudless sky. Right-click it in the Browser and duplicate it using the Clone Variant command.

- 2.Switch to the Levels tool in the Exposure tool tab and compress the tone curve by dragging the black and white point handles toward the center.
- 3.Vertical gray lines appear when you drag the handles. Drag the black and white points until these lines meet at an intersection of the red, green, and blue curves. The image in the Viewer will now have extremely high contrast but will still display sufficient detail for you to detect any dust spots.

- 4.Shift the midtone handle to the right to darken the image to the point at which you can clearly see the first few dust spots. Setting the Clarity value to 100 will help.

- 5.Switch to the Spot Removal tool and select the Dust option.
- 6.Click on each dust spot to remove it and adjust the midtone handle in the Levels tool regularly to make sure you don’t overlook any spots.

- 7.Once you’ve marked all the spots you can find, copy the mask by clicking the double-arrow button in the Spot Removal tool panel. Select the Dust option and click Copy.

- 8.Apply the copied mask to all the affected images by clicking the “Apply adjustments to all selected variants” button (the downward arrow) in the toolbar, or by using the A shortcut.

- 9.You’re done! You can now delete the cloned variant you created in step 1.
You should, of course, clean your cameras regularly. However, if you can’t do so immediately because you’re on the road or busy shooting, save the spot removal mask. You can’t save the mask as a Preset, so you need to go the User Style route. To do this, switch to the Adjustments tool tab, click the “+” button, and select only the Dust item in the Details section before clicking Save. See chapter 11 for more on saving and applying User Presets and Styles.