
10 The Local Adjustments Tool Tab

10.1 Local adjustments are made on a new layer that’s added to the image you’ve already edited, so you should usually perform them at the end of the workflow pipeline.
Local adjustments have been available in Capture One for a while now, enabling you to apply effects to selected areas on a separate image layer. In addition to White Balance (see section 5.3), for example, the Local Adjustments tool tab also includes Sharpening and Noise Reduction tools (see chapter 9); you can use the Curve tool selectively; and there are separate Clone and Heal controls, too. These tools enable you to perform simple retouching on a raw data level so you’ll have to export your images less often to Photoshop or other programs for further processing (see section 15.2).
This chapter introduces working with layers and masks in Capture One. We’ll discuss how to handle layers in general, as well as the types of adjustments you can make with them. We’ll also take a look at Clone and Heal layers and show you how these can replace tasks you’d normally have to perform in Photoshop.
10.1Adjustment Layers and Masks
Layer functionality enables you to keep your editing steps organized and apply creative effects to selected image areas. Layers are an essential part of most contemporary image editing processes.
Local adjustments in Capture One are facilitated using masks stored on separate image layers.
Capture One’s Local Adjustments functions are based on the same principle, enabling you to precisely select the area an adjustment affects. For example, you can increase exposure for some areas while retaining the original exposure levels in the rest of the image. Layers also make it simpler to organize individual editing steps, and you can superimpose your adjustments or switch their effects on or off as necessary. A clear layer-naming scheme also makes it easier to keep track of the individual steps you’ve applied.

10.2 Layers enable you to perform individual editing steps separately and tweak, show, and hide them as necessary.
Layers enable you to apply adjustments locally, using a brush to “paint” your adjustment into the image—or, more accurately, you mask specific areas with the brush and apply your tool(s) of choice to the masked areas.
The list of tools that can be applied locally is growing all the time and consisted of the following as of this writing:
- White Balance (see section 5.3)
- Color Editor (see section 5.6)
- Exposure (see section 6.1)
- High Dynamic Range (see section 6.2)
- Clarity and Structure (see section 6.4)
- Purple Fringing (see section 7.3)
- Sharpening (see section 9.2)
- Noise Reduction (see section 9.3)
- Moiré (see section 9.6)
- Curve (see section 6.3)
These are, of course, all tools that it makes sense to apply locally. Vignetting (see section 6.5) and lens corrections (see section 8.3), on the other hand, are tools that are designed for application to the entire image.
Let’s look at an example based on White Balance settings. It’s likely you’ve captured images using mixed natural and artificial light sources, or ones in which sunlit and shaded areas are of equal importance. The human brain can compensate automatically for such complex lighting conditions but camera sensors can’t.

10.3 White balance in the left-hand image is set for the sunlit part of the frame. In the version on the right, it’s set for the shadows. The image in the center shows the result of applying a local white balance adjustment.
Local adjustments present virtually endless editing options. For example, to remove a red-eye effect, all you have to do is select the subject’s pupils and adjust Saturation for the selection to –100. To emphasize lips, simply select them and increase the Clarity setting. To remove wrinkles, mask the face and reduce the Clarity and Structure values accordingly. As an alternative to the color key method described in section 5.6, you can mask the image area you wish to tone, invert the mask, and desaturate the rest of the image to black and white. In addition to limiting the effects of your adjustments, local adjustments are fantastic creative tools.
IMPORTANT
Each version of Capture One adds more tools for you to make local adjustments. These tools are marked with a small brush behind the tool’s name inside the Local Adjustments tool tab. They are not the same as the “normal” tools they mimic. They have the same options and features, but they work independently from settings you make in the usual way. If you want to change White Balance in a local adjustment layer, for example, you need to use the “brush version” of the White Balance tool, not the “normal” tool. Tools without the brush icon always edit the background layer (i.e., the whole image), and never a selected layer’s mask.

10.1.1Create and Manage Layers
The easiest way to create a new layer mask in Capture One is by using the Local Adjustments tool. Clicking the plus icon will add a new adjustment layer, and clicking and holding the icon will let you choose to create a clone or healing layer instead.
You create new layers using either the Local Adjustments tool or the Color Editor.

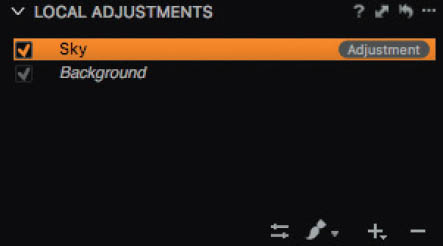
10.4 For adding or removing layers, you most often will use the Local Adjustments tool found in the tool tab of the same name.
Another way to create an adjustment layer is with the Color Editor. Choosing Create Masked Layer from Selection in the tool’s action menu opens a new adjustment layer that contains a mask made up of the color range you previously selected in the Color Editor.

10.5 You can create a new adjustment layer right inside the Color Editor—for example, if you want to quickly mask a sky to edit it separately, so you can change exposure settings or use higher levels of noise reduction than would benefit the rest of the image.
Layer creation might be powerful, but managing your layers is a pretty rudimentary thing in Capture One. You can delete layers by clicking on the minus icon, give them sensible names, change their order, or disable individual layers as needed via the checkboxes. But that’s about it. You can’t group layers or nest one layer inside another one. Also, you can’t copy an individual layer to another image. The tool’s action menu hides only simple layer transformation options, such as Invert Mask and Copy Mask, from another layer of the same image.

10.6 Management of your layers and masks is easy because there aren’t very many options to choose from.
QUICK TIP
Capture One might not allow you to copy and paste individual layers between images, but you can still copy and paste all layers in one go with the Adjustment Clipboard. Simply deselect or delete the layers you don’t need in the target image.
10.1.2Masks, Brushes, and Brush Options
You created a number of adjustment layers, so what now? It’s time to create the masks—i.e., define the areas in your image that you want to adjust. There are two different ways to mask your image in Capture One:
To mask your images, you need to use either the brush and eraser, or a gradient mask.
- 1.Brush and eraser
- 2.Gradients
Let’s look at the brush first. You activate it either with a click on the brush icon “Draw Mask,” or by hitting the B keyboard shortcut. The brush’s companion is the eraser, activated via a click-and-hold on the brush icon or with the E keyboard shortcut. A click-and-hold on the brush icon will also reveal mask display options: should the mask be visible at all times, or not visible at all (keyboard shortcut M)? And do you want to see the selection points that indicate where your brushstrokes are?
QUICK TIP
The B (brush), M (mask), and E (eraser) shortcuts make it simple to work on an image without having to use your mouse or graphics pen to switch the cursor function. And by the way, a graphics tablet is the ideal tool for performing local adjustments, especially if you program its custom buttons with the masking shortcuts listed here.

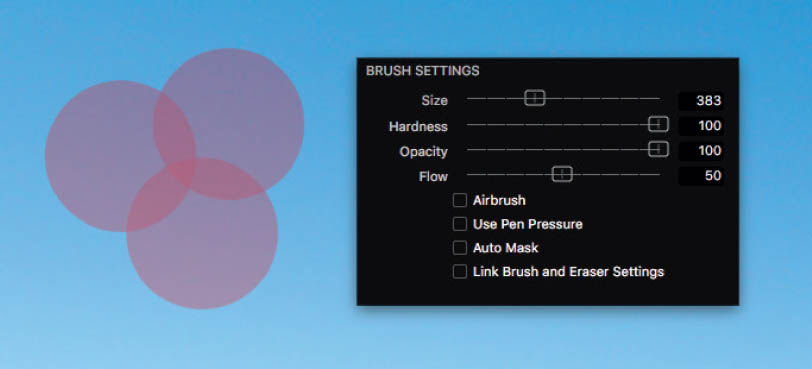
10.7 You access brush options either with a right-click in the Viewer (if the brush cursor tool is activated), or in the Local Adjustments tool.
Size and Opacity are pretty much self-explanatory. These two sliders define the size of your virtual brush and how vigorously it should paint. With Opacity at 100%, settings you make with tools such as White Balance or Exposure will also be applied at 100%. The lower your Opacity setting, the less the tool settings will affect the masked areas in your image.
10.8 Hardness defines how much Opacity should be lowered toward the edges of your brush.
Hardness is easily explained. Let’s consider real-life painting implements. A hard brush will paint lines with clear edges, almost like a ballpoint pen. A soft brush, on the other hand, will not distribute paint evenly; there will be less paint toward its edges. The Hardness setting in Capture One works the same way. The higher the setting, the harder your virtual brush. Using high values of Hardness will turn your brush into a pencil, whereas low values will result in only a small part of your brush applying “paint” at full force.
Simply put, Flow defines how quickly the build-up of your brush will happen. Does it take one, two, or fifteen clicks until you reach full Opacity? With a normal brush, the build-up happens in steps; it matters how often you click on your mask or touch it with additional brushstrokes. Here’s where the Airbrush option comes into play. Instead of using a normal brush, you’re now working with a virtual airbrush pistol. Flow literally defines the flow of your “paint” through the airbrush and the build-up happens over time, independently from how often you click your mouse or paint over an existing mask. Leave Flow at 100%, and your brushes will always apply full Opacity, regardless of whether you use a normal brush or an airbrush.
The Flow setting works best in conjunction with the Airbrush option, but both can be used individually, too.
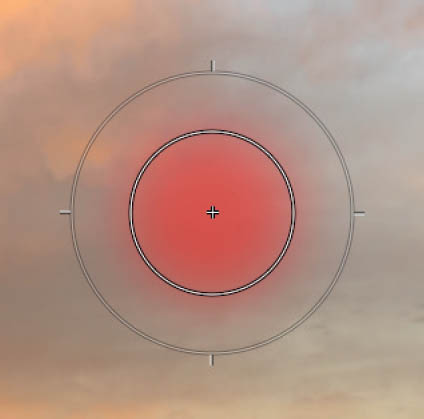
10.9 Three clicks with the mouse at 50% Flow. The brushstrokes overlap, reaching about 75% Opacity in the middle.
As is so often the case with Capture One, it’s best to simply experiment with different brush settings and options. Take some time, ten minutes or so, to play around with Capture One’s brushes. The Airbrush option works very well for touching up portraits. With different settings for Exposure and Clarity/Structure, it will almost feel like you are putting makeup on the model—to pronounce the bone structure or hide blemishes, for example. When using the airbrush, you should keep your Flow settings low—with a value of about 20, you have optimal control over your airbrush pistol.
The Link Brush and Eraser Settings option makes sure your eraser will delete masks the same way your last brush stroke applied them. If you used a brush with 80% Opacity, the eraser will only delete with 80%, meaning that 20% of the mask’s Opacity remains. If you deactivate this option, your eraser will have its own values. This is handy if you prefer the eraser to be thorough at all times, deleting the full mask with 100%, rather than lightening it up with lower Opacity settings you might have used to brush in your mask.
The Auto Mask function uses brightness, contrast, and color detection algorithms to guess where the outline of the mask needs to be. It works very well for objects with a fairly obvious outline, such as a person in front of a studio background, the sky in a landscape, or an object photographed on a light table. It’s ideal for quickly creating complex masks without having to do too much fiddly work with the eraser, and it’s so sophisticated that it notices if you accidentally mask part of an obvious outline.
The Auto Mask function makes selecting complex objects a breeze.

10.10 It only took three brushstrokes to mask the sky in this image. The Auto Mask option saves you from having to do a lot of painstaking brushwork.
QUICK TIP
Give your keyboard’s Shift key a shot: If you press and hold the Shift key while painting, the brush will draw only straight lines—horizontal and vertical. If you want to do a second stroke, pressing Shift prior to painting will connect the new stroke with the previous stroke’s endpoint. The behavior is hard to explain in words; it’s easier to understand if you try it out. Open an image, add an Adjustment Layer, Show Mask, and go for it.
Selecting the Gradient Mask option transforms the cursor into an arrow that you can use to drag a gradient in the Viewer image. This is a great tool for simulating a graduated filter or applying any other adjustment—for example, to increase Clarity from the top to the bottom of the frame or saturation from left to right.

10.11 Click-and-hold the brush button or use the G shortcut to activate the gradient mask.
The Show Selection Points option applies mainly to Clone and Heal layers, which we’ll discuss in the next section. The tool’s action menu contains commands for inverting, copying, and applying the mask to other layers.
- Invert Mask: Use this option to make a “negative selection” that you want to leave untouched when you apply an adjustment.
- Fill Mask: Use this option to fill the outline you draw with the brush. This option means you don’t have to “color in” your mask by hand. If you haven’t drawn an outline, Fill Mask masks the entire layer. This can be useful if you need to increase the value of an adjustment beyond its intended range (see section 6.2 for an example).
- Copy Mask From: Copying a mask from one of the other layers in an image overwrites the current mask. This is useful if you need to apply different tools to the same area.
QUICK TIP
The degree of precision required in a mask depends on which tool you’re using and the content of the image you’re editing. Generally speaking, masks for dark areas don’t need to be as precisely drawn as those in brighter areas. Rough masks are fine, too, for applying context-sensitive tools like Moiré (see section 9.6) or High Dynamic Range (see section 6.2).
Let’s look at an example: If you want to brighten a dark image area, you don’t have to perform painstaking brushwork in a 100% view—all you have to do is draw a rough mask and increase the Shadow value in the High Dynamic Range tool. If, on the other hand, you want to apply an Exposure adjustment to the same area, the mask needs to be more precise from the start, because the tool’s effect doesn’t take the surrounding pixels into account. If you need to darken a light area using the Exposure tool, the mask needs to be very precise indeed, whereas it can be a little rougher if you use the Highlight Adjustment in the High Dynamic Range tool (although it still has to be more precise than the one you use to brighten shadows). Whichever tools you use, the stronger a local adjustment, the more precise its mask has to be.
Improving Suboptimal Lighting in Landscape Shots
If you don’t happen to be shooting in the midday sun, landscape images are often difficult to capture as you remember them. Contrast is usually too great to be covered by the sensor’s dynamic range, and exposing for medium gray produces either shadows that are too dark and/or burned-out clouds. Using subtle HDR adjustments to correct a situation like this often yields unnatural-looking results. You could use an averaged White Balance setting to balance out the shadows and highlights, or apply a greater Clarity value to foreground, or whatever other adjustments appear to make sense.
The following steps demonstrate many (but not all) of the available local adjustments and are aimed at helping you to learn to “think locally”:
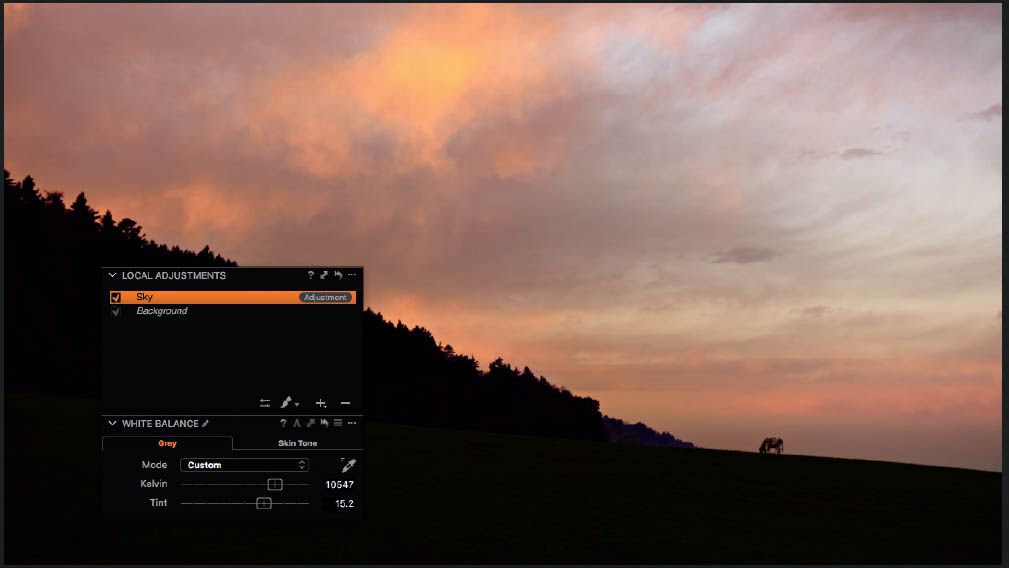
- 1.Our sample shows an early-morning scene that we slightly overexposed to retain as much image data as possible. The resulting image has little to do with how we remembered the scene, and the following steps are aimed at restoring the original dramatic mood of the sky without making the rest of the image look like an LSD trip.

- 2.We begin by making basic adjustments to exposure and the crop. It quickly becomes apparent that we can’t set white balance to reproduce the dramatic red sky of the original scene while retaining detail and a cooler look in the shadows.

- 3.We switch to the Local Adjustments tool tab and click the “+” button to create a new layer that we call Sky.
- 4.We select the Brush tool and check the Auto Mask option in the Viewer context menu. Leave Flow and Opacity at 100%.

- 5.We activate the Always Display Mask option using the M shortcut (this option is also available in the click-and-hold brush menu).

- 6.A right-click in the Viewer opens the Brush settings menu, and adjusting the settings alters the shape of the cursor to match. Brushstrokes we’ve already made are not affected. When you’re done, fine-tune the mask with the eraser. The eraser also works with Auto Mask, making necessary corrections a breeze.
- 7.With the mask complete, we use the M shortcut to hide the mask and select the Background layer in the Local Adjustments tool panel. We now adjust the White Balance setting in the Color tool tab to give the foreground the cool look we remember. At this point, we ignore the effect of our adjustments on the sky.

- 8.We select the Sky layer in the Local Adjustments tool tab and adjust the White Balance setting to taste.
- 9.To finish up, we use other tools such as Clarity, Exposure, and Saturation to adjust the sky so it looks just as dramatic as we remembered it. Then, we switch to the Background layer for final exposure tweaks to get the balance we are looking for between the sky and land.

You can, of course, add more layers to process other details the same way analog darkroom specialists dodge and burn individual areas in a print.
As of this writing, Capture One supported up to 16 layers—a number that has already been significantly increased thanks to user feedback. Of course, you don’t have to use all the available layers, and each new layer uses more processing power, so some computers will slow down to a snail’s pace before you can create more layers anyway. But, even if you’re working on a top-flight computer, applying too much of a good thing often produces the opposite of good. Ask yourself if you really need all the layers you’ve added. Even hundreds of layers can’t rescue a badly exposed or poorly composed image.
10.2Clone and Heal Layers
The addition of Clone and Heal layers was one of the most significant changes with Capture One 8, and Phase One continued to improve layer functionality with later versions. You’re probably already familiar with this kind of functionality in programs like Photoshop—instead of simply “painting over” details in an image, the Clone and Healing Brush tools enable you to copy and blend source pixels with the surrounding pixels in a selected target area.
The Clone and Heal tools have similar effects, although the Clone tool simply copies image content whereas the Heal tool blends the color and brightness of the source material with the surrounding pixels in the target area.
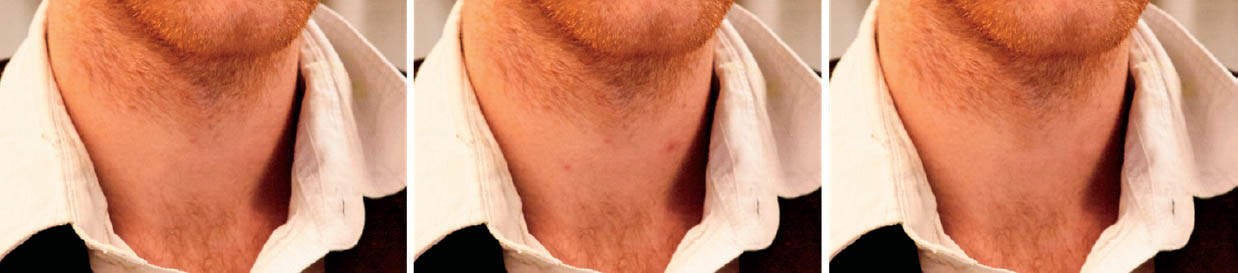
10.12 The center image repaired using a Clone layer (left) and a Heal layer (right)
Capture One offers the same functionality for application to raw data, thus saving you the trip to Photoshop and back when you need to make minor repairs to your images.
Did I say minor repairs? The fact is, full-blown image-processing programs like Photoshop support many more layers than Capture One, enabling you to split complex retouching work into multiple substeps that you can refine, undo, and reorder as necessary. Try to estimate whether Capture One’s layers will suffice before you start editing an image. If, after an hour or so of work, you notice that you’re running out of layers, you’ll have no alternative but to switch to Photoshop (or whatever program) and start over.
Clone and Heal layers are applied as follows:
- 1.Click-and-hold the “+” button in the Local Adjustments tool to create a new repair layer and select the appropriate tool from the drop-down list.
- 2.Hold the Alt key and click the source point in the Viewer.

- 3.If necessary, open the Brush Settings context menu to adjust the brush size.
- 4.Use the brush to apply the source material to the target area.

To move the source or the target, click and drag the corresponding handle in the Viewer image.
The Clone and Heal tools are relatively new (introduced in Capture One 8) and are still in active development with version 10. You cannot yet adjust the size of the source. However, you can expand the target area by adding brushstrokes, or reduce its size using the eraser. You cannot alter the Hardness or Opacity value of the mask once you’ve drawn it. This limitation is, however, simple to work around, too—all you have to do is create a new layer with the right settings and delete the old layer. This approach becomes really annoying when you’re performing very fine retouching work, though.
Using low Hardness and Opacity values and adding brushstrokes to increase the effect of the mask gives you plenty of control, and you can always remove unwanted masked areas using the eraser. Because you have to redraw the mask every time you want to adjust its settings, finding the right values can be quite laborious.

10.13 The eraser works the same in Clone and Heal layers as it does in Adjustment layers. You can choose to either link its settings to those of the brush, or use separate settings via the context menu. This way, you can lighten up a masked area, toning down Opacity and thus how severe cloning and healing appears in the final image.