
11 The Adjustments Tool Tab
In the chapters thus far, we’ve discussed User Presets, looks, and “adjustments” (that is, tool and metadata settings). The Adjustments tool tab is where you can manage all of these things and create new styles to apply to your images.
Many of the concepts discussed in the following sections are available at various stages in the Capture One workflow. Every tool has a double-arrow button for copying settings, the Import Images dialog gives you access to your User Presets, and the Adjustments menu gathers all your styles and presets together in one place. Because they’re available at every stage in the process, the tools in the Adjustments tab don’t have a specific position within the workflow.
11.1Styles and Presets: Basics and Differences
As explained in chapter 1, Capture One’s nondestructive approach to raw development enables it to apply tool settings to an original image in real time without affecting the original image file. What the software actually does is interpret the settings you make in the context of the currently selected image. The settings themselves are stored either as part of a catalog or in Session mode, in separate files (see section 4.2). The Adjustments tool tab gives you a meta-interface for handling all of these settings. You can’t change them, but you can bundle and copy them, and apply them to other images. ![]() 11.1
11.1
Presets affect individual tools, whereas styles are collections of settings that can be applied using any tool.
What exactly are styles, presets, settings, and adjustments?
- Settings and adjustments are the individual values that you enter using the keyboard or adjust using a tool’s sliders. Examples are the Saturation value in the Exposure tool, a Keystone adjustment, or the Creator metadata field.
- Presets are saved settings or sets of settings that apply to individual tools. For example, you could save a Saturation setting along with a Contrast setting in the Exposure tool, and then call the resulting preset chic; save a Keystone adjustment for application to an entire series of images; or combine the Creator, Address, City, Postal Code, and Email metadata fields in a preset called Contact Data.
- Styles bundle settings made in multiple tools and enable you to apply them simultaneously to produce a specific look. For example, you could combine Saturation and Contrast settings in the Exposure tool with a Structure setting in the Clarity tool and a Curve adjustment to produce a style called ultra-chic. Keystone plus Black & White might end up as Wide-angle monochrome sequence, May 2017. The Metadata fields listed earlier combined with a keyword for a lens could produce a style called Standard Nokton Import (in this case, for a lens whose name isn’t saved with the EXIF data in your images).

11.1 The Adjustments tool tab lists all the adjustment options for all the available tools.
Capture One has a range of built-in presets that you can select in each tool’s Manage and Apply menu (the one with the three horizontal lines), while you manage built-in styles via the Styles section of the Adjustments menu.

11.2 These are the built-in presets for the Color Balance tool. Presets are located in the menu highlighted in orange.
The terms “style” and “preset” sound very much as if they are things that influence the visual look of an image, but what they actually do is describe in general terms how Capture One has to treat an image file. Multiple metadata items that you wish to apply simultaneously (see chapter 12) are just as much a preset as the naming settings you make in the Import Images dialog (see section 4.4) or settings you save in process recipes (see chapter 13). Styles and presets are saved as text files that contain records of everything that you can tweak, set, or adjust in Capture One. See section 11.3 for more details on organizing your styles and presets.
11.2Saving, Copying, and Applying Presets and Styles
Presets are saved in the corresponding tool using the Presets menu.

11.3 The Presets menu for the Black & White tool offers a wide range of built-in presets.
Selecting Save User Preset opens a dialog in which you can choose which of the tool’s settings you wish to save. Once you’ve made your choices, click Save to save your preset and give it a meaningful name.

11.4 Creating a Black & White preset with conversion and filter simulation enabled but without the Split Tones settings (see section 5.5)
To save presets for multiple tools as a new style, switch to the Adjustments tool tab and select a processed image in the Browser. Select the Save Style option in the tool’s action menu to open a list of all the settings you’ve made for the selected image. ![]() 11.5
11.5

11.5 By default, Capture One automatically selects all the settings you’ve altered. However, you can use the Save Style dialog to deselect settings you don’t want to include in a style.
QUICK TIP
To make styles useful in a larger variety of situations, try not to save too many settings and instead concentrate on the core idea that you want the style to embody. Deselect settings that you’ll probably have to adjust individually anyway, such as exposure. If you’re in any doubt, deselect more rather than fewer options. And take care with your metadata—for example, not all images that you apply a black-and-white style to will require the same keywords, color tags, and ratings as the original you used to create your style.
In its default setup, the Adjustments tool tab contains the Styles and Presets and Adjustments Clipboard tools.
The Adjustments tool tab is the place where all presets and styles can be viewed, sorted, combined, fully or partially copied, and applied.

11.6 You select styles and presets to apply in the hierarchical listing of the Styles and Presets tool. To save a new style, use the action menu.
Stack Styles (in the Styles and Presets action menu) is an important option that you can also access via each tool’s Presets menu or the Adjustments > Styles menu. Activating it enables you to simultaneously apply multiple styles or presets—for example, a monochrome conversion style combined with a custom denoising style and your copyright metadata.

11.7 Stacking styles means activating multiple styles or presets in a single image. The styles you select are listed in the Applied Styles section of the Styles and Presets tool, where a brush icon indicates a style and the familiar icon with three horizontal lines indicates a preset.
The Adjustments Clipboard tool displays any settings you’ve copied using the double-arrow button in a tool’s title bar.

11.8 The Adjustments Clipboard tool displays the settings you’ve copied from an image to the Clipboard, not the settings for the current Browser image or a style you’ve selected using the Styles and Presets tool.
To get an idea of how the Adjustments Clipboard works, let’s take a look at the action menu in its title bar.

11.9 The action menu contains options for altering what the tool displays and how it functions.
The Autoselect Adjusted option is activated by default. This means that clicking the Copy button selects all the settings you’ve adjusted in the course of your work. The Expand All and Collapse All options expand or collapse the settings lists, Select All and Select None are self-explanatory, and Select Adjusted is the manual version of Autoselect Adjusted.
You can copy settings to the Clipboard in one of three ways:
- Right-click in the Browser and select the Copy Adjustments command. This copies all settings you’ve adjusted. The same command is also located in the Adjustments menu.
- Click the Copy button in the Adjustments tool tab to copy the settings checked in the Adjustments Clipboard tool from the currently active Browser image.
- Click the double-arrow button in any tool’s title bar to open a dialog in which you can select the settings you want to copy.
The Copy button copies your current settings to the Clipboard and therefore to the Adjustments Clipboard tool, too. The Apply button applies the copied settings to the selected image(s).

11.10 Clicking the double-arrow button in any tool’s title bar (shown here in orange in the Color Balance tool) opens a dialog in which you can select the settings you want to copy. If you want to copy all the settings from an image without showing the selection dialog, press the Alt key while you click the double-arrow button.
Copying and Applying Settings, then Saving Them as a Style
It is tricky to put the way the Adjustments Clipboard works into words, but the following steps should help you learn how to use it and also decide when you’re better off using context menus and the double-arrow button. This example uses a Black & White style to demonstrate the principles involved:
- 1.Select your image in the Browser and switch to the Adjustments tool tab.

- 2.Use the Select None option in the action menu to deselect everything and activate the Autoselect Adjusted option.

- 3.Click the Copy button at the bottom of the Adjustments Clipboard tool panel. All the selected adjustments are now available on the Clipboard.

- 4.As well as the Black & White adjustments, these include Filter, Levels, Clarity, and Vignette settings. If you’ve added color tags or keywords, or if you’ve already cropped your image or adjusted its exposure, deselect these types of settings and any others that are too specific for application to other images (or to serve as the basis for a style). Be sure to retain the settings that most strongly influence the overall look of your image.
- 5.Hold down the Cmd/Ctrl key, and then select the images you want to apply your new style to.

- 6.Click the Apply button, and the selected images will be displayed in black and white in the Browser.

- 7.Select the Save As Style option in the action menu, give the style an appropriate name, and click Save. This approach saves you from having to use the Save Style dialog and reselect your settings (this already took place in step 4).

This method is ideal for applying settings to sequences of images. The differences between this and the conventional context menu/double-arrow button technique are that you can a) copy settings from multiple tools onto the Clipboard, and b) select only the settings that it makes sense to apply. If you want to copy and apply settings from one specific tool, you’re better off using the double-arrow button. This allows you to select the settings that you really want to copy without having to scroll through a huge list of other settings in the process.
11.3Organizing Styles and Presets
If you save a lot of styles and presets, swap presets with other photographers, or purchase ready-made libraries of styles from resources such as captureonestyles.com, it’s all too easy to lose track of your options.

11.11 Importing style libraries using the Import command in the Styles and Presets action menu makes the Clipboard list and each tool’s Presets menu even longer and more confusing to use.
Unfortunately, Capture One has no functionality for reordering, renaming, or creating folders for your styles and presets yet. As of this writing, you can only import, create, save, and delete them.

11.12 If you touch a style or preset with your mouse without actually selecting it, Capture One automatically updates the preview in the Viewer and the Browser. This makes scrolling through many styles a lengthy process.
As previously mentioned, styles and presets are files saved within your Capture One installation, so the best way to organize them is at the operating system level.
Styles and presets are stored in two folders: Styles and Presets60. These can be found at the following locations:
From the operating system’s point of view, style libraries are stored in two folders with an unlimited number of subfolders.
- Mac: /Users/[user-name]/Library/Application Support/Capture One/
- PC: [drive]:Users[user-name]AppDataLocalCapture One/
Presets and styles are indicated by the .copreset and .costyle filename extensions. It doesn’t matter to Capture One how these files are organized as long as they’re contained in one of the two folders (or their subfolders). Presets only work with the specific tool they’re created for, and Capture One automatically stores them in an appropriately named subfolder.

11.13 The contents of the Presets60 folder, showing the subfolders for the individual tools. You can create additional subfolders to help you keep track of your presets.
IMPORTANT
Never change the names of the tool folders. If you do, Capture One will no longer be able to find your presets. However, to make life easier you can create as many subfolders as you like within each tool’s folder.
The best way to organize styles and presets is to create subfolders and give your styles and presets meaningful names:
- 1.Quit Capture One.
- 2.Switch to the application folder in the Finder or Windows Explorer. Our example uses a Mac.


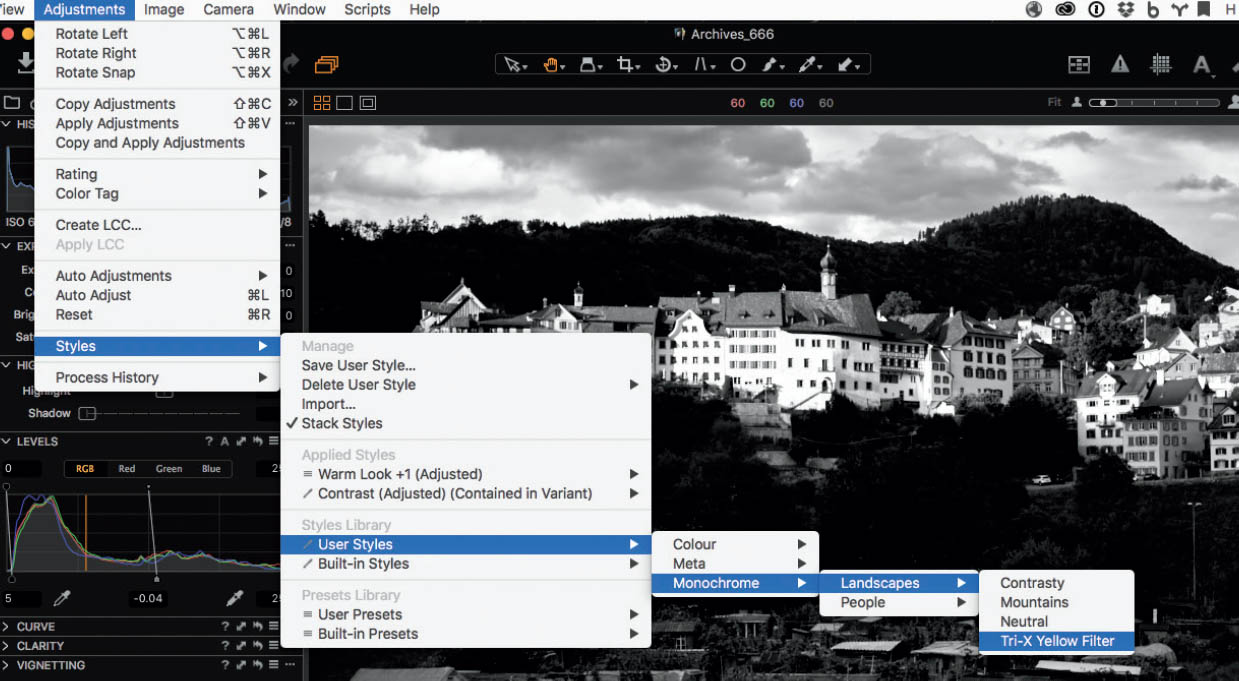
- 4.Create sub-subfolders to group related styles and keep the names short and sharp. For example, Monochrome is better than Black and white for use with portraits of people.

- 5.You can nest as many subfolder levels as you like. In our example, I’ve separated the black and white styles into “portrait” and “landscape” style types.

- 6.Once you’re done, restart Capture One. Your new structure will be made available in all the places where you usually select styles and presets.
QUICK TIP
Don’t create too many subfolder levels. If you nest your folders too deeply, at some point you’ll overshoot the width of your monitor, making things just as confusing as they were before you began sorting. I’ve found that two sublevels are usually enough.
If a subfolder contains a large number of styles or presets, it helps to number them. By default, Capture One orders these files alphabetically, so a style called 1-monochrome will appear before one called color-1 in the program’s menus and drop-down lists.