
12 The Metadata Tool Tab
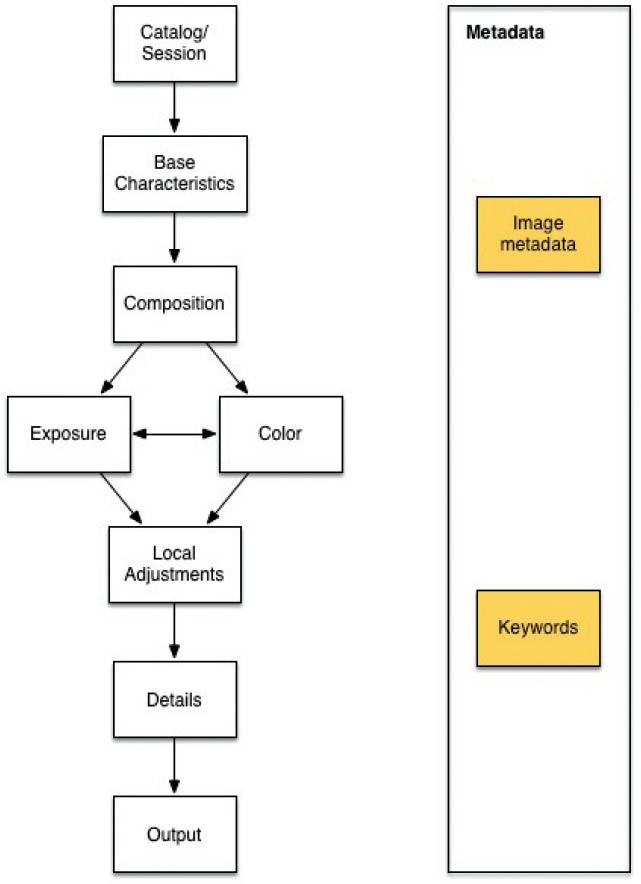
12.1 You can work on metadata during image import/processing or shortly before (or after) the output stage. This is why I’ve placed the metadata tools outside of the workflow pipeline.
To put it politely, Capture One’s metadata management tools had been fairly rudimentary since its inception. This is due to the program’s origins in raw conversion for studio photographers—Phase One assumed that you’d manage your data using a dedicated media database or DAM system and that Capture One didn’t need its own metadata management tools. Even selecting key images took place without the use of metadata, and even today, you can use a keyboard shortcut or a menu command to include images in a session’s Selects folder (see section 4.2). If you require more management functionality, you can always turn to the Phase One Media Pro package. This was the reasoning up to and including Capture One 8.
Today, though, Capture One 10 is comparable with its competitors in terms of its tool sets for metadata management. And it’s still improving—future point-releases of Capture One will focus on added metadata functionality and improvements in metadata handling. Compared to that of a full-fledged DAM system, Capture One’s metadata management functionality may still be in its infancy, but it’s growing up fast. Most users looking for a simple way to manage their image libraries will find Capture One up to the task.
Today, Capture One’s metadata management and editing functionality has finally caught up with that built into Lightroom and Aperture.

12.2 Metadata you edit in the Metadata tool tab is saved either in the catalog/session and XMP sidecar files or only in the database files within the catalog/a session’s own sidecar files, respectively. For more on metadata synchronization, see sections 1.7.2 and 4.9.
12.1Applying, Copying, and Deleting Metadata
The Metadata tool tab is divided into Metadata, Keywords, and Keyword Library sections. Let’s start with a quick overview on keywording and leave the Metadata tool alone for the moment. Capture One provides two ways of assigning keywords:
- 1.Select an image in the Browser, type keywords in the Enter Keywords field, and press Return.
- 2.Switch to the Library tool tab and drag images from the Browser to existing keywords in the Filters tool (or enter a new keyword or place using the “+” button).
When you use method #1, Capture One will add new keywords to all images selected in the browser—if you remember to enable the “Edit selected variants” option in the toolbar. This is different from previous versions, in which only the primary image received added keywords and you had to copy/paste the keywords to other variants via the Apply tool. You can delete single keywords from multiple image files in one go, and even arrange them at will.
In short, the keyword horrors so often discussed in web forums, blog posts, and articles are finally a thing of the past. If you are new to Capture One, you might not appreciate how big of a deal this is. Just as an illustration, this new keyword functionality was Phase One’s main marketing approach for selling upgrades to Capture One Pro 9. Yes, keywording in Capture One used to be that dire. You’ll learn more about the keyword tools in the next section of this chapter. For now, let’s have a look at assigning metadata. The Metadata tool still works as it did in previous versions, and is one of the last tools in Capture One that affects only the primary image and no selected variants. Thus, you’ll either have to copy and paste your metadata selection, such as your contact information or image category, or use method #2 described above (the Filters tool).

12.3 Using the action menu, you select which metadata fields are available in the Filters tool. You can assign metadata such as category or location to multiple images via drag-and-drop.

12.4 Dragging images from the Browser to the Filters tool is simple and works best for color tags, ratings, keywords, and place tags. This approach is really useful if you need to tag a lot of files—for example, if you imported folders full of old images into your catalog.
The metadata types included in the Filters tool can all be organized using your mouse. Add new keywords or place tags by clicking the “+” button and drag selected images to the appropriate ratings, color tags, place tags, and so forth.
Assigning Metadata Tags to Multiple Images
However impractical it may seem, you are sure to end up using the Metadata tool tab at some point. If you need to apply the same place tag, address, genre, or copyright information to multiple files, you have to copy the appropriate metadata and paste it to all the affected images. You can do this using either User Presets (see chapter 11) or the Apply Adjustments function in the Metadata tool:
- 1.Select all the images to which you want to apply metadata. They will appear with a thin border. Make sure you turned on the Edit Selected Variants option in the toolbar.

- 2.The image highlighted with the thick border is the master image, or “Primary Variant.” Write the required tags to this image (in our example, location and contact information). Navigate back and forth through the metadata fields using the Tab or Shift-Tab keystrokes. Press Esc when you are done.

- 3.Click the double-arrow button to open the Copy/Apply dialog.
- 4.Select the fields you wish to apply to your other images. By default, the program automatically selects all fields that have been edited since the image was imported. If the image contains metadata fields that you don’t want to apply—for example, color tags or ratings—deselect them now and click Apply.

All the selected images will now have the same metadata as the master image (in our case, location and contact info).
QUICK TIP
Sets of metadata tags that you rarely alter (for instance, your address or copyright information) are best saved as User Presets. This enables you to automatically add these kinds of data to your images during image import (see section 4.4) or add them to batches of images later. See chapter 11 for more on creating and managing User Presets.
12.2Working with Hierarchical and Nonhierarchical Keywords
Capture One supports keywords just like any other image management program. Keywords are descriptive terms—such as cat, beer can, or rock concert—that help you find the images you’re looking for. This section explores how to assign keywords, work with keyword libraries, and develop your own robust keywording strategy.

12.5 Assigned keywords (left) are displayed in list form in the Filters tool (right). Use the search field to find specific terms.
Basically, there are two ways to assign keywords to your images. Similar to Metadata handling, you can drag-and-drop one or more image files onto the corresponding term in the Filters tool (see section 4.6), or you can add new or existing terms using the Keywords tool by either typing the terms into the text field or choosing them from a list of existing keywords collected in sets. With Capture One 10, the second option is the preferred one.

12.6 The Keyword Library holds all of the keyword collections you’ve created inside the current Capture One catalog or session, those you’ve imported from a different Capture One catalog or session, and (controlled) vocabularies you’ve integrated into your workflow. Via the tool’s Action menu, you can export keyword sets you’ve created as Plain Text files to move your keywords to different Capture One installations or other DAM systems, or to prune and simplify your keyword choices using a text editor.
Capture One Pro bundles keywords in Keyword Libraries: sets of terms already used in either your catalog or session (called Catalog Keywords or Session Keywords, respectively); sets imported from vocabulary lists and other DAM systems, such as Media Pro; and sets you assemble inside Capture One yourself. Keyword Libraries structure your keywords, which makes it easier for you to stick with your preferred spelling and keyword choices. ![]() 12.6
12.6
You can also use the master image/selected variants method described in the previous section to apply keywords to multiple images. As of this writing, this approach does not allow you to choose which keywords you copy and paste; it’s all or nothing—copy all of the keywords assigned to the master image, and paste all of them to the secondary images. However, Capture One merges already existing keywords with the ones you copy and paste. For example, if you previously added a person’s name to an image as a keyword, the name will not be removed when you copy and paste a whole slew of different keywords from another image file to that same image.
You should develop a robust keywording strategy by sticking to the suggestions made by the autocomplete feature or the keywords you’ve collected in a Keyword Library set. This makes it far easier to stay on top of your image collection. For example, if you’ve labeled all of your monochrome images “BnW” in the past, stick with it and don’t use “BW” or “Mono” for new images. It is also a good idea to collect terms you often use in sets, such as those for animals, types of houses, or vehicles. This way you don’t have to remember what terms you used three years ago or whether to tag an image with “bicycle” rather than “bike” or, if you’re of a French persuasion, “velo.” The Keyword Library feature makes it easy to minimize keyword clutter, keeps autocomplete suggestions manageable, and helps you find specific images quickly and reliably.
Regarding keywording strategy, the first decision you need to make is whether or not you want to use hierarchical keywords. ![]() 12.7
12.7
Naturally, it’s up to you to decide which approach to use, although the type of photography you pursue will make a difference, too. For instance, it makes sense for wildlife photographers to assign keywords that match the biological classification Order > Family > Genus (e.g., mammals > great apes > bonobo). It gets trickier if you photograph subjects that are more difficult to classify hierarchically. Portraits, for example, can be classified in any number of ways: male > upper body > monochrome or wedding > happy couple > bridegroom are just two examples that illustrate how diverse such classifications can be.
Hierarchical keywords are nested and help define the content of an image more precisely—for example, pets > cat or USA > New York State > Orange County.

12.7 A hierarchical keyword system is simpler to navigate but requires more discipline at the creation stage. A nonhierarchical structure is less tidy but easier to fill out.
IMPORTANT
In Capture One’s Keywords tool, all terms are shown as bubbles—hierarchically nested keywords are split up, so the representation of keywords is “flat.” To see the position a specific keyword holds in the hierarchy, hover your mouse over the desired term, and the hierarchy will appear in a tooltip balloon. In the Keyword Library tool, all terms are shown in their hierarchical position.
Virtually any description can be nested, but the real question is whether it makes sense to you to do so. Some people like to keep things neatly structured, whereas others find labeling everything limiting. And others take issue with having to classify things to begin with and prefer nonhierarchical (flat), descriptive labels. If you decide to use a hierarchical system, you need to stick to it religiously. Mixing individual, ad hoc keywords with a systematic approach makes it extremely difficult to find all of the relevant images later on.
QUICK TIP
Regardless of whether you use a hierarchical or nonhierarchical keyword system, you should always differentiate between the genre and content of your images. Use keywords to describe content and the IPTC Category field to describe the genre. This makes it easier to find appropriate keywords and locate all of the images that belong to a specific category. Words like “lovers,” “umbrella,” “romantic,” and “dog” are keywords; “Street Photography” is a category.

12.8 To create nonhierarchical keywords with multiple terms, separate terms using commas or the Return key. To create a hierarchy, separate terms using chevrons (< or >).
Enough about theory; let’s talk about how you go about assigning keywords in Capture One Pro. As described earlier, there are two main methods: you can use either the Filters tool or the Metadata tool tab with its keywording tools. The former is ideal if you use very few keywords and want to assign existing keywords to multiple images on the fly; the keywording tools found in the Metadata tool tab are better suited for creating new hierarchical structures, adding lots of new nonhierarchical search terms, or managing huge keyword sets.
Follow these instructions to create and apply keywords:
- To create a new keyword, simply type it into the text field in the Keywords tool. The keyword is then added to all of the images currently selected in the Browser. To remove a keyword from selected images, hover the mouse over the tag and click the popup X.
- To add multiple nonhierarchical keywords, separate each term with a comma—for example: house, wood, flame, fire department. This approach is great for creating chains of associated terms that describe the content of an image. Capture One offers autocomplete suggestions whenever you begin to enter a keyword, and you can select a suggestion by using the up/down arrow keys and pressing Return. Using the auto-complete suggestions is quick and ensures that you stick to the same spelling for all of your keywords.
- If you need to create a new hierarchy from scratch, separate terms using chevrons. Use the orientation of the chevrons to indicate the direction in which you are classifying the terms—that is, if you’re classifying terms from broad to narrow use the > symbol (accident > fire > house > wooden). Here too, Capture One makes suggestions that you should follow to keep your keyword structure consistent.

Capture One supports hierarchical keywords when importing Aperture and Lightroom libraries but sometimes has issues if the keywords contain special characters, such as German umlauts or Icelandic characters. If you suspect this applies to you, import a test library before importing your entire archive (see section 4.11 for details on how to do this). If your test reveals issues, try replacing all of the special characters before you begin the import process. The other way around, Capture One saves hierarchical keywords additionally as a “flat” keywords list in XMP sidecars to prevent possible (meta)data loss. Should you switch from Capture One to Lightroom, for example, you might need to clean up your keywords afterward.
Unlike other DAM systems and library programs, Capture One allows sorting of keywords: the order in which you organize the keywords by drag-and-drop will be retained even when exporting an image using the Processing tab. Why is this worth mentioning? When uploading a processed image to flickr or 500px, for example, the order of the keywords is kept in place. You can thus make sure that keywords you value highly or that are important (say, for marketing purposes) are listed in first place, rather than alphabetically reordered or randomly listed. This can be useful even if you don’t plan to upload images to the web. Say you own and use older manual lenses and the camera doesn’t record the make, aperture, or focal length, but you want to add this information as keywords for use when searching in Capture One. Ordering the terms in a sensible way such as “Make, Model, Focal Length, Aperture” makes it easier for you to scan for these specifics.

12.9 Better than random ordering: Sorting your keywords inside Capture One makes sure that all information that belongs together stays together, even when using nonhierarchical keywords.
QUICK TIP
This chapter only scratches the surface of keywording strategies. If you want to delve deeper into the topic, I recommend Peter Krogh’s The DAM Book: Digital Asset Management for Photographers, 2nd edition (2009, O’Reilly Media). The book is based predominantly on Photoshop and Media Pro, but the strategies it discusses are just as valid for other DAM applications, including Capture One, of course.
12.3Metadata Compatibility and Third-Party Applications
To ensure the compatibility of keywords, ratings, creator information, and copyright data, Capture One uses the XMP (Extensible Metadata Platform) standard. XMP defines how metadata is saved but not the type of data.
Capture One organizes and synchronizes metadata via XMP but sticks to IPTC standards for the individual terms.
XMP was developed by Adobe to create, manage, and share metadata between multiple types of digital files and applications. Today, XMP has become an ISO standard and is widely used in commercial and open source software.
XMP metadata is usually saved in a reserved portion of a file (in the case of DNG, JPEG, PSD, and MP3 files), or in a separate “sidecar” file (as is the case with most RAW file formats). Sidecar files carry the .xmp filename extension. Because Capture One never alters your original image files, it saves metadata to XMP sidecar files or simply saves it in the current session or the library.
VERY IMPORTANT!
If your images archives contain XMP files, don’t delete them. Depending on which program you use, these tiny files contain everything from ratings and library data to face-recognition tags to complete sets of edits and adjustments. If you need to get rid of XMP files, make sure that the data they contain is saved elsewhere (in your image database, for example), and always make a backup before deleting them.
Capture One uses the IPTC Core and Extensions guidelines to define the names and permissible content of its metadata fields. It doesn’t save develop settings or Smart Album data to XMP sidecars or to the XMP data block in exported JPEG and TIFF files. This means that all common operating systems and third-party applications can completely and reliably interpret Capture One metadata.
Keywords and other metadata assigned within Capture One are saved in XMP sidecar files and can be reliably interpreted by file browsers on macOS, Windows, and Linux.
Unfortunately, the IPTC Core recommendations don’t cover all the types of data that are nowadays common to most image management programs.
Color tags are not defined, so software manufacturers have to use IPTC Extensions to cover the deficit, and this is where the confusion begins. Many manufacturers look to the market leader Adobe for guidance, whereas others assign additional numbers (1 = yellow, 2 = red, and so on) to the XMP terms or use control characters instead. As soon as programs from different manufacturers attempt to communicate, these varying approaches virtually guarantee that errors will occur.
QUICK TIP
If you use multiple programs to edit or manage your archives, don’t use color tags to indicate important attributes such as ratings or publication status. If you have to use color tags across various platforms, use a test environment to check in advance that they work with all of your software. And, need I say, make a backup!
As described in section 1.7.2, your Preferences settings determine how Capture One handles metadata and XMP sidecar files. If you decide against automatic metadata synchronization, you can still read metadata assigned using a third-party program and save new metadata in XMP sidecar files using the action menu in the Metadata tool.
You can automate metadata loading and writing to XMP sidecars for an entire session/catalog or for selected image files.

12.10 Use the commands in the Metadata tool’s action menu to reload or sync metadata.
- Reload Metadata: All metadata from the sidecar or XMP block of the selected image(s) is loaded into the current catalog or session. Any alterations you have made in Capture One will be overwritten.
- Sync Metadata: The opposite of the previous item—the current metadata in the selected image(s) is written to an XMP sidecar file.
- Reset Metadata Completions: Following a warning dialog, this option deletes the contents of the auto-complete memory.
IMPORTANT
Before you start work on your metadata, you need to decide where and how Capture One stores it. You can choose between storing it within the catalog/session or alongside your image files outside of your Capture One installation. See section 1.7.2 for suggestions on how to deal with this issue. If you need to work with keywords in multiple programs, you’ll have to use XMP sidecar files (see section 4.9 for more details).