
1Software: How Does Capture One Work?
Capture One Pro 10 is the current version of a raw developer that has proved itself in photographic studios over the course of more than a decade. It started life as an accessory program for Phase One’s medium-format digital backs and, over the years, has developed into a universal image-processing program for use with a wide range of cameras in all sorts of situations. However, Capture One still has its own particular focus and idiosyncrasies and isn’t particularly intuitive to use. This chapter addresses the underlying concepts that are most likely to cause problems for Capture One beginners and those switching from other, similar programs. Section 1.1 begins with a quick history lesson for those of you who have so far only heard about Capture One. If you’re already familiar with the program, you can move straight on to section 1.2, which is aimed at those who have an idea of what it’s all about but have yet to make a purchase decision.
Capture One wasn’t originally designed as an all-in-one software solution. In studio, media, and publishing environments, images are usually processed in Photoshop before they’re handed over to some kind of layout software. Capture One was originally conceived to squeeze the best possible image quality out of Phase One’s own cameras while making life as simple as possible for the photographer.
Capture One is not just another Lightroom or Aperture clone.
Today’s Capture One Pro is different from the original and, although its major strengths lie in professional studio shooting environments, the inclusion of support for an ever-expanding range of cameras has seen its target audience grow and grow. The toolset has moved away from its original raw developer/studio workflow base to encompass an expanding range of tools that include creative sharpening, selective processing, and spot removal—all functions that are traditionally handled by Photoshop. Version 7 saw the introduction of catalog functionality that is still not perfect but nevertheless covered many photographers’ DAM requirements. This only got better in later versions.
It’s important to keep the software’s origins in mind, especially if you’re used to the Lightroom/Aperture approach to image management and color profiles.
The software’s name includes the word “capture,” which clearly indicates the most important aspect of how it works. It’s primarily designed for capturing photos that are immediately saved on a computer, so memory cards play a secondary, backup role in the Capture One workflow. The advantages of this approach are as follows:
Tethered photo capture and meticulous color management were long the cornerstones of the Capture One philosophy.
- The art director in a team doesn’t have to wait until a memory card is full before development work on the raw files can begin. Every image is immediately available on the computer.
- If present at the shoot, the project leader or client can give immediate feedback on composition and lighting and doesn’t have to wait until later when the model has probably already left the building.
- You no longer have to remove the memory card from the camera, insert it into a card reader, and import your images. This saves a lot of time in situations that produce large numbers of extremely large files.
The program’s focus on image capture sessions resulted in concepts like using a session as a project container for storing folder locations (see section 4.1) and managing images and sidecar files outside of a database using the Enhanced Image Package (EIP) file format (see section 4.3). In other words, the program takes a highly file-centric approach. Unlike Aperture and Lightroom, which were both designed around the catalog as their central element, Capture One’s catalog functionality was added later to the basic program framework.
The studio photography workflow requires strict adherence to the International Color Consortium/Image Color Management (Windows) (ICC/ICM) color management guidelines. If you spend your time photographing fashion and jewelry using a camera that cost a five-figure sum, you’re probably producing work for magazines or advertising purposes. Capture One is designed with compatibility with various color models (RGB, CMYK, and so forth) in mind and has to be able to warn you at the raw development stage if your images exceed the color gamut of the planned output medium. It also has to deliver prepress-ready material without the use of third-party software. This approach is designed primarily with professional photographers in mind, but the benefits of a pro-grade workflow are nice to have for hobbyists and enthusiasts, too. Even if a pro workflow exceeds your initial needs, you’ll find it makes life a lot easier the more your imaging requirements grow.
1.1Basic Concepts and Features

1.1 The basic Capture One concept: raw image data development followed by nondestructive processing of the resulting images
Whatever you do with your images in Capture One, your original files remain unchanged. The program saves a log of all the adjustments you make and, in order to view, share, or publish a “finished” image, you have to output it using a process akin to making a print from an analog negative (see chapter 13).
QUICK TIP
To compare using Capture One with the creation of an analog photographic print is only half the story. The software not only enables you to make “prints” from “negatives,” it also enables you to keep your exposed “roll of film” and develop it again and again, however you wish. Although this isn’t possible using analog material, the simplified terms “negative” and “print” have become established in the digital world, too, and you’ll come across them regularly in the course of this book.
In Capture One, a “finished” image exists in the form of the original image file and its accompanying develop settings, either in the form of a sidecar file or as part of a catalog. If you decide at some point to switch from Capture One to another image-processing platform and you want to retain all the adjustments you’ve made to your images, you’ll first have to make your develop settings a permanent part of the corresponding image files. If your computer should crash or be stolen, you’ll have access to your backup image files but not to the adjustments you’ve made. Many photographers avoid such a situation by making a JPEG or 16-bit TIFF copy of each processed image as a regular part of their everyday processing workflow. The format you use will depend on the level of quality you require and the amount of available disk space.
Nondestructive processing means that images are only transformed into finished, output-ready files when you need them.
Capture One is still “only” a raw developer at heart, although each version has seen the addition of tools and functions that used to be available only in programs like Photoshop. Capture One Pro can perform each of the following tasks at the raw development stage:
Today’s Capture One is an all-in-one raw developer and image-processing package. The more processing steps you perform within Capture One, the fewer subsequent adjustments you’ll have to make to your finished images.
- Correct lens and perspective errors
- Eliminate the effects of dust on the sensor and the rear element of your lens
- Suppress the effects of sensor noise and hot pixels
- Apply basic, creative, and output sharpening
- Process color data for a range of color spaces and color models
- Convert to black and white and make creative color adjustments
- Remove red-eye and retouch skin tone
- Add watermarks to images for online publishing
- Make individual prints and contact sheets
- Manage assets
. . . and much more. Performing all these tasks at a raw level also means that you can combine multiple adjustments in any order without affecting the quality of the resulting image. For example, you can begin by reducing noise and sharpening before you correct lens errors and adjust the white point, or vice versa. Capture One applies adjustments directly to the original raw image data, which means that you can make selective changes to your adjustments later on, too.
A Sample Process
Let’s imagine you want to create a black-and-white version of an image using the Nik/Google Silver Efex software. Begin by creating the black-and-white image file in Capture One and hand over a TIFF copy to Silver Efex, where you mess around with the tone curve a little, add a vignette, and set a color filter. You’re happy with the results and save it . . .

1.2 Oops!
. . . only to discover online that you overlooked blotches in the sky. You take a deep breath and remove them in Capture One before starting over with your adjustments in Silver Efex. And then you realize that there are other specks you missed, or that you didn’t quite correct perspective properly, or that you don’t like the sepia tone you applied after all, and so on.
Performing all of these steps, including the black-and-white conversion, in Capture One saves you a lot of time and effort. All you have to do is correct each error individually—your previous steps and any you made after the one you’re adjusting are preserved without affecting the quality of the finished image.
This is the main reason for performing as many of your adjustments as possible at the raw development stage. You can, of course, use Photoshop layers to achieve a similar nondestructive workflow, but taking this approach often produces extremely large files and makes processing slower. Some steps—for example, noise reduction and lens error corrections—cannot be adjusted later in Photoshop. The moment you hand over a developed image to Photoshop, all the adjustments you’ve made so far become a permanent part of the image copy and can only be further adjusted if you’re prepared to accept a visible drop in image quality. The only other alternative is to start over.
So which major processing steps can’t be performed in Capture One yet? The list is actually quite short:
- Panorama stitching and other types of merging, such as HDRI
- Complex retouching and the cloning of image data from other images
- Automatic synchronization of images published at online sharing sites such as flickr and 500px
- Sharing of images using online services such as Twitter and Facebook
Although it has some limitations that we’ll look into in more detail in the next chapter, the scaled-down Capture One Express (for Sony) handles raw image data just like the full-fledged program. The original data remains unchanged and you have to create copies of your images to output them. The more steps you perform within Capture One, the fewer adjustments you’ll have to make to your final image.
1.2Which Version Do I Need?
This section is for those of you who haven’t yet decided which version of the program you need. The decision itself isn’t too difficult to make, but once you understand why a particular version and licensing model is the best for your particular purposes, you’ll significantly increase your chances of getting the very best out of the software.
1.2.1A Question of Licensing
As of version 8, you can either purchase Capture One outright or take out a subscription. However, unlike the Adobe CC model, which provides a comprehensive cloud environment and online disk space, the Capture One subscription model affects only how you actually pay for the software. Therefore, the first question you have to ask yourself is whether you prefer to buy or “rent” your software. Both models have their pros and cons.
The Subscription Model
A subscription gives you the right to always use the latest version of Capture One Pro. You don’t have to spend your entire life online to use this model—logging on once a month is sufficient to keep your subscription data up to date and synchronized with the Capture One servers.
Capture One isn’t cheap, so a subscription will help you keep tabs on your expenses and spread the cost of using the software. The more licenses you require, the better value the subscription model offers. Purchasing 10 standard licenses costs almost twice as much as a one-year subscription for 10 users and has to be paid immediately, so a subscription model is especially practical for smaller studios on a limited budget.
A subscription helps you keep your expenses under control.
If you haven’t decided whether Capture One is the right tool for you, you can try it for three or perhaps six months and, should you decide to use a different program after all, you can cancel your subscription at the end of any three-month period and save the difference in price between a full license and a few months’ tryout.
A subscription has downsides, too. It ties you to Phase One for its duration, and perhaps more important, Capture One catalogs and adjustments cannot be read by other image-processing programs. This means that if you cancel your subscription, you’ll either have to reprocess your images in your raw developer of choice, or create JPEG, TIFF, or PSD copies for use with your new software. You’ll also have to re-create your catalogs manually. The subscription servers don’t allow you to keep an expired version of the software on your computer even if you only occasionally need to create an image copy. If, for example, you find that a successful sequence of images that you made using Capture One has gotten lost or broken, you’ll have to take out a fresh three-month subscription in order to export your images along with the adjustments you made. The only alternative in this case is to reprocess all your images using your new software.
A subscription ties you to a specific vendor and forces you to upgrade.
System requirements can also cause trouble. For example, the Mac version of Capture One Pro 10 requires macOS 10.11 or later, so users of OS X 10.10 or earlier simply cannot use it. Similarly, the PC version requires a 64-bit OS, so users who have stuck with 32-bit, perhaps because they use peripherals that don’t ship with modern drivers, are out of luck. If future versions of the software are only compatible with certain versions of an operating system or require a specific minimum level of graphics power, you may find you have to update or even replace your computer to match, thus making it impossible to stick to a familiar running version.
Standard Full Licenses
Phase One is not planning to switch to a subscription-only licensing model for the time being, and standard licenses, too, offer certain advantages and disadvantages.
As already mentioned, Capture One is not particularly cheap, and even an upgrade can cost more than a full license for a competitive product. Over the years, using this model can cost a significant amount of money, so it’s worth taking a close look at your needs, especially if you use multiple licenses.
A single-user license is quite expensive.
Purchasing a full license makes you independent of future developments. This means if you are happy with version 10, you don’t have to upgrade to subsequent versions as they become available. If you find that version “X” no longer works with your computer or you want to use an older version to maintain your image archives, your “perpetual license” (as Phase One calls it) does the job. Freelancers and imaging studios often spend years optimizing their workflows and setting up hardware and software to suit their style of work and can’t (or don’t want to) update to the latest version.
A full license makes you independent.
Full and subscription licenses fulfill different purposes and neither model is “better” than the other. Rather than making a gut decision, take a careful look at your workflow, the hardware and software you use, and your available budget, and work out how much each model will cost over the next two or three years. Consider, too, how often you’ve upgraded in the past and whether you tend to skip some versions—perhaps you tend to upgrade only to every odd version to save on cash. Try to remain objective at this stage and only allow your instincts to take over once you’ve made that basic decision.
1.2.2Which Version Is Right for Me?
With the introduction of Capture One 8, the question of which version to use became a lot simpler to answer, as there was only one choice for most users: Capture One Pro 8. All earlier versions were eligible for an upgrade to Capture One Pro 8 for the same price—i.e., the upgrade from Capture One Pro 4 to Pro 8 cost the same as the upgrade from Pro 7 to Pro 8. With Capture One Pro 10, though, the scope of eligible versions was reduced to versions 8 and 9—i.e., if you want to upgrade to version 10 now, you need to already own a version 8 or 9 license. If you are upgrading from an earlier version, such as Capture One Pro 7, you are required to buy a full license. Supposedly Phase One decided on the wide scope with the introduction of Capture One Pro 8 to get as many users as possible on the same page. Nowadays, though, it’s as simple as that: two versions down? Upgrade possible. Older version? New license needed.
Capture One Pro and Capture One Express/Pro for Sony—choosing the right version is simple.
Users of modern Sony cameras are a special case and have the option of using a free “Express” version of Capture One that only supports those Sony cameras and comes with a reduced feature set. Look at it as if this version of the software was bundled with the camera you bought, but you need to download it. Regarding the reduced feature set, Capture One Express (for Sony) has, for example, no session mode and limited layer functionality. It doesn’t support tethered shooting (see chapter 14), and the Lens Correction tab contains fewer options than the full Pro version. Sony users can also opt to use the full Pro version “for Sony,” which, like the Express version, only supports Sony cameras and their proprietary file formats, and is a lot cheaper than the regular Pro version.
The Express version for Sony can also be upgraded to a full Pro version—say, if you also work with non-Sony cameras and don’t fancy using another raw developer for those files.
For the sake of completeness, I also need to mention the DB and Cultural Heritage versions of Capture One Pro. DB stands for Digital Back and is optimized for use with Phase One and Mamiya Leaf medium-format digital backs. This free version has functionality identical to that of the standard version of Capture One Pro but, like the Sony version, only supports the cameras it is delivered with.
The Cultural Heritage version is optimized for reproduction photography in museums and other archiving situations. It, too, has the same functionality as the regular Capture One but also offers extended support from Phase One and a range of support contracts that include additional hardware and software.
Neither of these special versions is available on the open market and won’t be mentioned again in the course of the book.
1.3An Overview of the Rendering Pipeline
In principle, Capture One works just like any other raw developer. It reads the raw image data, interprets it, and transforms it into an image that can be viewed by humans. Chapter 3 discusses in detail how your image files pass through the various modules that make up the Capture One “workflow pipeline,” but for now we’ll concentrate on a more fundamental question, namely:
How does Capture One know the color of a model’s hair or the precise shade of green produced by the rising sun shining on a meadow?
This section introduces the “rendering pipeline” and will help you understand how Capture One works on a rather basic level.
For the purposes of this book we’ll call the process of converting raw image data into a human-readable image “rendering.”

1.3 The rendering pipeline uses color profiles (shaded green) and device profiles (shaded gray) to link various processes.
Your images pass through a system made up of a series of color definitions. To interpret the raw data captured by the camera and transform it into an image that makes sense to a human viewer, Capture One requires two types of profiles. On the one hand, it needs to know about the attributes of the hardware used in the image capture process (lens distortion, sensor characteristics, and so forth) and on the other, it needs to produce realistic colors that can, if necessary, be adjusted to suit the monitor or output medium you’re using. The data for the former is found in device profiles and for the latter in standardized ICC color profiles.
The International Color Consortium (ICC) was formed in 1993 by Apple, Agfa, Adobe, Kodak, Microsoft, Silicon Graphics, Sun Microsystems, and Taligent with the aim of creating an open, system-independent standard for dealing with the digital reproduction of colors. In 2010, the standards created by the ICC became ISO standards. The ICC standard defines the format in which profiles are written but not which algorithms and methods are used to define the colors themselves.
ICC standards are governed technically by a color management module (CMM) that is part of your computer’s operating system or your image-processing software. Windows and macOS both have their own system-wide CMM, whereas Adobe products have their own proprietary CMM and the Firefox browser uses open source color management modules. Capture One is something of a hybrid in this respect, using the color management system embedded in the OS as well as its own internal colorimetric methods.
Because every color management module is different, you may end up producing quite different results from computer to computer and program to program, and this is one reason Capture One renders colors differently from programs such as Adobe Camera Raw.
All the color profiles used by Capture One are ICC profiles. This makes images processed using Capture One ideal for use in magazine and poster printing environments that usually use ICC workflows as standard. In other words, from the moment you open an image in Capture One it’s handled as part of a standardized technical environment. Capture One doesn’t have to use multiple color models and doesn’t have to convert tonal values or simulate output. Instead, it relies on standardized ICC profiles and renders tonal values using dedicated data at every stage of the development and editing process.
Capture One’s color management module and the entire rendering pipeline are optimized for use in studio and (offset) printing environments.
The downside of this high level of consistency is that the Capture One rendering pipeline has to strictly adhere to the ICC standards and color models. Adobe Lightroom, for example, is built from the ground up to process color data captured by digital cameras, making it simple to create custom camera profiles and adjust images using global HSL (Hue, Saturation, and Lightness) sliders. In contrast, Capture One is designed as part of a chain of predefined processes that encompasses the work of photographers, graphic designers, and printers.

1.4 These Lightroom HSL sliders are sorely missed by many in Capture One.
The limitations caused by strict adherence to ICC standards are often either theoretical or simply affect old habits such as use of the HSL sliders in Adobe Camera Raw. You’ll probably no longer notice the difference once you’ve become accustomed to the way Capture One works.
You won’t usually notice how Capture One processes color internally but, if you should have issues like the DNG-format special case discussed in section 1.4.2, remember that the cause is probably a system issue rather than a user error and can most likely be solved via a support question to Phase One. Section 1.4 takes a detailed look at ICC profiles and color management in general.
But let’s get down to brass tacks and take a look at how Capture One actually works. The steps involved in the rendering pipeline are as follows:
- 1. Capture One loads the original raw image data and creates preview images (see section 1.7).
- 2. The program uses an appropriate camera profile to interpret the raw data and create previews in the Viewer (see section 1.5). Some cameras have a choice of profiles, and you can select one according to the situation or your personal taste.

1.5 The built-in color profiles for the Canon EOS-1Ds. It’s up to you to decide which is best for the images you’re processing.
- 3. You can now process your images, tweak sliders, correct color casts, perform some basic sharpening, and so on. For every step you take, Capture One uses the profiles already used in the processing chain and applies your adjustments in real time.
- 4. If you want to save your images to JPEG or TIFF, Capture One uses the appropriate sRGB or CMYK Offset profiles.

1.6 sRGB or Adobe RGB? Or something else entirely? Use the tools you find in the Output tab to make your settings (see chapter 13).
- 5. When you’re making prints, you can leave color management for your particular paper to the printer driver, select a preset profile from your paper’s manufacturer, or create your own custom profile for your particular combination of paper and printer.

1.7 If you already have an appropriate profile for your combination of printer and paper, you can select it in the Printer dialog. If you don’t have an appropriate profile, it’s better to leave color management to the printer driver.
You can create your own color and device profiles or adjust existing profiles to suit your particular needs. The amount of effort involved ranges from “huge” (in the case of camera profiles) through “justifiable” (for printer profiles) to “child’s play” (monitor profiles). However you approach profile creation, the chain must not be broken! And the individual links in the chain have to be sufficiently robust if you want to achieve great results. Think carefully before adjusting profiles—if everything works out as planned, you’ll get perfect results, but you might just end up producing garbage instead.
The concept of the “rendering pipeline” will accompany you throughout the book, approached from varying points of view that suit the topics at hand. I call the combination of processing steps, program tools, and rendering pipeline the “workflow pipeline,” and chapter 3 is dedicated to explaining this term in detail. A complete diagram illustrating all the intersections and substeps in the pipeline is included in the appendix.
1.4Color Management and ICC/ICM Profiles
As mentioned, Capture One is based on ICC standards. This means that the entire rendering pipeline is optimized for the ICC-based color spaces and that ICC/ICM color profiles play an important role in the Capture One workflow. This section goes into more detail on aspects touched on in general in the previous section.
ICC profiles are embedded at various stages in the Capture One workflow, including file import, image processing, camera profiling, and output. For this model to work properly, the profile chain must not be broken. So what does this mean in practical terms?
Capture One uses ICC profiles to process color data, describe camera attributes, and prepare images for display and printing. Depending on the operating system you use, the corresponding files have .ICC or .ICM filename extensions. The two file types are interchangeable.
Color profiles provide a mathematical basis for the precise reproduction of colors. They describe devices (cameras, scanners, monitors, and printers) and color spaces (such as sRGB and Adobe RGB). Where these profiles come from and where they’re stored shouldn’t bother you in the course of your everyday workflow, as Capture One and your operating system provide all the profiles required for glitch-free image processing.

1.8 The color profiles involved in the rendering pipeline described in section 1.3
When interpreting colors, Capture One concentrates more on the final effect than on precise colorimetric results. The aim of the process is to produce images that are nice to look at, not ones that contain hues precisely calculated to several decimal places. Human perception is very different from that of machines, and it can be quite tricky to find the right compromise between images you like and ones that are empirically “correct.” Don’t worry if the colors in your test images turn out different in Lightroom or Aperture—that’s all part of what Capture One is about.
1.4.1Device Profiles and What You Can Do with Them
ICC/ICM device profiles are the most relevant in the world of photography. They describe the color sensitivity of your camera and how your printer and monitor reproduce colors. They are the only part of the profile chain that you should consider altering—camera profiles are too complex to be worth the effort.
ICC isn’t new and its tenets are deeply rooted in the history of imaging and printing. Unlike Adobe, which took a completely new approach when creating Lightroom and Adobe Camera Raw, Capture One is firmly based on ICC industry standards. If you want to create your own (clean) camera profiles, go ahead, but please note that doing so isn’t just a case of photographing a Color Checker the way you can for Adobe products. Creating camera profiles for Capture One involves coming to grips with the finer points of color profiling and a sizable investment in the necessary hardware and software. However you approach it, camera profiling is beyond the scope of this book.
The effort involved in producing camera profiles better than the ones provided with Capture One is usually much greater than the potential benefits.
With Capture One, it’s possible to use custom camera profiles in certain situations, although doing so is anything but trivial. Phase One continually invests a lot of time and specialist know-how in creating camera profiles for Capture One, and my advice is to go ahead and use the results of this investment. Color reproduction is one of the fundamental reasons for choosing one raw developer over another. If you don’t like the colors Capture One produces, you’re probably better off trying out the competition.
Things look very different at the other end of the profile chain. Even if you’re only moderately interested in producing balanced colors, always profile your printer and your monitor. This is quick and easy to do and doesn’t cost much. See chapter 2 for more details and the appendix for a selection of resources on the subject.
Appropriate monitor and printer profiles are not just nice to have, they are essential.

1.9 You can only correctly evaluate the colors in your images if you use a monitor and a printer that are profiled to match the lighting conditions where you work.
1.4.2The Problem with DNGs
Adobe designed DNG as an open, standardized archiving format, or “digital negative.” For most raw developers, DNG is akin to a standard, and if the software can read one DNG file it can usually read them all, including converted files like the ones produced by Lightroom when you use its Import DNG function. In this respect, Capture One is an exception and often has trouble handling raw image data that has been converted to DNG after capture.
What Phase One calls a “calibrated DNG” is a DNG file as it comes out of the camera. If the file was produced by a camera that Capture One supports, it comes with an appropriate ICC profile built in. Capture One handles such DNG files (for example, from Leica and Pentax cameras) like any other raw file, be it an Olympus ORF or Nikon NEF.
Capture One requires the use of corresponding camera profiles if you want to use it to process DNG files. If you don’t take this step, the software will apply a standard DNG color profile and color errors will result.
And this is where the trouble starts. ORF and NEF files can be converted to DNG, but Capture One has issues handling the results.

1.10 An Olympus raw file converted to DNG (right) shown with a copy of the same file made in Lightroom
When opening converted DNGs, instead of using the appropriate camera profile, Capture One uses the standard DNG Neutral ICC profile. Even if the file was converted losslessly, the camera profile Capture One uses doesn’t suit the converted file—color mapping is off-kilter and the ICC white point for interpolating other colors contradicts the one stored in the converted file, to name just two of the known issues. As a result, the entire rendering pipeline is disturbed.
Put simply, Capture One only supports “pure” DNG formats for which Phase One has analyzed and produced appropriate ICC profiles, or converted DNGs in which the original raw file (.NEF, .ORF, etc.) was embedded during conversion—that is, if Capture One supports the original raw file. For technical reasons, the camera profiles provided with the software don’t work with the image data stored in generically converted DNGs. Phase One provides ICC color profiles for every camera that uses DNG as its native file format, but in all other cases, you have to either stick to using your camera’s native file format, embed the original raw file during DNG conversion, or simply put up with the inconsistencies produced by the DNG Neutral profile.
This is a serious blow to Lightroom users who have converted their entire image archives to DNG without embedding the original raw files because they often cannot produce usable results when developing their images in Capture One. Until Phase One changes its mind and provides a better solution, you have to stick to the following rules when processing DNG files in Capture One:
- If you’re using Capture One as a second raw converter and you wish to save your images to DNG, embed the original raw files in your DNGs. To do this, check the Embed Original Raw File option in the Preferences dialog in the Adobe DNG Converter.
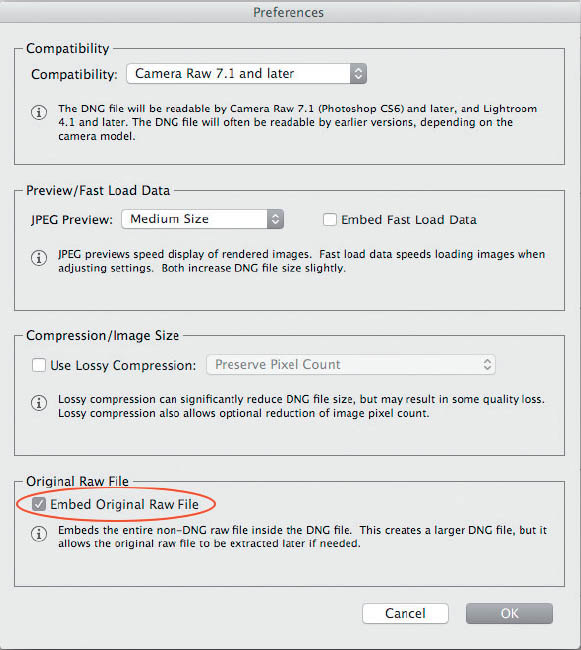
1.11 Checking the Embed Original Raw File option in Adobe’s DNG Converter produces enormous files but puts you on the safe side when it comes to ensuring that you can process your DNGs in the future—for example, if you decide to make Capture One your primary raw converter.
- As an alternative, you can create a backup copy of your original raw file before conversion—a process that’s easily automated during image import from a memory card.
- If you’ve already made the switch to Capture One and have to deal with DNG files that do not have embedded originals, you have to either create a new custom ICC camera profile for your converted DNGs or tweak the provided DNG Neutral profile using the Color Editor until the color shifts reach a tolerable level (see section 5.6 for more details).
1.5All about Panels, Tabs, and the Capture One Interface in General
Capture One can be freely configured to suit your own personal style of work. If you like a module-based approach like Lightroom, you can use the tool tabs provided with the program or create your own custom tabs with tools grouped to suit your needs. Capture One ships with a finished setup geared toward that goal: Migration (Window > Workspace > Migration).

1.12 The Capture One interface is highly configurable.
If you prefer to work with floating panels like in Photoshop, Capture One supports this, too. ![]() 1.12
1.12
To make sure you don’t get lost along the way, the following sections introduce the main elements of the user interface and some of the terms that we’ll be using frequently in this book. ![]() 1.13
1.13
- 1. The Toolbar (outlined in white): This contains tools that are often applied globally, such as the print tool; the tool for deleting files from the catalog; exposure warnings; the Focus Mask; and the Select, Pan, and Loupe tools. In tethered mode (see chapter 14), the Toolbar also shows the connected camera’s battery status.
- 2. Tool tabs (outlined in yellow): Capture One’s default settings group tools in preset tabs according to types of tasks, such as Exposure, Color, Lens, and Details. Depending on the workspace you selected and the way you rearranged your tools, tools may appear in different places in the user interface, with more or fewer tool tabs. For example, the Migration workspace already mentioned hides pretty much all tabs except those necessary to give Capture One a Lightroom-ish look and feel. In the course of this book, if you are unable to find a tool or even a tab when it is discussed, simply add the corresponding tab with a right-click in the tool tab bar (e.g., “Composition” for section 8). The Quick Tool tab features a selection of key tools to help you achieve a faster workflow.
- 3. Individual tools (outlined in green): Each tool has its own panel, which you can float anywhere on the desktop or dock to the right or left of the main window.
- 4. The Browser (outlined in blue): This shows all the currently selected images in a folder, Album, Smart Album, project, group, or catalog. The Browser can be docked to the right or left of the main window or beneath it, or you can display it to fill the screen—for example, on a second monitor. If you have limited desktop real estate, you can hide the Browser until you need it.
- 5. The Viewer (outlined in orange): This is where you see the effects of your adjustments. It can also be used to display multiple versions of a single image. The Viewer can be hidden, too, which can be useful if you want to concentrate on organizing your images in the catalog and have limited space on your monitor.
Because Capture One is so highly configurable, beginners often lose their way and can’t find the tool they’re looking for. To make getting started simpler, the program provides a selection of predefined workspaces located in the Window > Workspace menu. Take the time to click through them. If you find one that suits you, you can fine-tune it to suit your needs and save it using the Window > Workspace > Save Workspace command.
Workspaces give advanced users the option of creating custom workspaces for specific tasks. This way, you can define workspaces for organizing and keywording, pure retouching work, or whatever. You can then switch workspaces with a single click.

1.13 The major elements of the Capture One interface
1.5.1The Toolbar
The Toolbar contains basic functions like image import, undo/redo, and image delete. You can customize it using the View > Customize Toolbar command and hide it using View > Hide Toolbar. Experienced users often prefer to use keyboard shortcuts, and once you’re up to speed, you’ll probably rarely use the Toolbar buttons.
The Toolbar contains the most important tools that you need all the time. Many tools located here also have their own keyboard shortcuts.

1.14 The Toolbar can be easily customized and hidden.
The most important elements of the Toolbar are the Cursor tools. These are used to alter how the cursor functions, for example, transforming it into an eyedropper (the Pick White Balance tool) or a loupe. All the Cursor tools except Spot Removal offer a range of options that you can access using a click-and-hold or a keyboard shortcut.

1.15 Nearly all Cursor tools offer a range of options like those for the eyedropper shown here. The corresponding keyboard shortcuts—such as W for white balance or L for shadow level—are shown in brackets after each option.
Show Recipe Proofing (the icon that looks like a pair of glasses) is another important tool located in the Toolbar. We’ll discuss this separately in section 1.5.5.
The Cursor tools can also be accessed via their corresponding tool tabs. For example, the Pick White Balance tool can also be accessed via the White Balance section of the Color tool tab and the shadow level in the Exposure tool tab. It is a good idea to get familiar with the Cursor tools, but don’t be put off by the wide range of options they offer—each tool is automatically offered at the appropriate stages in the workflow. The Cursor Tool section of the toolbar is designed to give you quick access to these tools when you need them, even if the corresponding tool panel is hidden. This is just one of the many different approaches to using Capture One’s tools and is by no means obligatory.
1.5.2Floating Tool Panels or Tool Tabs?
As with most aspects of the Capture One workflow, it is up to you how you organize the look and feel of your tools. If you’re familiar with Aperture, you’ll probably prefer to float the tool panels on the desktop, whereas Lightroom users will be more accustomed to working with tool tabs. Capture One offers both approaches and you can combine them if you wish.
Tools can be floated freely on the desktop or docked to the main window, or you can do both.

1.16 A workspace with most of the tools arranged in tabs and the more important ones floated on the desktop. You can save any arrangement using the Workspace > Save Workspace command in the Window menu.
Capture One’s tool panels consist of a title bar with the tool’s name and any menus and options it offers. The rest of each panel is taken up with the tool’s sliders, buttons, curves, and so forth.
1.17 All tool panels have the same basic structure whether you float them or use them in tabs. The right-hand end of the title bar contains the tool’s options and menus, and mouseover tooltips explain each button’s functionality.
The tool options contained in each tool panel’s title bar are as follows (from left to right):
- Click the triangular icon at the left-hand end to show or hide the rest of the tool panel.
- Click the question mark to open a tool’s online help page.
- If the tool has an auto option, an uppercase A will be shown in the title bar and clicking it applies the tool automatically.
- The double-arrow copies the current settings to the Adjustments Clipboard for application to other images.
- Click the back arrow to reset adjustments made to all selected variants. Option/Alt-clicking the button temporarily resets your adjustments as long as you keep the mouse button pressed, and is a great way to compare your changes with the original image.
- The icon with three parallel lines is for creating and applying presets. The Stack Presets option enables you to simultaneously apply multiple presets.
- The icon with three dots reveals an action menu for applying or resetting camera-specific presets (see section 1.6), adjusting the size of the panel, and removing the tool from the current tab (or from the desktop if you’re using a floating tool panel).
Each tool offers various options according to its function. For example, the histogram can only display curves but doesn’t allow you to alter any settings, so it has no “copy settings” option. In contrast, the White Point adjustment has an auto option and thus has an A icon in its title bar.
You can hide tools using the Hide Tools command in the View menu. The Tools Auto Mode command automatically hides any active tools until you move the cursor to the edge of the Browser or Viewer window. This is a useful option if you have limited space on your desktop.
QUICK TIP
Most tools have their own context menus. For example, right-clicking the Viewer displays the settings for the active tool in a floating window at the current cursor position. This means you can make adjustments even when a tool is hidden. This gives you maximum desktop real estate for making adjustments and, once you have memorized the appropriate keyboard shortcuts, makes working with Capture One really fast.

1.18 The White Balance context menu. Context menus save a lot of mouse travel and enable you to hide tools and maximize your available desktop space.
1.5.3Browser and Viewer
Although they offer only a few options, the Viewer and Browser displays can be adjusted as well.
The Browser and the Viewer can be adjusted to suit your style.

1.19 The Viewer can be set up to show or hide image information as required.
The Viewer settings are located in the View menu:
- Viewer Mode offers the options Primary View (that is, the current image) and Multi View (all selected images in a tiled view). Show/Hide Proof Margin shows or hides the entire printable area. You can also access these commands via the three icons in the Viewer Toolbar, which you can hide if you prefer a clean Viewer interface.
- Show/Hide Viewer Labels shows or hides the info bar beneath the current image. The default setting shows the filename, the ISO setting, the exposure time, and the image rating. Even if you hide them in the Viewer, this data is still available in the Metadata tool.
View options that have a more significant effect on the Viewer display, such as Focus Mask and Proof Profile, are addressed in detail in section 1.8.
Most of the time, you’ll probably use the Browser in filmstrip mode, placed either to one side or below the Viewer window with one or two rows of images. Like with the Viewer, the Browser commands are located in the View menu.
QUICK TIP
To place the Browser on the left-hand side of the main window, navigate to the View menu and select the Place Tools Right command. To place it beneath the window, use the Place Browser Below command.

1.20 The Browser can be set up to show as much detail as you like, arranged the way you prefer.
The Browser’s display options are probably more interesting than its location options. Previews are a must, but do you want to show the contents of the current album as a list or as thumbnails? If you prefer a tiled view, how many rows do you want? ![]() 1.21
1.21

1.21 The Browser uses the available space according to the mode you have set. You can adjust the view using the three icons at the top left of the Browser window (if it is placed below the Viewer) or using the “eye” icon if it is placed to the left or right. This is also where you set the order in which your images are displayed.
The previews in the Browser provide information about the state of an image. A gearwheel icon at the bottom right indicates that an image has already been output, whereas a stack icon indicates that it has already been processed. This gives you a quick overview of your work while you are scrolling through the Browser view. The Browser defaults use Edit mode and show the filename, color tags, and ratings.
Edit mode is set in the Browser Labels submenu in the View menu and enables you to alter ratings, color tags, and filenames in the Browser. If you switch the view to Status mode, you can no longer alter the displayed data, which helps avoid adding unwanted ratings or tags when you’re clicking through large numbers of files.
Try out different Viewer and Browser settings until you find the combination of data and positions that suits you best. It is up to you to decide how much data you display and where. For example, ratings displayed in the Browser and the Viewer can be annoying.

1.22 If you select the View > Hide Viewer command, the Browser is automatically enlarged to fill the available space. This way, you can use the entire desktop for admin tasks that don’t require a Viewer window. To avoid setting unwanted tags and ratings while you browse, select Status mode in the View > Browser Labels menu.
1.5.4Catalog and Session Templates
Everyone has his or her own personal approach to work. Some people have a highly organized system for handling incoming mail, whereas others simply throw everything in a shoebox. Some think in projects and create new folders and database entries for each new job; others don’t.
If you prefer to treat each new job as a separate project, you are sure to appreciate the Templates functionality.
Catalog and Session templates enable you to save the structure and working environment for each project separately.

1.23 A highly organized system or a single folder called “Documents”—which type of user are you?
To save a project as a template, use the File > Save as Template command. This opens your operating system’s file management dialog, where you can give your template a meaningful name and save it. You can now replicate the environment you have saved for future projects—all you have to do is select the appropriate template from the drop-down list that appears when you select the New Session/New Catalog commands. ![]() 1.24
1.24

1.24 The Template drop-down list in the New Catalog dialog is easy to overlook.
Just like the way you organize your data, it is up to you to decide whether you need multiple catalogs or sessions. Phase One recommends that you use just one main catalog and multiple sessions to organize individual projects or tethered shooting sessions. We’ll go into detail on the advantages and disadvantages of catalogs and sessions in section 4.1.
1.5.5Recipe Proofing
Capture One’s background is in studio photography, mostly aimed at magazine productions. As we saw in section 1.4, this is the main reason the software offers a soft proofing option—i.e., the option to display images in the Viewer using output color profiles on the fly, reducing the need to make test prints, while still giving you a good idea of whether the colors will fit inside the output medium’s color gamut. Up to and including version 9, this was extent of the “proofing” available in Capture One.
Version 10 introduces an additional proof option. Clicking on the glasses icon in the toolbar, or hitting the corresponding menu item in the View menu, will switch the Viewer into Recipe Proofing mode. This option is only available in the Pro versions of Capture One, and may turn out to be the main reason for Sony users to upgrade from the Express version.
Recipe Proofing helps you streamline your workflow and avoid surprises when you’re processing a lot of images at once.
As the term suggests, Recipe Proofing is based on a selected process recipe. If you have checked multiple recipes in the Process Recipe tool, Show Recipe Proofing will use the highlighted entry for its calculations. To switch, simply select another recipe. We will discuss recipes extensively in chapter 13.
If you activate Show Recipe Proofing, the Viewer will interpret the selected images using all of the image editing you have done within Capture One, all tool settings, and all process recipe settings.
In short, Recipe Proofing will show you the image exactly as it would appear after hitting the Process button. This includes size, output sharpening, and, if you used low levels of the JPEG Quality setting, compression artifacts. But how is this handy, particularly for web output? Take the following example:
- 1. You want to output images for your online gallery or Facebook. So, you select your corresponding process recipe in the Process Recipes tool—for example, one that scales your images down to 960px (Long Edge) and exports them as JPEG files.
- 2. Next, you activate Recipe Proofing. Rather than showing you the original raw image with millions of pixels, the Viewer will now show you the scaled-down version, which is approximately 600,000 pixels in size.
- 3. Now you adjust the level of JPEG compression right inside the selected process recipe. The Viewer will update accordingly, making it easy for you to strike the perfect balance between file size and image quality.
- 4. Last but not least, you set your desired level of output sharpening, and the Viewer updates in real time to reflect your settings—no guesswork or test “prints” needed. (You will learn more about output sharpening in section 9.2.)
The fun thing is that all of these settings remain part of the selected process recipe, and thus are available in all of your sessions and catalogs. This means you can custom-tailor recipes for all of your online needs, including output sharpening and compression, without having to output or upload a single test image.

1.25 If Recipe Proofing is activated, the glasses icon will be highlighted, and a short “Proofing” tag will appear in the Viewer. At the same time, the standard soft proofing profiles located in the View menu will be deactivated.
And if after a while you realize your compression or sharpening settings were too aggressive, you can change them once, check with Recipe Proofing, and you’re done.
Naturally, the same goes for your printing recipes. Rather than sending files to your print shop for expensive tests, or wasting ink and paper when printing at home, Recipe Proofing lets you tune your settings virtually, right inside Capture One. This saves you time and money. And since you no longer need to use third-party software such as Sharpener Pro for best print results, it will tidy up your workflow.
QUICK TIP
In simple terms, Recipe Proofing creates processed files without writing them to a disk. Capture One updates those virtual files in real time, reacting to all settings adjustments and editing you do inside the application. But this also means that, depending on your computer’s age and horsepower, Capture One might become sluggish. Hence, you shouldn’t leave Recipe Proofing on at all times, but rather switch it on when you need it—say, when tweaking Film Grain or Clarity settings (chapter 9).
1.6Default Settings for Cameras
Capture One provides default settings for all the cameras it supports. These are displayed in the Base Characteristics section of the Color tool tab. ![]() 1.26
1.26
You can save default settings that are automatically applied when you open images from recognized cameras.
But what can you do if a particular camera always underexposes and requires you to apply an adjustment to all the images it captures? Or if you want to use a different ICC camera profile than the one Capture One recommends? If you use a pocket camera that produces a fair amount of image noise for your street photography but a high-end full-frame model to shoot landscapes, the denoising settings you use for each will be very different. And what if the sensor in an older camera always produces the same spots and dead pixels that have to be removed at the processing stage?

1.26 You can select the camera profile and the curve you want to use in the Base Characteristics section of the Color tool tab.
Many tool settings can be saved for use with a specific camera using the Save as Defaults for . . . command in the tool’s action menu (the one with the three dots at the top right in the tool panel).

1.27 Use the action menu to save tool settings for a specific camera or reset them to the program’s default values.
If you alter the default settings for a specific camera, the Reset Defaults command resets to your selected settings rather than “back to zero.” For example, if you set default exposure compensation of +0.3 stops for one of your cameras, using the Reset command in the Exposure tool will set compensation to +0.3, not 0.
Although the defaults discussed here are camera specific, the presets described in section 1.5.2 are applied to a specific image or images, regardless of which camera they were captured with. In other words, use defaults to correct known camera issues but not for creative image processing. Most creative adjustment decisions are made independent of the camera used to capture the image.
1.7Program Preferences
As well as setting up the interface to suit your needs, it is essential for you to familiarize yourself with Capture One’s preferences settings. The Preferences dialog is located under Capture One > Preferences on a Mac and Edit > Preferences in Windows.

1.28 Capture One’s Preferences settings are organized in themed tabs.
The Preferences dialog is where you can make global settings to suit the way you work. This dialog contains the following tabs:
- General: These settings govern how you zoom when using the Viewer, whether sessions and catalogs are opened in new windows, whether hardware acceleration is used, and so forth.
- Appearance: Sets the color scheme for the Viewer, the Browser, and local adjustment indicators.
- Image: Sets the preview size, enables or disables processing for various image formats, and determines how metadata is synchronized.
- Capture: These are the tethered shooting options.
- Color: Sets the desired rendering intent.
- Exposure: Determines when and how exposure warnings are used. Also, you can select the Levels tool’s mode of operation.
- Crop: These settings determine the look and feel of the Crop tool and the grid it uses.
- Focus: These settings determine the threshold value, opacity, and color for the Focus Mask.
- Warnings: Which situations require pop-up warnings?
- Update: Specifies how often you want the software to look for updates and how should it behave when an update is available.
Most of these are self-explanatory, but we’ll be addressing some of them in more detail later in this book (backups in section 4.10, and the Focus Mask in section 1.8, for example). The following sections deal directly with preview sizes and metadata synchronization.
1.7.1Preview Image Size
The size you select for your previews influences the overall size of your Capture One installation. As mentioned in section 1.3, when displaying and processing images, Capture One usually uses proxies rather than directly accessing your original image files, and preview images are proxies. They are automatically kept up to date when you import images (in Catalog mode) and when you’re navigating through your files and processing them during a session.
The best size for your preview images depends on the size of your image files and the resolution of your monitor.
Capture One never uses the JPEG previews embedded in raw image files. Instead, it creates its own new preview when you import new images or navigate existing ones. This means that styles you apply at the shooting stage (black and white, for example) are not visible in the Capture One raw view. It also means that it can take some time to open a folder that contains a large number of new images. Don’t interrupt the creation of new preview images—if you do, you’ll have to wait just as long the next time you start Capture One.

1.29 The preview embedded in the raw file (left) contains a style that Capture One ignores when it produces its own preview (right).
To find the right size for your preview images, you have to answer two questions:
- Do you often work on offline images?
- Do you use a high-dpi 4K/5K or MacBook Retina monitor?
Simply selecting the largest possible preview size costs time and processing power during image import and when you open collections. If you have a 1920 x 1080-dot monitor, this is simply an unnecessary waste.
If you don’t often work with offline images, the size you select will depend on the resolution of your main monitor, not on the resolution of your source images. Capture One generates a 100 percent view when it needs to, thus ensuring that critical details are displayed with sufficient accuracy. In the smaller views created by the Browser or the Viewer, Capture One usually displays preview images. Always use a preview size that suits your setup and doesn’t waste too much disk space.
Select a preview size that is one or two clicks smaller than the maximum size your monitor can display—for example, if your monitor is 1680 pixels wide, select a preview width of 1280 or 1440 px. For a 2560-dot monitor, select 1920 or 2048 px. For a 15” MacBook Pro with Retina display, select 2560 px.
Using previews that are two sizes smaller than maximum makes sense if you’re working with the Browser, tools, and Viewer on a single monitor, whereas larger previews make life easier if you’re using a dual-monitor setup or working with the tools hidden. If you work with your images displayed in full-screen mode on a second monitor, you can set the preview size to match your monitor’s resolution.
In offline mode, Capture One doesn’t have access to your original images and always uses its internal previews. In this case, you should always select the maximum preview size; this enables you to produce large copies of your images regardless of whether the disk that contains the originals is online, or if you have accidentally left your external disk in the studio.
If you often work in offline mode, set the largest preview size that matches the resolution of your source images.
Catalogs and sessions can quickly get quite large if you’re working with large previews. Solid-state drives (SSDs) require some free disk space to work at maximum speed, so it pays to keep 10–15 percent of your disk free. If you start running out of space, you can either reduce the size of your previews or save parts of your catalog/session to a separate disk.
1.7.2All About XMP Synchronization
When selecting your options in the Metadata section of the Image tab in the Preferences dialog, you need to consider the following:
- Does third-party software (another database, for example) require access to the metadata stored with your raw files?
- Do you want to limit third-party software access to the metadata in image copies?
- How do you want Capture One to react if third-party software such as Lightroom alters metadata?

1.30 The Metadata options you select have significant consequences.
If you manage your images in a Capture One catalog and develop them exclusively in Capture One, you don’t have to synchronize your metadata (that is, you can select the None option in the Auto Sync Sidecar XMP drop-down list). In this case, Capture One manages keywords, color tags, descriptions, albums, and so on exclusively in the current catalog or session and doesn’t hand over metadata to the filesystem that contains the original files.
Things are more complicated if you use a third-party solution to manage your image files. Full Sync sounds good, but isn’t necessarily the best option in a number of situations. With this option selected, Capture One always loads the metadata from the original files (or their XMP sidecar files) and also writes any changes you make to metadata in real time. This slows down processing, especially if you’re using a slow or full disk. More important, it can also cause sync conflicts between Capture One and your DAM system, either because the network connection is down, someone else is keywording images while you work, or simply because there’s a full moon!
Only use the Full Sync option in exceptional circumstances.
QUICK TIP
Only use the Full Sync option if you usually work alone and your image files reside on a fast main disk. If either of these criteria isn’t met, it is better to sync metadata as required by right-clicking a selected image—for example, if you have finished a processing session and wish to continue organizing your archives.
If you use a third-party DAM system, the best option is Load. Choosing Load forces you to perform all metadata management within your DAM environment. Ignoring Capture One’s metadata tools this way ensures that all metadata is written in a consistent format without the risk of conflicts, and also means that Capture One always loads the newest available metadata and embeds it in any images that you output.
Regardless of which metadata options you select, Capture One never alters your original files or the metadata they contain. However, if you select Full Sync it will write changes to existing XMP sidecar files and create new XMP sidecars for DNG files, even though DNG allows applications to write data inside a DNG’s designated XMP area. If your system includes third-party applications, make doubly sure that your backups include XMP sidecar files, especially if you’re working with DNG files.
1.8Global Tools
In addition to the Cursor tools mentioned earlier, Capture One has a set of global tools that you can apply anywhere at any time. Some of these are Cursor tools, whereas others are functions that can be accessed via the program’s menus. The following sections address the Loupe, the Focus Mask, the Copy Adjustments/Apply Adjustments function, and the Exposure Warning tool.
1.8.1The Loupe
One of the tools that made Aperture famous was its free-floating loupe tool that made it unnecessary to continually zoom in and out to check the effect of an adjustment. Although it is implemented as a Cursor tool, Capture One Pro’s Loupe tool has the same functionality.
You can use the Loupe in the Viewer and the Browser/Filmstrip.

1.31 You can access the Loupe by either clicking on its icon in the toolbar or using the P keyboard shortcut.
The Loupe has two modes:
- Floating: You click the tool’s button and then click in the Viewer or Browser image you wish to inspect.
- Zoom In/Out: In this mode, clicking within the image zooms in or, with the Option/Alt key pressed, zooms out.
QUICK TIP
The second mode listed is already implemented via the scroll wheel, so you’re unlikely to use it much. However, if you use a graphics tablet without a scroll wheel, you can use the Z shortcut to change the Viewer magnification without having to move your pen to the Viewer toolbar and back.
The floating loupe is great for checking focus and overall sharpness and is one of the reasons that most raw developers now include the same functionality. Unfortunately, the Capture One version cannot be used while other tools are active. This is because it is a tool in its own right and only functions for as long as you keep the mouse button pressed. Alternatively, if you really require a loupe-like window open during working on your images, give the Focus tool a shot (section 9.1).
1.8.2Copy and Apply Adjustments
The Copy Adjustments/Apply Adjustments function appears at first glance to be a Cursor tool, although it is actually available everywhere within the program and is one of the cornerstones of the Capture One system. Note that even if you have clicked the “Edit selected variants” button, you’re still only working on the currently active image. In only a few cases will Capture One apply your adjustments to the other selected images in the background.
One of the central elements of the Capture One philosophy is its ability to copy adjustments and apply them to other images.

1.32 The Stack icon toggles between editing the primary image and all selected variants. The primary image is indicated in the Browser by a thicker border.
Capture One differentiates between primary and other active images to enable you to compare versions (see chapter 3) and to select a “master” image from which to copy your adjustments. Legacy versions of the software were only capable of processing a single, “primary” image. Both primary and secondary images are called Variants inside Capture One’s user interface.
Batch Processing with a Master Image
If you’ve captured a sequence of images that you wish to process using adjustments you’ve made to the best image of the set (that is, the “master”), proceed as follows:
- 1. Click the “Toggle primary/selected variants” button in the toolbar. It will turn orange.
- 2. In the Browser, select the images you wish to process. To select all images, click the first one, press the Shift key, and then click the last image in the sequence. To select individual images, press the Cmd key (Mac) or the Ctrl key (Windows) and click each image separately.
- 3. Now click the image you want to use as the master. It will be highlighted with a thick border and the other images will remain selected.
- 4. Process the master image as required. When you use presets or automatic corrections on the master image, Capture One will update all the selected images to reflect your adjustments in real time. Otherwise, you will need to copy and apply your adjustments to other individual images (see below), or use Copy Adjustments from the context menu, and then Apply Adjustments on the whole selected series.
- 5. That’s it! You have processed the entire sequence in one go. To deselect your sequence, click an image that wasn’t selected during the previous steps.

1.33 The entire sequence is selected and the master highlighted.
As I said, this technique works with some of Capture One’s tools, but not all of them. To be on the safe side—to make sure all of your edits make it through to all variants—use the Copy/Apply tool as outlined below.

1.34 The Copy/Apply tool does just what it says, enabling you to copy adjustments you have made and apply them to other images.
It is really simple to apply adjustments you have made to other images. All you have to do is copy the adjustments from an image and click on an image in the Browser using the Apply tool.
- 1. Right-click an image whose adjustments you wish to copy and select the Copy Adjustments option from the context menu.
- 2. Switch to the Apply tool either by clicking it in the toolbar or using the A shortcut. The cursor will then turn into a broad arrow.
- 3. Click all the images in the Browser that you wish to apply the adjustments to.

1.35 Here, we have copied the monochrome adjustment from the primary image in order to apply it to other images in the Browser.
The Apply tool applies the adjustments that are currently located on the Capture One Adjustments Clipboard. This does not necessarily include all the adjustments you have made to an image. As described in section 1.5.2, you can use the double-arrow button in a tool’s panel to select individual adjustments. If you want to copy settings from multiple tools to the clipboard, select them in the Adjustments tool tab and apply them using the Apply tool. For more details, see chapter 11.
1.8.3The Focus Mask
The Focus Mask is designed to help you quickly find the photos in a series in which the desired elements (a portrait subject’s eyes, for example) are in focus. The tool is often but not always effective. Used with the right settings, it can definitely save you a lot of time. This section explains how.
The Focus Mask is primarily a studio tool but can be useful in other situations.

1.36 Does lots of green mean plenty of in-focus detail? Not necessarily . . .
But what is the Focus Mask anyway? In principle, it works like the focus peaking feature found in many cameras, analyzing local contrast in the images displayed in the Browser. If the tool’s algorithm finds high levels of contrast, it assumes that the image is in focus and highlights the in-focus areas in green. You can alter the degree of precision the Focus Mask works with by using the settings in the Focus tab in the Preferences dialog. ![]() 1.37
1.37
The Opacity and Color settings determine how the mask is displayed and are easy to set, but it is trickier to find the right setting for the Threshold slider. It offers values from 200 to 500 and the higher the number, the greater the contrast between details has to be before the tool assumes that the image is in focus. In theory, lower values ignore image areas that aren’t perfectly sharp.

1.37 Although their scope is limited, it is worth taking a look at the options available for tweaking the Focus Mask.
In practice, the optimum setting depends on which camera you use and how it is set up. The larger the pixels in your camera’s sensor and the closer the ISO value to its default setting, the lower you need to set the Threshold value. Conversely, the smaller the pixels and the noisier the image, the higher you need to set Threshold. Phase One recommends using a value of 250 with its medium-format IQ cameras, which have extremely large pixels. A 24-megapixel full-frame camera with a sensor half the size of those in the IQ cameras requires a much higher value if you want to produce usable results.

1.38 These two images show the effect of applying different Threshold values in the Focus Mask—on the left, using the default value for medium-format cameras and on the right, our tweaked value of 400.
QUICK TIP
The best way to find the optimum Threshold value is to experiment. Select an image with an obvious plane of focus and plenty of out-of-focus details, such as one captured at maximum aperture. Activate the Focus Mask using the toolbar button or via the View > Show Focus Mask command. Adjust the Threshold slider until only the details you know to be sharp are highlighted. Do the same for all your cameras and all the ISO values you use regularly and note the results. Remember, though, the values you end up with are approximations and the Focus Mask is rarely precise.
The tool is rarely precise and you have to find the right Threshold value for every combination of camera and ISO value you used to capture your images. So why bother using it at all? The answer is simple: using it is still the fastest way to find the best images in a batch.
It is always hard to find the key images in a sequence of shots of moving subjects such as models, athletes, or cars. Focusing perfectly on a player’s facial expression or a motocross bike’s wheel can depend on just a couple of millimeters of movement, and combining the Loupe with the Focus Mask is a great way to find the images that worked:
Using the Focus Mask together with the Loupe makes it much easier to find the key images in a sequence.
- 1. Hide the Viewer to make the Browser display as large as possible. Use the View > Hide Viewer command or the Cmd/Ctrl+Option/Alt+V shortcut.
- 2. Activate the Focus Mask and set the Threshold value that you have calculated for the camera and ISO value you used. The previews in the Browser will now be highlighted accordingly.
- 3. Activate the Loupe Cursor Tool (shortcut P) and click the images in which the Focus Mask appears to be correct. The Loupe displays the 100 percent view of the appropriate details without the highlight color, enabling you to see at a glance if the selected detail is in sharp focus.
- 4. Color tag or rate the best images in your sequence.

1.39 Using the Focus Mask and the Loupe is much quicker than in zooming in individually on hundreds of images.
1.8.4Exposure Warnings
Capture One’s exposure warnings work the same way as the ones built into your camera, highlighting under- or overexposed image areas. The difference is that you can precisely set the Threshold value at which the tool kicks in.
Like the Focus Mask, the Exposure Warning feature is designed help you form a quick impression, this time of the state of the image you’re working on.

1.40 Almost the same: exposure warnings on a Leica M9 and the Capture One version in red and blue
The Exposure Warning tool is dynamic and analyzes the current state of your processed image rather than the original, static raw image data. This makes it much easier to effectively apply an exposure correction (see section 6.1) or a Highlight adjustment in the High Dynamic Range tool (see section 6.2). All you have to do is adjust the sliders until the image areas you wish to recover no longer display a warning highlight.

1.41 Set the Threshold value for exposure warnings in the Exposure tab in the Preferences dialog. Shadow warnings are deactivated by default.
Like with the Focus Mask, the effectiveness of the exposure warnings depends on selecting the right Threshold value. ![]() 1.41
1.41
Exposure and shadow warning values range from 0 to 255—the entire 8-bit luminance range. The warning highlight kicks in when highlights threaten to burn out, and if activated, shadow warnings indicate when shadow detail begins to disappear.
The best settings for the exposure warnings depend on the camera you use and how it is set up as well as on your personal preferences. Use a high-key image with plenty of highlight detail to determine the best Exposure value and one with slight shadow detail to find the optimum Shadow Warning value. If you use multiple cameras with different dynamic ranges, note the values you assign for each. If your cameras have similar dynamic ranges, you can use the same values for all of them.