
2Hardware
Capture One requires a computer with plenty of processing power to run. This chapter addresses choosing Mac or PC, selecting the best type of graphics card to use, using the software on multiple computers, and using accessories such as a graphics tablet or a colorimeter.
Technology changes rapidly. Just a short time ago, only the rich could afford high-dpi (4K or 5K) monitors, whereas they are now virtually standard in new computers. The following sections don’t contain hardware recommendations but instead explain what you need to work effectively with Capture One and when it makes sense to invest in a hardware upgrade.
2.1The Oldest Question in the Book: Mac or PC?
Until recently, it was assumed that most “serious” photographers and graphic artists use Mac computers. Apple’s reputation for efficiency and effectiveness in creative spheres is still very good, but Windows systems have begun to catch up and, in some cases, overtake Macs:
Capture One offers the same functionality for Mac and PC users; only a few minor details differ between the two versions.
- Windows has supported 10 bpc (bits per channel) color for several years. This means that if you use a suitable graphics card and monitor, you can reproduce 1,024 tones per color channel, which in turn gives you more than a billion colors to play with. The current Mac Pro is still limited to 8 bpc (256 tones per channel and a total of 1.6 million colors). This gives you plenty of scope but is simply not as good as Windows if you depend on extremely precise color rendition. There are hints with the latest generation iMacs that Apple will finally hop on the 10 bpc bandwagon, but how well it will work out (will this happen transparently for the user, or are tons of application updates needed?) is still open to debate.
- Windows computers are a lot easier to upgrade. Graphics cards and CPUs can be swapped out in minutes, whereas Apple now solders more and more components permanently to the motherboard, and some models don’t even allow you to swap out their RAM. If your new camera produces images that are four times larger than those from your old one, you might just end up having to buy a new Mac.
- Comparing computing power alone, Windows computers are cheaper than Macs and save you money that you can sensibly invest in better lenses or a second camera body.
The major advantage of a Mac is that the system comes preconfigured and you don’t have to make any effort deciding which components to use. In the Windows camp, even if you buy a preconfigured workstation from HP or Dell, you still have to regularly update your drivers and test which version works best with your software. With Mac systems, all necessary upgrades are included in regular, all-in-one system updates.
Put simply, you have to choose between greater flexibility but more effort (Windows) and simplicity with less flexibility (Mac). So what does all this mean for Capture One users?
The Mac and PC versions of Capture One offer pretty much the same functionality and virtually the same handling. The only real exception is that you can operate the Mac version using AppleScript, whereas scripts are not available for the PC version. You can, however, control the PC version using third-party macros (see section 15.3). The other differences are extremely minor and extend to a couple of variations in keyboard shortcuts and the workspace presets included with the program (see section 1.5).
QUICK TIP
Most of you will already have a PC or a Mac. However, if you’re about to decide which “ecosystem” to buy into, you need to consider what you’ll be doing with your computer other than using Capture One, and you should also look into the other software you’ll need. Even if Capture One works the same in both environments, things probably look very different when it comes to running accounting or word processing software. The only factor that speaks specifically for choosing macOS is the AppleScript option—if you need to automate your Capture One workflow, go for a Mac.
2.2Choosing the Right Hardware
“More is better” is a simple maxim that certainly applies when it comes to selecting hardware to use with Capture One. Today’s cameras produce images with 40 or 80 megapixels—and more—that your computer has to juggle in its RAM and that Capture One has to handle. If you then incorporate your processed image in a photomontage or print it at poster size, it quickly becomes clear that you need plenty of RAM to keep things running smoothly. Capture One is a 64-bit application and generally uses as much RAM as it can. Don’t skimp on RAM—8 GB is the minimum requirement and 12 GB is better.
The more memory the better—you need at least 8 GB to make working with Capture One a smooth and pleasant experience. You need plenty of fast disk space when working with Capture One, especially in tethered shooting situations.
The same applies to hard disk space. Large image files, not only when using a medium-format system, have to be copied, moved, read, and written, so the faster your main disk the better. If you’re about to upgrade your computer, investing in an SSD will benefit you more than purchasing a new CPU. The (networked) FireWire or USB disks you use for your archives don’t have to be as fast but require plenty of space. If you shoot tethered, your main disk works like an extended memory card, so the faster your disk and the connection between your computer and the camera, the better the system can keep up with the large amounts of data that flow from the camera during a session (see chapter 14).
You need plenty of fast disk space when working with Capture One, especially in tethered shooting situations.
Capture One is a multithreaded application. This means it can run multiple parallel tasks on multiple processors. Since the release of version 7, these can be CPU cores or graphics processors.
The CPU and graphics card work in tandem, so Capture One benefits from a powerful graphics processor—provided, of course, that it is properly supported by the system.
To display adjustments in real time and quickly create copies of finished images, Capture One uses OpenCL to farm out most of its processes to your computer’s graphics processor. If Capture One supports your particular graphics unit, you’ll notice an obvious increase in performance, with immediate zooming in and out even with very large files and super-fast output of finished images. If your work demands that you produce hundreds of images per session, using fast hardware will save you hours of waiting in the course of your daily photo workflow.

2.1 You can select OpenCL for display and processing in the Preferences dialog’s General tab. If an option causes processing errors, simply uncheck it.
The CPU is nevertheless an important factor. Currently, not all of Capture One’s tools can be farmed out to the graphics processor and you’ll probably want to use your computer to do other things, too. In other words, it is not only the graphics processor itself but also the balance between CPU and graphics power that is crucial.
IMPORTANT
OpenCL stands for the Open Computing Language designed for distributing tasks between CPUs, graphics cards, signal processors, and the like. When you start it, Capture One creates an OpenCL kernel that depends on smooth cooperation between the program and your graphics driver software. Sometimes, system or program updates break the setup, causing display errors or producing image copies with unwanted stripes or other glitches. Incompatible drivers can even cause Capture One to crash. Test output with activated OpenCL before you use it to process batches of images. If you aren’t sure about the quality of the results, it’s better to switch off OpenCL support and wait a little longer than it is to risk producing a whole series of flawed images.
A list of the graphics cards that Capture One supports with OpenCL is available in article 1720 in the knowledge base at www.phaseone.com/support. The following criteria have to be met for OpenCL to work properly:
- Your graphics card has to have at least 1 GB of video memory. If it has less, Capture One won’t activate OpenCL, even if it supports the graphics processor in question.
- The larger your image files, the more video memory you’ll need to process them using OpenCL.
- Outputting your images requires more video memory than processing. If your image output shows errors, use only OpenCL display support.
If you discover display errors within Capture One, processing with OpenCL probably won’t work properly either.
Do some tests. Output a selection of your images with OpenCL activated, then deactivate it, restart Capture One, output the same images again, and compare the amount of time it takes. This way, you can check directly whether using OpenCL speeds up your workflow. If not, you can save yourself the hassle of the potential problems listed here and leave OpenCL support deactivated.
QUICK TIP
Obviously, Capture One benefits from being run on a fast computer, although all the components of a system have to be well tuned to provide the best results. You need a fast hard disk to review your images, plenty of RAM to display large files, a fast CPU for smooth output, and ideally, a fully supported graphics card. Don’t make the mistake of investing too much in one part of your system. Invest wisely and don’t forget to consider the other things you want to do with your computer—if your other work involves a lot of processing but not much graphics power, you’re better off investing in a faster CPU than a high-end graphics card.
2.3Using Capture One with Multiple Computers or on a Network
Many of today’s photographers use more than one computer: a notebook for work on the road or tethered sessions and one or two workstations for work at home or in the studio. Capture One’s licensing terms allow the use of the software on multiple computers in various ways.
As mentioned in section 1.2.1, nonsubscription licenses are available in single- and multiuser packs. A single-user license is for you alone, and you are allowed to install the software on three computers simultaneously. However, as soon as multiple users come into play, you have to purchase a multiuser license, which then determines the number of computers, or “seats,” you can use the software on, rather than the number of people who can use it—in other words, it doesn’t matter who is actually using the computer.
Once you have purchased a license, Capture One has to be activated online. Phase One’s servers then compare the number of active users with the license you have purchased. If you have a single-user license, you can use it on only three computers. If you have three or more computers, you either have to deactivate the software on one machine before activating it on another, or purchase an additional license via the Capture One > License command.

2.2 The License dialog shows when and how often you have activated Capture One and tells you how many activations you have left. Always deactivate unused licenses before you uninstall the software.
QUICK TIP
If you sell an old computer but forget to deactivate Capture One before getting rid of it, navigate to My Pages at www.phaseone.com. There you’ll find an overview of all your licenses and you can deactivate any unused copies via the web.
Aside from the licensing stipulations, you’re sure to be asking yourself how you can use Capture One on multiple computers. You have three options:
Capture One works seamlessly in networks and with multiple simultaneous users.
- 1. Each machine has its own catalogs and sessions, and you copy or move individual images between installations.
- 2. You keep a single set of catalogs and sessions and move them between machines as necessary.
- 3. You use a single set of networked catalogs and sessions and access the same ones from each machine.
Option #1 is useful if you use different computers for different types of work—for example, if you manage your archives on your workstation at home but use your notebook for individual jobs. Once a job is finished, you copy your images and adjustments to your main computer and continue working there. If you’re working in Session mode, you can either copy the entire session (see section 4.1.2) or bundle your original raw image files with your adjustments in an EIP file, which you can then import into your main catalog (see section 4.3).
Option #2 is trickier to implement but can be useful if, for example, you have two homes or studios and wish to have access to your entire archive at both. If you decide to take this approach, use fast portable storage such as a USB 3.0 external disk. You can then open catalogs and sessions by double-clicking or dragging-and-dropping them.
Option #3 is ideal for agencies. Since version 7, Capture One has been expanding its network capabilities from version to version. Sessions consist of simple folders of images and adjustment data (see section 4.2) and are well suited to being centrally managed. Catalogs, too, are multiuser compatible and work fine when saved on a network. If necessary, you can use the File > Lock Catalog command to ensure that no one else attempts to change its contents while you work. In both cases, all settings, adjustments, variants, and so forth are saved in the corresponding session or catalog. In a network environment, your local installation works as a “client” and the network-based catalog or session as the “server.” For this approach to work, you need constant access to the network—your original files, your previews, and your adjustments are no longer stored locally. If you’re using a notebook—for example, on-site with a client—you need to add the appropriate images to the network catalog when you’re done, as described in option #1.
As a variant of #3, you can also use individual catalogs or sessions on each computer, but keep the original raw files on a networked drive. In this case, the original images are referenced inside the various catalogs or sessions, but preview files are kept inside each individual installation. The advantage of this approach is that if your network drive is offline, you can still work with those “offline images,” which, depending on the preview sizes you chose (section 1.7.1), may be more than good enough for a quick export on-site. Just process the full-quality images later when you’re back in your office.
2.4Graphics Tablets and Other Input Devices

2.3 Capture One has excellent support for graphics tablets but works fine with other types of input devices as well.
Most people who work with computers do so with one hand on the mouse and the other on the keyboard. This approach works well with Capture One, and its mostly single-key shortcuts mean you don’t have to perform complex finger gymnastics to access specific tools and functions. Since the release of version 8.1, you can make adjustments to most tool settings via the context menu accessed by right-clicking in the Viewer—that is, you don’t have to constantly trail back and forth between the tool panels and the Viewer with your mouse. Whether you use a mouse or a trackball is up to you.
Even local adjustments (see chapter 10) are quite easy to perform using a mouse and a keyboard. Many graphic artists and illustrators don’t use graphics tablets simply because they are used to working with traditional input methods, whereas others—often for health reasons—prefer pen-based input. If you do decide to use a graphics tablet for whatever reason, rest assured that Capture One is well set up for use with this type of input device.
How you set up your graphics tablet depends on your personal preferences and the functionality the tablet offers. Some are quite simple, whereas others have sets of freely programmable buttons or parts of the active area that you can reserve for use with macros or selected program functions. Some people prefer to use the pen button like a right-click; others use it in place of a scroll wheel. The following tips will help you get the best out of Capture One when you use it with a graphics tablet.
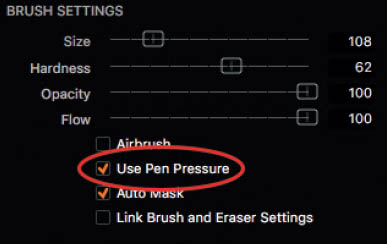
2.4 The brushes used to make local adjustments can be set up to react to pen pressure.
- Capture One’s default settings use the scroll wheel to zoom the Viewer. If you want to control the software using a pen only, deactivate this feature in the General tab of the Preferences dialog. This prevents unwanted scrolling if you accidentally trigger a scroll function in the tablet’s driver. The best way to control scrolls is by using keyboard shortcuts or the zoom slider in the Viewer window.
- If you usually use a mouse but prefer to use a pen when refining masks, enlarge the active area to match the surface area of the Viewer. You can then work more accurately and still control the tools you use with shortcuts or context menus.
- Assign functions to your tablet’s custom buttons that suit the way you work with Capture One. For example, if you often use context menus, it makes sense to assign a right-click to one of the custom buttons. Or perhaps assign to a free button one of the Cursor tools you most often use.


With version 10, Capture One introduced support for grading panels. Such devices by manufacturers like Tangent or Palette Gear let you control Capture One’s settings via physical knobs, dials, and switches—imagine a sound engineer’s mixing desk. At the time of writing, grading panels already supported over 400 individual Capture One settings. Phase One will expand its support, possibly getting additional manufacturers on board. If you already own a grading panel, perhaps from your video work, chances are good that your device might already be supported when you read this.

2.5 A Tangent panel, used with Capture One Pro 10. Image credit: Phase One/Mark Mawson
It’s up to you to decide which functions to assign to your tablet’s buttons. Capture One’s ability to assign keyboard shortcuts to menu commands enables you to perform virtually all of your everyday workflow using a graphics tablet.
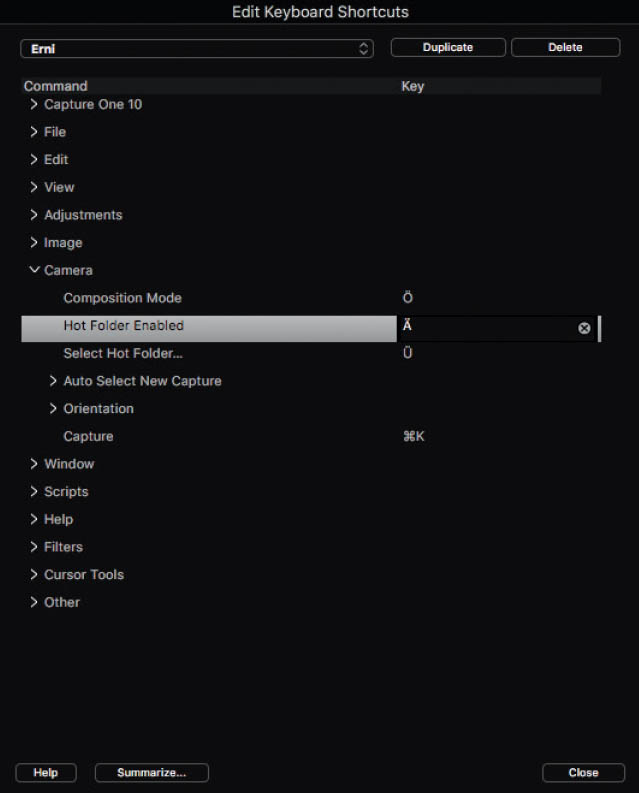
2.6 Used with the customization functions in your graphics tablet’s or grading panel’s driver, the Edit Keyboard Shortcuts dialog enables you to set up Capture One so that you can control it almost entirely using the pen, context menus, and dedicated function buttons.
QUICK TIP
It’s all in the mix. Even if you can control Capture One using a graphics tablet, some functions—entering keywords or altering metadata, for example—are simply easier to perform on a keyboard. Some functions are also better suited to use with a mouse than a pen. Don’t cramp your style by trying to use just one input device all the time. Instead, use the device that’s best suited to the task at hand.
2.5ICC Profiles: The Importance of Profiling Your Monitor
In section 1.4, we discussed how Capture One deals with various types of color profiles. However, your monitor plays an extremely important role in helping you assess your work for output on other devices and in other media.

2.7 The View menu includes the command for selecting your desired proof profile. The program makes suggestions, but you can also set it up to display all the profiles currently installed on your computer.
“Soft proofing” is a term that comes from the printing industry and means using a precisely calibrated monitor to check how the colors in a document will look in print. Offset printing techniques are cheap when it comes to producing bulk print runs, but creating a single test print is comparatively expensive. Colors have to be mixed, printing machines fine-tuned, rolls of paper mounted, and so forth, so it makes sense to use digital tools to minimize the amount of resources used when proofing. Capture One’s proof profiles fulfill the same task by simulating various types of output on your monitor before you go ahead with a print or send your work to the layout department—a layout department that doesn’t want to have to send your work back because shadow detail is swamped.

2.8 In the Capture One profile chain, the proof profile comes into play right before the monitor profile.
The diagram shows that Capture One always uses the monitor profile to create the colors displayed in the Viewer and the Browser, even if you select View > Proof Profile > No profile. It also illustrates the importance of matching preceding and subsequent profiles in order to avoid color reproduction or rounding errors. There is little you can do to optimize the camera profile (see section 5.1), but it is simply negligent if you don’t take the trouble to optimize your monitor profile.

2.9 The profile provided with this monitor obviously has issues. The left-hand version was displayed with the profile activated, the right-hand one without.
ICC monitor profiles are available in various versions. Not all manufacturers adhere strictly to the same standards for profile creation, and some programs support different types of profiles anyway. Some display manufacturers have gained a reputation for providing “broken” profiles that programs such as Lightroom or Capture One cannot read.
This means that the program ends up displaying images without involving the monitor profile at all, producing significant color casts on the monitor that don’t actually exist in the image file. You will probably then attempt to “correct” the colors, but that leads to overcompensation because correct colors are simply being incorrectly displayed. The result of all this confusion is that the finished image looks totally different than how you originally intended, regardless of which application you use to view it. Things get even more complicated if you have prints made by an online service or specialist lab—that’s when the whole exercise gets expensive, probably costing more than a dedicated monitor-profiling device.
QUICK TIP
Colorimeters are quite cheap and enable you to analyze your monitor and create your own custom ICC profile. Such profiles are usually more accurate than those provided by monitor manufacturers. If you have some money to burn, I definitely recommend purchasing a colorimeter over a new camera bag. Datacolor and X-Rite offer a range of devices to suit every budget.
The fact that you profile your monitor at all is much more important than how you profile it. The profile describes your monitor in a way that enables Capture One and other image-processing programs to produce predictable results, whether digitally or in print.