“There is a logic of colors, and it is with this alone, and not with the logic of the brain, that the painter should conform.”
–Paul Cezanne
CHAPTER 2
THE BASICS OF COLORED GELS
When it comes to implementing color into your photography, you need to consider a few things. For example, you need take into account already exisiting (ambient) light and its color. Depending on whether you’re shooting in a dimly lit ballroom or a room bathed in sunlight, your ambient light will have a specific color temperature. Will you use it as one of your main light sources and add accent lights to create your shot? Or will you power your strobes high enough to eliminate all ambient light and build your scene one light at a time?
MY GEAR KIT
I shoot with a DSLR, and I use small flashes, or speedlites, though any of the techniques in this book can also be used with larger packs or monolights.
Early in my career, my minimal gear kit was a product of necessity (gear is expensive). Nowadays, even though I could afford to buy a larger light system, I still prefer small flashes and battery-powered systems. I’ve grown fond of traveling light and being able to set up quickly. I know how to use larger light systems and do, when necessary, but I typically don’t need a large studio and gear kit for the type of work that I do (check out my previous books, Studio Anywhere 1 and 2). If I find that I am in need of a larger space and larger lights and modifiers than I use in my studio—for example, when I‘m photographing a large group of people—I rent the equipment and let the client foot the bill.
My travel kit can be seen in Figure 2.1. Because my gear list is so sparse, much of my gear fits in an Ona Prince Street messenger bag. It holds two bodies, two lenses, two flashes, several sets of AA batteries, two spare camera batteries, gels, memory cards, a 7' light stand, and my 13" MacBook Pro. The only thing that won’t fit in the bag is my Cactus 24" softbox (Figure 2.2). With this two-light kit, I can create a white, gray, or black scene for portraits (in nearly any environment), as well as a range of color scenarios.
Working with these smaller lights means I rarely need an assistant, which keeps my production costs down—meaning more of the client’s budget goes into my pocket. Working alone on a quiet set also breeds intimacy, which allows my subject to be more relaxed and engaged. Finally, not needing to check a bag at the airport means my luggage always arrives.
I use a Canon 5D Mark III with an 85 f/1.2L II as my main body. I have a mirrorless Panasonic Lumix GH4 with a 12-35 f/2.8 lens that serves as my backup kit. I also use it for wide-angle shots (it’s also wonderful for video). Aside from my travel kit, in my studio I have the following: one C-stand (great for booming softboxes overhead); a Godox battery pack (to provide extended life for my main light); a macro lens (used for product work); a few extra Cactus flashes with light stands and softboxes; a tripod; and a projector.

Figure 2.1 I can fit two camera bodies, two lenses, two flashes, spare batteries, a pack of gels, a 13" MacBook with charger, and a 7' light stand.

Figure 2.2 Here’s my travel gear kit and softbox. No checked bags for this guy.
There are several reasons I use the Cactus flash system over Canon (or other brands). The main reason is that I can trigger off-camera flashes without using additional transceivers on them (meaning fewer batteries and less weight). All I need is one transmitter to turn flashes on and off, power them up and down, and zoom them in and out, all from the comfort of my chair. This allows me to quickly build up layers of light in a scene and troubleshoot individual lights without wasting time and energy going back and forth adjusting the lights. This also means that I have access to several unique lighting cues at the click of a button, meaning more options for the client. As a bonus, Cactus recently added high-speed sync and ETTL capabilities (though I prefer to shoot in manual mode). Last, but not least, Cactus gear is extremely durable (I’ve dropped flashes many times without damaging them) and affordable (they cost about $200 brand new).
I even love the challenge that comes with using minimal gear. It creates the need for me to improvise and innovate, which pushes me outside my comfort zone and keeps me sharp. I embrace the happy accidents that come with using battery-powered lights. Though I use a battery pack on my main light when shooting at my studio, my accent and background lights still run off AA batteries. This means that when a light’s batteries are getting low, it begins to misfire. Though this can be maddening, it often results in a great alternate shot, as seen in Figures 2.3 and 2.4.
As I set up lights to create Figure 2.3, I I thought it’d be cool to have a halo gradating outward from behind the subject, so I placed a light behind her, three stops brighter than the main light. Due to shooting rapidly at a high output, the background light misfired a few times. When I saw the image that resulted from the misfire, I realized that was the better shot, so I turned off the background light and snapped a few more frames.

Figure 2.3 This shot was taken with my originally planned lighting setup.

Figure 2.4 This shot, which I prefer, resulted from the background light misfiring due to low batteries.
COLORED GELS
Which types of gels should you buy? The short answer is: ones that fit your light. There are no “high-end” gels that make for better pictures. Colored acetate is colored acetate. If you’re using larger strobe heads, you can buy gels individually by the color, or in a multicolored pack, which typically come in 12 x 12" or 20 x 24" sheets.
If you’re using small flashes, like I do, getting your hands on every color gel imaginable is just a click away. I use colored lighting gels by Rosco, called Roscolux. Rosco produces a swatch sampler of all of their gels that they sell on Amazon for around $10, or even free at certain camera shops. This way you can check out the colors in person before committing to buying a full-sized sheet (Figure 2.5). It just so happens that the sample-sized gels perfectly fit small flashes. The sampler comes with hundreds of gels, many of which you won’t use because they are either a dull color, a subtle variation of a dull color, or they are a light-reducing density gel (no one using a 60-watt flash wants to reduce their output).

Figure 2.5 Rosco makes a gel sampler pack of every colored gel in their inventory. It just so happens that the sample gels perfectly fit small flashes.
The product description says the gels in the sampler can’t be used to modify a small flash because of the small hole in the corner where the sampler is bound, but the gels are long enough to fully cover my flash when the hole is positioned off to the side. Once I remove the pin (Figure 2.6), I select the gels I will actually use in a shoot, arrange them by color, and store them in a small credit-card wallet (Figure 2.7).

Figure 2.6 The sampler comes with hundreds of gels, many of which you won’t need. Remove the pin and select the gels you think you’ll use.

Figure 2.7 Gels, organized by color group, in a credit-card wallet.
In Figure 2.8, you can see that the holes in the gels don’t pose a problem. I simply fold that portion of the gel around the side of the flash and affix the gel with a strip of gaffer tape or duct tape. I make sure to keep several extra strips of tape stuck to my flash in case I need a piece, but forgot to bring my roll.
A quick note regarding a common misconception about gels: let’s say you selected an orange gel to light the wall in your scene, but when you take a shot, the orange isn’t saturated like you’d hoped. A common misconception would be to add an additional orange gel on top of the other gel to make the color more saturated. However, using two multiple gels will cut down on how much light is emitted on the flash. The richness of the color will not change. Instead, make sure that you’ve selected a vibrant enough gel, rather than a diluted or even color-corrective hue. This will save you quite a bit of stress.
Now I have a riddle for you: what has two thumbs and hundreds of differently colored gels that cost next to nothing? For answer, refer to author photo.

Figure 2.8 I fold the part of the gel with the hole around the side of the flash and attach it with gaffer tape or duct tape. I also keep several extra strips of tape on my flash in case of emergency.
FOLLOWING THE RULES
The term color temperature refers to how cool or warm a color is. It’s measured in degrees kelvin. Warm colors are on the low end of the scale, and cool colors are on the high end, with daylight-balanced lights falling near the middle at 6500K. The kelvin scale (seen in Figure 2.9) ranges from 1000K on the low end to over 10000K on the high end. Candlelight, for example, is in the range of 1800K, while a clear blue sky is on the high end of the scale, around 8000K. Daylight-balanced lights are right in the middle of the scale, at 6500K.
Cameras come with a number of preset white balances that will get you in the range of different lighting conditions, such as overcast, daylight, flash, fluorescent, and Tungsten. Your camera also has a kelvin preset so you can dial in the exact temperature that you’re working with.

Figure 2.9 The kelvin scale ranges from 1000K on the low end to over 10000K on the high end, with daylight balance falling near the middle at 6500K.
As with everything in the photography world, opinions and workflows vary from one photographer to the next. I personally don’t nitpick over my white balance. I find a preset that looks good on my camera screen and I start shooting. As long as the image is close to balanced, it’s really easy to fine-tune in post-processing. As it relates to the flash system I use, I find that the daylight white balance setting gives me more accurate results than the flash preset, which is too warm for my taste.
If you’ve ever purchased a speedlight, it likely came with a small selection of corrective gels. Corrective gels come in several colors of varying densities. They are placed on your flash to cancel out or neutralize the color of the ambient light in your environment. For example, if you’re shooting a portrait or event, such as a wedding reception inside a ballroom at night, the lights will most likely be dim tungsten lightbulbs, resulting in an orange coloration, as shown in Figure 2.10. When a flash is added, the cooler temperature of the flash light balances the orange of the ambient light for a more natural look for the model—but the rest of the environment will still be still very orange (Figure 2.11).

Figure 2.10 This shot was taken in dim tungsten light with the white balance set to flash.
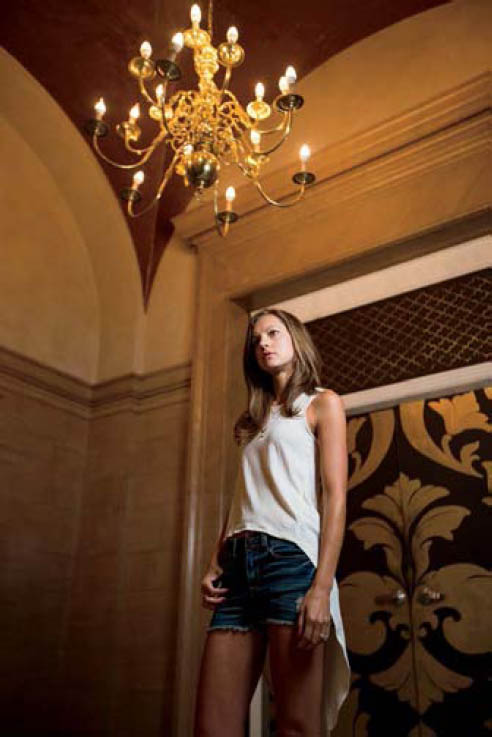
Figure 2.11 The cooler color temperature of the flash balances the coloring of the model, though the color of the environment is still very warm.

Figure 2.12 For this shot, the camera’s white balance is set to tungsten in an effort to dial back the warmth of the ambient light.

Figure 2.13 For this shot, the camera’s white balance is set to tungsten. The addition of an ungelled flash gives the image a blue color cast.

Figure 2.14 A simple white balance adjustment in post-processing won’t resolve this issue. You’ll need to match the color temperature of the flash to that of the room.
When you’re shooting in a tungsten-lit room and want to cool down the color of the ambient light, set your white balance to tungsten (Figure 2.12). However, if you were to add a flash, the subject would appear blue because the color temperature of the flash is much higher (and cooler) than the tungsten light (Figure 2.13). You might think you can correct the white balance in post-processing, but it’s not as simple as that. Once you color-correct the subject to eliminate the blue color cast, you’ll be back where you started, with an orange room (Figure 2.14). You’ll need to gel the flash to match the color temperature of the room.
This is a situation where you’ll benefit from using corrective colored gels with your flash. To cancel out the orange of the ambient light, use a half-strength (or full strength, if the room light is very warm) orange gel to match the color of your flash to the color of the ambient light, resulting in a more homogenous color in the final image (Figure 2.15).

Figure 2.15 Once an orange gel is added to the flash, the subject is lit neutrally, and the room will appear less orange.
Though it may seem counterintuitive to add a warm gel to your flash to eliminate warm ambient light, think of it in math terms. Any number divided by itself equals one, such as ten divided by ten. The same goes for color. Once you match the flash color to the room color, the color of the lights cancel each other out. Orange corrective gels are used to match tungsten-lit rooms; blue corrective gels are used to match daylight color temperatures; and green corrective gels match fluorescent lighting.
BREAKING THE RULES
While it’s all well and good to follow the rules, it’s not especially fun—nor does it ensure you’ll end up with an impactful image. Now that I’ve explained how to use color-corrective gels “properly,” let’s go into how to use them “improperly.” For example, instead of canceling out the orange ambient light, what if we made it more saturated? We cooled down the orange in the scene by matching color temperatures, so let’s go the other way. By adding a blue gel to the flash and then matching the white balance to that color, the orange ambient light will seem even more orange.
Since there are no preset white balances on your camera that can correct for the extreme warm shift caused by your blue-gelled flash, you’ll have to shift it manually. Find the x/y axis in your camera’s white balance menu (Figure 2.16). Note how I’ve shifted the white balance all the way to the right, which adds a great deal of red to my image. With this adjustment, the ambient light in the scene will be even more vibrant and warm in the final image (Figure 2.17). Now, when I light my subject with the blue-colored flash, she’ll appear balanced, but the background will be even more orange than before we started experimenting (Figure 2.18).

Figure 2.16 Since there are no preset white balances on your camera that will accommodate the kind of extreme warm shift you’ll need to counteract the blue-gelled flash, you will need to go into your white balance menu to shift the red balance to its most extreme point.

Figure 2.17 The warmed-up white balance increases the vibrant orange colors of the tungsten-lit room.

Figure 2.18 The blue-gelled flash will balance the color on the subject without affecting the (very) warm background.

Figure 2.19 In this image, the cool color of the flash matches the cool color of the ambient light on a cloudy day, resulting in a balanced color mix of strobe and ambient light.

Figure 2.20 In this image, my flash is gelled orange and my white balance is set to tungsten, resulting in blue ambient light.
Now let’s consider a cool-temperatured scenario. Figure 2.19 was shot in a naturally lit hallway on a cloudy day, which means the ambient light had a blue color to it. By setting my camera’s white balance to a similar temperature (such as flash, cloudy, or shade), I was able to neutralize the color of the ambient light.
As I mentioned in the tungsten scenario, once you pinpoint the color of the ambient light in the room, you can enhance it by gelling your light the opposite color (remember the color wheel for color relationships). If I want to enhance the existing blue color of the hallway, I’ll need to add the opposite color to my flash. Adding an orange gel to the light and setting the white balance to tungsten lit my subject neutrally while making the rest of the room appear blue (Figure 2.20).
Green corrective gels are generally used to cancel out the effect of fluorescent ambient light. According to the color wheel, the opposite of green is magenta. A green gel on your flash and a white balance shifted to the magenta side of the white balance x/y axis will counteract green, fluorescent ambient light. However, using that green flash on something purple (Figure 2.21) will exaggerate the purple in the scene (Figure 2.22).
You can also throw out the rule book altogether, and experiment with different combinations of white balance and a gelled flash. This is precisely how I transformed the boring, overcast scene in Figure 2.23: I shifted the white balance to tungsten, making the scene go blue; then I added a red gel to my main light to get a punchy, red-and-blue palette.

Figure 2.21 By using a green gel on the flash and shifting white balance to magenta to counteract the green, the final image will look magenta. Using a green gel to photograph an environment that is already magenta, such as a sunset, will make the color in the final image especially vibrant.

Figure 2.22 There’s a Purple Rain joke hiding somewhere in that puddle.

Figure 2.23 To create this image, I set the white balance to tungsten (which shifted the ambient light to be blue), and used a gel to light my subject red.