“They were color pictures of black and white . . .”
–Bill Watterson, Calvin and Hobbes
CHAPTER 10
COLOR IN BLACK-AND-WHITE
You may be asking yourself why there’s a chapter about black-and-white image-making in a book dedicated to color. However, if you’ve spent much time in Lightroom, you may have noticed that the Hue, Saturation, and Luminance sliders update to read “Black & White Mix” when you switch to Black & White mode. This feature allows you to raise or lower the light levels of each indivudal color from your original image, which means that you can make more nuanced adjustments to specific gray levels in your image than you could by adjusting the contrast or tone curves. In this chapter, we will cover how to intentionally light your images with color in order to give you more control when editing black-and-white files.
COLOR GRADING
In Figure 10.1, I’ve projected bands of color onto my daughter, Margot, to illustrate the control the Black & White Mix offers. I began by toggling over to Black & White mode at the top of the Basic panel (Figure 10.2). When you convert from color to black-and-white, there is a predetermined mix already set (Figure 10.3). I always start by double-clicking the words “Black & White Mix” to zero out all of the sliders (Figure 10.4) so I can better determine which color sliders I need to raise and which I need to lower to get the look I want.

Figure 10.1 The RAW file. I lit my daughter with a multicolored projection to demonstrate how to adjust the colors in Lightroom’s Black & White mode.

Figure 10.2 Toggle over to Black & White mode to begin color grading your file.
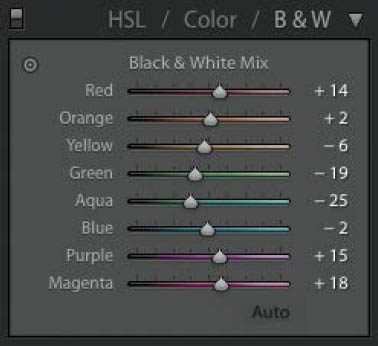
Figure 10.3 The color sliders have a preset “mix” after converting to Black & White mode.

Figure 10.4 Double-click on the words “Black & White Mix” to zero out the preset mix.
Next, I pick a cool color and a warm color, raising one and lowering the other. In this case, I raised the cyan and blue channels and lowered the red and orange channels (Figure 10.5). Now the bands that were red and orange are nearly black and the bands that were cyan and blue are light gray. To further manipulate the colors, you can adjust the Temp and Tint in the White Balance panel, which will deepen or lighten gray tones. As you can see in Figure 10.6, my dark-gray tones turn black and my light-gray tones turn nearly white.
Once I get my colors the shade I want, I can add a color tone to the black-and-white file by adjusting the RGB tone curve (Figure 10.7). Note that by adjusting the colors in the tone curve, the gray levels and Black & White Mix won’t be affected. Next, I bumped up the clarity to define the color bands and raised the green slider and eased up on the red slider. I further fine-tuned the colors in the Camera Calibration panel, shifting the shadow tint green and lowering the saturation of the blue channel. As you can see in the final image (Figure 10.8), color bands that were previously light gray are now black, and color bands that were previously a darker tone are now lighter.

Figure 10.5 I raised the cyan and blue channels and lowered the red and orange channels to affect the warm and cool colors. Then I shifted the Temp and Tint in the White Balance panel until I got a look that I liked.

Figure 10.6 With a small change to the Temp and Tint sliders, certain colors shift from gray to black.

Figure 10.7 The Lightroom settings. I increased the Clarity to define the individual color bands. I added contrast by making a tone curve adjustment. I also lowered the saturation of the blue primary slider in the CC panel.

Figure 10.8 The final shot. Colors that originally converted to light gray are now black, and colors that originally converted to dark gray are now light.
RED AND CYAN
Early on in my gel experiments, I used Black & White mode as a band-aid when I failed to achieve the colors I liked. Now I use it as an opportunity to provide clients with more options, in addition to the color images of the same pose. I used the color bands in the previous section to demonstrate the power of toning individual color channels; however, when I gel my lights specifically for creating black-and-white images, I stick to red and cyan.
These colors cover the cool and warm parts of the color spectrum, and I can adjust them in the WB or CC panels to get a wide range of tonal values. In Figure 10.9, you can see that Abby is lit with a soft red light on the left and a cyan light on the right. By lowering the red channel, I can give this two-light shot the appearance of a one-light portrait (Figure 10.10). It’s kind of like being able to add or remove a bounce fill after the fact.

Figure 10.9 When gelling my lights for a black-and-white image, I use cyan and red to cover both the cool and warm parts of the color spectrum.

Figure 10.10 Having the ability to easily raise or lower shadows in an image is like adding or removing a bounce fill after the fact.
If you’ve learned nothing else about me in the previous chapters, it should be clear by now that I always take experimentation a step further to see how many ways I can work a technique. For instance, let’s revisit Figure 9.26, when I used a red projection in combination with a cyan strobe. Now, knowingly lighting this subject for a black-and-white image, I position the projector to display a red, broken-glass pattern over my subject’s eye (Figure 10.11). I add a cyan-gelled strobe, which helps create a more defined edge to the red projection. When I lower the red channel in post-processing, the red pattern turns black (Figure 10.12). I’ve dubbed the technique eliminance, as in the elimination of luminance. It’s a really fun technique to use in your experimentation.

Figure 10.11 I project a red pattern on my subject, and use a cyan strobe to help define the edges of the pattern.

Figure 10.12 I’ve termed this technique eliminance, as in the elimination of luminance.