Additional shooting options are available from the Sony a6600’s Camera Settings II menu. These settings are adjustments that you generally don’t make during a particular shooting session but need to tweak more often than those in the Setup menu, which is described in Chapter 6. This menu has some very cool features, including the ability to assign many different behaviors to a variety of buttons and controls on your camera or lens. Sony has moved many menu items for the a6600 when compared to some of its predecessor a6xxx-series cameras, grouping some (but not all) related settings together more logically.
Camera Settings II Menu Entries
Figure 4.1 shows the first screen of the Camera Settings II menu. As you can see, at most only a half-dozen items are displayed at one time. The items found in this menu include:
Movie (Pages 01–03)
- Exposure Mode (Movies)
- Exposure Mode (S&Q)
- File Format (Movies)
- Record Setting (Movies)
- S&Q Settings (S&Q)
- Proxy Recording
- AF Drive Speed (Movies)
- AF Tracking Sensitivity (Movies)
- Auto Slow Shutter (Movies)
- Initial Focus Magnification (Movies)
- Audio Recording
- Audio Recording Level
- Audio Level Display
- Audio Out Timing
- Wind Noise Reduction
- Marker Display (Movies)
- Marker Settings (Movies)
- Movie with Shutter
Shutter/SteadyShot (Page 04)
- Silent Shooting (Stills)
- e-Front Curtain Shutter
- Release without Lens
- Release without Card
- SteadyShot
- SteadyShot Settings
Zoom (Page 05)
- Zoom
- Zoom Setting
- Zoom Ring Rotate
Display/Auto Review (Pages 06–07)
- DISP Button
- FINDER/MONITOR
- Finder Frame Rate (Stills)
- Zebra Setting
- Grid Line
- Exposure Setting Guide
- Live View Display
- Auto Review
Custom Operation (Pages 08–09)
- Custom Key (Stills)
- Custom Key (Movies)
- Custom Key (Playback)
- Function Menu Settings
- My Dial Settings
- Dial/Wheel Setup
- Av/Tv Rotate
- Dial/Wheel EV Compensation
- Function of Touch Operation
- MOVIE Button
- Dial/Wheel Lock
- Audio Signals
Exposure Mode (Movies)
Options: Program Auto, Aperture Priority, Shutter Priority, Manual Exposure
Default: Program Auto
My preference: Program Auto works well for me when shooting movies.
This setting is the first on the Camera Settings II-01 (Movie 1) menu. It is available only when the mode dial is in the Movie position and allows you to specify which exposure mode is used (from among P, S, A, and M options) when shooting movies; the mode you select can be different from the one set for still photography or S&Q modes.
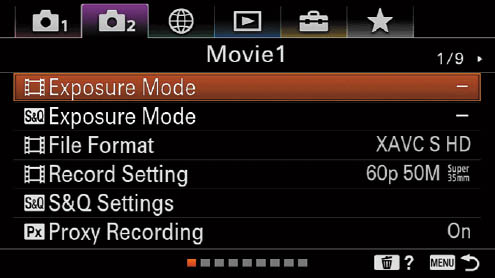
Figure 4.1 The Camera Settings II-1 (Movie 1) menu.
Exposure Mode (S&Q)
Options: Program Auto, Aperture Priority, Shutter Priority, Manual Exposure
Default: Program Auto
My preference: Program Auto
This setting is identical to the previous entry, except that it applies only to S&Q (Slow-motion and Quick-motion) capture and is grayed out if the mode dial is not set to the S&Q position. As before, the mode you select here can be different from the one set for still photography or movie shooting modes.
File Format (Movies)
Options: XAVC S 4K, XAVC S HD, AVCHD
Default: XAVC S HD
My preference: AVCHD
The a6600 offers full HD (high-definition) video recording in the AVCHD format. Advanced video shooters can also choose from the XAVC S 4K or XAVC S HD formats, which support faster recording speeds for improved quality, as I’ll explain in Chapter 10.
By default, movies are recorded in XAVC S HD, but this menu item allows you to switch to XAVC S 4K or AVCHD. In any case, you’ll need a fast memory card of at least 64GB capacity to support the higher frame rates possible with these pro formats. The XAVC S 4K format is especially demanding because of its ultra-high 3840 × 2160–pixel resolution (roughly four times that of full HD).
AVCHD clips are limited to roughly 2GB in size; when your movie file reaches that limit, the a6600 will continue recording using a new file that it creates automatically. If you’re using an external recorder, video monitor, or other device using the a6600’s HDMI connection, the real-time image is not displayed on the camera’s LCD monitor as you shoot.
Record Setting (Movies)
Options: Varies
Default: XAVC S: 60p 50M
My preference: XAVC S: 60p 50M
This item allows you to choose from various options if you are using XAVC S 4K, XAVC S, or AVCHD. Your choices are shown in the left-hand column of each of the tables that follow Table 4.1. Note that the frame rates apply to countries using the NTSC system, such as the US, Japan, and some other countries. For countries that use the PAL system, 25, 50, and 100 frame rates replace 30, 60, and 120 fps, respectively. I’ll explain frame rates, scanning, and bit rates in Chapters 10 and 11. All the terminology and concepts will make more sense when you read Chapters 10 and 11, which provide more of an education on many aspects of movie making.

S&Q Settings (S&Q Motion)
Options: Record Setting: 60p, 30p, 24p (NTSC); Frame Rate: 120, 60, 30, 15, 8, 4, 2, 1 frames per second
Default: 30p, 120 fps
My preference: N/A
This is a great feature if you want to shoot some slow-motion movies as a special effect, analyze the dynamics of a particular motion, or speed up a sequence to provide a humorous herky-jerky appearance. Sony’s implementation of high/slow frame rate photography, which it now calls slow-motion/quick-motion, allows you to capture a silent (no sound) slow-motion video at up to 120 frames-per-second rate (100 fps for PAL). It will play back 4X or 5X slower, depending on whether you select 30p/25p or 24p as your Record Setting option within this menu entry. You can also record at slower speeds (down to 1 frame per second) for speeded-up, Charlie Chaplinesque footage.
Here are your options, and how it works:
- Record setting. This parameter is labeled a bit misleadingly. It determines the playback speed of your video clip and, therefore, how much of a slow-motion/fast-motion effect you will see when viewing the movie. Your choices are 60p, 30p, or 24p when using the NTSC television system. Think of this setting as a factor, which, when dividing the Frame Rate, determines the motion effect you get. All will become clear in a moment.
- Frame rate. Here you select the number of frames per second captured in S&Q mode. You can select 120, 60, 30, 15, 8, 4, 2, and 1 frames per second. (Scroll down to find the last two options.) When the frames per second is divided by the record setting, you will arrive at the slow-motion effect or speed factor. I’ll show you some typical results next.
Slow-Motion
When you capture video at any frame rate and then play it back at a slower frame rate, the result is slow-motion. For example, if you choose 120 fps for the Frame Rate, a 10-second video will include 1,200 individual frames (120 fps × 10). If you’ve chosen 30 fps for your Record Setting, those frames will require 40 seconds to play back (1,200 frames divided by 30). The playback time is increased 4X. Other playback times involve different amounts of slow-motion: 24 fps gives you 5X playback. (When shooting at 120 fps, the 60 fps Record Setting is not available.) Table 4.2 shows the amount of slow motion you get with each combination of frame rates from 30 to 120, and playback settings of 60, 30, and 24 frames per second.
Quick Motion
Frame rates slower than 30 fps gives you speeded-up quick-motion instead of slow-motion. For example, with a Frame Rate of 4 frames per second you’ll capture just 40 frames in 10 seconds. When viewed at a Record Setting of, say, 24 fps, that 10-second clip will be compressed into only 1.7 seconds of viewing time. Obviously, because of the speed-up factor, you’ll get the maximum effect when you shoot longer sequences that can be displayed very, very quickly. Look over this table, and the explanation that follows to calculate your own slow-/quick-motion effects.
TABLE 4.2 Slow-Motion/Quick-Motion Effects

To calculate the slow-motion effects you can look forward to, multiply any of the figures labeled “slow-motion” by the number of seconds captured in your original clip. For example, if you shot a two-minute, 120 fps sequence and played it back at 30p (4X slow-motion), you’d need 8 minutes to watch the whole thing. Going the other way, a two-minute clip captured at 4 fps and played back at 30p would zip by in four seconds of frantic action.
Obviously, in real life you probably won’t be shooting slow-motion video for two whole minutes (a golf swing or sports action sequence can be captured in a few seconds), and will be shooting quick-motion, time-lapse-like clips (such as a blooming flower or the march of the stars across the night sky) for longer periods so you’ll have time to enjoy what you see. As you work with this cool feature, you may have to experiment to see which combination of frame rate capture speeds and the three possible playback speeds work best for you in a given situation. Also, keep in mind that many video-editing programs can handle clips captured at various frame rates and output them at a different rate for playback.
All movies are recorded in XAVC S HD format, and, as noted earlier, are silent. When shooting slow-motion video, TC Run, TC Output (under TC/UB Settings, described later), and 4K Output Selection are disabled. And, obviously, fast frame rates require shorter shutter speeds, so be ready to boost your ISO settings if necessary to cope.
Proxy Recording
Options: On, Off
Default: Off
My preference: Off
If you like, you can record a compact, low-bit-rate version of your XAVC S movies simultaneously while capturing your main movie. Although lower in quality, these “proxy” recordings are suitable for emailing, display on a smartphone or tablet, or uploading online.
While capturing your full HD (1920 × 1080) video, the a6600 also saves a standard HD (1280 × 720) version at a paltry 9 Mb/second, using the same frame rate (that is, 60/50p, 30/25p, or 24p) selected for the main video. You must use the XAVC S HD record setting with a frame rate other than 120/100p. A “Px” label appears over a main movie’s icon during image review to indicate that a proxy movie was recorded at the same time (the proxy itself cannot be displayed or edited in-camera). Any time you delete the main movie from your memory card the proxy is erased, too.
AF Drive Speed (Movies)
Options: Fast, Normal, Slow
Default: Normal
My preference: Normal for most scenes, Fast for sports and action
This entry is the first in the Camera Settings II-02 (Movie 2) menu (shown in Figure 4.2). It is a movies-only setting for the a6600 that is used to adjust how quickly the camera focuses while capturing video. It’s used in conjunction with AF Track Sensitivity (Movies), described next. Unlike stills, when focus changes while shooting movies it is apparent in the clip and can be undesirable. Your three options are as follows:
- Fast. The camera focuses as quickly as possible, but with slightly less precision. This setting is good for sports, action, photojournalism, and street photography, and any situation where it’s important to keep the main subjects in focus as they move around. In such situations, the automatic focus adjustments add to the feeling of following the action; any delay in refocusing would be disconcerting.
- Normal. The AF responds smoothly to subject movement by refocusing gradually. With scenes that are not filled with constant action, this mode may be the least noticeable to the viewer.
- Slow. Focusing is much less speedy and is a good choice if your subjects are moving at a constant rate of speed and direction. This setting will allow the a6600 to smoothly follow focus. Choose Slow to be on the safe side, in such situations, particularly when using older lenses that are themselves somewhat pokey in achieving focus.
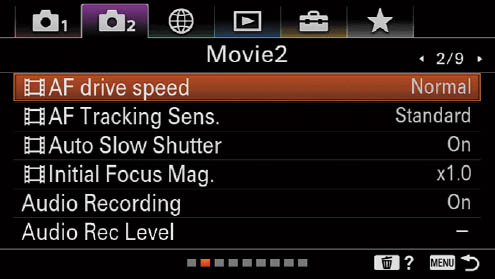
Figure 4.2 The Camera Settings II-2 (Movie 2) menu.
AF Track Sensitivity (Movies)
Options: Responsive or Standard
Default: Standard
My preference: Standard
This entry works hand-in-hand with the AF Drive Speed entry above. It is another movies-only setting and determines how quickly the camera unlocks focus from the subject it is currently tracking and focuses instead on another subject that intervenes. For example, if you’re shooting a video of a child or grandchild enjoying a playground and another kid unexpectedly darts between you and your youngster, you don’t want the camera to switch to the intervening subject. With this feature set to High, the camera will very quickly switch to the other youth, and then should return its attention to your child—but often, not quickly enough. A better choice would be to use Normal, so that the camera briefly ignores the other kid, who is likely to have moved on. Focus tracking will remain on the intended “star” of your video. Your options include:
- Responsive. The camera quickly responds to new subjects that cross the frame. This is the best setting to use for fast-moving subjects, such as sports or frenetic children, as long as you don’t expect intervening subjects. The camera will smoothly follow your subjects, especially if AF Drive Speed has been set to Fast, too.
- Standard. Response to movement is a bit slower, so that the camera doesn’t constantly refocus as subjects move about the frame. This is the default and should be used when there is only moderate movement, and especially if the movement is across the width or height of the frame (rather than coming toward you or away from you), and when you’re using a small f/stop, because the increased depth-of-field will eliminate the need for most refocusing.
Auto Slow Shutter (Movies)
Options: On, Off
Default: On
My preference: Off
When shooting movies in very dark locations, the best way to ensure that the video clips are bright is to use a slow shutter speed. When this menu item is On, the camera can automatically switch to a slower shutter speed than its default. This is a useful feature, since it works in any camera operating mode; there’s no need to use S mode and set a slow shutter speed yourself in dark locations. I like to leave it off, because when I am capturing video with a slow shutter speed, I want to make sure I have the camera mounted on a tripod, and the need to activate this feature manually is a reminder to me that I need to do so.
Initial Focus Magnification (Movies)
Options: 1X, 4X
Default: 1.0X
My preference: 4X
You can specify the initial magnification presented when the Focus Magnifier is invoked while shooting movies. It’s equivalent to the corresponding still photography setting in the Camera Settings I-13 menu. The default is also 1.0X (no magnification), but the optional zoomed-in choice is 4X. The default is fine if your first step is frequently to move the magnification window around in the frame before zooming in. At 1.0X, you see the entire frame and can position the window anywhere you like. I usually want to enlarge the image to 4X so I can study focus.
Audio Recording
Options: On, Off
Default: On
My preference: On
Use this item to turn off sound recording when you’re shooting videos, if desired. In most cases you’ll want to leave the setting On, to capture as much information as possible; the audio track can be deleted later, if desired, with software. However, there could be occasions when it’s useful to disable sound recording for movies, for example, if you know ahead of time that you will be dubbing in other sound, or if you have no need for sound, such as when panning over a vista of the Grand Canyon. At any rate, this option is there if you want to use it.
Audio Recording Level
Options: Levels from 0 to 31
Default: 26
My preference: On
You can adjust the recording level of the camera’s built-in or external microphones using this entry, which also enables/disables the audio level overlay on the screen while movies are captured. To use this feature, just follow these steps:
- 1. Rotate the mode dial to the Movie position.
- 2. Navigate to the Camera Settings II-02 menu, highlight Audio Rec Level, and press the center button.
- 3. The screen shown in Figure 4.3 appears. Rotate the front or rear dials or control wheel or use the left/right controls to adjust the volume level up or down. There are 32 different levels, from 0 to 31.
- 4. Press the center button to confirm and exit the screen.
- 5. Alternatively, you can use the up/down buttons to highlight Reset to return the recording level to the default value. Then press MENU to exit.
- 6. If Audio Recording and Audio Level Display are set to On, an overlay appears at the lower left of the EVF or LCD monitor showing the current audio levels for the left/right channels (Ch1/Ch2).
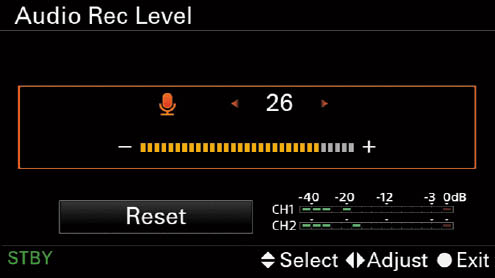
Figure 4.3 Set Audio level.
Audio Level Display
Options: On, Off
Default: On
My preference: N/A
This entry is the first in the Camera Settings II-03 (Movie 3) menu. (See Figure 4.4.) It is available only when the mode dial is set to the Movie position. It enables/disables display of audio level indicator bars, so you can monitor sound recording levels visually. The volume bars do not appear when Audio Recording is set to Off, or the DISP setting is set to No Disp. Info., or you are recording slow-motion or quick-motion video. When in movie standby mode, the bars will display so you adjust the sound level before starting to capture.
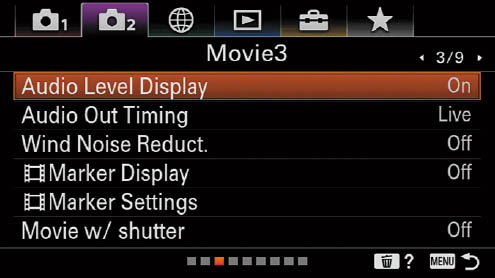
Figure 4.4 The Camera Settings II-03 (Movie 3) menu.
Audio Out Timing
Options: Live, Lip Sync
Default: Live
My preference: Live
With the a6600, audio out refers to the sound signal you hear when monitoring the recording through the camera’s headphone jack. In this mode, the sound you hear may be slightly out of sync with the video, because the video must be processed by the camera’s digital processing chip before you see it on the LCD or EVF. Using an external microphone may contribute to this delay. Sony offers two different audio modes that can ignore or compensate for this lag.
- Live. If you are not using headphones and are listing to the audio in real time, this setting allows you to hear the sound being recorded in real time, with no delay. Use this mode if you are watching the action in the scene directly, rather than viewing it through the viewfinder or on the LCD monitor.
- Lip Sync. In this mode, the audio and video shown while the movie is being captured are delayed by the same amount and will be in sync with each other if you monitor using headphones in conjunction with the EVF or LCD.
Wind Noise Reduction
Options: On, Off
Default: Off
My preference: Off
Designed to muffle the howling sound produced by a loud wind passing over the built-in microphones, this item (when On) is for use when recording video. It’s off by default because Wind Noise Reduction (provided by the camera’s processor) does degrade sound quality, especially bass tones, and the recording volume is reduced. I recommend setting it to On only when shooting in a location with loud wind noises.
Marker Display (Movies)
Options: On, Off
Default: Off
My preference: N/A
When shooting video that will end up being displayed in other than HDTV’s 16:9 ratio, it’s useful to know exactly where the boundaries of other types of frames are, so the image can be composed to keep important subject matter contained within those boundaries. This setting lets you turn the display of any of four different types of markers on or off, as described in the Marker Settings entry that follows.
Marker Settings (Movies)
Options: Center, Aspect Ratio, Safety Zone, Guideframe
Default: All marker settings Off
My preference: N/A
This entry allows you to choose which markers are displayed during video capture. You can select any or all of the following, if you like, although using more than one or two markers is likely to be confusing. Your choices (shown in Figure 4.5) are as follows:
- Center—On/Off. Whether or not the center marker is shown in the middle of the shooting screen. The default value is Off.
- Aspect—Off/4:3/13:9/14:9/15:9/1.66:1/1.85: 1/2.35:1. This activates a marker showing your preferred aspect ratio. The default is Off.
- Safety Zone—Off/80%/90%. Sets the safety zone display that represents the standard range that can be received by a household standard-definition television.
- Guideframe—On/Off. Enables/disables a guide frame that can be used to verify whether a subject is parallel or perpendicular.
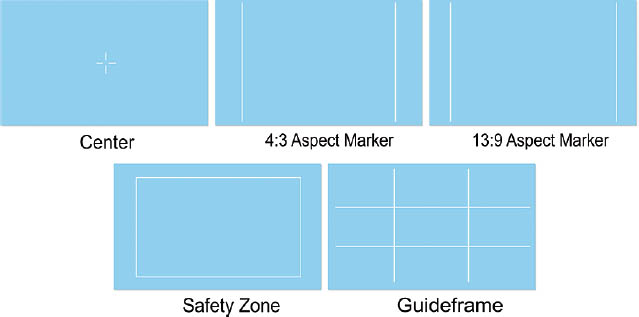
Figure 4.5 Video guide markers.
Movie with Shutter
Options: On, Off
Default: Off
My preference: Off
Your a6600 gives you the option of using the shutter release to start and stop shooting movies as an alternate to the Movie button located to the right of the viewfinder. Select On, and either button can be used; choose Off, and only the Movie button will activate/stop movie capture. It’s usually easier to find the shutter release, which is larger and located on top of the camera, when your eye is up to the viewfinder. It’s easy to press the AF-ON or even AEL button by mistake. If your current session will be confined to video capture, you’ll probably decide that using the shutter button will be more convenient.
I like this option when I am capturing movies hand-held. If the a6600 is mounted on a tripod and I am generally framing, composing, or focusing using the LCD monitor, I’ll usually use either the Movie button or a remote release like the Sony RMT-DSLR2 to stop/start video capture. (The latter helps avoid camera motion from “stabbing” the Movie button with a finger.)
Silent Shooting (Stills)
Options: On, Off
Default: Off
My preference: Off
This is the first entry in the Camera Settings II-04 (Shutter/SteadyShot) menu. (See Figure 4.6.) Because the a6600 model has an electronic front curtain shutter (described next), you can take still photographs without the audible clunk that the physical shutter makes. Silent Shooting is available only in P, S, A, or M shooting modes.
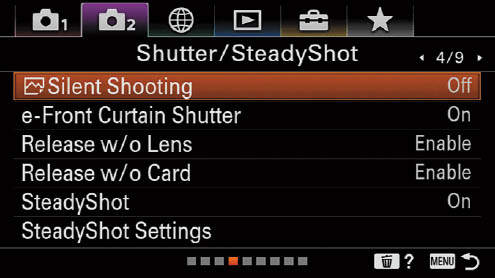
Figure 4.6 The Camera Settings II-04 (Shutter/SteadyShot) menu.
However, the most important limitation of silent shooting is that you can’t use electronic flash when in this mode. There’s a whole list of other functions that are not available in quiet mode. You can’t use it when making Bulb exposures, using Auto HDR, Picture Effect, or Picture Profile settings, nor when using Long Exposure noise reduction. It’s also disabled if you have the electronic front curtain shutter enabled. Bracket shooting is not available when shooting RAW or RAW & JPEG formats when you’ve specified Uncompressed for your JPEG format.
You can turn the silent shutter feature on or off using this menu entry. Note that even with silent shutter activated, the camera will not be totally silent. The opening and closing of the aperture as the f/stop changes may make a faint noise, and the focusing motor and zoom motor (in power zoom lenses) may also be heard. However, I’ve spooked a few colleagues when they saw me take a picture and could not hear the familiar shutter click.
The “rolling shutter” in silent shooting mode (the camera records the 6,336 lines in a full-resolution image, one line after another) may produce distortion with moving subjects, because as a subject crosses the frame, the portion at the top of the frame will be in a different position from the part of the subject at the bottom of the frame. This “Jell-o” effect may be most noticeable when shooting uncompressed RAW images. To reduce the distortion, change the RAW file type to Compressed, and use continuous shooting. You’ll get the best results, however, capturing in JPEG mode.
e-Front Curtain Shutter
Options: On, Off
Default: On
My preference: N/A
This feature reduces the lag time between when you press the shutter, and when the picture is actually taken. It can also reduce a certain type of blurring due to slight camera motion when the physical shutter “clunks” open. When set to On, the electronic front shutter curtain is used by the camera at the start of the exposure, rather than the mechanical shutter. (The physical rear shutter curtain is still used to conclude the exposure.)
Although e-front curtain shutter usually works very well, when you are using an unusually wide aperture, such as the Sony/Zeiss T* FE 55mm f/1.8 ZA lens, for example, and a very fast shutter speed, areas of the photo may exhibit a secondary (ghost) image and bokeh (the out-of-focus portion of the image) may be affected. When that happens, set this menu item to Off and the camera will use only its mechanical shutter mechanism, and the problem will not occur. Sony also recommends turning the e-curtain Off when you are using a lens made by another manufacturer, as exposure may be uneven or incorrect.
The problems pop up because the e-curtain is, in effect, too fast. It reduces the shutter lag to the point that the iris may not have sufficient time to close completely before the exposure begins. So, the f/stop used at the beginning of the exposure can be different from the one used for the rest of the exposure (after the iris closes down to the correct aperture completely). The overall exposure will thus be incorrect, regardless of shutter speed. In addition, at higher shutter speeds, exposure grading can occur. At those higher speeds, the “slit” (the gap between the front and rear curtains) is increasingly small as the shutter speed becomes faster, and parts of the image exposed initially will receive more exposure than those exposed later.
Exposure grading is worse with lenses that need a longer time to close their irises, and so is more likely with non-Sony lenses, older Sony lenses, and Sony/Minolta/third-party A-mount lenses used with one of the LA-EA adapters. The irises of those lenses aren’t designed to respond at the speeds demanded by an electronic front curtain shutter. In addition, even theoretically compatible lenses may have slower iris response due to dust/grit infiltration. You’ll want to use newer, good condition E-mount lenses, or adapted lenses that are manually stopped down to the “taking” aperture prior to exposure.
Release w/o Lens
Options: Disable, Enable
Default: Enable
My preference: Enable
By default, the a6600 will refuse to try to take a photo when a lens is not mounted on the camera; this is a logical setting, especially for distracted folks who fail to notice that they have a lensless camera body hanging around their necks. If you chose Enable, however, the camera will open its shutter when you depress the shutter release button when no lens is mounted. This option will be useful if you attach the camera to some accessory such as a telescope or a third-party optic that’s not recognized as a lens. I prefer to select Enable, because I frequently use oddball third-party and “foreign” lenses on my camera, such as my favorite Lensbaby distortion lens or a fisheye lens designed with a different camera mount.
Release w/o Card
Options: Disable, Enable
Default: Enable
My preference: Disable
The ability to trip the shutter without having a memory card installed is not especially useful, unless you want to hand your camera to someone for demonstration purposes and do not want to give them the capability of actually taking a picture. This happens frequently at trade shows, where vendors want you to try out their equipment, but would prefer you not leave the premises with any evidence/image samples, especially if the memory card in question belongs to the vendor rather than you.
On the contrary, it’s more likely that you’d prefer to have your own camera inoperable if you’ve forgotten to insert a memory card. It’s easy to miss the orange No Card warning that flashes when the non-picture is taken. Disabling release when a card is absent can help you avoid losing a card (you removed it to load some pictures onto someone else’s computer) or having to sheepishly ask the bride and groom if they would be willing to re-stage their wedding.
SteadyShot
Options: On, Off
Default: On
My preference: On
The a6600 has the ability to use its built-in body image stabilization (IBIS) as well as the optical image stabilization (Optical SteadyShot or OSS) built into certain lenses. If for some reason you want to disable SteadyShot, you can use this menu entry. Some lenses, like the Sony FE 24-105 f/4 G OSS have an Optical SteadyShot On/Off Switch. If so, this menu setting is not available.
SteadyShot is on by default to help counteract image blur that is caused by camera shake, but you should turn it off when the camera is mounted on a tripod, as the additional anti-shake feature is not needed, and slight movements of the tripod can sometimes “confuse” the system. In other situations, however, I recommend leaving SteadyShot turned on at all times. I’ll explain exactly how SteadyShot works in Chapter 12.
SteadyShot Settings
Options: Auto, Manual (8mm–1000mm)
Default: Manual, 8mm
My preference: Auto
This setting allows the camera to adjust the behavior of SteadyShot, based on the amount of image stabilization typically required at particular focal lengths. That is, telephoto lenses “magnify” camera shake and thus can benefit from more aggressive image stabilization. Indeed, this aspect is one reason why in-lens IS often is touted as superior to in-body stabilization. Your a6600 gives you the opportunity to benefit from both IBIS and lens-based image stabilization! This setting is not available if you have disabled SteadyShot using the entry above. If your lens has Optical SteadyShot, settings can only be changed using the control on the lens.
- Auto. When this default setting is chosen, the camera receives focal length information electronically from the lens and can activate the appropriate amount of SteadyShot anti-shake.
- Manual. You can enter the focal length of the lens or the zoom position from the range 8mm to 1000mm. This is especially useful if you’re working with a teleconverter, which produces magnification beyond that which the camera can detect from the supplied lens data alone. It’s also a good option if you are using a lens (possibly a “foreign” lens with an adapter) that cannot communicate focal length to the a6600.
Zoom
Options: Smart or Clear Image Zooming in shooting mode
Default: None
My preference: None
This is the first entry in the Camera Settings II-05 (Zoom) menu. (See Figure 4.7.) The feature adds an ersatz “power zoom” control to the a6600, which otherwise lacks one. It’s useful once you understand what it does and how it works, but Sony has done its best to make the feature as confusing as possible.
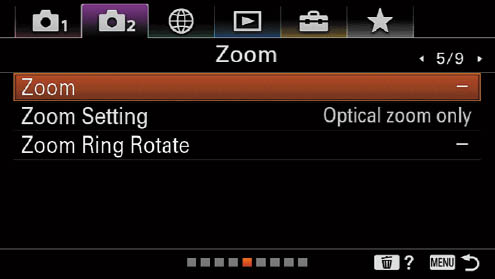
Figure 4.7 The Camera Settings II-05 (Zoom) menu.
Some other cameras in the Sony mirrorless lineup, such as the a5100, have a physical zoom lever located concentrically with the shutter release. None of the a6xxx-series models has this feature. But, in effect, you still have five different ways to zoom while you’re taking still photographs or movies. This list will sort out the options for you:
- Optical zoom with zoom ring. Zoom lenses always have a ring around their barrel that can be rotated back and forth to zoom in or out on your subject. The sole exception might be a few lenses that have a power zoom lever that takes the place of the zoom ring.
- Optical Power Zoom. Certain E-mount lenses include a PZ (power zoom) designation in their name. These include several APS-C format Sony lenses, and the Sony 28-135mm FE PZ F4 G OSS full-frame E-mount power zoom lens. They all have a zooming motor built in that can be activated by sliding a switch on the lens barrel itself. Alternatively, you can zoom these lenses using a camera’s zoom switch (if you own an APS-C model that has one).
- Smart Zoom. This is one of three zoom options that take you beyond the true optical zoom range of your lens into the realm of digitized zooming, which produces a zoom effect by taking the pixels in the center of the original image and filling the frame with them.
Smart Zoom is available only when you have set the camera to M (medium) or S (small) image size. It provides a limited amount of zooming, but, technically, requires no quality-reducing interpolation. The camera simply produces each “zoomed” image by cropping the photo to the zoomed size. The resolution of your final image corresponds to the resolution of the Medium or Small image size, as explained in Chapter 2. When using Smart Zoom, an S label appears in the viewfinder or LCD monitor zoom scale to indicate that the feature is in effect.
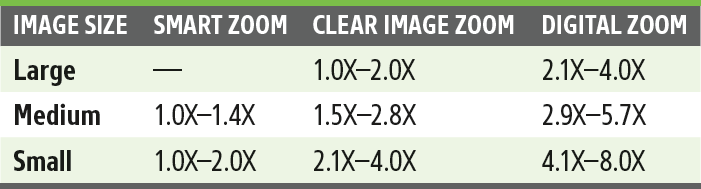
- Clear Image Zoom. When using this option, some quality is lost, as this kind of zooming doesn’t produce any actual additional information; it just interpolates the pixels captured optically to simulate a zoomed-in perspective. Pixels are created to fill the frame at the resolution of the given Image Size setting (Large, Medium, or Small). Clear Image Zoom has many options, and I’ll explain them later in this chapter. When a zoom scale is shown in the viewfinder or on the LCD monitor, a C label appears whenever you leave optical zooming behind and enter the Clear Image realm. When Clear Image Zoom is used alone, you’ll typical achieve 1X to 2X magnifications over and above whatever optical zoom setting you’ve used. At Medium and Small image size settings, you can zoom up to 2.8X and 4X, respectively.
- Digital Zoom. This option gives you even higher magnifications than Clear Image Zoom, with an additional decrease in image quality. I’ll explain the options later in the chapter. When Digital Zoom is active, it takes up where Clear Image Zoom leaves off, giving you up to 4X magnification beyond the optical zoom focal length you’ve selected when using Large image size. At Medium image size, you can zoom up to 5.7X; with Small image size, up to 8X.
Using Zoom
My basic recommendation is to use optical zoom only most of the time, and this feature might not be available. If you’ve set the camera for Optical Zoom Only in the Zoom Setting entry which follows this one, then this Zoom feature is not available at all if Image Size is set to Large. If Clear Image Zoom is set to On, you can use Clear Image zooming; if Digital Zoom is set to On, you can use both. When Image Size is set to Medium or Small, then Smart Zoom is also available for all three Zoom Settings options. After you’ve sorted out which of the zoom methods you want to use, using the Zoom feature while shooting is fairly easy. Just follow these steps:
- 1. Navigate to the Camera Settings II-05 (Zoom) menu. Select Zoom and press the center button.
- 2. Preview image. A live view of your sensor image appears in the EVF and LCD monitor, with a zoom scale at lower right, as shown in Figure 4.8.

Figure 4.8 The zoom scale shows the amount of magnification and type of zoom in use.
- 3. Zoom in or out. You can rotate the control wheel or use the left/right directional controls to zoom in or out.
- 4. Change zoom steps. Press the up/down controls to change the size of the zoom increment, from 1X to 1.4X and thence all the way up to 8X, depending on whether you’ve selected Large, Medium, or Small as your image size.
- 5. Confirm or cancel. When you’re satisfied with the zoom level, press the center button to confirm, or the MENU button to cancel. You can then continue to shoot at the new zoomed magnification.
Zoom Setting
Options: Optical Zoom Only, Clear Image Zoom, Digital Zoom
Default: Optical Zoom Only
My preference: Optical Zoom Only
The a6600 has three different types of selectable zoom settings: Optical Zoom, Clear Image Zoom, and Digital Zoom, and you can choose any one of them here. A fourth type, Smart Zoom, need not be specified; it is invoked automatically when Image Size is set to Medium or Small, and you are using either Clear Image Zoom and Digital Zoom. As I noted earlier, Smart Zoom does not digitally manipulate pixels; it simply fills the frame with pixels cropped out of the center of the image.
My preference is to stick with optical zoom only. I own lots of great lenses, and I don’t hesitate to switch to one of them when I need some extra reach. Neither Clear Image nor Digital Zoom give me the image quality I am looking for. However, if you don’t own a lens with enough telephoto magnification and/or don’t need the best quality for some applications, the two electronic zoom modes are available.
Of course, you can always shoot without the electronic zoom features and crop to the effective magnification you want in your image editor. Clear Image Zoom and Digital Zoom are not available when using Sweep Panorama, Smile Shutter, or when Image Quality is set to RAW or RAW & JPEG. When working with those ersatz zooms, the metering mode is locked at Multi, and Focus Area setting is disabled (the focus area frame in the zoomed image is shown by a dotted line). Descriptions of each type of zoom follow.
Using Optical Zoom Only
This is what you get when you select Optical Zoom Only. Simply turn the zoom ring on the lens (or use the power zoom button on a lens equipped with one, such as the 16-50mm kit lens). Your zooming is limited to the focal length range(s) provided by the lens mounted on your camera. With the 16-50mm kit lens, you’ll get only the field of view offered by the lens, and nothing more. If you have a fixed focal length lens mounted, you get no zooming at all.
This mode provides the best image quality, because the full 24 megapixels of the a6600’s sensor are used (when Large Image Size is selected in the Camera Settings I-01 menu) to record the photo. The magnification range is determined by the lens itself. For example, the 16-50mm kit lens allows a roughly 1X to 3X zoom range.
You should always use the optical zoom to magnify your image first, before resorting to one of the “fake” zoom options, because optical zoom produces the least amount of image degradation. Indeed, with a good-quality zoom lens, you may notice little, if any, loss in sharpness as you zoom in and out. Note that if you have selected Optical Zoom Only and set Image Size to Medium or Small, the Smart Zoom version (described next) is available. Table 4.3 shows the zoom magnifications you can expect.
Using Smart Zoom
You can’t “choose” Smart Zoom from the Zoom Settings menu. It is activated when you use either Clear Image Zoom or Digital Zoom, and have Image Size set to Medium or Small. Like the other two digital options, Smart Zoom varies its magnification effect depending on the Image Size you select in the Camera Settings I-01 menu. It produces a zoom effect by taking the pixels in the center of the original image and filling the frame with them.
Smart Zoom is available only when you have set the camera to M (medium) or S (small) image size. It provides a limited amount of zooming, but, technically, requires no quality-reducing interpolation. As I noted, the camera simply produces each “zoomed” image by cropping the photo to the zoomed size. The resolution of your final image corresponds to the resolution of the Medium or Small image size, as explained in Chapter 2. When using Smart Zoom, an S label appears in the viewfinder or LCD monitor zoom scale to indicate that the feature is in effect.
Using Clear Image Zoom
This digital zoom mode also varies its magnification effect depending on the Image Size you select in the Camera Settings I-01 menu, and shown in Table 4.3, above:
Large Image Size. When Clear Image Zoom is activated, rotate the zoom ring on any E-mount zoom lens you have mounted, or use the power zoom switch on lenses that have them (such as the 16-50mm kit lens). The a6600 will use image processing to magnify the image, if required. A scale on the LCD is divided into two parts. The left-hand portion shows the amount of optical zoom applied using the actual zooming characteristics of a zoom lens; the focal length (say, 16-50mm) appears under the scale. When the indicator crosses the center portion of the scale, the focal length readout freezes at the maximum focal length of the lens (say, 50mm), and Clear Image Zoom kicks in, and the magnifying glass icon has a “C” next to it to show that additional magnification is being applied using image processing.
Medium/Small Image Size. However, if you choose Medium or Small Image Size, the zooming begins as before with the left-hand portion of the scale showing the optical zoom range. Once the indicator crosses the marker, the camera will first simply crop the image (without any processing) from 1X to 1.4X (Medium) or 1.1X to 2.0X (Small), in Smart Zoom mode. The magnifying glass shows an “S” label. If you continue zooming, then image processing will be used to provide additional zooming from 1.5X to 2.8X (Medium) or 2.1X to 4.0X (Small). The magnifying glass icon will then display a “C” to show the processing mode being used.
Clear Image Zoom provides a simulated zoom effect that operates even if you don’t have a zoom lens! However, you could simply shoot Large JPEGs and later crop them with image-editing software in your computer to make the subject larger in the frame. This automated feature is useful if you do not own a sufficiently long telephoto lens, since it’s possible to make a subject larger in the frame.
Using Digital Zoom
With this variation, the camera gives you even higher magnifications, up to 4X in Large JPEG photos creating more impressive simulated zooming effects to fill the frame with a distant subject. However, the higher the level of digital zoom that you use the greater the loss of image quality will be. That’s because the camera crops the photo to simulate the use of a longer lens, discarding millions of pixels; the processor then uses interpolation (adding pixels) to restore the image to its original full size. That works well with Clear Image Zoom, but above 2X magnification the camera’s processor can no longer use the most sophisticated technology (which Sony calls Bi-pixel Super Resolution) so the image quality suffers; it gets worse at each higher magnification level. That’s why I recommend leaving the Digital Zoom item at Off and using only Clear Image Zoom unless you absolutely must have greater magnification of a distant subject.
Large Image Size. When Large is selected, Clear Image Zoom magnification, a high-quality image processing algorithm, will be used from 1.1X to 2X, while from 2.1X to 4X, the reduced image quality process, Digital Zoom, will be activated.
Medium Image Size. Select Medium resolution, and the highest quality Smart Zoom trimming will be applied from 1.1X to 1.4X, Clear Image Zoom from 1.5X to 2.8X, and Digital Zoom from 2.9X to 5.7X.
Small Image Size. Select Small and Smart Zoom will be applied from 1.1X to 2.0X, Clear Image Zoom will be applied from 2.1X to 4.0X, and Digital Zoom from 4.1X to 8.0X.
Zoom Ring Rotate
Options: Left/Right (Wide-Tele), Right/Left (Wide-Tele)
Default: Left (W), Right (T)
My preference: N/A
This setting controls whether power zooming (with PZ-designated lenses that have a power zoom feature) proceeds from wide-angle to telephoto settings when the zoom control is pressed from left to right, or in the reverse direction, from right to left. The setting is compatible only with power zoom lenses that support this feature.
DISP Button
Options (Monitor): Graphic Display, Display All Info., No Disp. Info., Histogram, Level, For Viewfinder, Monitor Off
Options (Viewfinder): Graphic Display, Display All Info., No Disp. Info., Histogram, Level
My preference: Activate all but Graphic Display
This is the first entry in the Camera Settings II-06 (Display/Auto Review 1) menu. (See Figure 4.9.) Use this item to specify which of the available display options will—and will not—be available in Shooting mode when you use the LCD or viewfinder and press the DISP button to cycle through the various displays. Choose from Monitor or Viewfinder and mark or unmark the screens you want to enable or disable. The Monitor selection includes a For Viewfinder option that displays a text/graphic display of your current settings on the back-panel LCD.
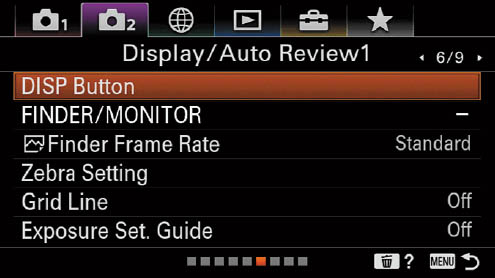
Figure 4.9 The Camera Settings II-06 (Display/Auto Review 1) menu.
You can use this menu item to deselect one or more of the display options, so it/they will never appear on the LCD when you press the DISP button. To make that change, scroll to an option and press the center button to remove the check mark beside it. Naturally, at least one display option must remain selected. If you de-select all of them, the camera will warn you about this and it will not return to Shooting mode until you add a check mark to one of the options. If you turn the camera off while none are selected, the camera will interpret this as a Cancel command and return to your most recent display settings.
The same screens shown at left in Figure 4.10 are also available for the electronic viewfinder, except For Viewfinder and Monitor Off. (See Figure 4.10, right.) The viewfinder versions have some slight differences; for example, at the bottom of the viewfinder version is an analog exposure indicator. You can select a different set of displays for the viewfinder and monitor. That is, you can choose to view the plain-vanilla No Display Info view in the EVF and Display All Info on the LCD monitor.
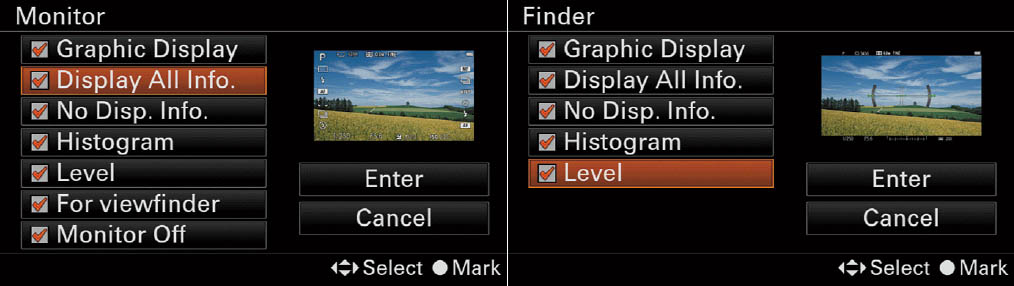
Figure 4.10 Select which display screens are shown on the LCD monitor (left) or viewfinder (right).
Here’s a recap of the available display options for the monitor.
- Graphic Display. When selected, this display shows basic shooting information, plus a graphic display of shutter speed and aperture (except when Sweep Panorama is the mode in use). If you learn how to interpret it, you’ll note that it indicates that a fast shutter speed will freeze motion, that a small aperture (large f/number) will provide a great range of acceptably sharp focus, and other information of this type. (See Figure 4.11, left.)
- Display All Info. The default screen when you first turn the camera on, this option displays data about current settings for a complete overview of recording information. (See Figure 4.11, right.) Not all the information in the figure may be displayed at one time, and there are additional icons not shown because they occupy the same space on the screen as another indicator.
- No Disp. Info. Despite its name, this display option provides the basic shooting information as to settings, in a conventional size. (See Figure 4.12, left.)
- Histogram. Activate this option if you want to be able to view a live luminance histogram to assist you in evaluating the exposure before taking a photo, a feature to be discussed in Chapter 9. The basic shooting data will appear in addition to the histogram. (See Figure 4.12, right.)
- Level. This display shows how much the camera is rotated around the lens axis (horizontal tilt) as well as how far it is tilted forward and backward. When the camera is not perfectly level, orange indicators show the amount of forward/backward and horizontal tilt. (See Figure 4.13.) When the camera is level in both directions, the indicators turn green. (See Figure 4.14.)
- For Viewfinder. This display can be shown only on the LCD monitor. When visible, you can press the Fn button to produce the Quick Navi screen, which I explained in Chapter 2. (See Figure 4.15.)
- Monitor Off. When this option is selected, pressing the DISP button eventually takes you to a blank monitor screen, which you might need to use when a brightly lit LCD is distracting or intrusive.

Figure 4.11 Graphic Display (left); Display All Information (right).
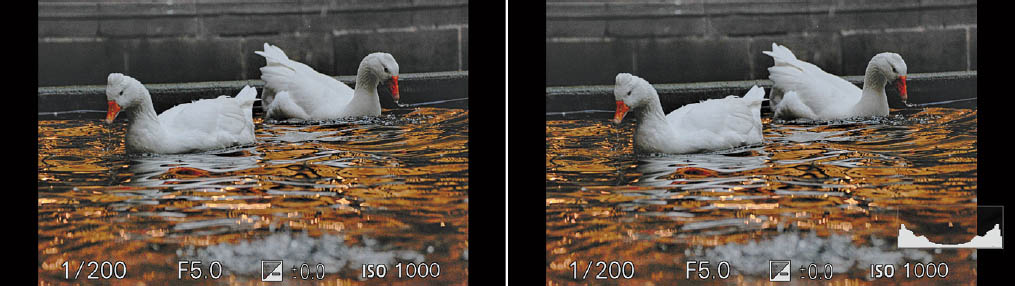
Figure 4.12 The No Display Information (left); Histogram Display (right).
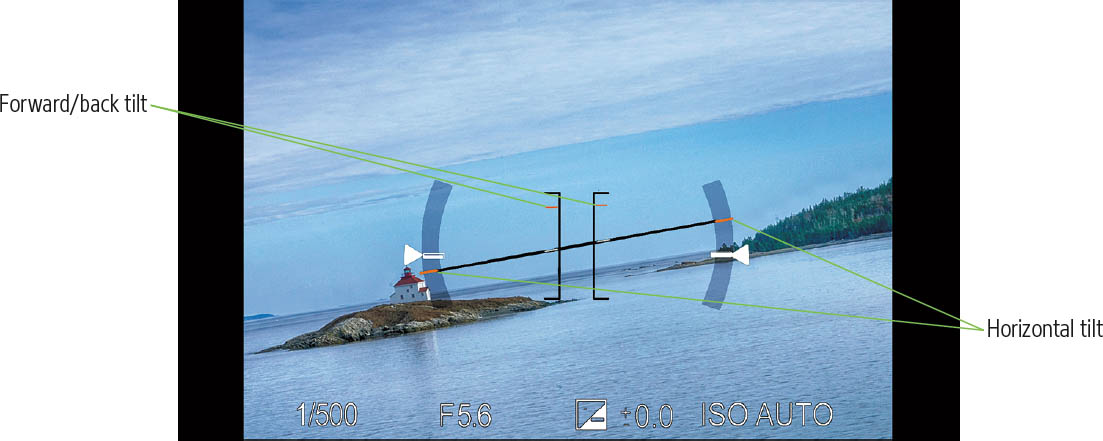
Figure 4.13 Orange indicators show the amount of tilt.
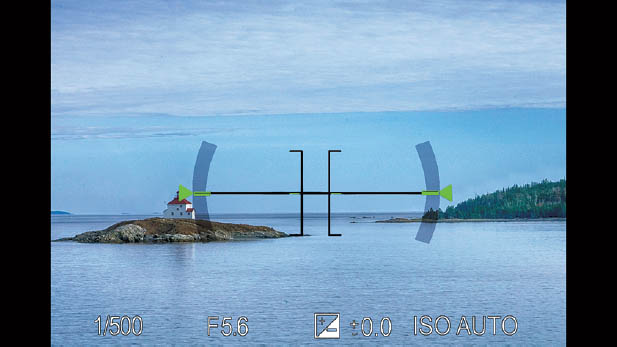
Figure 4.14 When the camera is level, the indicators turn green.

Figure 4.15 For Viewfinder display.
FINDER/MONITOR
Options: Auto, Viewfinder, Monitor
Default: Auto
My preference: N/A
This also uses the eye sensor located above the viewfinder window, but it controls only whether the camera turns off the LCD and switches the view to the viewfinder when your eye comes near the EVF. With the default setting of Auto, the screen goes blank and the viewfinder activates when your eye (or any other object) approaches the Eye-Start sensor. Helpfully, the eye sensor is disabled when you tilt the LCD monitor away from the camera body, presumably because in that mode you’ll be working exclusively with the LCD and do not want the a6600 to switch to viewfinder mode if your hand (or any other object) passes in front of the sensor.
Switch to the Viewfinder or Monitor options and the eye sensor no longer initiates a switch from one display to the other. The display is then always sent to the viewing device you selected, and the other one is turned off. You might want to use the Monitor option if you are doing work involving critical focusing using the LCD, and as you examine the screen closely, your face will frequently be close to the back of the camera where the Eye-Start sensor might detect it. Or, perhaps, you are shooting at a concert or other venue where the bright LCD can be distracting to others. Choose Viewfinder, and the shooting preview, menus, photos displayed for review during playback, and so forth will be shown only in the EVF.
Of course, if you disable automatic switching between the two, you’ll still want to have the option of activating the viewfinder or monitor displays manually. To do that, you’ll need to assign the FINDER/MONITOR switching function to a key. I’ll show you how to do that later in this chapter, when I describe the Custom Key option in the Camera Settings II-08 (Custom Operation) menu.
Finder Frame Rate (Stills)
Options: Standard, High
Default: Standard
My preference: Standard
The a6600 sports an advanced 5.76 million dot UXGA (Ultra-XGA) OLED Tru-Finder electronic viewfinder, and includes a Zeiss T* coating to reduce reflections. To reduce a slight jerkiness in the EVF when shooting action, you can switch from the default Standard (60 fps) frame rate to a blistering High (120 fps) rate that displays fast-moving subjects more smoothly. The tradeoff is a reduced resolution view at the highest frame rate. Standard is automatically invoked when reviewing images or video in playback mode, when viewing using an HDMI connection, or when the temperature inside the camera body is high. I tend to stick with the higher-resolution Standard frame rate, except when tracking sports or action subjects.
Zebra Setting
Options: On, Off, IRE 70, 75, 80, 85, 90, 95, 100, 100+
Default: Off; Zebra Level: 70
My preference: 80
This feature warns you when highlight levels in your image are brighter than a setting you specify in this menu option. It’s somewhat comparable to the flashing “blinkies” that digital cameras have long used during image review to tell us, after the fact, which highlight areas of the image we just took are blown out.
Zebra patterns are a much more useful tool, because you are given an alert before you take the picture and can specify exactly how bright too bright is. The Zebra feature has been a staple of professional video shooting for a long time, as you might guess from the moniker assigned to the unit used to specify brightness: IRE, a measure of video signal level, which stands for Institute of Radio Engineers.
When you want to use Zebra pattern warnings, access this menu entry and specify an IRE value from 70 to 100, and 100+. Once you’ve been notified, you can adjust your exposure settings to reduce the brightness of the highlights, as I’ll describe in Chapter 7.
So, exactly how bright is too bright? A value of 100 IRE indicates pure white, so any Zebra pattern visible when using this setting (or 100+) indicates that your image is extremely overexposed. Any details in the highlights are gone and cannot be retrieved. Settings from 70 to 90 can be used to make sure facial tones are not overexposed. Caucasian skin generally falls in the 80 IRE range, with darker skin tones registering as low as 70, and very fair skin or lighter areas of your subject edging closer to 90 IRE. Once you’ve decided the approximate range of tones that you want to make sure do not blow out, you can set the camera’s Zebra pattern sensitivity appropriately and receive the flashing striped warning on the LCD of your camera. (See Figure 4.16.) The pattern does not appear in output to a device through the HDMI port, nor in your final image, of course—it’s just an aid to keep you from blowing it, so to speak.
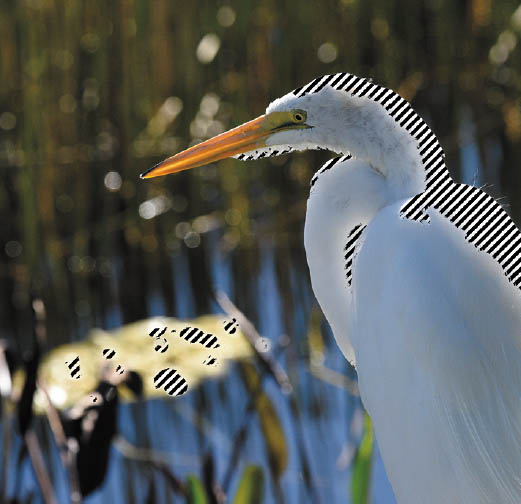
Figure 4.16 The flashing stripes show an area is overexposed.
Grid Line
Options: Rule of 3rds Grid, Square Grid, Diag.+Square Grid, Off
Default: Off
My preference: Off
This feature allows you to activate one of three optional grids, so it’s superimposed on the LCD or EVF display. The grid pattern can help you with composition while you are shooting architecture or similar subjects. I sometimes use the Rule of Thirds grid to help with composition, but you might want to activate another option when composing images of scenes that include diagonal, horizontal, and perpendicular lines. (See Figure 4.17.)
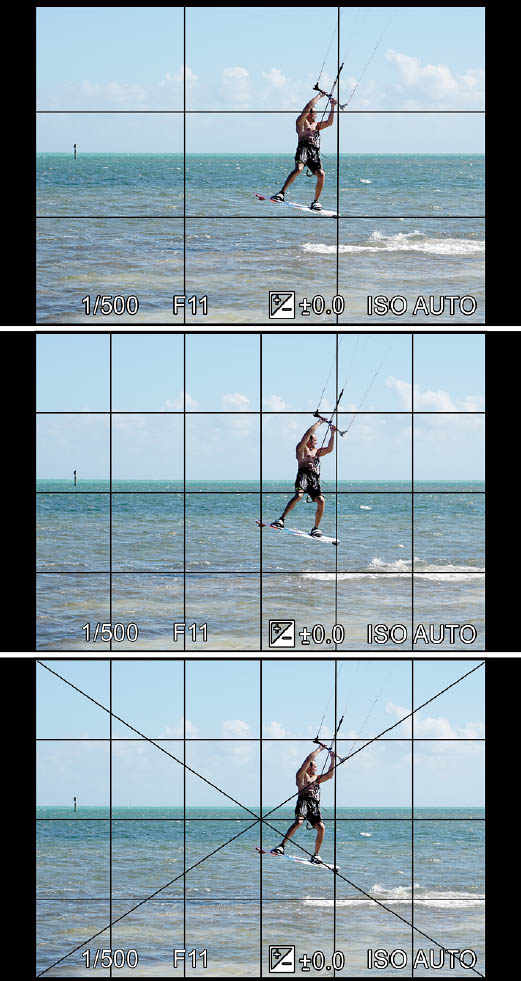
Figure 4.17 Grid lines can help you align your images on the LCD or EVF.
Exposure Setting Guide
Options: On, Off
Default: Off
My preference: N/A
This feature is of most use to those with poor eyesight, but a convenience for all. All it does is show a scrolling scale on the LCD or viewfinder with an enlarged rendition of the current shutter speed or aperture highlighted in orange. It more or less duplicates the display of both that already appears on the bottom line of the screen, but in a larger font and with the next/previous setting flanking the current value. In Aperture Priority, the scale shows f/stops. In Shutter Priority, you see shutter speeds. In Program mode, both are visible. When using Manual exposure, a single scrolling line appears showing shutter speed or aperture, depending on whether you rotate the control dial or control wheel. I like to leave it switched on, as the display is a reminder of which parameter I’m fooling with at the moment.
Live View Display
Options: Setting Effect ON, Setting Effect OFF
Default: Setting Effect ON
My preference: Setting Effect ON, unless using flash in manual mode
This is the first entry in the Camera Settings II-07 (Display/Auto Review 2) menu (see Figure 4.18). As a mirrorless camera, the a6xxx-series cameras are always in a “live view” mode, showing you what the sensor sees. This entry lets you specify whether the camera should apply any exposure settings or effects that you’ve selected to the image before presenting it to you as a preview.

Figure 4.18 The Camera Settings II-07 (Display/Auto Review 2) menu.
There are times when you don’t want to see the effects of the settings you’ve made on the screen/EVF. For example, when you are using flash in manual mode, the camera has no way of knowing exactly how much light will be illuminating your scene. That f/16 aperture may be ideal for a shot exposed by your studio strobes, but the a6600 will, when Setting Effect is set to ON, show you a preview based on the ambient light, rather than the flash. The result? Your viewfinder or LCD monitor image is very, very dim. You’ll want to select Setting Effect OFF so the camera will boost the electronic image to viewable levels.
When Setting Effects are active, the live view display in the EVF or the LCD reflects the exact effects of any camera features that you’re using to modify the view, including exposure compensation and white balance. In that mode, this allows for an accurate evaluation of what the photo will look like and enables you to determine whether the current settings will provide the effects you want.
The ON option can be especially helpful when you’re using any of the Picture Effects, because you can preview the exact rendition that the selected effect and its overrides will provide. It’s also very useful when you’re setting some exposure compensation, as you can visually determine how much lighter or darker each adjustment makes the image. And when you’re trying to achieve correct color balance, it’s useful to be able to preview the effect of your white balance setting.
If you’d like to preview the image without the effect of settings visible, you can set this feature to OFF. Naturally, the display will no longer accurately depict what your photo will look like when it’s taken. So, for most users, ON is the most suitable option. Unfortunately, this setting has caused more than a few minutes of head-scratching among new users who switch to Manual exposure mode and find themselves with a completely black (or utterly white) screen. The black screen, especially, may fool you into thinking your camera has malfunctioned.
Setting Effect OFF cannot be set when using Intelligent Auto, any scene mode, or shooting conventional or S&Q movies.
Auto Review
Options: Off, 2 sec., 5 sec., 10 sec.
Default: Off
My preference: N/A
When this item is set to 2, 5, or 10 seconds, the camera can display an image on the LCD or viewfinder for your review immediately after the photo is taken. (When you shoot a continuous or bracketed series of images, only the last picture that’s been recorded will be shown.) During this display, you can press the Zoom In button to get a closer look at your image, delete a disappointing shot by pressing the Delete button, or cancel picture review by tapping the shutter release button or performing another function. (You’ll never be prevented from taking another picture because you were reviewing images.) This option can be used to specify whether the review image appears for 2, 5, or 10 seconds, or not at all.
Depending on how you’re working, you might want a brief display, or you might prefer to have time for a more leisurely examination (when you’re carefully checking compositions). Other times, you might not want to have the review image displayed at all, such as when you’re taking photos in a darkened theater or concert venue, and the constant flashing of images might be distracting to others. Turning off picture review or keeping the duration short also saves battery power. You can always review the last picture you took at any time by pressing the Playback button.
Custom Key (Stills)
Options: More than 100 different definitions for Custom Buttons 1, 2, 3, 4, Center Button, Left/Right/Down Buttons, AF/MF Button, AEL Button, Focus Hold Button (on lens)
Default: Various
My preference: N/A
This is the first entry on the Camera Settings II-08 (Custom Operation 1) menu. (See Figure 4.19.) It allows customization of as many as 10 buttons on the camera, and one additional button, Focus Hold, found on some lenses. Indeed, the following is a list of the only buttons on the camera that you cannot redefine to perform some other function:
- Shutter release. It is always used to take a picture and will initiate autofocus if you haven’t assigned AF-ON and other AF functions to a different key.
- Up directional button. It is used to change your information display in shooting and Playback modes, and as a directional button in menus.
- Playback button. Activates picture review.
- Fn (Function) button. (Almost) always summons the Function menu, and in Playback mode sends the current image to a smart device. However, you can redefine the Fn button to FTP Transfer when in Playback mode (only).
- Movie button. Starts/stops movies. However, you can specify whether you want the button to commence video capture always, or only when the mode dial is set to the Movie position.
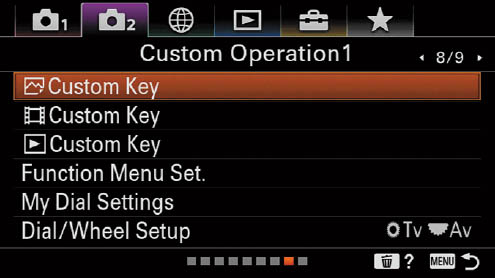
Figure 4.19 The eighth page of the Camera Settings II (Custom Operation 1) menu.
Your custom key definitions override any default definitions for those buttons when in Shooting mode; they retain their original functions in Playback mode (unless you redefine them, as I’ll describe shortly). Because button definition is such a personal choice, I steer away from recommending particular definitions for each of the buttons, even though certain functions can be accessed only by assigning them to a custom key setting. Our fingers and agility vary, so, while buttons like the AEL/AFL button are traditionally used for something like back-button focus, you may prefer to assign that function to a different key.
When assigning definitions to keys, keep in mind that certain behaviors can be used only when you have made them available using a custom key definition. For example, if you want to use the Bright Monitoring feature, which temporarily turns the Live View Setting Effect to Off to increase the brightness level of the screen in dark locations, you must assign it to a key.
Each of the customizable buttons have a default behavior assigned for shooting mode, listed below. In Movie mode, these buttons have the exact same behavior, unless you choose a different option. In Playback mode, only the Fn button and C1–C3 buttons can be redefined, with Custom 3 having the only default behavior (Protect).
- Custom 1: White Balance
- Custom 2: Focus Mode
- Custom 3: Focus Area
- AF/MF button (switch in AF/MF position): Switches between AF and MF while held down
- AEL button (switch in AEL position): Locks exposure while held down
- Control Wheel Center button: Focus Standard
- Left button: Drive Mode
- Right button: ISO
- Down button: Exposure Compensation
- Up button: DISP (Not customizable)
- Focus Hold (on lens): Focus Hold
Basic Functions
When you access the Custom Key entry, you’ll work with one of four screens; the first two are shown in Figure 4.20. Each screen shows a set of buttons that can be redefined, with an accompanying graphic as you highlight each. Press the center button to view a list of possible definitions for that key. The functions available for the Custom buttons 1, 2, 3, and 4, AF/MF, AEL, center, and Focus Hold buttons are listed below. In all cases, choosing Not Set deactivates that button. Note that not all functions are available for each of these Custom Keys.
- File Format
- JPEG Quality
- JPEG Image Size
- Aspect Ratio
Shoot/Drive
- Drive Mode
- Self-timer During Bracket
- Interval Shooting
- Memory Recall
- Recall Custom Hold 1
- Recall Custom Hold 2
- Recall Custom Hold 3
Autofocus Mode
- Focus Mode
- AF/MF Control Hold
- AF/MF Ctrl Toggle
- Focus Standard
- Focus Area
- Switch Focus Area
- Register AF Area Hold
- Register AF Area Toggle
- Register AF Area+AF-ON
- Tracking On
- Face/Eye Priority in AF
- Eye AF
- Subject Detection
- Switch Right/Left Eye
- Face/Eye Frame Display Selection
- AF Tracking Sensitivity
- Aperture Drive in AF
- AF On
- Focus Hold
Exposure
- Exposure Comp
- ISO
- ISO Auto Min SS
- Metering Mode
- Face Priority in Multi Metering
- AEL Hold
- AEL Toggle
- AEL Spot Hold
- AEL Spot Toggle
Flash
- Flash Mode
- Flash Compensation
- Wireless Flash
- FEL Lock Hold
- FEL Lock Toggle
- FEL Lock/AEL Hold
- FEL Lock/AEL Toggle
Color/WB/Image Processing
- White Balance
- Priority Set in AWB
- AWB Lock Hold
- AWB Lock Toggle
- DRO/Auto HDR
- Creative Style
- Picture Effect
- Picture Profile
Focus Assist
- Focus Magnifier
- Peaking Display Selection
- Peaking Level
- Peaking Color
Shooting Assist
- In-Camera Guide
Movie
- Movie
- S&Q Frame Rate
- Audio Rec Level
- Audio Level Display
- Marker Display Settings
Shutter/SteadyShot
- Silent Shooting
- SteadyShot
- SteadyShot Adjustments
- SteadyShot Focal Length
Zoom
- Zoom
Display/Auto Review
- Aperture Preview
- Shot Result Preview
- FINDER/MONITOR Selection
- Finder Frame Rate
- Zebra Display Select
- Zebra Level
- Grid Line
- Live View Display Selection
- Bright Monitoring
Custom Operation
- My Dial 1 During Hold
- My Dial 2 During Hold
- My Dial 3 During Hold
- My Dial 1 -> 2 -> 3
- Toggle My Dial 1
- Toggle My Dial 2
- Toggle My Dial 3
- Audio Signals
Network
- Sent to Smartphone
Playback
- Playback
Setup
- Monitor Brightness
- Gamma Display Assist
- Touch Operation Select
- TC/UB Display Switch
- Not Set
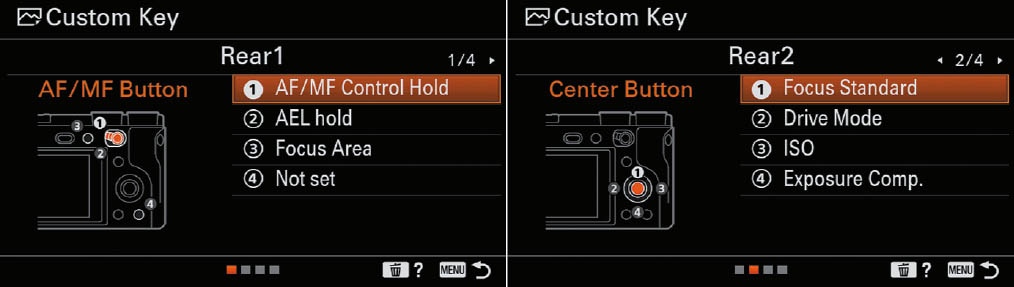
Figure 4.20 Choose which button to define from a set of screens like these.
VARIATIONS ON A THEME
You have several options for assigning the very useful autoexposure lock (AEL) functions to one of the definable keys.
- AEL Hold. Exposure is locked while the button is held down.
- AEL Toggle. The AEL button can be pressed and released, and the exposure remains locked until the button is pressed again.
- Center Point AEL Hold. Exposure is locked on the center point of the frame while the button is held down.
- Center Point AEL Toggle. Toggles exposure lock on/off using the center point of the frame.
New Assignable Functions
If you’re upgrading from an earlier Sony camera with custom keys, you’ll be interested in knowing which of the functions listed above are new for the a6600. Most of them have been implemented as a way of better using new features. Here is a list of the new menu functions:
- Interval Shooting. If you find yourself using the new Interval Shooting feature frequently, and think it’s a pain to navigate to the Camera Settings I-03 menu every time, you can assign a custom key of your choice to jump immediately to the interval photography settings.
- Face/Eye Priority in AF. Assign this function to one of the available keys to enable/disable giving higher priority to detected faces. You’ll find this capability especially useful to turn the feature off when your subjects include faces that may be difficult for the a6600 to detect (often people with long bangs or wearing sunglasses) or in difficult lighting conditions (shade, backlight, or low-light scenes).
- Subject Detection. If pet or animal photography is a big part of your shooting, you switch back and forth between Human and Animal eye detection more frequently than your average photographer. Assign Subject Detection to a custom key, and you can toggle back and forth between the two modes at the press of a button.
- AF Tracking Sensitivity. Sports photographers will like the ability to quickly change how quickly the camera responds to new subjects entering the frame. Assign the function to a custom key, and you can switch to responsive, standard, or locked on settings, as described in Chapter 3.
- Aperture Drive in AF. If you need quiet operation in certain environments, you can assign a key to enable or disable this feature, described earlier in this chapter.
- My Dial Assignments. You can assign up to three different behaviors to the control wheel and/or control dial, and return them to their default functions quickly. The custom functions let you activate the alternate behavior by holding the button down, switching among the three dial assignments by spinning a control, and toggling one of the three on or off. I’ll explain this feature later in the chapter.
Other Useful Key Definitions
Here are some other possible custom key definitions you might find useful:
- FINDER/MONITOR switch. If you turn off automatic switching between FINDER and MONITOR, you’ll want to have a button that will quickly toggle between the two.
- Eye AF. It’s handy to have a button that activates the a6600’s impressive Eye-AF feature.
- More pairs. Several custom buttons can be assigned pairs of related functions. For example, if you’ve set one to change ISO sensitivity, the other button can be used to specify ISO Auto Minimum Shutter Speed. Image Size/Quality is another good pair for button combinations.
- Freed-up keys. Once you assign ISO to another control, that leaves the right button, formerly used to set ISO, free for a new definition. You could assign it to Metering Mode or another function.
- Temporary Dial/Wheel settings. You can assign functions to the control wheel and/or control dial and recall them instantly by using a Custom Key. You have three different definitions that can be registered. I’ll show you how to do that using the My Dial Settings entry later in this chapter.
Custom Key (Movies)
Options: Definitions for Custom Buttons 1, 2, 3, 4; Center Button; Left/Right/Down Buttons; AF/MF Button, AEL Button; Focus Hold Button (on lens)
Default: Follow Custom (Stills)
My preference: N/A
You can assign different functions to each of the customizable controls when shooting movies, assuming you have such a need and an excellent memory. The default definition for those controls is Follow Custom (Stills), which uses whichever behaviors you have assigned using the Custom Key (Stills) entry.
Custom Key (Playback)
Options: Definitions for Custom Buttons 1, 2, 3, and 4, plus Fn/Send to Smartphone button
Default: Varies
My preference: N/A
Only a limited number of controls and functions are available using this entry. The Custom 1, 2, and 3 buttons can be assigned behaviors during Playback, most of them options from the Playback menu itself. C1, C2, C3, and C4 follow the setting made for Stills/Movie mode (unless you choose another behavior). The Fn button, which by default sends the displayed image to your smartphone, can also be defined to switch to various Playback menu settings.
Function Menu Settings
Options: 47 different Function menu settings, plus Not Set
Default: Top row: Drive Mode, Focus Mode, Focus Area, Exposure Compensation, ISO, Metering mode; Bottom row: Flash Mode, Flash Compensation, White Balance, Creative Style, File Format, Shoot Mode
My preference: N/A
When you press the Fn button when in Shooting or Movie modes, a screen like the one shown at left in Figure 4.21, left, pops up, with six settings each in two rows arrayed along the bottom. The default options are illustrated. This entry allows you to change the function of any of the 12 positions in the Function menu, so you can display only those you use most, and arrange them in the order that best suits you. There are 47 different functions available, plus Not Set. Browse through the list below and decide which 12 you want to display on the Function menu.
When you highlight Function Menu Set. and press OK, the screen shown in Figure 4.21, left, appears. The screen has an entry for each of the positions in the top row and bottom row, along with the current function with the still photo version at the top and movie Function Menu at the bottom. Highlight the position you want to modify and press OK. You can then select from among the options from a screen like the one shown in Figure 4.21, right. All the available options are explained in detail elsewhere in this book:
- File Format
- JPEG Quality
- JPEG Image Size
- Aspect Ratio
- Shoot Mode
- Drive Mode
- Self-timer During Bracket
- Interval Shooting
- Focus Mode
- Focus Area
- Face/Eye Priority in AF
- Subject Detection
- Left/Right Eye Select
- Face/Eye Frame Display
- Exposure Compensation
- ISO
- ISO Auto Minimum Shutter Speed
- Metering Mode
- Face Priority in Multi Metering
- Flash Mode
- Flash Compensation
- Wireless Flash
- White Balance
- Priority Set in AWB
- DRO/Auto HDR
- Creative Style
- Picture Effect
- Picture Profile
- Peaking Display
- Peaking Level
- Peaking Color
- Anti-Flicker Shooting
- S&Q Frame Rate
- Audio Recording Level
- Audio Level Display
- Marker Display
- Silent Shooting
- SteadyShot
- SteadyShot Adjust
- SteadyShot Focal Length
- Finder Frame Rate
- Zebra Display
- Zebra Level
- Grid Line
- Live View Display
- Audio Signals
- Gamma Display Assist
- Touch Operation
- Not Set
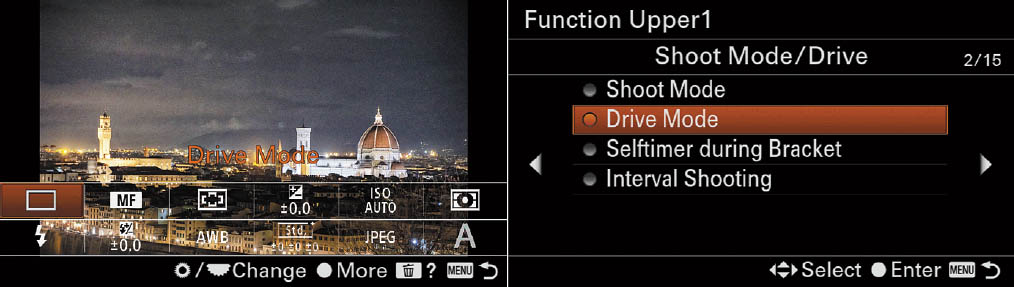
Figure 4.21 Choose Function Menu entry to edit (left). Select from available options (right).
Note that you can select Not Set to leave a position blank if you want to unclutter your screen, or even duplicate an entry in multiple positions, accidentally or on purpose. Don’t underestimate the power of this function. You can, in effect, create your own pop-up Function menu using any of more than four dozen different functions.
My Dial Settings
Options: Three separate definitions each for control wheel and control dial
Default: Not Set
My preference: N/A
This is an extremely versatile feature, which allows you to temporarily assign a different behavior to the control wheel and/or control dial, and still return them to their default functions easily. Most of the time in shooting mode, you’ll want to use the wheel/dial to control shutter speed or aperture. But a quick spin of the dial/wheel can be convenient for making other settings, such as ISO or white balance adjustments. You can assign that alternate function to one of those controls, and then recall it by pressing a Custom Key that you’ve defined (as described above).
When you access this entry, a screen similar to the one shown in Figure 4.22 appears. The left column shows the control dial and control wheel. The right three columns show the current values for the three definitions for each, called My Dial 1, My Dial 2, or My Dial 3. Before you have added any definitions, each of the current settings will be Not Set, represented by double-dashes like the ones at right in the figure.
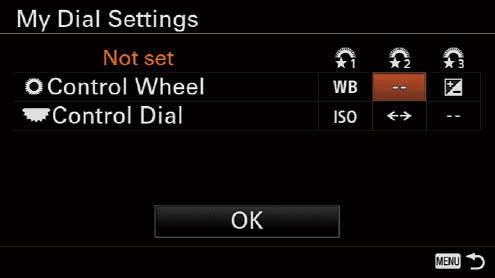
Figure 4.22 My Dial Settings.
Note: Each of the three My Dial settings can define actions for the control dial and control wheel, but you do not have to define a function for both. For example, you could use My Dial 1 to assign a particular function to the control wheel, but leave the control dial at Not Set (which means it would retain its default behaviors).
To assign a definition, just follow these steps:
- 1. Access My Dial Setup. The settings screen appears.
- 2. Choose your control and My Dial register. Use the directional buttons to highlight My Dial 1, My Dial 2, or My Dial 3, either in control dial or control wheel rows.
- 3. Press the center button. A set of screens will appear with five pages that encompass the possible functions that can be assigned.
- Move AF Point Left/Right
- Move AF Point Up/Down
- Aperture
- Shutter Speed
- Exposure Compensation
- ISO
- White Balance
- Color Temperature
- Creative Style
- Picture effect
- Audio Recording Level
- Not Set
- 4. Press the center button to confirm. You can then repeat steps 2 and 3 to define additional My Dial registers.
- 5. Highlight OK. Press OK to exit.
- 6. Assign My Dial 1, 2, or 3 to a Custom Key. Use the Custom Key (Stills) entry described earlier to assign the temporary behavior to the button you will use to switch to the alternate function. You have three different modes for activating the feature:
- My Dial 1 (or 2, or 3) During Hold. When you press the assigned Custom Key, the alternate function for the specified My Dial register is active. As soon as you release it, the wheel/dial resumes its default function.
- My Dial 1→2→3. When you press and hold the Custom Key, rotating that control switches among each of the registers in turn, and then wraps around to the first. Think of this as a meta-control: instead of activating a particular My Dial register and its settings, it allows you to quickly cycle among all three of them, each with their own set of settings. I suspect only those who truly need a larger number of alternate actions for the control wheel and control dial will really need this (and I don’t envy them the learning curve required to remember which My Dial settings contain which customized functions).
- Toggle My Dial 1 (or 2, or 3). The specified My Dial register is activated when the Custom Key is pressed, and deactivated when the Custom Key is pressed again. Use this if you need to turn on particular features for a period of time, and then return to the controls’ default operation with a second key press.
Dial/Wheel Setup
Options: Reverse functions
Default: Control Dial: Aperture; Control Wheel: Shutter Speed
My preference: N/A
By default, in Manual exposure mode the control dial controls the f/stop, and the control wheel adjusts the shutter speed. This entry allows you to reverse those functions for Manual exposure only if you prefer. (Either the control dial or control wheel can be used to adjust shutter speed [in Shutter Priority mode] and aperture [in Aperture Priority mode]). You may have a special reason for wanting to reverse the dial/wheel directions, but you’re better off leaving it alone.
Av/Tv Rotate
Options: Normal, Reverse functions
Default: Normal
My preference: N/A
This entry, the first in the Camera Settings II-09 (Custom Operation 2) menu (see Figure 4.23), lets you specify the direction of rotation of the control dial and control wheel when using them to adjust the aperture or shutter speed. When the default Normal is in effect, clockwise rotation produces a smaller f/stop or faster shutter speed; counterclockwise rotation sets a larger f/stop or slower shutter speed. Choose Reverse, and clockwise rotation sets a larger f/stop or slower shutter speed, while counterclockwise produces a smaller f/stop or faster shutter speed. This is a personal preference setting.
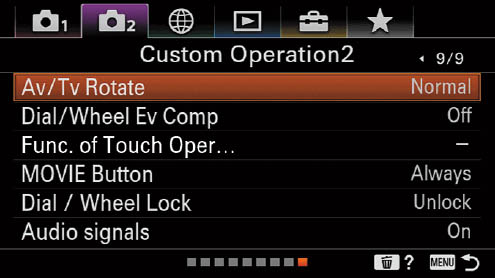
Figure 4.23 Camera Settings II-09 (Custom Operation 2) menu.
Dial/Wheel Ev Comp
Options: Off, Wheel, Dial
Default: Off
My preference: Off
If you like, you can use the control wheel or control dial to set exposure compensation. When you do that, the other control retains its original function. That is, if you choose the control wheel to set EV, then the control dial can still be used to adjust shutter speed in Shutter Priority mode, and the control dial to select aperture in Aperture Priority mode. Select the control dial for EV instead, and the control wheel retains its shutter speed or aperture function, respectively.
Function of Touch Operations
Options: Touch Shutter, Touch Focus, Touch Tracking
Default: Touch Focus
My preference: Touch Tracking
As I noted in Chapter 2, the a6600’s touch screen can operate in three different modes: Touch Shutter, Touch Focus, and Touch Tracking. You can have only one mode active at a time, but their functions overlap enough that one of the three will likely do the job for you. This entry allows you to activate the mode you prefer. To recap:
- Touch Shutter. Tap the screen to specify the focus point. The camera will then immediately take a picture. While Touch Shutter is enabled, you can activate it or deactivate it by tapping the icon at the upper-right corner of the screen. You can tell Touch Shutter is enabled when the orange bar appears to the left of the Touch icon.
This mode is most useful when you’re composing your image using the LCD monitor. Just tap to take a single picture, or keep touching the screen when Drive Mode is set to Continuous Shooting (or Scene Mode is set to Sports Action) to capture a burst. This mode is unavailable when using the viewfinder, or Movie, S&Q Motion, or Manual Focus modes; when using Digital or Clear Image Zoom; and when Focus Area is set to Digital or Clear Image Zoom.
- Touch Focus. Tap the LCD screen and select a focus point or zone anywhere that the a6600 is able to achieve autofocus (that is, most of the frame other than the edges).
- Tap the LCD screen. The camera will focus at that point. Or slide your finger around the screen to move the focus area around within the frame. You can do this whether composing on the LCD monitor or looking through the viewfinder.
- Double tap the LCD screen. In Manual Focus mode, a double-tap on the LCD activates the focus magnifier.
In autofocus mode, the a6600 will focus when you press the shutter release down halfway. You can deactivate touch focus by pressing the center button, or by tapping the “cancel focus” icon (a pointing finger with an X next to it) that appears at upper right on the screen. A quick tap may not register; this function requires a firm press.
This mode is not available for autofocus activation when Focus Area is set to Flexible Spot or Expand Flexible Spot, but you can still move the focus frame around. In Movie mode, Spot Focus can be used with the LCD only. Touch Focus is not available when using Digital Zoom or with A-mount lenses when using the LA-EA2 or LA-EA4 adapters.
- Touch Tracking. In this mode, you can specify a subject that will be tracked by tapping the LCD monitor. Tracking will start and continue until you press the center button or tap the Cancel Tracking icon in the upper-right corner of the LCD monitor. The camera will focus on the tracked subject when you press the shutter release down halfway. Note that this feature is not available in Manual Focus modes; with Smart, Clear Image, or Digital zoom features; and when using the LA-EA2 or LA-EA4 lens adapters. It is also disabled in Movie mode when Record Setting is set to 120p/100p.
MOVIE Button
Options: Always, Movie Mode Only
Default: Always
My preference: Always
Movie recording can be started in any operating mode by pressing the Movie record button. This feature is on by default, but if you find that you occasionally press the button inadvertently, you might want to choose the Off option. After you do so, pressing the button will have no effect; when you want to record a movie, you’ll need to rotate the mode dial to the Movie position. I prefer Always, because I find that impromptu video-capture situations are more frequent than accidental movie start-ups.
Dial/Wheel Lock
Options: Unlock, Lock
Default: Unlock
My preference: Unlock
If you want to avoid accidentally changing settings by inadvertently using the control dial or control wheel, you can implement this locking option. Choose Lock and the controls are frozen whenever the Fn button is pressed and held down. A “Locked” indicator appears on the screen. If the default Unlock option is selected, pressing the Fn button has no effect on the controls. I sometimes use this when using Manual exposure in a situation where the lighting does not change drastically, and I want to avoid accidentally changing my aperture or shutter speed settings.
Audio Signals
Options: On, Off
Default: On
My preference: Off
This setting enables and disables the beeping/chirping sounds the camera makes when various operations happen, such as achieving autofocus or the self-timer countdown. Most of the time I don’t require the feedback and, on the contrary, want to blend in without calling attention to myself, so I disable the noises. The self-timer countdown is especially noticeable, even in environments with a moderate amount of noise. Couple this setting with Silent Shooting and you can often take pictures virtually unnoticed.