8 |
The key tool we use to create and shape our images is light itself, in all its many forms and textures. Indeed, it’s said that Sir John Herschel coined the term “photography” from the Greek words for “writing with light” in a paper read before the Royal Society in March 1839. Our dependence on the qualities of the light we use to produce our images is absolute. An adept photographer knows how to compensate for too much or too little illumination, how to soften harsh lighting to mask defects, or increase its contrast to evoke shape and detail. Sometimes, we must adjust our cameras for the apparent “color” of light, use a brief burst of it to freeze action, or filter it to reduce glare.
The many ways we can work with light deserve three full chapters in this book. This chapter introduces using continuous lighting (such as daylight, incandescent, LED, or fluorescent sources). I’ll cover the brilliant snippets of light we call electronic flash, in Chapters 9 and 10.
Light That’s Available
You’ll often hear the term available light, meaning the ambient light at a scene, including whatever illumination is present outdoors during the day or at night, and that provided by lighting fixtures, windows, and other sources. In practice, available light includes any sort of illumination that’s available, and can include supplementary lighting added by the photographer in the form of additional lamps, reflectors, or studio continuous light sources.
For our purposes, available light is exactly what you might think: uninterrupted illumination that is available all the time during a shooting session. Daylight, moonlight, and the artificial lighting encountered both indoors and outdoors count as continuous light sources (although all of them can be “interrupted” by passing clouds, solar eclipses, a blown fuse, or simply by switching a lamp off). Indoor continuous illumination includes both the lights that are there already (such as incandescent lamps or overhead fluorescent lights indoors) and fixtures you supply yourself, including photoflood lamps or reflectors used to bounce existing light onto your subject.
Continuous lighting differs from electronic flash, which illuminates our photographs only in brief bursts. Flash, or “strobe” light is notable because it can be much more intense than continuous lighting, lasts only a moment, and can be much more portable than supplementary incandescent sources. It’s a light source you can carry with you and use anywhere. There are advantages and disadvantages to each type of illumination.
Here’s a quick checklist of pros and cons:
- Lighting preview—Pro: continuous lighting. With continuous lighting, thanks to the real-time sensor image preview through the viewfinder or LCD screen, if you’ve opted to set Exposure Simulation to Enable in the Shooting 7 menu, you’ll always know exactly what kind of lighting effect you’re going to get—including color balance—and, if multiple lights are used, how they will interact with each other. If the natural light present in a scene is perfect for the image you’re trying to capture, you’ll know immediately (see Figure 8.1).
- Lighting preview—Con: electronic flash. With electronic flash, unless you have a modeling light built into the flash, the general effect you’re going to see may be a mystery until you’ve built some experience, and you may need to review a shot, make some adjustments, and then reshoot to get the look you want. (In this sense, a digital camera’s review capabilities replace the Polaroid test shots pro photographers relied on in decades past.) An image like the candle-lit scene in Figure 8.1 would have been difficult to achieve with an off-camera battery-powered flash unit, because it would be tricky to balance the illumination of the candles with the light from the flash. While the modeling light feature offered by some Canon flash units can be helpful, it’s not a true continuous modeling light.
- Exposure calculation—Pro: continuous lighting. Your camera has no problem calculating exposure for continuous lighting, because it remains constant and can be measured directly from the light reaching the sensor. The amount of light available just before the exposure will, in almost all cases, be the same amount of light present when the shutter is released. The Spot metering mode can be used to measure and compare the proportions of light in the highlights and shadows, so you can make an adjustment (such as using more or less fill light) if necessary. If you want the utmost precision, you can even use a hand-held light meter to measure the light yourself, and then set the shutter speed and aperture to match in Manual exposure mode.
- Exposure calculation—Con: electronic flash. Electronic flash illumination doesn’t exist until the flash fires, and so can’t be measured by the exposure sensor at the moment of exposure. Instead, the light must be measured by metering the intensity of a pre-flash triggered an instant before the main flash, as it is reflected back to the camera and through the lens. If you have a do-it-yourself bent, there are hand-held flash meters, too, including models that measure both flash and continuous light, so you need only one meter for both types of illumination.
- Evenness of illumination—Pro/con: continuous lighting. Of the continuous light sources, daylight, in particular, provides illumination that tends to fill an image completely, lighting up the foreground, background, and your subject almost equally. Shadows do come into play, of course, so you might need to use reflectors or fill in additional light sources to even out the illumination further. But, barring objects that block large sections of your image from daylight, the light is spread fairly evenly. Indoors, however, continuous lighting is commonly less evenly distributed. The average living room, for example, has hot spots near the lamps and overhead lights, and dark corners located farther from those light sources. But on the plus side, you can easily see this uneven illumination and compensate with additional lamps.

Figure 8.1 You always know how the lighting will look when using continuous illumination.
- Evenness of illumination—Con: electronic flash. Electronic flash units, like continuous light sources such as lamps that don’t have the advantage of being located 93 million miles from the subject, suffer from the effects of their proximity. The inverse square law, first applied to both gravity and light by Sir Isaac Newton, dictates that as a light source’s distance increases from the subject, the amount of light reaching the subject falls off proportionately to the square of the distance. In plain English, that means that a flash or lamp that’s twelve feet away from a subject provides only one-quarter as much illumination as a source that’s six feet away (rather than half as much). This translates into relatively shallow “depth-of-light.” I’ll discuss this aspect again in Chapter 9.
- Action stopping—Pro: electronic flash. When it comes to the ability to freeze moving objects in their tracks, the advantage goes to electronic flash. The brief duration of electronic flash serves as a very high “shutter speed” when the flash is the main or only source of illumination for the photo. Your shutter speed may be set for 1/200th second during a flash exposure, but if the flash illumination predominates, the effective exposure time will be the 1/1000th to 1/50,000th second or less duration of the flash, as you can see in Figure 8.2, because the flash unit reduces the amount of light released by cutting short the duration of the flash. The only fly in the ointment is that, if the ambient light is strong enough, it may produce a secondary, “ghost” exposure, as I’ll explain in Chapter 9.
- Action stopping—Con: continuous lighting. Action stopping with continuous light sources is completely dependent on the shutter speed you’ve dialed in on the camera. And the speeds available are dependent on the amount of light available and your ISO sensitivity setting. Outdoors in daylight, there will probably be enough sunlight to let you shoot at 1/2000th second and f/6.3 with a non-grainy sensitivity setting of ISO 400. That’s a fairly useful combination of settings if you’re not using a super-telephoto with a small maximum aperture. But inside, the reduced illumination quickly has you pushing your camera to its limits. For example, if you’re shooting indoor sports, there probably won’t be enough available light to allow you to use a 1/2000th second shutter speed (although I routinely shoot indoor basketball at ISO 1600 and 1/500th second at f/4). In many indoor sports situations, the lack of available light, and the increased visual noise at settings of ISO 6400 and above, you may find yourself limited to 1/500th second or slower.
- Cost—Pro: continuous lighting. Incandescent, fluorescent, or LED lamps are generally much less expensive than electronic flash units, which can easily cost several hundred dollars. I’ve used everything from desktop high-intensity lamps to reflector flood lights for continuous illumination at very little cost. There are lamps made especially for photographic purposes, too. Maintenance is economical, as well: many incandescent or fluorescents use bulbs that cost only a few dollars, and LED lamps are not only much less costly to operate, they are virtually immortal.
- Cost—Con: electronic flash. Electronic flash units aren’t particularly cheap. The lowest-cost dedicated flash designed specifically for the Canon EOS cameras is about $150 (the EL-100), and it is probably not powerful enough for an advanced camera like the R5 or R6. Such basic units are limited in features and intended for those with entry-level cameras. Plan on spending some money to get the features that a sophisticated electronic flash offers.

Figure 8.2 Electronic flash can freeze almost any action.
- Flexibility—Pro: electronic flash. Electronic flash’s action-freezing power allows you to work without a tripod in the studio (and elsewhere), adding flexibility and speed when choosing angles and positions. Flash units can be easily filtered, and, because the filtration is placed over the light source rather than the lens, you don’t need to use high-quality filter material. For example, Roscoe or Lee lighting gels, which may be too flimsy to use in front of the lens, can be mounted or taped in front of your flash with ease.
- Flexibility—Con: continuous lighting. Because incandescent and fluorescent lamps are not as bright as electronic flash, the slower shutter speeds required (see “Action stopping,” above) mean that you may have to use a tripod more often, especially when shooting portraits. The incandescent variety of continuous lighting gets hot, especially in the studio, and the side effects range from discomfort (for your human models) to disintegration (if you happen to be shooting perishable foods like ice cream). The heat also makes it more difficult to add filtration to incandescent sources. (It’s no wonder that LED illumination is rapidly becoming the go-to continuous light source for photography.)
Continuous Lighting Basics
While continuous lighting and its effects are generally much easier to visualize and use than electronic flash, there are some factors you need to take into account, particularly the color temperature of the light, how accurately a given form of illumination reproduces colors (we’ve all seen the ghastly looks human faces assume under mercury-vapor lamps outdoors), and other considerations.
One important aspect is color temperature. Of course, color temperature concerns aren’t exclusive to continuous light sources, but the variations tend to be more extreme and less predictable than those of electronic flash, which output relatively consistent daylight-like illumination.
Living with Color Temperature
In practical terms, color temperature is how “bluish” or how “reddish” the light appears to be to the digital camera’s sensor. Indoor illumination is quite warm, comparatively, and appears reddish to the sensor. Daylight, in contrast, seems much bluer to the sensor. Our eyes (our brains, actually) are quite adaptable to these variations, so white objects don’t appear to have an orange tinge when viewed indoors, nor do they seem excessively blue outdoors in full daylight. Yet, these color temperature variations are real, and the sensor is not fooled. To capture the most accurate colors, we need to take the color temperature into account in setting the color balance (or white balance)—either automatically using the camera’s intelligence or manually using our own knowledge and experience.
While Canon has been valiant in its efforts to smarten up the camera’s ability to adjust for color balance automatically, an entire cottage industry has developed to provide us additional help, including gadgets like the ExpoDisc filter/caps (see Figure 8.3) and their ilk (www.expoimaging.com), which allow the camera’s add-on external custom white balance measuring feature to evaluate the illumination that passes through the disc/cap/filter/Pringle’s can lid, or whatever neutral-color substitute you employ. (A white or gray card also works.) Unfortunately, to help us tangle with the many different types of non-incandescent/non-daylight sources, Canon has provided only a single White Fluorescent setting (some competing models offer more than a half-dozen different presets for fluorescents, sodium-vapor, and mercury vapor illumination). When it comes to zeroing in on the exact color temperature for a scene, your main tools will be custom white balances set using neutral targets like the ExpoDisc, and adjustment of RAW files when you import photos into your image editor.

Figure 8.3 The ExpoDisc is placed on a lens and used as a neutral subject for measuring white balance.
The only time you need to think in terms of actual color temperature is when you’re making adjustments using the Color Temp. setting in the White Balance entry of the Shooting 3 menu, as I’ll describe in Chapter 11. It allows you to dial in exact color temperatures, if known. You can also shift and bias color balance along the blue/amber and magenta/green axes, and bracket white balance.
In most cases, however, the Auto setting in the Shooting menu’s White Balance entry will do a good job of calculating white balance for you. Auto can be used as your choice most of the time. Use the preset values or set a custom white balance that matches the current shooting conditions when you need to.
Remember that if you shoot RAW, you can specify the white balance of your image when you import it into Photoshop, Photoshop Elements, or another image editor using Adobe Camera Raw, or your preferred RAW converter. While color-balancing filters that fit on the front of the lens exist, they are primarily useful for film cameras, because film’s color balance can’t be tweaked as extensively as that of a sensor.
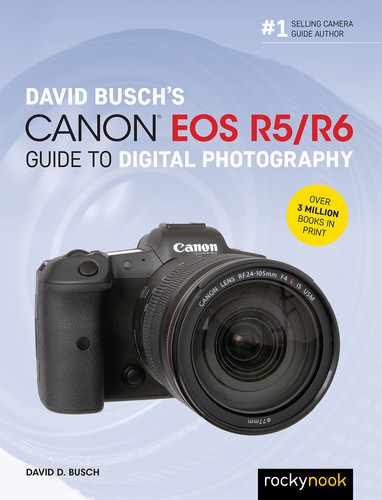
White Balance Bracketing
When using WB bracketing, the camera takes a single shot, and then saves multiple JPEG copies, each with a different color balance. It’s not necessary to capture multiple shots, as the raw information retrieved from the sensor for the single exposure is used to generate the multiple different versions. Rotate the Main Dial or QCD to the right to bracket one, two, or three increments in the blue/amber direction (see Figure 8.4, left), or to the left to bracket one, two, or three increments in the magenta/green direction. Once you have set blue/amber or magenta/green bias orientations, you can use the Multi-controller joystick to shift the bracket to provide greater bias in any of the two orientations. Figure 8.4, right shows a bracketing sequence along that blue/amber axis that is shifted in the blue and green directions. It’s unlikely you’ll need such fine-tuning; making images bluer/yellower or more green/magenta will usually suffice.
Figure 8.4 White balance bracketing can be done along the amber/blue axis (left) or green/magenta axis. Bias can be shifted, as well (right).
Making these adjustments are the only times you’re likely to be confused by a seeming contradiction in how color temperatures are named: warmer (more reddish) color temperatures (measured in degrees Kelvin) are the lower numbers, while cooler (bluer) color temperatures are higher numbers. It might not make sense to say that 3,400K is warmer than 6,000K, but that’s the way it is. If it helps, think of a glowing red ember contrasted with a white-hot welder’s torch, rather than fire and ice.
The confusion comes from physics. Scientists calculate color temperature from the light emitted by a mythical object called a black body radiator, which absorbs all the radiant energy that strikes it, and reflects none at all. Such a black body not only absorbs light perfectly, but it emits it perfectly when heated (and since nothing in the universe is perfect, that makes it mythical).
At a particular physical temperature, this imaginary object always emits light of the same wavelength or color. That makes it possible to define color temperature in terms of actual temperature in degrees on the Kelvin scale that scientists use. Incandescent light, for example, typically has a color temperature of 3,200K to 3,400K. Daylight might range from 5,500K to 6,000K. Each type of illumination we use for photography has its own color temperature range—with some cautions.
Daylight
Daylight is produced by the sun, and so is moonlight (which is just reflected sunlight). Daylight is present, of course, even when you can’t see the sun. When sunlight is direct, it can be bright and harsh. If daylight is diffused by clouds, softened by bouncing off objects such as walls or your photo reflectors, or filtered by shade, it can be much dimmer and less contrasty.
Daylight’s color temperature can vary quite widely. It is highest in temperature (most blue) at noon when the sun is directly overhead, because the light is traveling through a minimum amount of the filtering layer we call the atmosphere. The color temperature at high noon may be 6,000K. At other times of day, the sun is lower in the sky and the particles in the air provide a filtering effect that warms the illumination to about 5,500K for most of the day. Starting an hour before dusk and for an hour after sunrise, the warm appearance of the sunlight is even visible to our eyes when the color temperature may dip to 5,000K–4,500K, as shown in Figure 8.5.
Because you’ll be taking so many photos in daylight, you’ll want to learn how to use or compensate for the brightness and contrast of sunlight, as well as how to deal with its color temperature. I’ll provide some hints later in this chapter.

Figure 8.5 At dawn and dusk, the color temperature of daylight may dip as low as 4,500K.
Incandescent/Tungsten/Halogen Light
The term incandescent or tungsten/halogen illumination is usually applied to the direct descendents of Thomas Edison’s original electric lamp. Such lights consist of a glass bulb that contains a vacuum, or is filled with a halogen gas, and contains a tungsten filament that is heated by an electrical current, producing photons and heat. Tungsten-halogen lamps are a variation on the basic light bulb, using a more rugged (and longer-lasting) filament that can be heated to a higher temperature, housed in a thicker glass or quartz envelope, and filled with iodine or bromine (“halogen”) gases. The higher temperature allows tungsten-halogen (or quartz-halogen/quartz-iodine, depending on their construction) lamps to burn “hotter” and whiter. Although popular for automobile headlamps today, they’ve also been used for photographic illumination.
Although incandescent illumination isn’t a perfect black body radiator, it’s close enough that the color temperature of such lamps can be precisely calculated and used for photography without concerns about color variation (at least, until the very end of the lamp’s life). As I noted earlier, the color rendering index of such lamps tends to be very high, so you need to account only for the color temperature.
Of course, old-style tungsten lamps are on the way out, at first replaced either by compact fluorescent lights (CFL) or newer, more energy-efficient (and expensive) tungsten and halogen lights, and, eventually, by LED illumination. It appears that LED illumination is on track to supplant all of these for most applications in the near future. The other qualities of this type of lighting, such as contrast, are dependent on the distance of the lamp from the subject, type of reflectors used, and other factors that I’ll explain later in this chapter.
Fluorescent Light/Other Light Sources
Fluorescent light has some advantages in terms of illumination, but some disadvantages from a photographic standpoint. This type of lamp generates light through an electro-chemical reaction that emits most of its energy as visible light, rather than heat, which is why the bulbs don’t get as hot. The type of light produced varies depending on the phosphor coatings and type of gas in the tube. So, the illumination fluorescent bulbs produce can vary widely in its characteristics.
That’s not great news for photographers. Different types of lamps have different “color temperatures” that can’t be precisely measured in degrees Kelvin, because the light isn’t produced by heating. Worse, fluorescent lamps have a discontinuous spectrum of light that can have some colors missing entirely. A particular type of tube can lack certain shades of red or other colors (see Figure 8.6), which is why fluorescent lamps and other alternative technologies such as sodium-vapor illumination can produce ghastly looking human skin tones. Their spectra can lack the reddish tones we associate with healthy skin and emphasize the blues and greens popular in horror movies.

Figure 8.6 The uncorrected fluorescent lighting in the arena added a distinct greenish cast to this image when exposed with a daylight white balance setting.
Color Rendering
Faithful color rendition goes beyond color temperature. So-called “white” light is produced by a spectrum of colors that, when added together, provide the neutral color needed for accuracy. Artificial light sources don’t necessarily offer the same balanced spectrum found in sunlight. Some portions of the spectrum may be deficient or truncated or include gaps with certain wavelengths missing entirely. Astronomers use their knowledge of which elements absorb which colors of light to calculate the makeup of distant stars using spectrographs. In photography, the analysis of spectra is used to calculate the color rendering index, which measures how accurately colors are presented.
All artificial light sources have a color rendering index (CRI). That figure is calculated by rating eight different colors on a scale of 0 to 100, based on how natural the color looks compared to a perfect or “reference” light source at a particular color temperature. A CRI of 80-plus is considered acceptable; for critical applications like photography, a CRI higher than 93 is best. Incandescent and halogen bulbs typically have a CRI of 100 compared to a reference light source at the same color temperature. Standard LED lamps are rated at 83, although some can have CRIs as high as 98. Many types of fluorescent lights fall into the CRI 50–75 range.
Vendors, such as GE and Sylvania, may actually provide a figure known as the color rendering index on the packaging using a scale of 0 (some sodium-vapor lamps) to 100 (daylight and most incandescent lamps). Daylight fluorescents and deluxe cool white fluorescents suitable for photography might have a CRI of about 79 to 95, which is perfectly acceptable for most photographic applications. Less desirable are warm white fluorescents, which may have a CRI of 55. White deluxe mercury-vapor lights are even less suitable with a CRI of 45, while low-pressure sodium lamps can vary from CRI 0–18. If you’re using such a source not intended for photography, it may be worth your while to determine its color rendering index before you shoot. Fluorescent lights, discussed next, are an excellent example.
Fluorescent Light/LEDs
As I mentioned earlier, their color rendering indexes are far from ideal.
Compact fluorescent lights (CFLs) are those spiraling bulbs that became popular as old-school tungsten bulbs were phased out. However, CFLs don’t work in all fixtures and for all applications, such as dimmers (even if you purchase special “dimmable” CFLs), electronic timer or “dusk-to-dawn” light controllers, some illuminated wall switches, or with motion sensors. Only certain types of CFLs (cold cathode models) operate outside in cold weather; they emit IR signals that can confuse the remote control of your TV, air conditioner, etc.
Gaining in popularity are LED light sources, particularly for movies, in the form of compact units that clip onto the camera and provide a continuous beam of light to fill in shadows indoors or out, and/or to provide the main illumination when shooting video inside. Several vendors have introduced LED studio lights that are bright enough for general-purpose shooting. It’s become obvious that LED illumination will soon become the most widely used continuous light source. They’ve already made dramatic inroads in the automotive industry for taillights, headlights, and interior illumination. Innovations like the Lume Cube 2, a brilliant $90 waterproof variable-brightness LED lamp that can be triggered wirelessly, will find broader use. (See Figure 8.7.)

Figure 8.7 The Lume Cube 2.
Other Lighting Accessories
Once you start working with light, you’ll find there are plenty of useful accessories that can help you. Here are some of the most popular that you might want to consider. These all work well with both continuous lighting, discussed in this chapter, as well as with electronic flash, which will be our focus in the chapter that follows this one.
Do-It-Yourself Lighting
The cool thing about continuous lighting is that anything that lights up can be used as a lighting tool for your Flashlights (for “painting with light” techniques), shop work lights, or even desktop high-intensity lamps, like the one seen in Figure 8.8, top, can be pressed into service at little or no cost (if you already happen to own something that will work). I used that desk lamp to shoot the image seen in Figure 8.8, bottom, simply because the lamp was bright enough to let me use a small f/stop to maximize depth-of-field, and it was really easy to see the lighting effect and move the lamp an inch or two to get different effects.
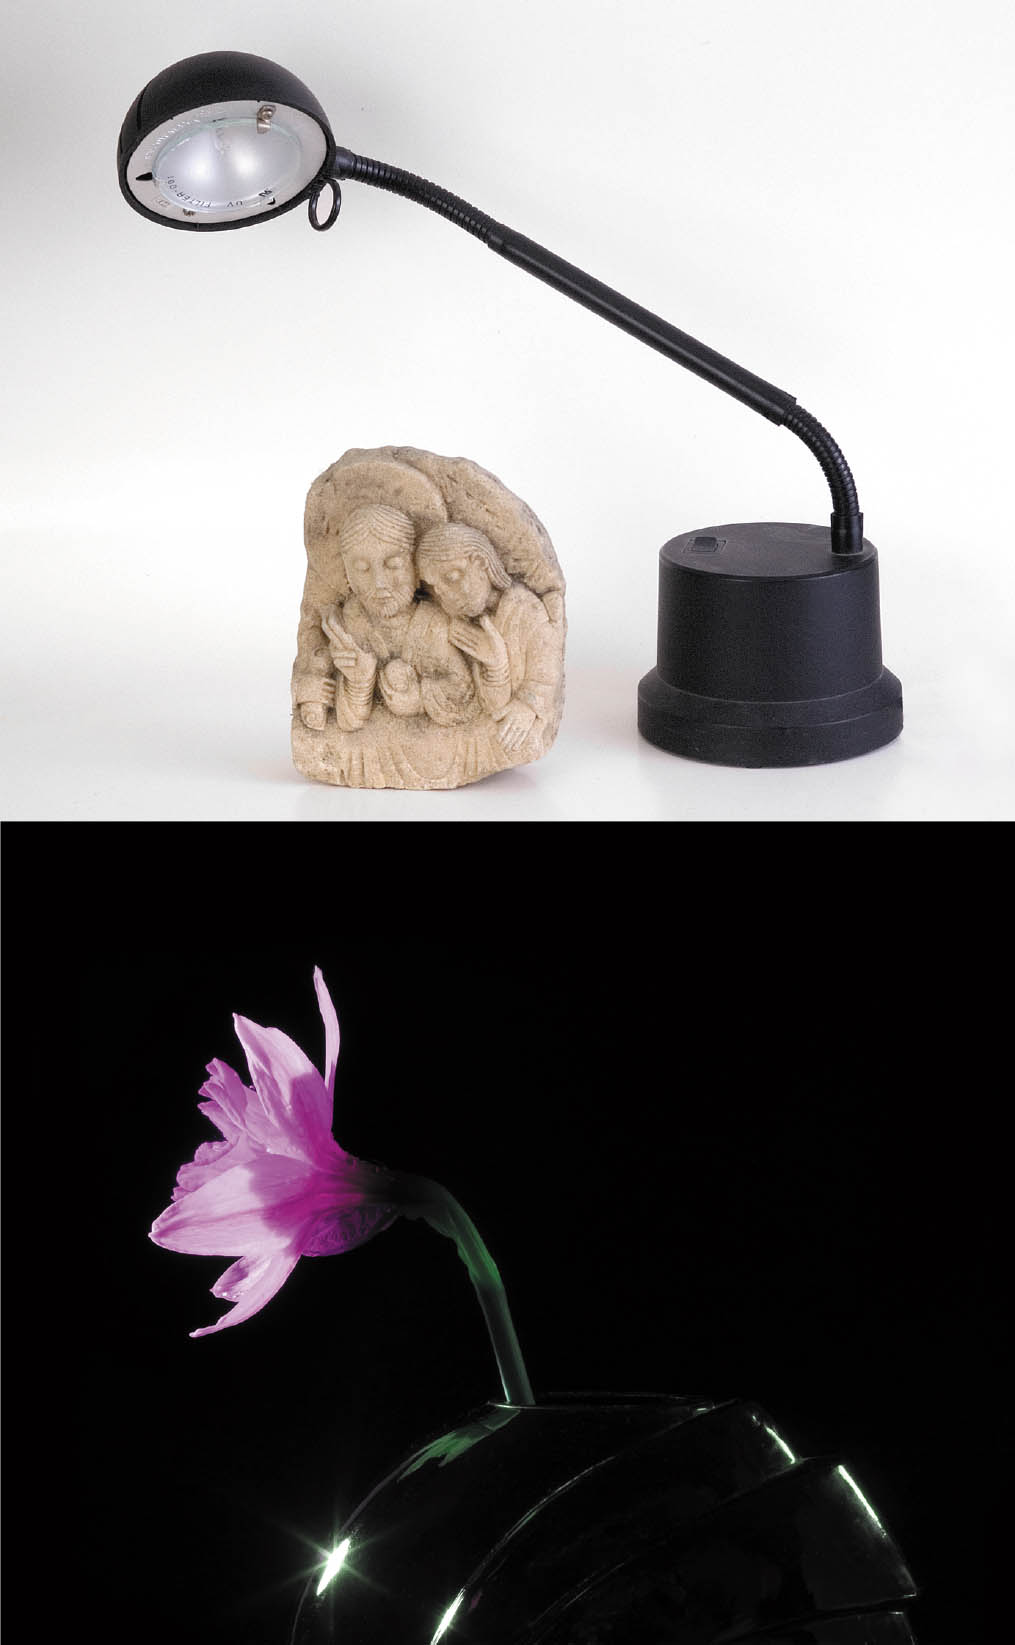
Figure 8.8 A desk lamp can be pressed into service as a light source for tabletop and macro photography.
Umbrellas
Umbrellas are just what you might think, a variation on those trusty shields-on-a-stick that protect us from the ravages of sun, rain, snow, or other elements of nature. Whether we know them as parasols (for the sun) or paraguas (for the water) on the Costa del Sol, as parapluies/ombrelles on the Riviera, or Sonnenschirme/Regenschirme (gotta love those Germans!), these inexpensive accessories are just as versatile for reflecting light as blocking it.
Indeed, you can use umbrellas in multiple roles:
- Light reflector. A silver umbrella can provide a softer, but not too soft light source, or a much softer source of illumination when a non-shiny white umbrella is used. The quality and quantity of the light that your camera sees can be further adjusted simply by moving the umbrella closer to your subject (for a softer illumination) or farther away (for more contrast).
- Light diffuser. A white umbrella diffuses and softens light, but a translucent white umbrella (of the “shoot-through” variety) can be reversed so that the illumination passes through the fabric and becomes even more soft and diffuse.
- Light blocker. Some umbrellas have a white or silver interior surface, and a black cover that prevents any light from leaking through the umbrella. Those models can be used to block light from other sources of illumination—even outdoors in daylight—to allow you to create subtle lighting effects.
- Light colorizer. Umbrellas may have a shiny golden, silver, or blue interior surface (as do many flat reflectors), and so can be used to add a rich warm tone, neutral sheen, or cold bluish cast to an image or shadows. You can use umbrella “colorizing” to create an effect or balance multiple light sources.
- Soft box in an instant. Many umbrellas can be fitted with a cover over their front that transforms them into a soft box. This conversion is more practical for use with electronic flash (covered in the next chapter) than for some kinds of continuous lighting, because of heat build-up. “Colder” forms of continuous lighting, such as fluorescent lights designed specially for photographic applications, can be used in soft box mode, however. Figure 8.9, left, shows both an umbrella and a soft box.
Tents
Tents, like the one seen in at right Figure 8.9, are useful for photographing shiny objects or any subject where you want to reduce the shadows and reflections to a minimum. The fabric of the tent is translucent, so you place the light sources around the sides or above, and a soft glow filters through to illuminate the image. You can still maintain subtle lighting effects by choosing to light up—or not light up—individual sides of the cube.
The lens protrudes through a hole or slit in the tent, so you can photograph the shiniest subject without having you or your camera show up in the final picture.

Figure 8.9 Umbrellas and soft boxes, seen at opposite sides of the frame, provide a soft, diffuse light source (left). Tents provide shadowless lighting for shiny objects (right).
Soft Boxes
Soft boxes are also handy for photographing shiny objects. They not only provide a soft light, but if the box itself happens to reflect in the subject (say you’re photographing a chromium toaster), the box will provide an interesting highlight that’s indistinct and not distracting.
You can buy soft boxes or make your own. Some lengths of friction-fit plastic pipe and a lot of muslin cut and sewed just so may be all that you need. Soft boxes are large square, rectangular, or round or octagonal devices that may resemble an umbrella with a front cover and produce a similar lighting effect. They can extend from a few feet square to massive boxes that stand five or six feet tall—virtually a wall of light. With a light source or two inside a soft box, you have a very large, semi-directional light source that’s very diffuse and very flattering for portraiture and other people photography.
Light Stands
Both electronic flash and incandescent lamps can benefit from light stands. These are lightweight, tripod-like devices (but without a swiveling or tilting head) that can be set on the floor, tabletops, or other elevated surfaces and positioned as needed. Light stands should be strong enough to support an external lighting unit, up to and including a relatively heavy flash with soft box or umbrella reflectors. You want the supports to be capable of raising the lights high enough to be effective. Look for light stands capable of extending six to seven feet high. The nine-foot units usually have larger, steadier bases, and extend high enough that you can use them as background supports. You’ll be using these stands for a lifetime, so invest in good ones. I bought my light stands when I was in college, and I have been using them for decades.
Backgrounds
Backgrounds can be backdrops of cloth, sheets of muslin you’ve painted yourself using a sponge dipped in paint, rolls of seamless paper, or any other suitable surface your mind can dream up. Backgrounds provide a complementary and non-distracting area behind subjects (especially portraits) and can be lit separately to provide contrast and separation that outlines the subject, or which helps set a mood.
I like to use plain-colored backgrounds for portraits, and white or gray seamless paper backgrounds for product photography. You can usually construct these yourself from cheap materials and tape them up on the wall behind your subject or mount them on a pole stretched between a pair of light stands.
Snoots and Barn Doors
These fit over the flash unit and direct the light at your subject. Snoots are excellent for converting a light source into a hair light, while barn doors give you enough control over the illumination by opening and closing their flaps that you can use another flash as a background light, with the capability of feathering the light exactly where you want it on the background.