9 |
Until you delve into the situation deeply enough, it might appear that serious photographers have a love/hate relationship with electronic flash. You’ll often hear that flash photography is less natural looking, and that the built-in flash in most cameras should never be used as the primary source of illumination because it provides a harsh, garish look. Indeed, many advanced cameras, like the R5 and R6, don’t have a built-in flash at all. Available (“continuous”) lighting is praised, and built-in flash photography seems to be roundly denounced.
In truth, however, the bias is against bad flash photography, the kind produced when you clamp a flash on top of the camera (as shown in Figure 9.1) and point it directly at your subject. In that mode, you’ll often end up with well-exposed (thanks to Canon’s e-TTL II metering system), but harshly lit images. Yet, in other configurations, flash has become the studio light source of choice for pro photographers, because it’s more intense (and its intensity can be varied to order by the photographer), freezes action, frees you from using a tripod (unless you want to use one to lock down a composition), and has a snappy, consistent light quality that matches daylight. (While color balance changes as the flash duration shortens, some Canon flash units can communicate to the camera the exact white balance provided for that shot.) And even pros will cede that an external flash has some important uses as an adjunct to existing light, particularly to illuminate dark shadows using a technique called fill flash. Moreover, creative photographers can use an external Speedlite in remarkably creative ways, especially in wireless and multiple flash modes (which I’ll explain in Chapter 10).
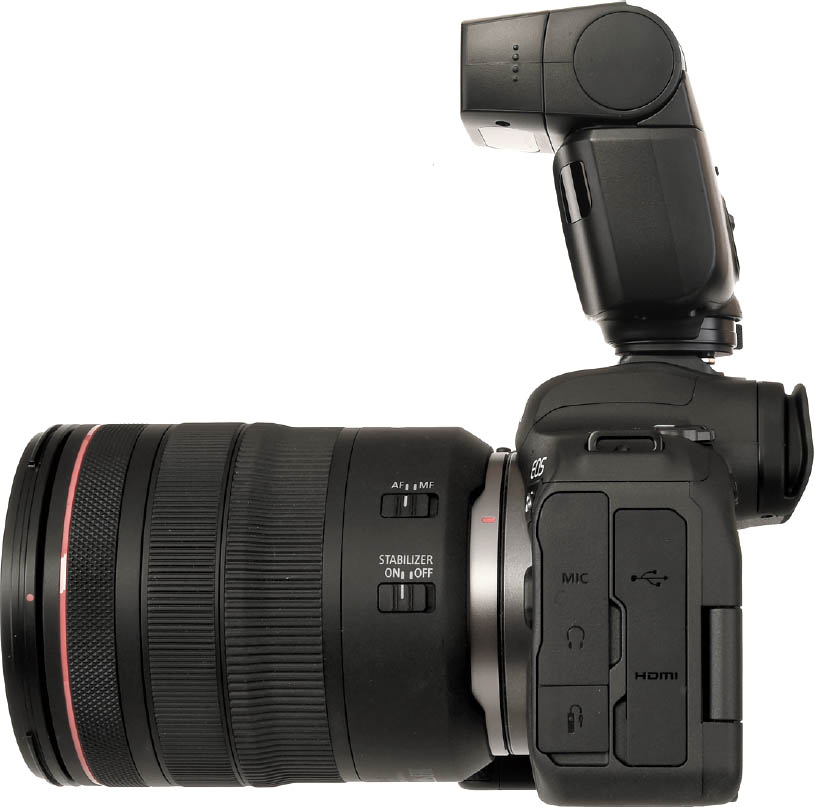
Figure 9.1 An add-on flash is a versatile accessory.
But electronic flash isn’t as inherently easy to use as continuous lighting. As I noted in Chapter 8, electronic flash units are more expensive, don’t show you exactly what the lighting effect will be (unless you use a second, relatively continuous source called a modeling light for a preview), and the exposure of electronic flash units is more difficult to calculate accurately.
How Electronic Flash Works
The bursts of light we call electronic flash are produced by a flash of photons generated by an electrical charge that is accumulated in a component called a capacitor and then directed through a glass tube containing xenon gas, which absorbs the energy and emits the brief flash. For a typical external flash, such as the Speedlite 600EX II-RT, the full burst of light lasts about 1/1000th of a second and provides enough illumination to shoot a subject 12 feet away at f/16 using the ISO 100 setting.
Because the duration of the burst is so brief, if the external flash is the main source of illumination, the effective exposure time is short, typically 1/1000th to 1/50,000th second, freezing a moving subject dramatically, as shown in Figure 9.2. These short bursts can also be repeated, producing multiple-exposure/stroboscopic effects, as described later in this chapter.
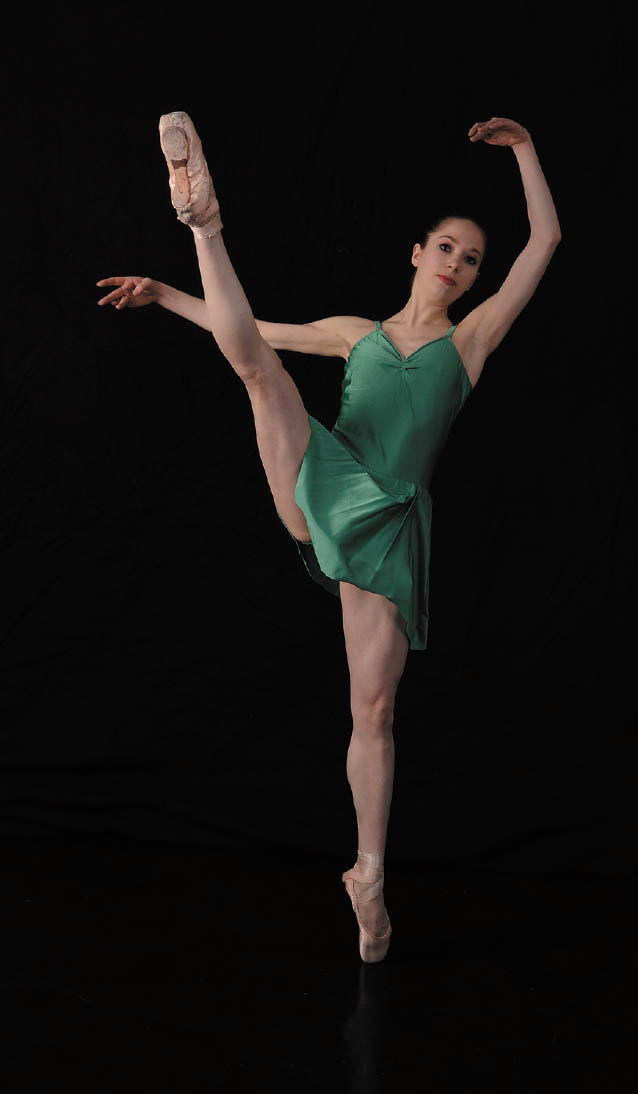
Figure 9.2 An external flash placed to the left and slightly in front of the dancer produced a brief burst that froze her en pointe.
An electronic flash is triggered at the instant of exposure, during a period when the sensor is fully exposed by the shutter. The camera has a vertically traveling shutter that consists of two curtains. The first curtain (either mechanical or electronic) opens and moves to the opposite side of the frame, at which point the shutter is completely open. The flash can be triggered at this point (so-called first-curtain sync), making the flash exposure. Then, after a delay that can vary from 30 seconds to 1/200th second (or 1/250th second if you’re using the electronic first-curtain shutter), a second curtain begins moving across the sensor plane, covering up the sensor again. If the flash is triggered just before the second curtain starts to close, then second-curtain sync is used. In both cases, though, a shutter speed of 1/200th second (or 1/250th second with the e-first curtain) is the maximum that can be used to take a photo (unless you’re using high-speed sync, discussed later in this chapter).
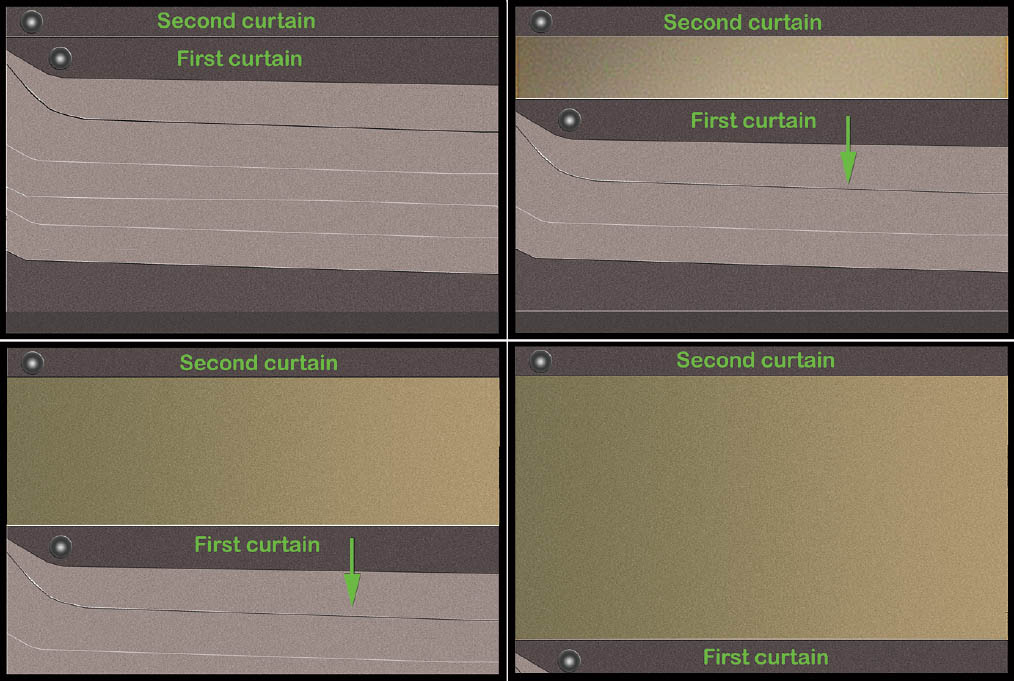
Figure 9.3 A focal plane shutter has two curtains, the upper, or first curtain, and a lower, second curtain.
Figure 9.3 illustrates how this works with the mechanical shutter. At upper left, you can see a fanciful illustration of a generic shutter with both curtains tightly closed. (Your shutter does not actually look like this, as you can confirm by removing your lens when the camera is powered off and the shutter closes to protect the sensor.) At upper right, the first curtain begins to move downward, starting to expose a narrow slit that reveals the sensor behind the shutter. At lower left, the first curtain moves downward farther until, as you can see at lower right in the figure, the sensor is fully exposed.
When first-curtain sync is used, the flash is triggered at the instant that the sensor is completely exposed. The shutter then remains open for an additional length of time (from 30 seconds to 1/200th–1/250th second), and the second curtain begins to move downward, covering the sensor once more. When second-curtain sync is activated, the flash is triggered after the main exposure is over, just before the second curtain begins to move downward.
Ghost Images
The difference between triggering the flash when the shutter just opens, or just when it begins to close might not seem like much. But whether you use first-curtain sync (the default setting) or second-curtain sync (an optional setting) can make a significant difference to your photograph if the ambient light in your scene also contributes to the image. You can set either of these sync modes in the Shooting 2 menu, under External Speedlite control, where you’ll find the Flash Function setting option. The External Speedlite control screen also includes an E-TTL Balance entry to let you control how ambient light and flash illumination are mixed. I’ll describe that option later in this chapter.
At faster shutter speeds, there isn’t much time for the ambient light to register, unless it is very bright. It’s likely that the electronic flash will provide almost all the illumination, so first-curtain sync or second-curtain sync isn’t very important. However, at slower shutter speeds, or with very bright ambient light levels, there is a significant difference, particularly if your subject is moving, or the camera isn’t steady.
In any of those situations, the ambient light will register as a second image accompanying the flash exposure, and if there is movement (camera or subject), that additional image will not be in the same place as the flash exposure. It will show as a ghost image and, if the movement is significant enough, as a blurred ghost image trailing in front of or behind your subject in the direction of the movement.
As I noted, when you’re using first-curtain sync, the flash’s main burst goes off the instant the shutter opens fully (a pre-flash used to measure exposure in auto flash modes fires before the shutter opens). This produces an image of the subject on the sensor. Then, the shutter remains open for an additional period, as described earlier. If your subject is moving, say, toward the right side of the frame, the ghost image produced by the ambient light will generate a blur on the right side of the original subject image, making it look as if your sharp (flash-produced) image is chasing the ghost. For those of us who grew up with lightning-fast superheroes who always left a ghost trail behind them, that looks unnatural (see Figure 9.4).

Figure 9.4 First-curtain sync produces an image that trails in front of the flash exposure (top), whereas second-curtain sync creates a more “natural-looking” trail behind the flash image.
So, Canon uses second-curtain sync to remedy the situation. In that mode, the shutter opens, as before. The shutter remains open for its designated duration, and the ghost image forms. If your subject moves from the left side of the frame to the right side, the ghost will move from left to right, too. Then, about 1.5 milliseconds before the second shutter curtain closes, the flash is triggered, producing a nice, sharp flash image ahead of the ghost image. Voilà! We have monsieur Speed Racer outdriving his own trailing image.
Avoiding Sync-Speed Problems
Using a shutter speed faster than the 1/200th- or 1/250th-second sync speed can cause problems. Triggering the electronic flash only when the shutter is completely open makes a lot of sense if you think about what’s going on. To obtain shutter speeds faster than the sync speed, only part of the sensor is exposed at one time, by starting the second curtain on its journey before the first curtain has completely opened, as shown in Figure 9.5. That effectively provides a briefer exposure as a slit, narrower than the full height of the sensor, passes above its surface. If the flash were to fire during the time when the first and second curtains partially obscured the sensor, only the slit that was actually open would be exposed.
You’d end up with only a narrow band, representing the portion of the sensor that was exposed when the picture is taken. For shutter speeds faster than the sync speed, the second curtain begins moving before the first curtain reaches the bottom of the frame. As a result, a moving slit, the distance between the first and second curtains, exposes one portion of the sensor at a time as it moves from the top to the bottom. Figure 9.5 shows three views of our typical (but imaginary) focal plane shutter. At left is pictured the closed shutter; in the middle version you can see the first curtain has moved down about 1/4 of the distance from the top; and in the right-hand version, the second curtain has started to “chase” the first curtain across the frame toward the bottom.
If the flash is triggered while this slit is moving, only the exposed portion of the sensor will receive any illumination. You end up with a photo like the one shown in Figure 9.6. Note that the band across the bottom of the image is black. That’s a shadow of the second shutter curtain, which had started to move when the flash was triggered. Sharp-eyed readers will wonder why the black band is at the bottom of the frame rather than at the top, where the second curtain begins its journey. The answer is simple: your lens flips the image upside down and forms it on the sensor in a reversed position. You never notice that, because the camera is smart enough to show you the pixels that make up your photo in their proper orientation. But this image flip is why, if your sensor gets dirty and you detect a spot of dust in the upper half of a test photo, if cleaning manually, you need to look for the speck in the bottom half of the sensor.

Figure 9.5 A closed shutter (left); partially open shutter as the first curtain begins to move downward (middle); only part of the sensor is exposed as the slit moves (right).
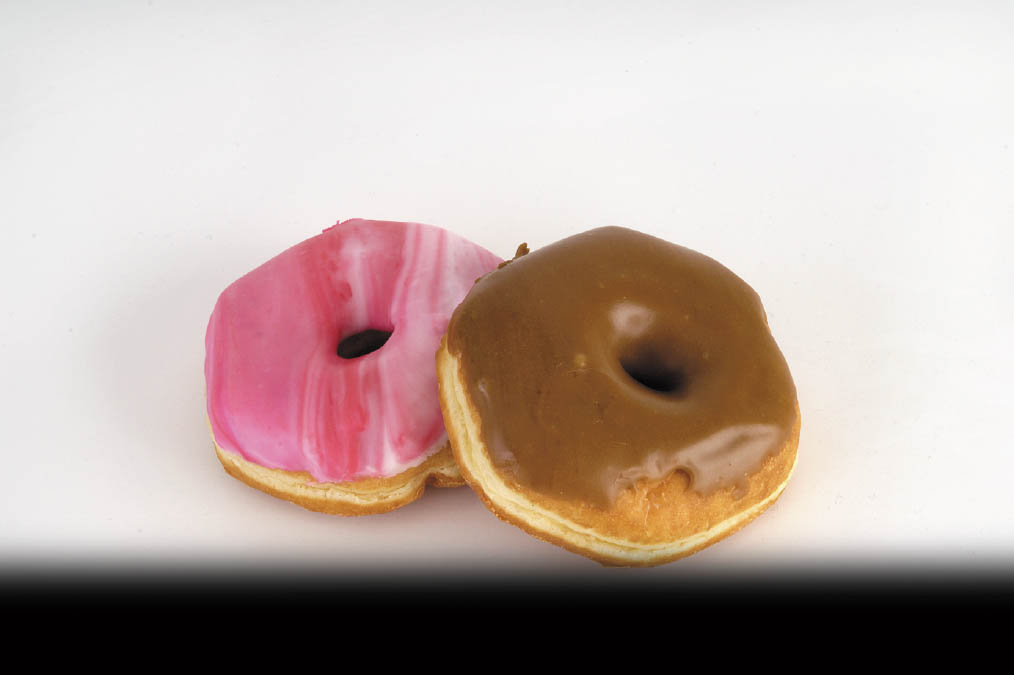
Figure 9.6 If a shutter speed faster than 1/200th second is used, you can end up photographing only a portion of the image.
I generally end up with sync-speed problems only when shooting in the studio, using studio flash units rather than a Canon-dedicated Speedlite. That’s because if you’re using a “smart” (dedicated) flash, the camera knows that a strobe is attached, and remedies any unintentional goof in shutter speed settings. If you happen to set the shutter to a faster speed in Fv, Tv, or M mode, the camera will automatically adjust the shutter speed down to the sync speed. In Av, P, or Scene Intelligent Auto modes where the exposure system selects the shutter speed, it will never choose a shutter speed higher than the sync speed when using flash. In P mode, shutter speed is automatically set between 1/60th and 1/200th/1/250th second when using flash.
But when using a non-dedicated flash, such as a studio unit plugged into the PC/X terminal of the R5, or, with the R6, a PC/X adapter (an accessory that fits into the flash shoe and provides a “dumb” flash connector) the camera has no way of knowing that a flash is connected, so shutter speeds faster than 1/200th second can be set inadvertently. Note that you can use a feature called high-speed sync that allows shutter speeds faster than the sync speed with certain external dedicated Canon flash units. When using high-speed sync (HSS), the flash fires a continuous series of bursts at reduced power for the entire exposure, so that the duration of the illumination is sufficient to expose the sensor as the slit moves. High-speed sync is set using the controls on the attached and powered-up compatible external flash. I’ll explain HSS later.
Determining Exposure
Calculating the proper exposure for an electronic flash photograph is a bit more complicated than determining the settings by continuous light. The right exposure isn’t simply a function of how far away your subject is (which can be calculated based on the autofocus distance that’s locked in just prior to taking the picture). Various objects reflect more or less light at the same distance so, obviously, the camera needs to measure the amount of light reflected back and through the lens. Yet, as the flash itself isn’t available for measuring until it’s triggered, there is nothing to measure.
The solution is to fire the flash multiple times. The initial shot is a pre-flash that can be analyzed, then followed by a main flash that’s given exactly the calculated intensity needed to provide a correct exposure. If the main flash is serving as a sender to trigger off-camera flash units, additional coded pulses can convey settings information to the receiver flashes and trigger their firing. Of course, if radio signals rather than optical signals are in play, the sequences may be different. I’ll cover various radio and optical wireless flash modes in Chapter 10; this chapter just explains the basics.
Because of the need to abbreviate or quench a flash burst in order to provide the optimum exposure, the primary flash may be longer for distant objects and shorter for closer subjects, depending on the required intensity. This through-the-lens evaluative flash exposure system is called E-TTL II, and it operates whenever you have attached a Canon dedicated flash unit.
Guide Numbers
Guide numbers, usually abbreviated GN, are a way of specifying the power of an electronic flash in a way that can be used to determine the right f/stop to use at a particular shooting distance and ISO setting. In fact, before automatic flash units became prevalent, the GN was actually used to do just that. A GN is usually given as a pair of numbers for both feet and meters that represent the range at ISO 100. For example, consider the Canon Speedlite 270EX II. The 270EX II has a GN of 89 at ISO 100. That guide number applies when the flash is set to the 50mm zoom setting (so that the unit’s coverage is optimized to fill up the frame when using a 50mm focal length on a full-frame camera body). (The effective guide number is just 72 when the flash is mounted on a “cropped” sensor camera like the EOS 90D.) If you’re using the 270EX II set to the 28mm zoom position, the light spreads out more to cover the wider area captured at that focal length, and the guide number of the unit drops to 79.
Of course, the question remains, what can you do with a guide number, other than to evaluate relative light output when comparing different flash units? In theory, you could use the GN to calculate the approximate exposure that would be needed to take a photo at a given distance. To calculate the right exposure at ISO 100, you’d divide the guide number by the distance to arrive at the appropriate f/stop. (Remember that the shutter speed has no bearing on the flash exposure; the flash burst will occur while the shutter is wide open and will have a duration of less than the time the shutter is open.)
Again, using the 270EX II as an example, at ISO 100 with its GN of 89, if you wanted to shoot a subject at a distance of 11 feet, you’d use f/8 (89 divided by 11). At approximately 16 feet, an f/stop of f/5.6 would be used. Some quick mental calculations with the GN will give you any particular electronic flash’s range. You can easily see that the 270EX II would begin to peter out at about 32 feet, where you’d need an aperture of roughly f/2.8 at ISO 100. Of course, in the real world you’d probably bump the sensitivity up to a setting of ISO 400 so you could use a more practical f/5.6 at that distance.
You should use guide numbers as an estimate only. Other factors can affect the relative “power” of a flash unit. For example, if you’re shooting in a small room. Some light will bounce off ceilings and walls—even with the flash pointed straight ahead—and give your flash a slight boost, especially if you’re not shooting extra-close to your subject. Use the same flash outdoors at night, say, on a football field, and the flash will have less relative power, because helpful reflections from surrounding objects are not likely.
So, today, guide numbers are most useful for comparing the power of various flash units. You don’t need to be a math genius to see that an electronic flash with a GN of, say, 197 (like the 600EX II-RT) would be a lot more powerful than that of the 270EX II. You could use f/12 instead of f/5.6 at 16 feet. That’s slightly more than two full f/stops’ difference. As the owner of an R5 or R6, we can safely assume you’ll be using one of the more powerful flash units in the Canon line (or perhaps a similar unit from a third-party vendor).
Getting Started with Electronic Flash
The accessory flash is one of the most useful add-ons you can have. I’ll include detailed explanations of your flash settings options later in the chapter. This section will get you started quickly.
When you’re using Scene Intelligent Auto, P, Av, Tv, Fv, B, or Manual exposure modes, attach the flash and turn it on. The behavior of the external flash varies, depending on which exposure mode you’re using:
- Scene Intelligent Auto. When set to this mode, the flash will fire automatically, if it is attached and powered up.
- P. In Program mode, the exposure process is fully automated, giving you subtle fill flash effects in daylight, and fully illuminating your subject under dimmer lighting conditions. The camera selects a shutter speed from 1/60th to the sync speed and sets an appropriate aperture.
- Av. In Aperture-priority mode, you set the aperture as always, and the camera chooses a shutter speed from 30 seconds to the sync speed. Use this mode with care, because if the camera detects a dark background, it will use the flash to expose the main subject in the foreground, and then leave the shutter open long enough to allow the background to be exposed correctly, too. If you’re not using an image-stabilized lens, you can end up with blurry ghost images even of non-moving subjects at exposures longer than 1/30th second, and if your camera is not mounted on a tripod, you’ll see these blurs at exposures longer than about 1/8th second even if you are using IS.
To disable use of a slow shutter speed with flash, access the Slow Synchro option in the External Speedlite Control entry in the Shooting 2 menu and change from the default setting (Auto) to either 1/200-1/60sec. auto or 1/200sec. (fixed). You’ll see a message reminding you that 1/250th second can be used with the electronic first-curtain shutter.
- Tv. When using flash in Tv mode, you set the shutter speed from 30 seconds to 1/200th second, and the camera will choose the correct aperture for the correct flash exposure. If you accidentally set the shutter speed higher than 1/200th second, the camera will reduce it to 1/200th second when you’re using the flash. Again, 1/250th second is available with the electronic first-curtain shutter.
- Fv. In this mode, you can specify shutter speed, aperture, and ISO sensitivity either manually or automatically, and the camera will adjust the remaining parameters. That means when using flash, the camera will behave as if it were in Program mode (if you don’t choose a shutter speed or aperture manually), or Tv mode (if you select only a shutter speed), or Av mode (if you choose only the aperture), or M mode (if you select both).
- M/B. In Manual or Bulb exposure modes, you select both shutter speed and aperture. The camera will adjust the shutter speed to the sync speed if you try to use a faster speed with a flash. The E-TTL II system will provide the correct amount of exposure for your main subject at the aperture you’ve chosen (if the subject is within the flash’s range, of course). In Bulb mode, the shutter will remain open for as long as the release button on top of the camera is held down, or the release of your remote control is activated. If you use the Bulb timer, you can specify long exposures.
Flash Exposure Compensation and FE Lock
If you want to lock flash exposure for a subject that is not centered in the frame, you can use the FE Lock (the * button) to lock in a specific flash exposure. Just center the viewfinder on the subject you want to correctly expose and press the * button. The pre-flash fires and calculates exposure. The camera remembers the correct exposure until you take a picture, and the FEL indicator, a lightning bolt with an * next to it in the lower-left corner of the display, is your reminder. If you want to recalculate your flash exposure, just press the * button again. When you’re ready to shoot, recompose your photo and press the shutter down the rest of the way to take the picture.
You can also manually add or subtract exposure to the flash exposure, without needing to touch the flash. When using any of the exposure modes except Scene Intelligent Auto (that is, Program AE, Aperture-priority, Shutter-priority, Flexible-priority, or Manual), you can access flash exposure compensation (FEC) in several different ways, with three of them illustrated in Figure 9.7.
- Set FEC on the flash. Consult your Speedlite manual to see if you can set flash exposure compensation on the flash. See the sidebar which follows. Note that when you specify FEC on the flash, you cannot change it using the camera’s controls.
- Press the INFO button. If you’ve enabled the Shooting Information screen, display it by pressing the INFO button until the screen appears. Then press the Q button, highlight the FEC icon at the right side far of the second row of the Quick Control screen, then use any dial to make the adjustment. (See Figure 9.7, left.)

Figure 9.7 Three ways of setting Flash exposure compensation.
- Press SET on the Quick Control screen when Flash Exposure compensation is highlighted. It produces the screen similar to the one seen at the center of Figure 9.7. You might want to do this if you preferred to use the touch screen to make your adjustments or needed the extra legibility the larger screen provides.
- Access External Speedlite Control. Find it in the Shooting 2 menu, press SET, and, if your flash is attached and powered up, select Flash Function settings. Then navigate to the Flash Exposure Compensation icon in the second row of the screen. You might go this route if you were making multiple settings, including FEC, from that screen. See Figure 9.7, right.
SETTING FEC ON THE FLASH
While setting flash exposure compensation within the camera is usually most convenient, with some Canon Speedlites (such as the 600EX II-RT), you can set exposure compensation on the external flash instead. With the 600EX II-RT, in ETTL, M, or MULTI modes, press the #2 button to highlight the +/-FEC indicator, then rotate the flash’s Select Dial to set the specific amount. Press the Select/SET button to confirm your choice.
If you want to avoid accidentally changing the FEC value on the flash, say, while making other adjustments, use either flash unit’s C.Fn-13 setting (not to be confused with the camera’s own Custom Functions). When set to the default, 0, rotating the Select Dial specifies the amount; change to 1, instead, and you must first press the Select/SET button before rotating the dial.
Flash exposure compensation can work in tandem with non-flash exposure compensation, so you can adjust the amount of light registered from the scene by ambient light even while you’re tweaking the amount of illumination absorbed from your flash unit. As with non-flash exposure compensation, the compensation you make remains in effect for the pictures that follow, and even when you’ve turned the camera off, remember to cancel the flash exposure compensation adjustment by reversing the steps used to set it when you’re done using it.

TIP If you’ve enabled the Auto Lighting Optimizer in the Shooting 2 menu, it may cancel out any EV you’ve subtracted using flash exposure compensation. Disable the Auto Lighting Optimizer if you find your images are still too bright when using flash exposure compensation.
Flash Range
The illumination of the external flash varies with distance, focal length, and ISO sensitivity setting.
- Distance. The farther away your subject is from the camera, the greater the light fall-off, thanks to the inverse square law discussed in Chapter 8. Keep in mind that a subject that’s twice as far away receives only one-quarter as much light, which is two f/stops’ worth. (See Figure 9.8.)
- Focal length. A non-zooming flash “covers” only a limited angle of view, which doesn’t change. So, when you’re using a lens that is wider than the default focal length, the frame may not be covered fully, and you’ll experience dark areas, especially in the corners. As you zoom in using longer focal lengths, some of the illumination is outside the area of view and is “wasted.” (This phenomenon is why some external flash units, such as the 600EX II-RT or EL-1, automatically “zoom” to match the zoom setting of your lens to concentrate the available flash burst onto the actual subject area.)
- ISO setting. The higher the ISO sensitivity, the more photons captured by the sensor. So, doubling the sensitivity from ISO 100 to 200 produces the same effect as, say, opening up your lens from f/8 to f/5.6.
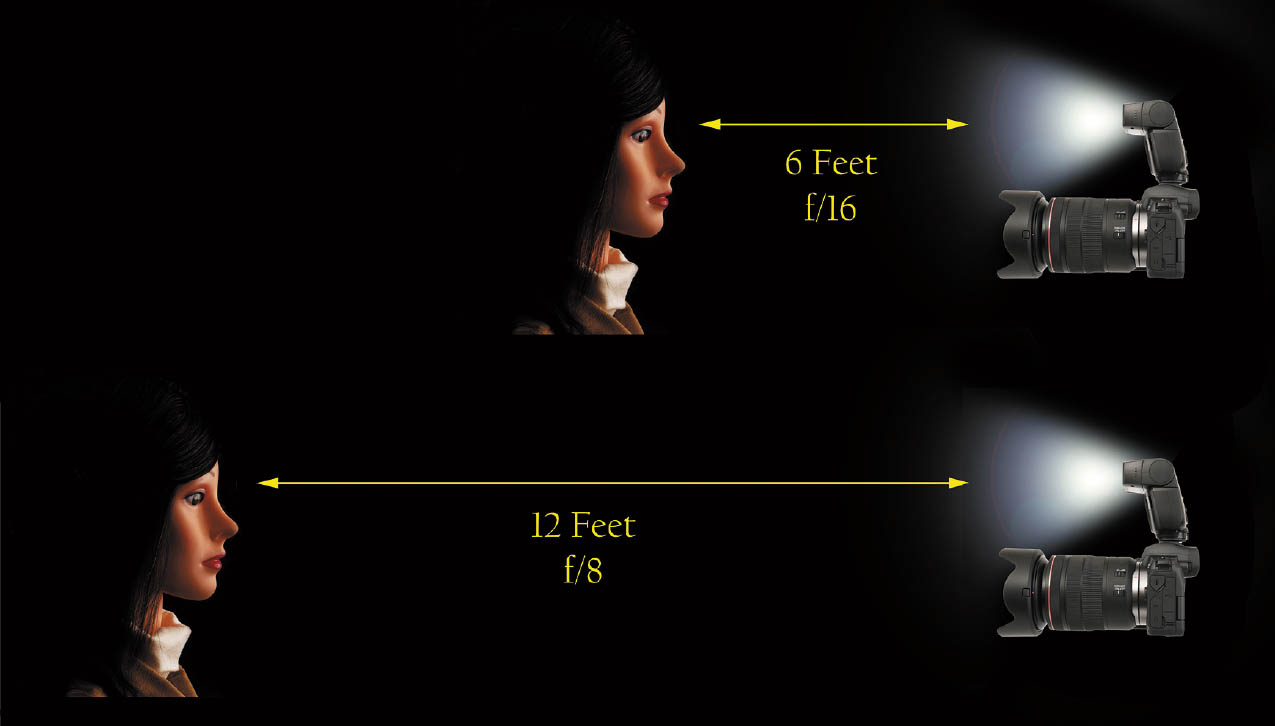
Figure 9.8 Because of the inverse square law, a subject that’s twice as far away receives two stops worth less illumination.
External Speedlite Control
The Shooting 2 menu’s External Speedlite control menu offers several options, plus Clear Settings (see Figure 9.9). The next sections will explain your choices, which are also discussed in Chapter 11.

Figure 9.9 The External Speedlite control menu has these options.
Flash Firing
This menu entry has two options: Enable and Disable. It can be used to activate or deactivate any attached external electronic dedicated flash unit. When disabled, the flash cannot fire even if you have an accessory flash attached and turned on. However, you should keep in mind that the AF-assist beam can still be used. If you want to disable that, too, you’ll need to turn it off using the AF-Assist Beam Firing entry in the AF 2 menu.
E-TTL Balance
As I explained in the “Ghost Images” section earlier in this chapter, when using flash your image is always comprised of two different exposures: one by the ambient illumination and a second exposure from the flash. These dual exposures are a problem only when your subject is moving, and the ambient illumination produces that “ghost” image in addition to the static image recorded by the flash.
At other times, ambient illumination can be useful, lighting up the background area that is too far from the flash to be lit evenly. This entry allows you to specify how the camera mixes ambient and flash illumination by using slower shutter speeds, when useful, to allow ambient light to fill in those backgrounds. You can choose Standard (the default), which gives Speedlite and existing illumination equal weight. With the Ambience Priority setting, the existing light dominates, and the flash is used as fill light to brighten shadows. If you don’t care about the background—or are concerned about ghost images with subjects that aren’t stationary, choose Flash Priority instead. The Speedlite becomes the main light source, illuminating both your subject and the background. This mode may work best under dim lighting conditions in which not much ambient illumination is available.
E-TTL II Metering
When you’re using E-TTL II mode, you can specify whether the camera uses Evaluative (Matrix) or Average metering modes for the electronic flash exposure meter. A third option, Evaluative (Face Priority) gives extra exposure emphasis to faces detected in a scene. Both types of Evaluative metering intelligently look at selected areas in the scene and compares its measurements to a database of typical scene “layouts” to calculate exposure, while Average calculates flash exposure by reading the entire scene. Your choice becomes active when you select E-TTL II as your flash mode, using the entry listed first on this menu screen, and described in more detail in the next section.
Continuous Flash Control
You can use flash when shooting continuously and use this entry to control whether the camera recalculates exposure before every shot (choose E-TTL Each Shot), or uses the exposure determined for the first exposure in a sequence for all subsequent photos (choose E-TTL 1st Shot). The last option is useful when you want the highest continuous shooting speed and works best when you are not recomposing between shots. That’s because if you reframe (or if your subject moves) the exposure may change, and the first shot setting may be less than optimal.
Slow Synchro
You can select the flash synchronization speed that will be used when working in Aperture-priority mode. In Aperture-priority mode when using flash, you specify the f/stop to be locked in. The exposure is then adjusted by varying the output of the electronic flash (rather than by adjusting the shutter speed, which is the norm with non-flash images). Because the primary exposure comes from the flash, the main effect of the shutter speed selected is on the secondary exposure from the ambient light within the scene.
Auto is your best choice under most conditions. The camera will choose a shutter speed that balances the flash exposure and available, ambient light. The 1/200th-/1/250th- to 1/60th-second setting locks out slower shutter speeds, preventing blur from camera/subject movement in the secondary (“ghost”) exposure. However, the background may be rendered dark, if the flash is not strong enough to illuminate it. The 1/200th- to 1/250th-second (fixed) setting further reduces the chance of getting those blurry ghosts, but there is more of a chance the background will be dark.
- *Auto. The camera selects the shutter speed from 30 seconds to 1/200th second (1/250th second if using the electronic 1st curtain shutter); however, high-speed sync (HSS) can also be activated at the flash.
- *1/200/1/250–1/60 auto. Only shutter speeds from 1/200th to 1/60th second will be used. (A top speed of 1/250th second can be used if working with the electronic 1st curtain shutter.) This locks out shutter speeds slower than 1/60th second and is useful when you want to avoid blur in the secondary, ambient light exposure due to subject movement and/or camera shake. The camera will always expose the main subject correctly using the flash, but, as noted earlier, the unavailability of slower shutter speeds may mean that the camera is unable to balance the flash with ambient illumination, making the background too dark. HSS is not possible in Av mode with this setting.
- *1/200/1/250 sec. (fixed). A shutter speed of 1/200th second (or 1/250th second with e-first curtain shutter) will be used with flash at all times. Use this setting when you want to make sure that the highest flash sync speed is used, minimizing the possibility of blur in the secondary, ambient light exposure. As with the previous setting, using a fixed 1/200th-/1/250th-second shutter speed may cause the background to appear darker because less of the ambient light can be used to balance the exposure. HSS is not possible in Av mode with this setting.
Flash Function Settings
This entry (see Figure 9.10) provides access to functions that may differ between different flash units. Because the available features may vary, you can’t access this screen unless the Speedlite you’ll be using is attached and powered up; the camera needs to know what flash it is working with to properly display this submenu. It has six sections that can be used to adjust flash mode, wireless functions, zoom head coverage, shutter sync, flash exposure compensation, and flash exposure bracketing.

Figure 9.10 The entries in the Flash Function Settings screen.
- Flash mode. This entry offers several choices, depending on the modes your flash offers (check your Speedlite’s manual to see the full list of specialized flash modes for your unit):
- • E-TTL. This E-TTL II is the standard mode for EX-series Speedlites.
- • M. This Manual flash can be used to set a fixed flash output, from full power (1/1) to 1/128th power.
- • MULTI. This MULTI flash is used to produce stroboscopic effects.
- • External Auto/External Manual. Some flash units include a metering sensor on the flash itself. When you specify either of those choices, through-the-lens (E-TTL II) metering is disabled, and the flash’s external sensor will be used to measure exposure instead. You’ll find in most cases that E-TTL II metering is more accurate, and preferable for applications like balanced fill flash outdoors or balancing ambient light and flash indoors when using Av or Tv modes.
While these external metering modes are often considered obsolete, some find them useful, say, when removing the flash from the camera to illuminate backgrounds or other objects—including macro subjects—from an angle. The Speedlite still needs to be connected with a cable, such as the Canon OC-E3, but you can position the flash anywhere the cable can stretch to.With External A, when you take a photo, the flash output is adjusted according to the aperture and ISO speed you’ve chosen. Press the shutter release halfway to see the effective flash range. With External M, you must manually tell the flash unit the aperture and ISO speed set on the camera. This manual mode allows connecting the Speedlite to the camera using a “dumb” PC/X terminal or adapter. The main reason you might want to use this type of connection is because PC/X cables are available in much longer lengths than the “intelligent” OC-E3 cable. It’s a stretch, but this feature is available if you need it.
- • CSP. If your flash offers the continuous shooting priority mode, the flash output will be automatically decreased by one stop, ISO sensitivity is set to Auto, and Safety FE is automatically enabled. These adjustments allow you to shoot continuously if you need to and conserve your flash’s battery power in both continuous and single-shot modes. Because of the adjustments the camera makes for you in this mode, you should check your ISO settings after you stop using the flash and reset them to your preferred values if necessary.
- Wireless functions. Functions vary, depending on the attached Speedlite. If you’re not working with wireless flash, your only choice is Wireless: OFF. If you do want to use an attached flash (or a flash trigger unit) as a sender flash, multiple additional options may appear, such as select Wireless: Optical Transmission; Wireless: Radio Transmission; and, with either of those two, additional functions, such as mode, channel, firing group, and other options become available. These options are explained in Chapter 10.
- Zoom. When using a compatible (zoomable) flash, select this entry and press the SET button. Then, you can rotate the Quick Control Dial 1 to choose Auto (the flash zooms to the correct setting based on information about focal length supplied to the flash by the camera), or 24mm, 28mm, 35mm, 50mm, 70mm, 80mm, or 105mm (available with the older 580EX II) plus 135mm and 200mm (with the 600EX II-RT and EL-1).
- Shutter sync. You can choose first-curtain sync (which fires the main flash as soon as the shutter is completely open) or second-curtain sync (which waits until just before the shutter starts to close to fire the main flash). If you have a compatible Canon Speedlite attached, you can also select high-speed sync (HSS), which allows using shutter speeds faster than 1/200th/1/250th second.
- Flash exposure compensation. If you’d rather adjust flash exposure using a menu than with the Quick Control screen, you can do that here. Select this option with the SET button, then dial in the amount of flash EV compensation you want using the Quick Control Dial. The EV that was in place before you started to make your adjustment is shown as a blue indicator, so you can return to that value quickly. Press SET again to confirm your change, then press the MENU button twice to exit. Keep in mind that using this entry overrides any flash exposure compensation you might set with any flash function settings.
- Flash exposure bracketing (FEB). This option is available with flash units that support Flash Exposure Bracketing. It operates similarly to regular exposure bracketing, discussed in Chapter 4. Highlight this entry, press SET, and you can rotate either QCD, or use the Multi-controller joystick to specify up to four stops of compensation over/under the metered exposure for a set of three flash pictures.
If you enable wireless flash, additional options appear in this menu. I’ll cover these in more detail in Chapter 10:
- Channel. All flashes used wirelessly can communicate on one of four channels. This setting allows you to choose which channel is used. Channels are especially helpful when you’re working around other Canon photographers; each can select a different channel so one photographer’s flash units don’t trigger those of another photographer.
- Sender flash firing. You can enable or disable use of the external flash as the sender controller for the other wireless flashes. When set to enable, the attached external flash is used as the sender.
- Flash Firing Group. Multiple flash units can be assigned to a group. This choice allows specifying which groups are triggered, A/B, A/B plus C, or All. The 600EX-RT/600EX II-RT and EL-1 offer additional groups when using radio control mode, Groups D and E.
- A:B fire ratio. If you select A/B or A/B plus C, this option appears, and allows you to set the proportionate outputs of Groups A and B, in ratios from 8:1 to 1:8, as explained in Chapter 12.
- Group C exposure compensation. If you select A/B plus C, this option appears, too, to the right of the Fire Ratio icon, allowing you to set flash exposure compensation separately for Group C flashes.
Flash C.Fn Settings
This menu entry produces a screen that allows you to set any available Custom Functions in your flash, from the camera. The functions available will depend on the C.Fn settings included in the flash unit. The EL-100 has only two Custom Functions, while the more top-of-the-line models EX600 II-RT and EL-1, each have 23 Custom Functions (see Figure 9.11). To set flash Custom Functions, rotate the QCD-1 to choose the C.Fn number to be adjusted, then press SET. Rotate the QCD-1 again to choose from that function’s options, then press SET again to confirm.
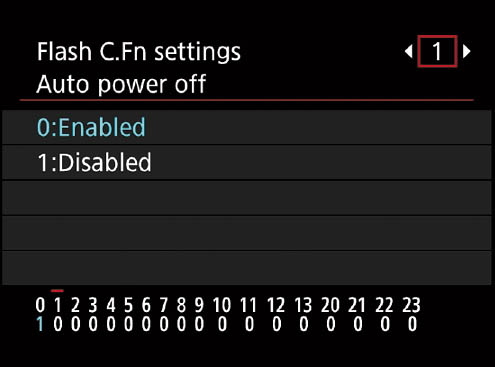
Figure 9.11 Custom Functions for your Speedlite can be set from the camera’s Flash C.Fn menu.
Clear Settings
Select this menu entry, located at the bottom of the screen, and you’ll be asked if you want to change all the flash settings to their factory default values. You have two choices: Clear Flash Settings (the settings internal to the camera) and Clear All Speedlite C.Fn’s, which returns all the attached Speedlite’s Custom Function settings to their factory defaults. The only exception is C.Fn-0: Distance Indicator Display, which will remain at its set value.
Using Flash Settings
This section includes some tips for using the available Flash settings.
When to Disable Flash Firing
There are a few applications where I always disable my flash and AF-assist beam, even though my camera won’t fire an attached flash without my intervention anyway. Some situations are too important to take chances.
- Venues where flash is forbidden. I’ve discovered that many No Photography signs actually mean “No Flash Photography,” either because those who make the decisions feel that flash is distracting, or they fear it may potentially damage works of art. Tourists may not understand the difference between flash and available-light photography or may be unable to set their camera to turn off the flash. One of the first phrases I learn in any foreign language is “Is it permitted to take photos if I do not use flash?” Fortunately, the word “flash” has come to mean camera electronic flash in many languages, and quite a few tongues have adopted the English expression “OK,” too. So “OK (sin, sans, senza, sem) flash?” usually works in Spanish, French, Italian, and Portuguese, respectively, with no problem. A polite request, while brandishing an advanced camera like the R5 or R6 (which may indicate you know what you are doing), can often result in permission to shoot away.
- Venues where flash is ineffective anyway. We’ve all seen the concert goers who stand up in the last row to shoot flash pictures from 100 yards away. I tend to not tell friends that their pictures are not going to come out, because they usually come back to me with a dismal, grainy shot (actually exposed by the dim available light) that they find satisfactory, just to prove I was wrong.
- Venues where flash is annoying. If I’m taking pictures in a situation where flash is permitted, but mostly supplies little more than visual pollution, I’ll disable or remove it from the camera entirely. Concerts or religious ceremonies may allow flash photography, but who needs to add to the blinding bursts when you have a camera that will take perfectly good pictures at ISO 3200? Of course, I invariably see one or two people flashing away at events where flash is not allowed, but that doesn’t mean I am eager to join in the festivities.
More on Flash Modes
In choosing Flash mode, you have up to four main choices. The available modes are E-TTL II, the standard mode for EX-series Speedlites; Manual flash, which you can use to set a fixed flash output, from full power (1/1) to 1/128th power; MULTI flash, used to produce stroboscopic effects; and CSP, to preserve your battery power and allow grabbing more shots continuously.
E-TTL II
You’ll leave Flash mode enabled most of the time. In this mode, the camera fires a pre-flash prior to the exposure, and measures the amount of light reflected to calculate the proper settings. As noted earlier, when you’ve selected the E-TTL II flash mode, you can also choose Evaluative, Evaluative (Face Priority), or Average metering methods. If you select Manual flash or MULTI flash, that option is removed from the menu.
Manual Flash
Use this setting when you want to specify exactly how much light is emitted by the flash, and don’t want the E-TTL II exposure system to calculate the f/stop for you. When you activate this option, a new entry appears in the Flash Func. Setting menu, with a sliding scale from 1/1 (full power) to 1/128th power. (The EL-1 has 14 stops worth of manual power variations, up to 1/8192th power.) Highlight the scale and press the SET button. You can then rotate the QCD-1 and choose any of the settings. (Only 1/4, 1/2, 1/1, and the intermediate settings between them appear when 1/1 is chosen; view the other power settings by rotating the QCD-1 counterclockwise.) A blue dot appears under the 1/1 setting, and a white dot appears under your new setting, a reminder that you’ve chosen something other than full power.
Here are some situations where you might want to use manual flash settings:
- Close-ups. You’re shooting macro photos and the E-TTL II exposure is not precisely what you’d like. You can dial in exposure compensation or set the output manually. Close-up photos are problematic, because the power of the flash may be too much (choose 1/128th power or a higher setting with the EL-1, to minimize the output), or the reflected light may not be interpreted accurately by the through-the-lens metering system. Manual flash gives you greater control.
- Fill flash. Although E-TTL II can be used in full daylight to provide fill flash to brighten shadows or add a catchlight to a human subject’s eyes, using manual flash allows you to tweak the amount of light being emitted in precise steps. Perhaps you want just a little more illumination in the shadows to retain a dramatic lighting effect without the dark portions losing all detail. Again, you can try using exposure compensation to make this adjustment, but I prefer to use manual flash settings. (See Figure 9.12.)
- Action stopping. The lower the power of the flash, the shorter the effective exposure. Use 1/128th power in a darkened room (so that there is no ambient light to contribute to the exposure and cause a “ghost” image) and you can end up with a “shutter speed” that’s the equivalent of 1/50,000th second!

Figure 9.12 You can fine-tune fill illumination by adjusting the output of your camera’s flash manually.
MULTI Flash
The MULTI flash setting makes it possible to shoot cool stroboscopic effects, with the flash firing several times in quick succession. You can use the capability to produce multiple images of moving objects, to trace movement (say, your golf swing). When you’ve activated MULTI flash, three parameters appear on the Flash Function Setting menu. They include:
- Flash output. Similar to the Flash Output option in Manual mode, you can choose the intensity of each individual flash in your multiple flash sequence, from 1/4 to 1/128th power (the 1/1 and 1/2 power settings are not available).
- Frequency. This figure specifies the number of bursts per second. With the external flash, you can choose (theoretically) 1 to 199 bursts per second (or up to 500 bursts per second with the EL-1). The actual number of flashes produced will be determined by your flash count (which turns off the flash after the specified number of flashes), flash output (higher output levels will deplete the available energy in your flash unit), and shutter speed.
- Flash count. This setting determines the number of flashes in a given burst and can be set from 1 to 30 flashes.
These factors work together to determine the maximum number of flashes you can string together in a single shot. The exact number will vary, depending on your settings and your Speedlite model. Here are some guidelines you can use:
- Power level. As you cut the power from 1/4 to 1/128th (and beyond), the output of the flash drops dramatically, and so does the maximum distance you can shoot at any particular f/stop. The 1/4 power setting, the most powerful setting available with MULTI flash, will give you the greatest flash range in this mode. With your sensitivity set to ISO 1600, your flash will allow you to photograph a subject at 10 feet using f/8 and one-quarter power. (If you remember the discussion of guide numbers from earlier in this chapter, the flash would have an effective GN of 80 at ISO 1600.)
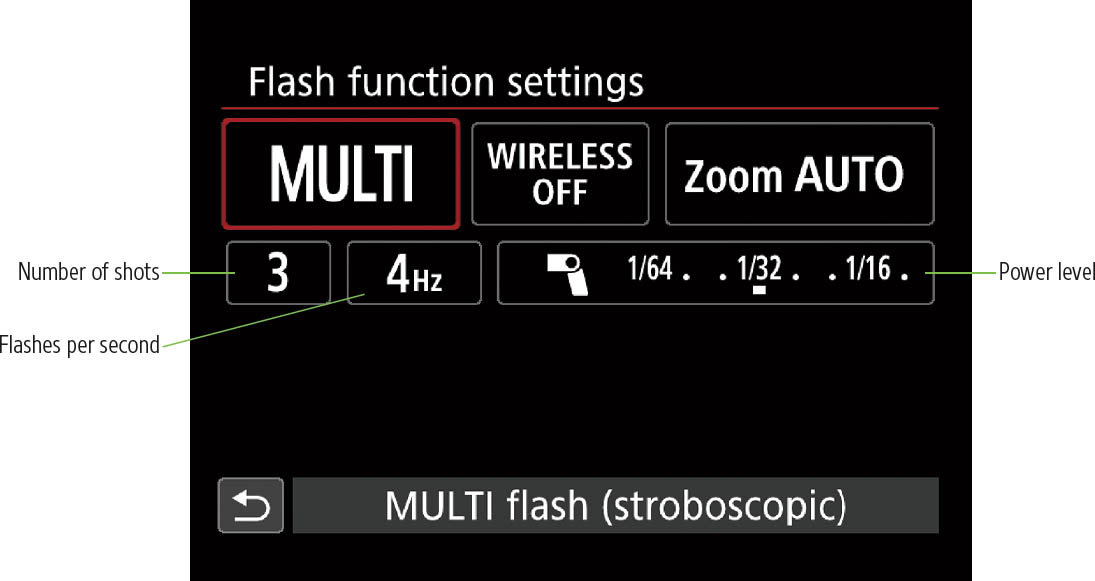
Figure 9.13 MULTI flash settings.
If you wanted to use the 1/16th power setting instead, you’d need to use f/4 to account for the reduced output of the flash. By the time you dial down to 1/128th power, your flash has a feeble guide number of about 14 (at ISO 1600!), so to shoot at f/4 you’d be able to locate your subject no farther than 3.5 feet from the camera.
The output level also determines the maximum number of flashes that are possible before the charge stored in your flash’s capacitor is depleted. The capacitor partially recharges itself as you shoot, so the number of flashes also varies by the flashes-per-second rate. At the 1Hz (one flash per second) rate and 1/4 power, you can expect about 6 to 7 flashes before the Speedlite’s power poops out. By the time you reach 10Hz (10 flashes per second) and higher, the unit can crank out no more than two flashes per second at 1/4 power.
Logically, as output levels decrease, more flashes can be pumped out in a given time period. At 1/128th power, you can expect as many as 100 flashes at the 1Hz rate, and up to 40 consecutive flashes at the 20Hz to 199Hz frequency.
- Flashes per second. Cycles per second are, by convention, measured using an increment called Hertz. The more flashes you want during the time the shutter is open, the higher the rate you must select. You can select rates of 1Hz to 199Hz, or 1 to 199 flashes per second (or up to 500 flashes per second with the EL-1), plus “- -” (more on that later). To maximize the number of flashes in a second, you’ll also need to choose the lowest power output level that you find acceptable. The flash unit can emit a lot more fractional 1/128th power bursts in a given period of time than it can more robust (relatively) 1/4 power bursts.
When you choose “- -” for your frequency, the flash will continue firing until the shutter closes, or its internal storage is depleted. (In any case, you should not use the MULTI flash feature for more than 10 consecutive pictures. At that point, you should allow the flash to “rest” for at least 15 minutes. But don’t worry, the unit will shut down automatically to avoid overheating.)
I like to shoot “strobing” flash pictures in dark rooms against a dark backdrop and use a long exposure to capture multiple images in a single frame, like the (yet another) plummeting fruit example seen in Figure 9.14.
- Number of shots. Chose the number of flashes, from 1 to 30, that you want in your multiple exposure, given the output and flash frequency constraints described above.
High-Speed Sync
High-speed sync is a special mode that allows you to synchronize a compatible external flash at all shutter speeds, rather than just 1/200th/1/250th second and slower. The entire frame is illuminated by a series of continuous bursts as the shutter opening moves across the sensor plane, so you do not end up with a horizontal black band, as shown earlier in Figure 9.6.
HSS is especially useful in three situations, all related to problems associated with high ambient light levels:
- Eliminate “ghosts” with moving images. When shooting with flash, the primary source of illumination may be the flash itself. However, if there is enough available light, a secondary image may be recorded by that light (as described under “Ghost Images” earlier in this chapter). If your main subject is not moving, the secondary image may be acceptable or even desirable. But if your subject is moving, the secondary image creates a ghost image.
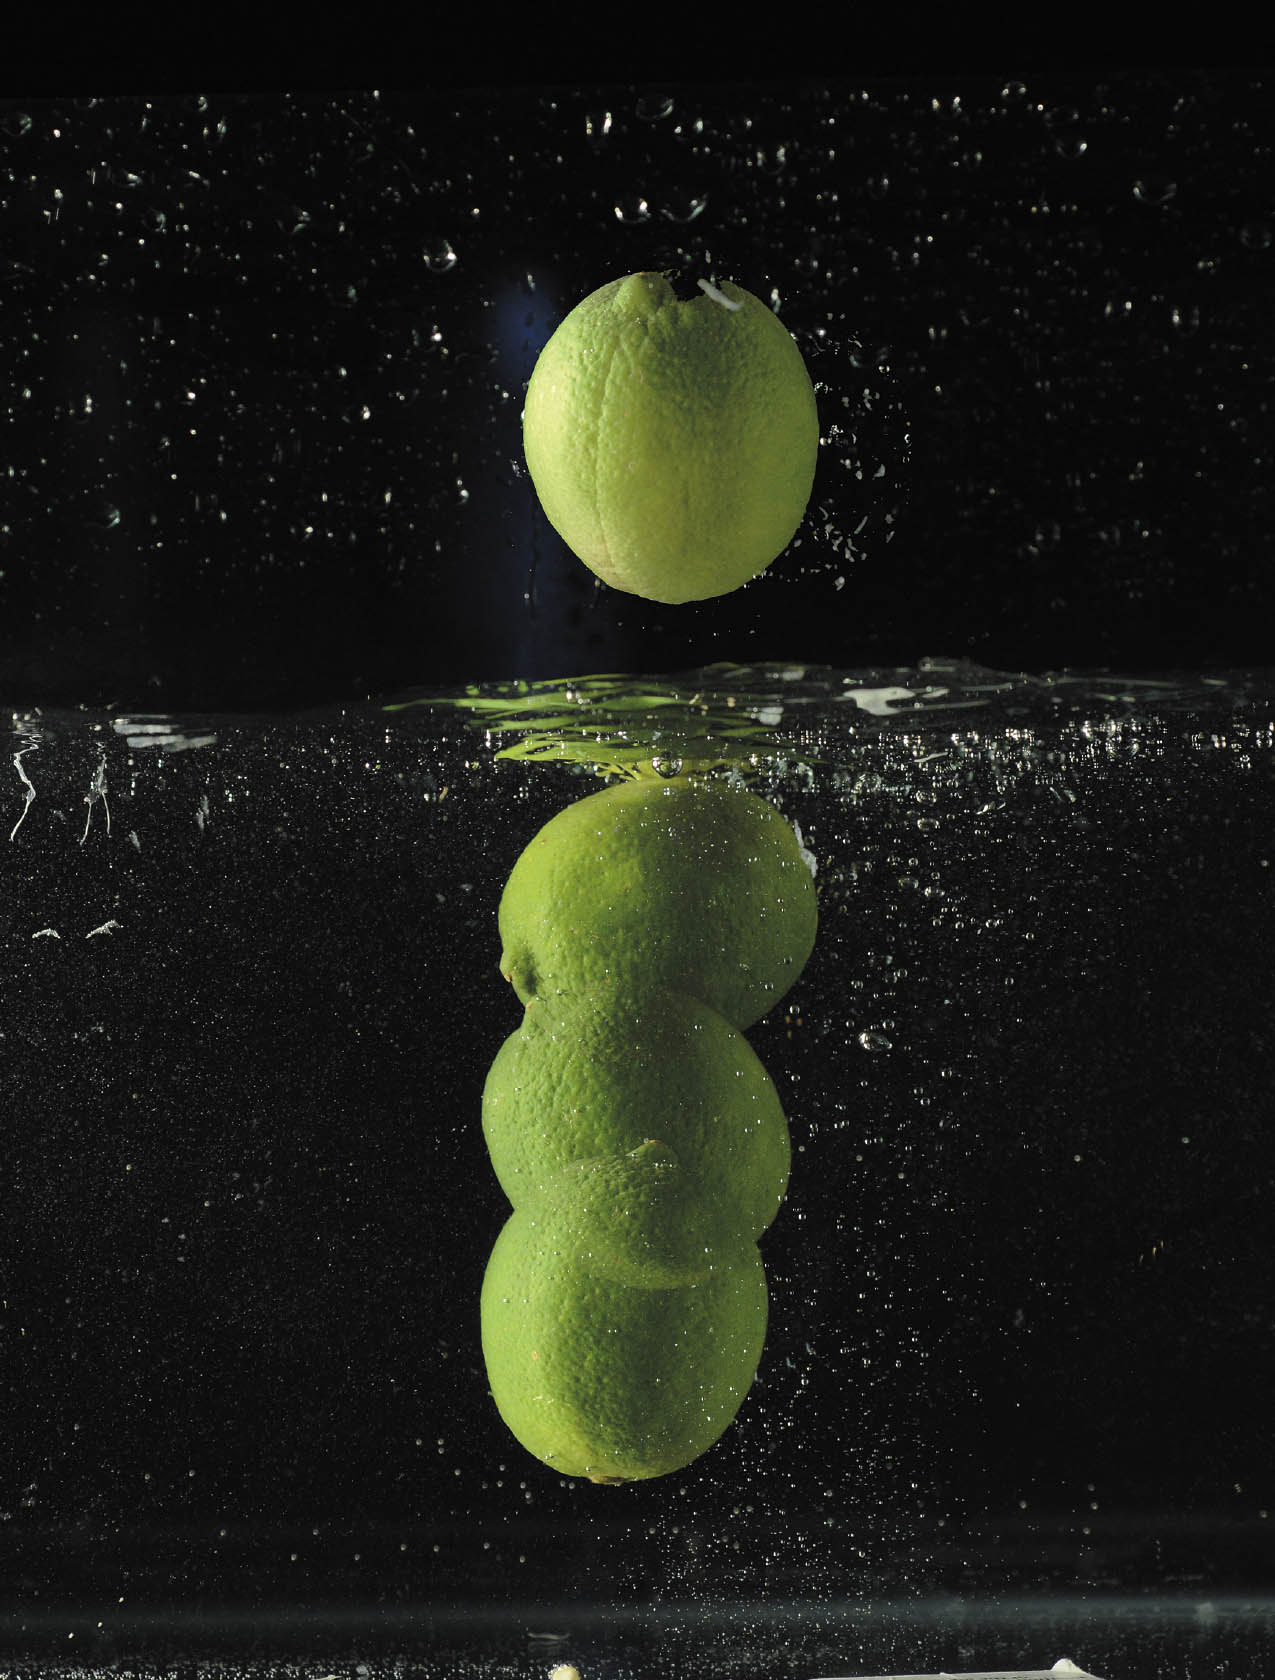
Figure 9.14 Four bursts during the exposure yielded this exciting photo of a drowning lime.
High-speed sync gives you the ability to use a higher shutter speed. If ambient light produces a ghost image at 1/200th second, upping the shutter speed to 1/500th or 1/1000th second may eliminate it.
Of course, HSS reduces the amount of light the flash produces. If your subject is not close to the camera, the waning illumination of the flash may force you to use a larger f/stop to capture the flash exposure. So, while shifting from 1/200th second at f/8 to 1/500th second at f/8 will reduce ghost images, if you switch to 1/500th second at f/5.6 (because the flash is effectively less intense), you’ll end up with the same ambient light exposure. Still, it’s worth a try.
- Improved fill flash in daylight. The camera can use an attached flash unit to fill in inky shadows—both automatically and using manually specified power ratios, as described earlier in this chapter. However, both methods force you to use a 1/200th second (or slower) shutter speed. That limitation can cause three complications.
First, in very bright surroundings, such as beach or snow scenes, it may be difficult to get the correct exposure at 1/200th or 1/250th second. You might have to use f/16 or a smaller f/stop to expose a given image, even at ISO 100. If you want to use a larger f/stop for selective focus, then you encounter the second problem—1/200th second, for example, won’t allow apertures wider than f/8 or f/5.6 under many daylight conditions at ISO 100. (See the discussion of fill flash with Aperture-priority in the next bullet.)
Finally, if you’re shooting action, you’ll probably want a faster shutter speed, if at all possible, under the current lighting. That’s because, in fill-flash situations, the ambient light (often daylight) provides the primary source of illumination. For many sports and fast-moving subjects, 1/500th second, or faster, is desirable. HSS allows you to increase your shutter speed and still avail yourself of fill flash. This assumes that your subject is close enough to your camera that the fill flash has some effect; forget about using fill and HSS with subjects a dozen feet away or farther. The flash won’t be powerful enough to have much effect on the shadows.
- When using fill flash with Aperture-priority. The difficulties of using selective focus with fill flash, mentioned earlier, become particularly acute when you switch to Av exposure mode. Selecting f/5.6, f/4, or a wider aperture when using flash is guaranteed to create problems when photographing close subjects, particularly at ISO settings higher than ISO 100. If you own a compatible external flash unit, HSS may be the solution you are looking for.
To use High-speed sync, just follow these steps:
- 1. Attach the flash. Mount/connect the external flash on the camera, using the hot shoe or a dedicated flash cable. (HSS cannot be used in wireless radio mode with the 600EX II-RT, nor with a flash linked through the PC terminal.)
- 2. Power up. Turn the flash and camera on.
- 3. Select HSS in the camera. Set the Flash Function setting in the camera to HSS as the camera’s sync mode.
- 4. Choose HSS on the flash. Activate HSS (FP flash) on your attached external flash. With the older (but still common) Speedlite 580EX II, press the High-speed sync/Sync button on the back of the flash unit (it’s the second from the right under the LCD). If you’re using the 600EX II-RT, press the #4 function button (of the array under the LCD) until the HSS icon appears on the LCD. With the EL-1, push the flash’s joystick vertically and select HSS from the menu that appears.
- 5. Confirm HSS is active. The HSS icon will be displayed on the flash unit’s LCD, and at bottom left in the camera’s viewfinder. If you choose a shutter speed of 1/200th second or slower, the indicator will not appear in the viewfinder, as HSS will not be used at slower speeds.
- 6. View minimum/maximum shooting distance. Choose a distance based on the maximum shown in the line at the bottom of the flash’s LCD display (from 0.5 to 18 meters).
- 7. Shoot. Take the picture. To turn off HSS, press the button on the flash again. Remember that you can’t use MULTI flash or Wireless flash when working with high-speed sync.
Using External Electronic Flash
Once the capacitor is charged, the burst of light that produces the main exposure can be initiated by a signal from the camera that commands the internal or connected flash units to fire. External strobes can be linked to the camera in several different ways:
- Camera-mounted/hardwired external dedicated flash. Units offered by Canon or other vendors that are compatible with Canon’s lighting system can be clipped onto the accessory “hot” shoe on top of the camera or linked through a wired system such as the Canon Off Shoe Camera Cord OC-E3. (See Figure 9.15.)
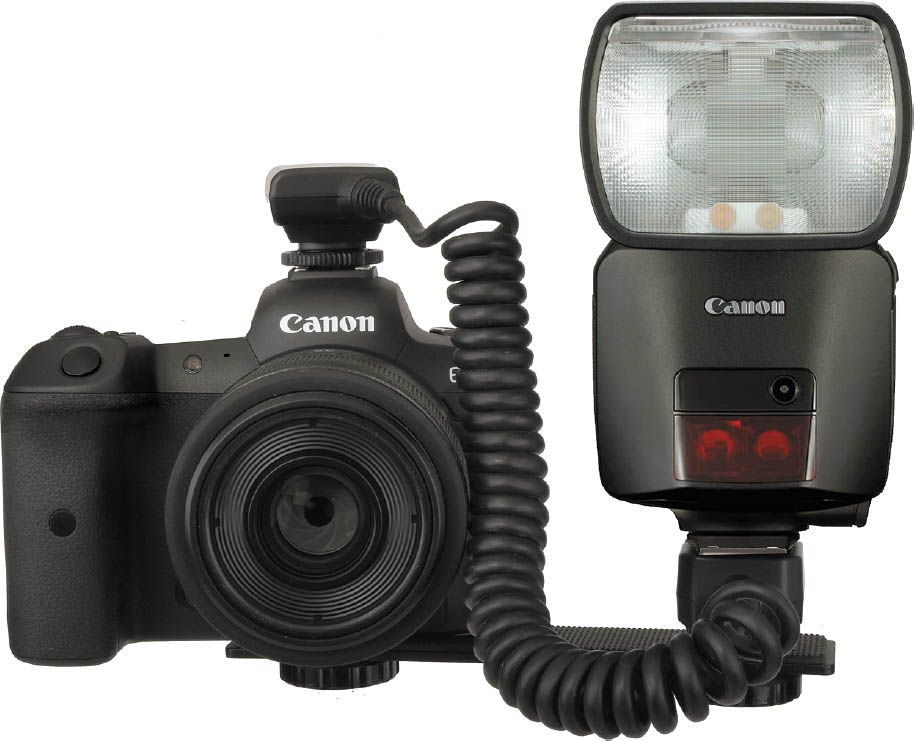
Figure 9.15 The Canon Speedlight EL-1 connected using an OC-E3 cable.
- Wireless dedicated flash. A compatible unit can be triggered by signals produced by a pre-flash (before the main flash burst begins), which offers two-way communication between the camera and flash unit. The triggering flash can be an external flash unit in sender mode, or a wireless non-flashing accessory, such as the Canon Speedlite Transmitter ST-E2 and radio-controlled wireless trigger, the Speedlite Transmitter ST-E3-RT, which each do nothing but “talk” to the external flashes. You’ll find more on this mode in Chapter 10.
- Wired, non-intelligent mode. If you connect a flash to a PC/X adapter attached to the hot shoe, you can use non-dedicated flash units, including studio strobes, through a non-intelligent camera/flash link that sends just one piece of information, one way: it tells a connected flash to fire. There is no other exchange of information between the camera and flash. The PC/X connection can be used to link the camera to studio flash units, manual flash, flash units from other vendors that can use a PC cable, or even Canon-brand Speedlites that you elect to connect to the camera in “unintelligent” mode.
- Infrared/radio transmitter/receivers. Another way to link flash units to the camera is through third-party wireless infrared or radio transmitters, like a PocketWizard, Radio Popper, or the Paul C. Buff CyberSync trigger. These are generally mounted on the accessory shoe of the camera and emit a signal when the camera sends a command to fire through the hot shoe. The simplest of these function as a wireless dumb (PC/X-type) connector, with no other communication between the camera and flash (other than the instruction to fire). However, sophisticated units have their own built-in controls and can send additional commands to the receivers when connected to compatible flash units. I use one to adjust the power output of my Alien Bees studio flash from the camera, without the need to walk over to the flash itself.
- Simple slave connection. In the days before intelligent wireless communication, the most common way to trigger off-camera, non-wired flash units was through a slave unit. These can be small external triggers connected to the remote flash (or built into the flash itself) and set off when the slave’s optical sensor detects a burst initiated by the camera itself. When it “sees” the main flash (from the camera attached external flash, or another flash), the slave flash units are triggered quickly enough to contribute to the same exposure. The main problem with this type of connection—other than the lack of any intelligent communication between the camera and flash—is that the slave may be fooled by any pre-flashes that are emitted by the other strobes, and fire too soon. Modern slave triggers have a special “digital” mode that ignores the pre-flash and fires only from the main flash burst.
Canon offers a broad range of accessory electronic flash units for the camera. They can be mounted to the flash accessory shoe or used off-camera with a dedicated cord that plugs into the flash shoe to maintain full communications with the camera for all special features. (Non-dedicated flash units, such as studio flash, can be connected using a PC/X adapter.) They range from the Speedlite EL-1, Speedlite 600EX II-RT, and Speedlite 580EX II, which can correctly expose subjects up to 24 feet away at f/11 and ISO 200, to the 270EX II, which is good out to 9 feet at f/11 and ISO 200. (You’ll get greater ranges at even higher ISO settings, of course.) There are also two electronic flash units specifically for specialized close-up flash photography.
I power my Speedlites with Eneloop AA nickel metal hydride batteries, seen in Figure 9.16. These are a special type of rechargeable battery with a feature that’s ideal for electronic flash use. The Eneloop cells, unlike conventional batteries, don’t self-discharge over relative short periods of time. Once charged, they can hold onto most of their juice for a year or more. That means you can stuff some of these into your Speedlite, along with a few spares in your camera bag, and not worry about whether the batteries have retained their power between uses. There’s nothing worse than firing up your strobe after not using it for a month and discovering that the batteries are dead.
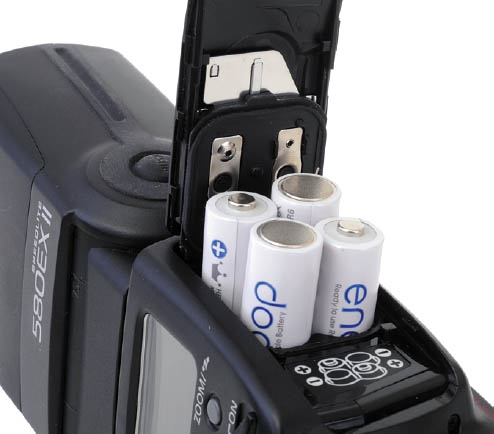
Figure 9.16 Eneloop AA batteries are a perfect power source for Canon Speedlites.
Speedlite EL-1
It may be an oversimplification to call the new Canon Speedlite EL-1 the flagship of the company’s electronic flash lineup. At $1,100, such a quantum leap above the previous top-line Canon strobe, the Speedlite 600EX-RT II probably belongs in a separate category, along with the professional users who can afford this flash. It’s really nothing like what we’ve seen before in a Speedlite from Canon.
Start with the battery. Instead of AA cells, EL-1 uses a new LP-EL battery ($120) that looks a lot like the LP-E6NH battery that powers the camera and can be revitalized in the same LC-E6 charger. The new power source allows a lightning-fast 0.9-second recycling time at full power, which means continuous shooting at about one frame per second is possible. An active cooling system helps keep the flash from overheating during rapid-fire shooting of up to 170 frames. You can expect up to 335 flashes with a guide number of 60/197 meters/feet.
The EL-1’s controls are new, using a command dial and joystick to navigate a new, faster menu system. The flash head swivels 180 degrees, allows bounce flash at angles up to 120 degrees, and has built-in panels (for “white card” fill and catchlights) and wide-angle adjustment. Pro-level weather sealing can withstand extreme environments, and there’s an LED modeling light that can be adjusted for brightness and color temperature. As I mentioned earlier, manual flash power settings extend to the equivalent of 14 f/stops—to 1/8192 power. There’s a “memory” option to recall your settings when you switch from auto to manual mode and back again.
Some 13 Custom Functions of the EL-1 can be set using the External Flash C.Fn Setting menu. Additional Personal Functions can be specified on the flash itself. The functions include:
 C.Fn-00Distance indicator display (Meters/Feet)
- C.Fn-01Auto power off (Enabled/Disabled)
- C.Fn-02Modeling flash (Enabled-DOF preview button/Enabled-test firing button/Enabled-both buttons/Disabled)
- C.Fn-03FEB Flash exposure bracketing auto cancel (Enabled/Disabled)
- C.Fn-04FEB Flash exposure bracketing sequence (Metered > Decreased > Increased Exposure/Decreased > Metered > Increased Exposure)
- C.Fn-08AF-assist beam firing (Enabled/Disabled)
- C.Fn-10Receiver auto power off timer (60 minutes/10 minutes)
- C.Fn-11Cancellation of receiver unit auto power off by sender unit (within 8 hours/within 1 hour)
- C.Fn-12Flash recycling on external power (Use internal and external power/Use only external power)
- C.Fn-13Flash exposure metering setting button (Speedlite button and dial/Speedlite dial only)
- C.Fn-21Light distribution (Standard, Guide number priority, Even coverage)
- C.Fn-22LCD panel illumination (On for 12 seconds, Disable, Always on)
- C.Fn-23Receiver flash battery check (AF-assist beam/Flash lamp, Flash lamp only)
The Personal Functions available include the following.
- P.Fn-01LCD panel display contrast (Five levels of contrast)
- P.Fn-02LCD panel illumination color: Normal (Green, Orange)
- P.Fn-03LCD panel illumination color: Sender (Green, Orange)
- P.Fn-04LCD panel illumination color: Receiver (Green, Orange)
- P.Fn-05Color filter auto detection (Auto, Disable)
- P.Fn-06Wireless button toggle sequence (Normal > Radio > Optical, Normal < > Radio, Normal < > Optical)
- P.Fn-07Flash firing during linked shooting (Disabled, Enabled)
- P.Fn-08Modeling lamp (Brightness, Color)
- P.Fn-09Modeling lamp (Lit time)
Many other features—including zoom head and custom functions—match those of the Speedlite 600EX II-RT, described next.
Speedlite 600EX-RT/600EX II-RT
This former flagship of the Canon accessory flash line (about $500) has the same 197 guide number as the EL-1 and costs half as much. It has a manual/automatic zoom flash head that covers the full frame of lenses from 24mm wide angle to 200mm telephoto. (There’s a flip-down, wide-angle diffuser that spreads the flash to cover a 14mm lens’s field of view, too.) All angle specifications given by Canon refer to full-frame sensors, but this flash unit automatically converts its field of view coverage to accommodate the 1.6X crop factor. The latest 600EX II-RT has improved continuous flash firing rates (up to 2X faster with an optional CP-E4N battery pack).
The 600EX-RT/II-RT share basic features with the discontinued (but still widely used) 580EX II, described next, so I won’t repeat them here, because the typical veteran Canon owner is more likely to own multiple Speedlites.
The killer feature of this series is the wireless two-way radio communication between the camera and this flash (or ST-E3-RT wireless controller and the flash) at distances of up to 98 feet. You can link up to 15 different flash units with radio control, using five groups (A, B, C, D, and E), and no line-of-sight connection is needed. (You can hide the flash under a desk or in a potted plant.) With the latest Canon cameras having a revised “intelligent” hot shoe, a second 600EX-RT/600EX II-RT can be used to trigger a camera that also has a 600EX-RT/600EX II-RT mounted, from a remote location. That means you can set up multiple cameras equipped with multiple flash units to all fire simultaneously! For example, if you were shooting a wedding, you could photograph the bridal couple from two different angles, with the second camera set up on a tripod, say, behind the altar.
600EX (NON-RADIO)
If you see references to a 600EX model (non-RT), you’ll find that a version with the radio control crippled is sold only outside the USA in countries where obtaining permission to use the relevant radio spectrum is problematic.
The 600EX II-RT maintains backward compatibility with optical transmission used by earlier cameras. If you’re looking for a high-end flash unit and don’t need radio control, I still recommend the Speedlite 580EX II (described next), which is still widely available and is the most-used high-end flash Canon has ever offered.
Remember that with the 600EX II-RT, you can’t use radio control and some other features unless you own at least two radio-controlled Speedlites, such as an EL-1, 600EX II-RT, or 430EX III-RT (described later) or one EL-1 or 600EX II-RT plus the ST-E3-RT, which costs about $300. Radio control is possible only between a camera that has a radio-capable flash or ST-E3-RT in the hot shoe, and an additional radio-capable flash or ST-E3-RT.
Some 18 Custom Functions of the 600EX II-RT can be set using the External Flash C.Fn Setting menu. Additional Personal Functions can be specified on the flash itself. The functions include:
- C.Fn-00Distance indicator display (Meters/Feet)
- C.Fn-01Auto power off (Enabled/Disabled)
- C.Fn-02Modeling flash (Enabled-DOF preview button/Enabled-test firing button/Enabled-both buttons/Disabled)
- C.Fn-03FEB Flash exposure bracketing auto cancel (Enabled/Disabled)
- C.Fn-04FEB Flash exposure bracketing sequence (Metered > Decreased > Increased Exposure/Decreased > Metered > Increased Exposure)
- C.Fn-05Flash metering mode (E-TTL II/E-TTL/TTL/External metering: Auto/External metering: Manual)
- C.Fn-06Quickflash with continuous shot (Disabled/Enabled)
- C.Fn-07Test firing with autoflash (1/32/Full power)
- C.Fn-08AF-assist beam firing (Enabled/Disabled)
- C.Fn-09Auto zoom adjusted for image/sensor size (Enabled/Disabled)
- C.Fn-10Receiver auto power-off timer (60 minutes/10 minutes)
- C.Fn-11Cancellation of receiver unit auto power off by sender unit (Within 8 hours/within 1 hour)
- C.Fn-12Flash recycling on external power (Use internal and external power/Use only external power)
- C.Fn-13Flash exposure metering setting button (Speedlite button and dial/Speedlite dial only)
- C.Fn-20Beep (Enable/Disable)
- C.Fn-21Light distribution (Standard, Guide number priority, Even coverage)
- C.Fn-22LCD panel illumination (On for 12 seconds, Disable, Always on)
- C.Fn-23Receiver flash battery check (AF-assist beam/Flash lamp, Flash lamp only)
The Personal Functions available include the following. Note that you can set the LCD panel color to differentiate at a glance whether a given flash is functioning in Sender or Receiver mode.
- P.Fn-01LCD panel display contrast (Five levels of contrast)
- P.Fn-02LCD panel illumination color: Normal (Green, Orange)
- P.Fn-03LCD panel illumination color: Sender (Green, Orange)
- P.Fn-04LCD panel illumination color: Receiver (Green, Orange)
- P.Fn-05Color filter auto detection (Auto, Disable)
- P.Fn-06Wireless button toggle sequence (Normal > Radio > Optical, Normal < > Radio, Normal < > Optical)
- P.Fn-07Flash firing during linked shooting (Disabled, Enabled)
Speedlite 580EX II
If you were using Canon cameras prior to purchasing your R5 or R6, you might already own this deposed flagship of the Canon accessory flash line. Despite the introduction of the 600EX-RT/600EX II-RT, this unit is still the most widely used Canon Speedlite, popular because of its relatively lower price and wide availability new or used. The 580EX II is the second-most powerful unit the company offered, with a GN of 190, and a manual/automatic zoom flash head that covers the full frame of lenses from 24mm wide angle to 105mm telephoto, as well as 14mm optics with a flip-down diffuser.
Like the 600EX II-RT, this unit offers full swivel, 180 degrees in either direction and has its own built-in AF-assist beam. Powered by economical AA-size batteries, the unit recycles in 0.1 to 6 seconds, and can squeeze 100 to 700 flashes from a set of alkaline batteries.
The 580EX II automatically communicates white balance information to your camera, allowing it to adjust WB to match the flash output. You can even simulate a modeling light effect: When you press the depth-of-field preview button on the R5 or R6, the 580EX II emits a one-second burst of light that allows you to judge the flash effect. If you’re using multiple flash units with Canon’s wireless E-TTL system, this model can serve as a master/sender flash that controls the receiver units you’ve set up (more about this later) or function as a receiver itself.
It’s easy to access all the features of this unit, because it has a large backlit LCD panel on the back that provides information about all flash settings. There are 14 Custom Functions that can be controlled from the flash, numbered from 00 to 13. These functions are (the first setting is the default value):
- C.Fn-00Distance indicator display (Meters/Feet)
- C.Fn-01Auto power off (Enabled/Disabled)
- C.Fn-02Modeling flash (Enabled-DOF preview button/Enabled-test firing button/Enabled-both buttons/Disabled)
- C.Fn-03FEB Flash exposure bracketing auto cancel (Enabled/Disabled)
- C.Fn-04FEB Flash exposure bracketing sequence (Metered > Decreased > Increased Exposure/Decreased > Metered > Increased Exposure)
- C.Fn-05Flash metering mode (E-TTL II-E-TTL/TTL/External metering: Auto/External metering: Manual)
- C.Fn-06Quickflash with continuous shot (Disabled/Enabled)
- C.Fn-07Test firing with autoflash (1/32/Full power)
- C.Fn-08AF-assist beam firing (Enabled/Disabled)
- C.Fn-09Auto zoom adjusted for image/sensor size (Enabled/Disabled)
- C.Fn-10Receiver auto power off timer (60 minutes/10 minutes)
- C.Fn-11Cancellation of receiver unit auto power off by sender unit (within 8 hours/within 1 hour)
- C.Fn-12Flash recycling on external power (Use internal and external power/Use only external power)
- C.Fn-13Flash exposure metering setting button (Speedlite button and dial/Speedlite dial only)
Speedlite 470EX-AI
If you don’t want to work with your flash detached from the camera, the Speedlite 470EX-AI (about $300) makes the most of on-camera flash, thanks to an Auto Intelligent (AI) bounce function. The flash itself can evaluate the distance and position of nearby walls or ceiling, the focus distance to your subject, and then calculate the optimal bounce angle, and swivel itself into position automatically. It maintains that bounce angle even as you rotate the camera from vertical to horizontal. Just tap the shutter release twice and the flash will reposition its flash head. The feature can be used in full-auto mode, or you can choose a bounce angle yourself (from 0 to 120 degrees of tilt, and plus/minus 180 degrees of rotation).
The flash has a useful 154 guide number, a zoom head with coverage of 24-105mm, and a diffuser that extends flash coverage to 14mm. Although it can’t be used as a wireless sender flash, it can be triggered optically by any Canon sender flash or controller.
Speedlite 430EX III-RT
This less pricey electronic flash (available for less than $300) is an affordable replacement for the 580EX II for those who don’t need the beefy power of the older Speedlite. It also makes radio control wireless triggering available to those who can’t afford the 600EX-RT’s price tag. The 430EX III-RT has automatic and manual zoom coverage from 24mm to 105mm, and the same wide-angle pullout panel found on the 600EX-RT/600EX II-RT that covers the area of a 14mm lens on a full-frame camera, and automatic conversion to the cropped frame area of the APS-C format. The 430EX III-RT also communicates white balance information with the camera and has its own AF-assist beam. Compatible with Canon’s wireless E-TTL system, it makes a good receiver unit, but it cannot serve as a sender flash. It, too, uses AA batteries, and offers recycle times of 0.1 to 3.7 seconds for 200 to 1,400 flashes, depending on subject distance.
This long-overdue replacement for the 430EX II has as its biggest selling point the ability to communicate either optically (as a receiver) with any compatible sender flash or by radio transmission (as either sender or receiver) with other RT flashes, including the 600EX RT. Previously, you needed either two of the expensive 600EX RT/600EX II-RT units or one 600EX RT/600EX II-RT and an ST-E3-RT trigger to use radio communications.
The Canon Speedlite 430EX III-RT offers a sophisticated set of features, including an LCD panel that allows you to navigate the unit’s menu and view its status. These features, along with powerful output and automatic zoom means this unit has more in common with Canon’s high-end Speedlites than it does with the 320EX or the 270EX II. The Speedlite 430EX III-RT is compatible with E-TTL II and earlier flash technologies. It can serve as a receiver unit in an optical wireless configuration. The Speedlite 430EX III-RT has a guide number of 43/141 (meters/feet) at ISO 100, at 105mm focal length.
Speedlite 320EX
This $249 flash (see Figure 9.17) has a GN of 105. Lightweight and more pocket-sized than the 430EX III-RT and 600EX-RT, this bounceable (both horizontally and vertically) flash has some interesting features, including a built-in LED video light that can be used for shooting movies with the R5 or R6, or as a modeling light or even AF-assist beam when shooting with live view. Canon says that this efficient LED light can provide up to four hours of illumination with a set of AA batteries. It can be used as a wireless receiver unit, and it has a flash-release function that allows the shutter to be triggered remotely with a two-second delay.
Figure 9.17 The Speedlite 320EX has a builtin video lamp.
Speedlite EL-100
I got this compact little flash when it was first introduced and have grown especially fond of it. At $150, it’s clearly the high-value bargain flash among Canon Speedlites, because it does so many things you don’t expect from such an inexpensive unit. If you want to keep your kit’s weight reasonable, the EL-100 has most of what you really need, with the only cost being total light output.
It’s pleasantly small at about 2.5 × 3.6 × 2.8 inches and weighs less than eight ounces with two AA batteries. (See Figure 9.18, left.) The flash head rotates 180 degrees and pivots up and down from zero to 90 degrees, so you can easily bounce light off a nearby wall or ceiling. (Keep in mind that bounce flash really soaks up a strobe’s illumination, and the EL-100 has a guide number of only 85 at ISO 100 when using the 50mm flash coverage setting to begin with.) It recycles in less than six seconds, and signals that it’s ready to go with a flash-ready indicator.

Figure 9.18 The EL-100 is Canon’s most versatile low-cost Speedlite.
The EL-100’s controls are simplicity itself; there is no LCD and a plethora of buttons or dials. One switch labeled Receiver allows you to choose Channels 1–4, a rotating dial chooses Off, On, Auto Flash (which allows the camera to decide whether to use flash or not), and assigns the flash to Groups A, B, or C for wireless applications. There’s also a flash Test button. That’s it. (See Figure 9.18, right.)
The number of flash modes available make this unit quite versatile. You can use E-TTL, Manual, MULTI, or CSP modes using External Flash Functions settings described earlier. In wireless mode, it can serve as an optical sender or receiver, and access the ratio and exposure compensation options described earlier, including light ratio controls and separate Group C exposure compensation. Its burst will normally fill the frame captured by a 24mm lens or zoom setting, but you can adjust it for a 50mm focal length, which gives the unit a bit more range.
The EL-100 can clearly be a strong choice for someone who’s already working with a variety of Canon equipment. But any creative photographer can enjoy the Speedlite EL-100 as the highly competent tool it is. In the right hands, it can brighten shots with precision, help you evade overexposure, and enable you to be ready to take on challenging lighting circumstances. And with how simple it is to use, it’s not hard to find the right hands to use the EL-100.
I like this unit as an on-camera flash for fill light outdoors, and to trigger wireless Speedlights optically (in such cases, you may not want an extra-powerful flash mounted on the camera anyway). The EL-100 is an economical choice for both functions.
Speedlite 270EX II
The Canon Speedlite 270EX II is designed to work with compatible EOS cameras utilizing E-TTL II and E-TTL automatic flash technologies. This flash unit is entirely controlled from the camera, making it as simple to use as a built-in flash. Its options can be selected and set via the camera’s menu system. The 270EX II can also be used as an off-camera receiver unit when controlled by a sender Speedlite, transmitter unit, or a camera with an integrated Speedlite transmitter. One interesting feature of this unit is that it is also a remote-control transmitter, allowing you to wirelessly release the shutter on cameras compatible with certain remote-controller units. The Speedlite 270EX II has a guide number of 27/89 (meters/feet) at ISO 100, with the flash head pulled forward.
This $170 ultra-compact unit is Canon’s entry-level Speedlite, and suitable for owners who want a simple strobe for occasional use, without sacrificing the ability to operate it as a wireless receiver unit. With its modest guide number, it provides a little extra pop for fill-flash applications. It has vertical bounce capabilities of up to 90 degrees, and it can be switched between Tele modes to Normal (28mm full-frame coverage) at a reduced guide number of 72.
The 270EX II functions as a wireless receiver unit triggered by any Canon EOS unit or flash (such as the 430EX III-RT) with a sender function. It also has the new flash release function with a two-second delay that lets you reposition the flash. There’s a built-in AF-assist beam, and this 5.5-ounce, 2.6 × 2.6 × 3–inch unit is powered by just two AA-size batteries.
Close-Up Lites
Canon has offered three lites, especially suitable for close-up photography: the Macro Ring Lite MR-14EX/EX II and Macro Twin Lite flash MD-24EX-RT. As you might guess from their names, these lites are especially suitable for close-up, or macro photography, because they provide a relatively shadowless illumination. It’s always tricky photographing small subjects up close, because there often isn’t room enough between the camera lens and the subject to position lights effectively. Ring lites, in particular, especially those with their own modeling lamps to help you visualize the illumination you’re going to get, mount around the lens at the camera position, and help solve many close-up lighting problems.
But, in recent years, the ring lite has gone far beyond the macro realm and is now probably even more popular as a light source for fashion and glamour photography. The right ring lite, properly used, can provide killer illumination for glamour shots, while eliminating the need to move and reset lights for those shots that lend themselves to ring lite illumination. As you, the photographer, move around your subject, the ring lite moves with you.
One of the key drawbacks to ring lites (whether used for macro or glamour photography) is that they are somewhat bulky and clumsy to use (they must be fastened around the camera lens itself, or the photographer must position the ring lite, and then shoot “through” the opening or ring). That means that you might not be moving around your subject as much as you thought and will, instead, mount the ring lite and camera on a tripod, studio stand, or other support.
Another drawback is the cost. The MR-14EX/MR-14EX II and MR-24EX-RT close-up lites are priced in the $550 and $989 range, respectively. You have to be planning a lot of macro or fashion work to pay for one of those. Specialists take note. I tend to favor a third-party substitute for close-up photography, the Alien Bees ABR800 Ringflash. It’s priced at about $400, and, besides, it integrates very well with my other Alien Bees studio flash units.