Clarity
Options: –4 to +4
My preference: N/A
Leave it to Canon to add an often-misunderstood feature to their cameras, but not tell you what it is in sufficient detail. That’s why I’m here. Clarity is a contrast-adjustment process that concentrates on the mid-tones rather than the image as a whole. And, as I emphasized in Chapter 5’s discussion of autofocus, increased contrast translates into sharpness, and reduced contrast results in a blurrier appearance. However, Clarity adjustments—whether applied in-camera using this menu entry or in an image editor like Photoshop—differ from sharpness controls. Sharpness increases the contrast between all dark and light tones, while clarity increases the contrast only within the middle tones of the image. The results are similar to sharpening, but textures become more evident, and you don’t get as much digital noise.
If you want to increase or decrease Clarity, this menu entry provides a simple slider, with 0 as the default and adjustments available from –4 to +4. I recommend you experiment with the feature before using it widely. The clarity adjustments aren’t shown in-camera, so you’ll need to send your images to your computer to evaluate your results. Keep in mind that in images that are already high in contrast (that is, those with fewer middle tones), the clarity setting may lighten or darken areas adjacent to the boundaries between portions of your images.
Lens Aberration Correction
Options: Peripheral illumination correction: Enable (default)/Disable; Distortion correction: Enable/Disable (default); Digital Lens Optimizer (Chromatic Aberration and Diffraction correction): Enable/Disable (default)
My preference: Use the default values
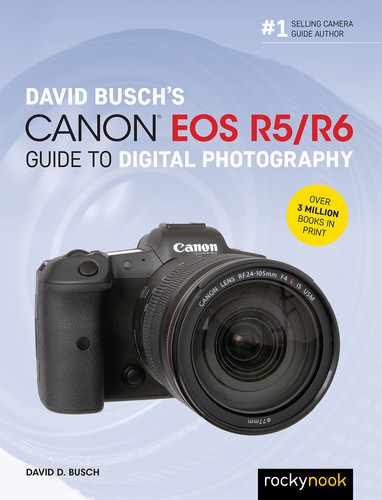
Your camera can automatically partially correct for lens aberrations in several different ways using three different settings if you are using a lens for which correction data is available. Previously, several of these corrections were available only when post-processing the image in Digital Photo Professional or another utility. The three choices (see Figure 11.17), all described in detail in the next section, are as follows:
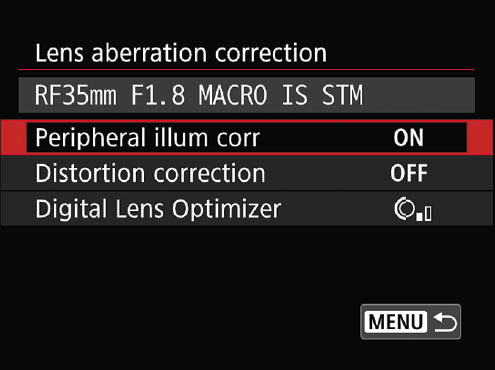
Figure 11.17 The Lens Aberration Correction screen.
- Peripheral illumination correction. Fixes light fall-off at the edges of an image.
- Distortion correction. Adjusts for barrel and pincushion distortion.
- Digital lens optimizer. Corrects for a variety of characteristics, taking into account the lens, subject distance, focal length, aperture, and low-pass (anti-aliasing) filter over the sensor. It corrects for both chromatic aberration (color fringes around the edges of subjects) and diffraction for moiré effects produced when shooting at a very small aperture.
I’ll explain what each of these components do one at a time and include some examples of those aspects that can be easily illustrated.
Peripheral Illumination Correction
One defect is caused by a phenomenon called vignetting, which is a darkening of the four corners of the frame because of a slight amount of fall-off in illumination at those nether regions. This menu option allows you to activate Peripheral Illumination Correction, a clever feature that partially (or fully) compensates for this effect for any lens included in the camera’s internal, updateable (through firmware upgrades) database. Depending on the f/stop you use, the lens mounted, and the focal length setting, vignetting can be non-existent, slight, or may be so strong that it appears you’ve used a too-small hood on your camera. (Indeed, the wrong lens hood can produce a vignette effect of its own.) Vignetting can be affected by the use of a telephoto converter (more on those in Chapter 7, too).
Peripheral illumination drop-off, even if pronounced, may not be much of a problem. I actually add vignetting, sometimes, when shooting portraits and some other subjects. Slightly dark corners tend to focus attention on a subject in the middle of the frame. On the other hand, vignetting with subjects that are supposed to be evenly illuminated, such as landscapes, is seldom a benefit.
To minimize the effects of corner light fall-off, you can process RAW files using Digital Photo Professional or, if you want your JPEG files fixed as you shoot them, by using this menu option. Figure 11.18 shows an image at top left without peripheral illumination correction, and a corrected image at bottom left. I’ve exaggerated the vignetting a little to make it more evident on the printed page. Keep in mind that the amount of correction available with Digital Photo Pro can be a little more intense than that applied in the camera. In addition, the higher the ISO speed, the less correction is applied. If you see severe vignetting with a particular lens, focal length, or ISO setting, you might want to turn off this feature, shoot RAW, and apply correction using DPP instead.
When you select this menu option from the Shooting 3 menu, a screen appears with the name of the lens currently attached to the camera, along with a notation whether correction data needed to brighten the corners is already registered in the camera. (Information about the most popular lenses is included in firmware.) If so, you can use the QCD-1 to choose Enable to activate the feature or Disable to turn it off. Press the SET button to confirm your choice. Note that in-camera correction must be specified before you take the photo, so that the DIGIC X processing engine can lighten the corners of your photo before it is saved to the memory card.
Distortion Correction
This option adjusts to correct barrel and pincushion distortion, based on information in the camera’s database.
Barrel distortion is found in some wide-angle lenses, and causes straight lines to bow outward, with the strongest effect at the edges. In fisheye (or curvilinear) lenses, this defect is a feature. When distortion is not desired, you’ll need to use a lens that has corrected barrel distortion. Manufacturers like Canon do their best to minimize or eliminate it (producing a rectilinear lens), often using aspherical lens elements (which are not cross-sections of a sphere). You can also minimize less severe barrel distortion simply by framing your photo with some extra space all around, so the edges where the defect is most obvious can be cropped out of the picture. If none of the above work, you can apply this feature, which is disabled by default, to “undistort” your image with some bending of its own.
Pincushion distortion is a trait of many telephoto lenses, producing lines that curve inward toward the center of the frame. You might find after a bit of testing that it is worse at certain focal lengths with your particular zoom lens. Like chromatic aberration, it can be partially corrected using tools like Photoshop’s Lens Correction filter and Photoshop Elements’ Correct Camera Distortion filter, Digital Photo Professional, or this in-camera feature.
Digital Lens Optimizer
This option is a general-purpose fixer-upper based on a database of lenses and characteristics of the camera and sensor. It applies a whole range of corrections and can apply them separately to the center or edges of the frame, fixing spherical aberration, axial chromatic aberration, curvature of field, astigmatism, chromatic aberration, sagittal halo, and chromatic magnification. Many of these are technical aspects that are beyond the scope of this book. Note that image processing takes longer when these corrections are applied, continuous shooting maximum burst is lower with the High setting, and visual noise may increase. The higher the ISO setting, the lower amount of correction applied.
Another defect fixed by the Digital Lens Optimizer involves fringes of color around backlit objects, produced by chromatic aberration, which comes in two forms: longitudinal/axial, in which all the colors of light don’t focus in the same plane, and lateral/transverse, in which the colors are shifted in one direction. (See Figure 11.18, top right.) When this feature is enabled, the camera will automatically correct images taken with one of the supported lenses to reduce or eliminate the amount of color fringing seen in the final photograph. (See 11.18, bottom right.)

Figure 11.18 Left: Vignetting (top) is undesirable. You can correct this defect in the camera (bottom). Right: Color fringes can be corrected using the lens aberration correction feature (right top and bottom).
The final defect corrected by the Digital Lens Optimizer is diffraction, a phenomenon that can cause a reduction in the apparent sharpness of your image due to scattering and interference of photons as they pass through smaller lens openings. In effect, the edges of your lens aperture affect proportionately more photons as the f/stop grows smaller. The relative amount of space available to pass freely decreases, and the amount of edge surface that can collide with incoming light increases.
The best analogy I can think of is a pond with two floating docks sticking out into the water, as shown in Figure 11.19. Throw a big rock in the pond, and the ripples pass between the docks relatively smoothly if the structures are relatively far apart (top). Move them closer together (bottom), and some ripples rebound off each dock to interfere with the incoming wavelets. In a lens, smaller apertures produce the same effect.
The sensor includes a so-called “anti-aliasing” filter (technically known as an optical low-pass filter, or OLPF) designed to eliminate moiré. You might see it on your television when a guest wears a checked shirt with a pattern that’s very close to the interval, or frequency, of the lines that produce the video image. Or, it might show up when photographing a window screen (see Figure 11.20, left). The optical low-pass filter blocks most of that moiré by blurring the image slightly in a special way. Figure 11.20, right, shows what happens. The components described below are shown from left to right in the figure. Note that this diagram is a conceptual representation only and may not show the precise makeup (so far unreleased) of the new four-layer anti-aliasing filter Canon has developed.

Figure 11.19 Diffraction interference can be visualized as ripples on a lake.
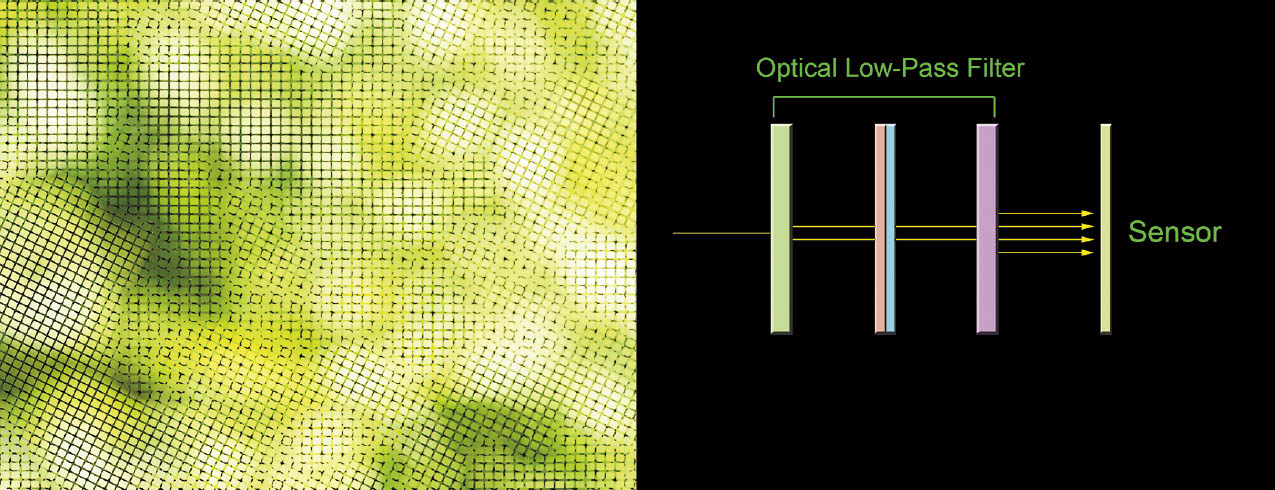
Figure 11.20 Moiré effect (left); the optical low-pass filter (right).
- Low-pass Filter #1 (Green). Light arriving at the filter pack in front of the sensor first moves through low-pass filter #1, at the left side of the illustration. This filter splits the beam of light in the horizontal direction.
- Wave plate (Red). The next component takes the split beam of light and polarizes it circularly, so all the beams of light are pulsating in the same orientation.
- IR filter (Blue). The polarized beams next pass through an IR cut-off filter that removes most (but not all) of the light in the infrared range, which keeps the IR illumination (which focuses at a different plane than visible light) from tainting the image.
- Low-pass Filter #2 (Purple). The split beams next arrive at the second low-pass filter, where they are split once again in the vertical direction.
- Sensor. What was originally a single beam of light arrives at the sensor in four pieces, producing a slight blurring effect. The Diffraction Correction feature analyzes the image and counteracts excessive blurring, performing some sharpening internally before saving the image to your memory card with reduced blur.
Canon has greatly expanded the list of lens data included within the camera itself. However, if lens aberration correction information for your lens is not registered in the camera, you can often remedy that deficit using the most recent version of the EOS Utility. Just follow these steps:
- 1. Link up your camera. Connect to your computer using the USB cable supplied with the camera.
- 2. Launch the EOS utility. Load the utility and click on Camera Settings/Remote Shooting from the splash screen that appears.
- 3. Select the Shooting menu. It’s located on the menu bar located about midway in the control panel that appears on your computer display. The Shooting menu icon is the white camera on a red background.
- 4. Click on the Lens Aberration Correction choice. The selection screen will appear.
- 5. Choose your lens. Select the category containing the lens you want to register from the panels at the top of the new screen; then place a check mark next to all the lenses you’d like to register in the camera.
- 6. Confirm your choice. Click OK to send the data from your computer to the camera and register your lenses.
- 7. Activate correction. When a newly registered lens is mounted on the camera, you will be able to activate the anti-vignetting feature for that lens from the Set-up 1 menu.
Long Exposure Noise Reduction
Options: Off/Disable (default), Auto, On/Enable
My preference: Auto
This entry is the first in the Shooting 4 menu. (See Figure 11.21.) It allows you to enable or disable long exposure noise reduction or allow the camera to evaluate your scene and decide whether to use this noise-canceling adjustment. Visual noise is that graininess that shows up as multicolored specks in images, and this setting helps you manage it. In some ways, noise is like the excessive grain found in some high-speed photographic films. However, while photographic grain is sometimes used as a special effect, it’s rarely desirable in a digital photograph.
Figure 11.21 The Shooting 4 menu.
The visual noise-producing process is something like listening to a CD in your car, and then rolling down all the windows. You’re adding sonic noise to the audio signal, and while increasing the CD player’s volume may help a bit, you’re still contending with an unfavorable signal-to-noise ratio that probably mutes tones (especially higher treble notes) that you really want to hear.
The same thing happens when the analog signal is amplified: You’re increasing the image information in the signal but boosting the background fuzziness at the same time. Tune in a very faint or distant AM radio station on your car stereo. Then turn up the volume. After a certain point, turning up the volume further no longer helps you hear better. There’s a similar point of diminishing returns for digital sensor ISO increases and signal amplification as well.
These processes create several different kinds of noise. Noise can be produced from high ISO settings. As the captured information is amplified to produce higher ISO sensitivities, some random noise in the signal is amplified along with the photon information. Increasing the ISO setting of your camera raises the threshold of sensitivity so that fewer and fewer photons are needed to register as an exposed pixel. Yet, that also increases the chances of one of those phantom photons being counted among the real-life light particles, too.
Fortunately, the sensor and its digital processing chip are optimized to produce the low noise levels, so ratings as high as ISO 800 or ISO 1600 can be used routinely (although there will be some noise, of course), and even ISO 3200 can generate good results.
A second way noise is created is through longer exposures. Extended exposure times allow more photons to reach the sensor but increase the likelihood that some photosites will react randomly even though not struck by a particle of light. Moreover, as the sensor remains switched on for the longer exposure, it heats, and this heat can be mistakenly recorded as if it were a barrage of photons. This entry can be used to tailor the amount of noise-canceling performed by the digital signal processor.
- Off/Disable. Disables long exposure noise reduction. Use this setting when you want the maximum amount of detail present in your photograph, even though higher noise levels will result. This setting also eliminates the extra time needed to take a picture caused by the noise reduction process. If you plan to use only lower ISO settings (thereby reducing the noise caused by ISO amplification), the noise levels produced by longer exposures may be acceptable. For example, you might be shooting a river spilling over rocks at ISO 100 with the camera mounted on a tripod, using a neutral-density filter and long exposure to cause the pounding water to blur slightly. To maximize detail in the non-moving portions of your photos, you can switch off long exposure noise reduction. Because the noise-reduction process used with Auto and On can effectively double the time required to take a picture, Off is a good setting to use when you want to avoid this delay when possible.
- Auto. With exposures of one second or longer, if long exposure noise is detected, a second, blank exposure is made and compared to the first image. Noise found in the “dark frame” image is subtracted from your original picture, and only the noise-corrected image is saved to your memory card.
- On/Enable. When this setting is activated, dark frame subtraction is applied to all exposures longer than one second. You might want to use this option when you’re working with high ISO settings (which will already have noise boosted a bit) and want to make sure that any additional noise from long exposures is eliminated, too. Noise reduction will be applied to some exposures that would not have caused it to kick in using the Auto setting.

TIP While the “dark frame” is being exposed, the display will be blank during Live View mode, and the number of shots you can take in continuous shooting mode will be reduced. White balance bracketing is disabled during this process.
High ISO Speed Noise Reduction
Options: Disable, Low, Standard (default), High, Multi Shot Noise Reduction
My preference: Low, with further noise reduction as required in an image editor
The other type of noise results from using higher ISO settings. This entry allows you to specify just how much or how little of this noise reduction to apply, which can be a valuable option because noise reduction does eliminate detail while blurring the amount of noise. The default is Standard noise reduction, but you can specify Low or High noise reduction, or disable noise reduction entirely. At lower ISO values, noise reduction improves the appearance of shadow areas without affecting highlights; at higher ISO settings, noise reduction is applied to the entire photo. Note that when the High option is selected, the maximum number of continuous shots that can be taken will decrease significantly, because of the additional processing time for the images.
- Disable. No additional noise reduction will be applied.
- Low. A smaller amount of noise reduction is used. This will increase the grainy appearance but preserve more fine image detail.
- Standard. At lower ISO values, noise reduction is applied primarily to shadow areas; at higher ISO settings, noise reduction affects the entire image.
- High. More aggressive noise reduction is used, at the cost of some image detail, adding a “mushy” appearance that may be noticeable and objectionable. Because of the image processing applied by this setting, your continuous shooting maximum burst will decrease significantly.
- Multi Shot Noise Reduction. When this option is active, the camera takes four separate shots continuously. It then aligns them (in case there was movement between images) and then merges them, using the dark frame subtraction technique to ignore random pixels caused by noise. The result is an image that is of better quality than the High setting.
Multi Shot NR works best if the camera is mounted on a tripod and your subject is not moving. It is not available when Image Quality is set to RAW or RAW+JPEG/HEIF or Dual Pixel RAW, nor when using flash, live view, shooting multiple or Bulb exposures, or performing autoexposure/white balance bracketing.
Dust Delete Data
Options: Store Delete Data
My preference: N/A
This menu choice lets you “take a picture” of any dust or other particles that may be adhering to your sensor. The information about the location of this dust will be appended to your photos, so that the Digital Photo Professional software can use this reference information to identify dust in your images and remove it automatically. You should capture a Dust Delete Data photo from time to time as your final line of defense against sensor dust. When you access this menu entry, the date of your last update will be displayed.
To use this feature, select Dust Delete Data, select OK, and press the SET button. The camera will first perform a self-cleaning operation by applying ultrasonic vibration to the low-pass filter that resides on top of the sensor. Then, a screen will appear asking you to press the shutter button. Point the camera at a solid-white card with the lens set on manual focus and rotate the focus ring to infinity. When you press the shutter release, the camera takes a photo of the card using Aperture-priority and f/22 (which provides enough depth-of-field [in this case, depth-of-focus] to image the dust sharply). The “picture” is not saved to your memory card but, rather, is stored in a special memory area in the camera. Finally, a “Data obtained” screen appears.
The Dust Delete Data information is retained in the camera until you update it by taking a new “picture.” The information is added to each image file automatically.
Multiple Exposure
Options: Multiple exposure: Disable (default), On (Function and Control Priority), On (Continuous Shooting Priority); Multiple exposure control, Number of exposures, Save source images, Continue multiple exposure, Select image for multi-exposure
My preference: N/A
This is the first entry in the Shooting 5 menu. (See Figure 11.22.) This option lets you combine two to nine separate images into one photo without the need for an image editor like Photoshop. It can be an entertaining way to return to those thrilling days of yesteryear when complex photos were created in the camera itself. In truth, prior to the digital age, multiple exposures were a cool, groovy, far-out, hep/hip, phat, sick, fabulous way of producing composite images. Today, it’s more common to take the lazy way out, snap two or more pictures, and then assemble them in an image editor like Photoshop.
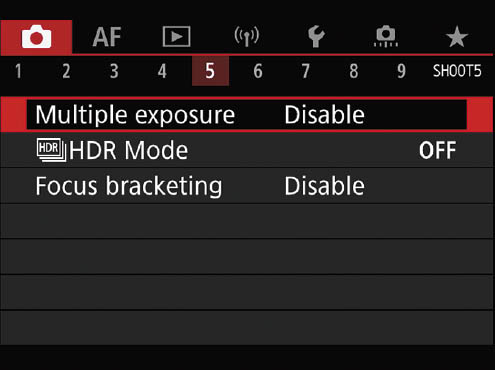
Figure 11.22 The Shooting 5 menu.
However, if you’re willing to spend the time planning a multiple exposure (or are open to some happy accidents), there is a lot to recommend the multiple exposure capability that Canon has provided. For one thing, you can combine two or more images using the RAW data from the sensor, producing photos that are blended together more smoothly than is likely for anyone who’s not a Photoshop guru. In addition, Canon has eliminated one annoying aspect of the feature found in some cameras: it’s not necessary to return to the menu to activate multiple exposure for every set. If you want to take a series of pictures, you can set it once, and forget it. (But don’t forget to turn it off when you’re done!)
Multiple exposures cannot be captured if white balance bracketing, HDR shooting, or movie-making modes are in use. Before you begin snapping your own multi-exposures, you’ll need to set your parameters using the options discussed below. The Multiple Exposure command has so many options that I didn’t list them in the Options line at the beginning of this entry; each one requires a more detailed explanation that I’m going to supply next. (See Figure 11.23.)
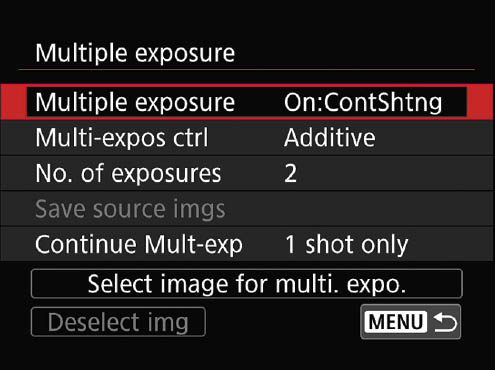
Figure 11.23 Set these parameters to configure your multiple exposures.
Multiple Exposure
The Disable option deactivates the multi-exposure feature, but you can quickly choose either of the two On variations. This is the “master control” that allows you to turn multiple exposure on and off (leaving the other parameters you’ve set unchanged) and to select from two different multi-exposure modes.
- Disable. Deactivates multiple exposure.
- On: Func/Ctrl. In the Function and Control-priority mode, the camera snaps off each series, but returns control to you between each set so you can review your results or make any adjustments in exposure settings or other parameters. I tend to experiment a lot when firing off multiple exposures and prefer this mode for shooting subjects that aren’t moving around a lot, and when I want to carefully arrange objects in the frame between shots. Its main disadvantage is that continuous shooting speed is reduced, so it’s not the best choice for action.
Any time during shooting when using Function and Control-priority mode, you can press the Playback button to monitor exposure level, overlap alignment, and other factors. If the image doesn’t match what you wanted to get, you can press the Trash button and view a set of four options:
- • Undo last image. The image you are viewing will be deleted, and the number of remaining shots increases by one.
- • Save and Exit. The multiple exposure will be saved, and continued shooting will be aborted. If you’ve selected All Images in Save Source Images, all the exposures and the merged images will be saved. If you’ve selected Result Only, only the merged image that has already been compiled will be saved. I’ll describe the Save Source Images options in more detail shortly.
- • Exit Without Saving. Multiple exposure shooting is aborted and no images are saved.
- • Return to Previous Screen. Backs up to the last screen viewed.
- On: ContShtng. In Continuous Shooting-priority mode, the camera can operate in continuous mode. I use this when shooting multiple exposures at dance and ballet performances. I can’t plan each individual image, anyway, and want to be able to grab separate shots of each movement as they unfold. In this mode, image review, playback, menus, and undo last image are all disabled while you’re shooting. In addition, because of the speed at which images are captured, only the final, combined image is saved on your memory card; the Save Source Imgs option, described below, is disabled.
Multiple Exposure Control
This essential parameter can determine how successful your multiple exposure is, by controlling how each individual exposure is merged with the overlapping portions of the other images in the series. Picture an image like the one shown at left in Figure 11.24. The performer, Todd Cooper of the Alan Parsons Live Project, was photographed against a plain, dark background. He happened to be moving, so neither of the two images overlapped with each other, or with any details of the featureless background. But in Figure 11.24, right, the dancer remained in place, so that each subsequent image overlapped the others slightly. The Multiple Exposure Control feature allows you to specify how the images are combined with these choices:
- Additive. Each individual shot in the series is, by default, given the full exposure, which is what I used for Figure 11.24, left. Because the background was totally black and the subject was moving and did not overlap, the cumulative exposure effect was to combine two separate images into one image.
However, you can manually adjust the amount of exposure each shot is given by dialing in exposure compensation, making this mode useful for overlapping images as well. The customary procedure is to specify –1-stop exposure compensation for two shots, –1.5 EV for three-shot multiple exposures, and –2 EV for four-shot multis. Manually calculating the amount of negative exposure compensation allows you to fine-tune the look of overlapping images.
- Average. Choose this option to apply appropriate negative exposure compensation, based on the number of exposures you’re combining into a single image. If your multiple exposures happen to be of the same scene (rather than separate subjects), the camera will attempt to ensure that the background receives the equivalent of a full exposure. I used this option for Figure 11.24, right.

Figure 11.24 Left: Multiple exposure using Additive exposure, and no exposure compensation. Right: Multiple exposure using Average exposure.
- Bright. This mode uses special algorithms to compare the first shot in a series with subsequent images that will be added to that base shot, and then give preference to the brighter parts of the image where pixels overlap. Conceptually, this is like the “lighten” layer merging routines in Photoshop (and other image editors).
- Dark. Similar to the Bright option, only preference is given to darker pixels. You may need to use both the Bright and Dark parameters for a while to visualize how they affect your images. I can’t really provide hard and fast examples of when to use one or the other; it’s a creative process.
Number of Exposures
You can choose from 2 to 9 exposures in each multiple exposure set. Highlight the option, press SET, and spin the QCD-1 to choose the number of exposures. I recommend starting out with three multiple exposures when you begin exploring this tool; you’ll quickly discover picture opportunities that call for more or fewer combined shots in a single image.
Save Source Images
As you might guess, in producing multiple exposures, each shot is taken separately, and then combined before the combination shot is saved. (In other words, the process is not like film multiple exposures, in which the same photosensitive frame collects all the images, adding each subsequent shot to the images that are already there.) Doing it this way keeps the sensor from becoming “overloaded” and losing detail, plus the camera can intelligently combine the images, using exposure compensation and other pixel tricks to produce the final image.
You can elect to save Result Only (just the merged image), or All Images to store each individual image for later use. There are two advantages to the latter approach. You may be able to create a merger of your own manually that is superior to the one generated in the camera. In addition, if one individual shot happens to be a “keeper” on its own, you’ll have it available without the distraction of the other merged images. The disadvantage is that saving All Images requires some extra time and memory card space.
Continue Multiple Exposure
Choose 1 Shot Only or Continuously. Choose the former if you want to take a single multiple exposure series and then return to normal shooting with Multiple Exposure then disabled. Select Continuously if you plan to shoot a batch of different multiple exposures and don’t want to return to the menu system to reactivate the feature after each shot.
Select Image for Multiple Exposure
If you like, you can use an image you already took as the base image for a subsequent multi-exposure. The base image can only be a RAW image. When RAW images taken with your camera (other RAW images on the card cannot be used) are available, this option will be selectable. However, a RAW image that is already a multiple exposure can be used as your base image (the mind boggles at the possibilities).
With the option highlighted, press SET and choose the image you want to use. Rotate the QCD to view compatible RAW images and press SET to choose one. Press OK. You can then take the remaining exposures in your set. That is, if you’ve chosen to combine three shots in a multiple exposure, the base image counts as one, so you’ll be able to add two more by pressing and holding the shutter release.
Note that images using Highlight Tone Priority or an Aspect Ratio other than 3:2 cannot be used as your base image, and Lens Aberration Correction and Auto Lighting Optimizer will not be applied to your set. If the RAW image specifies the Auto Picture Style, the camera will revert to Standard for the rest of the images.
MULTI NOTES
Some special conditions are required to shoot multiple exposures. Some features are disabled, and others are locked in at particular values.
- Auto Lighting Optimizer, Highlight Tone Priority, and Lens Aberration Correction are disabled, and the Standard Picture Style will be used if you’ve chosen the Auto Picture Style setting. Multiple exposures are disabled if your camera is connected to a computer or printer via the USB cable.
- Most settings used for the first shot in a series are locked in for all subsequent images in that series, including image recording quality, ISO sensitivity, Picture Style, high ISO noise reduction, and color space.
- Other functions that cannot be changed while shooting multiple exposures will be dimmed in the camera menu.
HDR Mode
Options: Adjust Dynamic Range, Effect, Continuous HDR, Auto Image Align, Save Source Images
My preference: N/A
I described using HDR mode in detail in Chapter 4. To recap, this menu entry has five subentries you can adjust:
- Adjust Dynamic Range. Select Disable HDR, allow the camera to select a dynamic range automatically, or select the range yourself to achieve a particular look. You can choose plus/minus 1, 2, or 3 EV.
- Effect. You can add special effects on top of any Picture Style you are using to produce an even more dramatic HDR image. Your choices are as follows:
- • Natural. Provides the most useful range of highlight and shadow details.
- • Art Standard. Offers a great deal of highlight and shadow detail, but with lower overall contrast and outlines accentuated, making the image look more like a painting. Saturation, bold outline, and brightness are adjusted to the default levels, and tonal range is lower in contrast.
- • Art Vivid. Like Art Standard, but saturation is boosted to produce richer colors, and the bold outlines not as strong, producing a poster-like effect.
- • Art Bold. Even higher saturation than Art Vivid, with emphasized edge transitions, producing what Canon calls an “oil painting” effect.
- • Art Embossed. Reduced saturation, darker tones, and lower contrast give the image a faded, aged look. The edge transitions are brighter or darker to emphasize them.
- Continuous HDR. Choose 1 Shot Only if you plan to take just a single HDR exposure and want the feature disabled automatically thereafter, or Every Shot to continue using HDR mode for all subsequent exposures until you turn it off. This is like the multiple exposure option described earlier.
- Auto Image Align. You can choose Enable to have the camera attempt to align all three HDR exposures when shooting hand-held or select Disable when using a tripod. The success of the automatic alignment will vary, depending on the shutter speed used (higher is better), and the amount of camera movement (less is better!).
- Save Source Images. When the camera has finished creating its HDR image from your three shots, you can choose to save all the images on your memory card (so you can manually combine them later or perform other manipulations using your image editor). Or, you can elect to save your final HDR image only. You might prefer that choice to save card space, reduce the number of images you won’t be using anyway, or if you’re shooting a lot of HDR and are confident that the camera’s results will suit your needs.
Focus Bracketing
Options: Focus Bracketing, Number of Shots, Focus Increment, Exposure Smoothing
My preference: N/A
If you are doing macro (close-up) photography of flowers or other small objects at short distances, the depth-of-field often will be extremely narrow. In some cases, it will be so narrow that it will be impossible to keep the entire subject in focus in one photograph. Although having part of the image out of focus can be a pleasing effect for a portrait of a person, it is likely to be a hindrance when you are trying to make an accurate photographic record of a flower, or small piece of precision equipment. One solution to this problem is focus stacking (which Canon calls “Focus Bracketing”), a procedure that can be considered like HDR translated for the world of focus—taking multiple shots with different settings, and, using software as explained below, combining the best parts from each image in order to make a whole that is better than the sum of the parts. Focus bracketing requires a non-moving object, so some subjects, such as flowers, are best photographed in a breezeless environment, such as indoors.
With the camera’s focus bracketing feature, the camera takes a series of pictures, adjusting the focus slightly between each image, refocusing from closest to your subject to the farthest point that needs to appear sharp. You end up with a series of up to 999 different images that can be combined using Digital Photo Professional or another application. I find the process much easier in Photoshop, using two simple Photoshop commands, which I will describe shortly. If you prefer to use DPP, you can consult that software’s documentation for instructions.
You can visualize how focus stacking works if you examine Figure 11.25, which is cropped versions of three actual frames from one of my own focus bracketing series. All three used an exposure of 1/30th second at f/6.3 with an RF 85mm f/2 Macro IS STM lens. At top is the original exposure, with the lens focused on the nearest die. The center image shows the 35th exposure in the series, in which the focus shift feature had adjusted focus on the last die. In between were 33 intermediate-focus shots that I merged to produce the finished image at bottom.

Figure 11.25 Closest focus (top), farthest focus (center), merged image (bottom).
Here are the detailed steps you can take to use focus bracketing for your own deep-focus images:
- 1. Set the camera firmly on a solid tripod. A tripod or other equally firm support is absolutely essential for this procedure. You don’t want the camera (or the subject) to move at all during the exposures.
- 2. Attach a remote release. You want to be able to trigger the camera without moving it. However, the procedure does pause for a short period of time once you activate it, perhaps giving your tripod/camera time to settle down even if you begin by pressing the shutter release button with your finger.
- 3. Attach a lens with an appropriate focus range. Focus bracketing uses the lens’s built-in autofocus motor.
- 4. Set the focus modes. Choose One-Shot AF operation and single-point AF. Focus bracketing cannot be used when the lens is set to manual focus.
- 5. Set the quality of the images to JPEG. Use the Shooting 1 menu to make this adjustment.
- 6. Set the exposure, ISO, and white balance manually. Use test shots if necessary, to determine the best values. This will help prevent visible variations from arising among the multiple shots that you’ll be taking. You don’t want the camera to change the ISO setting or white balance between shots.
Note: Even though you’ll be effectively increasing depth-of-field through focus stacking, you should still avoid the widest apertures of your lens, as they are rarely the sharpest f/stops. I always stop down at least 1.5 f/stops—using f/6.3 in the example. Shutter speed is not as important, because the camera is on a tripod, but I tend to avoid very slow speeds anyway. You can manually set a slightly higher ISO sensitivity, if needed, to obtain the shutter speed/aperture combination you want to use.
- 7. Turn off image stabilization. You want straight exposures with no IS applied.
- 8. Access the Focus Bracketing menu. It’s shown at upper left in Figure 11.26. Select an appropriate setting for each of the following four parameters, using my guidelines:
- • Focus Bracketing. Set to Enable to activate focus bracketing.
- • Number of Shots. You can choose from 1 to 999 individually refocused shots. (See Figure 11.26, upper right.) The number of images captured will depend on how finely you want to have the camera change focus between shots (and you’ll combine this with the step increment option described next). I rarely need more than 50 shots and used only 35 for the example shown earlier in Figure 11.25.
- • Focus Increment. You can specify values from 1 (a narrow slice per adjustment) and 10 (a much wider focus change). (See Figure 11.26, lower left.) Canon does not specify how much each increment changes the focus, for a very good reason: it can’t. Depending on the focal length of your lens and your f/stop, the effective plane of apparent focus may vary from narrow, to very narrow, to super-narrow in macro shooting environments. (If you’re confused, see “Circles of Confusion” in Chapter 5.)

Figure 11.26 Focus Bracketing Shooting options.
You may need some trial-and-error to choose the correct number of shots and focus step width. For example, with 50 shots and a wide focus step, the first 10 may encompass your entire subject and the last 40 may be wasted on completely out-of-focus images. It’s often worthwhile to take a test shot, view a slide show of all your images, and decide whether to increase/decrease the number of shots and/or focus step width.
- • Exposure Smoothing. This option minimizes changes in image brightness when set to Enable, compensating for differences in the actual aperture value as focus changes. The distance between the lens’s iris and the sensor focal plane can change as you change focus from near to far, producing a slightly different effective f/stop. Exposure smoothing takes that into account and adjusts.
- 9. Choose MENU to exit. When finished, choose MENU to exit the focus bracketing setup screens.
- 10. Create a new folder. I highly recommend depositing your bracketed images in a new folder. When you exit the focus bracketing settings, a Folder icon appears at lower left on the LCD screen. Tap it to create a new folder using the next highest number increment.
- 11. Set focus point to nearest object. Use the directional controls to position the red focus box on the subject nearest the camera lens. Press the shutter button halfway to focus.
- 12. Capture images. Press the shutter button down all the way to begin capture. The shots are captured continuously, with the focal position moving toward infinity with each shot by the increment you’ve specified.
- 13. Combine your images. I’ll describe the steps for that next.
The next step is to process the images you’ve taken. Here are the instructions for Photoshop. Transfer the images to your computer, and then follow these steps:
- 1. In Photoshop, select File > Scripts > Load Files into Stack. In the dialog box that then appears, navigate on your computer to find the files for the photographs you have taken, and highlight them all.
- 2. At the bottom of the next dialog box that appears, check the box that says, “Attempt to Automatically Align Source Images,” then click OK. The images will load; it may take several minutes for the program to load the images and attempt to arrange them into layers that are aligned based on their content.
- 3. Once the program has finished processing the images, go to the Layers panel and select all the layers. You can do this by clicking on the top layer and then Shift-clicking on the bottom one.
- 4. While the layers are all selected, in Photoshop go to Edit > Auto-Blend Layers. In the dialog box that appears, select the two options, Stack Images and Seamless Tones and Colors, then click OK. The program will process the images, possibly for a considerable length of time.
- 5. If the procedure worked well, the result will be a single image made up of numerous layers that have been processed to produce a sharply focused rendering of your subject. If it did not work well, you may have to take additional images the next time, focusing very carefully on small slices of the subject as you move progressively farther away from the lens.
- 6. You’ll want to flatten the final image before saving it. Given the 24MP resolution of the camera, the stack of individual shots will easily be more than 2GB, which exceeds the maximum file size of some storage media and/or OS file systems.
Although this procedure can work very well in Photoshop, you also may want to try it with Digital Photo Professional, as well as programs that were developed more specifically for focus stacking and related procedures, such as Helicon Focus (www.heliconsoft.com), PhotoAcute (www.photoacute.com), or CombineZM (https://combinezm.informer.com/). Note that focus bracketing is not “sticky” and the setting reverts to Disable when the camera is powered down.
Interval Timer
Options: Disable (default), Enable, Exposure Time
My preference: N/A
This feature, the first in the Shooting 6 menu, is available only when the Mode Dial is set to the B (Bulb) position. It allows you to specify exposure times up to 99 hours, 59 minutes, and 59 seconds. I described use of this feature in Chapter 6. (See Figure 11.27.)

Figure 11.27 The Shooting 6 menu.
Bulb Timer
Options: Disable (default), Enable; Times from 00:00:00 to 99:59:59 seconds
My preference: N/A
When you’ve enabled the feature using this menu entry, you can press the INFO button to specify a long exposure time up to 99 hours, 59 minutes, and 59 seconds. It’s unlikely that your battery will last that long and your camera won’t overheat with an ultra-long exposure (I haven’t tested the extreme settings), but longer exposures are helpful for star trails and other shots that require more than 30 seconds. The Mode must be set to B (Bulb) to use this feature, but unlike traditional Bulb exposures, you do not need to keep the shutter button depressed the entire time.
Shutter Mode
Options: Mechanical, Electronic 1st Curtain, Electronic
My preference: Enable when needed
Your camera can shoot completely silently using the camera’s electronic shutter instead of the mechanical shutter. There is a third mode available, in which an electronic first-curtain shutter is used to start the exposure, which is terminated using the conventional mechanical shutter. I explained first- and second-curtain shutters and electronic shutters in detail in Chapter 9 and will not repeat that information here. Here’s what you need to know to use the Shutter Mode entry:
- Mechanical shutter. This is the traditional mode, in which a mechanical first curtain drops to expose the sensor, with the exposure lasting until the mechanical second curtain descends to cover the sensor again. The second-curtain delay can be anywhere from 30 seconds to 1/200th second; for shutter speeds faster than 1/200th second (up to 1/8000th second), the first and second curtains form a slit that exposes only part of the sensor at a time. (This is why flash sync is limited to 1/200th second with the mechanical shutter.)
You’ll want to use the mechanical shutter for the best dynamic range in your images, as explained below.
- Electronic 1st-Curtain shutter. This mode eliminates the physical first curtain, potentially eliminating the loss of sharpness that can occur from mechanical shutter “bounce” during longer exposures. The shutter opens and then the sensor is “cleared” electronically, just as if a mechanical first curtain has opened. The exposure continues until the conventional mechanical second curtain descends after 30 to 1/250th second. (Electronic flash sync is at 1/250th second in this mode.)
- Electronic shutter. This mode starts and ends exposure electronically, providing exposure times of one-half second to 1/8000th second. In continuous shooting mode, the camera always shoots at 20 frames per second and a white frame is displayed to let you know pictures are being taken. There are trade-offs in exchange for this mode’s silence:
- • Exposures longer than 0.5 seconds cannot be set, except for Bulb exposures, which will automatically switch the camera into electronic first-curtain shutter mode.
- • Electronic flash or automatic exposure bracketing cannot be used. A flash burst tends to be more disruptive than even the loudest camera shutter anyway, so the electronic shutter’s silence wouldn’t provide much of an advantage.
- • Continuous shooting speeds may be lower.
- • Because of the length of time required to capture the full frame using the camera’s rolling shutter, your images may exhibit banding artifacts, especially under flickering light sources. Images of fast-moving subjects may look distorted because the first portion of the subject captured will have moved by the time the last portion is exposed.
- • The camera drops from 14-bit to 12-bit readout mode, which helps reduce the rolling shutter effect, but also limiting the dynamic range to capture tones in the darkest shadow areas. This is especially noticeable at ISO settings higher than ISO 400. So for best results use lower ISOs and/or stick to the mechanical shutter.
Release Shutter without Card
Options: Enable (default), Disable
My preference: Disable
This entry in the Shooting menu gives you the ability to snap off “pictures” without a memory card installed—or to lock the camera shutter release if that is the case. It is sometimes called Play mode, because you can experiment with your camera’s features or even hand your camera to a friend to let him/her fool around, without any danger of pictures being taken. Back in our film days, we’d sometimes finish a roll, rewind the film back into its cassette surreptitiously, and then hand the camera to a child to take a few pictures—without wasting any film. It’s hard to waste digital film, but Release Shutter without Card mode is still appreciated by some, especially camera vendors who want to be able to demo a camera at a store or trade show, but don’t want to have to equip every demonstrator model with a memory card. Choose this menu item, press SET, select Enable or Disable, and press SET again to turn this capability on or off.
IS (Image Stabilizer) Mode
Options: Enable (default), Disable, Focal Length
My preference: Disable
This is the first entry on the Shooting 7 menu. (See Figure 11.28.) In-body image stabilization (IBIS) is built into your camera, and optical image stabilization (OIS) is included in some RF- and EF-mount lenses. As I described in Chapter 7, the two systems can work with each other to provide up to 8 stops of stabilization and can add IS features even to lenses not equipped with OIS. This entry allows you to fine-tune these systems. The choices that appear depend on whether you have a lens with OIS attached and are in still photography or movie mode.
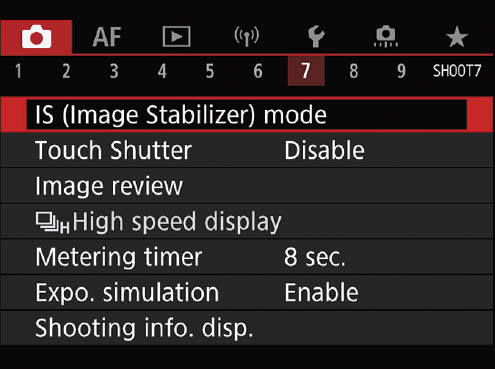
Figure 11.28 The Shooting 7 menu page.
- Non-IS RF lens. If an RF lens that does not have OIS is attached your choices are the following:
- • Movie Digital IS: Enhanced (in Movie mode only), On, Off (in Still and Movie mode).
- Non-IS EF lens. If an EF lens that does not have OIS is attached your choices are as follows:
- • IS Mode: On, Off
- • Movie Digital IS: On, Off
- • Still Photo IS: Always, Only for Shot
- IS RF/EF lens. If an RF or EF lens with OIS is attached your choices are as follows:
- • Movie Digital IS: On, Off, Enhanced (Movie mode). You’ll receive a reminder to turn IS on using the lens switch if it is currently off.
- • Movie Digital IS: On, Off (Still modes). If the switch is currently off, the camera will prompt you to turn it on.
The Enhanced setting available in Movie mode applies electronic IS in addition to OIS and IBIS. Electronic image stabilization moves a slightly cropped version of each frame around within the boundaries of the sensor, allowing stronger shake correction. The result is a slightly magnified image due to the cropping. This enhanced IS works best with wide-angle lenses and not at all with lenses over 1000mm. It can also produce a slight amount of blurring caused by the pixel movement, as well as additional grain. You should avoid using the Enhanced setting when the camera is mounted on a tripod.
Touch Shutter
Options: Enable (default), Disable
My preference: Disable
The Touch Shutter feature allows you to tap the LCD screen to focus and snap a picture with one gesture. It’s easy to accidentally trigger the Touch Shutter, so I generally leave it off. However, it’s quite useful when your camera is on a tripod and you want to be able to snap a picture of some portion of your scene quickly and with minimal vibration. An icon appears in the lower-left corner of the screen. You can tap to toggle to turn the touch shutter on and off once you’ve enabled it here. When you’ve turned it off, touching the screen will instead perform focusing on the spot tapped. You’d need to press the shutter release down all the way to take the picture.
In Touch Shutter mode, the camera performs in single-shot mode even when continuous shooting has been specified; touch focus uses One-Shot AF, even if AF Operation has been set to Servo AF. To shoot with a Bulb exposure, tap the screen twice: first to start the exposure and a second time to stop it.
Image Review
Options: Review Duration: 2 sec. (default), Off, 4 sec., 8 sec., Hold; Viewfinder Review: Disable (default), Enable
My preference: 2 sec., Disable
This setting has two options: Review Duration, and whether you want to play back images in the viewfinder.
- Review Duration. You can adjust the amount of time an image is displayed for review on the LCD after each shot is taken. You can elect to disable this review entirely (Off), or choose display times of 2, 4, or 8 seconds. You can also select Hold, an indefinite display, which will keep your image on the screen until you use one of the other controls, such as the shutter button, Main Dial, or QCD-1, or the time set for Display Off in the Power Saving entry of the Set-up 2 menu elapses.
Turning the review display off or choosing a brief duration can help preserve battery power. However, the camera will always override the review display when the shutter button is partially or fully depressed, so you’ll never miss a shot because a previous image was on the screen. Choose Image Review and select Off, 2 sec., 4 sec., 8 sec., or Hold. If you want to retain an image on the screen for a longer period, but don’t want to use Hold as your default, press the Erase button under the LCD monitor. The image will display until you choose Cancel or Erase from the menu that pops up at the bottom of the screen. A longer review time gives you an opportunity to delete a non-keeper quickly without a visit to the menu system.
- Viewfinder Review. If you enable viewfinder review, you can see a playback of the shot you just took in the viewfinder.
High-Speed Display
Options: Enable, Disable (default)
My preference: Enable
This function activates a high-speed display that is more responsive, switching between the shot you’ve taken and the live image. It is always activated when working with the electronic shutter. Sports shooters will find it particularly useful when they’re trying to follow action. To use high-speed display, these conditions must be met:
- Using RF lens. High-speed display does not work when an adapted EF/EF-S lens is mounted.
- Servo AF. You must set AF Operation to Servo AF to allow continuous focusing of your moving subject.
- High-Speed Continuous. Drive mode must be set to High-Speed Continuous (not High-Speed Continuous+). You don’t need this feature at slower shooting speeds, anyway, and the fastest speed is too rapid for even the high-speed display to keep up.
- No Anti-Flicker Shooting. Set Anti-Flicker to Disable.
- Exposure Simulation. You must enable Exposure Simulation.
High-speed display is not used at shutter speeds slower than 1/30th second and apertures smaller than f/11, during flash photography, or when expanded (L or H) ISO settings are used.
Metering Timer
Options: 4 sec., 8 sec. (default), 16 sec., 30 sec., 1 min., 10 min., 30 min.
My preference: 8 sec. most of the time; I switch to 10 min. when shooting sports
This option allows you to specify how long the metering system will remain active before switching off. Tap the shutter release to start the timer again after it switches off.
Exposure Simulation
Options: Enable (default), During DOF Preview, Disable
My preference: During DOF Preview
This option allows you to choose whether the live view image mimics the exposure level of the final image, or whether the screen displays a bright image (dependent on the LCD Brightness setting you’ve specified in the Set-up 2 menu) that may be easier to view under high ambient lighting conditions. Your choices are as follows:
- Enable. The image on the screen corresponds to the brightness level of the actual image based on the current exposure settings, including any exposure compensation you’ve specified. Use this option when you want to be able to roughly (but not precisely) monitor the effects of your exposure settings in live view.
- During DOF Preview. The view image is displayed at standard brightness but will be adjusted to simulate your exposure settings when you press any button you may have defined as a depth-of-field preview button. This is your best option when you might want to check exposure from time to time during a shooting session. It’s the setting I use most often, because I can compose with a big, bright screen, but still stop down to the aperture that will be used and view the effects.
- Disable. The camera ignores any exposure settings and compensation and shows the image at standard brightness. This setting is useful outdoors in full sunlight when using the LCD screen because any exposure simulation causing a dimmed LCD will be difficult to interpret under high ambient lighting anyway.
Shooting Information Display
Options: Screen Info. Settings, VF Info/Toggle Settings, VF Vertical Display, Grid Display, Histogram Display, Focus Distance Display, Reset
My preference: N/A
This multi-layered entry allows you to customize what is displayed while you’re shooting. Your camera is able to display a wealth of information right in your viewfinder or on the LCD screen while you shoot. Unfortunately, having all that data presented constantly can be distracting. The six sub-settings in this entry let you specify exactly what you do or do not view while you’re taking pictures. (See Figure 11.29, left.)
- Screen Information Settings. You can choose to enable or disable any of five different types of LCD screen information, as shown in Figure 11.29, right, activated by pressing the INFO button.
- 1. Basic information
- 2. All information except live histogram
- 3. All information including live histogram
- 4. Only autofocus point/zone display
- 5. Graphic shooting information screen
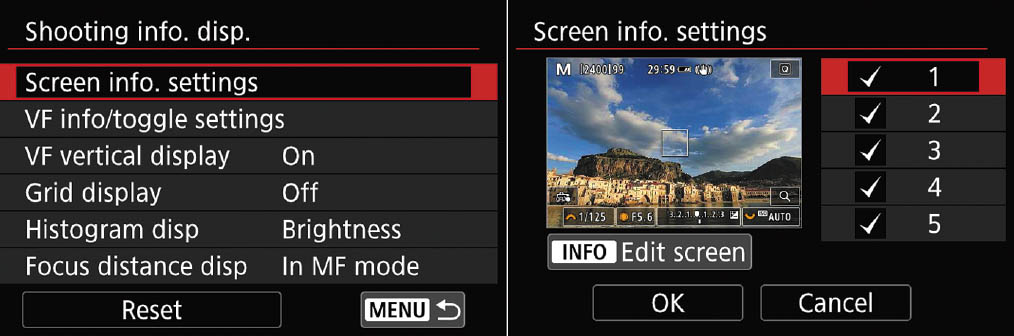
Figure 11.29 Shooting Information Display (left); Screen Information Settings (right).
- Viewfinder Information/Toggle Settings. Choose to enable/disable three different viewfinder displays, equivalent to screens 1–3 listed above.
- VF Vertical Display. Choose On, and when you rotate the camera to a vertical orientation, your viewfinder information rotates as well.
- Grid Display. You can choose 3 × 3, 6 × 4, or 3 × 3 with diagonal grids or turn grids off on the LCD screen and viewfinder.
- Histogram Display. This parameter has two options:
- • Brightness/RGB. Choose the Brightness (luminance) live histogram or RGB (all three primary colors) live histogram.
- • Display Size. Choose Large or Small.
- Focus Distance Display. This parameter has two options for displaying focus distance:
- • Display Settings. Determines when focus distance will be shown: In manual focus mode only, While focusing only, Always, or Never (disable).
- • Unit. Determines focus distance units, either Meters or Feet.
- Reset. Restores the above parameters to their default values.
Viewfinder Display Format
Options: Display 1, Display 2
My preference: Display 2
This is the first of two entries in the Shooting 8 menu. (See Figure 11.30.) Even if you don’t completely declutter your viewfinder, you can make it a little easier to view. You can choose from two viewfinder display formats. (See Figure 11.31.) Display 1 fills the viewfinder with your image, with some information located in a black bar below the frame, but the rest overlaid on the frame itself. Choose Display 2, and black bars appear at left and right sides and above the frame, and the additional information is included within those bars rather than overlaid on a somewhat smaller image frame. Pressing INFO cycles among the viewfinder information displays you’ve activated in the Shooting Information Display entry described above.

Figure 11.30 The Shooting 8 menu page.
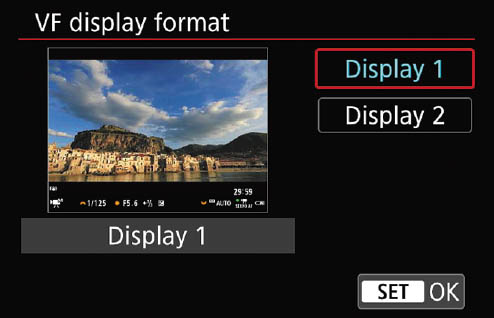
Figure 11.31 Choose from two viewfinder display formats.
Display Performance
Options: Power Saving, Smooth
My preference: Smooth
This setting determines whether the display uses more power or displays quick-moving subjects more smoothly. I always carry extra batteries and am not concerned about power-saving, so I always use the Smooth setting.