15 |
Custom Functions let you tailor the behavior of your camera in a variety of different ways, such as the function carried out when the SET button is pressed. If you don’t like the default way the camera carries out a particular task, you may be able to do something about it. You can find the Custom Functions in their own menu, color-coded orange-brown, and visible whenever you are using P, Fv, Tv, Av, M, and B exposure modes.
Custom Functions 1
- Exposure Level Increments
- ISO Speed Setting Increments
- Speed From Metering/ISO Auto
- Bracketing Auto Cancel
- Bracketing Sequence
- Number of Bracketed Shots
- Safety Shift
Custom Functions 2
- Same Exposure for New Aperture
- AE Lock Metering Mode After Focus
- Restrict Shooting Modes (R5 Only)
- Set Shutter Speed Range
- Set Aperture Range
Custom Functions 3
- Dial Direction During Tv/Av
- Control Ring Rotation
- Customize Buttons
- Customize Dials
- Clear Customized Settings
Custom Functions 4
- Add Cropping Information
- Audio Compression
- Default Erase Option
- Release Shutter Without Lens
- Retract Lens on Power Off
- Add IPTC Information
Custom Functions 5
- Clear All Custom Func. (C.Fn)
Custom Function Settings
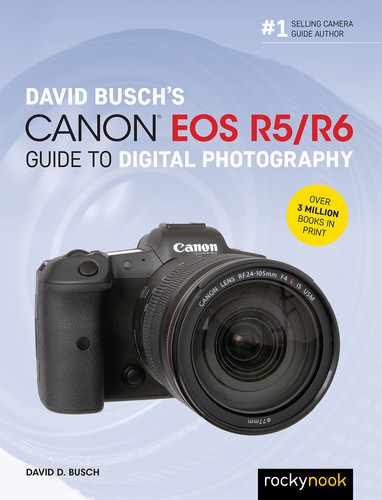
I’ve often suspected that the Custom Function category was invented by Canon in order to keep the Set-up menu from approaching a dozen pages in length. Many of these are “set-up” type adjustments that you specify once and forget about for long periods. Are Touch Control options (Set-up 4) and Control Ring Rotation (Custom Functions 3) really that much different? Your choices start out with the first of the five C.Fn menu pages, where you can set the increments for exposure and ISO, define bracketing parameters, and change a few other settings. See Figure 15.1.
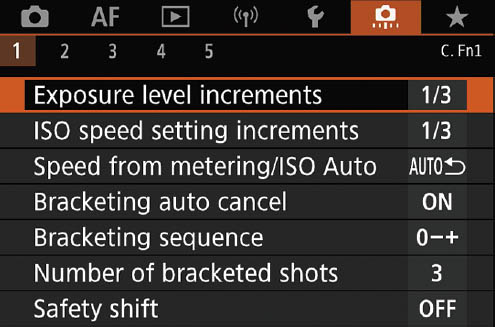
Figure 15.1 The Custom Function 1 menu.
Exposure Level Increments
Options: 1/3 stop (default), 1/2 stop
My preference: 1/3 stop
This setting tells the camera the size of the “jumps” it should use when making exposure adjustments—either one-third or one-half stop. The increment you specify here applies to f/stops, shutter speeds, EV changes, and autoexposure bracketing.
- 1/3 stop. Choose this setting when you want the finest increments between shutter speeds and/ or f/stops. For example, the camera will use shutter speeds such as 1/60th, 1/80th, 1/100th, and 1/125th second, and f/stops such as f/5.6, f/6.3, f/7.1, and f/8, giving you (and the autoexposure system) maximum control.
- 1/2 stop. Use this setting when you want larger and more noticeable changes between increments. The camera will apply shutter speeds such as 1/60th, 1/125th, 1/250th, and 1/500th second, and f/stops including f/5.6, f/6.7, f/8, f/9.5, and f/11. These coarser adjustments are useful when you want more dramatic changes between different exposures.
ISO Speed Setting Increments
Options: 1/3 stop (default), 1 stop
My preference: 1/3 stop
This setting determines the size of the “jumps” made when adjusting ISO—either one-third or one full stop. At the one-third stop setting, typical ISO values would be 100, 125, 160, 200, and so forth. Switch to the one-stop setting, and ISO values would be 100, 200, 400, 800, and so forth. The larger increment can help you leap from an ISO setting to one that’s twice (or half) as sensitive with one click.
Speed From Metering/ISO Auto
Options: Restore Auto after Metering (default), Retain Speed after Metering
My preference: Restore Auto after Metering
ISO Auto has the ability to change your ISO to a different value once it has evaluated your scene and determined an appropriate exposure. This entry determines what happens if ISO Auto changes to a different sensitivity for a particular photo when using P, Tv, Av, M, or Bulb modes.
- Restore Auto after Metering. With this setting, after the metering timer expires, the camera returns to the Auto setting.
- Retain Speed after Metering. In this case, after the metering timer expires, the new ISO setting is retained. You’d want to use this in situations where you expect to take several more exposures under the same lighting conditions and want them all to be consistent in terms of ISO.
Bracketing Auto Cancel
Options: Enable (default), Disable
My preference: Enable
When Auto Cancel is activated (the default), AEB (Auto Exposure Bracketing) and WB-BKT (White Balance Bracketing) are cancelled when you power down, change lenses, use the flash, or change memory cards; when Auto Cancel is deactivated, bracketing remains in effect until you manually turn it off or use the flash. When Auto Cancel is switched off, the AEB and WB-BKT settings will be kept even when the power switch is turned to the OFF position. The flash still cancels autoexposure bracketing, but your settings are retained.
I prefer the Enable setting, because I generally shoot a series of bracketed exposures and then turn off the camera when I am finished.
Bracketing Sequence
Options: 0-+ (default), -0+, +0-
My preference: -0+
You can define the sequence in which AEB and WB-BKT series are exposed. For exposure bracketing, you can determine whether the order is metered exposure, decreased exposure, increased exposure; decreased exposure, metered exposure, increased exposure; or increased exposure, metered exposure, decreased exposure. Or with white balance bracketing, if your bias preference is set to Blue/Amber in the WB SHIFT/BKT adjustments in the Shooting 4 menu, the white balance sequence when option 0 is selected will be current WB, more blue, more amber. If your bias preference is set to Magenta/Green, then the sequence for option 0 will be current WB, more magenta, more green. Because I shoot so many HDR images to merge in Photoshop, I prefer the -0+ sequence, which starts with less exposure, metered exposure, and plus exposure, as that is the way I bracketed back in the film days.
Here are your options:
- 0-+. Exposure sequence is metered exposure, decreased exposure, increased exposure (0,-,+). White balance sequence is current WB, more blue/more magenta (depending on how your bias is set), more amber/more green (ditto).
- -0+. The sequence is decreased exposure, metered exposure, increased exposure (-,0,+). White balance sequence is more blue/more magenta, current WB, more amber/more green.
- +0-. The sequence is increased exposure, metered exposure, decreased exposure (+,0,-). White balance sequence is more amber/more green, current WB, more blue/more magenta.
Number of Bracketed Shots
Options: 2, 3 (default), 5, 7 shots
My preference: 3
Your choices are 2, 3, 5, or 7 shots in a bracket sequence. I find that with an increment of 2/3 or one full stop, three bracketed exposures are enough that one of them will be close to optimum.
Safety Shift
Options: Disable (default), Shutter Speed/Aperture, ISO Speed
My preference: Disable
Ordinarily, both Aperture-priority and Shutter-priority modes work fine because you’ll select an f/stop or shutter speed that allows the camera to produce a correct exposure using the other type of setting (shutter speed for Av; aperture for Tv). However, when lighting conditions change, it may not be possible to select an appropriate setting with the available exposure options, and the camera will be unable to take a picture at all. (Note: for this and other similar discussions, Fv mode is considered the same as Av or Tv mode when you select either aperture or shutter speed manually.)
For example, you might be at a concert shooting the performers and, to increase your chances of getting a sharp image, you’ve selected Tv or Fv mode and a shutter speed of 1/250th second. Under bright lights and with an appropriate ISO setting, the exposure system might select f/5.6, f/4, or even f/2.8. Then, in a dramatic moment, the stage lights are dimmed significantly. An exposure of 1/250th second at f/2 is called for, but your lens has an f/2.8 maximum aperture. If you’ve used this Custom Function to allow the camera to override your own selection, it will automatically switch to 1/125th second to allow the picture to be taken at f/2.8.
Safety Shift will make similar adjustments if your scene suddenly becomes too bright; although, in practice, you’ll find that the override will be needed most often when using Tv mode. It’s easier to “run out of” f/stops, which generally range no smaller than f/22 or f/32, than to deplete the available supply of shutter speeds, which can be as brief as 1/8000th second. For example, if you’re shooting at ISO 400 in Tv mode at 1/1000th second, an extra-bright beach scene could easily call for an f/stop smaller than f/22, causing overexposure. However, Safety Shift would bump your shutter speed up to 1/2000th second with no problem.
On the other hand, if you were shooting under the same illumination in Av mode with the preferred aperture set to f/16, the camera could use 1/1000th, 1/2000th, 1/4000th, or 1/8000th second shutter speeds to retain that f/16 aperture under conditions that are 2X, 4X, 8X, or 16X as bright as normal daylight. No Safety Shift would be needed, even if the ISO were (for some unknown reason) set much higher than the ISO 400 used in this example. These are your options:
- Disable. Turn off Safety Shift. Your specified shutter speed or f/stop remains locked in, even if conditions are too bright or too dim for an appropriate exposure. Use this option if you’d prefer to have the shot taken at the shutter speed, aperture, or ISO you’ve selected under all circumstances, even if it means an improperly exposed photo. You might be able to salvage the photo in your image editor.
- Shutter Speed/Aperture. Safety Shift is activated for Tv and Av modes. The camera will adjust the preferred shutter speed or f/stop to allow a correct exposure. If you don’t mind having your camera countermand your orders, this option can save images that otherwise might be incorrectly exposed. Use when working with a shutter speed or aperture that is preferable, but not critical.
- ISO Speed. This option operates in Program AE (P) mode as well as Tv and Av modes. Think of it as an “emergency” Auto ISO option. You can manually select your preferred ISO setting, and the camera will generally stick with that, but you can adjust the ISO setting if required to produce an acceptable exposure. If you’ve selected a minimum and maximum allowable ISO range in the ISO Speed Settings entry of the Shooting 2 menu (as explained in Chapter 11), this setting will honor those limits unless your current manually selected ISO is outside those boundaries.
For example, if you’ve chosen a minimum and maximum Auto ISO range of ISO 200–800, this setting will stay within that range when adjusting ISO (even though you have Auto ISO off), but if your camera is currently manually set to ISO 100 or a value higher than ISO 800, it will go ahead and use the extra values, too.
Same Exposure for New Aperture
Options: Disable (default), ISO Speed, ISO Speed/Shutter Speed, Shutter Speed (Tv)
My preference: Disable
This entry, the first in the Custom Function 2 menu (see Figure 15.2), works in Manual exposure mode to allow you to keep the same exposure when you switch lenses, attach a teleconverter, or use a zoom lens that doesn’t have a constant maximum aperture (say, it varies from f/3.5 at the wide end to f/5.6 at the telephoto setting). In all three cases, the reason the manual exposure you’ve set changes is because your lens (or lens/converter combination) may have a maximum aperture that is different from that when you made your original setting. For example, if you switch from a lens with an f/2.8 maximum aperture to one that opens no wider than f/4, or use, say, a 1.4X tele extender that changes the effective maximum aperture by one stop, your manually set exposure may be wrong. Similarly, a lens that has a maximum aperture of f/3.5 at its widest setting may have the equivalent of just f/5.6 at its longest telephoto setting. Unless you’ve set ISO Auto for Manual mode, your exposure can differ from what you intended.
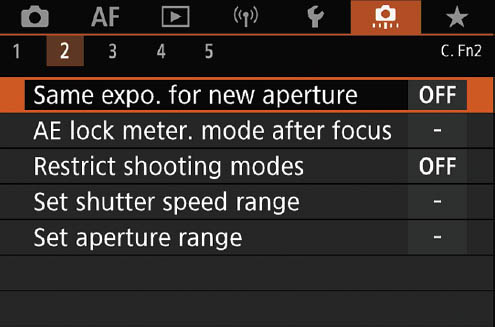
Figure 15.2 The Custom Function 2 menu. The R6 does not include the Restrict Shooting Modes entry.
This setting allows you to account for these effects and retain your desired exposure in Manual mode. Note that it does not work with macro lenses that change their effective aperture value as their focus magnification changes. Your choices are as follows:
- Disable (default). No automatic compensation is applied. If you switch lenses, use a tele extender, or have a variable aperture lens, you may need to manually adjust your exposure to allow for the “slower” lens speed. This setting displays as OFF in the Custom Function 2 menu.
- ISO Speed. Choose this setting, and the camera will set a higher ISO speed to compensate so your exposure remains the same. The ISO sensitivity will be adjusted within the boundaries you’ve set for the Range for Stills option in the ISO Speed Settings entry of the Shooting 2 menu, as explained in Chapter 11.
- ISO Speed/Shutter Speed. In this case, a higher ISO speed will be set first. If the upper boundaries specified in Range for Stills is exceeded, the camera will then change the shutter speed within the range specified for Set Shutter Speed Range on the Custom Functions 2 page.
- Shutter Speed (Tv). The camera will compensate by using a slower shutter speed to keep the same exposure you set manually. The Set Shutter Speed Range boundaries will be observed, so this setting does not guarantee that your desired exposure will be achieved.
Which should you select? I generally don’t use this setting at all, partially because I own very few lenses with variable maximum apertures, and, when I change lenses or add a teleconverter, I am (usually) smart enough to know I need to recalculate my manual exposure. You probably do the same. The most common scenario for needing this feature is when you want to use a lens that does have an aperture that changes when you zoom. It’s not only cheap lenses that change their aperture: Canon’s two EF 100-400mm zooms have an effective aperture of f/4.5 at 100mm, and f/5.6 at 400mm. There are several good lenses, in the 70-300mm range (including one L lens) with f/4-5.6 variable apertures. If you do decide to implement this feature, decide which is most important to you: constant ISO speed or shutter speed. For sports, especially in low-light situations, the ISO Speed/Shutter Speed option is likely to be your best bet.
AE Lock Metering Mode After Focus
Options: Lock: Evaluative (default), Partial, Spot, Center-weighted Average metering (Any or all)
My preference: N/A
If you find yourself frequently using the * button to lock exposure, you may find this entry handy. You can order the camera to automatically lock the exposure as soon as autofocus is achieved in One-Shot AF mode by pressing the shutter release halfway. There is no need to press the * button; simply keep the shutter release depressed halfway until you press it all the way down to take a picture, or release it. Highlight any of the four metering mode options (Evaluative, Partial, Spot, Center-weighted Averaging) and press SET to enable exposure lock for that mode. A check mark appears above the metering mode, and you can enable the feature for any, all, or none. (See Figure 15.3.) The exposure lock does not apply to Servo mode.
Figure 15.3 Lock exposure after autofocusing for any of the four metering modes.
Restrict Shooting Modes (R5 Only)
Options: Auto+, Fv, P, Tv, Av, M, Bulb, C1, C2, C3 (Enable or disable)
My preference: N/A
The R5 uses the MODE button and top-panel LCD screen to change shooting modes, rather than a Mode Dial (like the R6). If there are certain modes that you do not use very often, you can exclude them here. When you access the screen shown in Figure 15.4 and select Enable, the choices shown appear. Screen intelligent auto (A+) cannot be disabled. You can press the Q button, then rotate the QCD-1 to highlight a mode you want to disable. Press SET to add or remove a check mark. You cannot clear all nine modes (leaving you with no choices). Note: The restrictions you set here are not registered to the C1, C2, or C3 user slots when using Program mode.

Figure 15.4 You can restrict shooting modes on the R5.
Set Shutter Speed Range
Options: Highest speed: 1/8000th sec. to 15 sec.; Lowest speed: 30 sec. to 1/4000th sec.
My preference: N/A
There are times when you want to limit shutter speed range when using Tv or M exposure modes, or the value chosen automatically by the camera in P and Av modes. For example, if you’re shooting motor sports and want to maintain a bit of blur in the vehicle tires (to avoid that “frozen in time” look), you might want to lock out any shutter speeds higher than 1/500th second. In that case, you might not mind if your aperture changes when the upper limit is reached, or you might let Auto ISO kick in lower sensitivity a notch or two to allow optimum exposure. Going the other way, you might want to avoid shutter speeds lower than, say 1/60th second because you know that’s the slowest speed at which a hand-held image is going to be acceptably sharp. This setting lets you specify a “top” shutter speed from 1/8000th second to 15 seconds, and a “bottom” speed from 30 seconds to 1/4000th second, depending on your creative needs.
Set Aperture Range
Options: Minimum Aperture (smallest lens opening): f/91 to f/1.4; Maximum Aperture (largest lens opening): f/1.0 to f/64
My preference: N/A
This entry allows you to specify an aperture range. When using Av, M, and Bulb exposure modes, you can set the aperture manually within the range you specify here. In P and Tv, the aperture will be set automatically within this range when shooting stills. Minimum apertures (the smallest f/stops) can be specified for f/91 to f/1.4, and a maximum aperture of f/1.0 to f/64. These “limits” all depend on the maximum and minimum apertures of your lenses, of course. Use this entry when you want to limit the available f/stops, say, to preserve selective focus or, going the other direction, to maximize depth-of-field (even if it costs you some sharpness because of diffraction). I explained diffraction in Chapter 11.
Dial Direction During Tv/Av
Options: Normal (-+) (default), Reverse direction(+-)
My preference: Normal
This setting, the first in the Custom Function 3 menu (see Figure 15.5), reverses the result when rotating the Quick Control Dial 1 and Main Dial when using Shutter-priority or Aperture-priority (Tv and Av). That is, rotating the Main Dial to the right will decrease the shutter speed rather than increase it; f/stops will become larger rather than smaller. Use this if you find the default rotation scheme in Tv and Av modes are not to your liking. Activating this option also reverses the dial direction in Manual exposure mode. In other shooting modes, only the Main Dial’s direction will be reversed.
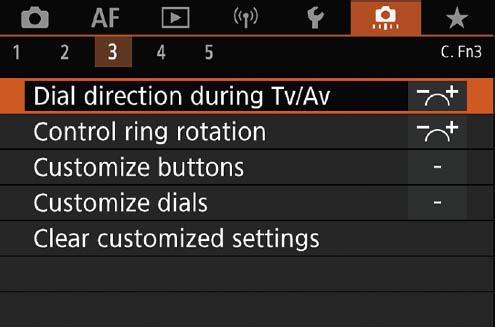
Figure 15.5 The Custom Function 3 menu.
Here are your options:
- Normal. The Main Dial and Quick Control Dial 1 change shutter speed and aperture normally.
- Reverse direction. The dials adjust shutter speed and aperture in the reverse direction when rotated.
Control Ring Rotation
Options: Normal (-+) (default), Reverse direction(+-)
My preference: Normal
This setting reverses the rotational direction of the control ring on RF-mount lenses and the control ring mount adapter, as well.
Customize Buttons
Options: Redefine 10 buttons
My preference: N/A
If you’re eager to totally confuse any poor soul who is not equipped to deal with a custom-configured camera (or, perhaps, even yourself), Canon allows you to redefine the behavior of no less than 10 different buttons (many of them in different configurations for still and movie modes) in interesting, and potentially hilarious ways. Just highlight any of the options (some are shown in Figure 15.6), press SET to view the functions you can assign, and make your choice. You’ll need to scroll down using the Multi-controller joystick or QCD-1 to view them all.
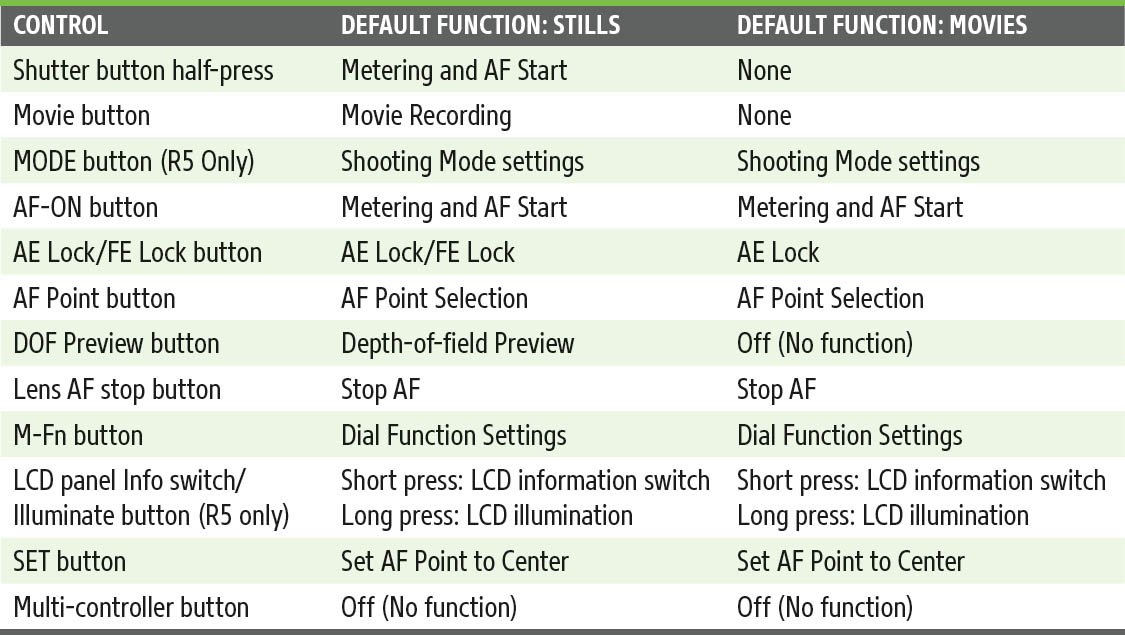
If you see the INFO icon at bottom left when viewing the available functions, there are even more decisions to make. You can truly manipulate your camera to work in a way that’s fastest and most efficient for you. There are dozens of combinations of control possibilities, spelled out in a huge matrix+legend description starting on page 823 (R5) or 776 (R6) of your factory manual. Those huge tables and explanations would take up half this chapter, so I won’t duplicate that information here. The default values are shown in Table 15.1.
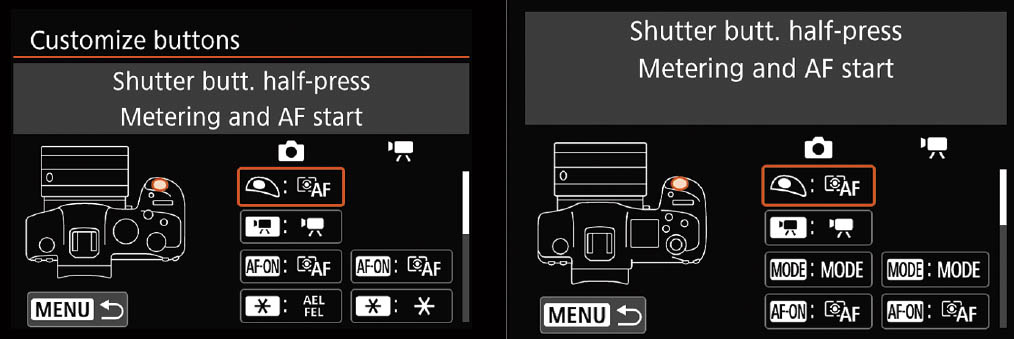
Figure 15.6 Scroll down the list to view all of the assignable buttons for the R6 (left) or R5 (right).
TABLE 15.1 Default Button Assignments
The customizing process will be easier if I lead you through a typical session, using the M-Fn button as an example. Its default behavior is Dial Functions: if you press the M-Fn button (without first pressing the AF Point button), a scrollable list of functions like the one shown in Figure 15.7 appears. Rotating the QCD-1 moves the highlighting in the bottom row from ISO to Drive Mode to Focus Mode to White Balance to Flash Exposure Compensation. Once a function is highlighted, you can rotate the Main Dial to adjust the settings for the highlighted function. Here’s how to modify that behavior:
- 1. Select M-Fn button. In the Customize buttons screen seen at left in Figure 15.8, use the Multi-controller joystick to highlight M-Fn in the left column, under the camera icon. Note that you can also select M-Fn in the right (movie camera) column to assign a different behavior in Movie mode.
- 2. Press SET. The screen shown in Figure 15.8, center, appears.
Figure 15.7 Dial Functions options.

Figure 15.8 Highlight a button (left), choose function (center), and specify additional options, if available (right).
- 3. Choose function. In this example, Dial Func is highlighted, as I’m going to show you how to modify how Dial Functions behave. However, if you wanted to substitute a different behavior, you could select the following:
Top Row:
AF Stop
AE Lock/AF Stop
AF Point Selection
Set AF Point to Center
Bottom Row:
Direct AF Method Selection
One-Shot AF ↔ Servo (toggle)
Touch & Drag AF
Eye Detection
Peaking
Scrolling down, you’ll find an additional 33 functions you can assign to the M-Fn button.
- 4. Press INFO. Many of the available functions are simply turned on and off. Others have additional options, indicated by an INFO: Detail Set. option seen at lower left in Figure 15.8, center. Dial Functions is one of those.
- 5. View Options. For this example in modifying the Dial Functions setting, you’ll see a screen like the one shown at right in Figure 15.8. Other functions will have a different array of options.
- 6. Select Options. Nine items are available. You can highlight up to five of them and press SET for each to enable that option for the Dial Functions behavior. You can substitute Exposure Compensation, AF Method, Metering Mode, or Picture Style for any of the five default behaviors.
- 7. Confirm. Press INFO when finished and to view a screen showing the sequence you’ve selected. Press INFO to exit the setup screens.
- 8. Exit. Press SET to exit to the Customize Buttons screen.
Other buttons are customizable with their own behaviors, and not all are assignable to every control. For example, Shutter button half-press can invoke Metering and AF Start, Metering Start (only), or AE Lock (while button is pressed), and no other functions. The best way to learn what each button can do is to work your way through the Customize Buttons screen.
Customize Dials
Options: Redefine Main Dial, QCD-2, QCD-1, and Control Ring
My preference: N/A
Each of these dials can also be redefined with a customized behavior, but, fortunately, the possibilities are more limited. All these are a matter of personal taste, and don’t need to be changed to “improve” anything. Your choices are as follows:
- Redefine Main Dial. By default, the Main Dial adjusts the shutter speed in Tv and Manual exposure modes, and in Fv mode if you haven’t set the camera to adjust shutter speed automatically. The dial’s behavior can be changed only for Manual exposure mode. You can set it to adjust shutter speed (the default), aperture, or disable it so that the dial does nothing in Manual exposure mode.
- Quick Control Dial 2 (QCD-2). By default, the QCD-2 sets ISO speed. You can redefine it to shutter speed in M mode, aperture in M mode, Exposure compensation, Direct AF point selection, Select AF method, Picture Style, White Balance, Select Color Temperature, or Off (No function). Note that your customization does not apply to Fv mode; the dial will continue to adjust ISO.
- Quick Control Dial 1 (QCD-1). By default, the QCD-1 adjusts the aperture in Av and Manual exposure modes, and in Fv mode if you haven’t set the camera to adjust aperture automatically. The dial’s behavior can be changed only for Manual exposure mode. You can set it to adjust aperture (the default), switch it to change the shutter speed, or disable it so that the dial does nothing in Manual exposure mode.
- Control Ring. The Control Ring on the lens or mount adapter has a little more flexibility. By default, you can use it to change the aperture of the lens by rotating it as you hold the shutter release (or other Metering Start button you may have defined). In effect, this gives you an old-school lens aperture adjustment ring, and is very convenient if you want to adjust the f/stop while cradling the lens in your left hand. (That may be more comfortable than using a thumb on the QCD-1 for some users.)
If you prefer, the Control Ring can be defined to set aperture, shutter speed, ISO, or exposure compensation when rotated, and you can choose to require holding down the shutter release, or skip so that any of these adjustments can be performed just by spinning the dial, with no need to hold a button down. The no-hold options are faster, but make it easier for you to accidentally adjust a setting when you grip the Control Ring instead of the Focus Ring by mistake. Like the other two, the Control Ring can also be set to Off to disable it.
Clear Customized Settings
Options: Clear Customize Buttons and Customize Dials settings
My preference: N/A
This entry can be used to erase all your customization of controls, should you need to do that. Note that the Clear All Custom Functions entry (the only one in the Custom Function 5 menu) does not reset these settings (fortunately); you have to do it here.
Add Cropping Information
Options: Off (default), Aspect ratios 6:6, 3:4, 4:5, 6:7, 10:12, 5:7
My preference: Varies depending on print size
This is the first setting in the Custom Functions 4 menu. (See Figure 15.9.) If you want to use image crops other than the default 3:2 aspect ratio in live view, but don’t want to lock the settings down in stone, this Custom Function may help you. It allows you to specify one of the optional available crops, such that vertical lines will appear on the live view image to delineate that cropping—but the image you take will be saved in its full-frame form, without the actual crop being applied. However, the cropping information is embedded in the image file and can be retrieved by compatible software (including Canon’s Digital Photo Pro) and used to apply the crop in post-processing.

Figure 15.9 The Custom Function 4 menu.
If you’re saying, “Wha?” about now, I can clarify. One of the coolest things about a mirrorless camera’s live view is that it mimics the ground glass screen of the medium format (say, 120/220 roll film models) or large format (4 × 5, 5 × 7, or larger-sheet film cameras) that many of us grew up with (although our numbers are dwindling rapidly). That is, as with a medium-format or large-format film camera, the actual film/sensor plane image is there for you to view (although, not necessarily reversed left to right or reversed and inverted as in the good old days).
Canon gives you a variety of optional cropping proportions so you can compose and expose your image just as if you were using a camera from those thrilling days of yesteryear—or simply want to use an alternate aspect ratio for creative effect. Your choices include the 6:6 and 6:7 proportions used to create 6cm × 6cm and 6cm × 7cm film images (think Hasselblad or Pentax 67); 4:5 and 5:7 ratios used with 4 × 5–inch, 8 × 10–inch, and 5 × 7–inch sheet film cameras; plus other formats as well. These include 3:4 and 10:12 (the latter perfect for 20 × 24–inch wall prints).
Of course, these days, cameras have enough resolution that you can easily crop the full-frame image to any proportions you like, but many photographers still enjoy composing within a given aspect ratio. This feature can be used only when the Cropping/Aspect Ratio in the Shooting 1 menu is set to Full Frame.
Audio Compression
Options: ON: Enable, OFF: Disable
My preference: OFF: Disable
Specifies the amount of audio compression when recording video. I like to set this option to Disable to achieve higher audio quality, even though the file sizes are somewhat larger. Even if Disable is set, audio is compressed in Scene Intelligent Auto (A+) mode when Movie Recording Quality is set to FHD: 29.97p IPB/25p Low Quality.
Default Erase Option
Options: Cancel Selected (default), Erase Selected/Erase RAW+JPEG Selected, Erase RAW Selected, Erase JPEG Selected
My preference: Erase/Erase RAW+JPEG Selected
Specify what happens during image review and playback when you press the Trash button and the Erase Image screen appears. This entry determines which choice is the default. You’ll want to choose the option you use most often, either for convenience or to avoid accidentally erasing an image you mean to keep.
- Cancel Selected. Pressing the SET button backs you out of the screen with no harm done. You’d choose this if you find you accidentally press Trash from time to time and want to avoid losing your shot.
- Erase Selected/Erase RAW+JPEG Selected. With this option enabled, when you press SET, the current image will be deleted. If you’re shooting RAW+JPEG, both versions will be removed. It’s your choice, but I prefer speed over caution, so I use this setting most of the time.
- Erase RAW Selected. Only the RAW file will be deleted; if you shot both formats, the JPEG file is retained. This choice and the one below provide a safety net.
- Erase JPEG Selected. Only the JPEG/HEIF file will be deleted; if you shot both formats, the RAW file is retained. When I am shooting RAW+JPEG or RAW+HEIF but intend to process mostly JPEG or HEIF files (as at an event where I will be selecting large numbers of images and don’t plan to do much post-processing), I use this option so I can quickly delete the non-RAW version of the file. Back home, I can delete any RAW file that doesn’t have a matching JPEG or HEIF file, but if I’ve changed my mind, I still have the RAW version as a backup.
Release Shutter without Lens
Options: Enable, Disable (default)
My preference: Enable
Ordinarily, you don’t want the camera to be capable of actuating the shutter when no lens is attached. However, if you are using optics that the R5 or R6 does not recognize as a lens—such as a microscope, telescope, or a lens mounted on a bellows, you do want to take a photo using your manual exposure controls (ISO, shutter speed, and whatever aperture your device offers).
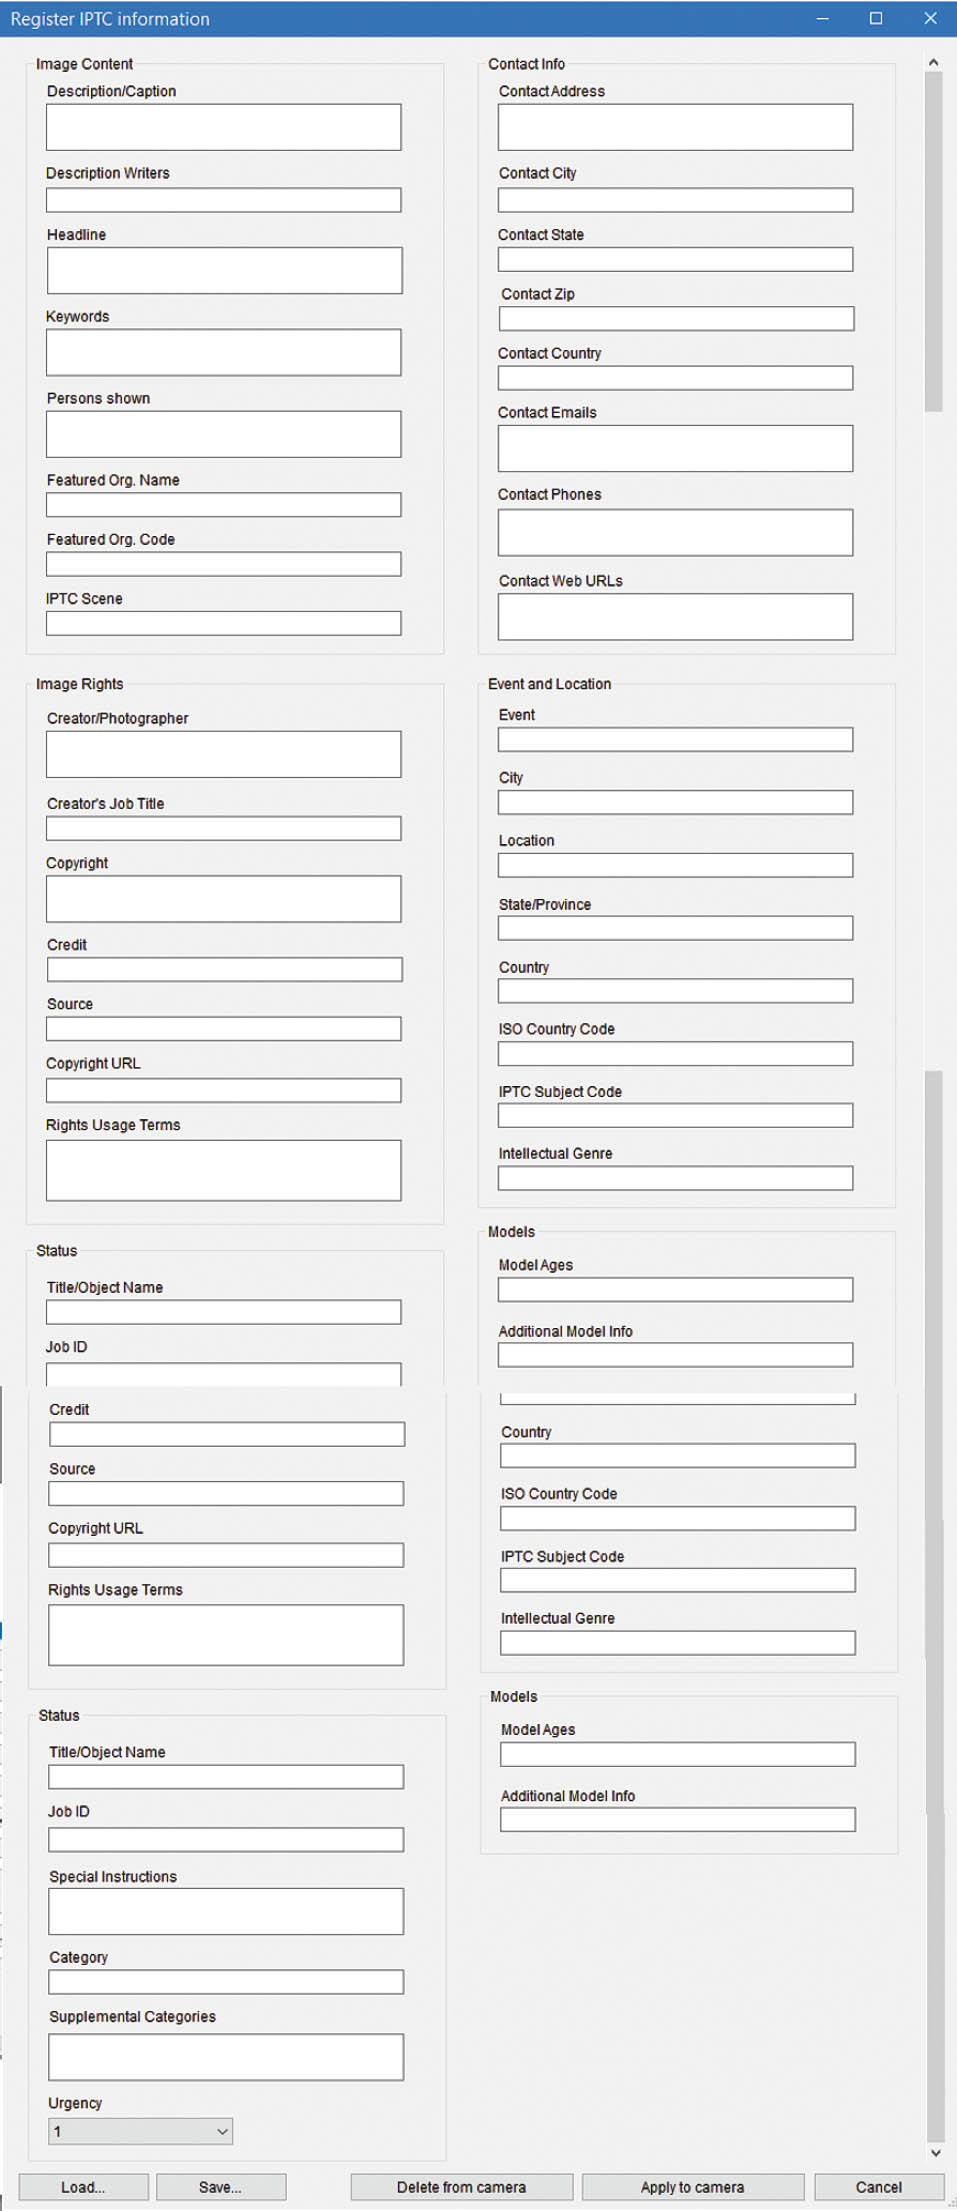
Figure 15.10 IPTC data fields.
Retract Lens on Power Off
Options: Enable (default), Disable
My preference: Enable
Some lenses that focus using a gear mechanism (such as the EF40mm f/2.8 STM) can retract when the camera is turned off. The retracted lens is smaller and its reduced surface area is better protected against bumps, so I usually leave this setting enabled.
Add IPTC Information
Options: Disable (default), Enable
My preference: Disable
This entry enables you to enable or disable embedding of IPTC (International Press Telecommunications Council) metadata in your image files. The IPTC standard is the most widely used standard used by news and photo agencies, photojournalists, libraries, and museums. You can load, edit, save, and register specifications using the EOS Utility. Connect your camera to your computer, launch the utility, and navigate to the data entry page shown in Figure 15.10.
My Menu
Options: Add My Menu Tab, Delete All My Menu Tabs, Delete All Items, Menu Display
My preference: N/A
Your camera has a great feature that allows you to define your own menu with multiple tabs, each with just the items listed that you want. Remember that the camera always returns to the last menu and menu entry accessed when you press the MENU button. So, you can set up My Menu to include just the items you want, and jump to those items instantly by pressing the MENU button. Or, you can set your camera so that My Menu appears when the MENU button has been pressed, regardless of what other menu entry you accessed last.
To create your own My Menu, you have to register the menu items you want to include. When no items have been registered, the initial My Menu tab looks like the one at left in Figure 15.11. Just follow these steps:
- 1. Press the MENU button and use the Main Dial or directional controls to select the My Menu tab. When you first begin, the personalized menu will be empty except for the My Menu settings shown at left in the figure.
- 2. Rotate the Quick Control Dial 1 to select Add My Menu Tab, then press the SET button. Highlight OK in the screen that appears, and press SET once again.
- 3. The Configure choice will appear. Press SET to view a list of options. Choose Select Items to Register, located at the top of the options screen. (See Figure 15.11, right.)
- 4. Use the Quick Control Dial 1 to scroll down through the continuous list of menu entries to find one you would like to add. Press SET.
- 5. Confirm your choice by selecting OK in the next screen and pressing SET again.
- 6. Continue to select more entries for your My Menu tab. You can add up to six for each tab. If you try to add a seventh, you’ll be told that you cannot register more items for the current tab.
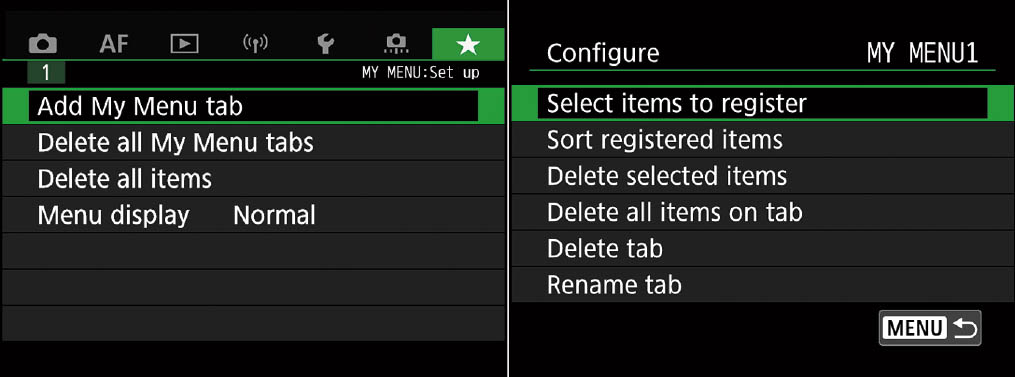
Figure 15.11 Initial My Menu screen (left); Configure tab screen (right).
- 7. When you’re finished, press the MENU button twice to return to the My Menu screen to see your customized menu, which might look like my example in Figure 15.12.
The Configure choice now appears at the bottom of the My Menu tab you have just created (and will be repeated at the bottom of any additional My Menu tabs you add). If you want to modify this tab (or any tabs created later), just select Configure and use the options that appear in the screen shown in Figure 15.11, right, shown earlier.

Figure 15.12 Typical user-created My Menu tab.
Those items include:
- Select items to register. Use this entry to add additional items to My Menu. As a tab fills up, a new tab will be created, and will be assigned names, like MY MENU1, MY MENU2, etc. The original MY MENU: Set-up tab will move to the farthest position in the tab lineup. You can have a maximum of five new tabs, plus the sixth Set-up tab.
- Sort registered items. Choose this entry to reorder the items in each My Menu tab. Select the menu item and press the SET button. Rotate the Quick Control Dial 1 to move the item up and down within the menu list. When you’ve placed it where you’d like it, press the MENU button to lock in your selection and return to the previous screen. When finished, press MENU again to exit.
- Delete selected items, Delete all items on tab, Delete tab. Use these to remove an individual menu item or all menu items on a tab, or to delete the entire tab itself.
- Rename tab. You’re not stuck with the MY MENU1, MY MENU2 . . . monikers. This entry allows you to apply a new name for a tab with up to 16 characters. For example, if you created customized Shooting or Autofocus settings, you could name them My Shooting and My Autofocus, respectively. As with any of the text-entry screens, this is one example of when the touch screen is highly preferable.
The Configure entry operates only on the currently selected tab. However, once you’ve created your first tab, a new Set Up tab appears automatically. It looks like Figure 15.13, left, and contains the following options:
- Add My Menu Tab. Use this to create a new, blank tab, which will be assigned the next available number.
- Delete All My Menu Tabs. Removes your existing tabs and all the items in them so you can start fresh.
- Delete All Items. This deletes all the registered items on all the tabs you have added. The options in the MY MENU: Set-Up tab remain. When you delete all items, each will still contain a Configure choice, which allows you to register more entries. The tabs themselves are not removed.
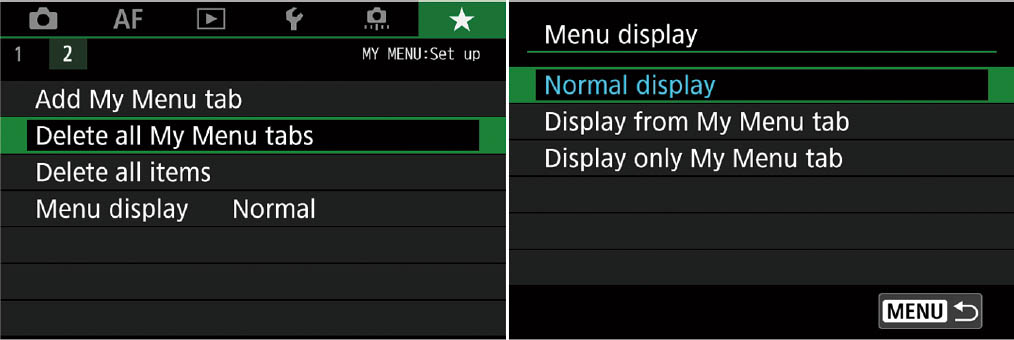
Figure 15.13 Add or delete tabs (left) and customize My Menu display (right).
- Menu Display. This determines which menu screen appears first when the MENU button is pressed. You can choose:
- • Normal display (default). Shows the most recently displayed menu tab from the Shooting, AF, Playback, Set-up, Custom Settings, and My Menu choices. You’d want this if you prefer to jump back to whichever menu you were working with recently.
- • Display from My Menu tab. Shows the My Menu tab only. Use this if you want to bypass the conventional menus and make your menu choices only from your custom My Menu tabs. The other menu tabs are still shown and can be selected.
- • Display only My Menu tab. Only the My Menu tabs are available. The others are hidden. Use this only if you do not need to use the conventional menus as you work. You can return to this entry and restore Normal display at any time.
Clear All Custom Func. (C.Fn)
Options: Clear
My preference: N/A
This is the only entry on the Custom Functions 5 page (not shown in a figure). Select this entry and choose Cancel (if you chicken out) or OK to return all your Custom Functions to their default values. But don’t panic—your matrix of customized buttons and dials are retained. You must reset them using their specific entries, described earlier.