04Focus, AF-Area, and Release Modes

Sunrise at Hunting Island © Brenda Young
The Focus, AF-area, and Release modes are active settings you’ll deal with each time you use your camera. Unlike adjusting settings in the menus, which you’ll do from time to time, you’ll use these modes every time you create a photo or movie. These critical functions affect how and where the camera focuses on your subject.
To take pictures and make movies, you need to be very familiar with these settings, so this is an important chapter for your mastery of the Nikon Z6 II or Z7 II. Grab your camera and let’s get started!
Autofocus Types
A mirrorless Nikon does not have a separate autofocus (AF) module. Instead, the sensor itself is used for autofocus. The two cameras have a different number of AF points–273 versus 493—and they cover the majority of the sensor surface in special rows. In figure 4.0 you’ll see an approximation of each camera’s AF point array.

Figure 4.0: The Nikon Z6 II’s 273 AF points (left) and the Z7 II’s 493 AF points (right)
Here are the two types of autofocus built into the sensor:
- Phase detection autofocus (PDAF): The Z6 II and Z7 II imaging sensors (figure 4.0) provide focal plane phase-detection autofocus, with the Z6 II having 273 AF points (figure 4.0, left image) and the Z7 II having 493 AF points (figure 4.0, right image). As you can see, both cameras have AF point arrays covering the majority of the sensor surface, giving you a wide choice of which area of your subject initiates autofocus. You can select which AF point(s) to use with the Sub-selector joystick or Multi selector pad. Each of these AF points is composed of a number of photosites (pixels); therefore, thousands of pixels are involved in autofocus. The photosites in the AF point array are dual-purpose. All the rows of the sensor can capture image data to make your photograph; however, a limited number of those same rows can also compare areas of the subject to provide autofocus. Phase-detection AF is a very fast type of autofocus.
- Contrast detection autofocus (CDAF): The camera’s imaging sensor also provides focal plane contrast-detection AF, which uses pixel-level contrast detection. The entire surface of the imaging sensor can be used to detect contrast between light and dark boundaries to provide autofocus. This is a somewhat slower form of autofocus, but it is extremely accurate because it is done at the pixel level. This form of autofocus appears to be used only when you have selected Pinpoint AF (page 276), although, I have read in Nikon literature that the camera may also “top off” the phase-detection autofocus with a little contrast-detection, to make the AF very precise.
Shutter-Release Button versus AF-ON Button for Autofocus
In this chapter, I will often mention pressing the Shutter-release button halfway down to start autofocus. However, for those who like to use back-button focus, the AF-ON button is available. When I mention pressing the Shutter-release button for autofocus, please keep in mind that you can substitute the AF-ON button. The only difference in how the two work for initiating autofocus is that you press the Shutter-release button halfway down and you press the AF-ON button fully down.
If you prefer to disable the Shutter-release button for autofocus, simply set Custom Setting Menu > a Autofocus > a6 AF activation to AF-ON only (page 384). Then you can use the AF-ON button for back-button focus and the Shutter-release button will release the shutter but not initiate autofocus. If you leave the camera set to the default of Shutter/AF-ON in Custom setting a6, both the Shutter-release button and the AF-ON button will initiate autofocus. Use AF-ON only for back-button focus.
Custom Settings for Autofocus
The camera has 12 configurable Custom settings, a1–a12, for autofocus. We will examine each of those Custom settings in the chapter titled Custom Setting Menu under the a Autofocus subheading (page 409). You may want to read over each of them after reading this chapter.
Three Important Mode Groups
There are three specific mode groups that you should fully understand: Autofocus modes, AF-area modes, and Release modes.
Many people get these modes confused and incorrectly apply functions from one mode to a completely different mode. It is a bit confusing at times, but if you read this carefully and try to wrap your brain around the different functionalities provided, you’ll have much greater control of your camera later.
First let’s examine a list of settings in each of the three mode groups, and then we’ll look more closely at each setting.
Focus modes
- Single AF (AF-S)
- Continuous AF (AF-C)
- Full-time AF (AF-F) [Movie mode only]
- Manual focus (MF)
AF-area modes
- Pinpoint AF (PIN) [Photo mode only]
- Single-point AF
- Dynamic-area AF
- Wide-area AF (S)
- Wide-area AF (L)
- Wide-area AF (L-people)
- Wide-area AF (L-animals)
- Auto-area AF
- Auto-area AF (people)
- Auto-area AF (animals)
Release modes
- Single frame (S)
- Continuous [Movie mode only]
- Continuous L (L) [Photo mode only]
- Continuous H (H) [Photo mode only]
- Continuous H (extended) (H*) [Photo mode only]
- Self-timer [Photo mode only]
What’s the difference between these mode groups? Think of them like this: The Focus modes control how the camera focuses, the AF-area modes control where it focuses, and the Release modes control when focus happens and how often a picture is taken.
With the controls built into the camera’s body, you’ll be able to select whether it uses just one or many of its AF points to find your subject. You’ll also select whether the camera simply locks focus on a static subject or whether it continuously seeks a new focus when your subject is moving, and how fast (in frames per second) it captures the images.
Settings Recommendation: If you are having trouble remembering what all these modes do—join the club! I’ve written many books about Nikon cameras and I still sometimes forget what each mode does. I often refer back to my own books to remember all the details. In addition to the printed book, I have an e-book version on my iPad and iPhone.
You’ll become familiar with the modes you use most often, and that is usually sufficient. Try to associate the type of mode with its name, and that will make it easier. Learn the difference between a Focus mode (focus how), an AF-area mode (focus where), and a Release mode (focus when).
Accessing the Individual Mode Groups
Let’s examine how to access the individual Focus and AF-area modes and afterward we will discuss what each mode does. The Focus modes and AF-area modes are accessible in these three ways:
- From the i Menu
- By assigning the Focus mode/AF-area mode function to one of the camera’s buttons
- From the Photo and Movie Shooting Menus
The Release modes are available only by pressing the Release mode button. Let’s examine each access method.
Access from the i Menu
First, let’s see how to access the modes from the i Menu, then we will consider the other two methods for Focus and AF-area mode access.

Figure 4.1Aa: The i button opens the i Menu
Use the following steps to access the Focus and AF-area modes from the i Menu (with lens cap left on for maximum contrast while examining control locations).
- 1.Press the i button to open the i Menu (figure 4.1Aa). Now, let’s locate the Focus and AF-area modes on the i Menu (figure 4.1Ab).

Figure 4.1Ab: Accessing the Focus and AF-area modes
- 2.You will find the Focus mode entry point on the bottom row, last location on the right (figure 4.1Ab, image 1). Press OK to enter the Focus mode secondary screen. Choose one of the available Focus modes, such as AF-S, then press or touch OK to select the mode (figure 4.1Ab, image 2). See **Note.
- 3.You will find the AF-area mode entry point on the top row, last location on the right (figure 4.1Ab, image 3). Press OK to enter the AF-area mode secondary screen. Choose one of the available AF-area modes, such as Single-point AF, then press or touch OK to select the mode (figure 4.1Ab, image 4). See **Note.
**Note: When using the screens shown in images 1 and 3 (figure 4.1Ab), alternatively you can rotate either of the Command dials to Set a mode, instead of pressing OK to open the secondary screen and choosing the mode there.
Next, let’s consider how to assign Focus and AF-area modes to a button, and then use the button to access the modes.
Access with an Assigned Button
First, let’s assign the Focus and AF-area modes to a particular camera button and then we’ll see how to use the button and dials to change modes.
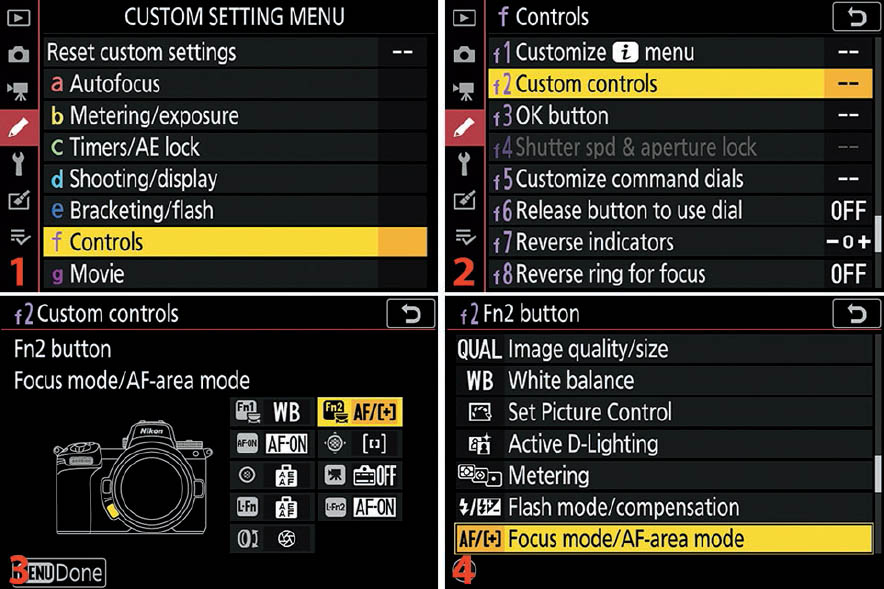
Figure 4.1B: Assigning the Focus and AF-area modes to a camera button
Use the following steps to assign Focus mode/AF-area mode to one of the camera’s buttons:
- 1.Choose f Controls (figure 4.1B, image 1).
- 2.Select f2 Custom controls (figure 4.1B, image 2).
- 3.Pick a camera button to assign (figure 4.1B, image 3). The Fn2 button is the factory default for the Focus/AF-area mode selection, but you may prefer another button. Leave the Fn2 button assigned as it was and skip the next step or find a different button you want to use and press OK to open it.
- 4.Highlight AF/[+] Focus mode/AF-area mode (if available) and press OK to finish (figure 4.1B, image 4). AF/[+] Focus mode/AF-area mode cannot be assigned to all buttons. It will be in the assignment list for any buttons to which it can be assigned (such as seen in image 4).
Now that you have assigned Focus mode/AF-area mode to one of the buttons, you can use that button at any time to access the Focus and AF-area modes.
Now let’s see how to use the Fn2 button we just assigned to access the Focus and AF-area modes.

Figure 4.1C: Accessing the Focus modes with an assigned button
Use the following steps to choose a Focus mode with external camera controls:
- 1.Press and hold the Fn2 button on the front of the camera, or whatever button you assigned under figure 4.1B, step 3 (figure 4.1C, image 1).
- 2.Turn the rear Main command dial on the back of the camera (figure 4.1C, image 2). The Monitor or EVF will display Focus mode symbols at the top (figure 4.1C, image 3, red arrow). The Focus mode will change as you rotate the rear Main command dial. When the Focus mode you want to use is displayed on the screen, stop turning the Main command dial and release the Fn2 button.
Next, let’s see how to access and change the AF-area modes.
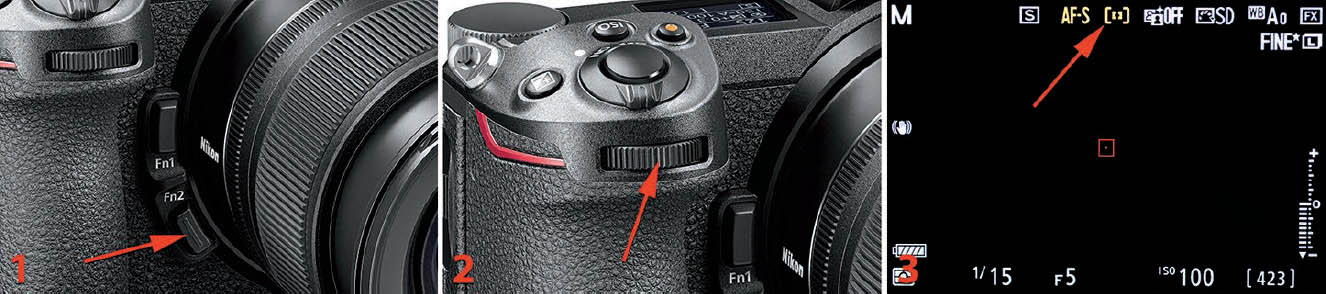
Figure 4.1D: Accessing the AF-area modes with an assigned button
Use the following steps to choose a Focus mode with external camera controls:
- 1.Press and hold the Fn2 button on the front of the camera, or whatever button you assigned under figure 4.1B, step 3 (figure 4.1D, image 1).
- 2.Turn the Sub-command dial on the camera’s front handgrip (figure 4.1D, image 2). The Monitor and EVF will display AF-area mode symbols at the top (figure 4.1D, image 3, red arrow). The AF-area mode will change as you rotate the front Sub-command dial. When the AF-area mode you want to use is displayed on the screen, stop turning the Sub-command dial and release the Fn2 button.
Note: For more information on making button assignments in general, see Custom Setting f2: Custom Controls on page 436.
Next, let’s consider how to access the Focus and AF-area modes from the Photo Shooting Menu and Movie Shooting Menu.
Access from the Photo and Movie Shooting Menus
Choosing a Focus or AF-area mode from the camera’s main menu system is very easy; however, it takes a little longer since you have to learn where to find the setting. Let’s see how it works.
Selecting a Mode from the Photo Shooting Menu
Use the following steps to choose a Focus and AF-Area mode from the camera’s Photo Shooting Menu.
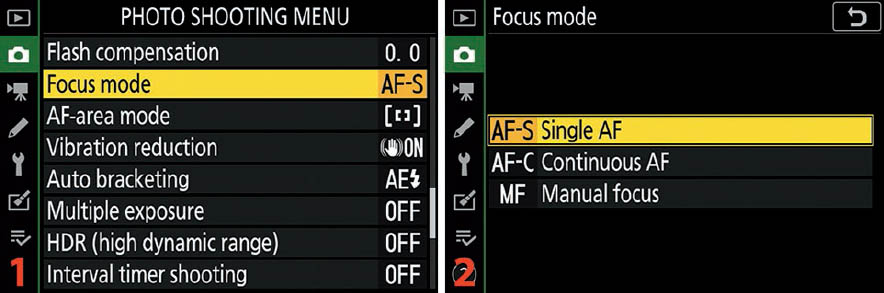
Figure 4.1E: Choosing a Focus mode from the Photo Shooting Menu (still photography)
- 1.Choose Focus mode (figure 4.1E, image 1).
- 2.Select a Focus mode and press OK or tap the mode (figure 4.1E, image 2).
Next let’s see how to select an AF-area mode from the Photo Shooting Menu.

Figure 4.1F: Choosing an AF-area mode from the Photo Shooting Menu (still photography)
- 1.Choose AF-area mode (figure 4.1F, image 1).
- 2.Select an AF-area mode and press OK, or tap the mode (figure 4.1F, image 2). Pinpoint AF AF-area mode is available only when you are using Single AF (AF-S) Focus mode. Dynamic area AF AF-area mode is available only when you are using Continuous AF (AF-C) Focus mode.
Next, let’s examine how to use the Movie Shooting Menu for mode selection.
Selecting a Mode from the Movie Shooting Menu
Use the following steps to choose a Focus and AF-Area mode from the Movie Shooting Menu.

Figure 4.1G: Choosing a Focus mode from the Movie Shooting Menu (video)
- 1.Choose Focus mode (figure 4.1G, image 1).
- 2.Select a Focus mode and press OK, or tap the mode (figure 4.1G, image 2).
Next, let’s consider how to access the AF-area modes from the Movie Shooting Menu.
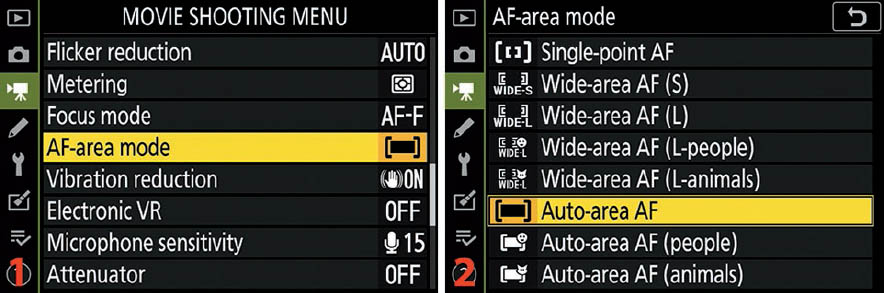
Figure 4.1H: Choosing an AF-area mode from the Movie Shooting Menu (video)
- 1.Choose AF-area mode (figure 4.1H, image 1).
- 2.Select an AF-area mode and press OK, or tap the mode (figure 41.H, image 2).
Note: Selecting the Manual focus (MF) Focus mode disables the AF-area modes and they become grayed out and unavailable on the camera’s various menus. The camera expects that you will be manually focusing when you are using MF mode, using something like Focus peaking (page 422) to help you get good focus. Keep that in mind as you examine how to use the Focus and AF-area modes in this chapter.
Release Mode Access
Now let’s consider how to select a Release mode, first for still photography and then for video.
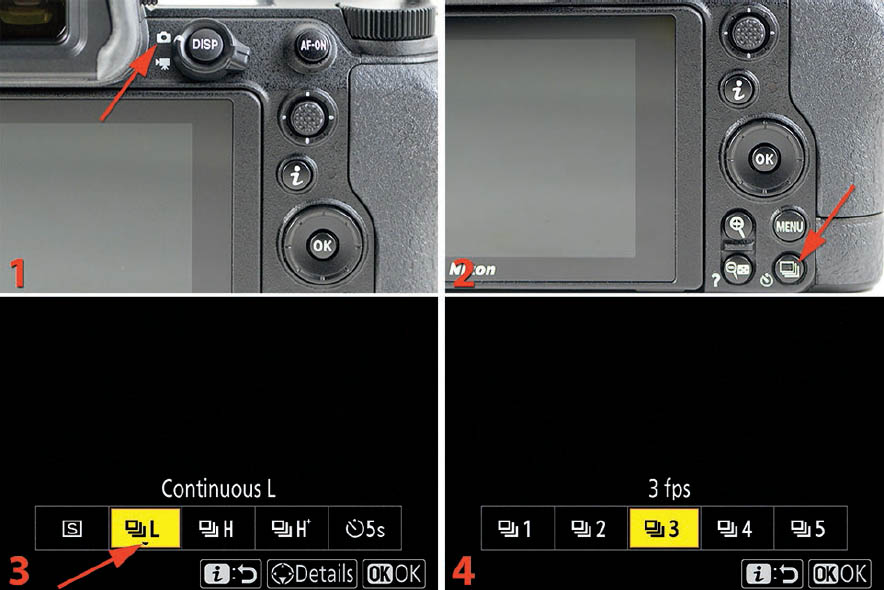
Figure 4.1I: Selecting a Release mode (Photo mode)
Use the following steps to select a Release mode for still photography:
- 1.Flip the Photo/movie selector lever to its Photo mode position (figure 4.1I, image 1).
- 2.Press the Release mode button (figure 4.1I, image 2), and the Release mode screen will open.
- 3.Choose one of the Release modes (e.g., Continuous L, Continuous H) and press or touch OK. If there is a little down pointer, such as is seen in figure 4.1I, image 3 (red arrow), you can press down on the Multi selector pad instead of pressing OK, to select a secondary screen with more choices. Only the Continuous L and Self-timer settings have secondary screens.
- 4.The Continuous L mode offers you from 1 fps–5 fps (figure 4.1I, image 4). The Self-timer (not shown) offers you from two seconds (2s) to 20 seconds (20s), with a default of five seconds (5s). Once you have selected the Release mode you want to use, press the Release mode button again to finish.
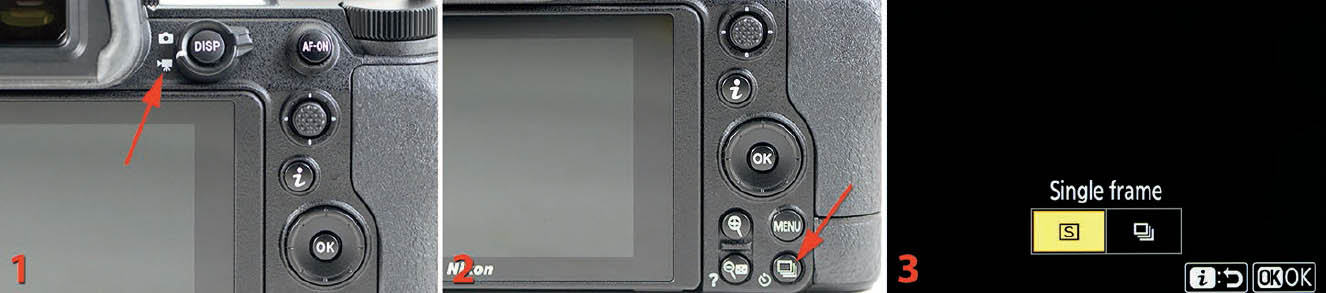
Figure 4.1J: Selecting a Release mode (Movie mode)
Use the following steps to select a Release mode for 16:9 aspect ratio still photography in Movie mode:
- 1.Flip the Photo/movie selector lever to its Movie mode position (figure 4.1J, image 1).
- 2.Press the Release mode button (figure 4.1J, image 2) and the Release mode window will open.
- 3.Select either Single frame or Continuous modes (figure 4.1J, image 3). Be very careful with the Continuous mode. It does not do what you might expect and could cause you to take hundreds of 16:9 still images in a few seconds. Read up on Continuous mode for Movie mode still photography, on page 105, before using it! When you have selected the Release mode you want to use, press the Release mode button again to lock it in.
Now let’s look more closely at each Focus, AF-area, and Release mode.
Focus Modes
The Focus modes allow you to control how the autofocus works with static and moving subjects in Photo and Movie modes. They allow your camera to lock focus on a subject that is not moving or is moving very slowly (AF-S). They also allow your camera to update focus continuously on a moving subject (AF-C) as long as you hold the Shutter-release button halfway down or the AF-ON button all the way down.
In Movie mode only, you can use full-time autofocus (AF-F) for video capture, where the camera updates the focus constantly without you holding down any buttons. The Nikon Z cameras have Nikon’s best-ever AF-F mode, recognized for its continuous-focus capability when making videos.
You can also make use of Manual focus (MF) mode. Plan on using focus Peaking and on-screen symbols, which we will discuss, to assist you in finding the best focus.
Let’s consider each of the Focus modes to see when and how you might use them best. I will use the i Menu access method for our example screens in the following subsections because I like it best. Just remember that you can also access the Focus modes by using an assigned button (e.g., Fn2) or the Photo and Movie Shooting Menus, as described in the previous Accessing the Individual Mode Groups section (page 79).
Single AF (AF-S)

Figure 4.2A: Single AF (AF-S) mode on the i Menu (press the i button)
Single AF (AF-S) mode (figure 4.2A) works best when your subject is stationary—like a house or landscape. You can use AF-S on slowly moving subjects if you’d like, but you must be careful to keep autofocus adjusted as the subject moves. The two scenarios listed next may help you decide:
- Subject is not moving: When you press the Shutter-release button halfway down (or press the AF-ON button fully down), the camera quickly locks focus on your subject and waits for you to fire the shutter. If your subject starts moving and you don’t release and reapply pressure on the Shutter-release button (or AF-ON button) to refocus, the focus will be obsolete and useless. When the camera has the focus locked on your subject, take the picture quickly. This mode is perfect for stationary subjects or, in some cases, very slowly moving subjects.
- Subject is regularly moving: This will require a little more work on your part. Since the AF system locks focus on your subject, if the subject moves even slightly, the focus may no longer be good. You’ll have to lift your finger off the Shutter-release button and reapply pressure halfway down to refocus (or press the AF-ON button fully down). If the subject continues moving, you’ll need to continue releasing and pressing the Shutter-release button (or AF-ON button) halfway down to keep the focus accurate. If your subject never stops moving, is moving erratically, or stops only briefly, AF-S is probably not the best mode to use. In this case, AF-C is better because it never locks focus and the camera is able to better adjust for your subject’s movement, keeping it in constant focus.
Continuous AF (AF-C)

Figure 4.2B: Continuous AF (AF-C) mode on the i Menu (press the i button)
Continuous AF (AF-C) mode (figure 4.2B) continuously updates the focus while you hold the Shutter-release button halfway down, or the AF-ON button fully down. The slightest camera or subject movement causes the camera to refocus. Read these three scenarios carefully:
- Subject is not moving: When the subject is standing still, Continuous AF acts a lot like Single AF with the exception that the focus never locks. If your camera or subject moves, the autofocus stepper motor will make small adjustments in the focus position. Because focus never locks in this mode, you’ll need to be careful that you don’t accidentally move the active AF point(s) off the subject because it may focus on something in the background instead.
- Subject is moving across the Viewfinder: If your subject moves from left to right, right to left, or up and down in the Viewfinder, you’ll need to keep your AF point on the subject in all AF-area modes. The size of the AF point can be varied from small to large, as we will discuss in the upcoming AF-Area Modes section (page 93).
- Subject is moving toward or away from the camera: If your subject is coming toward you, or moving away from you, another automatic function of the camera kicks in. It is called Predictive Focus Tracking, and it figures out how far the subject will move in the milliseconds before the shutter fires. After you’ve pressed the Shutter-release button all the way down, predictive focus tracking moves the lens elements slightly to correspond to where the subject should be when the shutter fires a few milliseconds later. In other words, if the subject is moving toward you, the lens focuses slightly in front of your subject so that the camera has time to open the shutter blades, exposing the imaging sensor at the exact moment the subject arrives at the point of best focus.
Full-Time AF (AF-F)

Figure 4.2C: Full-time AF (AF-F) mode on the i Menu (press the i button)
Full-time AF (AF-F) mode (figure 4.2C) is available in Movie mode only. It is designed to automatically maintain good focus on a detected subject without you pressing any buttons (i.e., Shutter-release or AF-ON). This mode provides constantly updating autofocus that is tempered by the AF-area mode you have selected. The size and shape of the focus square (AF point) changes with the AF-area mode (page 93) you have selected.
In all AF-area modes, except Auto-area AF, you will need to keep the focus square (AF point) on your subject to have accurate focus. Many videographers will use AF-F mode along with one of the three Auto-area AF modes (standard, people, or animals), so that the camera will not only constantly update focus, but it will also track the subject, keeping it in good focus.
When using the AF-F Focus mode, the focus doesn’t lock on the subject; it updates continuously unless you press the Shutter-release button halfway down or AF-ON button fully down, at which time the camera locks focus only while you hold the button down. If you release pressure from the Shutter-release or AF-ON button, the camera unlocks the focus and instantly resumes continuous autofocus.
In other words, the camera acts as if it is in AF-S mode when you have pressure on the Shutter-release button and AF-C mode when you remove pressure. You really don’t need to press the Shutter-release button or AF-ON button, except to force a refocus. The camera will maintain focus on your subject automatically.
Again, your primary job with the AF-F Focus mode is to keep the focus square on your subject (except in Auto-area AF AF-area mode, where the camera automatically focuses on your subject).
Manual Focus (MF)

Figure 4.2D: Manual focus (MF) mode on the i Menu (press the i button)
Manual focus (MF) mode (figure 4.2D) allows you to fully control the focus by turning the focus ring on the lens. You can use your eyes or various focus assistance aids to focus. Let’s examine how to enable or disable a couple of important features for using MF.
Visible Focus Point
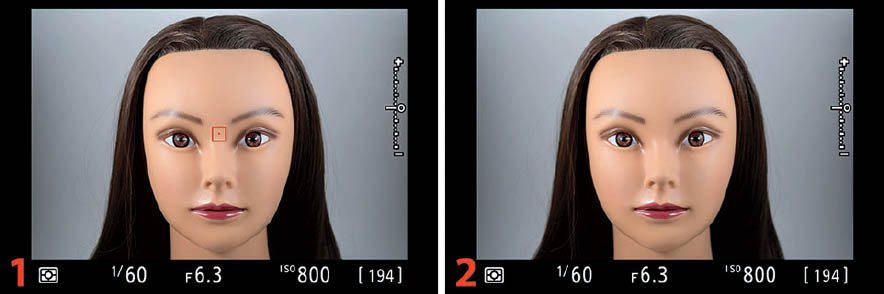
Figure 4.2E: Model Lilly Mae shows us (1) a visible AF point, and (2) a hidden AF point
In Manual Focus mode, you can leave the AF point visible in the Viewfinder, as seen between model Lilly Mae’s eyes (figure 4.2E, image 1), or you can turn the AF point off (image 2).
The red AF point can be positioned over an area and will turn green when you have turned the focus ring and the area under the focus point has good focus. If you choose not to use the AF point square, the EVF and Monitor will show no AF points at all and you must manually focus by eyesight or use other Manual focus assistance tools, which will we discuss shortly.
Settings Recommendation: Most will leave the AF point enabled.
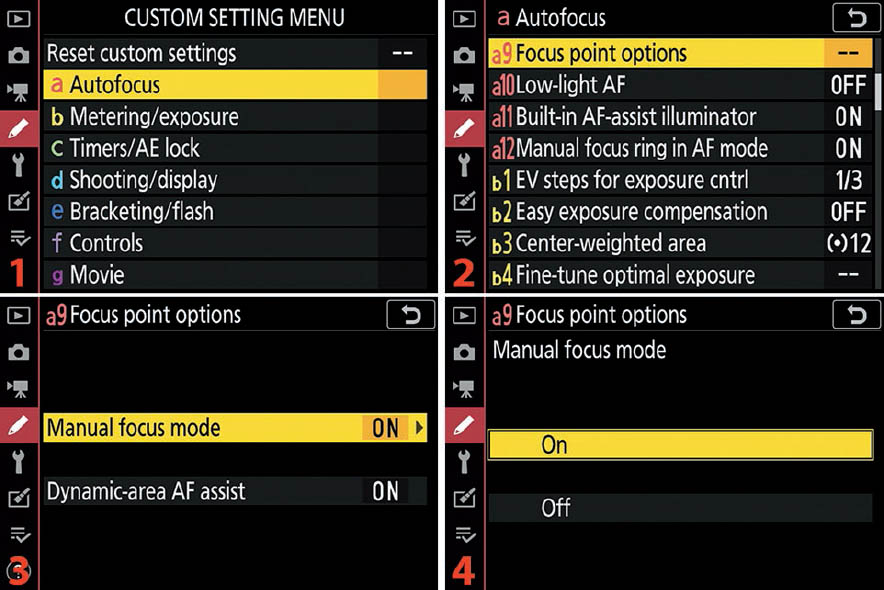
Figure 4.2F: Enabling or disabling the onscreen AF point for Manual focus
Use the following steps to enable or disable the onscreen AF point for Manual focus (MF) mode:
- 1.Follow the screen flow in figure 4.2F, images 1 to 3 (Custom Setting Menu > a Autofocus > a9 Focus point options > Manual focus mode), until you arrive at the final screen shown in image 4.
- 2.Choose On to enable the onscreen AF point or Off to disable it (figure 4.2F, image 4). Most of us will leave it enabled because it is useful to determine Manual focus in a specific area. Press the OK button or tap the option to finish.
Focus Peaking Highlights
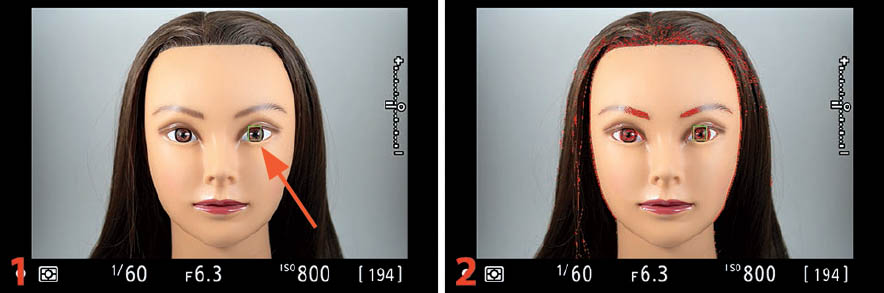
Figure 4.2G: Model Lilly Mae without and with focus Peaking highlights (red)
Peaking highlights (focus peaking) is a function that you can use to help you find the best Manual focus. This feature surrounds the edges of your subject with one of four colors to help you see exactly where the best focus is on your subject. You can see the red Peaking highlights on model Lilly Mae in figure 4.2G, image 2.
In image 1, there are no Peaking highlights, only the green AF point, signifying good focus. In image 2 you can see the red Focus peaking highlights in her pupils, eyebrows, and the front of her hairline, signifying good focus in that area. Remember that areas highlighted in red (or three other selectable colors) are in good focus.
If you use Manual focus, you really should be using Peaking highlights. Let’s see how to enable it.
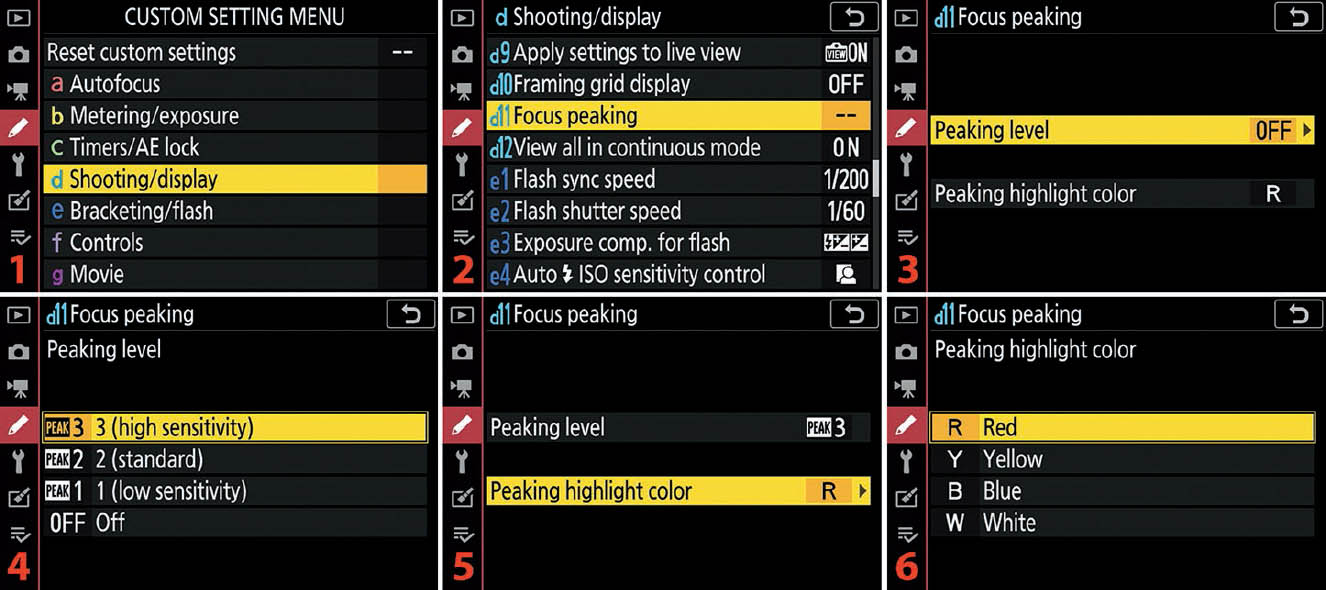
Figure 4.2H: Enabling or disabling focus Peaking highlights
Use the following steps to choose a Peaking level and enable focus peaking:
- 1.Choose d Shooting/display (figure 4.2H, image 1).
- 2.Select d11 Focus peaking (figure 4.2H, image 2).
- 3.Highlight Peaking level and scroll to the right (figure 4.2H, image 3).
- 4.Choose a Peaking level, from PEAK 3 (high sensitivity) to PEAK 1 (low sensitivity) (figure 4.2H, image 4). Press OK or tap the option to choose a sensitivity and intensity level. The larger the Peaking level number the higher the sensitivity and larger the focus peaking highlight colored fringe will be. When you choose a Peaking level (anything but Off), you have also enabled focus peaking for manual focusing. There is no other way to enable or disable focus peaking than to select a Peaking level or set it to Off. Now let’s choose a peaking color.
- 5.Select Peaking highlight color and scroll to the right (figure 4.2H, image 5).
- 6.Choose one of the highlight colors: Red, Yellow, Blue, or White (figure 4.2H, image 6). Press OK or tap the option to finish.
Settings Recommendation: I generally choose the Red setting for the Peaking highlight color because red seems to contrast well with most other colors. Of course, some subjects (especially red subjects) will do better with other colors; therefore, you have a choice of three more when needed.
Now let’s examine the use of all of the camera’s focusing assistance functions.
Manual Focus Assistance

Figure 4.2I: Model Lilly Mae shows off the camera’s Manual focus aids
There are multiple focus aids available to you if you decide to use MF. Figure 4.2I shows model Lilly Mae in various states of focus (or lack thereof). Images 1 and 2 are very slightly out of focus, and image 3 is in focus. In image 1, the focus is in front of her face. In image 2, the focus is behind her face. In image 3, good focus is on the pupil of model Lilly Mae’s left eye (right side of picture). Let’s discuss each image and what the Focus assistance functions are indicating:
- A.Focus ring direction-turn indicators: The camera tells you whether the focus is currently in front of or behind your subject, and which direction to turn the focus ring on the lens to obtain better focus. In figure 4.2I, images 1 and 2, the A red arrow is pointing at the turn direction pointers. The small black pointer in image 1 indicates that you need to turn the lens ring to the right (clockwise) to find good focus. That also means the focus is currently in front of Lilly Mae. The small black pointer in image 2 shows that you need to turn the lens ring to the left (counterclockwise) to obtain good focus. That also means the focus is currently behind Lilly Mae’s face. In-focus indicator: The solid white dot at the A arrow in figure 4.2I, image 3, appears when good focus has been attained. You can use this dot, which appears between the two Focus ring direction indicators, along with the direction-turn indicators, to see how well the camera is focused on the area under your AF point (which turns red and green according to whether focus is bad or good). For best focus, the dot should show and should not be blinking.
- B.Rangefinder scale: The rangefinder scale at the point of the B red arrow, just below our model’s mouth, in figure 4.2I, images 1 and 2, shows for only a few seconds when you make a focus adjustment. It displays a rough focus range between minimum and infinity focus. It will disappear when you stop turning the Focus ring.
- C.AF point color: The AF point stays red when the camera is not focused on anything: red for out of focus, green for in focus. You will notice the AF point is colored red at the C arrow in figure 4.2I, images 1 and 2. The out-of-focus red AF point is on model Lilly Mae’s left eye. Notice, however, that the AF point has turned green at the C arrow in image 3. This green color signifies that the area under the AF point is in good focus.
- D.Focus Peaking: As previously discussed, Peaking highlights provides a color fringe on the edges of the in-focus areas. In figure 4.2F, image 1, the focus is in front of the model’s face, probably near the tip of her nose. Her left eye has just a hint of red Peaking highlights, signifying that good focus is just beginning to occur in the pupil area but is not quite there yet. In image 2, the focus is well past her face, as can be seen by the Peaking highlights on her hair. In image 3, the picture with good focus, the red Peaking highlights extend from her eyebrows (D arrow), slightly in front of her eyes, to the hairline at the top of her forehead, showing that the best focus area is no more than an inch from front to back. As you turn the Focus ring on the lens, you will see the red fringe move forward and backward on the subject. You must decide when the red fringe indicates the area that is best in focus.
Using a combination of all these Manual focus assistance functions makes it fairly easy to get good focus when using MF. Learn to use each of them if you plan on using MF often.
Note: For more information on the Focus modes, see the Photo Shooting Menu (page 273) and Movie Shooting Menu (page 358) chapters.
Settings Recommendation: I leave my camera’s Autofocus mode set to AF-S most of the time because I shoot a lot of static nature images and portraits.
If I am shooting sports, though, I switch to AF-C mode so that the camera will keep updating its autofocus as the subject moves very quickly. Wildlife photography is another type of imaging that begs for AF-C, which updates AF continuously when you hold down the Shutter-release button halfway or the AF-ON button all the way.
I am very happy with the AF-F mode when I am capturing video. The camera does a good job keeping the focus continuously on my subject when using AF-F. The Z-series cameras are the first Nikons I‘ve ever used that can truly maintain good focus on a subject when using its Live view in video recording, unlike Nikon DSLRs.
AF-Area Modes
The AF-area modes are designed to let you control the size of the AF point that shows where the camera is currently focusing. The larger the AF point, the larger the area of the subject that is taken into consideration for what is in good focus.

Figure 4.3A: Accessing the AF-area modes on the i Menu
In this section we will again use the i Menu to access the AF-area modes (figure 4.3A). To access the i Menu, press the i button. Of course, you can also use the Photo and Movie Shooting Menus or an assigned button to access the modes (see pages 81–84 in this chapter).
Be sure that the Photo/movie selector lever is set to the appropriate Photo or Movie mode when you make adjustments. The camera maintains separate settings for the Photo and Movie modes.
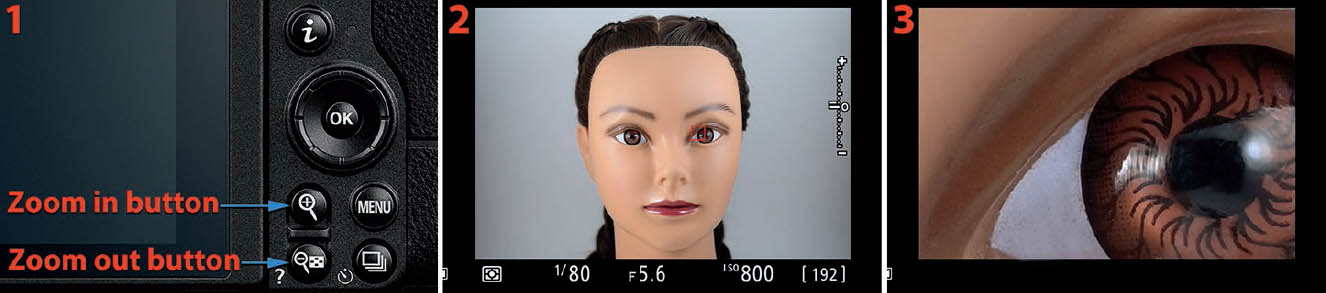
Figure 4.3B: The Zoom in and Zoom out buttons
When you are using the upcoming AF-area modes to focus on your subject, you can zoom in to pixel-peeping level to check how well the focus is working and to fine-tune it if necessary (figure 4.3B). Simply press the Zoom in button to zoom in and the Zoom out button to zoom back out.
Let’s examine each of the AF-area modes and discuss what each does.
Pinpoint AF
In figure 4.3C, you can see the red Pinpoint AF point square on model Lilly Mae’s left eye (right side of picture). This mode allows you to choose a very small area of your subject for autofocus. You can move the AF point to the pupil of an eye or a drop of water on a leaf. It is made to give you precise autofocus so that you can focus on specific areas. This mode does not use phase-detection auto-focus (PDAF); instead, it uses contrast-detection (CDAF) only, which is slower to focus, yet very accurate.

Figure 4.3C: Pinpoint AF AF-area mode
The Pinpoint AF square can be moved around within the cameras AF points in the EVF or on the Monitor by using the Sub-selector joystick or Multi selector pad. When the camera has achieved good focus, the Pinpoint AF square will change from red to green and focus will lock—as long as you hold pressure on the Shutter-release or AF-ON button.
Pinpoint AF AF-area mode is available only when you are using the Single AF (AF-S) Focus mode. It is grayed out on the Photo Shooting Menu and not available in the i Menu if the camera is using Continuous AF (AF-C). Pinpoint AF is not available in Movie mode.
Single-point AF
In figure 4.3D, you can see the Single-point AF point square on model Lilly Mae’s left eye (right side of picture). Single-point AF is the preferred mode for many photographers. It has an AF point frame that is larger than the Pinpoint AF frame. Single-point AF is faster than Pinpoint AF and still allows precise location of focus within the cameras AF points in the frame. This mode uses PDAF initially and, according to Nikon, tops off the focus by using CDAF for focus verification.

Figure 4.3D: Single-point AF AF-area mode
The Single-point AF square can be moved around within the cameras AF points in the EVF or on the Monitor by using the Sub-selector joystick or Multi selector pad. When you are using Single AF (AF-S) Focus mode, and the camera has achieved good focus, the Single-point AF frame will change from red to green and focus will lock. If you are using Continuous AF (AF-C) Focus mode, the frame will stay red because the camera does not stop seeking active focus (never locks)—as long as you hold pressure on the Shutter-release or AF-ON button.
Single-point AF AF-area mode is available in both AF-S and AF-C Focus modes. It is available in both Photo and Movie modes.
Dynamic-area AF
In figure 4.3E, you can see the center Dynamic-area AF point square—with its surrounding dots representing additional active AF points—on model Lilly Mae’s left eye (right side of picture). Dynamic-area AF uses a center active AF point, like Single-point AF, but it surrounds that AF point with eight additional points that are on high alert. If you or the subject moves and the active center AF point loses the subject, one of the surrounding AF points can recapture the subject. All of the AF points within the red AF point frame are actively seeking focus.
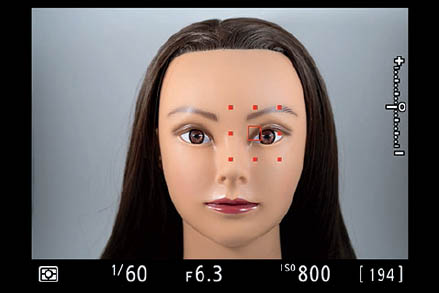
Figure 4.3E: Dynamic-area AF AF-area mode
The Dynamic-area AF frame can be moved around within the cameras AF points in the EVF or on the Monitor by using the Sub-selector joystick or Multi selector pad. The color of the frame does not change from red to green when focus is acquired; rather, it stays red because all the AF points are continuously seeking focus.
Dynamic-area AF is available for Photo mode only, not Movie mode. This AF-area mode is not available when you have the camera set to Single AF (AF-S) Focus mode. You must use Continuous AF (AF-C) Focus mode or Dynamic-area AF will be grayed out on the Photo Shooting Menu and not available on the i Menu.
Wide-area AF
Wide-area AF is an AF-area mode that gives you a larger focus frame for various uses. The modes vary the size and functionality of the focus frame. Here is a brief look at the four Wide-area AF modes:
- Wide-area AF (S): Provides a medium-sized square focus frame for general purpose use
- Wide-area AF (L): Provides a large-sized rectangular focus frame for general purpose use
- Wide-area AF (L-people): Provides a large-sized rectangular focus frame for human subjects only
- Wide-area AF (L-animals): Provides a large-sized rectangular focus frame for animal subjects only
Now let’s discuss each of the four Wide-area AF AF-area modes and see how we can best use each of them.
Wide-Area AF (S)
In figure 4.3F, you can see the Wide-area AF (S) focus frame on model Lilly Mae’s left eye (right side of picture). This mode works in a similar manner to Single-point AF, except that it has a wider group of AF points in its frame. The Wide-area AF (S) AF-area mode frame is significantly larger than the Single-point AF frame. All of the invisible focus points within the red focus frame are active.

Figure 4.3F: Wide-area AF (S) AF-area mode
The Wide-area AF (S) frame can be moved around within the cameras AF points in the EVF or on the Monitor by using the Sub-selector joystick or Multi selector pad. When you are using Single AF (AF-S) Focus mode, and the camera has achieved good focus, the Wide-area AF (S) frame will change from red to green and focus will lock. If you are using Continuous AF (AF-C) Focus mode, the frame will stay red because the camera does not stop seeking active focus (never locks)—as long as you hold pressure on the Shutter-release or AF-ON button.
Wide-area AF (S) AF-area mode is available in both AF-S and AF-C Focus modes. It is also available in Photo and Movie modes.
Wide-area AF (L)
In figure 4.3G, you can see the Wide-area AF (L) focus frame surrounding most of the left side of Lilly Mae’s face (right side of picture). This mode works in a similar manner to Wide-area AF (S), except that it has a significantly larger group of AF points within its frame. The Wide-area AF (L) AF-area mode frame is much larger than the Wide-area AF (S) AF-area mode frame, and all of the invisible focus points within the red focus frame are active.

Figure 4.3G: Wide-area AF (L) AF-area mode
This AF point frame can be moved around within the camera’s AF points in the EVF or on the Monitor by using the Sub-selector joystick or Multi selector pad. When you are using Single AF (AF-S) Focus mode, and the camera has achieved good focus, the Wide-area AF (L) frame will change from red to green and focus will lock. If you are using Continuous AF (AF-C) Focus mode, the frame will stay red because the camera does not stop seeking active focus (never locks)—as long as you hold pressure on the Shutter-release or AF-ON button.
Wide-area AF (L) AF-area mode is available in both AF-S and AF-C Focus modes. It is also available in Photo and Movie modes.
Wide-area AF (L-people)
In figure 4.3H, you can see the red Wide-area AF (L-people) AF-area mode frame covering part of the face of our model Lilly Mae. In this “people” mode, the camera will ignore anything outside the red frame. Inside the red frame, face and eye detection becomes active. Note that a yellow eye detection square is located on Lilly Mae’s left eye, while the camera ignores Lilly Mae’s partner Billy Bob, even though they are in the same focal plane.

Figure 4.3H: Wide-area AF (L-people) AF-area mode
The red frame, which you can move with the Sub-selector joystick or Multi selector pad, allows you to provide boundaries for face and eye detection. You can use the red frame to single out a particular subject in a group, which prevents the camera trying to find faces and eyes anywhere outside the red frame’s area.
This will be useful in situations such as shooting a wedding. When the bride and groom are walking up the aisle, you can keep the red frame on the bride’s face and the camera will ignore the face and eyes of everyone in the audience, even people closer to the camera, focusing only on the limited area of the bride’s face. As long as you can keep the red frame on the face of your subject, you don’t have to worry that the camera might switch focus away from your subject to nearby faces and eyes.
When you are using Single AF (AF-S) Focus mode, and the camera has achieved good focus, the Wide-area AF (L-people) AF-area frame will change from red to green and focus will lock. When you are using Continuous AF (AF-C) Focus mode, the frame will stay red because the camera does not stop seeking active focus (never locks)—as long as you hold pressure on the Shutter-release or AF-ON button.
Wide-area AF (L-people) AF-area mode is available in both AF-S and AF-C Focus modes. It is also available in Photo and Movie modes.
Wide-area AF (L-animals)
In figure 4.3I, the camera is in “animal” mode, which seems functional even for non-human characters such as Baby Yoda (Grogu). The red Wide-area AF (L-animals) AF-area mode frame is surrounding the face of Grogu and the yellow eye detection square has located his right eye. This animal mode is designed primarily to detect the face and eyes of dogs and cats, but as Grogu’s picture shows, it might work for other non-human subjects. You will need to experiment with this mode to see if it works with the animal subjects you want to photograph or video.

Figure 4.3I: Wide-area AF (L-animals) AF-area mode
The red frame, which you can move with the Sub-selector joystick or Multi selector pad, allows you to provide boundaries for non-human face and eye detection. You can use the red frame to single out a particular animal subject in a group, which prevents the camera trying to find animal faces and eyes anywhere outside the red frame’s area.
When you are using Single AF (AF-S) Focus mode, and the camera has achieved good focus, the Wide-area AF (L-people) AF-area mode frame will change from red to green. When you are using Continuous AF (AF-C) Focus mode, the frame will stay red because the camera does not stop seeking active focus with AF-C Focus mode (never locks)—as long as you hold pressure on the Shutter-release or AF-ON button.
Wide-area AF (L-animals) AF-area mode is available in both AF-S and AF-C Focus modes. It is also available in Photo and Movie modes.
Auto-area AF
Auto-area AF is a multi-featured automatic AF-area mode, designed to give you a more automatic way to obtain good focus in a particular subject area, when you have less time to check focus yourself but still must have sharply focused images. It comes in three modes:
- Auto-area AF: Designed for general-purpose and varied subjects
- Auto-area AF (people): Created for automatic human face and eye recognition
- Auto-area AF (animals): Made for automatic animal face and eye detection
In the three upcoming subsections we will discuss all three of the Auto-area AF AF-area modes.
Auto-area AF (General Purpose)
The general-purpose Auto-area AF AF-area mode gives you a large focus area that covers most of the EVF and Monitor. Notice the red corner brackets in figure 4.3J. Within this bracketed area, the camera locates subjects of all types and automatically focuses on them.
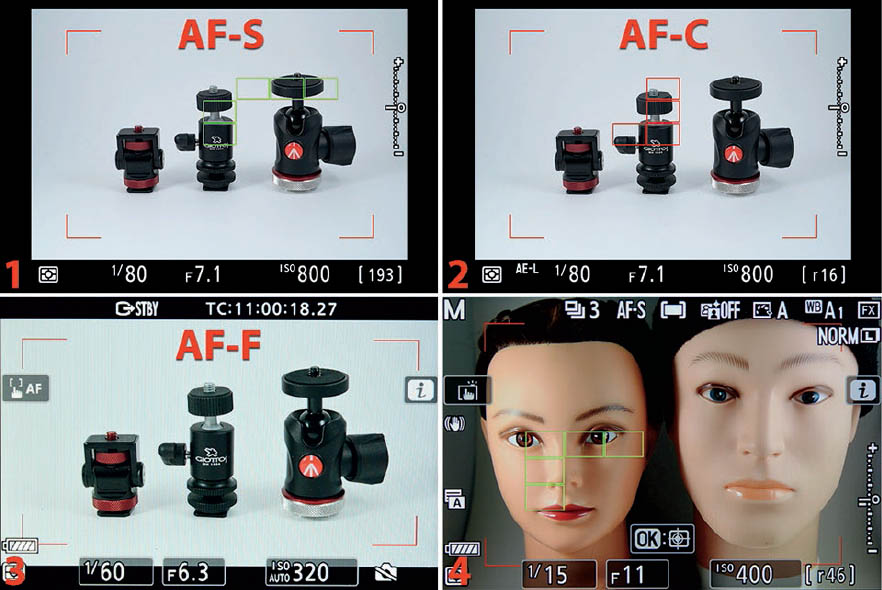
Figure 4.3J: Auto-area AF AF-area mode
Auto-area AF gives full control of the AF system to the camera. You cannot manually move a focus point around the screen. Focus works only if you keep your subject within the red frame markers near the four corners of the screen (figure 4.3J). The camera will choose a combination of AF points within the frame to achieve the best focus on your subject. You will see a group of red or green rectangles marking the areas the camera is using for autofocus.
Similar to how the person-based Auto-area AF yellow focus frame works, these non-person AF points have several ways to indicate good AF, according to which Focus mode you have selected:
- When using Single AF (AF-S) Focus mode (figure 4.3I, images 1 and 4): The small green frames will appear anywhere within the red corner boundaries while you hold down the Shutter-release button halfway or the AF-ON button all the way. The autofocus locks while you hold the button down, which is what the green focus rectangles signify. If you want to update focus you must release pressure and then press the Shutter-release or AF-ON button again.
- When using Continuous AF (AF-C) Focus mode (figure 4.3I, image 2): A group of small red AF points will appear within the red corner boundaries while you are holding down the Shutter-release or AF-ON button. The group of AF points will not turn green nor will the focus lock when good focus is acquired because the grouped AF points seeks focus continuously. You will see the autofocus update by the movement of the red AF point group as it adjusts focus at the slightest movement of the camera or subject. The camera stops updating the focus if you stop holding the Shutter-release or AF-ON button.
- When using Full-time AF (AF-F) Focus mode (figure 4.3I, image 3): Full-time AF is limited to Movie mode and is not available in Photo mode. No AF points appear within the red corner boundaries. As long as you keep the subject within the corner boundaries the camera will do its best to maintain good focus on your subject. If you hold the Shutter-release button halfway down or the AF-ON button all the way, a group of green AF points will appear and the focus will lock. As soon as you release the button, the camera continues updating focus automatically, with nothing in the frame to show you what is in focus.
Auto-area AF (People) and (Animals)
The Auto-area AF (people) or Auto-area AF (animals) mode automatically uses human or animal face and eye detection to keep the focus updated on selected subjects. We will discuss both human and animal face and eye detection at the same time. We will use human subjects as our example; however, remember that animal subject Auto-area AF works the same.
Since both of these modes are Auto modes, the camera will initially choose a subject automatically, but it allows you to switch to a different face by pressing left or right on the Sub-selector joystick or Multi selector pad. Let’s discuss both Face and Eye detection.
Face Detection
If the human or animal subject is some distance away, or the subject’s eyes are not easily seen, the camera will use face detection to locate the subject, using a large yellow frame that covers most of the subject’s face (figure 4.3K).

Figure 4.3K: Auto-area AF (people) using human Face detection
In figure 4.3K, images 1 and 2, you can see the yellow Face detection frame surrounding the face of one subject. The yellow frame can surround only one face at a time and that face provides the most important autofocus area. You can see the yellow focus frame surrounding most of model Lilly Mae’s face in figure 4.3K, image 1, and the young woman on the left in image 2.
When there are multiple human or animal faces in the frame (not at the same time, unfortunately), the camera allows you to choose which face you want to focus on. Notice in image 2 that the yellow focus frame has a small yellow pointer on the right side (red arrow). This pointer means that you can select the other face(s) in the frame by scrolling in the direction of the pointer with the Sub-selector joystick or Multi selector pad, or by touching a different face on the Monitor. If there are multiple faces, such as in a group photo, there will be small yellow pointers on both sides of the frame, signifying that you can move the frame to any face detected by the camera, for best focus on that person
If the camera sees no faces at all in the frame, it will temporarily use general-purpose Auto-area AF, as described with figure 4.3J (page 98).
Eye Detection
As you get closer to your subject, the camera will switch from Face detection to Eye detection and the big yellow face-sized frame will change to a small yellow eye-sized frame surrounding one eye. Let’s look more closely at the process (figure 4.3L).

Figure 4.3L: Auto-area AF (people) using human Eye detection
In figure 4.3L, images 1 and 2, you can see the yellow Eye detection frame surrounding an eye of one subject. The yellow frame can surround only one eye at a time and that eye provides the most important autofocus area. You can see the yellow focus frame surrounding model Lilly Mae’s right eye in figure 4.3L, image 1, and her left eye in image 2.
Since there are multiple eyes in the frame, the camera allows you to choose which eye you want to focus on. Notice in images 1 and 2 that the yellow focus frame has a small yellow pointer on one or both sides (red arrows). This pointer means that you can select the other eye(s) in the frame by scrolling in the direction of the pointer with the Sub-selector joystick or Multi selector pad, or by touching a different eye on the Monitor. There are usually multiple eyes visible on each person, of course; therefore, there will be small yellow pointers on both sides of the frame most of the time, signifying that you can move the frame to any eye detected by the camera, for best focus on that person’s eye.
If the camera sees no faces at all in the frame, it will temporarily use general-purpose Auto-area AF, as described with figure 4.3J (page 98).
Information on Yellow Frame Behavior for Face and Eye Detection
When you are using different Focus modes (AF-S, AF-C, and AF-F), the yellow focus frame for both Face and Eye detection will do different things, as follows:
- When using Single AF (AF-S) Focus mode: The yellow focus frame will turn green when the camera achieves good focus, and focus will lock while you hold down the Shutter-release button halfway or the AF-ON button all the way. If you want to update focus, you must use the Shutter-release or AF-ON button again.
- When using Continuous AF (AF-C) Focus mode: The yellow focus frame will turn red while you are holding down the Shutter-release or AF-ON buttons, but it will not turn green nor will the focus lock when good focus is acquired because the focus frame seeks focus continuously. The camera stops updating the focus if you stop pressing the Shutter-release or AF-ON button.
- When using Full-time AF (AF-F) Focus mode (Movie mode only): The yellow focus frame is constantly and automatically seeking focus and may jump around a bit. The camera does its best to maintain good focus as your subject moves in the frame. The yellow focus frame will turn green and the focus will lock while you hold down the Shutter-release button halfway or the AF-ON button all the way. As soon as you release the button, the focus automatically continues updating by itself.
Settings Recommendation: I normally leave my camera set to Auto-area AF (people) when I need to use an auto AF-area mode. The camera will use the Face and Eye detection features when a human is present. If no human is present, it will use the general-purpose Auto-area AF as described with figure 4.3J, even though it is set to people mode.
Focus Tracking
The focus tracking system in the Nikon Z6 II and Z7 II is a little different than what you are used to with your Nikon DSLRs.

Figure 4.3M: Using focus tracking
Figure 4.3M, images 1–3, show the Auto-area AF screens for a human subject (an animal subject works the same). Images 3–6 show the Auto-area AF screens for a non-human subject.
To track a subject, you must press or touch OK (figure 4.3M, images 2 and 5, bottom red arrows) and a small, white, square targeting reticle will appear on the screen (images 2 and 5, top red arrows). The targeting reticle has small pointers on all four sides, which signify that you can move this tracking frame around the screen with the Sub-selector joystick or Multi selector pad until it is over the area you want to track.
Once the white targeting reticle is located exactly on the point of the subject you want to track, you can execute one of three actions to cause the camera to track the subject:
- Press or touch OK again.
- Press the Shutter-release button halfway down.
- Press the AF-ON button all the way down.
When you have done one of the initiating actions from the list, the camera will activate Subject tracking and will attempt to track a moving subject. The white targeting reticle will change to a yellow tracking frame and the pointers around its four edges will disappear (figure 4.3M, images 3 and 6, top red arrow). As you move the camera or the subject moves, the camera will try to keep the area under the tracking frame in focus.
Note: If you are using Auto-area AF (people) or (animal) mode, and are close enough to your subjects, the yellow tracking frame will often be replaced by the yellow Eye detection frame, which serves the same purpose, with the additional benefit of allowing you to move the Eye detection frame to different eyes, as described in the previous section.
You can also use Touch AF to instantly initiate autofocus and tracking, skipping the initial action of pressing OK to open the targeting reticle, by doing one of the following two actions:
- Touch the monitor exactly on the area you want to track, except the eye or face of a human or animal subject, which will start Eye detection. You can quickly change to a different human or animal subject or different parts of the same subject for tracking by simply touching the screen in the appropriate area. Touch AF (page 50) must be enabled for this to work.
- Touch the non-human or non-animal subject anywhere on the monitor that you want to track. You can quickly change to a different subject or different parts of the same subject for tracking by simply touching the screen again in a different area. Touch AF (page 50) must be on for this to work.
To stop tracking your subject, you can execute one of three actions:
- Press or touch OK and the white targeting reticle will reappear.
- Touch the Exit control, if there is one on the screen.
- Press the Zoom out button.
Special Considerations Concerning Tracking
There are several things you need to consider when using Auto-area AF and tracking, as follows:
- Tracking sensitivity: You can set a delay on how long the camera will take to switch to a new subject when it loses your old subject—such as when something temporarily gets between you and your subject, or when the subject accidently moves outside the focus area.
- For Photo mode use the Blocked shot AF response setting in the Custom Setting Menu > a Autofocus > a3 Focus tracking with lock-on (page 379) function. Set a lost-subject timeout between 1 and 5 (Quick to Delayed). The more toward Delayed you set it, the longer the camera tries to find your lost subject before switching to a different subject. (Settings Recommendation: I set mine to 5, or fully Delayed.)
- For Movie mode use the Custom Setting Menu > g Movie > g5 AF tracking sensitivity (page 480) function. You can select from 1 (High) to 7 (Low). The higher the setting (e.g., 1), the less likely it is that your camera will lose the subject; the lower the setting (e.g., 7), the more likely it is that the subject will be lost due to interference. (Settings Recommendation: I set mine to 1, or High.)
- AF speed: In Movie mode, you can set how fast the camera changes focus when you use Touch AF (page 50) to move the focus between two subjects. Do you want it to snap into focus or gradually change focus (focus pulling)? Use Custom Setting Menu > g Movie > g4 AF speed (page 479). You can select from −5 for slower focus changes to +5 for faster focus changes. (Settings Recommendation: I set mine to +5 for a fast focus transition. The camera isn’t all that snappy when it changes focus areas, even at its fastest setting of +5. Experiment!)
For even more information on the AF-area modes, see the Photo Shooting Menu, AF-Area Mode function (page 276) and Movie Shooting Menu, AF-Area Mode function (page 360).
Settings Recommendation: For static or slowly moving subjects, such as portraits, landscapes, nature, wildlife, and outdoors, I use Single AF (AF-S) Focus mode (page 273), Single-point AF AF-area mode (page 276), and Single frame (S) Release mode (page 105) almost exclusively. For moving wildlife I will likely switch to a burst mode such as Continuous L (L) Release mode (page 106).
If I’m shooting an event or a wedding where the bride and her father are walking slowly down the aisle, I use Continuous AF (AF-C) Focus mode (page 87), Wide-area AF (L-people) AF-area mode (page 96), and Continuous L (L) Release mode (page 106).
For rapidly moving subjects, such as sports, car races, and airplane shows, I’ll use Continuous AF (AF-C) Focus mode (page 87), Wide-area AF (L) AF-area mode (page 96), and Continuous H (H) Release mode (page 107).
These suggestions are all very subjective and you should find the best combinations for your own styles of shooting.
I suggest extensive experimentation with all these Focus and AF-area modes. You will need to use them all for different types of photography, so take the time necessary to learn how each mode functions for your style of shooting.
Release Modes
In the good old film days, the Release modes would have been called motor-drive settings because they are concerned with how often and how fast the camera is capable of taking pictures.
The Release modes are for still photography, not video capture. The five main release modes are available when your camera is in Photo mode:
- Single frame
- Continuous L
- Continuous H
- Continuous H (extended)
- Self-timer
However, since you can take low-res 16×9 pictures in Movie mode, either before or during a video capture session, there are also two Release modes for Movie mode:
- Single frame
- Continuous
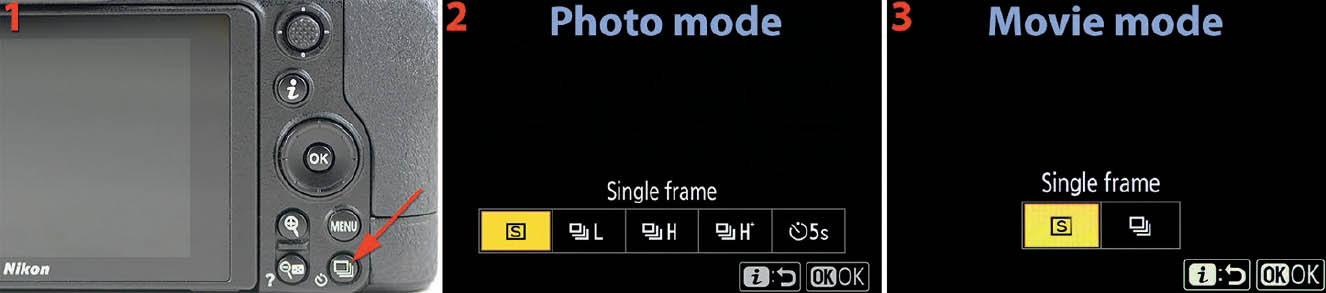
Figure 4.4A: The Release mode/self-timer button and Release mode selection screen
Make sure the camera’s Photo/movie selector lever (surrounding the DISP button) is set to the correct position (Photo or Movie mode), and then press the Release mode button (figure 4.4A, image 1).
You will now see the Release mode selection screen (Photo mode: image 2; Movie mode: image 3). Choose the Release mode you want by selecting it with the Multi selector pad or touching it with your fingertip. If there is a small down pointer under a Release mode name, you can open a secondary screen with more settings by pressing down on the Multi selector pad. This applies only to the two Release modes: Continuous L and Self-timer, which both have secondary settings. Remember how to access these screens because we will refer to them as we discuss the individual Release modes.
You can see which Release mode (e.g., S, L, H, H*) you currently have selected without opening the camera’s menus by glancing at the lower-left corner of the Control panel on top of the camera.
Now let’s look more deeply at each Release mode to see how they can help you capture your subject well. The Release mode screens are presented with the lens cap on for maximum contrast.
Single Frame
Single frame Release mode (figure 4.4B) is the simplest mode. It takes a single picture each time you fully press the Shutter-release button.
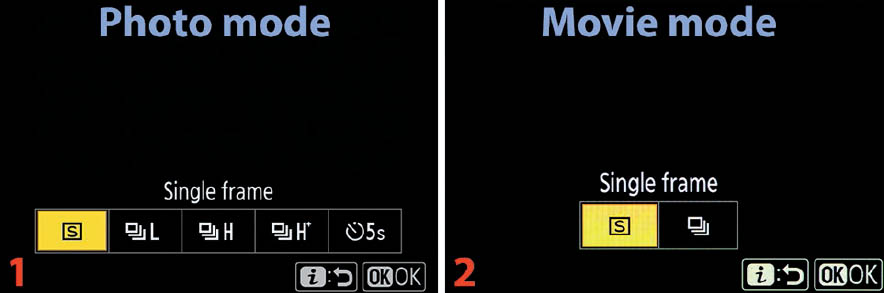
Figure 4.4B: Single frame Release mode
There are five modes available in Photo mode, and two modes available in Movie mode, of which Single frame (S) is the first. Open the Release mode screen by pressing the Release mode button (figure 4.4A, image 1). Select Single frame from the Photo mode or Movie mode screen by highlighting it with the Multi selector pad and pressing OK or tapping the setting.
There is no speed in the Single frame Release mode! This is for photographers shooting one picture at a time.
Nature shooters often use this mode because they are more concerned with correct depth of field and excellent composition than blazing speed. This mode also works well for portraits, graduation, weddings, and event shooting. One picture per Shutter-release button press!
When the camera is in Movie mode, Single frame Release mode allows the camera to take one 16×9 picture based on the Frame size/frame rate (page 330) currently configured for Movie mode. You can take one picture at a time when you are not recording a video. When you are recording a video, you can press the Shutter-release button all the way down and the camera will capture one frame from the video as a still picture, without stopping or harming the video recording in progress. You can capture up to 50 still pictures maximum per video recording.
Continuous (Movie mode only)
The Continuous Release mode (figure 4.4C) is available in Movie mode only. This mode is not the same as the Continuous L or Continuous H modes in Photo mode (next sections). When you are not recording a video, it allows you to take a large number of 16×9 frames in a burst up to three seconds (3s) long when you hold the Shutter-release button down.
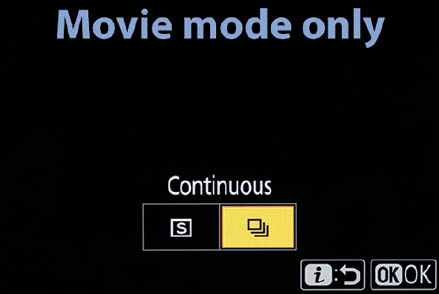
Figure 4.4C: Continuous Release mode for Movies
To access Continuous mode, make sure the camera is in Movie mode (with the Photo/movie selector lever in the lower position) and open the Release mode screen by pressing the Release mode button (figure 4.4A, image 1). Select the Continuous mode from the Movie mode screen by highlighting it with the Multi selector pad and pressing OK or tapping the setting.
Warning: Be very careful with the Movie mode’s Continuous mode (not the Photo mode’s Continuous L or H). As previously mentioned, when you are not capturing video, you can take pictures with Single frame (one picture at a time) or Continuous (many pictures in a burst). When I say “many pictures,” I’m not kidding you. The camera can take literally hundreds of 16×9 images in a few seconds—using the silent electronic shutter—if you hold the Shutter-release button down. Basically, using the Continuous mode while not recording a video is like capturing a manual, three-second-long movie, and having each frame of that movie appear as a single image on your camera’s memory card.
Each of these pictures is the equivalent of one 16×9 video frame. Each1080p picture is about 2 MP in size, while each 4K picture is about 8 MP in size. Even though the camera has a limited buffer, the XQD/CFexpress card’s transfer rate is so fast that it almost instantly clears the buffer, meaning you can virtually take as many pictures as you want—or should I say many more than you thought you wanted! The camera attempts to limit your massive individual image intake by stopping the capture at the end of three seconds. However, in those three seconds, you can take hundreds of images. I’m not going to tell you how I discovered this, but I bet you can imagine.
Note: When you are recording a video and press the Shutter-release button, regardless of whether you have Single frame or Continuous Release mode selected, the camera will take just one 16×9 photo for each Shutter-release button press, without interrupting the video capture in any way.
Continuous L
Continuous L Release mode (figure 4.4D) allows you to select a frame rate between one and five frames per second (fps). This mode is limited to the Photo mode (see the previous subsection for the Movie mode’s form of Continuous release).
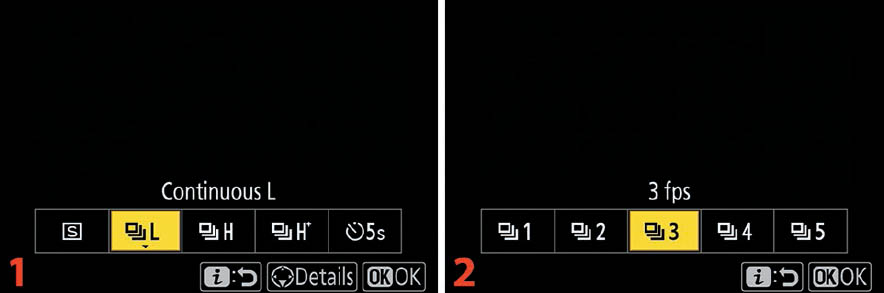
Figure 4.4D: Continuous L (low speed) Release mode
To access the mode, open the Release mode screen by pressing the Release mode button (figure 4.4A, image 1), then highlight the Continuous L location (figure 4.4D, image 1). Press down on the Multi selector pad to open the secondary screen. Select a frames-per-second burst rate—from 1 to 5 fps—for shooting with the camera’s mechanical shutter. Press or touch OK to finish.
You will see a brief blackout of the EVF or Monitor as each picture is taken when you are using the camera’s mechanical shutter. The camera will provide autofocus (AF) and autoexposure (AE) for every frame when shooting in this mode.
Note: There will be some variations in the frames per second rate when using the Silent photography mode’s electronic shutter (page 321) instead of the mechanical shutter. See the chart on pages 127–128 of the downloadable Nikon Z 6II/Z 7II Reference Manual.
Continuous H
Continuous high speed Release mode (figure 4.4E) is designed for when you want to shoot at the next to highest frame rate the camera can manage. This mode is not available in Movie mode.
To access the mode, open the Release mode screen by pressing the Release mode button (figure 4.4A, image 1). Select Continuous H from the Photo mode screen by highlighting it with the Multi selector pad and pressing OK or tapping the setting. The normal frame rate with the camera’s mechanical and electronic shutters for the two cameras are:
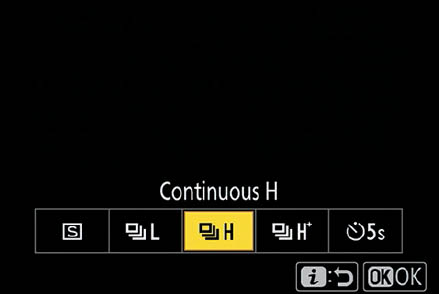
Figure 4.4E: Continuous H (high speed) Release mode
- Nikon Z6 II: Using the standard mechanical shutter the frame rate is 5.5 fps for JPEG, 12-bit NEF (RAW), or 14-bit NEF (RAW). In silent photography mode (electronic shutter) the frame rate drops to 4.5 fps for JPEG and 12-bit NEF (RAW); and 4 fps for 14-bit NEF (RAW).
- Nikon Z7 II: Using the standard mechanical shutter the frame rate is 5.5 fps for JPEG and 12-bit NEF (RAW). Shooting with 14-bit NEF (RAW) drops the frame rate to 5 fps. In silent photography mode (electronic shutter) the frame rate drops to 4 fps for JPEG and 12-bit NEF (RAW); and 3.5 fps for 14-bit NEF (RAW).
Note: There will be some variations in the frames per second rate when using various Focus and AF-area modes. See the chart on pages 127–128 of the downloadable Nikon Z 6II/Z 7II Reference Manual.
Continuous H (Extended)
Continuous H (extended) Release mode (figure 4.4F) is an especially high-speed mode that has no EVF or Monitor blackout when shooting at its maximum FPS rate. This mode is not available in Movie mode.
To access the mode, open the Release mode screen by pressing the Release mode button (figure 4.4A, image 1). Select Continuous H (extended) from the Photo mode screen by highlighting it with the Multi selector pad and pressing OK or tapping the setting. The normal frame rate with the camera’s mechanical and electronic shutters for the two cameras are:
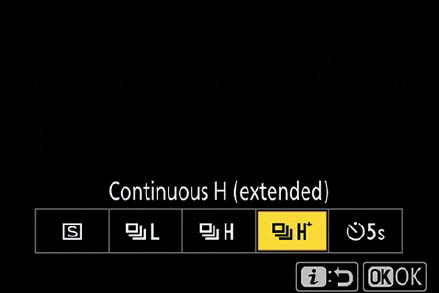
Figure 4.4F: Continuous H (extended) Release mode
- Nikon Z6 II: Using the standard mechanical shutter the frame rate is 14 fps for JPEG, 12-bit NEF (RAW). Shooting with 14-bit NEF (RAW) drops the frame rate to 10 fps. In silent photography mode (electronic shutter) the frame rate drops to 12 fps for JPEG and 12-bit NEF (RAW); and 8 fps for 14-bit NEF (RAW).
- Nikon Z7 II: Using the standard mechanical shutter the frame rate is 10 fps for JPEG and 12-bit NEF (RAW). Shooting with 14-bit NEF (RAW) drops the frame rate to 9 fps. In silent photography mode (electronic shutter) the frame rate drops to 8 fps for JPEG and 12-bit NEF (RAW); and 6.5 fps for 14-bit NEF (RAW).
Note: There will be some variations in the frames per second rate when using various Focus and AF-area modes. See the chart on pages 127–128 of the downloadable Nikon Z 6II/Z 7II Reference Manual.
Memory Buffer Information
When you hold down the Shutter-release button in the Continuous Release modes, the camera will fire at the chosen frame rate continuously until you let up on the button or the internal memory buffer gets full.
A chart appearing on pages 773–776 of the downloadable Nikon Z 6II/Z 7II Reference Manual, displays the number of frames you can expect the buffer to hold before the camera’s frame rate slows down, from as low as 46 frames to as high as 200.
You can also see how many frames (approximately) the buffer will hold in your camera’s current configuration by holding down the Shutter-release button halfway. In the bottom-right corner of all the camera’s screens you will see an “r” number (e.g., r46) where the frame counter is normally displayed. Whatever number follows the “r” is the number of images your camera’s buffer can hold.
Fortunately, the buffer is extended somewhat by having a fast XQD or CFexpress type B memory card in the camera. These two card types allow images to be written so quickly that often the buffer will hold more images than you would expect because one picture is being written to the memory card while one is being taken. The camera may slow down in maximum frame rate, but it will not stop accepting images in Continuous L mode.
If you don’t hold the Shutter-release button down continuously and fill up the buffer, you can often shoot a burst of images, hesitate a moment for some images to be written to the card, and then fire off another burst. You may be able to do this until you fill up the memory card!
Self-Timer
Use the Self-timer Release mode (figure 4.4G) to cause your camera to take pictures a few seconds after you press the Shutter-release button. The camera will auto focus when you press the Shutter-release button halfway down and start the Self-timer when you press it all the way down. This mode is not available in Movie mode.
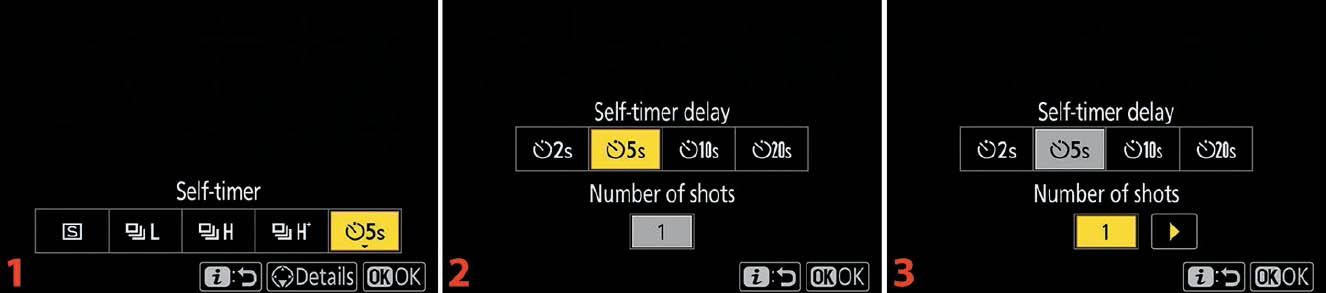
Figure 4.4G: Self-timer Release mode
To access this mode, open the Release mode screen by pressing the Release mode button (figure 4.4A, image 1). Select the Self-timer Release mode (figure 4.4G, image 1) and press down on the Multi selector pad. Select a delay timeout (i.e., 2s, 5s, 10s, or 20s), as seen in image 2. Next, press down on the Multi selector pad again to select the Number of shots (image 3) in this Self-timer cycle (from 1–9 shots). Press or touch OK to finish. The factory default time-out for the Self-timer is 5 seconds.
You can also use Custom Setting Menu > c Timers/AE lock > c2 Self-timer to set the timeout (2 s to 20 s), number of shots taken for each self-timer cycle (1–9 shots), and the interval between each shot (from 0.5s to 3s).
If you like to hear that little beep beep beep when the Self-timer is counting down the seconds before firing the shutter, you can control that sound with Setup Menu > Beep options.
After you press the Shutter-release button in Self-timer mode, the Self-timer lamp will blink about twice per second and the beeping will start (if enabled). When the last two seconds arrive, the Self-timer lamp will shine continuously, and the beeping will double in speed. You are out of time when the beeping speeds up! The image is taken at about the time the beeping stops.
If you want to stop the self-timer, simply press the MENU or Playback button.
Author’s Conclusion
I’ve followed the development of Nikon autofocus systems since the late 1980s. Autofocus with the Nikon Z6 II and Z7 II is a real pleasure. They have a more powerful AF system than many cameras before them, and yet they are somewhat simplified in operation by comparison. The system can still seem complex, but if you spend some time with this chapter, you should come away with a much greater understanding of the camera’s AF system. You’ll better understand how you can adapt your camera to work best for your style of photography. Enjoy your Nikon Z’s excellent autofocus system.
Next let’s examine the camera’s White balance system in detail. White balance is very important for JPEG shooters in particular. It is important to understand how White balance works, even if you shoot only in NEF (RAW) mode. White balance is the base for having good color in your images. Learn to use it well!