05White Balance

Laurel Falls Trail in Great Smoky Mountains © Darrell Young
Back in the good old days, photographers bought special rolls of film or filters to meet the challenges of color casts that come from indoor lighting, overcast days, or special situations.
The camera’s three Auto White balance settings (A0, A1, A2) do a great job for general shooting. However, discerning photographers learn how to use the White balance controls so they can achieve color consistency in special situations. Fortunately, the Z6 II’s and Z7 II’s method for balancing the camera to the available light comes with the White balance (WB) controls.
How Does White Balance Work?
Normally, White balance (WB) is used to adjust the camera so that whites are truly white and other colors are accurate under whatever light source you are shooting. You can also use the White balance controls to deliberately introduce color casts into your image for interesting special effects.
The camera’s WB color temperature scale is exactly the opposite of the Kelvin scale we learned in school for star temperatures. Remember that a red giant star is cool, whereas a blue/white star is hot. The WB color temperatures are the opposite of that approach because the WB system adds color to make up for a deficit of color in the original light of the subject, instead of absorbing and radiating specific color frequencies according to physical temperature the way a “blackbody” does.
Under a fluorescent light, there is a deficit of blue, which makes the subject appear greenish yellow. When the camera adds blue, the image is balanced to a more normal appearance. The White balance for many fluorescent light sources is around 4000K.
Another example might be shooting on a cloudy, overcast day. The cool, ambient light could cause the image to look bluish if left unadjusted. The White balance control in your camera sees the cool color temperature and adds some red to warm the colors a bit. The White balance on a cloudy, overcast day might be about 6000K.
Just remember that we use the real kelvin temperature range in reverse and that red colors are considered warm and blue colors are cool. Even though this is the opposite of what we were taught in school, it fits our situation better. To photographers, blue seems cool and red seems warm! Just don’t let your astronomer friends convince you otherwise.
Understanding WB in a fundamental way is simply realizing that light has an adjustable range of colors that go from cool to warm. We can adjust our cameras to use the available light in an accurate, neutral, and balanced way that compensates for the actual light source; or, we can allow a color cast to enter the image by unbalancing the settings. In this chapter, we will discuss this from the standpoint of the Z6 II and Z7 II camera controls and how they deal with WB.
Color Temperature
The camera’s WB range can vary from a very cool 2500K to a very warm 10,000K. Figure 5.0 shows the same picture adjusted in Adobe Photoshop, with the use of photo filters, to three WB settings. Notice how the image in the center is about right; the image on the left is cooler (bluish cast) and the image on the right is warmer (reddish cast). For astronomy mavens, remember that camera White balance color temperature is opposite star color temperature (see previous section).

Figure 5.0: Same image with three different WB Color Temperature settings
The same adjustments we used to make with film and filters can now be achieved with the White balance settings built into the camera. To achieve the same effect as daylight film and a warming filter, simply select the Cloudy White balance setting while shooting in normal daylight. This sets the WB to balance at about 6000K, which makes nice, warm-looking images. If you want to really warm up the image, choose the White balance setting called Shade, which sets the camera to 8000K. Or you could set the camera’s White balance to AUTO2 (A2), which warms up the colors and automatically adjusts for current light sources.
On the other hand, if you want to make the image appear cool or bluish, try using the Cool-white fluorescent (4200K) or Incandescent (3000K) setting in normal daylight.
Remember, the color temperature shifts from cool values to warm values. The camera can record your images with any color temperature from 2500K (very cool or bluish) to 10,000K (very warm or reddish) and any major value in between. There is no need to carry various film emulsions or filters to deal with light color range. The camera has very easy-to-use color temperature controls and a full range of color temperatures available. The WB symbols, official names, kelvin values, and specifications—in camera order—are as follows:
|
Auto (3500K to 8000K): This mode uses the following symbols: AUTO0 Keep white (reduce warm colors) automatically adjusts the WB with a bias toward cooler coloration. AUTO1 Keep overall atmosphere automatically adjusts the WB with coloration that most people would consider normal colors for the subject. AUTO2 Keep warm lighting colors tends to make the image a little warmer than normal, which is quite appealing to most people. When you are using a G, E, D Nikkor lens, or any Nikkor Z lens, the WB is adjusted automatically with any of the three Auto types. |
|
Natural light auto (4500–8000K): This mode is similar to AUTO1 Normal in that it adjusts the WB so that the image coloration is closer to what is normally seen by the naked eye. However, Natural light auto varies the WB automatically in a narrower range that is more consistent with natural light (e.g., landscapes). If you are a nature shooter, you may want to experiment with this mode. |
|
Direct sunlight (5200K): This mode is best used when you are photographing subjects in direct sunlight. |
|
Cloudy (6000K): This mode allows you to warm up the image on an overcast day. |
|
Shade (8000K): This mode helps overcome the strong blue tint caused by a blue sky when you are photographing a subject in the shade. |
|
Incandescent (3000K): This mode allows the camera to produce correct and consistent coloration when the main light source is an older style incandescent light (older type light bulb). |
|
Fluorescent (2700K to 7200K): This mode has seven subtypes, including Sodium-vapor lamps (2700K), Warm-white fluorescent (3000K), White fluorescent (3700K), Cool-white fluorescent (4200K), Day white fluorescent (5000K), Daylight fluorescent (6500K), and High temp. mercury-vapor (7200K). Refer to the listing on the bulb or bulb packaging in order to determine the correct type. |
|
Flash (5400K): This mode is best used when you want to match the color of your Nikon Speedlight output and maintain consistent color between frames. |
|
K (2500K–10,000K): Choose a color temperature manually from a range of color temperatures. This mode allows you to very carefully match the exact color of the lighting on a subject for more critical work. |
|
PRE (Preset manual): White balance is measured from actual ambient light by using a white or gray card under that light source. This value can then be stored in the camera’s memory (d–1 to d–6) for future reuse under the same lighting. |
When Does White Balance Matter?
Most of us will use Auto White Balance because the camera does a great job at detecting the color temperature of ambient light and adjusting the camera so that colors appear accurate.
When you are shooting JPEG images, you should make sure the White balance is correct for the current ambient light by using Auto or by manually choosing an appropriate WB setting. If you use the wrong WB value for JPEG images, it is hard to correct the color balance later during post-processing. It can be done, but it is not easy. Therefore, it is important to get the WB set correctly for JPEGs. But what about RAW images?
Many ask the question: Should I worry about WB if I shoot in NEF (RAW) mode? The quick answer is no, but that may not be the best answer. When you take a picture using NEF (RAW) mode, the sensor image data has no White balance, sharpening, or color saturation information applied. Instead, the information about your camera settings is stored as markers along with the RAW black-and-white sensor data. Color information, including White balance, is applied permanently to the image only when you post-process and save the image in another format, such as JPEG or TIFF.
When you open the image in Nikon Capture NX-D, Photoshop, Lightroom, Capture One, or another RAW conversion program, the camera settings are applied to the sensor data in a temporary way so that you can view the image on your computer screen. If you don’t like the White balance or almost any other setting you used in-camera, you can simply change it in the conversion software, and the image will look as if you used the new setting when you first took the picture.
Does that mean you should not be concerned about WB settings if you shoot RAW most of the time? No! The human brain can quickly adjust to image colors and perceive them as normal, even when they are not. The brain does its own automatic white balancing. When you are looking at a white object under direct sunlight does it not appear white to you? How about a white object under fluorescent light? It still appears white to you. Your brain adjusts the white point for you so that colors look normal to you under almost any light source, even though there may actually be a wide variance in color temperature.
This is one of the dangers of not using correct WB. Because an unbalanced image on your computer screen is not being compared to another correctly balanced image side by side, there is some danger that your brain may accept the slightly incorrect camera settings as normal, and your image will be saved with a color cast.
As a rule of thumb, if you use your WB correctly at all times, you’ll consistently produce better images. You’ll do less post-processing if the WB is correct in the first place. As RAW shooters, we already have a lot of post-processing work to do. Why add WB corrections to the workflow, unless necessary?
Additionally, you might decide to switch to JPEG mode in the middle of a shoot, and if you are not accustomed to using your WB controls, you’ll be in trouble. When you shoot JPEGs, your camera will apply the WB information directly to the image and save it on its memory card—permanently. Be safe; always use good WB technique!
Now let’s consider how to adjust the White balance.
Methods for Adjusting White Balance
There are three methods for setting the White balance in the Nikon Z. Let’s discuss each of them.
- WB on the i Menu: You can quickly access the White Balance settings by selecting White balance from the i Menu (press the i button). You will need to make sure the Photo/movie selector switch is set to the correct position for Photo or Movie mode. Different WB settings can be used for photos and video.
- WB on the Photo and Movie Shooting Menus: The White balance settings on the Photo Shooting Menu affect still images only, while the WB settings on the Movie Shooting Menu affect videos only. With one minor difference, which we will discuss, both of these menus work exactly the same. Different WB settings can be used for photos and video.
- Assigning White Balance to a camera button: If you change White balance very frequently, you can assign the White balance function to a camera button, such as Fn1 or Fn2. You can adjust the White balance for taking pictures by having the Photo/movie selector switch set to Photo mode, or for recording video by having the Photo/movie selector switch set to Movie mode.
Now let’s consider each of these White balance adjustment methods.
White Balance on the i Menu
The majority of photographers and videographers will use the camera’s i Menu to choose an appropriate WB value, simply because the White balance setting is easily available there. Let’s examine how to use the i Menu for choosing a White balance.
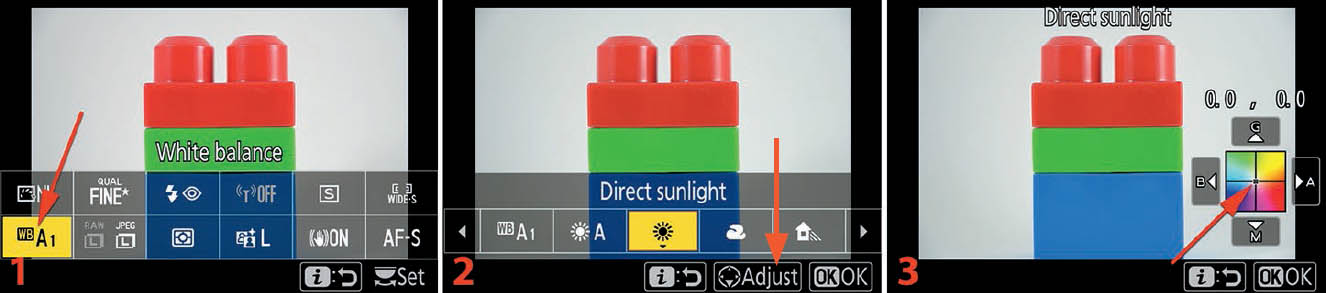
Figure 5.1A: Choosing a WB value from the i Menu
Use the following steps to choose a White balance value:
- 1.With your subject showing on the screen, press the i button to open the i Menu. Choose the White balance position on the bottom row, first position on the left (figure 5.1A, image 1), and then press OK or touch the WB position.
- 2.Select one of the White balance values (e.g., Direct sunlight) and press or touch OK (button or screen control) to finish. If you want to fine-tune the White balance color setting, you may do so by highlighting a WB value and pressing down on the Multi selector pad or by touching Adjust (figure 5.1A, image 2).
- 3.To fine-tune the current Auto WB, you have four color axes available: green (G), amber (A), magenta (M), and blue (B). Move the little black square (figure 5.1A, image 3, red arrow) toward any of the axes or between two of them. You will see the color change on your subject as you move the square. When you are satisfied with the fine-tuning, press or touch OK to finish.
Four of the WB choices have an intermediate screen (Auto, Fluorescent, K, and PRE). Let’s see how to use the additional screens.
Auto White Balance on the i Menu
The Auto WB setting has an additional screen that allows you to choose and fine-tune one of the three Auto WB settings (A0, A1, or A2). Let’s see how (using the i Menu with a lens cap on for maximum screen contrast).

Figure 5.1B: Choosing and fine-tuning an Auto WB from the i Menu
Use the following steps to choose and/or fine-tune one of the three Auto WB types:
- 1.With your subject showing on the screen, press the i button to open the i Menu. Choose the White balance position on the bottom row, first position on the left (figure 5.1B, image 1), and press the OK button or touch the WB position.
- 2.Scroll to the Auto WB item on the left and press or touch OK (e.g., A1) to lock in the current Auto WB setting (figure 5.1B, image 2). If you want to change to a different Auto WB setting, scroll down with the Multi selector pad or touch the Details control. The next screen allows you to choose one of the three WB values (i.e., A0, A1, or A2).
- 3.Select one of the three Auto WB values: A0 Keep white (reduce warm colors), A1 Keep overall atmosphere, or A2 Keep warm lighting colors (figure 5.1B, image 3). If you want to fine-tune the White balance color setting, you may do so by highlighting one of the Auto WB values and pressing down on the Multi selector pad or by touching Adjust (figure 5.1B, image 3).
- 4.To fine-tune the current Auto WB, you have four color axes available: green (G), amber (A), magenta (M), and blue (B). Move the little black square (figure 5.1B, image 4, red arrow) toward any of the axes or between two of them. You will see the color change on your subject as you move the square. When you are satisfied with the fine-tuning, press or touch OK to finish.
Fluorescent White Balance on the i Menu
The Fluorescent WB setting has an additional screen that allows you to choose and fine-tune one of the seven available fluorescent types.

Figure 5.1C: Choosing and fine-tuning a Fluorescent WB setting from the i Menu
Use the following steps to choose and/or fine-tune a Fluorescent WB type:
- 1.With your subject showing on the screen, press the i button to open the i Menu. Choose the White balance position on the bottom row, first position on the left (figure 5.1C, image 1), and then press OK or touch the WB position.
- 2.Scroll to the Fluorescent WB item (e.g., 4) and press or touch OK (figure 5.1C, image 2). If you want to change to a different Fluorescent WB setting, scroll down with the Multi selector pad or touch the Details control. The next screen allows you to choose one of the seven WB values.
- 3.Select one of the seven Fluorescent WB values (figure 5.1C, image 3): Sodium-vapor lamps (1), Warm-white fluorescent (2), White fluorescent (3), Cool-white fluorescent (4), Day white fluorescent (5), Daylight fluorescent (6), or High temp. mercury-vapor (7). If you want to fine-tune the White balance color setting, you may do so by highlighting one of the Fluorescent WB values and pressing down on the Multi selector pad or by touching Adjust (figure 5.1C, image 3).
- 4.To fine-tune the current Fluorescent WB, you have four color axes available: green (G), amber (A), magenta (M), and blue (B). Move the little black square (figure 5.1C, image 4, red arrow) toward any of the axes or between two of them. You will see the color change on your subject as you move the square. When you are satisfied with the fine-tuning, press or touch OK to finish.
K White Balance on the i Menu
The K WB setting has an additional screen that allows you to choose and fine-tune a specific color temperature in the range of 2500K to 10000K.

Figure 5.1D: Choosing and fine-tuning a K WB setting on the i Menu
Use the following steps to choose and/or fine-tune a K White balance type:
- 1.With your subject showing on the screen, press the i button to open the i Menu. Choose the White balance position on the bottom row, first position on the left (figure 5.1D, image 1), and press OK or touch the WB position.
- 2.Scroll to the K WB item and press or touch OK (e.g., 4) to lock in the current K WB setting (figure 5.1D, image 2). The default is 5000K. If you want to change to a different K WB setting, scroll down with the Multi selector pad or touch the Adjust control. The next screen allows you to choose from a range of WB values.
- 3.Make sure the yellow box is surrounding the left (5000K) area of the screen (figure 5.D, image 3, red arrow). There are three adjustable up/down settings. Touch on the up/down pointers or press up or down on the Multi selector pad to choose a value for each of the three adjustment fields. The available range is 2500K to 10000K. Press or touch OK to finish.
- 4.If you want to fine-tune the White balance color setting, you may do so by moving the yellow box to the right. This is the fine-tuning section for the K WB screen. Pressing down on the Multi selector pad or touching the lower (M) pointer with your fingertip adds magenta to the current White balance (figure 5.1D, image 4). Pressing up on the Multi selector pad or touching the upper (G) pointer with your fingertip adds green to the current K White balance. You will immediately see the fine-tuning color changes in your subject. When fine-tuning a specific K value, you cannot add blue (B) or amber (A), as with previous WB settings. When you are satisfied with the fine-tuning, press or touch OK to finish.
PRE White Balance on the i Menu
The PRE WB setting has an additional screen that allows you to choose from or create saved WB settings.
This setting is one of the camera’s prime ways to let you create WB settings and save them for immediate and later use. These saved preset values are created by reading a white or gray card under the current ambient light.

Figure 5.1E: Choosing and/or creating a measured WB reading from the i Menu
Use the following steps to choose or create a measured PRE WB:
- 1.Point the camera’s lens at a well-lit white or gray card—don’t worry about focus—and press the i button to open the i Menu. Choose the White balance position on the bottom row, first position on the left (figure 5.1E, image 1), and press the OK button or touch the WB position.
- 2.Scroll to the PRE WB item (e.g., PRE1) and press or touch OK to lock in the current PRE WB setting (figure 5.1E, image 2). If, instead, you want to measure the light and create a new PRE WB setting, scroll down with the Multi selector pad to open the next screen.
- 3.Choose one of the available PRE memory locations (d–1 to d–6). You will place the upcoming white or gray card reading into one of these six memory locations for immediate and future use (figure 5.1E, image 3). When you have selected the memory location (e.g., d–1) where you want to receive the white or gray card reading, press or touch OK to return to the main i Menu screen.
- 4.You will note that the i Menu screen now has a new touch control named OK–Measure mde (figure 5.1E, image 4, red arrow). Touch on OK–Measure mde and the camera will switch to the measurement screen.
- 5.PRE1 (or whichever PRE-number you chose) will be flashing in the top-right corner of the measurement screen (figure 5.1E, image 5). This screen allows you read the ambient light reflected from your white or gray card and then store that in one of six PRE WB memory locations (d–1 to d–6) for immediate or later use. Make sure the white or gray card is close to the front of the lens—without casting a shadow on the card that might influence the reading—and press or touch OK Measure. The camera will not try to focus on the card so you can place it close to the lens to prevent reading anything from the background. You will hear the shutter open and close as the camera makes a White balance reading of the card.
- 6.If the WB reading was successful, you will see a screen like the one shown in figure 5.1E, image 6. The camera will inform you: Data acquired. The WB reading has been stored in the memory location (d–1 to d–6) you chose. You can now take pictures with accurate white balance while remaining under the current light source. You can also return later to the same light source, if it has not changed, and reuse the WB reading you just stored, by selecting the memory location again (see steps 1 and 2). If the WB reading was unsuccessful, the camera will inform you: Unable to measure white balance. Please try again. If you see this message, the light may be too dim, the card may have a very bright reflection or an intruding shadow, or the color or pattern of the card may be unacceptable to the camera. If the reading was unsuccessful, reposition the camera or change cards and try again.
Note: You can fine-tune this PRE WB setting by touching the Adjust control seen in figure 5.1E, image 3. Use the instructions seen under figure 5.1C, image 4 (step 4) to fine-tune the WB setting.
WB on the Photo and Movie Shooting Menus
This method involves using either the Photo Shooting Menu or Movie Shooting Menu screens to select the appropriate White balance. As an example, we will use the Photo Shooting Menu; however, the Movie Shooting Menu works in the same manner with a couple of minor differences, which we will discuss.

Figure 5.2A: Choosing a WB value from the Photo or Movie Shooting Menu
Use the following steps to choose a White balance value:
- 1.Choose White balance from the Photo or Movie Shooting Menu (figure 5.2A, image 1).
- 2.Select one of the White balance values (e.g., Direct sunlight) and press or touch OK to finish. Figure 5.2A, image 2, shows the secondary screen from the Photo Shooting Menu, and figure 5.2A, image 3, shows the secondary screen from the Movie Shooting Menu. There are two minor differences in the Movie Shooting Menu:
- The Photo Shooting Menu (image 2) has a Flash WB setting (not shown) that does not exist on the Movie Shooting Menu. You will not use a Nikon Speedlight flash while capturing video, so the setting is not available on the Movie Shooting Menu.
- The Movie Shooting Menu (image 3) has a setting called Same as photo settings. This setting tells the camera to use the same WB settings for both still images and video, using the Photo Shooting Menu settings for both.
- 3.If you want to fine-tune the White balance color setting, you may do so by highlighting a WB value and scrolling to the right with the Multi selector pad or by touching Adjust (figure 5.2A, image 2).
- 4.To fine-tune the current Auto WB, you have four color axes available: green (G), amber (A), magenta (M), and blue (B). Move the little black square (figure 5.2A, image 4, red arrow) toward any of the axes or between two of them. You will see the color change on your subject as you move the square. When you are satisfied with the fine-tuning, press or touch OK to finish.
Four of the WB choices have an intermediate screen (Auto, Fluorescent, K, and PRE). Let’s see how to use the additional screens.
Auto White Balance on the Photo/Movie Shooting Menus
The Auto WB setting has an additional screen that allows you to choose and fine-tune one of the three Auto WB settings (AUTO0, AUTO1, or AUTO2). Let’s see how.

Figure 5.2B: Choosing and fine-tuning Auto WB from the Photo/Movie Shooting Menu
Use the following steps to choose and/or fine-tune one of the three Auto WB types:
- 1.Choose White balance from the Photo or Movie Shooting Menu (figure 5.2B, image 1).
- 2.Scroll to the Auto WB item (e.g., AUTO1) and press or touch OK to lock in the current Auto WB setting (figure 5.2B, image 2). If you want to change to a different Auto WB setting, scroll to the right with the Multi selector pad. The next screen allows you to choose one of the three WB values (i.e., AUTO0, AUTO1, or AUTO2).
- 3.Select one of the three Auto WB values: AUTO0 Keep white (reduce warm colors), AUTO1 Keep overall atmosphere, or AUTO2 Keep warm lighting colors (figure 5.2B, image 3). If you want to fine-tune the White balance color setting, you may do so by highlighting one of the Auto WB values and scrolling to the right with the Multi selector pad or by touching Adjust (figure 5.2B, image 3).
- 4.To fine-tune the current Auto WB, you have four color axes available: green (G), amber (A), magenta (M), and blue (B). Move the little black square (figure 5.2B, image 4, red arrow) toward any of the axes or between two of them. When you are satisfied with your fine-tuning, press or touch OK to finish.
Settings Recommendation: I often use AUTO1 White balance on my camera for general-purpose photography. The only time I use anything but AUTO1 is when I am shooting special types of images. For instance, if I am shooting an event with flash and I want consistent image color, I often choose the Flash White balance setting. Or, if I am shooting landscapes, I often shoot with the Natural light auto White balance setting. Other than special occasions, Auto White balance works very well for me. Give it a try, along with each of the others in their respective environments. Experimenting is part of improving our digital photography. A few years back, we carried different film emulsions and colored filters to get these same effects. Now it’s all built in!
Fluorescent White Balance on the Photo/Movie Shooting Menus
The Fluorescent WB setting has an additional screen that allows you to choose and fine-tune one of the seven available fluorescent types.

Figure 5.2C: Choosing and fine-tuning Fluorescent WB on the Photo/Movie Shooting Menu
Use the following steps to choose and/or fine-tune a Fluorescent WB type:
- 1.Choose White balance from the Photo or Movie Shooting Menu (figure 5.2C, image 1).
- 2.Scroll to the Fluorescent WB item (e.g., 4) and press or touch OK to lock in the current Fluorescent WB setting (figure 5.2C, image 2). If you want to change to a different Fluorescent WB setting, scroll to the right with the Multi selector pad. The next screen allows you to choose one of the seven WB values.
- 3.Select one of the seven Fluorescent WB types (figure 5.2C, image 3) and press or touch OK to finish. If you want to fine-tune the White balance color setting, you may do so by highlighting one of the Fluorescent WB values and scrolling to the right with the Multi selector pad or by touching Adjust (figure 5.2C, image 3).
- 4.To fine-tune the current Fluorescent WB, you have four color axes available: green (G), amber (A), magenta (M), and blue (B). Move the little black square (figure 5.2C, image 4, red arrow) toward any of the axes or between two of them. When you are satisfied with your fine-tuning, press or touch OK to finish.
K White Balance on the Photo/Movie Shooting Menus
The K WB setting has an additional screen that allows you to choose and fine-tune a specific color temperature in the range of 2500K to 10000K.

Figure 5.2D: Choosing and fine-tuning a K WB on the Photo/Movie Shooting Menu
Use the following steps to choose and/or fine-tune a K White balance type:
- 1.Choose White balance from the Photo or Movie Shooting Menu (figure 5.2D, image 1).
- 2.Scroll to the K Choose color temperature item and press or touch OK to lock in the current K WB setting (figure 5.2D, image 2). The default is 5000K. If you want to change to a different K WB setting, scroll to the right with the Multi selector pad. The next screen allows you to choose from a range of WB values.
- 3.The yellow box should be surrounding the left (2500K–10000K) area of the screen (figure 5.2D, image 3, red arrow). There are three adjustable up/down settings. Touch on the up/down pointers or press up or down on the Multi selector pad to choose a value for each of the three adjustment fields. The available range is 2500K to 10000K. Press or touch OK to finish.
- 4.If you want to fine-tune the White balance color setting, you may do so by moving the yellow box to the right. This is the fine-tuning section for the K WB screen. Pressing down on the Multi selector pad or touching the lower (M) pointer adds magenta to the current White balance (figure 5.2D, image 4). Pressing up on the Multi selector pad or touching the upper (G) pointer adds green to the current K White balance. You will immediately see the fine-tuning color changes in your subject. You cannot add blue (B) or amber (A), as with previous WB settings, when fine-tuning a specific K value. When you are satisfied with your fine-tuning, press or touch OK to finish.
PRE White Balance on the Photo/Movie Shooting Menu
The PRE (Preset manual) WB setting has additional screens that allow you to choose, name, and protect saved WB readings. These saved preset values are ones you’ve created previously by reading a white or gray card under the current ambient light (page 119).
Additionally, you can select another image to use as a WB source, copying the WB from an older image to a saved PRE memory location for use when making new images and videos.
Let’s examine each of the subsettings within the PRE WB setting.
Choosing an Existing PRE White Balance
The PRE WB method for the Photo/Movie Shooting Menus is a little complicated because there are several subsettings to consider.
First, let’s examine how to choose an existing PRE WB measurement you have previously stored (page 124) in the camera’s six PRE memory locations (d-1 to d-6).

Figure 5.2E: Choosing an existing (pre-measured) PRE WB setting
Use the following steps to choose or create a measured PRE WB:
- 1.Choose White balance from the Photo or Movie Shooting Menu (figure 5.2E, image 1).
- 2.Select to the Preset manual item (e.g., PRE1) and scroll to the right (figure 5.2E, image 2).
- 3.Highlight one of the existing stored PRE WB measurements (d–1 to d–6) and press or touch OK to finish (5.2E, image 3).
Next let’s examine how to fine-tune a Preset manual WB setting.
Fine-Tuning an Existing PRE White Balance
Previously we examined how to take a PRE measurement from a white or gray card to balance the camera to the available light (page 119), and we also looked at how to select an existing PRE WB (previous subsection). What if you want to fine-tune one of the d–1 to d–6 Preset manual in mired values before you use it? Let’s see how.

Figure 5.2F: Fine-tuning a Preset manual WB value
Use these steps to fine-tune a Preset White balance value:
- 1.Follow the screen flow shown in figure 5.2F, images 1 and 2 (White balance > Preset manual), until you arrive at the third screen in the series.
- 2.Scroll to one of the memory location you want to fine-tune (d–1 to d–6) with the Multi selector pad (figure 5.2F, image 3). Press the Zoom in button or touch Select to open the Preset manual menu. Note: Don’t press OK or touch the d–1 to d–6 location in this case because that will merely select that particular Preset for use and not allow you to fine-tune the value. You must use the Zoom in button or touch Select.
- 3.Choose Fine-tune from the Preset manual menu and scroll to the right (figure 5.2F, image 4).
- 4.Use the Multi selector pad to adjust the color balance in 0.25- or 0.5-mired increments (figure 5.2F, image 5), according to the direction you press on the Multi selector pad (i.e., up/down = 0.25 mired; left/right = 0.5 mired; and one full step = 5 mired). You can also touch on the arrows on the four sides of the color box with your fingertip to modify the color values. Scroll around in the color box toward whatever color you want to add to the currently stored White balance (B2.0 and G2.0 are selected in figure 5.2F, image 5). You’ll see the color-mired values change on the right side of the screen in the fields next to A–B and G–M. Each full step (e.g., G1.0 to G2.0) is equal to about 5 mired.
- 5.Press or touch OK to save your adjustments to the stored White balance. When you return to the main Photo or Movie Shooting Menu screen you will see that PRE* appears next to White balance (figure 5.2F, image 6). The asterisk shows that this particular Preset manual WB has been fine-tuned.
What Is Mired?
In this chapter I mention adjusting the White balance in mired increments. Mired stands for micro reciprocal degree. It is a unit of measurement used to express color temperature value differences. It is based on a just-noticeable difference between two light sources and founded on the difference of the reciprocal of their kelvin color temperatures (not the temperatures themselves). The use of mired values dates back to 1932 when Irwin G. Priest invented the method. It is based on a mathematical formula, as follows: M = 1,000,000 / T, where M is the desired mired value and T is the color temperature in units of kelvin. Most of us don’t need to be concerned about understanding the term “mired.” Just realize that it means a visual difference between color values.
Editing a Preset Manual (PRE) WB Comment Field
You can edit (add text to) the comment field of an existing PRE WB memory location (d–1 to d–6) to help you remember what type of light was measured and stored in that Preset manual setting.
Let’s see how to change the comment to something that will remind you of this measured WB setting’s purpose.

Figure 5.2G: Editing the comment field
Here are the steps to edit a WB setting’s comment field:
- 1.Follow the screen flow shown in figure 5.2G, images 1 and 2 (White balance > Preset manual), until you arrive at the third screen in the series.
- 2.Select the memory location for which you want to edit the comment (d–1 to d–6) and press the Zoom in button or touch Select with your fingertip (figure 5.2G, image 3). This will open the Preset manual menu. Don’t press OK or touch the item in this case because that will merely select the d–1 Preset for use and won’t allow you to edit the comment field. You must use the Zoom in button or the Select touch control. Notice at the tip of the red arrow in image 3 there is no text after d–1 in the comment field. Let’s use this field to identify under what type of light source the PRE reading was taken.
- 3.Choose Edit comment from the menu and scroll to the right (figure 5.2G, image 4).
- 4.The character-selection panel will now appear (figure 5.2G, image 5). Use the touch screen arrows to move the cursor in the data entry field and then touch on the characters you want to use in each space. Touch on the Aa& button to change case and to select symbols. Select Delete to delete the current character. Press or touch OK to save the PRE memory location comment.
- 5.The White balance memory location screen will now appear with the new memory location comment displayed (figure 5.2G, image 6, red arrow). Here, the PRE comment field for memory location d–1 was changed to Fluorescent Bulb.
Settings Recommendation: Unfortunately, you cannot create a PRE comment at the time you make a Preset manual reading from a white or gray card (page 119); you will have to use this Edit comment item in the Photo or Movie Shooting Menu. At the very least, I think you should be able to make a PRE WB reading here in this function and then name it. However, you must make the reading under the i Menu or from a button with White balance assigned to it (page 124) to create a new PRE WB measurement, and then you must come here and set up the comment field. This separation is not well thought out, in my opinion.
Using the White Balance from a Previous Image (Select Image)
This setting allows you to select an image you have already successfully taken and then store the WB information from that image in a PRE memory area (d–1 to d–6) to use it for new images. The thumbnail of the image will appear in the PRE location you select. Let’s see how.

Figure 5.2H: Using White balance from a previously taken image
Here are the steps to recover the White balance setting from an image stored on your camera’s memory card:
- 1.Follow the screen flow shown in figure 5.2H, images 1 and 2 (White balance > Preset manual), until you arrive at the third screen in the series.
- 2.Choose a memory location to which you want to save the White balance setting from an existing picture. I chose d–5 (figure 5.2H, image 3). Press the Zoom in button or touch Select to choose the memory location. This opens the Preset manual menu. Note: Don’t press OK or touch the item at this time because that will merely select the d–5 Preset for use and will not allow you to select a previously taken image. You must use the Zoom in button or the Select touch control.
- 3.Choose Select image from the Preset manual menu and scroll to the right (figure 5.2H, image 4). Select image will be grayed out if there are no images on your current memory card.
- 4.You will now see the Select image screen (figure 5.2H, image 5). Navigate through the available image thumbnails until you find the one you want to use for White balance information. You can zoom in to look at a larger version of the image by pressing the Zoom in button or by touching the Zoom control. Press or touch OK to choose the image.
- 5.A thumbnail of the image will appear in your selected Preset White balance memory location and is saved there for future use (figure 5.2H, image 6). The White balance setting from that picture is now the White balance setting for the camera, until you change it.
Protecting a White Balance Preset
You may have gone to great efforts to create a particular PRE WB value that you will use frequently. Maybe you have a studio with a certain type of lighting that does not vary, and you want to have a dependable Preset manual value available for it. Let’s see how to protect a saved Preset (d–1 to d–6) value.

Figure 5.2I: Protecting a Preset manual White balance from deletion or change
Here are the steps to protect a White balance Preset manual value:
- 1.Follow the screen flow shown in figure 5.2I, images 1 and 2 (White balance > Preset manual), until you arrive at the third screen in the series.
- 2.Choose the memory location you want to protect (d–1 to d–6). We will use Preset manual d–5 (figure 5.2I, image 3) as our example. Press the Zoom in button or touch on Select to select the Preset memory location. This opens the Preset manual menu. Note: Don’t press OK or touch the item at this time because that will merely select the d–1 Preset for use and will not allow you to protect the Preset manual value. You must use the Zoom in button or the Select touch control.
- 3.Choose Protect from the Preset manual menu and scroll to the right (figure 5.2I, image 4).
- 4.Choose On to protect or Off to remove protection from the selected White balance memory location. I am protecting d–5, so I chose On (figure 5.2I, image 5).
- 5.The camera will display the White balance screen with a protection symbol (a tiny key) showing on the memory location you protected. The key symbol at the point of the red arrow in figure 5.2I, image 6, shows that memory location d–5 is locked from deletion and change. You cannot modify the protected value in any way, including fine-tuning or editing the comment field, until you remove the protection.
Now let’s examine how to use an assigned camera button for White balance operations.
Using an Assigned Camera Button for White Balance
The camera’s Fn1 button defaults to White balance. Therefore, unless it has been changed, you will be able to use the Fn1 button immediately to execute various WB operations.
In case you want to assign White balance to a different button or change Fn1 back to White balance (if it was changed), let’s review how to assign White balance to a camera control.
Assigning White Balance to a Camera Control
Let’s briefly examine how to assign White balance to the Fn1 button, in case your camera has been changed. You can assign White balance to another control if you would prefer.
If you press the Fn1 button and the White balance screen appears, you can skip figure 5.3A and its four steps.

Figure 5.3A: Assigning White balance to the Fn1 button
Use the following steps to assign White balance to the Fn1 button, or another camera control (we will use the Fn1 button as our example):
- 1.Choose f Controls (figure 5.3A, image 1).
- 2.Select f2 Custom control assignment (figure 5.3A, image 2).
- 3.Highlight the Fn1 button (or some other control, if you prefer) and press OK to enter the assignment screen (figure 5.3A, image 3).
- 4.Scroll up or down with the Multi selector pad until you locate White balance (WB) on the menu (figure 5.3A, image 4). Highlight White balance and press OK to assign White balance to the Fn1 button.
Now that we have assigned White balance to the Fn1 button, let’s see how to use the Fn1 button to execute White balance operations.
Using an Assigned Button for White Balance Operations
In the previous subsection we assigned White balance to the Fn1 button (which is also the factory default). Let’s now examine how to use the Fn1 button to control White balance.
Choosing a White Balance with the Fn1 Button
To use a button to call up the White balance (WB) system, you will need to choose a capture mode (photo or video), press and hold the assigned button down, and rotate the rear Main command dial to select a White balance type and the front Sub-command dial to select a subtype—if there is one.
First let’s examine how to select a White balance with no subtype (Direct sunlight).

Figure 5.3B: Choosing a WB type with the Fn1 button
Use the following steps to choose a White balance type with the Fn1 button (or a different assigned button):
- 1.Set the Photo/Movie selector (figure 5.3B, image 1, red arrow) to Photography mode (top position) or Movie mode (bottom position).
- 2.Press and hold the Fn1 button, or other assigned button (figure 5.3B, image 2), and the White balance screen will appear (figure 5.3B, image 3). While still pressing the Fn1 button, rotate the rear Main command dial and you will see 10 White balance types scroll across the screen.
- 3.Stop turning the rear dial when the White balance you want to use is highlighted in yellow (figure 5.3B, image 4). The name of the White balance type will show just below the highlighted symbol for that WB, such as the one currently selected (Direct sunlight). Simply release the Fn1 button when you have selected a particular White balance and you are ready to take pictures or capture video with the selected White balance.
Now that we have seen how to select a White balance that has no subtypes (Natural light auto, Direct sunlight, Cloudy, Shade, and Incandescent), let’s examine White balance settings that do have subtypes (Auto, Fluorescent, K, and PRE).
Auto White Balance Selection by Assigned Button
The Auto WB setting has three available subtypes. Since each is an Auto WB setting, they each have a range of color temperatures they can automatically select from, varying from as cool as 3500K to as warm as 8000K.
Remember, Nikon’s Kelvin White balance is backwards from the blackbody radiation Kelvin color temperatures we learned about in school because the camera adds colors to balance for a deficit of certain colors radiating from your subject.
Here is a description of the three Auto subtypes:
- AUTO0 – Keep white (reduce warm colors): This Auto setting tends to cool down the image by selecting from a cooler white balance (e.g., in the direction of 3500K).
- AUTO1 – Keep overall atmosphere: This Auto setting is more neutral and is probably perferred for most general photography and video, where the photographer/video-grapher is not overly concerned about maintaining a singular white balance, yet wants nicely balanced colors. This setting tends to keep the white balance around the 5000K range, but can move up or down the Kelvin scale as needed, within the 3500K to 8000K range.
- AUTO2 – Keep warm lighting colors: This Auto setting is for those of us who love the feel of warmer pictures. If you used a warming filter on your film camera, this setting is for you. This setting will tend to automatically select white balance in the warmer range toward 8000K, without warming up the image too much.
Let’s examine how to select an Auto setting and one of its subtypes.

Figure 5.3C: Choosing Auto WB and a subtype
Use the following steps to choose Auto WB and one of its three subtypes:
- 1.Press and hold the Fn1 button while rotating the rear Main command dial until Auto is selected (figure 5.3C, image 1).
- 2.While still holding the Fn1 button, rotate the front Sub-command dial. You may select from A0, A1, or A2, also known as: 0 Keep white (reduce warm colors), 1 Keep overall atmosphere, and 2 Keep warm lighting colors (figure 5.3C, image 2).
- 3.When you have selected Auto WB and one of its three subtypes, release the Fn1 button and go make pictures or movies with your selected White balance.
Fluorescent White Balance Selection by Assigned Button
The camera offers seven different Fluorescent White balance settings so that you can carefully match your White balance to the ambient fluorescent light type.

Figure 5.3D: Selecting the Fluorescent White balance and one of its subtypes
Use the following steps to choose Fluorescent WB and one of its seven subtypes:
- 1.Press and hold the Fn1 button while rotating the rear Main command dial until Fluorescent is selected (figure 5.3D, image 1).
- 2.While still holding the Fn1 button, rotate the front Sub-command dial. You may select from: 1 Sodium-vapor lamps, 2 Warm-white fluorescent, 3 White fluorescent, 4 Cool-white fluorescent (default), 5 Day white fluorescent, 6 Daylight fluorescent, and 7 High temp. mercury-vapor (figure 5.3D, image 2).
- 3.When you have selected Fluorescent WB and one of its seven subtypes, release the Fn1 button and the new White balance is locked in.
K White Balance Selection by Assigned Button
The K WB setting allows you to select a specific Kelvin color temperature from a range of 2500K to 10000K. Let’s see how.

Figure 5.3E: Choosing a specific Kelvin WB color temperature
Use the following steps to choose a specific Kelvin (K) WB color temperature:
- 1.Press and hold the Fn1 button while rotating the rear Main command dial until Choose color temperature is selected (figure 5.3E, image 1).
- 2.While still holding the Fn1 button, rotate the front Sub-command dial. You may select from a large Kelvin color temperature range of 2500K to 10000K (figure 5.3E, image 2).
- 3.When you have selected Choose color temperature and a specific Kelvin WB value (e.g., 5260K), release the Fn1 button to lock in the new White balance.
PRE White Balance Selection by Assigned Button
This setting allows you to choose a Preset manual (PRE) White balance that has been previously created. You can also use a white or gray card and do a WB reading for immediate use or to store for future use. The camera provides six Preset manual WB memory locations (d–1 to d–6) for your use.
Let’s examine how to choose an existing PRE WB and also how to make a new one.

Figure 5.3F: Selecting a Preset manual (PRE) WB setting and/or making a new one
Use the following steps to choose an existing Preset manual (PRE) WB setting and/or obtain a measurement from a gray or white card to make and store a new PRE WB setting:
- 1.Press and hold the Fn1 button while rotating the rear Main command dial until Preset manual is selected (figure 5.3F, image 1).
- 2.While still holding the Fn1 button, rotate the front Sub-command dial. You may select from six Preset manual memory locations: PRE1 (d–1) to PRE6 (d–6), as seen in figure 5.3F, image 2. Once you have selected an existing PRE WB setting, you can simply release the Fn1 button and use the previously saved Preset manual WB value. Or you can make a new PRE WB reading by following the next two steps.
- 3.With a Preset manual memory location selected (e.g., PRE6), release and repress the Fn1 button. You will need to hold the Fn1 button down for a couple of seconds and then the screen shown in figure 5.3F, image 3, will display with a PRE symbol and number blinking in the top right corner (e.g., PRE6). Point the lens at a white or gray card, while under the ambient light you want to measure. At the bottom of the screen (image 3) is a touch control called Measure. Touch on the Measure control or press the OK button to do a reading of the light reflected from your white or gray card.
- 4.If the WB measurement was successful, you will see the screen shown in figure 5.3F, image 4, with the message: Data acquired. If the white balance measurement was unsuccessful, you will instead see the message: Unable to measure white balance. Please try again. If the reading fails, please refer to the side bar below titled: White Balance Tips and Tricks.
This WB function and the WB function found under the i Menu (page 23) are the two ways the camera has provided to let you make accurate, measured white balance readings when you must maintain consistent colors, such as when doing product shots in a studio. Learn to use both of them so that you can make a WB reading when you need it.
White Balance Tips and Tricks
When measuring WB with a gray or white card, keep in mind that your camera does not need to focus on the card. In PRE mode, it will not focus anyway because it is only trying to read light values, not take a picture. The important thing is to put your lens close enough to the card to prevent it from seeing anything other than the card. Three or four inches (about 75mm to 100mm) away from the card is about right for most lenses.
Be careful that your lens does not cast a shadow onto the card in a way that lets your camera see some of the shadow. This will make the measurement less accurate. Also, be sure that your source light does not produce glare on the card. This problem is not common because most cards have a matte surface, but it can happen. You may want to hold the card at a slight angle to the source light if the light is particularly bright and might cause glare.
Finally, when the light is dim, use the white side of the card because it is more reflective. This may prevent a bad reading in low light. The gray card may be more accurate for color balancing, but it might be a little dark for a good measurement in dim light. If you are shooting in normal light, the gray card is best for balancing. You might want to experiment in normal light to see which you prefer.
Auto White Balance Considerations
Auto White balance works very well in the Nikon Z6 II and Z7 II. As the camera’s RGB meter senses colors, it does its best to balance to any white or midrange grays it can find in the image. However, the color will vary a little on each shot. If you shoot only in Auto WB mode, your camera considers each image a new WB problem and solves it without reference to the last image taken.
That’s not a problem unless you must maintain a very tightly controlled color balance, in which case you should not use Auto WB. Instead, you should do a white or gray card reading (page 119) and arrive at a very specific White balance for your needs.
For the majority of us, using one of the three Auto White balance settings (AUTO0 to AUTO2) is fine. Nikon’s color science is excellent and is recognized as one of the best available. Therefore, you can feel confident in using Auto WB for most of your photography and videography.
Remember that it is very important to get the white balance right when you are shooting in JPEG or TIFF modes. It is hard to change color balance when the color settings have been baked into the image file. On the other hand, shooting in NEF (RAW) mode frees you from some of the worry of White balance accuracy. You can change the WB on a RAW file after the fact and it will be as if you had used the new WB when you first took the picture. Learn to use RAW mode, if you haven’t already, and post-process your own images! This is the closest thing we have to the chemical darkrooms of old (we miss you, Ansel Adams).
You have a robust digital darkroom. Learn to use WB effectively and shoot in RAW mode for best results.
Author’s Conclusion
With these simple tips and some practice, you can become a Nikon Z White balance expert. Learn to use the color temperature features of your camera to make superior images. You’ll be able to capture very accurate colors or make pictures with intentional color casts to reflect how you feel about your images. Practice a bit and you’ll find it easy to remember how to set WB in the field.
Now, let’s move on to the reference section of this book (chapters 6–12), with a detailed consideration of all the menu items and the hundreds of individual settings inside your powerful Z6 II and Z7 II camera.