
Movie-Making Basics | 10 |
As we’ve seen during our exploration of its features so far, the a7 IV is superbly equipped for taking still photographs of very high quality in a wide variety of shooting environments. But this camera’s superior level of performance is not limited to stills. It’s highly capable in the movie-making arena as well. It can shoot Full HD (high-definition) and 4K (ultra-high-definition) clips. Sony has also provided overrides for controlling all important aspects of a video clip.
So, even though you may have bought your camera primarily for shooting stationary scenes, you acquired a device that’s also great for recording high-quality video clips. Whether you’re looking to record informal clips of the family on vacation, the latest viral video for YouTube, or a set of scenes that will be painstakingly crafted into a cinematic masterpiece using editing software, the a7 IV will perform admirably.
This camera can shoot HD video in the XAVC S and HS format with full HD 1920 × 1080-pixel resolution, and, optionally, a “proxy” copy recorded simultaneously. The a7 IV adds the ability to capture superior 4K video internally using XAVC S 4K at 24p, 25p, and 30p. A 4K 60p mode is also available, but only in Super 35/APS-C mode. Good news for vloggers and those who need to shoot long-form video (such as presentations or concerts) is that the 29-minute recording limitation has been eliminated; you can capture as much video as your memory card (or attached video recorder) can hold—subject only to possible overheating that can occur in warm environments or when recording 4K video at the fastest transfer speeds.
The a7 IV offers Standard and Active image stabilization; Standard takes advantage of the camera’s in-body stabilization (and that of a lens with built-in Optical Image Stabilization), while the Active mode uses electronic stabilization as well, with a small crop used to trim the borders as the frames are realigned to account for blur. This chapter and the next deal with conventional video; S&Q (slow-and quick-motion video) settings were explained in Chapter 6.
The a7 IV also uses something called Picture Profiles, to tailor color, saturation, sharpness, and some video-centric attributes. You can visualize Picture Profiles as Creative Looks for video. This chapter will show you the fundamentals of shooting video; in the next chapter, you’ll learn about some of your camera’s more advanced features.
Some Fundamentals
Recording a video with the a7 IV is extraordinarily easy to accomplish—just press the black button with the red ring located on the top of the camera to the immediate southeast of the shutter button. Sony has placed it there to minimize the chance that you’ll start recording a movie accidentally. That’s because video can be captured in any exposure mode; there’s no need to activate a special Movie mode. After you press the button, the camera will confirm that it’s recording with a red REC and numerals showing the elapsed time in the EVF and LCD monitor. Press the button again when you want to stop recording.
Before you start, though, there are steps to take to prepare the camera to record the scene the way you want it to. I’ll show you how to optimize your settings before you start shooting video, but here are some considerations to be aware of as you get started. Many of these points will be covered in more detail later in this chapter:
- ■Use the right card. Because movie capture is, basically, full-time “continuous” shooting, you’ll need to use a memory card with sufficient capacity and a fast enough write speed to handle the streams of video you’ll be shooting. I recommend CFexpress memory cards 64GB or larger.
- ■Avoid extraneous noise. Try not to make too much noise when changing camera controls or when using a conventional zoom lens’s mechanical zooming ring. Power zooms with a zoom lever on the lens are typically relatively quiet. The new Sony FE 16-35mm f/4 PZ G lens was specifically designed with four (count ‘em) separate linear motors to drive the zoom mechanism. And don’t make comments while capturing that you will not want to hear on the audio track.
- ■Minimize zooming. While it’s great to be able to use the zoom for filling the frame with a distant subject (especially the power zoom on lenses equipped with that feature), think twice before zooming. The sound made by a mechanical zoom ring rotating will be picked up and it will be audible when you play a movie. (As I noted, lenses with power zoom are virtually silent.) As well, remember that any more than the occasional minor zoom will be very distracting to friends who watch your videos. And while digital zoom will definitely degrade video quality, the effect is minimized when shooting video because your final video frame (in Full HD mode) will be just 1920 × 1080 pixels and 3840 × 2160 pixels in 4K mode. Digital zoom is useful as a way of mimicking a power zoom, as you can “zoom” quietly and digitally by pressing the right button, and then pressing and holding again to zoom continuously.
- ■Use a fully charged battery. A fresh battery will allow at least one hour of filming at normal (nonwinter) temperatures, but that can be shorter if there are many focus adjustments.
- ■Keep it cool. Video quality can suffer terribly when the imaging sensor gets hot so keep the camera in a cool place. When shooting on hot days especially, the sensor can get hot more quickly than usual; when there’s a risk of overheating, the camera will stop recording and it will shut down about five seconds later. A thermometer icon will appear on the screen as a warning. Give the sensor time to cool down before using the camera again. This limitation generally won’t affect serious movie makers, who tend to shoot a series of short scenes that are assembled into a finished movie with an editor. But if you plan to set up your camera and photograph your kid’s school pageant non-stop for an hour, you’re out of luck.
- ■Press the Movie button. You don’t have to hold it down. Press it again when you’re done to stop recording. It’s recessed so you will not press it inadvertently.
Preparing to Shoot Video
First, here’s what I recommend you do to prepare for a basic recording session. More advanced detail settings will be addressed later. Although many movie settings are available when the Still/ Movie/S&Q dial is set to the Still photo position, you’ll have access to a full range of options if you rotate it to the Movie position as you prepare to capture video.
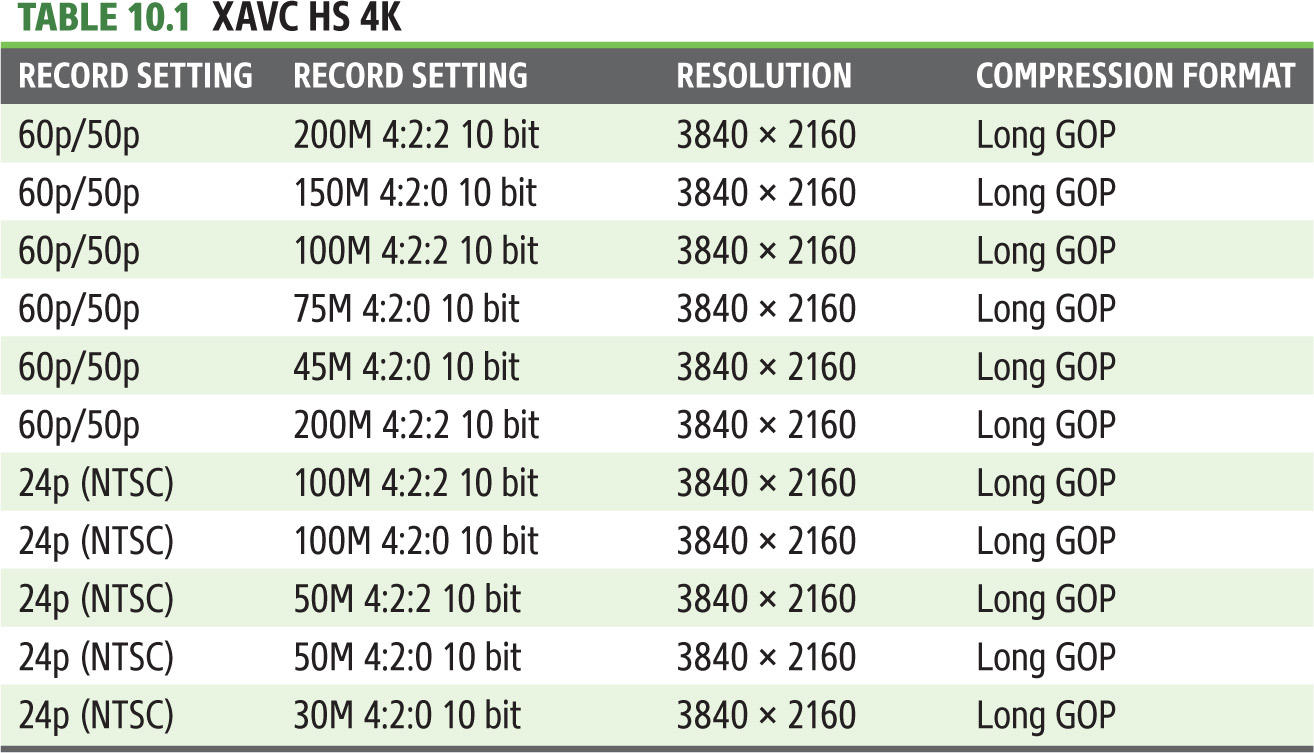
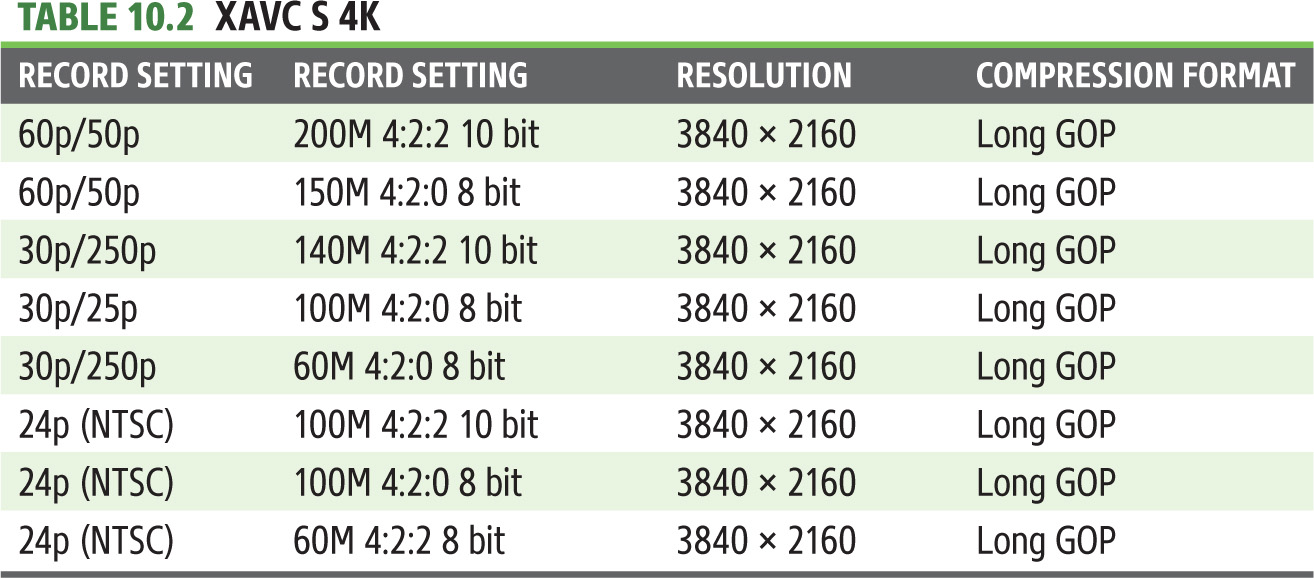
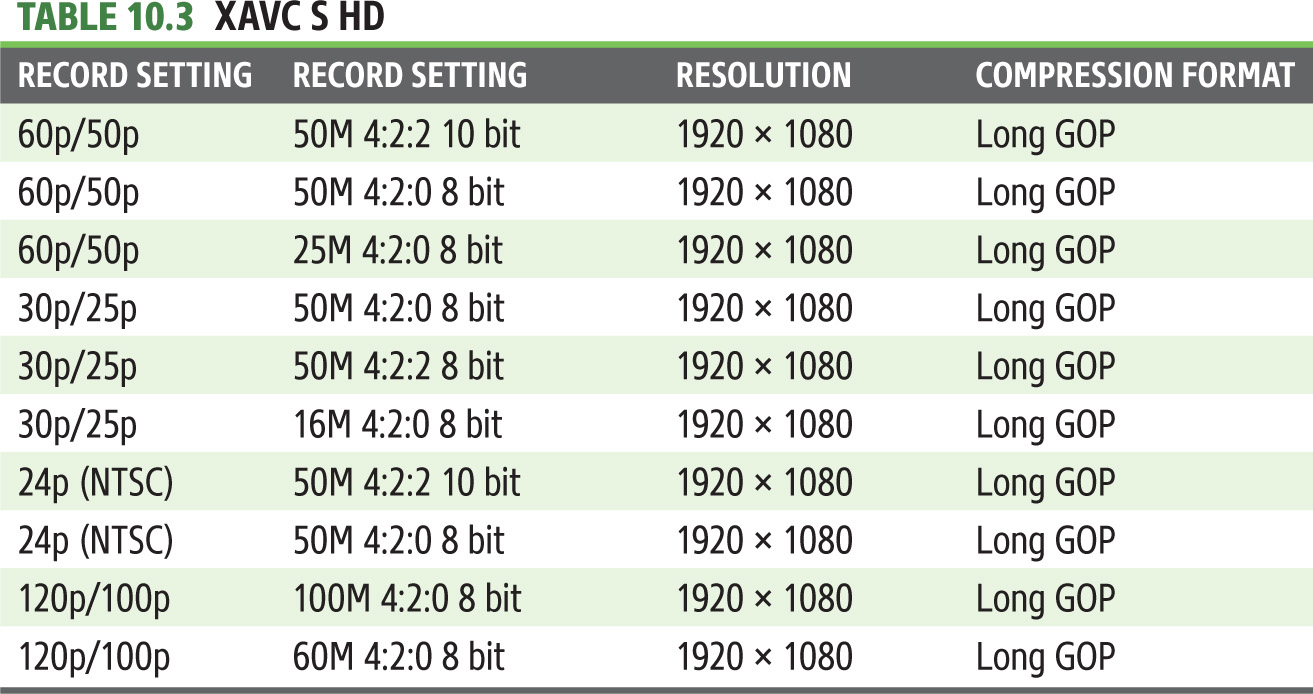
- ■Choose your file format. Go to the Shooting > Image Quality > Movie File Format entry as discussed in Chapter 6, and select the file format for your movies. (The Still/Movie/S&Q dial must be set to Movie mode to access this entry.) You can set it to XAVC S HD or XAVC S 4K to start. File formats determine the transfer rate (roughly equivalent to JPEG compression), which, with resolution, determines the quality of your video. You’ll learn more about these and additional options later.
- ■Choose Movie settings. Also, in the Shooting > Image Quality group you’ll find the Movie Settings entry, which allows you to choose the size, frame rate, and image quality for your movies. A Recording Frame Rate of 30p and a Record Setting of 50M 4:2:0 8 bit is a good place to begin. Tables 10.1 to 10.5 spell out your choices.
- Which of the options should you choose? It depends in part on your needs. If your plan is to primarily shoot videos that you’ll show to friends and family on an HDTV set, choose XAVC S HD. For more professional productions, you’ll want to select XAVC S 4K. I’ll explain the differences later.
- ■Activate proxy recording (optional). I described your proxy recording options in Chapter 6. Use the Shooting > Image Quality > Proxy Recording entry. You can choose the higher quality XAVC HS HD to save a proxy video file at full HD (1920 × 1080) resolution, or select XAVC S HD standard HD (1280 x 720) version. The same frame rate selected for the main video will be used (that is, 60/50p, 30/25p, or 24p). You cannot create a proxy video file when using the 120/100p frame rate.
- In all cases, your proxy video will be highly compressed. The XAVC HS full HD video will be captured with either a 16M or 9M 4:2:0 10-bit transfer rate; the standard HD proxy will transfer at a 6M 4:2:0 8-bit rate.
- You’ll definitely want to use a large memory card when working with this option. When you review your images, the proxy video isn’t displayed, viewable, or editable in the camera; the “main” movie will have a Px indicator overlaid on its icon to show you that the clip is paired with a proxy counterpart. Deleting or protecting the main clip deletes/protects the proxy at the same time.
- ■Turn on autofocus. Make sure autofocus is turned on through the Focus > AF/MF > Focus Mode entry. You also have the option of using manual focus, with focus peaking. I find that manual focus is fine for situations such as a stage play where the actors will usually be at roughly the same distance to your position during the entire performance, and for more professional productions where precise focus is a must, or when changing focus during a shot (focus pulling) is used creatively. In other cases, however, you’ll probably want to rely on the camera’s effective full-time continuous autofocus ability while recording a video clip.
- ■Try Expand Spot AF Area. As in still image making, you can use the Expand Spot AF Area while recording a video clip. This feature is most suitable for a static scene you’ll record with the camera on a tripod, where an important small subject is off-center and will remain in the same location. By placing the AF Area exactly on that part of the scene, you’ll be sure that the focus will remain on the most important part of the scene during the entire recording. (In truth, you could use manual focus for the same purpose.)
- If you decide to try this, compose the scene as desired before pressing the record button. Set the Focus Area to Expand Spot. Brackets will appear on the screen, indicating the current location of the active focus detection point. Move the brackets with the directional buttons so they cover the primary subject and press the center button to confirm. Press the center button again any time you want to reposition the focus area. You can now begin recording the video, confident that the focus will always be on your primary subject (assuming it does not move while you’re recording).
- ■Set useful functions. Before you start recording, you can set a desired ISO, white balance, Creative Looks, Picture Profiles (explained in the next chapter), any of the three metering modes, and the level of exposure compensation. The DRO feature will not be available, however. You’ll recall that these functions are not available in fully automatic modes; if you set them while using another mode and then switch to a fully automatic mode for recording the video, the camera will revert back to the defaults.
- ■Decide on a shooting mode. You can choose an exposure mode (P, S, A, or M) for your movies, either using a menu entry or by rotating the mode dial.
- The P mode works well, allowing the camera to set the aperture/shutter speed and giving you access to the other features discussed above. Program Shift (to other aperture/shutter speed combinations) can be used before you start recording, but it will not be available during actual recording.
- You might prefer to use Aperture Priority (A) mode for full control over the specific aperture; in that case, you can preset a desired aperture and you can also change it anytime while recording. Be careful however, especially if you have set a specific ISO level. If you switch to a very small aperture while recording in low light, your movie clip may darken; this is particularly likely if you’re using a low ISO level. And if you switch to a very wide aperture on a sunny day, especially if using a high ISO, your video will become too bright. Of course, you can see the change in brightness in the live view display before recording a movie and while you’re recording.
- Switch to S mode if you want control over the shutter speed; this is a more advanced technique in Movie mode. You can preset a shutter speed and you can change it while recording. Again, be careful as to your settings to avoid a very dark or overly bright video especially if you have set a specific ISO level. The live view display before and during recording will help to guide you. I don’t recommend using the Manual (M) mode initially, but you might want to experiment with it later.
- Activate Flexible Exposure Control using Shooting > Shooting Mode > Exposure Control Type, and you can individually toggle shutter speed, aperture, and ISO between manual and auto adjustment by pressing the defined custom keys (as described in Chapter 6). Keep in mind that the Still/Movie/S&Q dial must be set to the Movie position to capture video using Flexible exposure. Even if the feature is enabled, if you begin capturing a movie in Still photo mode, the current PASM exposure method will be used instead.
- ■Press the record button. You don’t have to hold it down. Press it to start recording and press it again when you’re done. Shoot a short test clip and view it to make sure that the settings you made are producing the overall effect you want. If not, change some settings (White Balance or Creative Style or Exposure Compensation, for example) and try again.
Steps During Movie Making
Once you have set up the camera for your video session and pressed the Movie button, you have done most of the technical work that’s required of you for basic movie clips. Now your task is to use your skills at composition, lighting, scene selection, and, perhaps, directing actors, to make a compelling video production.
- ■Zoom, autofocus, and autoexposure all work. If you’re new to the world of high-quality still cameras that also take video, you may just take it for granted that functions such as autofocus continue to work normally when you switch from stills to video. But until recently, most such cameras performed weakly in their video modes; they would lock their exposure and focus at the beginning of the scene, and you could not zoom while shooting the video. The a7 IV has no such handicaps, and, in fact, it is especially capable in these areas.
- Indeed, this camera allows you to choose any exposure mode, including Manual exposure, Auto ISO, shutter speed, and aperture. You can change settings while shooting, and lock exposure with the AEL button.
- Autoexposure works very well, modifying the exposure as the scene brightness changes; the method used depends on the metering mode that you’re using. You can zoom to your heart’s content (though I recommend that you zoom sparingly). Best of all, AF-C autofocus works like a charm; the camera can track moving subjects and quickly snap them back into sharp focus with speedy continuous AF. Manual focus is also available, with focus peaking to help you zero in on a focus plane. Don’t limit yourself based on the weaknesses of past cameras; the a7 IV opens up new horizons of video freedom.
- ■Exposure compensation works while filming. I found this feature to be quite remarkable. Although the autoexposure system works very well (especially with Multi metering) to vary the aperture when the ambient lighting changes, you can certainly dial in exposure compensation when you need to do so or want to do so for a certain effect. You could even use this function as a limited kind of “fade to black” in the camera, though you probably won’t be able to fade quite all the way to black.
- If the preview display (when Live View Display is set to Setting Effect On) suggests that your movie will be dark (underexposed) and if it does not get brighter after you set plus compensation, there’s another problem: the camera cannot provide a good exposure for the movie at the ISO that you have set (as discussed earlier). Switch to a higher ISO level until the brightness is as desired or switch to ISO Auto to enable the camera to set a higher ISO level to prevent the “underexposure.”
- ■Use AE lock instead. Occasionally, you may find that you start having an exposure problem during recording; this might happen when pointing the lens toward a light-tone area that causes the camera to begin underexposing. While plus compensation will allow you to increase brightness, it’s preferable to use a defined AE lock button (one you specify using custom keys) to maintain a pleasing exposure during the entire video clip.
- Why would you need this feature? Let’s say you’re filming entertainers against grass and foliage, but you’re moving the camera and will soon be filming a second group against a white sky. As soon as you do so, the backlighting will cause the video to get darker. Don’t let that happen. Before pointing the lens toward the backlit area, press AEL and keep it depressed. This will prevent the exposure from changing as you point the lens toward the backlit part of the scene. This is preferable to waiting until an underexposure problem starts and then setting plus exposure compensation that suddenly makes the video brighter.
- ■Don’t be a flash in the pan. With HD video, there is a possibility of introducing artifacts or distortion if you pan too quickly. (This effect is called rolling shutter distortion or the “Jell-O effect.”) That is, because of the way the lines of video are displayed in sequence, if the camera moves too quickly in a sideways motion, some of the lines may not show up on the screen quickly enough to catch up to the rest of the picture. As a result, objects in your video can become somewhat distorted or you may experience a jiggling effect and/or loss of detail. So, if at all possible, make your pans smooth and steady, and slow them down to a comfortable pace.
More About Frame Rates and Bit Rates
Both videos and stills are captured in much the same way, but the technology used for the sensor can cause problems that are most evident when shooting movies. To understand why, it’s necessary to understand the difference between a rolling shutter and a global shutter, and how interlacing differs from progressive scan.
An image (still or video) captured by the sensor consists of rows and columns of pixels. With the a7 IV, there are 4,672 different rows, each row consisting of 7,008 individual pixels. A “rolling” shutter captures each row one after the other, so that, effectively, the pixels in the top row are captured at a different moment in time than those in the bottom row. This gap is very brief, and typically isn’t noticeable in still photographs. But with video this difference can manifest itself as anomalies such as wobble when the camera is moving or vibrating, skew (which is a diagonal bending of an image due to wobble), smear (produced when part of the image, such as an automobile tire, is rotating), and other defects. Even though a video frame is cropped at top and bottom (resulting in a smaller number of rows), the rolling shutter effect is still present.
A “global” shutter, on the other hand, captures the entire image in one instant, eliminating these problems. Although your a7 IV does have a rolling shutter, the high speed of its sensor and BIONZ XR digital image processing chip minimizes the rolling shutter effects. However you should still be cautious when shooting moving subjects; even with improvements the a7 IV’s rolling shutter can produce objectionable effects.
Frame Rates
That leads us to progressive scanning versus interlacing. With a rolling shutter, line-by-line scanning during capture and playback can be done in one of two ways. With interlaced scanning, odd-numbered lines (lines 1, 3, 5, 7, and so forth) are captured with one pass, and then the even-numbered lines (2, 4, 6, 8, and so forth) are grabbed. With the 1080/60i format, roughly 60 pairs of odd/even line scans, or 60 fields are captured each second. (The actual number is 59.94 fields per second.) Interlaced scanning was developed for and works best with analog display systems such as older television sets. It was originally created as a way to reduce the amount of bandwidth required to transmit television pictures over the air. Modern LCD, LED, and plasma-based HDTV displays must de-interlace a 1080i image to display it. (See Figure 10.1.)
Newer displays work better with a second method, called progressive scanning or sequential scanning, and progressive scan modes are the only choices when shooting XAVC S video. Instead of two interlaced fields, the entire image is scanned as consecutive lines (lines 1, 2, 3, 4, and so forth). This happens at a rate of 120, 60, 30, or 24 frames per second (not fields). (All these numbers apply to the NTSC television system used in the United States, Canada, Japan, and some other countries; other places use systems like PAL, where the nominal scanning figures are 100/50/25 rather than 120/60/30.)
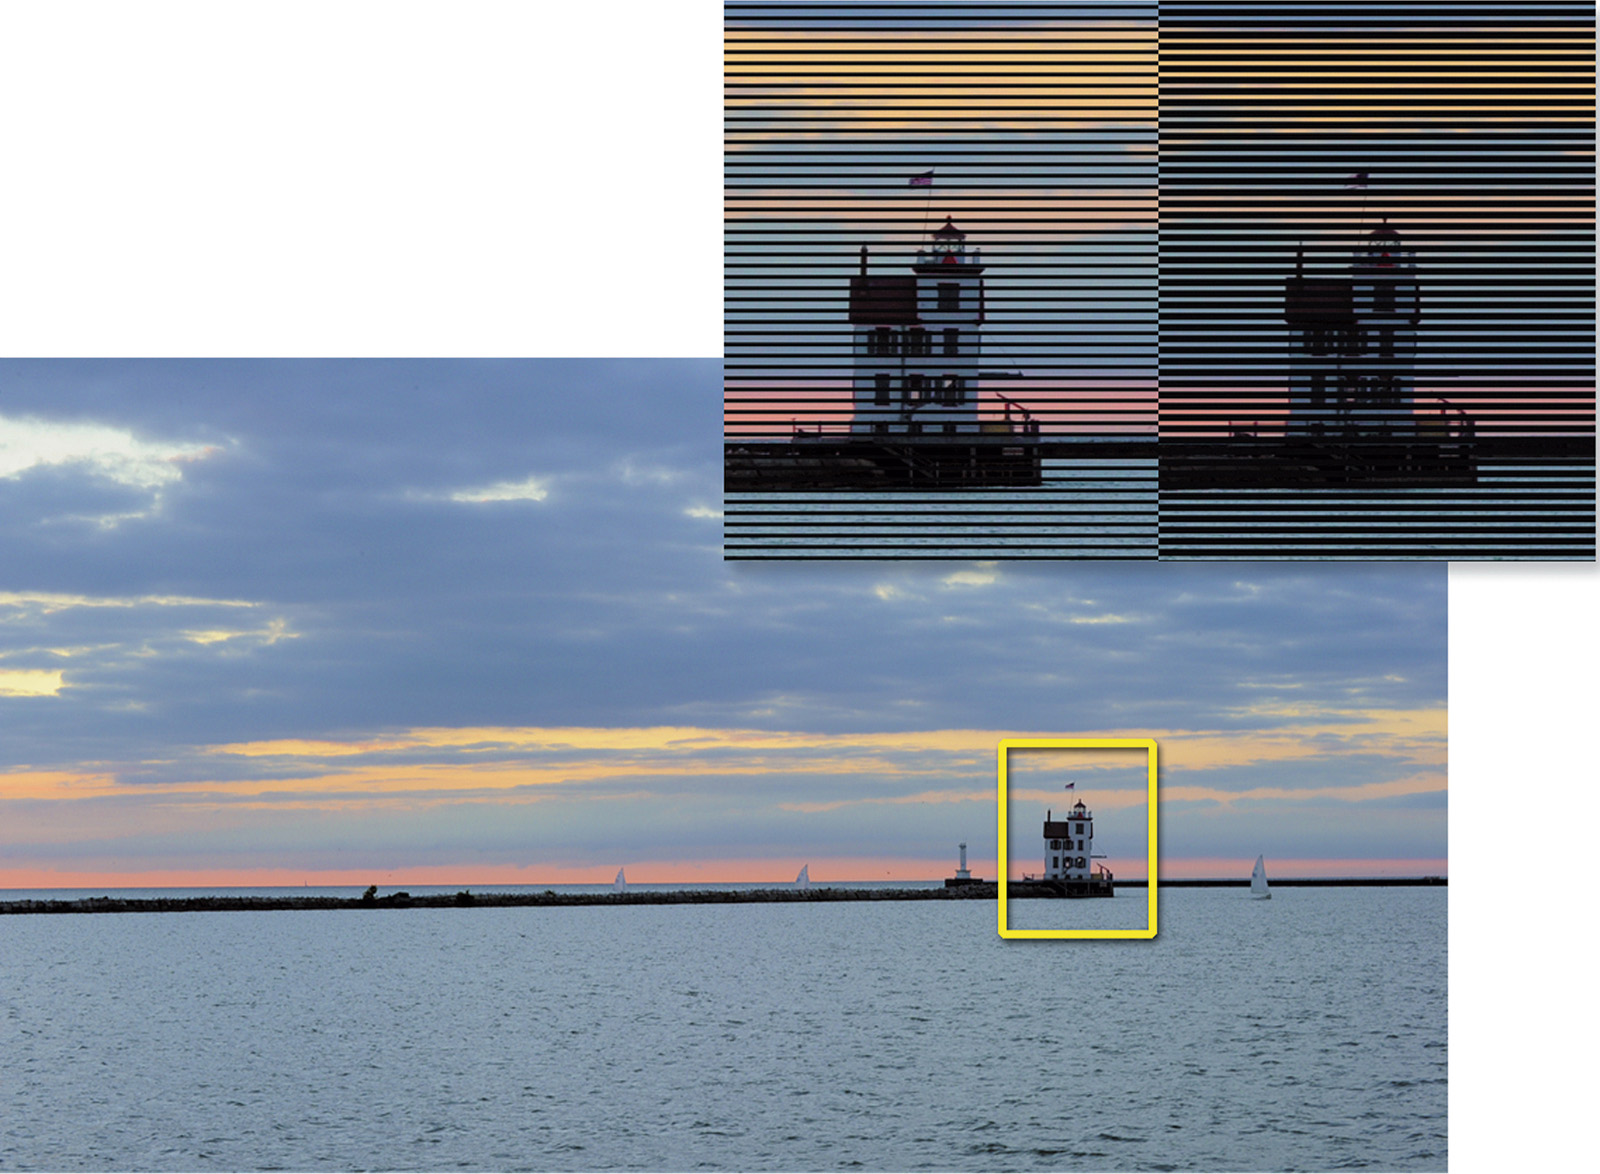
Figure 10.1 The inset shows how lines of the image alternate between odd and even in an interlaced video capture.
The rolling shutter effect I described earlier is even worse when shooting moving subjects with interlaced scanning. Half of the image (one set of interlaced lines) will change to keep up with the movement of the subject while the other interlaced half retains the “old” image as it waits to be refreshed. Flicker or interline twitter results. That makes progressive scan (p) options a better choice for action photography. Users of earlier Sony cameras should note that interlaced video frame rates (using the AVCHD recording format) are no longer supported with the a7 IV. Some of the improvement in the camera’s rolling shutter effects come from eliminating the problematic interlaced video options.
Computer-editing software like Final Cut Pro can handle most video formats, and convert between them (although XAVC S/HS 4K and XAVC S HD may not be compatible with the other software you own). The choice between 30/60 fps (NTSC) and25/50 fps (PAL), or 24 fps, is determined by what you plan to do with your video. The short explanation is that, for technical reasons I won’t go into here, shooting at 24 fps gives your movie more of the so-called “cinematic” look that film would produce, excellent for showing fine detail. However, if your clip has moving subjects, or you pan the camera, 24 fps can produce a jerky effect called “judder.” The 30 and 60 fps (or 25 and 50 fps) options produce a home-video look that some feel is less desirable, but which is smoother and less jittery when displayed on an electronic monitor. I suggest you try both and use the frame rate that best suits your tastes and video-editing software.
Bit Rates
Bit rates represent the speed of transfer from your camera to your memory card or external video recorder. The higher the bit rate, the more demands made on your media in storing that data quick enough to keep pace with the video capture. Higher average bit rates range from 16Mbps (megabits per second) to 100Mbps. Tables 10.1-10.5 show the frame rates, bit rates, and resolution of the various recording settings for video. Note that frame rates of 30/25, 60/50, and 120/100 represent NTSC/PAL systems, respectively.
As I noted in Chapter 6, the parameters you need to know are these:
- ■Codec. The 4K HS format uses the HEVC (High Efficiency Video Coding, also known as H.265) codec. This software produces higher image quality with the same size files as the other settings, which use the less-efficient H.264 codec. The HEIC still photo format is based on HEVC, which is why images captured in that format will better match video captured using the HEVC codec.
- ■Resolution. The 4K and full HD formats provide 3840 x 2160 and 1920 x 1080 pixel resolution, respectively.
- ■Move compression format. The first three file formats shown in the tables offer long GOP (group of pictures) interframe compression. The last two, XAVC S-1 4K and XAVC S-I HD, use All-I compression.
- With long GOP compression, one I-frame (intraframe) is recorded that contains all the information for a frame, minimally compressed. The next frame after this key frame is called a B-frame, and it stores only the changes from the I-frame, which greatly reduces the amount of information that must be kept. It may be followed by another B-frame, and then a P-frame, which just predicts what the actual frame should look like based on the information from the previous frames, and, eventually, the next I-frame. This type of compression is sometimes called IPB Compression, after the Intra-, Predictive, and Bidirectional frame types.
- The XAVC-I 4K and XAVC S-I HD formats use All-I compression, in which each frame is an Intra- or key frame. While All-I produces larger files and the capability of the camera to support the higher transfer rate they demand, they are more friendly for editing, particularly for those who are doing tight, frame-by-frame editing. For example, if you are capturing a video at a wedding and a still photography flash burst occurs at an inopportune time, you can edit out that particular frame.
Choosing Metering/Exposure Modes
You can use Multi, Center, Spot, Averaging, or Highlight-weighted metering when shooting movies. I recommend sticking with Multi metering, unless you have a special reason for, say, Spot metering. Next, you’ll want to select exposure mode, from among Program, Aperture Priority, Shutter Priority, or Manual. You can also use the Flexible Exposure mode I described in Chapter 6. Rotate the Still/Movie/S&Q dial to the Movie position and specify which of these modes is used for movies. The mode you select will be used when the Still/Movie/S&Q dial is in the Movie position.
- ■Program mode. The P mode works well for movies, allowing the camera to set the aperture/shutter speed. Program Shift (to other aperture/shutter speed combinations) can be used before you start recording, but it will not be available during actual recording.
- ■Aperture Priority. You might prefer to use Aperture Priority (A) mode for full control over the specific aperture; in that case, you can preset a desired aperture and you can also change it anytime while recording. However, remember that your shutter speed may change in Aperture Priority mode, and when shooting movies, it is often desirable to use a specific shutter speed (as I’ll explain in an upcoming section).
- ■Shutter Priority. Switch to S mode if you want control over the shutter speed; this is a more advanced technique in Movie mode. You can preset a shutter speed and you can change it while recording. Again, be careful as to your settings to avoid a very dark or overly bright video especially if you have set a specific ISO level. The live view display before and during recording will help to guide you. I recommend Shutter Priority highly, especially for beginners.
- ■Manual Exposure. Manual exposure may be best when you want to maintain tight control over shutter speed and aperture, say, to maintain exposure as lighting conditions change, or to keep the same depth-of-field in a scene under changing conditions.
As you work, you’ll discover that the a7 IV’s Zebra feature can be a marvelous aid in monitoring your exposure. If you are using Shutter Priority, as I recommended, you’ll have the shutter speed fixed and, based on what you see in the viewfinder or LCD monitor and Zebra display feedback, adjust the aperture or ISO sensitivity to get the exposure you want. As I explained in Chapter 6, you can adjust the Zebra feature’s threshold setting, perhaps specifying 95% so that you’re alerted only when the brightest highlights start to clip (making the stripes less distracting) or use 85% so you’ll know when human skin starts to be overexposed. Zebra display may not work for you when using S-Log2/S-Log3 gamma settings (described later in this chapter), as those very low-contrast renditions don’t lend themselves to that kind of monitoring.
Should you need to adjust exposure from what the camera recommends, exposure compensation works quite well while filming. Although the autoexposure system does a good job (especially with Multi metering) to vary the aperture when the ambient lighting changes, you can certainly dial in exposure compensation when you need to do so or want to do so for a certain effect. You could even use this function as a limited kind of “fade to black” in the camera, though, as I mentioned earlier, you probably won’t be able to fade quite all the way to black.
If the preview display (when Live View Display is set to Setting Effect On) suggests that your movie will be dark (underexposed) and if it does not get brighter after you set plus EV compensation, there’s another problem: the camera cannot provide a good exposure for the movie at the ISO that you have set (as discussed earlier). Switch to a higher ISO level until the brightness is as desired or switch to ISO Auto to enable the camera to set a higher ISO level to prevent the “underexposure.”
You can also “lock” exposure to keep the same exposure settings as lighting changes or you reframe your scene. As I mentioned, you may find that you start having an exposure problem during recording; maybe when pointing the lens toward a light-tone area that causes the camera to begin underexposing. While plus compensation will allow you to increase brightness, it’s preferable to use the defined AE lock button you specify using Custom Key (Movie) options in the Setup > Operation Customize tab to maintain exposure during the entire clip.
Let’s say you’re filming entertainers against grass and foliage, but you’re moving the camera and will soon be filming another group against a white sky. As soon as you do so, the backlighting will cause the video to get darker. Don’t let that happen. Before pointing the lens toward the backlit area, press AEL and keep it depressed. This will prevent the exposure from changing as you point the lens toward the backlit part of the scene.
Stop That!
Both Manual Exposure and Shutter Priority modes allow you to explicitly choose a shutter speed. You might think that setting your camera to a faster shutter speed will help give you sharper video frames. But the choice of a shutter speed for movie making is a bit more complicated than that. As you might guess, in most cases it’s best to leave the shutter speed at 1/30th or 1/60th second and allow the overall exposure to be adjusted by varying the aperture and/or ISO sensitivity.
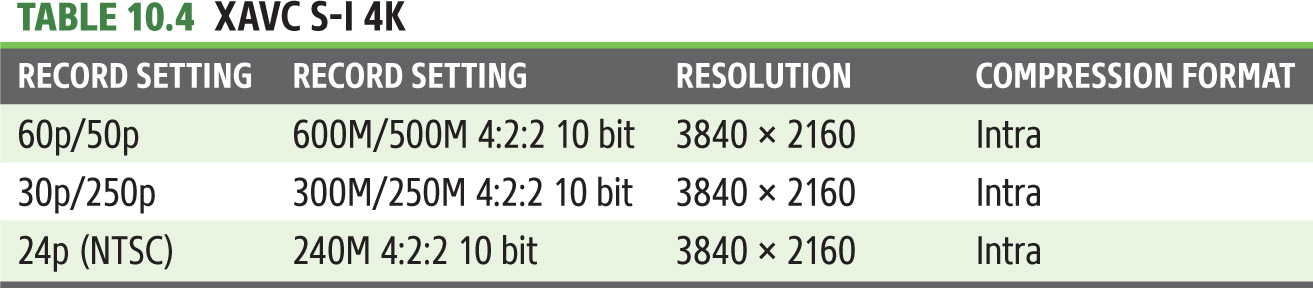
Effectively, you’re better off working in Shutter Priority mode, so that the aperture or ISO settings are your only way of adjusting the exposure. A “slow” 1/30th- or 1/60th-second shutter speed doesn’t mean your movies will have the same amount of blur that a typical still photograph will have using those shutter speeds. We don’t normally stare at a video frame for longer than 1/30th or 1/24th second, so while the shakiness of the camera can be disruptive (and often corrected by your camera’s in-lens and in-body image stabilization), if there is a bit of blur in our subjects from movement, we tend not to notice. Each frame flashes by in the blink of an eye, so to speak, so a shutter speed of 1/30th or 1/60th second works a lot better in video than it does when shooting stills. Even shots with lots of movement, such as the frame shown in Figure 10.2, are often sufficiently sharp at 1/60th second.
Higher shutter speeds actually introduce problems of their own. If you shoot a video frame using a shutter speed of 1/250th second, the actual moment in time that’s captured represents only about 12 percent of the 1/30th second of elapsed time in that frame. Yet, when played back, that frame occupies the full 1/30th of a second, with 88 percent of that time filled by stretching the original image to fill it. The result is often a choppy/jumpy image, and one that may appear to be too sharp.
The reason for that is more social imprinting than scientific: we’ve all grown up accustomed to seeing the look of Hollywood productions that, by convention, were shot using a shutter speed that’s half the reciprocal of the frame rate (that is, 1/48th second for a 24 fps movie). Movie cameras use a rotary shutter (achieving that 1/48th second exposure by using a 180-degree shutter “angle”), but the effect on our visual expectations is the same. For the most “film-like” appearance, use 24 fps and 1/60th second shutter speed.
Faster shutter speeds do have some specialized uses for motion analysis, especially where individual frames are studied. The rest of the time, 1/30th or 1/60th of a second will suffice. If the reason you needed a higher shutter speed was to obtain the correct exposure, use a slower ISO setting, or a neutral-density filter to cut down on the amount of light passing through the lens. A good rule of thumb is to use 1/60th second or slower when shooting at 24 fps; 1/60th second or slower at 30 fps; and 1/125th second or slower at 60 fps.
Figure 10.2 Movement adds interest to a video clip.
In choosing between 30p and 60p, there are several considerations. The 30p frame rate allows you to use a reduced ISO setting for improved grain compared to 60p at a higher ISO value. That’s an advantage under low light. However, as I mentioned earlier, at 60p you can safely use a higher shutter speed of 1/125th second, which can produce smoother video of moving subjects. Video editors can transcode 60p video to give you 30p video (with files suitable for uploading to websites) as well as the 60i video you might need for DVD/Blu-Ray productions.
Choosing an Autofocus Mode
As I said in Chapter 8, you’ll generally want sharp focus in your image—somewhere—but exactly where and how focus is achieved can be an important part of your creative process. On the one hand, while shooting certain types of scenes—particularly action scenes—you’ll want the camera to automatically retain focus on your main subjects and keep them tightly in focus. Other times, you’ll want to use selective focus to emphasize a subject and de-emphasize the background, or “pull” focus to dramatically change the focus (so to speak) of the scene, say, refocusing to cause a blurry subject to suddenly come into sharp relief.
As with still photography, you have both manual focus and autofocus tools at your disposal, which allow you to specify when to focus and what to focus on. An important step before shooting is to ensure autofocus is turned on through the Focus Mode entry of the Focus Menu tab. Only Continuous AF (AF-C) and Manual Focus (MF) can be used when shooting movies. Here are some points to consider.
- ■AF-C or MF. If the Still/Movie/S&Q dial is in the Movie position, only AF-C and MF are available.
- ■Presto change-o. If the Still/Movie/S&Q dial is not in the Movie position, and you have selected a focus mode other than AF-C or MF, when you begin shooting movies, the a7 IV will automatically switch to AF-C.
- ■Lock focus. As video is captured, the a7 IV’s Continuous autofocus will refocus as you move the camera, or subjects in the frame change location. To lock focus, press the shutter release halfway, or use a key you’ve assigned that function. When you release the button, the camera will refocus. Ordinarily, it does an excellent job of not refocusing constantly, and changes focus only when the a7 IV detects camera or subject movement.
- ■Manual focus. If you prefer manual focus, you’ll need to set it before commencing video capture. As I mentioned, manual focus is fine for situations such as a stage play where the actors are at roughly the same distance to your position during the entire performance, and for more professional productions where precise focus is a must, or when changing focus during a shot (focus pulling) is used creatively. In other cases, however, you’ll probably want to rely on the camera’s effective full-time continuous autofocus ability while recording a video clip.
- ■Focus area modes. You can use all focus area modes, as described in Chapter 4, except for Tracking AF. (You can still activate tracking while capturing video, as described below.) If you don’t need tracking, try Spot AF. As in still image making, you can use the Spot AF Area (also discussed in Chapter 4) while recording a video clip. This feature is most suitable for a static scene you’ll record with the camera on a tripod, where an important small subject is off-center and will remain in the same location.
- By placing the Focus Area exactly on that part of the scene, you’ll be sure that the focus will remain on the most important part of the scene during the entire recording. (In truth, you could use manual focus for the same purpose.) If you decide to try this, compose the scene as desired before pressing the record button. Set the Focus Area to Spot. When you press the center button (or designated Focus Standard button), locator brackets will appear on the screen, indicating the current location of the active focus detection point. Move the bracket with the directional buttons so they cover the primary subject and press OK (the center button) to confirm. You can now begin recording the video, confident that the focus will always be on your primary subject (assuming it does not move while you’re recording).
Tracking in Video
Conventional tracking available in still mode is disabled once you switch to Movie mode. When the Still/Movie/S&Q dial is set to the Movie position, the Tracking focus area modes are grayed out. However, that doesn’t mean tracking is totally unavailable in Movie mode:
- ■Tracking a subject. You can still use the touch screen to specify a subject and have the a7 IV continually refocus to track its movement. Navigate to the Setup > Touch Operation > Touch Function and set Function of Touch Operation to Touch Tracking. Thereafter, you can simply tap a subject on the LCD screen, and the a7 IV will track it as you capture video. However, if you want to use the alternate touch functions in stills mode (Touch Focus), you’ll need to return to the Function of Touch Operation entry and revert to your preferred setting when you’re finished shooting video.
- ■Eye detection. If the subject you want to track is a living creature, the full array of eye detection features are available in Movie mode, so you can let the camera find an eye, focus on it, and track that face as it moves around the frame as you shoot.
It’s tempting to assume that the reason Sony disabled the conventional Tracking AF area modes in video was to discourage shooting movies that involve the kind of motion that produces those awful rolling shutter distortions. Another rationale is that constant focusing and refocusing in video can be extremely distracting, especially at large apertures in which depth-of-field is limited. However, serious filmmakers know ways of putting focus to work in creative ways, as in pull focus effects in which the focus plane is manually adjusted in order to change the emphasis from one subject to another. There are even lever accessories that clamp onto lens focus rings with markings that allow precisely moving from one focus point to another.
Tips for Movie Making
I’m going to close out this introductory movie chapter with a general discussion of movie-making concepts that you need to understand as you move toward more polished video production. In the chapter that follows, I’ll explain some of the a7 IV’s features that allow you to produce more sophisticated movies. Here are some basic tips:
- ■Keep things stable and on the level. Camera shake’s enough of a problem with still photography, but it becomes even more of a nuisance when you’re shooting video. While the a7 IV’s in-body five-axis stabilization and stabilizer found in lenses with the OSS designation can help minimize this, neither can work miracles. Placing your camera on a tripod will work much better than trying to hand-hold it while shooting. One bit of really good news is that compared to those hefty pro dSLRs, the a7 IV, even though it is a full-frame camera, can work very effectively on a lighter tripod, due to its light weight. On windy days however, the extra mass of a heavy tripod is still valuable.
- ■Use a shooting script. A shooting script is nothing more than a coordinated plan that covers both audio and video and provides order and structure for your video. A detailed script will cover what types of shots you’re going after, what dialogue you’re going to use, audio effects, transitions, and graphics.
- ■Plan with storyboards. A storyboard is a series of panels providing visuals of what each scene should look like. While the ones produced by Hollywood are generally of very high quality, there’s nothing that says drawing skills are important for this step. Stick figures work just fine if that’s the best you can do. The storyboard just helps you visualize locations, placement of actors/ actresses, props, and furniture, and also helps everyone involved get an idea of what you’re trying to show. It also helps show how you want to frame or compose a shot. You can even shoot a series of still photos and transform them into a “storyboard” if you want, such as in Figure 10.3.
- Today’s audience is used to fast-paced, short-scene storytelling. In order to produce interesting video for such viewers, it’s important to view video storytelling as a kind of shorthand code for the more leisurely efforts print media offers. Audio and video should always be advancing the story. While it’s okay to let the camera linger from time to time, it should only be for a compelling reason and only briefly.
- It only takes a second or two for an establishing shot to impart the necessary information. For example, many of the scenes for a video documenting a model being photographed in a rock ‘n’ roll music setting might be close-ups and talking heads, but an establishing shot showing the studio where the video was captured helps set the scene.
- ■Provide variety. Provide variety, too. Change camera angles and perspectives often and never leave a static scene on the screen for a long period of time. (You can record a static scene for a reasonably long period and then edit in other shots that cut away and back to the longer scene with close-ups that show each person talking.)
- ■When editing, keep transitions basic! I can’t stress this one enough. Watch a television program or movie. The action “jumps” from one scene or person to the next. Fancy transitions that involve exotic “wipes,” dissolves, or cross fades take too long for the average viewer and make your video ponderous.
Figure 10.3 A storyboard is a series of simple sketches or photos to help visualize a segment of video.
Composition
In movie shooting, several factors restrict your composition, and impose requirements you just don’t always have in still photography (although other rules of good composition do apply). Here are some of the key differences to keep in mind when composing movie frames:
- ■Horizontal compositions only. Some subjects, such as basketball players and tall buildings, just lend themselves to vertical compositions. But movies are generally shot and shown in horizontal format only. (Unless you’re capturing a clip with your smartphone; I see many vertically oriented YouTube videos.) So, if you’re shooting a conventional video and interviewing a local basketball star, you can end up with a worst-case situation like the one shown in Figure 10.4. If you want to show how tall your subject is, it’s often impractical to move back far enough to show him fulllength. You really can’t capture a vertical composition. Tricks like getting down on the floor and shooting up at your subject can exaggerate the perspective but aren’t a perfect solution.
- ■Wasted space at the sides. Moving in to frame the basketball player as outlined by the yellow box in Figure 10.4 means that you’re still forced to leave a lot of empty space on either side. (Of course, you can fill that space with other people and/or interesting stuff, but that defeats your intent of concentrating on your main subject.) So, when faced with some types of subjects in a horizontal frame, you can be creative, or move in really tight. For example, if I was willing to give up the “height” aspect of my composition, I could have framed the shot as shown by the green box in the figure and wasted less of the image area at either side.

Figure 10.4 Movie shooting requires you to fit all your subjects into a horizontally oriented frame.
- ■Seamless (or seamed) transitions. Unless you’re telling a picture story with a photo essay, still pictures often stand alone. But with movies, each of your compositions must relate to the shot that preceded it, and the one that follows. It can be jarring to jump from a long shot to a tight close-up unless the director—you—is very creative. Another common error is the “jump cut” in which successive shots vary only slightly in camera angle, making it appear that the main subject has “jumped” from one place to another. (Although everyone from French New Wave director Jean-Luc Goddard to Guy Ritchie—Madonna’s ex—have used jump cuts effectively in their films.) The rule of thumb is to vary the camera angle by at least 30 degrees between shots to make it appear to be seamless. Unless you prefer that your images flaunt convention and appear to be “seamy.”
- ■The time dimension. Unlike still photography, with motion pictures there’s a lot more emphasis on using a series of images to build on each other to tell a story. Static shots where the camera is mounted on a tripod and everything is shot from the same distance are a recipe for dull videos. Watch a television program sometime and notice how often camera shots change distances and directions. Viewers are used to this variety and have come to expect it. Professional video productions are often done with multiple cameras shooting from different angles and positions. But many professional productions are shot with just one camera, and with careful planning you can do just fine with your a7 IV camera.
Here’s a look at the different types of commonly used compositional tools:
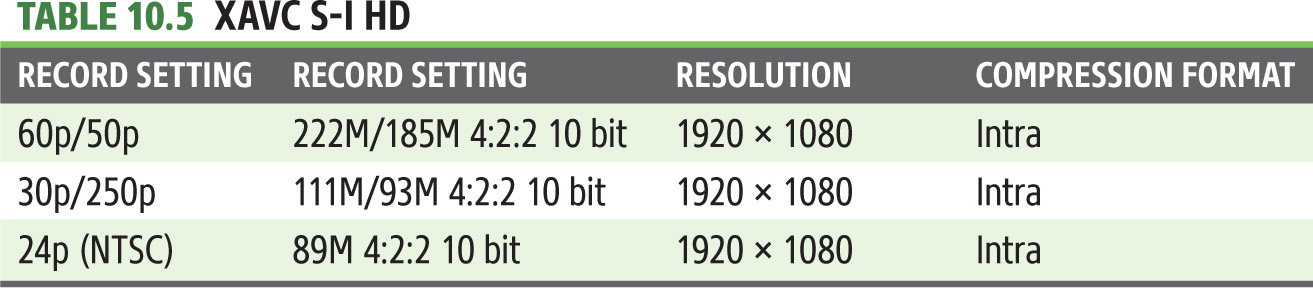
- ■Establishing shot. Much like it sounds, this type of composition, as shown at top left in Figure 10.5, establishes the scene and tells the viewer where the action is taking place. Let’s say you’re shooting a video of your offspring’s move to college; the establishing shot could be a wide shot of the campus with a sign welcoming you to the school in the foreground. Another example would be for a child’s birthday party; the establishing shot could be the front of the house decorated with birthday signs and streamers or a shot of the dining room table decked out with party favors and a candle-covered birthday cake. In this case, I wanted to show the studio where the video was shot.
- ■Medium shot. This shot is composed from about waist to head room (some space above the subject’s head). It’s useful for providing variety from a series of close-ups and also makes for a useful first look at a speaker. (See Figure 10.5, top right.)
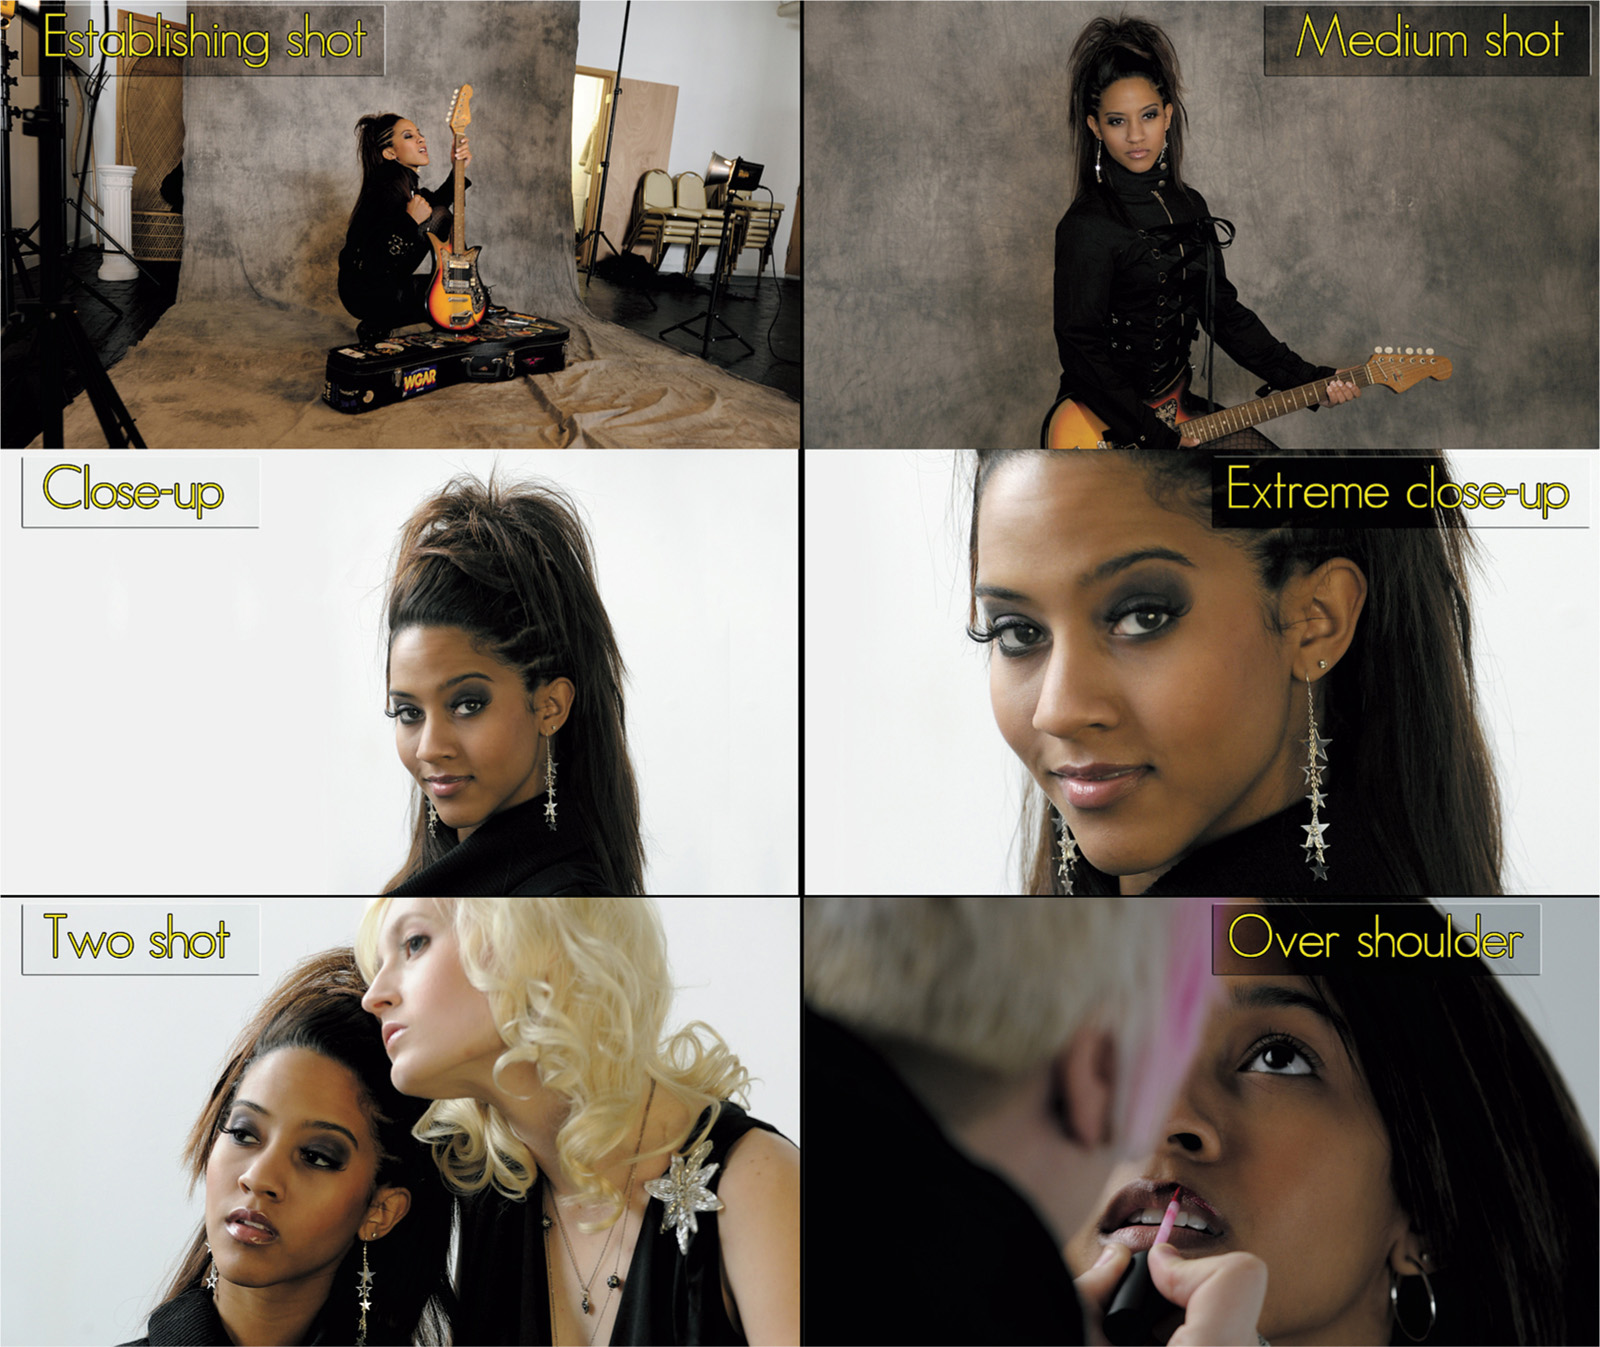
Figure 10.5 Establishing shot (upper left); Medium shot (upper right); Close-up (middle left); Extreme close-up (middle right); Two shot (lower left); Over-the-shoulder shot (lower right).
- ■Close-up. The close-up, usually described as “from shirt pocket to head room,” provides a good composition for someone talking directly to the camera. Although it’s common to have your talking head centered in the shot, that’s not a requirement. In the middle left image in Figure 10.5, the subject was offset to the right. This would allow other images, especially graphics or titles, to be superimposed in the frame in a “real” (professional) production. But the compositional technique can be used with a7 IV videos, too, even if special effects are not going to be added.
- ■Extreme close-up. When I went through broadcast training, this shot was described as the “big talking face” shot and we were actively discouraged from employing it. Styles and tastes change over the years and now the big talking face is much more commonly used (maybe people are better looking these days?) and so this view may be appropriate. Just remember, the a7 IV is capable of shooting in high-definition video and you may be playing the video on a high-def TV; be careful that you use this composition on a face that can stand up to high definition. (See middle right, Figure 10.5.)
- ■“Two” shot. A two shot shows a pair of subjects in one frame. They can be side by side or one subject in the foreground and one in the background. This does not have to be a head-to-ground composition. Subjects can be standing or seated. A “three shot” is the same principle except that three people are in the frame. (See Figure 10.5, lower left.)
- ■Over-the-shoulder shot. Long a composition of interview programs, the “over-the-shoulder shot” uses the rear of one person’s head and shoulder to serve as a frame for the other person. This puts the viewer’s perspective as that of the person facing away from the camera. (See Figure 10.5, lower right.)
Lighting for Video
Much like in still photography, how you handle light pretty much can make or break your videography. Lighting for video can be more complicated than lighting for still photography, since both subject and camera movement are often part of the process.
Lighting for video presents several concerns. First off, you want enough illumination to create a useable video. Beyond that, you want to use light to help tell your story or increase drama. Let’s take a better look at both.
Illumination
You can significantly improve the quality of your video by increasing the light falling in the scene. This is true indoors or out, by the way. While it may seem like sunlight is more than enough, it depends on how much contrast you’re dealing with. If your subject is in shadow (which can help him from squinting) or wearing a ball cap, a video light can help make him look a lot better.
Lighting choices for amateur videographers are a lot better these days than they were a decade or two ago. An inexpensive incandescent video light, which will easily fit in a camera bag, can be found for $15 or $20. You can even get a good-quality LED video light for less than $100. Work lights sold at many home improvement stores can also serve as video lights since you can set the camera’s white balance to correct for any color casts. You’ll need to mount these lights on a tripod or other support, or, perhaps, to a bracket that fastens to the tripod socket on the bottom of the camera.
Much of the challenge depends upon whether you’re just trying to add some fill light on your subject versus trying to boost the light on an entire scene. A small video light will do just fine for the former. It won’t handle the latter. Fortunately, the versatility of the a7 IV comes in quite handy here. Since the camera shoots video in Auto ISO mode, it can compensate for lower lighting levels and still produce a decent image. For best results though, better lighting is necessary.
I’ve found a number of lighting accessories that work well with a small camera like the a7 IV. Several Sony flash units, including the HVL-F43M, HVL-F45RM, and HVL-F60RM have built-in LED movie lights that you can control from the camera. (I cover electronic flash in more detail in Chapter 13.) You’ll probably find those too bulky for shooting video during sessions where you have no need for their flash capabilities. Dedicated LED units are smaller and more practical. One I like is the versatile Lume Cube 2.0 (about $90, but frequently found on sale). It’s waterproof, it’s less than two inches tall (without the optional accessory shoe mount shown), brightness can be adjusted wirelessly, and it has a brilliant 80-degree beam that can light up a room. Battery life is about 1.5 hours at its 100 percent setting. The Lume Panel Mini ($60) is about the length and width of a credit card, has adjustable color temperature, and is provided with a softening diffuser for gentle, flattering light that’s useful when capturing video (or stills!) of people. If you need more light, a Lume Panel Go ($99) and Lume Panel Pro ($200) are available. The former has 150 percent of the light output of the Mini, and measures 4.8 × 2.6 × 0.3 inches, while the latter, at 1500 lux (at .5 meters) emits three times as much illumination from its 6 x 3.14 x 0.43-inch form factor.
When I need a lot of light for a long time, I use my trusty Neewer 160 LED panel, available on Amazon and elsewhere for as little as $25. I load mine up with six Panasonic eneloop rechargeable AA batteries and shoot for hours. There are newer (“Neewer”) versions that are thinner and use rechargeable batteries from a variety of vendors. All are bulkier than the Lume offerings and have fewer features, but you can’t beat their $25-$50 price tags.
Creative Lighting
While ramping up the light intensity will produce better technical quality in your video, it won’t necessarily improve the artistic quality of it. Whether we’re outdoors or indoors, we’re used to seeing light come from above. Videographers need to consider how they position their lights to provide even illumination while up high enough to angle shadows down low and out of sight of the camera.
When considering lighting for video, there are several factors. One is the quality of the light. It can either be hard (direct) light or soft (diffused) light. Hard light is good for showing detail, but it can also be very harsh and unforgiving. “Softening” the light, but diffusing it somehow, can reduce the intensity of the light but make for a kinder, gentler light as well.
While mixing light sources isn’t always a good idea, one approach is to combine window light with supplemental lighting. Position your subject with the window to one side and bring in either a supplemental light or a reflector to the other side for reasonably even lighting.
Lighting Styles
Some lighting styles are more heavily used than others. Some forms are used for special effects, while others are designed to be invisible. At its most basic, lighting just illuminates the scene, but when used properly it can also create drama. Let’s look at some types of lighting styles:
- ■Three-point lighting. This is a basic lighting setup for one person. A main light illuminates the strong side of a person’s face, while a fill light lights up the other side. A third light is then positioned above and behind the subject to light the back of the head and shoulders. (See Figure 10.6, left.)
- ■Flat lighting. Use this type of lighting to provide illumination and nothing more. It calls for a variety of lights and diffusers set to raise the light level in a space enough for good video reproduction, but not to create a particular mood or emphasize a particular scene or individual. With flat lighting, you’re trying to create even lighting levels throughout the video space and minimize any shadows. Generally, the lights are placed up high and angled downward (or possibly pointed straight up to bounce off of a white ceiling). (See Figure 10.6, right.)
- ■“Ghoul” lighting. This is the style of lighting used for old horror movies. The idea is to position the light down low, pointed upward. It’s such an unnatural style of lighting that it makes its targets seem weird and ghoulish.
- ■Outdoor lighting. While shooting outdoors may seem easier because the sun provides more light, it also presents its own problems. As a general rule of thumb, keep the sun behind you when you’re shooting video outdoors, except when shooting faces (anything from a medium shot and closer) since the viewer won’t want to see a squinting subject. When shooting another human this way, put the sun behind her and use a video light to balance light levels between the foreground and background. If the sun is simply too bright, position the subject in the shade and use the video light for your main illumination. Using reflectors (white board panels or aluminum foil-covered cardboard panels are cheap options) can also help balance light effectively.

Figure 10.6 With three-point lighting (left) and flat lighting (right).
Audio
When it comes to making a successful video, audio quality is one of those things that separates the professionals from the amateurs. We’re used to watching top-quality productions on television and in the movies, yet the average person has no idea how much effort goes in to producing what seems to be “natural” sound. Much of the sound you hear in such productions is actually recorded on carefully controlled sound stages and “sweetened” with a variety of sound effects and other recordings of “natural” sound.
Your a7 IV has a pair of stereo microphones on its top surface, able to capture Dolby Digital Audio. You can plug an external microphone into the mic jack on the left side of the camera, or work with a microphone designed specifically for Sony cameras, such as the (roughly $130) Sony ECM-XYST1M mic (see Figure 10.7). Hook up Sony’s ECM-B1M shotgun mic or XLR-K3M XLR adapter kit with a pro microphone; you’ll get professional digital (not analog) audio quality that can match any dedicated camcorder.
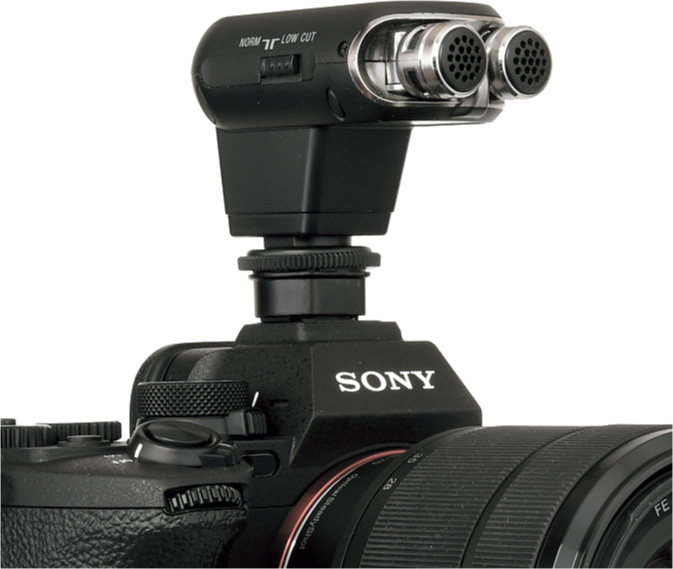
Figure 10.7 An external microphone can significantly improve your audio quality.
If you stick with the built-in microphones, you must be extra careful to optimize the sound captured by those fixed sound-grabbers. In the Shooting > Audio Recording group you’ll find entries for Audio Recording, Audio Recording Level, Audio Out Timing (to compensate for a delay when viewing live video through the a7 IV’s HDMI port), and a Wind Noise Reduction on/off entry. The latter is a low-cut filter feature that can further reduce wind noise; however, this processing feature also affects other sounds, making a wind screen on the microphone itself far more useful.
Tips for Better Audio
Since recording high-quality audio is such a challenge, it’s a good idea to do everything possible to maximize recording quality:
- ■Turn off any sound makers you can. Little things like fans and air handling units aren’t obvious to the human ear but will be picked up by the microphone. Turn off any machinery or devices that you can plus make sure cell phones are set to silent mode. Also, do what you can to minimize sounds such as wind, radio, television, or people talking in the background.
- ■Make sure to record some “natural” sound. If you’re shooting video at an event of some kind, make sure you get some background sound that you can add to your audio as desired in postproduction.
- ■Consider recording audio separately. Lip-syncing is probably beyond most of the people you’re going to be shooting, but there’s nothing that says you can’t record narration separately and add it later. It’s relatively easy if you learn how to use simple software video-editing programs like iMovie (for the Macintosh) or Windows Movie Maker (for Windows PCs). Any time the speaker is off-camera, you can work with separately recorded narration rather than recording the speaker on-camera. This can produce much cleaner sound.
I’ll explain the half-dozen Audio Recording options available with the a7 IV in Chapter 11.
Lens Craft
I’ll cover the use of lenses with the a7 IV in more detail in Chapter 12, but a discussion of lens selection when shooting movies may be useful at this point. In the video world, not all lenses are created equal. The two most important considerations are depth-of-field, or the beneficial lack thereof, and zooming. I’ll address each of these separately.
Depth-of-Field and Video
Have you wondered why professional videographers have gone nuts over still cameras that can also shoot video? The producers of Saturday Night Live could afford to have their director of photography use the niftiest, most-expensive, high-resolution video cameras to shoot the opening sequences of the program. Instead, Buono opted for a pair of digital SLR cameras. One thing that makes digital still cameras so attractive for video is that they have relatively large sensors. That provides two benefits compared to cameras with a smaller sensor. In addition to improved low-light performance, the large chip allows for unusually shallow depth-of-field (a limited range of acceptable sharpness) for blurring the background; this effect is difficult or impossible to match with most professional video cameras since they use smaller sensors.
As you’ll learn in Chapter 12, a larger sensor calls for the use of longer focal lengths to produce the same field of view, so, in effect, a larger sensor allows for making images with reduced depth-of-field. And that’s what makes cameras like the a7 IV attractive from a creative standpoint. Shallow depth-of-field makes it easier to blur a cluttered background to keep the viewers’ eyes riveted on the primary subject. Your camera, with its larger sensor, has a distinct advantage over consumer camcorders in this regard, and even does a much better job than professional video cameras.
Zooming and Video
When shooting still photos, a zoom is a zoom is a zoom. The key considerations for a zoom lens used only for still photography are the maximum aperture available at each focal length (“How fast is this lens?), the zoom range (“How far can I zoom in or out?”), and its sharpness at any given f/stop (“Do I lose sharpness when I shoot wide open?”).
When recording video, the priorities may change, and there are two additional parameters to consider. The first two I listed, lens speed and zoom range, have roughly the same importance in both still and video photography. Zoom range gains a bit of importance in videography, because you can always/usually move closer to shoot a still photograph, but when you’re zooming during a shot most of us don’t have that option (or the funds to buy/rent a dolly to smoothly move the camera during capture). But, oddly enough, overall sharpness may have slightly less importance under certain conditions when shooting video. That’s because the image changes in some way many times per second (30/60 times per second), so any given frame doesn’t hang around long enough for our eyes to pick out every single detail. You want a sharp image, of course, but your standards don’t need to be quite as high when shooting video.
Here are the considerations:
- ■Zoom lens maximum aperture. The “speed” of the lens matters in several ways. A zoom with a relatively wide maximum aperture (small f/number) lets you shoot in lower light levels with fewer exposure problems. A wide aperture like f/1.8 also enables you to minimize depth-of-field for selective focus. Keep in mind that with most zooms, the maximum aperture gets smaller as you zoom to longer focal lengths. A variable-aperture f/3.5 to 5.6 lens like the power zoom kit lens, offers a fairly wide f/3.5 maximum aperture at its shortest focal length but only f/5.6 worth of light-capturing ability at the long end. Zooms with a wide and constant (not variable) maximum aperture such as f/2.8 are available, but they are larger, heavier, and more expensive.
- ■Power zoom. An ideal movie zoom should have a power zoom feature, and that’s available with Sony lenses with the PZ designation. PZ lenses offer smooth, silent zooming that’s ideal for video shooting. Mechanical zooming with other lenses during capture can produce jerky images, even with vibration reduction turned on. If you own a remote with a zoom button, such as the RM-VPR1, I recommend using that with your PZ lenses for smoother zooming. As I mentioned earlier, you can also mimic power zoom using the a7 IV’s digital zoom feature.
- ■Zoom range. Use of zoom during actual capture should not be an everyday thing unless you’re shooting a kung-fu movie. However, there are effective uses for a zoom shot, particularly if it’s a “long” one from wide angle to telephoto. Most of the time, you’ll use the zoom range to adjust the perspective of the camera between shots, and a longer zoom range can mean less trotting back and forth to adjust the field of view. Zoom range also comes into play when you’re working with selective focus (longer focal lengths produce shallower depth-of-field) or want to expand or compress the apparent distance between foreground and background subjects. A longer range gives you more flexibility.
- ■Linearity. Interchangeable lenses may have some drawbacks, as many photographers who have been using the video features of their digital SLRs have discovered. That’s because lenses with mechanical zooming are rarely linear unless they were specifically designed for shooting movies. Rotating the zoom ring manually at a constant speed doesn’t always produce a smooth zoom. There may be “jumps” as the elements of the lens shift around during the zoom. Keep that in mind if you plan to zoom during a shot and are using a non-linear lens. In practice, those include virtually all the lenses at your disposal, aside from power zoom lenses (like the new Sony FE 16-35mm f/4 PZ G), a special E-mount cine lens, or a cine lens in an entirely different mount that you can use with your a7 IV with an optional third-party adapter.