
3
PATTERNS AND REPEATS
PATTERNS AND REPEATS IN DIGITAL TEXTILE DESIGN
Artists and designers have always been inspired by both the natural and man-made textures and patterns that surround them, and repeating patterns have formed the basis of most surface design in the decorative arts. It seems that we are instinctively drawn to designs that mimic the rhythms found in nature.
If a design is hand painted or drawn then the pattern may be made to change continuously, in the same way that ripples in water vary, and yet also seem to follow a predictable structure. In traditional mechanized printing, however, this kind of randomization is not possible and the exact repetition of motifs is an intrinsic part of the process. The introduction of digital printing means that such rigid repetition is no longer necessary. But there are still sound aesthetic and practical reasons for putting a design into repeat.
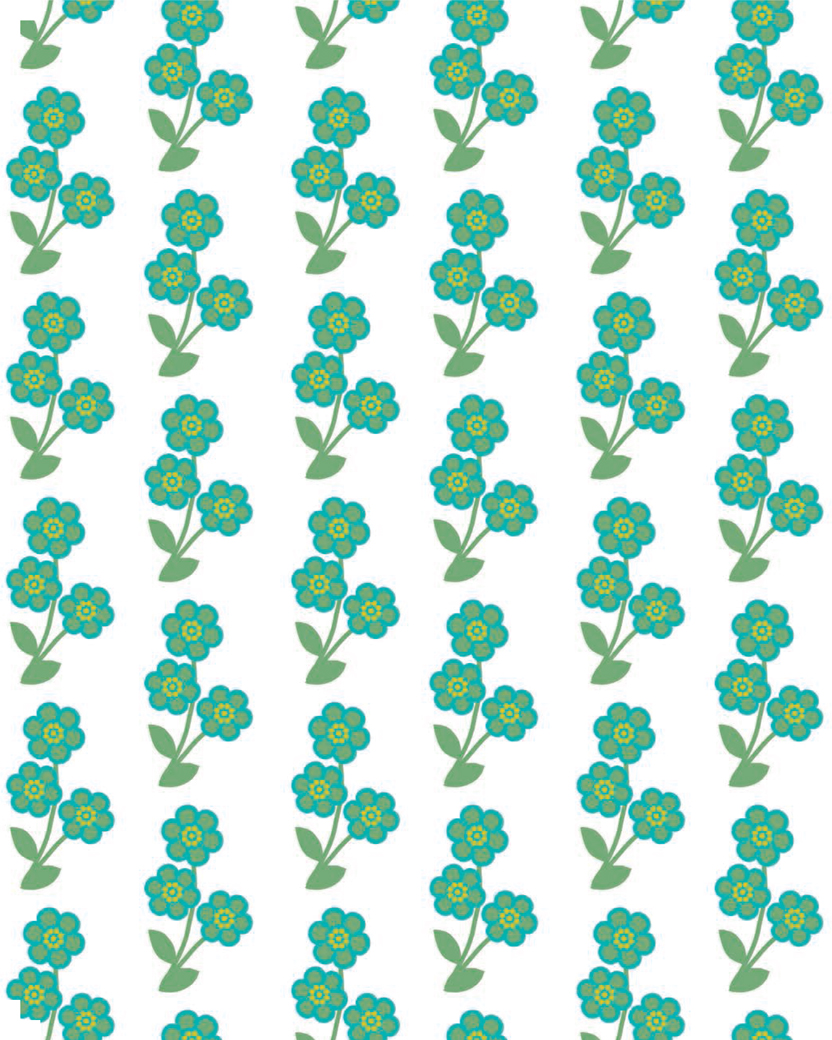
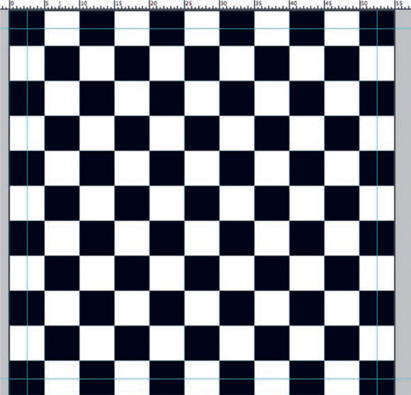
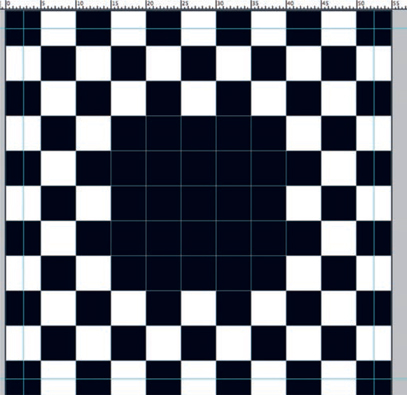
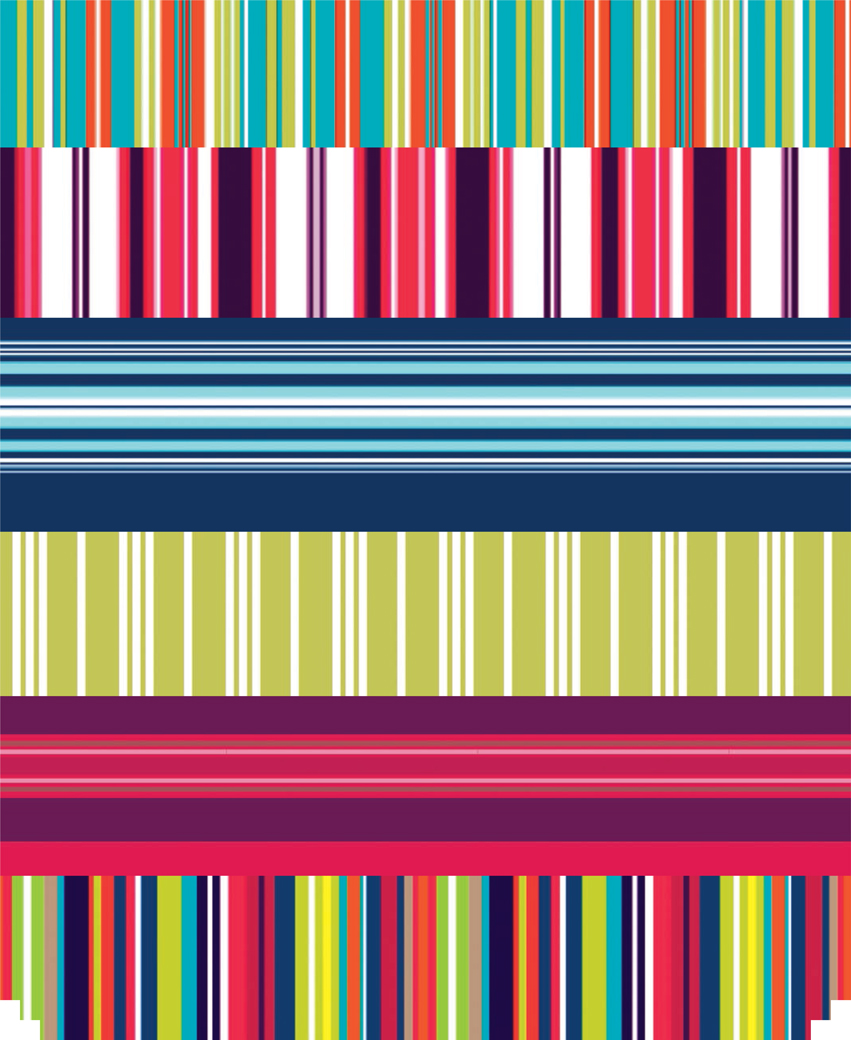
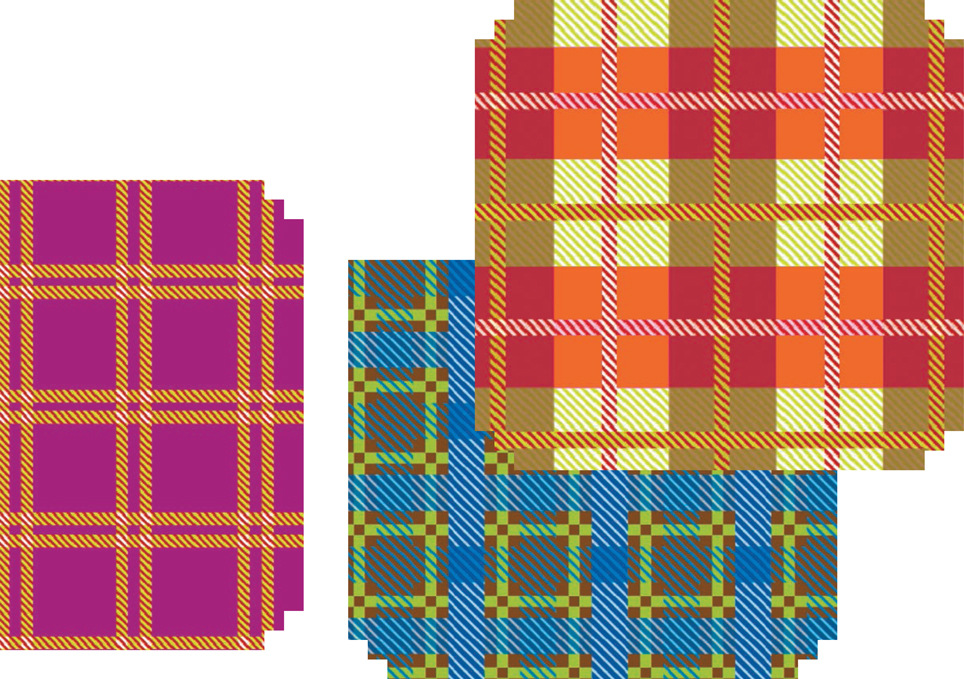
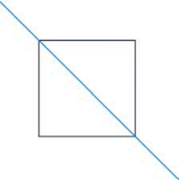
There are two types of repeat structure used to lay out a design so that, once printed, it will form a continuous length: the block or tile, and the half-drop repeat. It may not seem obvious at first, but all surface designs that have been printed by traditional mechanical methods fit into one of these two structures. Examples of tiled repeats include checkerboards, plaids, and stripes, while half-drops include polka dots, diamonds, and ogees, as well as the familiar pattern in which bricks are often laid.
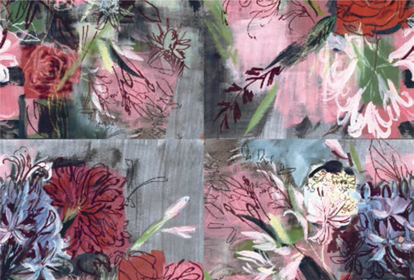
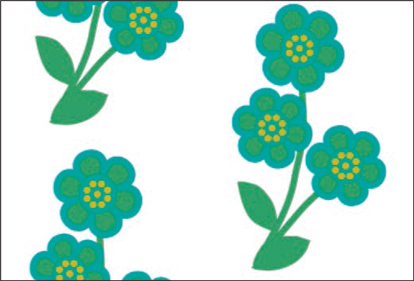
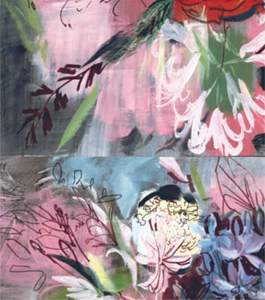
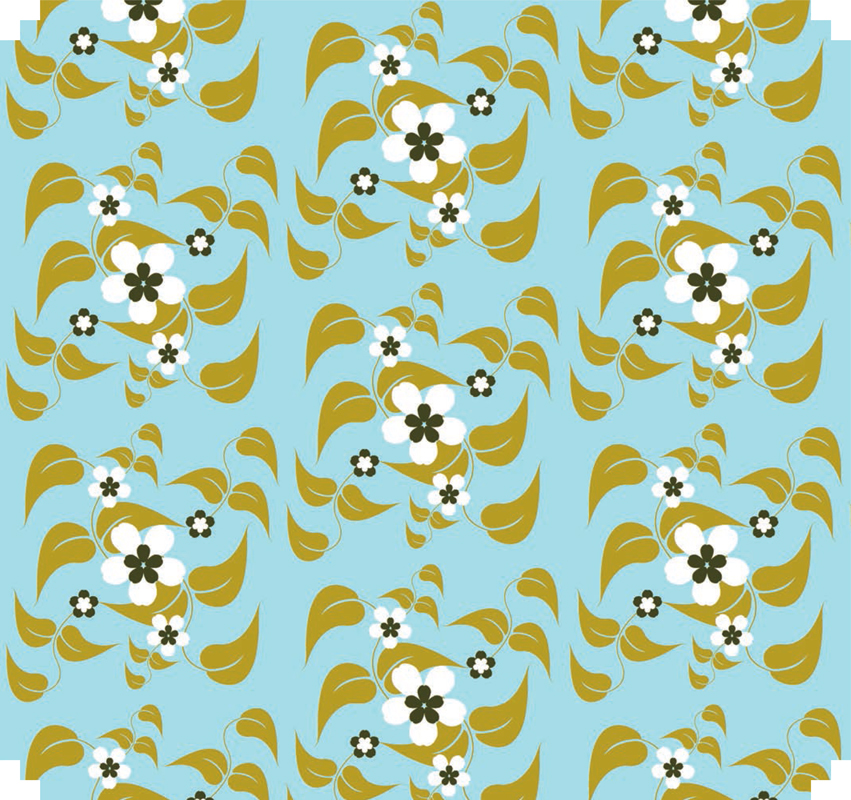
An obvious and intentional geometric structure is part of the very nature of a plaid or diamond design. In the case of more organic patterns, such as floral or textural designs, where the designer does not intend to lay out the motifs geometrically, a successful repeat is one that is not obvious, but instead creates an illusion of randomly scattered motifs or unbroken texture (see page 79). Such textural designs tend to be more meditative and restful to the eye, in contrast to patterns in which the repeat structure is intended to dominate the design, making a bold statement. Both styles can be equally pleasing.
A skilled repeat artist is able to put an organic design based on pebbles or woodgrain together in such a way that a viewer who is not searching for the repeat unit will not be aware of it. In an example of a repeat that has not been well constructed, a particularly bright pebble might perhaps stand out from the rest as it was repeated, drawing the viewer’s eye to this one element and destroying the illusion of a natural surface.
This problem, known as “tracking” within the surface design industry, where an unintentional stripe or diagonal has been created, can be resolved by scattering copies or variations of noticeable elements in a design in such a way that they appear to be randomly placed and equally balanced with other similar motifs or colored areas. An important factor in carrying out this randomization is to make sure that the initial size of the repeat unit is large enough to contain enough elements with which to work. This may be accomplished by joining several images together to form the unit that will then be repeated. All of us have seen this type of repeat in the textures often used in kitchen Formica or linoleum, based on photographs of marble, for example. In the case of a floral, a balanced rhythm can be created by rotating and mirroring motifs until the overall effect is fluid and the eye is not distracted by a rigid structure. A balanced distribution of negative space is also crucial.
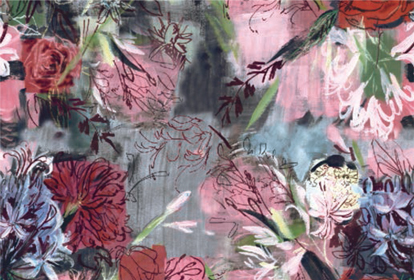
By using digital techniques and “stepping out”—or tiling— your design in repeat on-screen, prior to printing, you have the option of rectifying any visual mistakes such as tracking. If tracking does occur, then you should rework and retile the repeat until you achieve a balanced effect.
CREATING REPEATS IN PHOTOSHOP AND ILLUSTRATOR
Putting your design into repeat is the final stage of preparing your work for production. It is vital that you understand repeat structures and how they can change the look of a design, and the different approaches that can be explored. Prior to the introduction of software such as Photoshop, repeats were created by tracing or photocopying the original artwork, cutting up the page, and collaging or retracing motifs to work across the seam. Once the repeat unit was deemed successful, the design would be recreated by painting or photocopying. The methods explained in this chapter for creating a repeat digitally follow the same principles, although they are obviously far less time-consuming.
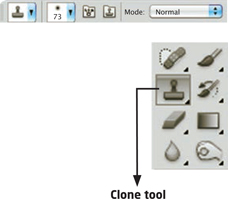
Even though Photoshop and Illustrator were not created for textile designers, there are many methods for creating repeats using these programs. Photoshop offers a painterly approach to design work; for example, the Clone Stamp tool may be used to maintain the hand-drawn or photographic qualities of an original design. The tools can help when mending any of the seams that are inevitably created during the repeat process, which must be done with skill.
Illustrator, on the other hand, is a vector-based program and the software maintains a mathematical “memory” of elements so that they never become distorted during manipulation. It is easier to set up groups of motifs in Illustrator than in Photoshop so that they may all be moved or manipulated together. Accurate and complex graphic patterns and constructions can be built in this program, providing an infinite range of possibilities.
This chapter presents tutorials designed to explain the basic principles of setting up block and half-drop repeats in both Photoshop and Illustrator; examples include stripes and plaids. Once you have mastered the mechanical processes in both programs they should become second nature, allowing you to concentrate on designing and constructing successful repeats. Photoshop is better suited to organic, painterly, or photographic designs, while Illustrator works well with geometric and hardedged styles.

Vicki Murdoch created an eccentric textile collection for furnishing her 1969 caravan, the owner of which is her cat! She is inspired by retro prints of the era. Repeat patterns are intrinsic to her design process and allow her designs to work together in harmony with their somewhat bizarre surroundings.
Specialist textile design software geared for production and the preparation of designs for traditional print production, such as AVA, Pointcarré, and Lectra, does exist and will be covered more fully in Chapter Six. Many of these systems have the advantage of providing functions for creating repeats that are considerably faster and more sophisticated than off-the-shelf packages such as Photoshop and Illustrator.
PHOTOSHOP REPEAT: BASIC BLOCK REPEAT
The quickest way to make a basic block pattern in Photoshop is with the Define Pattern function. This simply puts a motif into repeat and stores it in the Pattern Library for you to use at any time.
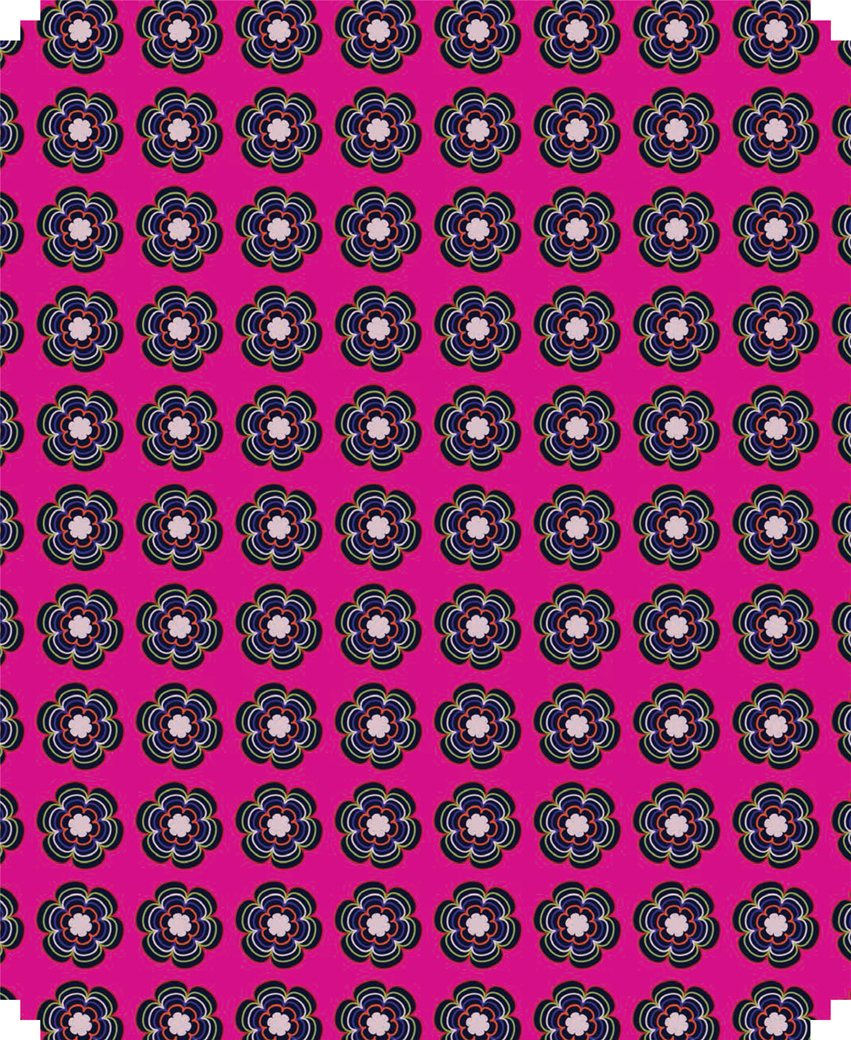
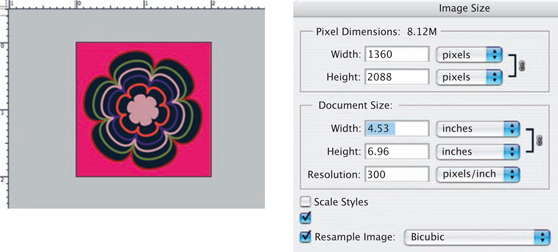
Choose a motif and resize the unit to the required size. Here the image was scaled down to 0.8 x 0.8 in (2 x 2 cm).
Image > Image Size.
Select > All.
STEP 2
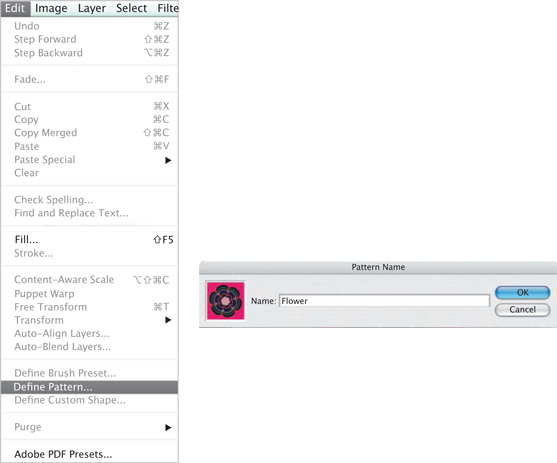
Edit > Define Pattern.
Name your new pattern and press OK.
STEP 3
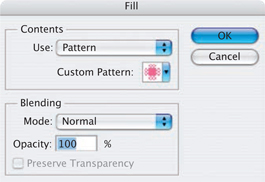
Open a new document or select the shape you want to fill with your new pattern.
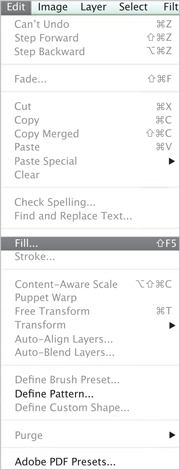
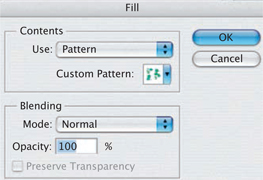
Edit > Fill.
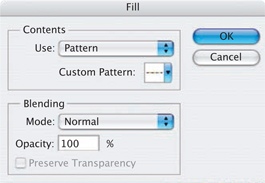
STEP 4
In the Fill dialog box, select Pattern.
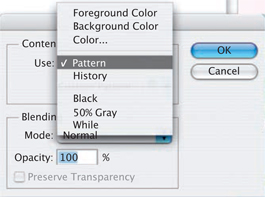
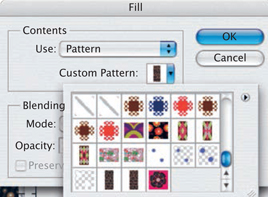
STEP 5
Click on Custom Pattern to reveal the patterns stored in the Pattern Library. The last pattern shown will be the one you have just made.
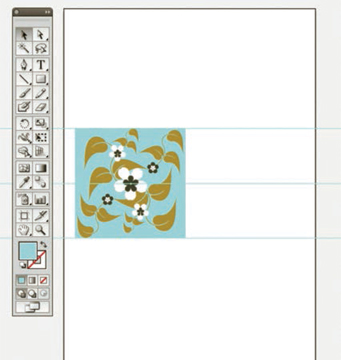
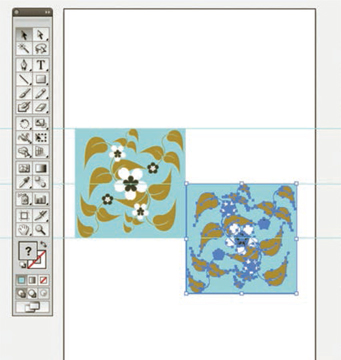
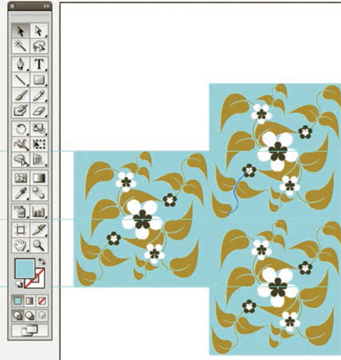
PHOTOSHOP REPEAT: BLOCK REPEAT WITH OFFSET FILTER
You can create an easy block repeat by defining your design unit as a pattern. However, if your design is not a simple, flat motif and has texture, you will see a seam appear. By offsetting the design you can carefully mend the seam and avoid any ugly lines passing through the repeat. The mending of a seam can take time and patience, but it is an important part of the process of achieving a beautiful and natural pattern.

This tutorial demonstrates a floral painting being put into a repeat. The painting is built up with layers of acrylic paint, and it is crucial to maintain the feel and quality of the painting in the mending process.
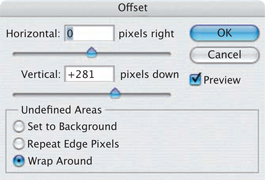
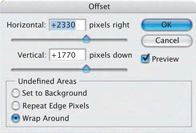
Open the artwork in Photoshop and apply the Offset filter.
Filter > Other > Offset.
In the Offset dialog box, ensure that Wrap Around is selected. Divide the Horizontal and the Vertical pixel image sizes by two and enter the new values.
Click OK.
STEP 2
Your artwork should now be cut into four and flipped so the outsides of the design will match edge to edge. However, seams now run through the design.
STEP 3
You need to carefully mend the seams, using any tools you think are appropriate for the job. Here, the Clone tool is used to retain the painted textures. Select a soft brush option to avoid creating hard edges. Paint and draw back into the seams using the Eyedropper tool for color-matching. You can also copy and paste parts of the design to rebuild an area around the seams.
The Spot Healing Brush tool will copy the texture from a selected area and match it to the color and tone of the area you are mending.
With Content-Aware Fill, you can copy and color-match data from one area of the image to fill in another selected area. The selected area changes to match the area around it and fills in the selection with actual image detail.
STEP 4
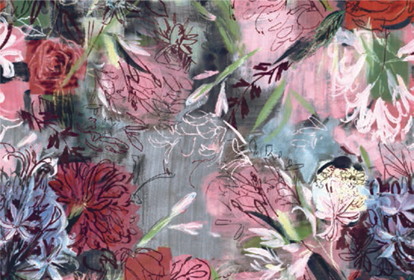
Once you are happy with your mending you can offset again (steps 1 to 3) to check the repeat unit.
Finally, flatten the artwork.
Layer > Flatten Image.
STEP 5
Before you define the pattern you can change the unit size.
Image > Image Size.
STEP 6
Edit > Define Pattern.
Name your pattern and click OK.

PHOTOSHOP REPEAT: SIMPLE HALF-DROP MOTIF
This tutorial shows a simple method for creating a half-drop if you have a motif you wish to put into repeat. As the motif is self-contained, there are no seams to mend and no need to use the more complex method for making a half-drop repeat shown on page 96. You can use this method to create simple patterns that you can store in your Pattern Library.
Open your motif in Photoshop.
Select > All.
Edit > Copy.

STEP 2
Image > Image Size.
Write down the pixel measurements.

STEP 3
Filter > Other > Offset.
In the Offset dialog box, ensure that Wrap
Around is selected. Divide the Vertical pixel image size by two and enter the new value.
Click OK.
STEP 4
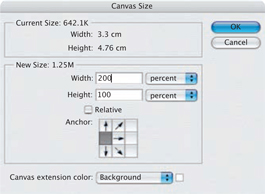
Image > Canvas Size.
Select the middle box on the left-hand side of the Anchor grid.
For Width, enter 200 percent.
STEP 5
You have already copied the original motif.
Edit > Paste.
Position the new motif next to the first.
Flatten the image.
Layer > Flatten Image.
STEP 6
Change the size of the motif if you wish.
Image > Image Size.
STEP 7
Edit > Define Pattern.
Name your pattern and click OK.

STEP 8
Open a new document.
Edit > Fill.
Cick on Custom Pattern and find your new pattern.
PHOTOSHOP REPEAT: HALF-DROP REPEAT
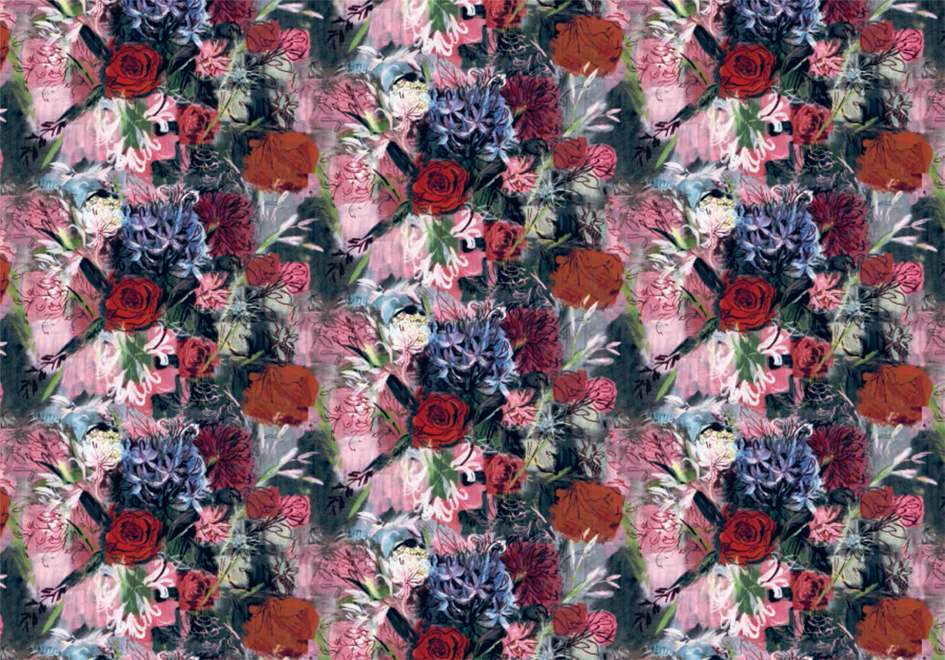
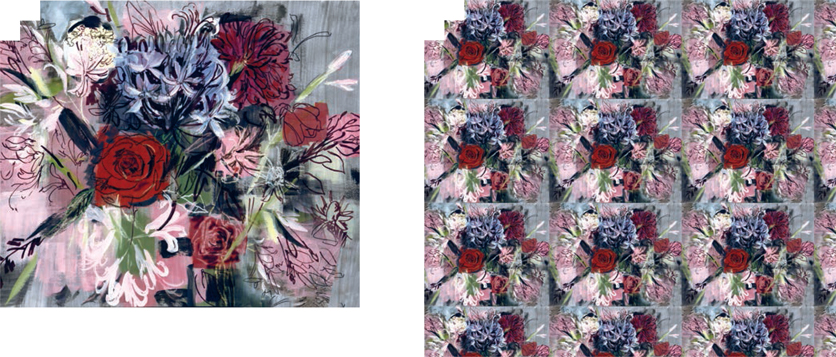
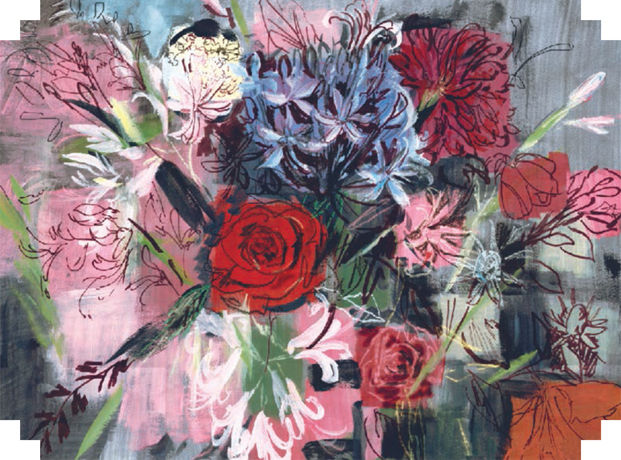
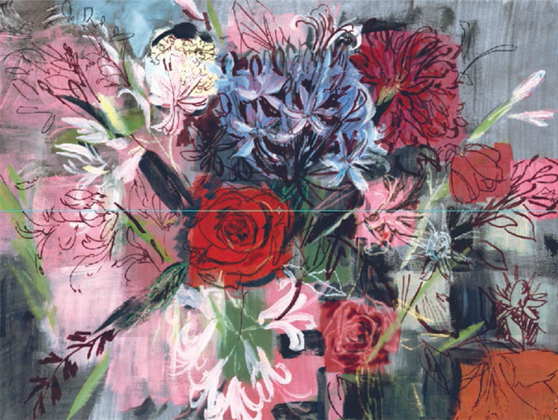
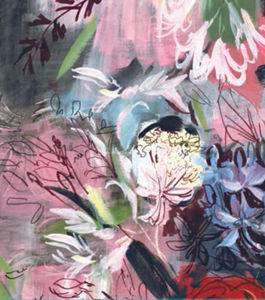
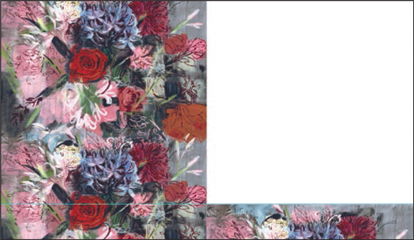
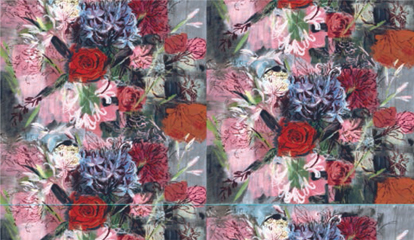
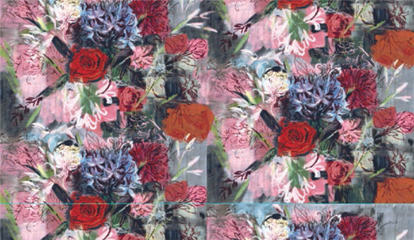
The half-drop is the most complex repeat you can do in Photoshop. The process is straightforward, but you will need patience to mend the seams so that they flow with the design to achieve a fluid repeat. In this tutorial, Victoria Purver’s floral painting Ophilia is used to demonstrate a half-drop repeat.
Open your image in Photoshop.
Layer > Flatten Image.
View > Snap To > All.
STEP 2
Select > All.
Edit > Free Transform.
Notice the crosshairs that appear to mark the central point of your design.
STEP 3
View > Rulers.
Drag a guide down so it clicks into place over the crosshairs.
Press Escape.
STEP 4
Select your design.
Edit > Copy.
Deselect the design.
STEP 5
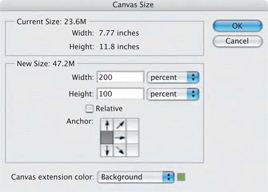
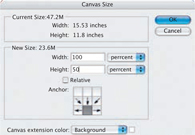
Image > Canvas Size.
Select the middle square at the bottom of the Anchor grid.
Change the Height to 200 percent.
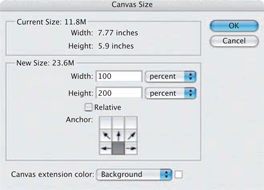
STEP 6
Click OK. You will see the canvas size is doubled in height.
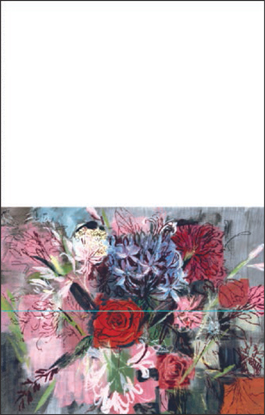
STEP 7
Edit > Paste.
Flatten the image.
Now you need to carefully mend the seams, using any tools you think are appropriate for the job. Here, the Clone tool is used to retain the painted textures. Select a soft brush option to avoid creating hard edges. Paint and draw back into the seams using the Eyedropper tool for color-matching. You can also copy and paste parts of the design to rebuild an area around the seams.
The Healing Brush tool will copy the texture from a selected area and match it to the color and tone of the area you are mending.
With Content-Aware Fill, you can copy and color-match data from one area of the image to fill in another selected area. The selected area changes to match the area around it and fills in the selection with actual image detail.
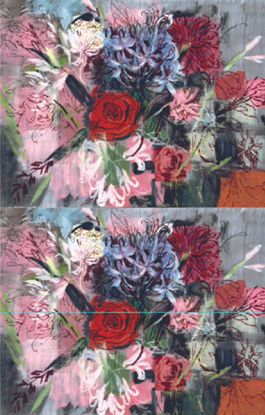
STEP 9
Select > All.
Edit > Copy.
It can help to copy and paste other design elements during the process. For example, the red flower on the right-hand side was only half an element in the design work and would otherwise have been quite hard to complete using standard Photoshop tools.

STEP 10
Image > Canvas size.
Set the Width to 200 percent so that the canvas doubles in width.
Edit > Paste.
Move the pasted image so the top snaps into place along the guide line.
STEP 12
Duplicate the new pasted layer. Drag this so the bottom snaps onto the guide line. Flatten the layers.
STEP 13
Now mend the seams as before.
STEP 14
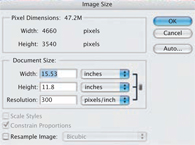
Image > Image Size.
Note the pixel size.
STEP 15
Filter > Other > Offset.
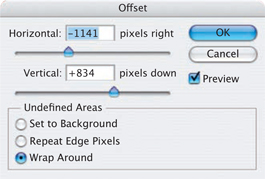
In the Offset dialog box, select Wrap Around. Divide the Horizontal and the Vertical pixel image sizes by two and enter the new values. Click OK. New seams will appear that, once again, you will need to mend.

STEP 16
Image > Canvas Size.
Select the middle square at the bottom of the Anchor grid.
Change Height to 50 percent.
STEP 17
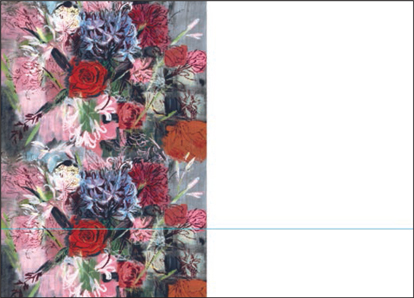
Your design is now in a half-drop unit.
At this point you may alter the image size.
This is the unit that you can give to a digital print bureau to print out in repeat.
STEP 18
Select > All.
Edit > Define Pattern.
Name the pattern and press OK.
Open up a new document to see the repeat effect.
Edit > Fill.
Select Pattern and find your new pattern.
![]()
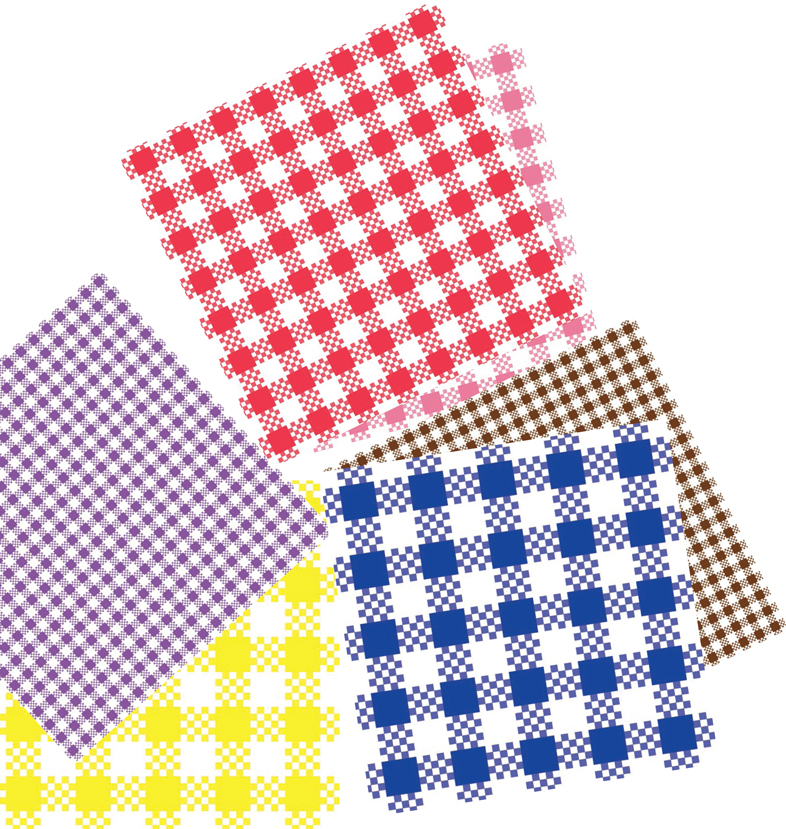
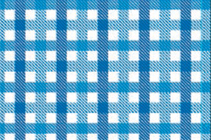
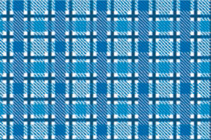
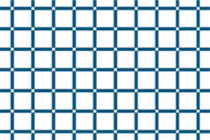
PHOTOSHOP PATTERN: GINGHAM
This tutorial shows how to create the eternally popular gingham pattern. Once created, it can be filled with any color and changed in scale. It may be used alone or incorporated into a design. However it’s applied, it adds a charming, fresh element to a design.
STEP 1
Open a new document in Photoshop at size 2 x 2 inches .
STEP 2
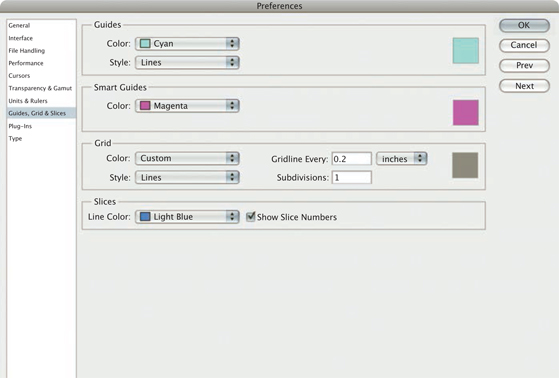
Adjust your grid settings.
Photoshop > Preferences > Guides, Grid & Slices.
A dialog box will appear. Set a Gridline every 0.2 in (0.5 cm), and set Subdivisions to 1.
STEP 3
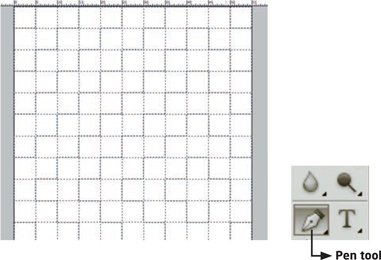
View > Show > Grid.
View > Snap To > Grid.
STEP 4
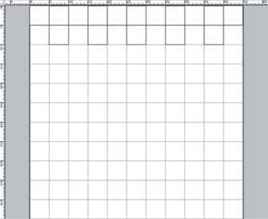
Select the Pen tool from the toolbar.
Use the Pen tool to draw alternating squares, using the grid as a guide to create a checkerboard effect. The anchor point should click automatically to the corner point of each grid square.
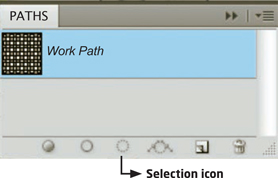
STEP 5
Click on the Paths palette to see the paths you have created.
Click on the Selection icon at the bottom of the palette to make your path a live selection.
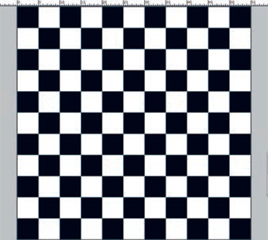
STEP 6
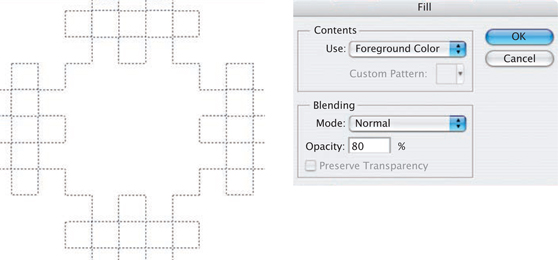
Edit > Fill.
Choose black as the foreground color.
Drag horizontal and vertical guide lines 0.2 in (0.5 cm) from the edge of the design.
STEP 8
Use the Pen tool draw a central five-by-five square.
Make it into a selection in the Paths palette.
Edit > Fill > Foreground Color.
STEP 9
Use the Pen tool again to draw and fill in the corner three-by-three squares and, as before, select them.
Fill the squares with white.
STEP 10
Now, with your guide lines as your guides and, using the Crop tool in the Tool palette, crop your design. You have now created the unit for your gingham pattern.

You could now simply select the black and color it as desired. The following method shows a two-tone effect for a woven look.
Select the gingham and fill with white.
Now select it again, and fill with your desired color.
However, in the Fill dialog box change the Opacity to 80%.
STEP 12
Use the Pen tool to draw the central square. Select it and fill it with the same color but with Opacity set to 100%.

STEP 13
Now your gingham is ready. You can change its size using the Image Size dialog box to vary the scale.
Image > Image Size.
STEP 14
Select > All.
Edit > Define Pattern.
Name your pattern and click OK.
Create a new document.
Edit > Fill.
Select Pattern and find your gingham.

PHOTOSHOP PATTERN: CREATING STRIPES
You can create simple or sophisticated stripes in Photoshop and store them in your Pattern Library for later use.
STEP 1
Open a new document. The one shown here is 2.4 x 4.7 in (6 x 12 cm).
View > Rulers.
Select a long, thin area with the Marquee tool.
STEP 2
Fill the selected area with color using the Paint Bucket tool. Continue to build up stripes across the area using this method.
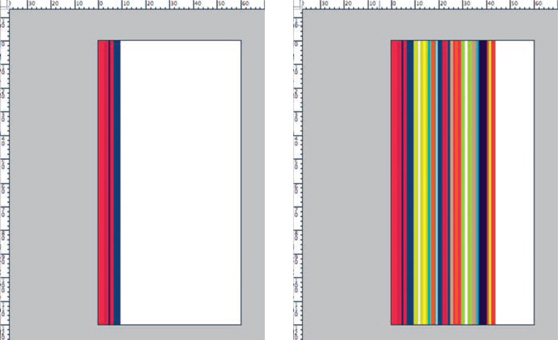
STEP 3
Complete your stripes.
Select > All.

STEP 4
Edit > Define Pattern.
Name your stripe and click OK.

STEP 5
Open a new document.
Edit > Fill.
Select Pattern and find your stripe.
Fill the new document with your new stripe.
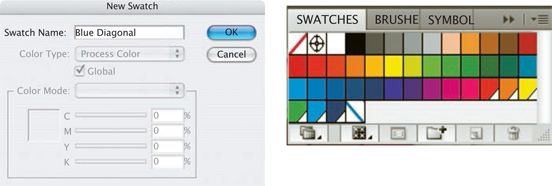
ILLUSTRATOR REPEAT: BASIC PATTERN SWATCH
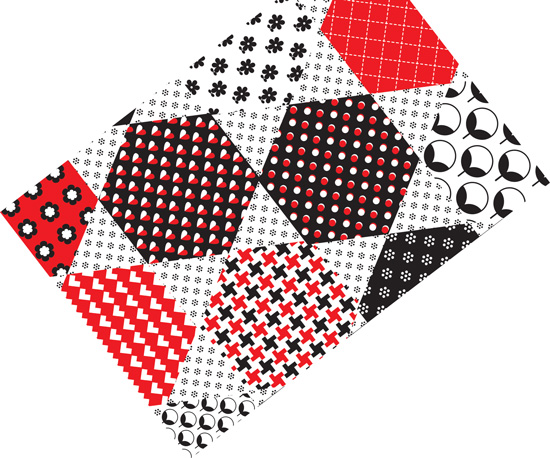
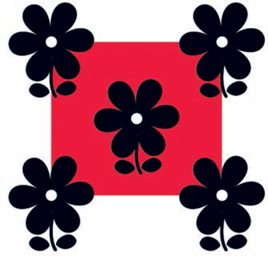
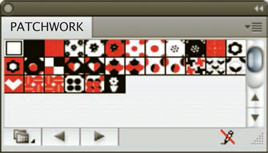
Illustrator offers a simple method of constructing a patterned tile. This tutorial explains how to make a block and half-drop tile that can be used to create striking patterns. Working with vector graphic motifs, you can create a library of pattern swatches to use in designs such as patchwork. You can also create different color variations.
STEP 1
Create your motif. If it has several elements, group them together.
Object > Group.

STEP 2
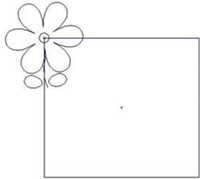
To create a simple block tile, place the motif in the center of a square, and select both the square and the motif.
Edit > Define Pattern.
Name your motif.

STEP 3
To create a half-drop tile, draw a square to place your motif in. Check the View menu and make sure Snap to Point and Smart Guides are selected.

STEP 4
Copy and paste your flower into the square.
View > Outline.
STEP 5
Using the Selection tool, select the center of the flower and drag it over the left-hand corner of the square. It will snap into place and crosshairs will appear.
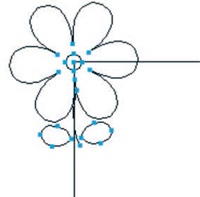
STEP 6
Duplicate the flower. Place one in each corner of the square, and add another one in the center.
STEP 7
View > Preview.
Select your filled square.
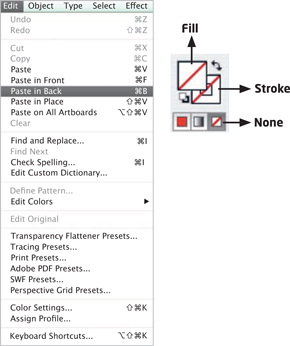
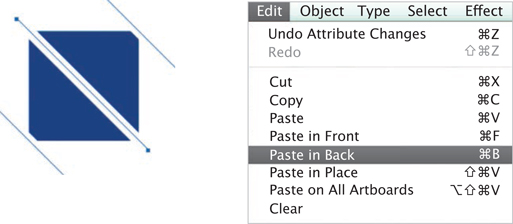
Edit > Paste in Back.
With the square still selected, set Stroke and Fill to “None” to create a bounding box.
(If you are already using a transparent square, this step is unnecessary.)
STEP 8
Select the square and patterns.
Edit > Define Pattern.
Name your pattern and click OK.
Your pattern will appear in the Swatches panel. Once your swatches are made, save them in the Swatch Library for future use.
STEP 9
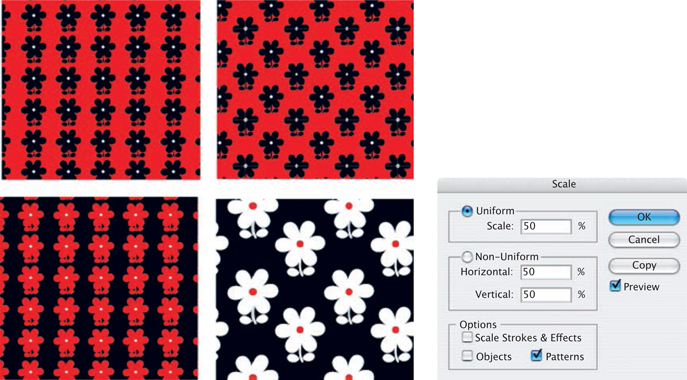
Create a shape and fill it with your new swatch tile. Experiment with the Transform tools to change the pattern rotation and scale.
Object > Transform > Rotate.
Object > Transform Scale.
Make sure you have the Patterns option selected and Objects and Scale Strokes & Effects deselected.
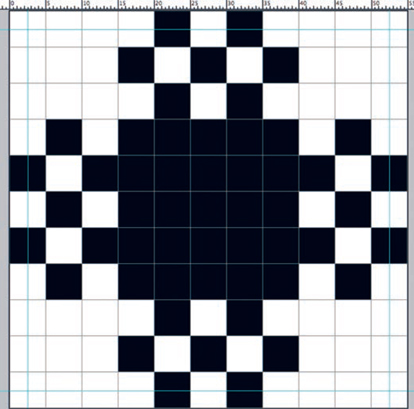
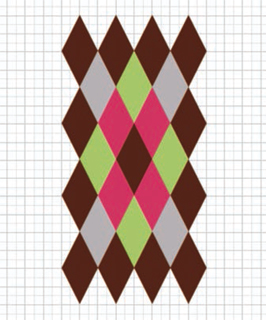
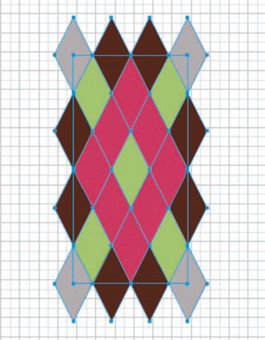
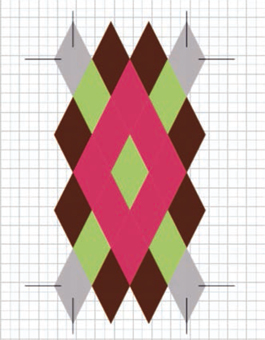
ILLUSTRATOR PATTERN: DIAMOND PATTERN
There are an infinite number of ways to create a geometric tile in Illustrator. This tutorial shows how to create a classic diamond pattern. By coloring individual diamond shapes you can build a variety of designs that can be saved in the Swatch Library. Once created in Illustrator, you can save the swatches and use them as pattern tiles in Photoshop.
STEP 1
Open a document in Illustrator.
View > Show Grid.
View > Snap to Grid.
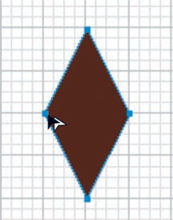
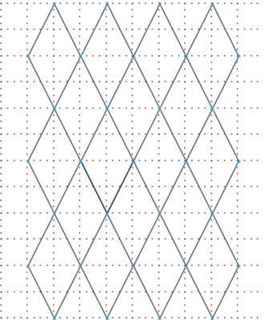
Use the Pen tool to draw a diamond with equal sides. The anchor points will snap to the grid.
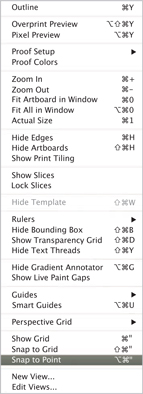
STEP 2
Now go to the View menu and deselect Snap to Grid. Select Snap to Point and Smart Guides instead.
STEP 3
Position the pointer on the left-hand anchor point and begin to drag it to the right. Hold down the Shift and Option/Alt keys to constrain and leave a copy. The cursor will turn white when it has snapped to point.
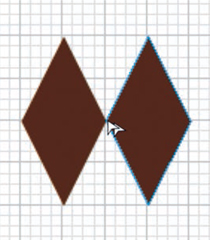
STEP 4
Repeat this action with the keyboard shortcut Command + D to build up a row of four diamonds.
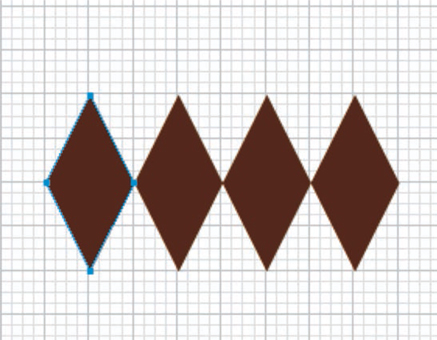
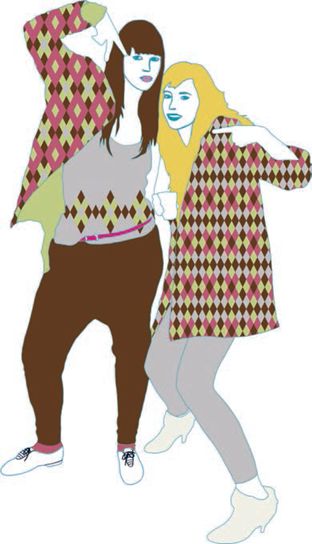
Here, the pattern has been dropped into a fashion illustration by Daisy Butler.
Once your row of four diamonds is complete, select the top anchor point on the left-hand diamond and, holding down the Option/Alt key, drag it until it snaps into place with the right anchor point of the same diamond. Repeat until you have a row of three diamonds.
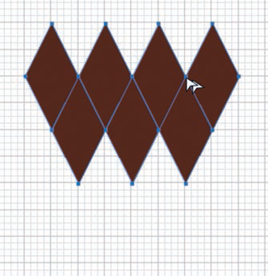
STEP 6
Select all the diamonds. Start at the top left-hand diamond’s anchor point and, holding down the Option/Alt key, drag it until it snaps into place with the bottom row’s left anchor point. Continue to build a fifth row of diamonds.
STEP 7
Select individual diamonds and color them to create a pattern.
STEP 8
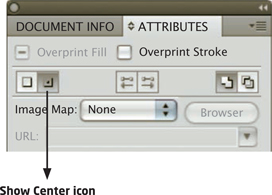
View > Outline.
Window > Attributes.
With all the diamonds selected, click the Show Center icon to display the center point of the diamonds.
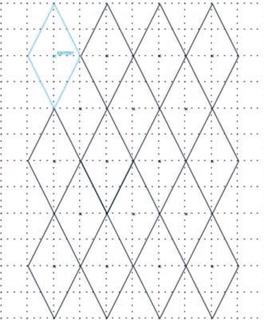
STEP 9
Select the Rectangle tool from the Tool palette. Set Stroke and Fill to “None.” Draw a rectangle, starting from the center point of the top left-hand diamond and ending at the center point of the bottom right-hand diamond.
STEP 10
Select the rectangle and all the pattern elements.
Edit > Define Pattern.
Name your pattern and click OK. Your pattern will appear in the Swatches palette.
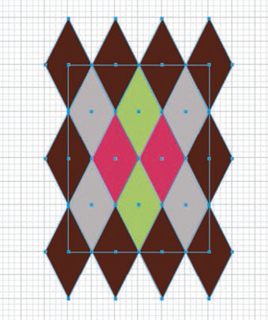
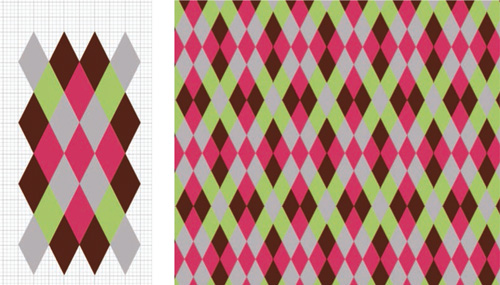
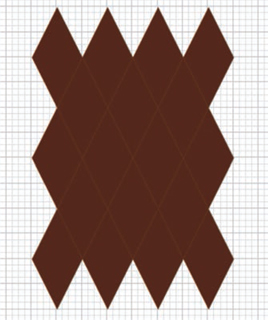
Once you have your diamond unit, you can make an infinite number of different diamond formations by selecting and changing the fill colors.
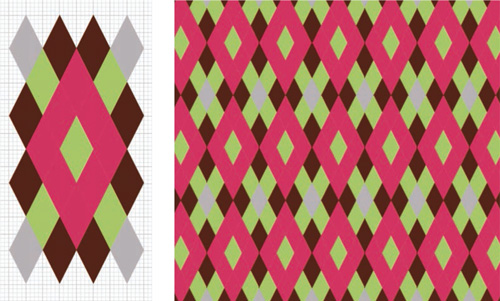
Save each pattern as a swatch, draw a rectangle, and fill it with the new swatch patterns to create different effects.
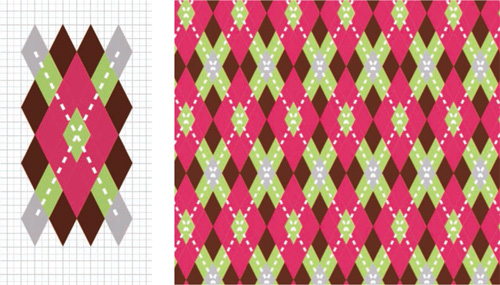
Using the Pen tool, create a diagonal line from the center points in the outside diamond, and apply a dash to the stroke. This will give a stitched effect reminiscent of the classic Argyle pattern.
PUTTING ILLUSTRATOR PATTERN FILES INTO PHOTOSHOP
Once you have made your pattern tile, save it in the Swatch Library so you can use it again. You can also save it in the Photoshop Pattern Library for use in a Photoshop image.
STEP 1
In Illustrator, open your saved swatches from the Swatch Library.
STEP 2
Drag your pattern out.
View > Outline.
Select the bounding box.
If the pattern is grouped, Object > Ungroup. Select the bounding box.
Edit > Copy. Deselect everything.
Edit > Paste in Front.
STEP 3
Select the rectangle.
Object > Create Trim Marks.
Save the file.
STEP 4
Open Photoshop and then open your Illustrator pattern file. An Import PDF dialog box will appear.
Alter the resolution to 300 pixels/inch.
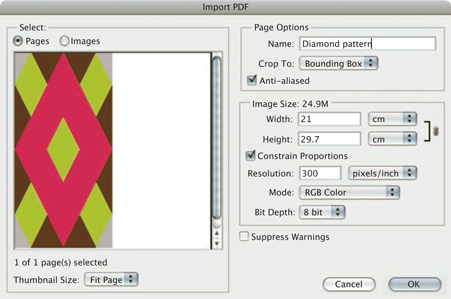
STEP 5
Click OK and your pattern tile will open.
At this point you can change the image size.
Image > Image size.

STEP 6
Select > All.
Edit > Define Pattern.
Name your pattern and click OK.
You can now apply your tiles to a Photoshop file.

TUTORIAL 19
ILLUSTRATOR PATTERN: PLAID PATTERNS
This tutorial shows you how to create a traditional plaid design that can be used by a print or weave designer. A plaid is constructed through the threads of the loom; the warp is set up vertically and the weft horizontally. We will work with the same method, but using Adobe Illustrator.
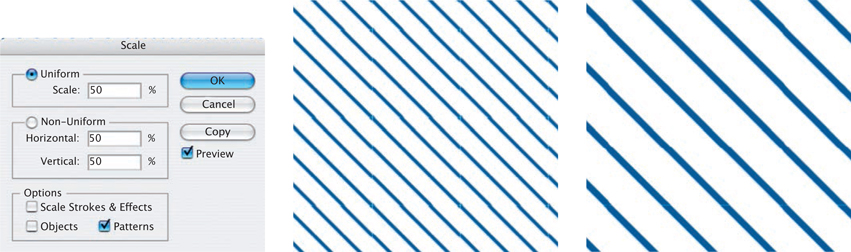
To give your plaid more pattern and texture we will first create some diagonal stripe pattern tiles. Once you have created a pattern tile you can then alter it with any of the Transform tools, and by also creating different color variations you can then build up plaid and check designs.
STEP 1
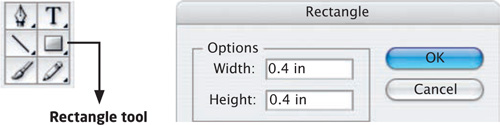
Use the Rectangle tool to create a 0.4 x 0.4 in (1 x 1 cm) square.
STEP 2
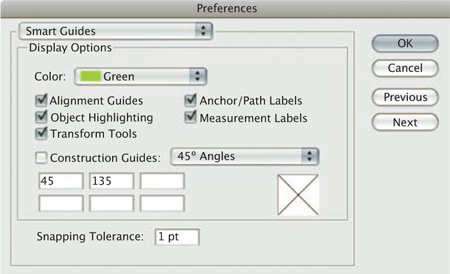
Illustrator > Preferences > Smart Guides.
Set the Construction Guides to 45° Angles. Check the View menu to make sure Smart Guides and Snap to Point are on.
STEP 3
Set Stroke and Fill to “None.”
View > Outline.
Select the Pen tool and drag it across the square until it hits the 45-degree line. Now draw a line diagonally across the square.
View > Preview.
Give the line a 3 pt black stroke.
STEP 5
Use the Selection tool to grab the diagonal line.
Drag it toward the right-hand corner of the square, holding down the Shift and Option/Alt keys to constrain and copy it.
Do not release the mouse button or the keys until the cursor goes white; this means the line has snapped into place.
Repeat for the left-hand corner line.
STEP 6
Select all three lines to change the stroke color.
STEP 7
You can alter the background color and the stroke color. Select the three lines and choose a new stroke color. Select the square and fill it with a new color.
Select the square.
Edit > Copy.
Edit > Paste in Back.
This will still be selected; set Stroke and Fill to “None.”
STEP 8
Select > All.
Edit > Define Pattern.
Name your pattern and click OK.
The new pattern tile will appear in the Swatches palette.
Draw a rectangle and fill it with your swatch.
You can change the scale:
Object > Transform > Scale.
A dialog box will appear.
Under Options, select Patterns. All the other options should be deselected.
Now change the Uniform Scale percentage.
STEP 10
To build up a basic diagonal plaid:
Object > Transform > Reflect.
Select Vertical Axis and the Patterns option, and then click Copy.
With this new box selected, open the Transparency palette.
Window > Transparency.
Lower the Opacity to create a weave effect.

STEP 11
Create some different color variations and save your swatches to the Swatch Library.
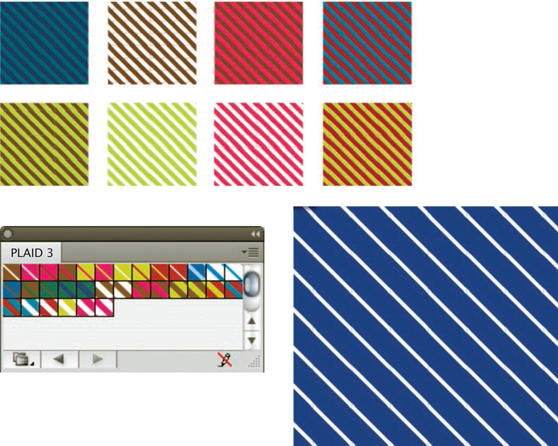
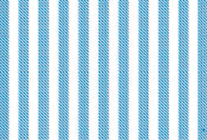
CREATING A PLAID WITH THE DIAGONAL PATTERN TILE
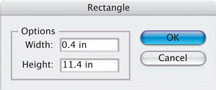
Open a new Letter-size (A4) document in Illustrator.
Double-click on the Rectangle tool, and the Rectangle dialog box will open. Enter a Width of 0.4 in (1 cm) and a Height of 11.4 in (29 cm). Fill your rectangle with the new diagonal pattern fill.
STEP 2
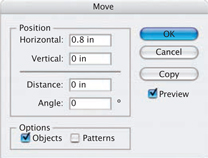
Select the new rectangle. Press Return and the Move dialog box will appear.
Enter a Horizontal Position of 0.8 in (2 cm).
Select the Objects option and press Copy.
Press Command + D repeatedly to complete the row.
STEP 3
Fill alternate rows with a different color.
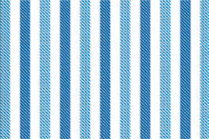
STEP 4
Complete the horizontal rows using the same method. Create a rectangle with a Width of 8.3 in (21 cm) and a Height of 0.4 in (1 cm).
Enter a Vertical Position of 0.8 in (2 cm) in the Move dialog box.
STEP 5
Select alternate rows and change the Opacity in the Transparency palette to achieve a woven effect.
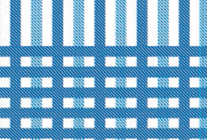
STEP 6
Create a new layer. On this, create a new grid with a fill color 0.2 in (0.5 cm) in width.
STEP 7
Turn offthe top layer to reveal your new check.
Select all and open the Pathfinder palette.
Window > Pathfinder.
Select the Exclude icon, which excludes the overlaps and cuts them away.
STEP 8
Now turn the top layer back on and begin to experiment with colorways by adding a background and changing the color of the block grid. Try creating other tiles in different colorways for more options.
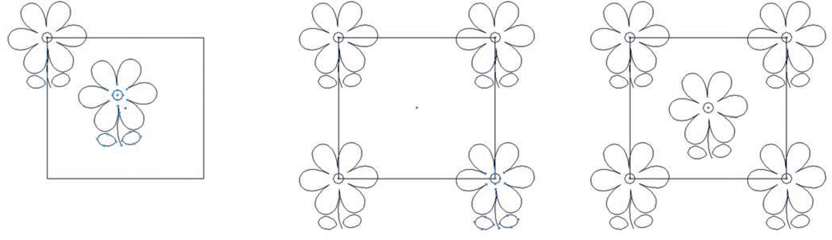
ILLUSTRATOR PATTERN: HALF-DROP
This floral design, created in Illustrator using various shapes and drawn with a Pen tool, is set inside a square box, which is useful if you wish to make a half-drop repeat.

STEP 1
In the View menu, click on Smart Guides and on Snap to Point; a tick should appear next to each. Also show rulers.
View > Rulers > Show Rulers.

STEP 2
Drag some guides from the rulers until they snap into place on the top and bottom of the square design. It is important to find the center of the design using the Smart Guides.
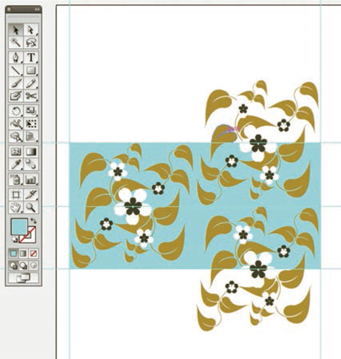
STEP 3
To create a half-drop repeat, duplicate the design and align it next to the original so that the box edges are touching and the vertical alignment is on the center guide.
You can duplicate using the Copy and Paste commands found in the Edit menu, and use the Align palette found in the Windows menu. Alternatively, select and hold the object with the mouse, then press Option/Alt+Shift and drag the object away to automatically duplicate it.
If you drag from the corner edge of the box, the Smart Guides will snap to the edge of the original.
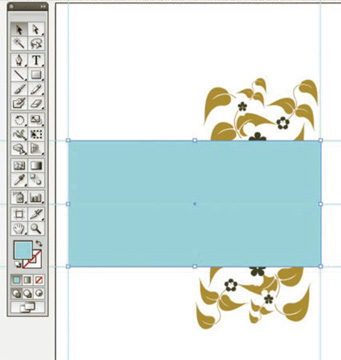
STEP 4
Duplicate and align the design again, with the bottom of the new box aligned with the center guide.
Drag some vertical guide lines to snap to the left and right sides of the design. Use the Ungroup command in the Object menu as many times as possible to ungroup all the objects.
Object > Ungroup.
Delete all the color boxes and make another box to fit the guide edges.
Edit > Copy.
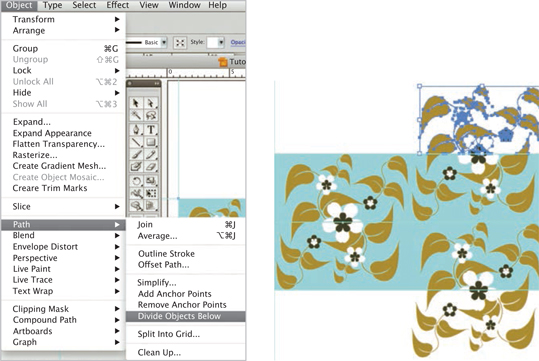
STEP 6
Select the new box.
Object > Arrange > Send to Back.
Object > Lock > Selection.
Make sure the box is still selected.
Edit > Paste in Front.
STEP 7
The top box should still be selected.
Object > Path > Divide Objects Below.
This will cut the excess design outside of the boxed area. Select and delete the excess design.
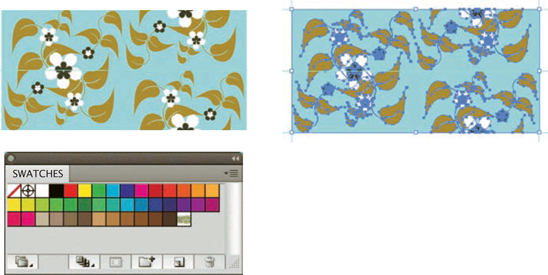
You should be left with something similar to this example.
Object > Unlock All.
Group all the objects together. At this point you can scale your repeat unit.
Object > Transform > Scale.
Then drag the entire design into the Swatches panel. You will see your floral design appear in the panel.
STEP 9
Test your design by creating a larger box and filling it with your new swatch.
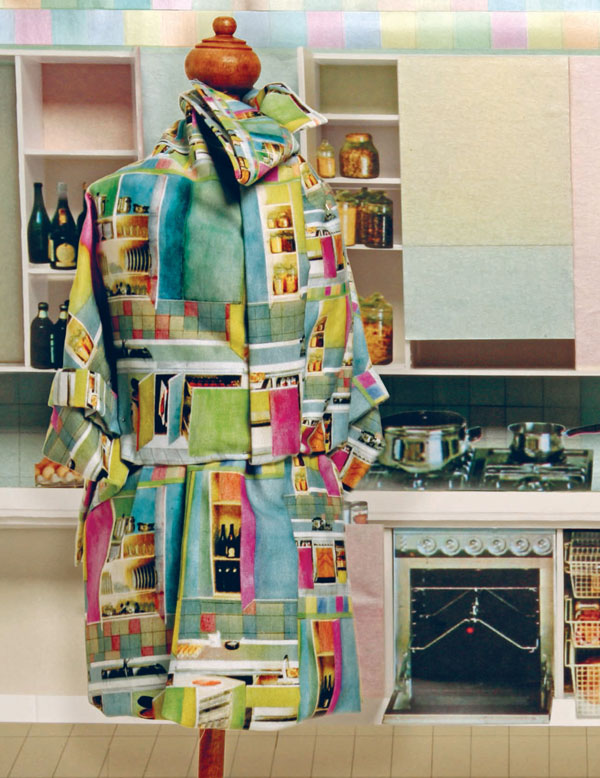
This illustration was created by Chae Young Kim for her “Camouflage Kitchen” dress, the concept being to create a “future vintage” by giving objects from the 1960s and 1970s a modern expression. After photographing her garment on a mannequin, she superimposed it onto a background created in Photoshop. The images were enhanced with lighting effects and filters.